This chapter describes the ins and outs of
scrolling. It pays particular attention to application-defined
scrolling, which is often required when the simple scrolling provided
by the ScrolledWindow widget is insufficient.
The ScrolledWindow widget provides a viewing area
into another, usually larger, visual object. The viewport may be
adjusted by the user through the use of ScrollBars that are attached to
the ScrolledWindow. The Motif MainWindow, ScrolledList, and
ScrolledText objects use ScrolledWindows to implement scrolling for
their respective contents. The ScrolledWindow can also be used
independently to provide a viewport into another large object, such as
a DrawingArea or a manager widget that contains a large group of
widgets. All of these scenarios are explored in this chapter.
The user always interacts with a ScrolledWindow
through ScrollBars. Internally, however, there are several ways to
implement what the user sees. These methods are based on two different
scrolling models: automatic scrolling and application-defined
scrolling. In either case, the application gives the ScrolledWindow a
work window that contains the visual data to be viewed. Although
the two models are different, they share many of the same concepts and
features.
In automatic scrolling mode, the ScrolledWindow
operates entirely on its own, adjusting the viewport as necessary in
response to ScrollBar activity. The application simply creates the
desired data, such as a Label widget that contains a large pixmap, and
makes that widget the work window for the ScrolledWindow. When the user
operates the ScrollBars to change the visible area, the ScrolledWindow
adjusts the Label so that the appropriate portion is visible. This
design is demonstrated in Chapter 4, The Main Window, and
Chapter 10, The DrawingArea Widget.
With application-defined scrolling, the
ScrolledWindow operates under the assumption that the work window is
not complete. The widget assumes that another entity, such as the
application or the internals of another widget, controls the data
within the work window and that the data may change dynamically as the
user scrolls. In order to control scrolling, the application must
control all aspects of the ScrollBars. This level of control is
necessary when it is impossible or impractical for an application to
provide the ScrolledWindow with a sufficiently large work window (or
the data for it) at any one time.
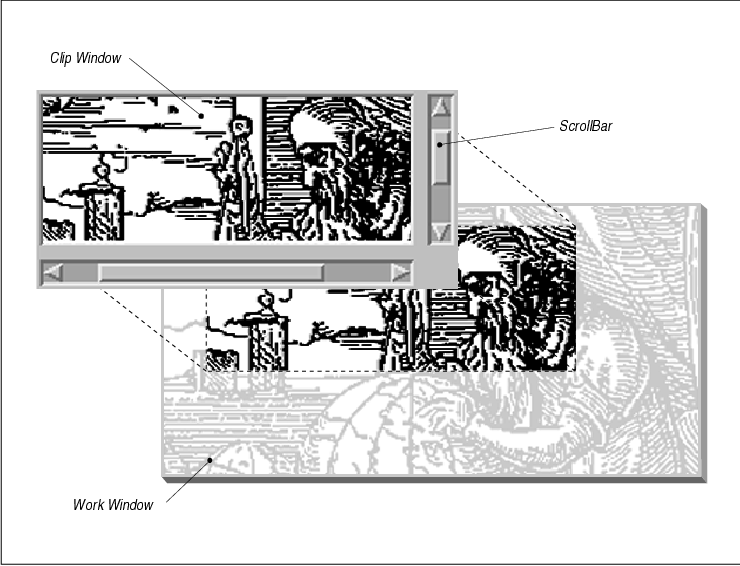
Most of the time, the ScrolledWindow widget is used in automatic scrolling mode. When it is used in this mode, the ScrolledWindow contains at most three internal widgets: two ScrollBars and a clip window. The clip window is implemented as a DrawingArea widget. The ScrolledWindow creates these widgets automatically. The work area is an external widget (specified by the XmNworkWindow resource) that is clipped by the clip window. This work window is a child of the ScrolledWindow that is provided by the application; it is not created automatically by the ScrolledWindow. When the user interacts with the ScrollBars, the work window is adjusted so that the appropriate part is visible through the clip window. The general design of the ScrolledWindow in automatic scrolling mode is illustrated in the figure.
The work window can be almost any widget, but there
can be only one work window per ScrolledWindow. If you want to have
more than one widget inside of a ScrolledWindow, you can place all of
the widgets in a manager widget and make that manager the work window.
The clip window is always the size of the viewport portion of the
ScrolledWindow, which is the size of the ScrolledWindow minus the size
of the ScrollBars and any borders and margins. The clip window is not
adjusted in size unless the ScrolledWindow is resized. The clip window
is always positioned at the origin, which means that you cannot use
XtMoveWidget() or change its XmNx and XmNy
resources to reposition it in the ScrolledWindow. The internals of the
ScrolledWindow are solely responsible for changing the view in the clip
window, although you can affect this behavior. While you can get a
handle to the clip window, you cannot remove it or replace it with
another window.
In the application-defined scrolling model, which is
the default model, the ScrolledWindow always makes itself the same size
as the work window. Just as for automatic scrolling, the application
must provide the work window as a child of the ScrolledWindow. The main
reason to use application-defined scrolling is if the work window
contains more data than can possibly be loaded in the automatic
scrolling mode. An application may also require different scrolling
behavior than the default pixel-by-pixel increments provided by the
automatic scrolling mode. Application-defined scrolling is also the
best option when the contents of the work window changes dynamically
and the application does not want to rely on the ScrolledWindow to
scroll new data into view.
The disadvantage of application-defined scrolling is
that the application, not the ScrolledWindow, is responsible for the
ScrollBars. The application must create and manage the ScrollBars, as
well as respond to the scrolling actions initiated by the user. Since
what is displayed in the clip window and the work window are identical,
the ScrolledWindow widget does not bother to create a clip window.
However, there are still some limitations as to what the ScrolledWindow
can support. It is important that you understand the limitations before
designing your application, so let's look at two examples.
A Text widget that displays the contents of an
arbitrarily large file provides a classic example of
application-defined scrolling. Under the automatic scrolling model, the
application might have to provide the ScrolledWindow with a work window
that is large enough to render thousands of lines of text, so that all
of the text is immediately available to the user. An object of such
proportions is prohibitive for reasonable performance and resource
consumption. Since the work window cannot be as large as it would need
to be for automatic scrolling, it might as well be as small as
possible, which is the size of the clip window. When the Text widget is
a child of a ScrolledWindow, the Text widget creates its own ScrollBars
and attaches callback routines to them so that it can be notified of
scrolling actions. When the user scrolls, the Text widget changes the
text in the work window to the text that corresponds to the new region
that just scrolled into view. The user has the illusion that scrolling
is taking place, but in reality, the data in the work window has simply
changed, thereby saving a great deal of overhead in system and server
resources. The List widget uses the same method when it is the child of
a ScrolledWindow. The Text and List widgets are the only examples of
application-defined scrolling that are supported by the current
implementation of the ScrolledWindow.
There is another scenario in which a large amount of
data is retrieved dynamically and is not all available at the same
time. Even though the ScrolledWindow does not really support this
scenario, you should be familiar with the situation, since it may come
up in a large application. There are some possible workarounds that
we'll discuss later in the chapter. Let's say that the Pacific Gas and
Electric Company has an online database that contains all of the
pipeline information for California and that an operator wants to view
the data for San Francisco county. To display this information, the
application must read the data from the database and convert that data
into an image that can be presented in a ScrolledWindow.
Although the database cannot get all the information
for the whole county all at once, it can get more information than the
window can display. Let's say that the window can display 10% of the
county and the database can return information on 20% of the county in
a reasonable amount of time. The application needs to use the
application-defined mechanisms because 100% of the data is not
available for automatic scrolling. The fact that more than what can be
displayed is available just means that the application could optimize
performance by avoiding unnecessary retrieval of data from the database
whenever scrolling takes place. The application could reuse the
existing work window as a cache, so that if the user scrolls by an
amount that is small enough, the work window is redisplayed in a way
similar to the automatic scrolling mechanism. The application would
still have to control this behavior manually, though.
Unfortunately, the ScrolledWindow does not support
this type of behavior. The ScrolledWindow always expands to the size of
its work window in application-defined scrolling mode. In other words,
you cannot have a work window that is a different size from the clip
window. This situation leaves you with several design decisions. You
could reduce the amount of data obtained from a database query, throw
away excess information not used in your display, or make the viewport
of an automatic ScrolledWindow large enough for each query. In any
case, the best approach is to use some method that makes the size of
the work window the same as the clip window. While this requirement may
present some logistical problems with the design of your application,
we'll discuss some workarounds for the situation later in the chapter.
In the two preceding examples, we have defined two
fundamentally similar methods of scrolling: semi-automatic scrolling
and true application-defined scrolling. In the first case, Text and
List widgets handle their own scrolling internally through special-case
routines attached to the ScrollBars. We call this method semi-automatic
scrolling, since the application programmer is not responsible for the
scrolling of these widgets. Nevertheless, the ScrolledWindow is in the
application-defined scrolling mode. This situation is in contrast to
true application-defined scrolling, where you must handle the
ScrollBars and the associated scrolling actions entirely on your own.
This method is more intricate and requires a significant amount of code
to be implemented properly.
Obviously, the automatic scrolling mechanism
provided by the ScrolledWindow is much simpler than the
application-defined mechanism and it requires much less application
intervention. However, there are some drawbacks in the implementation
of automatic scrolling. Automatic ScrolledWindows only scroll in
single-pixel increments. If other scrolling behavior is required, you
must use application-defined scrolling. And while application-defined
scrolling is far more complicated, the advantage is that it provides
more flexibility in the ways that the object is scrolled.
Creating a ScrolledWindow is no different from
creating other kinds of Motif widgets. Applications that wish to use
ScrolledWindows must include the header file <Xm/ScrolledW.h>.
The process of creating a ScrolledWindow is shown in the following code
fragment:
   Widget  scrollw;

   scrollw = XtVaCreateManagedWidget ("name",
       xmScrolledWindowWidgetClass, parent,
       resource-value-list,
       NULL);
The parent can be a Shell or any manager widget. The
ScrolledWindow can be created as a managed widget, since the addition
of its child does not cause it to renegotiate its size. (See Chapter 8,
Manager Widgets, for a discussion of when manager widgets should be
created as managed or unmanaged widgets.) The resource-value pairs
control the behavior of the ScrolledWindow, as well as its visual
effects. The most important resources are XmNscrollingPolicy,
XmNvisualPolicy, and XmNscrollBarDisplayPolicy. The
value for XmNscrollingPolicy can be set to either
XmAUTOMATIC or XmAPPLICATION_DEFINED, depending on which
scrolling method you want to use. The use of other ScrolledWindow
resources varies depending on the scrolling behavior that is specified.
In automatic scrolling mode, the ScrolledWindow
assumes that all of the data is already available in the work window
and that the size of the work window represents the entire size of the
viewable data. Even if the data changes and the size of work window is
modified, the ScrolledWindow can still manage its display
automatically. The ScrolledWindow should never resize itself due to
changes in the work windows, so XmNvisualPolicy is typically
set to XmCONSTANT. This value tells the ScrolledWindow not to
resize itself when the work window grows or shrinks. If
XmNvisualPolicy is set to XmVARIABLE, the ScrolledWindow
always sizes itself to contain the entire work window, which nullifies
the need for an automatic ScrolledWindow. Like any other widget, the
only time that a ScrolledWindow should change size is when the parent
resizes it, presumably for one of the following reasons:
For automatic scrolling, the only thing left to
decide is how you want the ScrollBars to be displayed if the work
window dynamically grows or shrinks. There may be situations where the
work window is the same size as or smaller than the clip window. In
this case, you may not want to display the ScrollBars, since they are
not needed. If so, you can set XmNscrollBarDisplayPolicy to
XmAS_NEEDED. If you always want the ScrollBars to be visible,
whether or not they are needed, you can set the resource to
XmSTATIC. Some people prefer static ScrollBars, so that consistency
is maintained in the interface; having ScrollBars appear and disappear
frequently may be confusing. Perhaps the best thing to do is to allow
the user to specify the XmNscrollBarDisplayPolicy. You can
always set your preference in the application defaults file, as shown
below:
*XmScrolledWindow.scrollBarDisplayPolicy: static
In the application-defined scrolling mode,
XmNscrollingPolicy is set to XmAPPLICATION_DEFINED. In
this case, the work window must be the same size as the clip window, so
the size of the work window is set by the toolkit. As a result, the
XmNvisualPolicy resource has the value of XmVARIABLE,
which indicates that the work window grows and shrinks with the
ScrolledWindow. Since the two windows are the same size, the
ScrolledWindow doesn't need to have a clip window, so it doesn't create
one.
Because application-defined scrolling implies that
you are responsible for the creation and management of the ScrollBars,
the toolkit forces the XmNscrollBarDisplayPolicy to
XmSTATIC. which means that the ScrolledWindow always displays the
ScrollBars if they are managed. Since the ScrolledWindow cannot know
the size of the entire data, it cannot automate the visibility of the
ScrollBars. If you want your application to emulate the XmAS_NEEDED
behavior, you must monitor the size of the ScrolledWindow and the work
area and manage the ScrollBars manually.
Another ScrolledWindow resource is the
XmNworkWindow, which is used to identify the widget that acts as
the ScrolledWindow's work window. A ScrolledWindow can have only one
work window and a work window can be associated with only one
ScrolledWindow. In other words, you cannot assign the same widget ID to
multiple ScrolledWindows to get multiple views into the same object.
There are ways of achieving this effect, though, that will become
apparent as we go through the chapter.
The XmNclipWindow resource specifies the
widget ID for the clip window. This resource is read-only, so it is
illegal to set the clip window manually or to reset it to NULL
. For practical purposes, this resource should be left alone. The
XmNverticalScrollBar and XmNhorizontalScrollBar resources
specify the widget IDs of the ScrollBars in the ScrolledWindow. These
resources allow you to set and retrieve the ScrollBars, which is useful
for monitoring scrolling actions and setting up application-defined
scrolling. Like any other manager, the ScrolledWindow also has
resources that control the margin height and width and other visual
attributes.
Automatic scrolling is the simpler of the two types
of scrolling policies available. Fortunately, it is also the more
common of the two. You shouldn't let this simplicity sway you too much,
though, as it is a common design error for programmers to use the
automatic scrolling mechanisms for designs that are better suited to
the application-defined model. On the other hand, if you merely want to
monitor scrolling without necessarily controlling it, you can install
your own callback routines on the ScrollBars in an automatic
ScrolledWindow, as we'll describe in the next section
In automatic mode, a ScrolledWindow automatically
creates its own ScrollBars and handles their callback procedures to
position the work window in the clip window. All of the examples that
use ScrolledWindows in the rest of the chapters in this book (such as
those in Chapter 4, The Main Window, and Chapter 10, The
DrawingArea Widget) use the automatic scrolling mode. The only
exceptions are the ScrolledList and ScrolledText objects, but the List
and Text widgets handle application-defined scrolling internally.
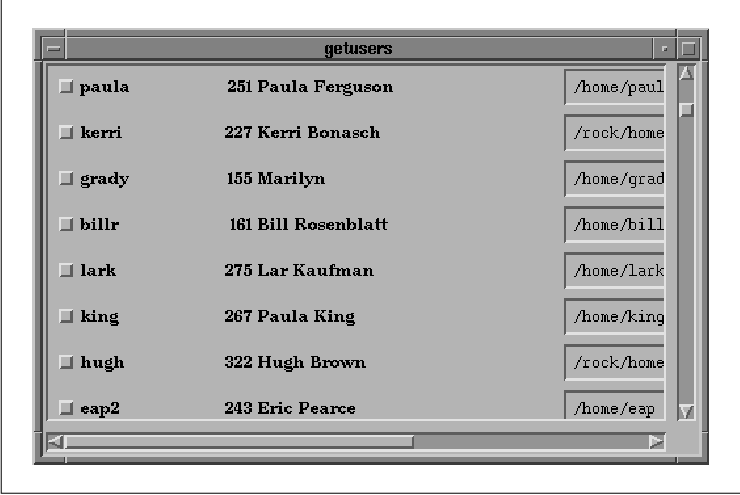
the source code shows a large panel of Labels,
ToggleButtons, and Text widgets that are arranged in a collection of
Form and RowColumn widgets and managed by a ScrolledWindow widget.
XtSetLanguageProc() is only available in X11R5; there is no
corresponding function in X11R4.
   /* getusers.c -- demonstrate a simple ScrolledWindow by showing
    * how it can manage a RowColumn that contains a vertical stack of
    * Form widgets, each of which contains a Toggle, two Labels and
    * a Text widget.  The program fills the values of the widgets
    * using various pieces of information from the password file.
    * Note: there are no callback routines associated with any of the
    * widgets created here -- this is for demonstration purposes only.
    */
   #include <Xm/PushBG.h>
   #include <Xm/LabelG.h>
   #include <Xm/ToggleB.h>
   #include <Xm/ScrolledW.h>
   #include <Xm/RowColumn.h>
   #include <Xm/Form.h>
   #include <Xm/Text.h>
   #include <pwd.h>

   typedef struct {
       String      login;
       int         uid;
       String      name;
       String      homedir;
   } UserInfo;

   /* use getpwent() to read data in the password file to store
    * information about all the users on the system.  The list is
    * a dynamically grown array, the last of which has a NULL login.
    */
   UserInfo *
   getusers()
   {
       /* extern struct *passwd getpwent(); */
       extern char *strcpy();
       struct passwd *pw;
       UserInfo *users = NULL;
       int n;

       setpwent();

       /* getpwent() returns NULL when there are no more users */
       for (n = 0; pw = getpwent(); n++) {
           /* reallocate the pointer to contain one more entry.  You may choose
            * to optimize by adding 10 entries at a time, or perhaps more?
            */
           users = (UserInfo *) XtRealloc (users, (n+1) * sizeof (UserInfo));
           users[n].login = strcpy (XtMalloc
               (strlen (pw->pw_name)+1), pw->pw_name);
           users[n].name = strcpy (XtMalloc
               (strlen (pw->pw_gecos)+1), pw->pw_gecos);
           users[n].homedir = strcpy (XtMalloc
               (strlen (pw->pw_dir)+1), pw->pw_dir);
           users[n].uid = pw->pw_uid;
       }
       /* allocate one more item and set its login string to NULL */
       users = (UserInfo *) XtRealloc (users, (n+1) * sizeof (UserInfo));
       users[n].login = NULL;
       endpwent();
       return users; /* return new array */
   }

   main(argc, argv)
   int argc;
   char *argv[];
   {
       Widget toplevel, sw, main_rc, form, toggle;
       XtAppContext app;
       UserInfo *users;

       XtSetLanguageProc (NULL, NULL, NULL);

       toplevel = XtVaAppInitialize (&app, "Demos", NULL, 0,
           &argc, argv, NULL, NULL);

       /* Create a 500x300 scrolled window.  This value is arbitrary,
        * but happens to look good initially.  It is resizable by the user.
        */
       sw = XtVaCreateManagedWidget ("scrolled_w",
           xmScrolledWindowWidgetClass, toplevel,
           XmNwidth,           500,
           XmNheight,          300,
           XmNscrollingPolicy, XmAUTOMATIC,
           NULL);

       /* RowColumn is the work window for the widget */
       main_rc = XtVaCreateWidget ("main_rc", xmRowColumnWidgetClass, sw, NULL);
       /* load the users from the passwd file */
       if (!(users = getusers())) {
           perror ("Can't read user data info");
           exit (1);
       }
       /* for each login entry found in the password file, create a
        * form containing a toggle button, two labels and a text widget.
        */
       while (users->login) { /* NULL login terminates list */
           char uid[8];
           form = XtVaCreateWidget (NULL, xmFormWidgetClass, main_rc, NULL);
           XtVaCreateManagedWidget (users->login, xmToggleButtonWidgetClass, form,
               XmNalignment,        XmALIGNMENT_BEGINNING,
               XmNtopAttachment,    XmATTACH_FORM,
               XmNbottomAttachment, XmATTACH_FORM,
               XmNleftAttachment,   XmATTACH_FORM,
               XmNrightAttachment,  XmATTACH_POSITION,
               XmNrightPosition,    15,
               NULL);
           sprintf (uid, "%d", users->uid);
           XtVaCreateManagedWidget (uid, xmLabelGadgetClass, form,
               XmNalignment,        XmALIGNMENT_END,
               XmNtopAttachment,    XmATTACH_FORM,
               XmNbottomAttachment, XmATTACH_FORM,
               XmNleftAttachment,   XmATTACH_POSITION,
               XmNleftPosition,     15,
               XmNrightAttachment,  XmATTACH_POSITION,
               XmNrightPosition,    20,
               NULL);
           XtVaCreateManagedWidget (users->name, xmLabelGadgetClass, form,
               XmNalignment,        XmALIGNMENT_BEGINNING,
               XmNtopAttachment,    XmATTACH_FORM,
               XmNbottomAttachment, XmATTACH_FORM,
               XmNleftAttachment,   XmATTACH_POSITION,
               XmNleftPosition,     20,
               XmNrightAttachment,  XmATTACH_POSITION,
               XmNrightPosition,    50,
               NULL);
           /* Although the home directory is readonly, it may be longer
            * than expected, so don't use a Label widget.  Use a Text widget
            * so that left-right scrolling can take place.
            */
           XtVaCreateManagedWidget (users->homedir, xmTextWidgetClass, form,
               XmNeditable,         False,
               XmNcursorPositionVisible, False,
               XmNtopAttachment,    XmATTACH_FORM,
               XmNbottomAttachment, XmATTACH_FORM,
               XmNleftAttachment,   XmATTACH_POSITION,
               XmNleftPosition,     50,
               XmNrightAttachment,  XmATTACH_FORM,
               XmNvalue,            users->homedir,
               NULL);
           XtManageChild (form);
           users++;
       }
       XtManageChild (main_rc);

       XtRealizeWidget (toplevel);
       XtAppMainLoop (app);
   }
Those of you who are familiar with UNIX programming techniques should
find the use of getpwent() and endpwent() quite
familiar. If you are not aware of these functions, you should consult
the documentation for your UNIX system. In short, they can be used to
return information about the contents of the password file (typically
/etc/passwd), which contains information about all of the users on
the system. The first call to getpwent() opens the password
file and returns a data structure describing the first entry.
Subsequent calls return consecutive entries. When the entries have been
exhausted, getpwent() returns NULL and endpwent()
closes the password file. In the source code the information from the
password file is represented using ToggleButtons, Labels, and Text
widgets, as shown in the figure.
The components in the program do not have any
functionality; the program is used solely to demonstrate how panels of
arbitrary widgets can be displayed in a ScrolledWindow. The widget
hierarchy is irrelevant to the operation of the ScrolledWindow. In this
particular case, the ScrolledWindow is a child of the top-level shell.
We could have used a MainWindow widget in place of a ScrolledWindow;
these two components are interchangeable because the MainWindow is
subclassed from the ScrolledWindow. See Chapter 4, The Main Window
, for more details on how the MainWindow widget fits into the design of
an application.
We used arbitrary values for the width and height of
the ScrolledWindow; they were chosen because they seemed to work best.
If you are using a ScrolledWindow with a number of other widgets in an
interface, you do not need to specify an initial size for the
ScrolledWindow. Since the ScrolledWindow is extremely flexible, you can
allow its parent or its siblings to control its size. ScrolledWindows
work well with PanedWindows because they can be adjusted easily.
However, the ScrolledWindow does not have a sensible default size, so
you should provide an initial geometry if the ScrolledWindow is going
to control its own size. In this case, the size that you choose for the
widget should be based on the aesthetics of the data that is being
displayed.
In the example, the child of the ScrolledWindow is
the main_rc widget, which is a RowColumn that contains all of
the children that represent the password file information. After
getusers() is called, the program loops through each item in the
array of UserInfo structures and creates a Form widget that
contains a ToggleButton, two Labels, and a Text widget. All of the
Forms are stacked vertically on top of one another in the RowColumn.
Once complete, the user can scroll around and access any of the
elements without the application having to support any of the scrolling
mechanisms because they are completely automated by the toolkit. In
most cases, an application does not need to do anything other than what
we described in this section to take advantage of automatic scrolling.
The ScrollBar is the backbone of the ScrolledWindow.
Although the ScrollBar is a standalone widget that can be created and
manipulated without being the child of a ScrolledWindow, we are not
going to discuss this usage because it is not consistent with the
Motif Style Guide. The kinds of things that you can do with a
ScrollBar individually are no more interesting than the sorts of things
that you can do with them as children of ScrolledWindows, anyway. We
are going to discuss how to control a ScrollBar directly from an
application in the context of a ScrolledWindow widget. This information
is useful if you want to monitor scrolling, if you want to fine-tune
the way that automatic scrolling is handled, or if you want to
implement application-defined scrolling.
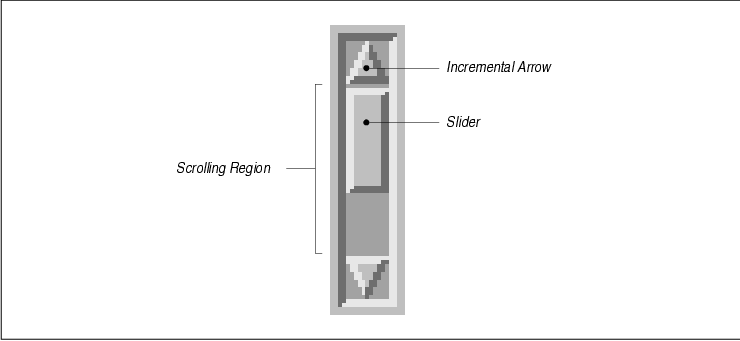
Before we begin, it is important to understand that the ScrollBar does not handle scrolling itself. The widget merely reports scrolling actions through its callback routines. It is up to the internals of an application or a widget to install callback procedures on the ScrollBar that adjust the work window appropriately. The ScrollBar manages its own display in accordance with scrolling actions, so you do not need to update the ScrollBar's display unless the underlying data of the object being scrolled changes. To change the display, you can set resources that are associated with the different elements of the ScrollBar. the figure illustrates the design of a ScrollBar and identifies its elements. This figure represents a vertical ScrollBar; a ScrollBar can also be oriented horizontally.
The appearance and behavior of a ScrollBar is
directly related to the object that it scrolls. The relationship
between the ScrollBar and the object it scrolls is proportional, so
that the size of the slider in the ScrollBar represents how much of the
object that is being scrolled is visible in the clip window. The size
of the object being scrolled is broken down into equally sized units;
the size of the units is called the unit length. When the user
clicks on one of the incremental arrows (also called directional
arrows), the ScrollBar scrolls in the direction indicated by the arrow
in unit increments. It is important to realize that the unit length is
stored and interpreted internally by the object being scrolled; it is
of no interest to the ScrollBar itself, since it does not affect the
display of the ScrollBar. While this value is not set on the ScrollBar
itself, it plays a key role in understanding how ScrollBars work.
All of the other resource values for the ScrollBar are measured in
terms of the unit length. A Text widget might set its unit length for
the vertical ScrollBar to the height of the tallest character in the
widget's font set, plus some margin for whitespace on the top and
bottom of the character. As a result, vertical scrolling adjusts the
window so that the text is always displayed without lines being
partially obscured. However, it is the Text widget's responsibility to
know the unit length value. The unit length for the horizontal
ScrollBar unit length might be the average width of the characters in
the font that is being used.
The value of a ScrollBar is the offset,
measured in unit lengths, of the data in the clip window from the
object's origin. For example, if the top of the clip window displays
the fourth line of text in a Text widget, the ScrollBar is said to have
a value of 3, since it is offset from 0. Clicking and
dragging the slider directly changes the ScrollBar's value to an
absolute number; clicking on either of the directional arrows changes
the ScrollBar's value incrementally; clicking in the scrolling region,
but not on the slider itself changes the ScrollBar's value by page
lengths. The value is measured in units, not pixels.
The view length is the size of the viewable
area (clip window), as measured in unit lengths. The vertical ScrollBar
for a Text widget that is displaying 15 lines of text would have a view
length of 15. The horizontal ScrollBar's view length would be
the number of columns that the clip window can display.
The page length is measured in unit lengths
and is usually one less than the view length. If the user scrolls the
window by a page increment, the first line from the old view is
retained as the last line in the new view for visual reference because
otherwise, the user might lose her orientation.
the figure illustrates the relationship between the elements listed above and introduces the ScrollBar resources that correspond to these values.

The XmNincrement resource represents the
number of units that the ScrollBar reports having scrolled when the
user clicks on its incremental arrows. The value for XmNincrement
in the figure is 1 because each incremental scroll on the
vertical ScrollBar should scroll the text one line. Internally, the
Text widget knows that the number of pixels associated with
XmNincrement is the height of a line. For an automatic
ScrolledWindow, it is rare to set the resource to any value other than
1.
The XmNpageIncrement resource specifies the
number of units that the ScrollBar should report having scrolled when
the user moves the ScrollBar by a page. Again, the ScrollBar doesn't
actually perform the scrolling, it just reports the scrolling action.
However, the ScrollBar does use this value to calculate the new visual
position for the slider within the scrolling area and to update its
display. The application can use this value, multiplied by
pixels-per-unit, to determine the new data to display in the work
window.
The XmNmaximum resource is the largest
size, measured in unit increments, that the object can have. For the
Text widget shown above, the value for XmNmaximum is 9
. The Motif Text widget sets its horizontal ScrollBar's XmNmaximum
to the number of characters in its widest visible line, rather than the
widest of all of its lines. The XmNminimum resource is the
smallest size, measured in unit increments, that the object will ever
have. The XmNsliderSize resource corresponds to the view
length. The resource specifies the size of the clip window in unit
lengths. For example, in the figure, the clip window can display five
lines, so XmNsliderSize is 5.
The XmNvalue is the number of units that
the data in the clip window is offset from the beginning of the work
window. For example, if the Text widget has been scrolled down by four
lines from the top, the value of the vertical ScrollBar's XmNvalue
resource would be 4.
the source code demonstrates how the vertical
ScrollBar resources get their values from a typical ScrolledText
object. XtSetLanguageProc() is only available in X11R5; there
is no corresponding function in X11R4.
   /* simple_sb.c -- demonstrate the Scrollbar resource values from
    * a ScrolledText object.  This is used as an introductory examination
    * of the resources used by Scrollbars.
    */
   #include <Xm/ScrolledW.h>
   #include <Xm/RowColumn.h>
   #include <Xm/PushBG.h>
   #include <Xm/Text.h>

   /* print the "interesting" resource values of a scrollbar */
   void
   get_sb(widget, client_data, call_data)
   Widget widget;
   XtPointer client_data;
   XtPointer call_data;
   {
       Widget scrollbar = (Widget) client_data;
       int increment=0, maximum=0, minimum=0;
       int page_incr=0, slider_size=0, value=0;

       XtVaGetValues (scrollbar,
           XmNincrement,     &increment,
           XmNmaximum,       &maximum,
           XmNminimum,       &minimum,
           XmNpageIncrement, &page_incr,
           XmNsliderSize,    &slider_size,
           XmNvalue,         &value,
           NULL);
       printf ("increment=%d, max=%d, min=%d, page=%d, slider=%d, value=%d0,
           increment, maximum, minimum, page_incr, slider_size, value);
   }

   main(argc, argv)
   int argc;
   char *argv[];
   {
       Widget        toplevel, rowcol, text_w, pb, sb;
       XtAppContext  app;
       Arg           args[10];
       int           n = 0;

       XtSetLanguageProc (NULL, NULL, NULL);

       toplevel = XtVaAppInitialize (&app, "Demos",
           NULL, 0, &argc, argv, NULL, NULL);

       /* RowColumn contains ScrolledText and PushButton */
       rowcol = XtVaCreateWidget ("rowcol",
           xmRowColumnWidgetClass, toplevel, NULL);

       XtSetArg (args[n], XmNrows,      10); n++;
       XtSetArg (args[n], XmNcolumns,   80); n++;
       XtSetArg (args[n], XmNeditMode,  XmMULTI_LINE_EDIT); n++;
       XtSetArg (args[n], XmNscrollHorizontal,  False); n++;
       XtSetArg (args[n], XmNwordWrap,  True); n++;
       text_w = XmCreateScrolledText (rowcol, "text_w", args, n);
       XtManageChild (text_w);

       /* get the scrollbar from ScrolledWindow associated with Text widget */
       XtVaGetValues (XtParent (text_w), XmNverticalScrollBar, &sb, NULL);

       /* provide a pushbutton to obtain the scrollbar's resource values */
       pb = XtVaCreateManagedWidget ("Print ScrollBar Values",
           xmPushButtonGadgetClass, rowcol, NULL);
       XtAddCallback (pb, XmNactivateCallback, get_sb, sb);

       XtManageChild (rowcol);

       XtRealizeWidget (toplevel);
       XtAppMainLoop (app);
   }
This program simply displays a ScrolledText object and a PushButton.
The ScrolledText object does not contain any text by default; you can
cut and paste some text into the object. The graphical output of the
program is displayed in the figure.

When the PushButton is activated, it retrieves some
resource values from the vertical ScrollBar of the Text widget's
ScrolledWindow. These values are output to stdout. The following
output shows some possible values for the different resources:
   increment=1, max=12, min=0, page=9, slider=10, value=0
   increment=1, max=12, min=0, page=9, slider=10, value=1
   increment=1, max=25, min=0, page=9, slider=10, value=6
   increment=1, max=25, min=0, page=9, slider=10, value=12
   increment=1, max=25, min=0, page=9, slider=10, value=15
The value for XmNincrement is always 1, which indicates that the incremental arrow buttons scroll the text by one unit in either direction. The value for XmNmaximum changes according to the number of lines of text that there are in the window. The value of XmNminimum is always 0 because this object can have as few as zero lines of text.
The values for XmNsliderSize and
XmNpageIncrement are 10 and 9, respectively. The
values never changed because the ScrolledWindow was not resized. If it
had been, the slider size and page increment values would have changed
to match the new number of lines displayed in the window. The page
increment is one less than the number of lines that can be displayed in
the clip window, so that if the user scrolls by a page, the new view
contains at least one of the previously-viewed lines for reference.
The value for XmNvalue varies depending on
the line that is displayed at the top of the clip window. If the
beginning of the text is displayed, XmNvalue is 0. As
the user scrolls through the text, the value for XmNvalue
increases or decreases, but it is always a positive value.
Incidentally, you can adjust these resource values
to get some different results. For example, you could set the
XmNincrement resource to 2 in order to modify the number
of lines that are scrolled when the user selects the incremental
arrows. However, you should not change these resources arbitrarily, as
you could really confuse the user.
As mentioned at the beginning of this section, the
most important thing to remember about the ScrollBar widget is that it
does not cause any actual scrolling of the object in the work window.
The widget merely reports scrolling activity through its callback
routines. When scrolling occurs, it is the callback routines that are
responsible for modifying the data in the work window, by adjusting
elements or redrawing the image. The ScrollBar updates its own display
according to the scrolling action. If the widget or the application
that owns the callback routines fails to modify the display, the user
will see an inconsistency between the ScrollBar display and the data in
the clip window.
Two ScrollBar resources that are closely related are
XmNorientation and XmNprocessingDirection. These
resources specify the horizontal or vertical orientation of the
ScrollBar and its normal processing direction. The value for
XmNorientation can be either XmHORIZONTAL or
XmVERTICAL. When a ScrollBar is oriented horizontally, the normal
processing direction for it is such that the minimum value is on the
left and the maximum is on the right. When the orientation is vertical,
the minimum is on the bottom and the maximum is on the top. You can
change the processing direction using the XmNprocessingDirection
resource. This resource can have the following values:
   XmMAX_ON_LEFT
   XmMAX_ON_RIGHT
   XmMAX_ON_TOP
   XmMAX_ON_BOTTOM
These values only need to be changed when the user's environment is such that the natural language for the locale is read from right-to-left. In this case, The XmNscrollBarPlacement resource for the ScrolledWindow needs to be changed to match the processing direction. This resource can have the following values:
   XmTOP_LEFT
   XmTOP_RIGHT
   XmBOTTOM_LEFT
   XmBOTTOM_RIGHT
The callback routines associated with the ScrollBar
are its only links into the internal mechanisms that actually scroll
the data. You can use these callback routines in various contexts,
depending on what you want to accomplish. For example, you can monitor
scrolling in an automatic or semi-automatic ScrolledWindow, such as a
ScrolledText or ScrolledList object. These two activities are identical
when it comes to the implementation of what we are about to describe.
You can also implement application-defined scrolling, which requires
intimate knowledge of the internals of the object being scrolled.
There are different parts of a ScrollBar that the
user can manipulate to cause a scrolling action. In fact, each part of
the ScrollBar has a separate callback routine associated with it. These
callback routines are used both to monitor automatic (or
semi-automatic) scrolling and to implement application-defined
scrolling. As with all Motif callbacks, the callback routines take the
form of an XtCallbackProc. All of the ScrollBar callbacks pass
a structure of type XmScrollBarCallbackStruct for the third
parameter. This structure takes the following form:
   typedef struct {
      int      reason;
      XEvent  *event;
      int      value;
      int      pixel;
   } XmScrollBarCallbackStruct;
The reason field specifies the scrolling action performed by
the user. Each callback has a corresponding reason that indicates the
action. lists the callback name, reason, and scrolling action for each
ScrollBar callback resource. tab(@), linesize(2); l | l | l lp9fCW |
lp9fCW | lw(1.7i). Resource Name@Reason@Action
The value field of the callback structure
indicates the new position of the ScrollBar. This value can range from
XmNminimum to XmNmaximum. The pixel field
indicates the x or y coordinate of the mouse location
relative to the origin of the ScrollBar for the XmNtoTopCallback
, XmNtoBottomCallback, and XmNdragCallback routines.
The origin is the top of a vertical ScrollBar or the left side of a
horizontal ScrollBar, regardless of the value of
XmNprocessingDirection.
the source code demonstrates how a callback routine
can be hooked up to each of the callback resources to allow you to
monitor the scrolling in a List widget more precisely. For Text and
List widgets, you really should not be using the callback routines to
change the default scrolling behavior. XtSetLanguageProc() is
only available in X11R5; there is no corresponding function in X11R4.
   /* monitor_sb.c -- demonstrate the ScrollBar callback routines by
    * monitoring the ScrollBar for a ScrolledList.  Functionally, this
    * program does nothing.  However, by tinkering with the Scrolled
    * List and watching the output from the ScrollBar's callback routine,
    * you'll see some interesting behavioral patterns.  By interacting
    * with the *List* widget to cause scrolling, the ScrollBar's callback
    * routine is never called.  Thus, monitoring the scrolling actions
    * of a ScrollBar should not be used to keep tabs on exactly when
    * the ScrollBar's value changes!
    */
   #include <Xm/List.h>

   /* print the interesting resource values of a scrollbar */
   void
   scroll_action(scrollbar, client_data, call_data)
   Widget scrollbar;
   XtPointer client_data;
   XtPointer call_data;
   {
       XmScrollBarCallbackStruct *cbs =
           (XmScrollBarCallbackStruct *) call_data;

       printf ("cbs->reason: %s, cbs->value = %d, cbs->pixel = %d0,
           cbs->reason == XmCR_DRAG? "drag" :
           cbs->reason == XmCR_VALUE_CHANGED? "value changed" :
           cbs->reason == XmCR_INCREMENT? "increment" :
           cbs->reason == XmCR_DECREMENT? "decrement" :
           cbs->reason == XmCR_PAGE_INCREMENT? "page increment" :
           cbs->reason == XmCR_PAGE_DECREMENT? "page decrement" :
           cbs->reason == XmCR_TO_TOP? "top" :
           cbs->reason == XmCR_TO_BOTTOM? "bottom" : "unknown",
           cbs->value, cbs->pixel);
   }

   main(argc, argv)
   int argc;
   char *argv[];
   {
       Widget        toplevel, list_w, sb;
       XtAppContext  app;
       char *items = "choice0, choice1, choice2, choice3, choice4,                    choice5, choice6, choice7, choice8, choice9,                    choice10, choice11, choice12, choice13, choice14";

       XtSetLanguageProc (NULL, NULL, NULL);

       toplevel = XtAppInitialize(&app, "Demos",
           NULL, 0, &argc, argv, NULL, NULL, 0);

       list_w = XmCreateScrolledList (toplevel, "list_w", NULL, 0);
       XtVaSetValues (list_w,
           /* Rather than convert the entire list of items into an array
            * of compound strings, let's just let Motif's type converter
            * do it for us and save lots of effort (altho not much time).
            */
           XtVaTypedArg, XmNitems, XmRString, items, strlen (items)+1,
           XmNitemCount, 15,
           XmNvisibleItemCount, 5,
           NULL);
       XtManageChild (list_w);

       /* get the scrollbar from ScrolledWindow associated with Text widget */
       XtVaGetValues (XtParent (list_w), XmNverticalScrollBar, &sb, NULL);
       XtAddCallback (sb, XmNvalueChangedCallback, scroll_action, NULL);
       XtAddCallback (sb, XmNdragCallback, scroll_action, NULL);
       XtAddCallback (sb, XmNincrementCallback, scroll_action, NULL);
       XtAddCallback (sb, XmNdecrementCallback, scroll_action, NULL);
       XtAddCallback (sb, XmNpageIncrementCallback, scroll_action, NULL);
       XtAddCallback (sb, XmNpageDecrementCallback, scroll_action, NULL);
       XtAddCallback (sb, XmNtoTopCallback, scroll_action, NULL);
       XtAddCallback (sb, XmNtoBottomCallback, scroll_action, NULL);

       XtRealizeWidget (toplevel);
       XtAppMainLoop (app);
   }
The program displays a simple ScrolledList that contains 15 entries, as
shown in the figure.
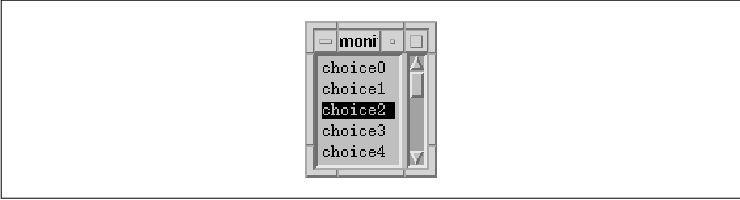
The entries in the List are not important; the way
that the ScrollBar reacts to the user's interaction is what is
interesting. The following output shows what happens when the user
scrolls the List:
   cbs->reason: increment, cbs->value = 1, cbs->pixel = 0
   cbs->reason: page increment, cbs->value = 5, cbs->pixel = 0
   cbs->reason: drag, cbs->value = 6, cbs->pixel = 46
   cbs->reason: drag, cbs->value = 7, cbs->pixel = 50
   cbs->reason: value changed, cbs->value = 7, cbs->pixel = 50
   cbs->reason: decrement, cbs->value = 6, cbs->pixel = 0
   cbs->reason: top, cbs->value = 0, cbs->pixel = 11
If you use the keyboard to select elements or scroll
around in the list, you'll notice that the callbacks for the ScrollBar
are not invoked because the List widget is taking all of the keyboard
events from the ScrollBar. Like any other widget, the ScrollBar can
receive keyboard events, and it even has translations to map certain
key sequences to scrolling actions. However, the List widget sets
XmNtraversalOn to False for the ScrollBar, so that the
List can process its own keyboard actions, some of which scroll the
window. The Text widget does the same thing with its ScrollBars. As a
result, there is a limit to what you can accomplish by monitoring
ScrollBar actions on semi-automatic scrolling objects like List and
Text widgets.
In this section, we pull together what we've learned
in this chapter and put it to work to implement application-defined
scrolling. We are going to use an example that displays a large number
of individual bitmaps in a ScrolledWindow, so that the user can view
all of the bitmaps by scrolling the window. The intent is to make the
appearance and functionality of the ScrolledWindow mimic the automatic
scrolling mode as much as possible.
There are actually several ways to go about writing
this program, depending on the constraints that we impose. The simplest
method is to render each bitmap into one large pixmap and use that
pixmap as the XmNlabelPixmap for a Label widget. The Label
widget can then be used as the work window for an automatic
ScrolledWindow. This design is similar to most of the other examples of
ScrolledWindows used throughout the book. However, we want to add a
constraint such that each incremental scrolling action causes the
display to shift by one bitmap cell, so that the top and left sides of
the viewport always show a full bitmap. In other words, no
partially-displayed bitmaps are allowed. Furthermore, when the user
drags the slider, we want the display to scroll in cell-increments, not
pixel-by-pixel.
The constraints that we just described define the
behavior that the List and Text widgets use for their own displays.
Like those widgets, our example program has a conceptual unit size that
is represented by the object being scrolled. For the Text and List
widgets, the unit size is the height and width of the font used by the
entries. For our bitmap viewer, the heights and widths of the bitmaps
vary more dramatically than the characters in a font, so for
consistency, the unit size is set to the largest of all of the bitmaps.
The design of our program is based on the same principles used by the
ScrolledWindow's automatic scrolling method. Only in this case, we are
going to do the work ourselves. The reason that we need to use
application-defined scrolling is that the automatic scrolling method
cannot support the scrolling constraints described above; there is no
way to change the number of pixels per scrolling unit with an automatic
ScrolledWindow.
In our implementation, the work window is a
DrawingArea widget whose size is constrained by the size of the
viewport in the ScrolledWindow. Initially, the ScrolledWindow sizes
itself to the size of the DrawingArea widget, but once the program is
running, the size of the DrawingArea is changed by the ScrolledWindow
as it is resized. The bitmaps are rendered into a large pixmap, which
is rendered into the DrawingArea in connection with scrolling actions.
The offset of the pixmap and how much of it is copied into the
DrawingArea is controlled by the application, following the same
algorithm that the ScrolledWindow uses in automatic scrolling mode. The
only difference is that we can adjust for the pixels-per-unit value,
whereas the automatic ScrolledWindow is only aware of single-pixel
units.
Proper scrolling is not a particularly difficult
problem to solve, as it only involves simple arithmetic. The real
problem is handling the case where the user or the application causes
the ScrolledWindow to resize, since this action changes all of the
variables in the calculation. When resizing happens, the ScrolledWindow
passes that resizing onto the DrawingArea widget, which must
recalculate its size and update the ScrollBar resources so that the
display and the graphic representation match. Basically, the program
has to solve four independent problems:
   /* app_scroll.c - Displays bitmaps specified on the command line.  All
    * bitmaps are drawn into a pixmap, which is rendered into a DrawingArea
    * widget, which is used as the work window for a ScrolledWindow.  This
    * method is only used to demonstrate application-defined scrolling for
    * the motif ScrolledWindow.  Automatic scrolling is much simpler, but
    * does not allow the programmer to impose incremental scrolling units.
    *
    * The bitmaps are displayed in an equal number of rows and columns if
    * possible.
    *
    * Example:
    *  app_scroll /usr/include/X11/bitmaps/*
    */

   #include <stdio.h>
   #include <strings.h>
   #include <Xm/ScrolledW.h>
   #include <Xm/DrawingA.h>
   #include <Xm/ScrollBar.h>

   #ifdef max  /* just in case--we don't know, but these are commonly set */
   #undef max  /* by arbitrary unix systems.  Also, we cast to int! */
   #endif
   /* redefine "max" and "min" macros to take into account "unsigned" values */
   #define max(a,b) ((int)(a)>(int)(b)?(int)(a):(int)(b))
   #define min(a,b) ((int)(a)<(int)(b)?(int)(a):(int)(b))

   /* don't accept bitmaps larger than 100x100 .. This value is arbitrarily
    * chosen, but is sufficiently large for most images.  Handling extremely
    * large bitmaps would eat too much memory and make the interface awkward.
    */
   #define MAX_WIDTH  100
   #define MAX_HEIGHT 100

   typedef struct {
       char *name;
       int len; /* strlen(name) */
       unsigned int width, height;
       Pixmap bitmap;
   } Bitmap;

   /* get the integer square root of n -- used to calculate an equal
    * number of rows and colums for a given number of elements.
    */
   int_sqrt(n)
   register int n;
   {
       register int i, s = 0, t;
       for (i = 15; i >= 0; i--) {
           t = (s | (1L << i));
           if (t * t <= n)
               s = t;
       }
       return s;
   }

   /* Global variables */
   Widget drawing_a, vsb, hsb;
   Pixmap pixmap; /* used as the image for DrawingArea widget */
   Display *dpy;
   Dimension view_width = 300, view_height = 300;
   int rows, cols;
   unsigned int cell_width, cell_height;
   unsigned int pix_hoffset, pix_voffset, sw_hoffset, sw_voffset;
   void redraw();

   main(argc, argv)
   int argc;
   char *argv[];
   {
       extern char *strcpy();
       XtAppContext app;
       Widget toplevel, scrolled_w;
       Bitmap *list = (Bitmap *) NULL;
       GC gc;
       char *p;
       XFontStruct *font;
       int i = 0, total = 0;
       unsigned int bitmap_error;
       int j, k;
       void scrolled(), expose_resize();

       XtSetLanguageProc (NULL, NULL, NULL);

       toplevel = XtAppInitialize (&app, argv[0], NULL, 0,
           &argc, argv, NULL, NULL, 0);
       dpy = XtDisplay (toplevel);

       font = XLoadQueryFont (dpy, "fixed");

       /* load bitmaps from filenames specified on command line */
       while (*++argv) {
           printf ("Loading
           if (i == total) {
               total += 10; /* allocate bitmap structures in groups of 10 */
               if (!(list = (Bitmap *) XtRealloc (list, total * sizeof (Bitmap))))
                   XtError ("Not enough memory for bitmap data");
           }
           /* read bitmap file using standard X routine.  Save the resulting
            * image if the file isn't too big.
            */
           if ((bitmap_error = XReadBitmapFile (dpy, DefaultRootWindow (dpy),
                   *argv, &list[i].width, &list[i].height, &list[i].bitmap,
                   &j, &k)) == BitmapSuccess) {
               /* Get just the base filename (minus leading pathname)
                * We save this value for later use when we caption the bitmap.
                */
               if (p = rindex (*argv, '/'))
                   p++;
               else
                   p = *argv;
               if (list[i].width > MAX_WIDTH || list[i].height > MAX_HEIGHT) {
                   printf ("%s: bitmap too big0, p);
                   XFreePixmap (dpy, list[i].bitmap);
                   continue;
               }
               list[i].len = strlen (p);
               list[i].name = p;  /* we'll be getting it later */
               printf ("Size: %dx%d0, list[i].width, list[i].height);
               i++;
           } else {
               printf ("Couldn't load bitmap:
               switch (bitmap_error) {
                   case BitmapOpenFailed : puts ("Open failed."); break;
                   case BitmapFileInvalid : puts ("Bad file format."); break;
                   case BitmapNoMemory : puts ("Not enough memory."); break;
               }
           }
       }
       if ((total = i) == 0) {
           puts ("Couldn't load any bitmaps.");
           exit (1);
       }
       printf ("Total bitmaps loaded: %d0, total);
       /* calculate size for pixmap by getting the dimensions of each. */
       printf ("Calculating sizes for pixmap..."), fflush (stdout);
       for (i = 0; i < total; i++) {
           if (list[i].width > cell_width)
               cell_width = list[i].width;
           if (list[i].height > cell_height)
               cell_height = list[i].height;
           /* the bitmap's size is one thing, but its caption may exceed it */
           if ((j = XTextWidth (font, list[i].name, list[i].len)) > cell_width)
               cell_width = j;
       }
       /* compensate for font in the vertical dimension; add a 6 pixel padding */
       cell_height += 6 + font->ascent + font->descent;
       cell_width += 6;
       cols = int_sqrt (total);
       rows = (total + cols-1)/cols;

       printf ("Creating pixmap area of size %dx%d (%d rows, %d cols)0,
           cols * cell_width, rows * cell_height, rows, cols);

       /* Create a single, 1-bit deep pixmap */
       if (!(pixmap = XCreatePixmap (dpy, DefaultRootWindow (dpy),
               cols * cell_width + 1, rows * cell_height + 1, 1)))
           XtError ("Can't Create pixmap");

       if (!(gc = XCreateGC (dpy, pixmap, NULL, 0)))
           XtError ("Can't create gc");
       XSetForeground(dpy, gc, 0); /* 1-bit deep pixmaps use 0 as background */
       /* Clear the pixmap by setting the entire image to 0's */
       XFillRectangle (dpy, pixmap, gc, 0, 0,
           cols * cell_width, rows * cell_height);
       XSetForeground (dpy, gc, 1); /* Set the foreground to 1 (1-bit deep) */
       XSetFont (dpy, gc, font->fid); /* to print bitmap filenames (captions) */

       /* Draw the grid lines between bitmaps */
       for (j = 0; j <= rows * cell_height; j += cell_height)
           XDrawLine (dpy, pixmap, gc, 0, j, cols * cell_width, j);
       for (j = 0; j <= cols * cell_width; j += cell_width)
           XDrawLine (dpy, pixmap, gc, j, 0, j, rows*cell_height);

       /* Draw each of the bitmaps into the big picture */
       for (i = 0; i < total; i++) {
           int x = cell_width * (i % cols);
           int y = cell_height * (i / cols);
           XDrawString (dpy, pixmap, gc, x + 5, y + font->ascent,
               list[i].name, list[i].len);
           XCopyArea (dpy, list[i].bitmap, pixmap, gc,
               0, 0, list[i].width, list[i].height,
               x + 5, y + font->ascent + font->descent);
           /* Once we copy it into the big picture, we don't need the bitmap */
           XFreePixmap (dpy, list[i].bitmap);
       }
       XtFree (list); /* don't need the array of structs anymore */
       XFreeGC (dpy, gc); /* nor do we need this GC */

       /* Create automatic Scrolled Window */
       scrolled_w = XtVaCreateManagedWidget ("scrolled_w",
           xmScrolledWindowWidgetClass, toplevel,
           XmNscrollingPolicy, XmAPPLICATION_DEFINED, /* default values */
XmNvisualPolicy, XmVARIABLE, /* specified for
clarity */ NULL); /* Create a drawing area as a child of the
ScrolledWindow. * The DA's size is initialized (arbitrarily) to
view_width and * view_height. The ScrolledWindow will expand to this
size. */ drawing_a = XtVaCreateManagedWidget ("drawing_a",
xmDrawingAreaWidgetClass, scrolled_w, XmNwidth, view_width, XmNheight,
view_height, NULL); XtAddCallback (drawing_a, XmNexposeCallback,
expose_resize, NULL); XtAddCallback (drawing_a, XmNresizeCallback,
expose_resize, NULL); /* Application-defined ScrolledWindows won't
create their own * ScrollBars. So, we create them ourselves as children
of the * ScrolledWindow widget. The vertical ScrollBar's maximum size
is * the number of rows that exist (in unit values). The horizontal *
ScrollBar's maximum width is represented by the number of columns. */
vsb = XtVaCreateManagedWidget ("vsb", xmScrollBarWidgetClass,
scrolled_w, XmNorientation, XmVERTICAL, XmNmaximum, rows,
XmNsliderSize, min (view_height / cell_height, rows), XmNpageIncrement,
max ((view_height / cell_height) - 1, 1), NULL); if (view_height /
cell_height > rows) sw_voffset = (view_height - rows * cell_height) /
2; hsb = XtVaCreateManagedWidget ("hsb", xmScrollBarWidgetClass,
scrolled_w, XmNorientation, XmHORIZONTAL, XmNmaximum, cols,
XmNsliderSize, min (view_width / cell_width, cols), XmNpageIncrement,
max ((view_width / cell_width) - 1, 1), NULL); if (view_width /
cell_width > cols) sw_hoffset = (view_width - cols * cell_width) / 2;
/* Allow the ScrolledWindow to initialize itself accordingly...*/
XmScrolledWindowSetAreas (scrolled_w, hsb, vsb, drawing_a); /* use same
callback for both ScrollBars and all callback reasons */ XtAddCallback
(vsb, XmNvalueChangedCallback, scrolled, XmVERTICAL); XtAddCallback
(hsb, XmNvalueChangedCallback, scrolled, XmHORIZONTAL); XtAddCallback
(vsb, XmNdragCallback, scrolled, XmVERTICAL); XtAddCallback (hsb,
XmNdragCallback, scrolled, XmHORIZONTAL); XtRealizeWidget (toplevel);
XtAppMainLoop (app); } /* React to scrolling actions. Reset position of
ScrollBars; call redraw() * to do actual scrolling. cbs->value is
ScrollBar's new position. */ void scrolled(scrollbar, client_data,
call_data) Widget scrollbar; XtPointer client_data; XtPointer
call_data; { int orientation = (int) client_data; /* XmVERTICAL or
XmHORIZONTAL */ XmScrollBarCallbackStruct *cbs =
(XmScrollBarCallbackStruct *) call_data; if (orientation == XmVERTICAL)
{ pix_voffset = cbs->value * cell_height; if (((rows * cell_height) -
pix_voffset) > view_height) XClearWindow (dpy, XtWindow (drawing_a)); }
else { pix_hoffset = cbs->value * cell_width; if (((cols * cell_width)
- pix_hoffset) > view_width) XClearWindow (dpy, XtWindow (drawing_a));
} redraw (XtWindow (drawing_a)); } /* This function handles both expose
and resize (configure) events. * For XmCR_EXPOSE, just call redraw()
and return. For resizing, * we must calculate the new size of the
viewable area and possibly * reposition the pixmap's display and
position offsets. Since we * are also responsible for the ScrollBars,
adjust them accordingly. */ void expose_resize(drawing_a, client_data,
call_data) Widget drawing_a; XtPointer client_data; XtPointer
call_data; { Dimension new_width, new_height, oldw, oldh; Boolean
do_clear = False; XmDrawingAreaCallbackStruct *cbs =
(XmDrawingAreaCallbackStruct *) call_data; if (cbs->reason ==
XmCR_EXPOSE) { redraw (cbs->window); return; } oldw = view_width; oldh
= view_height; /* Unfortunately, the cbs->event field is NULL, so we
have to have * get the size of the drawing area manually. A misdesign
of * the DrawingArea widget--not a bug (technically). */ XtVaGetValues
(drawing_a, XmNwidth, &view_width, XmNheight, &view_height, NULL); /*
Get the size of the viewable area in "units lengths" where * each unit
is the cell size for each dimension. This prevents * rounding error for
the pix_voffset and pix_hoffset values later. */ new_width = view_width
/ cell_width; new_height = view_height / cell_height; /* When the user
resizes the frame bigger, expose events are generated, * so that's not
a problem, since the expose handler will repaint the * whole viewport.
However, when the window resizes smaller, no * expose event is
generated. The window does not need to be * redisplayed if the old
viewport was smaller than the pixmap. * (The existing image is still
valid--no redisplay is necessary.) * The window WILL need to be
redisplayed if: * 1) new view size is larger than pixmap (pixmap needs
to be centered). * 2) new view size is smaller than pixmap, but the OLD
view size was * larger than pixmap. */ if ((int) new_height >= rows) {
/* The height of the viewport is taller than the pixmap, so set *
pix_voffset = 0, so the top origin of the pixmap is shown, * and the
pixmap is centered vertically in viewport. */ pix_voffset = 0;
sw_voffset = (view_height - rows * cell_height)/2; /* Case 1 above */
do_clear = True; /* scrollbar is maximum size */ new_height = rows; }
else { /* Pixmap is larger than viewport, so viewport will be
completely * redrawn on the redisplay. (So, we don't need to clear
window.) * Make sure upper side has origin of a cell (bitmap). */
pix_voffset = min (pix_voffset, (rows-new_height) * cell_height);
sw_voffset = 0; /* no centering is done */ /* Case 2 above */ if (oldh
> rows * cell_height) do_clear = True; } XtVaSetValues (vsb,
XmNsliderSize, max (new_height, 1), XmNvalue, pix_voffset /
cell_height, XmNpageIncrement, max (new_height-1, 1), NULL); /*
identical to vertical case above */ if ((int) new_width >= cols) { /*
The width of the viewport is wider than the pixmap, so set *
pix_hoffset = 0, so the left origin of the pixmap is shown, * and the
pixmap is centered horizontally in viewport. */ pix_hoffset = 0;
sw_hoffset = (view_width - cols * cell_width)/2; /* Case 1 above */
do_clear = True; /* scrollbar is maximum size */ new_width = cols; }
else { /* Pixmap is larger than viewport, so viewport will be
completely * redrawn on the redisplay. (So, we don't need to clear
window.) * Make sure left side has origin of a cell (bitmap). */
pix_hoffset = min (pix_hoffset, (cols-new_width)*cell_width);
sw_hoffset = 0; /* Case 2 above */ if (oldw > cols * cell_width)
do_clear = True; } XtVaSetValues (hsb, XmNsliderSize, max (new_width,
1), XmNvalue, pix_hoffset / cell_width, XmNpageIncrement, max
(new_width-1, 1), NULL); if (do_clear) { /* XClearWindow() doesn't
generate an ExposeEvent */ XClearArea (dpy, cbs->window, 0, 0, 0, 0,
True); /* all 0's means the whole window */ } } void redraw(window)
Window window; { static GC gc; /* static variables are *ALWAYS*
initialized to NULL */ if (!gc) { /* !gc means that this GC hasn't yet
been created. */ /* We create our own gc because the other one is based
on a 1-bit * bitmap and the drawing area window might be color
(multiplane). * Remember, we're rendering a multiplane pixmap, not the
original * single-plane bitmaps! */ gc = XCreateGC (dpy, window, NULL,
0); XSetForeground (dpy, gc, BlackPixelOfScreen (XtScreen
(drawing_a))); XSetBackground (dpy, gc, WhitePixelOfScreen (XtScreen
(drawing_a))); } if (DefaultDepthOfScreen (XtScreen (drawing_a)) > 1)
XCopyPlane (dpy, pixmap, window, gc, pix_hoffset, pix_voffset,
view_width, view_height, sw_hoffset, sw_voffset, 1L); else XCopyArea
(dpy, pixmap, window, gc, pix_hoffset, pix_voffset, view_width,
view_height, sw_hoffset, sw_voffset); } The bitmaps to be displayed are
specified on the command line, as shown in the following command:
% app_scroll /usr/include/X11/bitmaps/*The output of this command is shown in the figure.
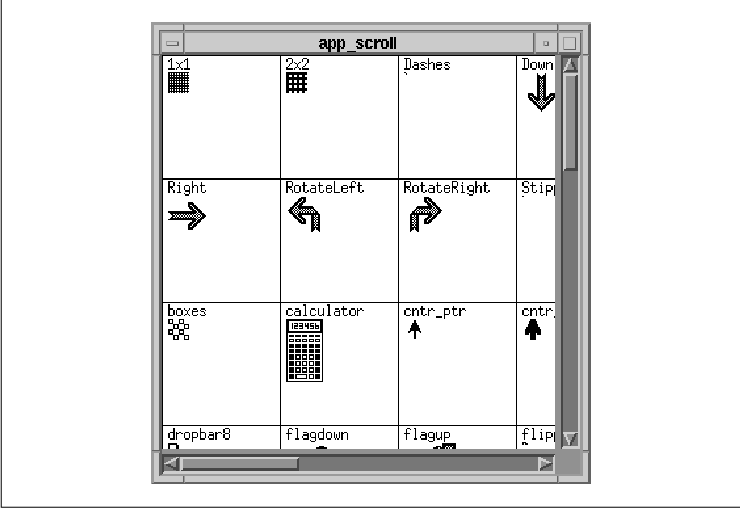
The program begins by loading the bitmaps into an
array of Bitmap structures that are specially designed for
this application. Since each bitmap can have a different size, we save
all of the information about them for comparison after they are all
loaded. At that time, the largest bitmap is found and its size is used
as the cell size for the viewer. The pixmap is created with a
single-plane (a bitmap), since color is not used to render the standard
X11 bitmaps when they are created. This pixmap is used as a virtual
work window; its contents are rendered into the real DrawingArea work
window.
After the bitmaps are loaded, the ScrolledWindow and
DrawingArea are created. The DrawingArea has XmNexposeCallback
and XmNresizeCallback callbacks installed so that the pixmap
can be rendered or repositioned within the DrawingArea at any time.
Resizing does not change the pixmap, but it may cause its origin to be
repositioned relative to the DrawingArea widget. We create the
ScrollBars explicitly, since they are not created automatically when
XmNscrollingPolicy is set to XmAPPLICATION_DEFINED. The
ScrollBars are created as children of the ScrolledWindow, as shown in
the following fragment:
vsb = XtVaCreateManagedWidget ("vsb",
xmScrollBarWidgetClass, scrolled_w,
XmNorientation, XmVERTICAL,
XmNmaximum, rows,
XmNsliderSize, min (view_height / cell_height, rows),
XmNpageIncrement, max ((view_height / cell_height) - 1, 1),
NULL);
if (view_height / cell_height > rows)
sw_voffset = (view_height - rows * cell_height) / 2;
The ScrollBars are initialized so that the XmNmaximum values
are set to the number of rows and columns in the pixmap. Similarly,
XmNsliderSize is set to the number of bitmap cells that can fit in
the viewport in the horizontal and vertical dimensions. Internally, the
application knows how many pixels each scrolling unit represents, since
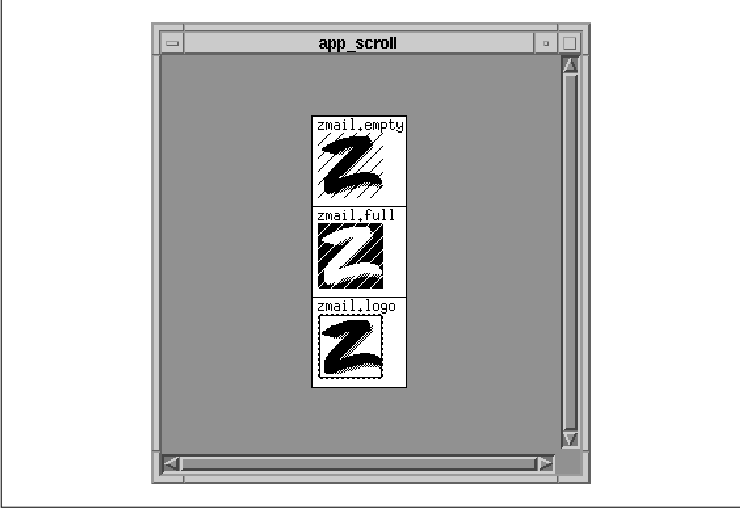
there is no ScrollBar resource for this value. The variables
sw_hoffset and sw_voffset are used when the pixmap is
smaller than the actual ScrolledWindow. In this case, the variables
indicate the origin of the pixmap in the DrawingArea, so that the
pixmap appears centered, as shown in the figure.
The call to XmScrolledWindowSetAreas()
initializes the ScrolledWindow appropriately. This function assigns the
ScrollBars and the DrawingArea widget to internal variables within the
ScrolledWindow, so that the widget functions properly. While this call
is opaque for automatic scrolling, it must be done for
application-defined scrolling.
The ScrollBars are assigned a callback routine for
the XmNvalueChangedCallback and XmNdragCallback
callbacks. The scrolled() routine handles all of the scrolling
actions, including incremental and page scrolling, that cause the value
of the ScrollBar to change. We pass the values XmHORIZONTAL
and XmVERTICAL as client_data, so that the routine
knows which of the two ScrollBars invoked it. The routine determines
the portion of the pixmap that should be rendered in the DrawingArea by
calculating offsets into the pixmap. These offsets are calculated by
multiplying the value of the ScrollBar by the pixels-per-unit value for
the pixmap.
Finally, the top-level widget is realized and the
main loop is started. At this point, the DrawingArea is realized, so
the XmNexposeCallback is activated, which causes the
DrawingArea to draw itself and display the first image of the pixmap.
The function expose_resize() handles both the Expose
and ConfigureNotify (resize) events. The function determines
which event was delivered by checking the reason field of the
callback structure passed to the function. When the DrawingArea is
resized, we need to adjust a number of resources so that the pixmap is
scrolled properly. For Expose events, no recalculation of
variables is necessary, so all we need to do is redraw the display
using redraw().
The position at which the pixmap is rendered into
the DrawingArea's window is somewhat complicated to calculate. If the
pixmap is larger than the clip window, the clip window acts as a view
into the pixmap, so only a portion of the pixmap can be seen. If the
pixmap is smaller than the clip window, the entire pixmap can be seen,
so the pixmap should be centered in the middle of the viewable area.
The application controls this behavior using a number of global
variables.
The view_width and view_height
variables represent the dimensions of the ScrolledWindow, which are
also the dimensions of the DrawingArea window. The area specified by
these values is the area of the pixmap that is going to be copied into
the window. The pix_hoffset and pix_voffset variables
represent the horizontal and vertical offsets into the pixmap when it
is rendered into the DrawingArea. If the pixmap is larger than the clip
window, these values are calculated in the scrolled() callback
routine when the user performs a scrolling action. If the pixmap is
smaller than the DrawingArea, these values are set to 0
because the origin of the pixmap is always visible. The sw_hoffset
and sw_voffset variables are used when the pixmap is smaller
than the DrawingArea. The values indicate the offsets into the
DrawingArea where the entire pixmap is rendered so that it appears
centered in the viewport.
The redraw() routine depends on these
variables being set. In order to maintain the values, the application
monitors the size of the DrawingArea. When a ConfigureNotify
event occurs on the DrawingArea, the expose_resize() callback
routine is invoked. The routine gets the new dimensions of the
DrawingArea so that it can update the six variables mentioned above.
Normally, we can get the new dimensions directly from the event
field of the callback structure. However, the DrawingArea widget
invokes the XmNresizeCallback from within the Resize()
method, instead of from an action routine, so the callback does not
have an XEvent structure associated with it. All widget
internals have methods that are invoked automatically by the X Toolkit
Intrinsics and are not associated with the translation tables normally
used to handle events. Resize() is one such method. See
Volume Four, X Toolkit Intrinsics Programming Manual, for more
information. Since the event field of the callback structure
is set to NULL, we have to get the window's size in another
way. We use XtVaGetValues(), as shown in the following code
fragment:
   XtVaGetValues (drawing_a,
       XmNwidth,  &view_width,
       XmNheight, &view_height,
       NULL);
Once we have the dimensions, we need to recalculate the value of the
other four variables. Since our variables represent pixel values, while
the ScrollBar resources that we need to set use an abstract unit size,
we must convert between the two types of values using the
cell_width and cell_height values. The variables
new_width and new_height represent the new viewport width
and height in ScrollBar units.
If the new viewport height exceeds the number of
rows in the pixmap, we know that the height of the viewport exceeds the
height of the pixmap. In this case, the value for sw_voffset
is calculated to determine the offset that causes the pixmap to be
centered vertically in the viewport. Since the viewport needs to be
completely redisplayed, we set the local variable do_clear to
True. We use this variable instead of calling XClearWindow()
directly because we may have to do it again later when we calculate the
values for the horizontal ScrollBar. The value for new_height
is going to be used to set the XmNsliderSize for the vertical
ScrollBar, so we make sure that it does not exceed its XmNmaximum
value.
On the other hand, if the new viewport height does
not exceed the total number of rows, we know that the pixmap is larger
than the viewport vertically. The pixmap is not going to be centered in
the DrawingArea, so sw_voffset is set to 0.
pix_voffset is set to the minimum of its existing value and the
difference between the total number of rows and the new height of the
viewport. If the viewport used to be bigger than the pixmap, but is now
smaller, we need to clear the window and do a complete redisplay. If
the pixmap was bigger than the viewport and it still is, then we do not
need to clear the window because the current view is still accurate.
The different between these two cases is subtle and it is the sort of
thing that you catch only when you test your program thoroughly.
After the calculations are performed, the
application sets the XmNsliderSize, XmNvalue, and
XmNpageIncrement resources for the vertical ScrollBar. The exact
same calculations are done for the horizontal dimension and the same
resources are set on the horizontal ScrollBar. With these resources
set, scrolling continues to function properly when the DrawingArea is
resized. When redraw() is called, it uses the global variables
to copy the relevant portion of the full pixmap directly into the
DrawingArea. If the program is running on a color screen, the routine
uses XCopyPlane() because the DrawingArea cannot create a
1-bit deep window on a color screen. (Motif widgets always create
windows of the same depth as the screen on which they reside.) If the
application is run on a monochrome screen, the routine uses
XCopyArea(). We determine the depth of the screen using
DefaultDepthOfScreen().
Incidentally, while we did not use it,
XmScrollBarSetValues() could have been used to set the resources on
the ScrollBars. This function takes the following form:
   void
   XmScrollBarSetValues(widget, value, slider_size, increment,
                                     page_increment, notify)
       Widget widget;
       int value;
       int slider_size;
       int increment;
       int page_increment;
       Boolean notify;
The notify parameter specifies whether you want the
XmNvalueChangedCallback for the ScrollBar to be invoked. Using
this interface is probably slightly faster than using the
XtVaSetValues() method, but only by a small margin, so we chose to
maintain consistency with our own style. The companion function for
XmScrollBarSetValues() is XmScrollBarGetValues(). This
function retrieves the values from the ScrollBar widget and takes the
following form:
   void
   XmScrollBarGetValues(widget, value, slider_size, increment,
                                            page_increment)
       Widget widget;
       int *value;
       int *slider_size;
       int *increment;
       int *page_increment;
Before closing this section, let's examine what the Text and List
widgets do and compare it with what we have done in the source code We
stated earlier that while we mimic much of what these widgets do
internally, the implementation is quite different. The major difference
is that we are fortunate enough to have all of the bitmaps loaded into
a large, statically-sized pixmap that we can render at will using the
redraw() function. This function is clearly a convenience, since it
simply calls XCopyArea() or XCopyPlane() to copy the
pixmap into the DrawingArea using pre-calculated internal variables.
The Text and List widgets do not have this luxury; they must redraw
their respective data directly into the work windows each time they
need to redisplay.
If we were to implement the bitmap viewer using this
technique, we would have to move the functionality of the main for
loop in main() into redraw() and calculate the
location of each individual bitmap in the DrawingArea. This process is
quite painstaking and very error-prone. If you do not take into account
multiple exposures, exposure regions, and other low-level Xlib
functionality, you might run into X performance issues. We didn't even
take these issues into account in our program. For example, our
redraw() routine completely repaints the entire window for every
Expose event. Strictly speaking, repainting is inefficient and may
not perform adequately for all applications, especially
graphic-intensive ones. To avoid this problem, you could come up with a
generic set of routines to handle exposures, so that of all your
applications could use the same methodology, but that's the point of a
toolkit.
Let's take another look at the PG&E scenario that we
discussed at the beginning of the chapter. As you recall, the problem
with that particular situation was that the database could retrieve 20%
of the county (the work window), but the graphic resolution was such
that only 10% of it could be displayed at one time (the viewport). The
fundamental problem with the application-defined scrolling mode is that
the work window cannot be a different size from the viewport. However,
we can work around this problem by complying with the restriction that
the work window and viewport are the same size, but we can use the
enlarged pixmap idea from the source code to accomplish the task. Each
database query can be converted and rendered into a sufficiently large
pixmap, which can then be rendered into the work window as necessary.
If the scrolling is small enough, another part of the pixmap can be
rendered into the work window, instead of performing a completely new
database lookup.
As we described in Chapter 8, Manager Widgets
, manager widgets play a significant role in handling keyboard traversal
mechanisms. As a manager, the ScrolledWindow supports keyboard
traversal. However, one significant difference is that the widgets in a
ScrolledWindow may not be visible at all times. In Motif 1.1, the
toolkit does not provide a mechanism to allow keyboard traversal to
widgets that are not visible. While it might be possible to implement
this feature, it certainly would not be an easy task. By default, the
ScrolledWindow only allows the user to traverse to widgets that are
visible.
In Motif 1.2, there is a new callback for the
ScrolledWindow that supports keyboard traversal in a ScrolledWindow.
The XmNtraverseObscuredCallback is invoked when the user
attempts to traverse to a widget that is not visible in a
ScrolledWindow. If there is no routine specified for this callback, the
keyboard traversal functionality is the same as in Motif 1.1. An
application can use the callback to cause the ScrolledWindow to make a
widget visible, so that it can receive the input focus. the source code
shows the use of the XmNtraverseObscuredCallback. This example
uses functionality that is new in Motif 1.2, so it only works with the
1.2 version of the Motif toolkit.
   /* traversal.c -- demonstrate keyboard traversal in a ScrolledWindow
    * using the XmNtraverseObscuredCallback.
    */
   #include <Xm/PushB.h>
   #include <Xm/ToggleB.h>
   #include <Xm/ScrolledW.h>
   #include <Xm/RowColumn.h>

   main(argc, argv)
   int argc;
   char *argv[];
   {
       Widget toplevel, sw, rc;
       XtAppContext app;
       void traverse();
       int i;
       char name[10];

       XtSetLanguageProc (NULL, NULL, NULL);

       toplevel = XtVaAppInitialize (&app, "Demos", NULL, 0,
           &argc, argv, NULL, NULL);

       sw = XtVaCreateManagedWidget ("scrolled_w",
           xmScrolledWindowWidgetClass, toplevel,
           XmNscrollingPolicy, XmAUTOMATIC,
           NULL);

       XtAddCallback (sw, XmNtraverseObscuredCallback, traverse, NULL);

       /* RowColumn is the work window for the widget */
       rc = XtVaCreateWidget ("rc",
           xmRowColumnWidgetClass, sw,
     XmNorientation, XmHORIZONTAL,
           XmNpacking, XmPACK_COLUMN,
     XmNnumColumns, 10,
           NULL);

       for ( i = 0; i < 10; i++ ) {
           sprintf (name, "Toggle %d", i);
           XtVaCreateManagedWidget (name, xmToggleButtonWidgetClass, rc, NULL);
           sprintf (name, "Button %d", i);
           XtVaCreateManagedWidget (name, xmPushButtonWidgetClass, rc, NULL);
       }
       XtManageChild (rc);

       XtRealizeWidget (toplevel);
       XtAppMainLoop (app);
   }

   void
   traverse(widget, client_data, call_data)
   Widget widget;
   XtPointer client_data;
   XtPointer call_data;
   {
       XmTraverseObscuredCallbackStruct *cbs =
           (XmTraverseObscuredCallbackStruct *) call_data;

       XmScrollVisible (widget, cbs->traversal_destination, 10, 10);
   }
This program creates a bunch of ToggleButtons and PushButtons in a
RowColumn widget that is the work area for a ScrolledWindow. The
traverse() routine is installed as the
XmNtraverseObscuredCallback. The call_data parameter is an
XmTraverseObscuredCallbackStruct, which is defined as follows:
   typedef struct {
       int                   reason;
       XEvent               *event;
       Widget                traversal_destination;
       XmTraversalDirection  direction;
   } XmTraverseObscuredCallbackStruct;
The reason field contains the value
XmCR_OBSCURED_TRAVERSAL. The traversal_destination field
specifies the widget that is to receive the input focus and
direction specifies the direction of traversal. The traverse()
routine calls XmScrollVisible() to make the
traversal_destination widget visible. This routine takes the
following form:
   void
   XmScrollVisible(scrollw, widget, hor_margin, ver_margin)
       Widget scrollw;
       Widget widget;
       Dimension hor_margin;
       Dimension ver_margin;
The scrollw parameter specifies the ScrolledWindow
widget, while the widget parameter specifies the widget
that is to be made visible. The hor_margin and
ver_margin arguments indicate the margins that are used if the
viewport of the ScrolledWindow needs to be adjusted to make the widget
visible. In early versions of the Motif 1.2 toolkit, there is a bug in
XmScrollVisible() that may cause it to function incorrectly when
the margins are set to any value other than 0. If you run the
program in the source code you can use the arrow keys to traverse all
of the widgets in the ScrolledWindow.
The ScrolledWindow provides a convenient interface
for displaying large amounts of data when you have limited screen real
estate. For most situations, the automatic scrolling mode is all that
you really need. In this mode, a ScrolledWindow requires very little
care and feeding. By installing callback routines on the ScrollBars,
you can even monitor the scrolling actions. However, there are some
drawbacks to the automatic scrolling mode: all of the data must be
rendered into the work window widget and scrolling occurs in
single-pixel increments. If the size of the work window that you need
is prohibitively large or if you need to support scrolling in other
than single-pixel increments, you must use application-defined
scrolling.
As demonstrated in the source code there is quite a
bit of work involved in supporting real application-defined scrolling
because of the different states in the relationship between the size of
the work window and the underlying data. You must be able to support
not only the underlying data, but also the way it is rendered into the
work window, the ScrollBars, and all of the auxiliary variables
required for the scrolling calculations. And that work is just to
support the scrolling functionality. When you introduce the complexity
of a real application, there is a greater chance of a poor design
model. The xshowbitmap.c program in the Appendix, Additional
Example Programs, is fundamentally the same program as
app_scroll.c, but it has been enhanced into more of a real-world
program.
The following exercises focus on the concepts and
methods described in this chapter.