This chapter describes advanced concepts and
programming techniques in UIL. It builds on the UIL material explained
in the previous chapters.
This chapter introduces and examines ways that you
can make the most of UIL's more advanced features. In the following
sections, we describe how to add non-Motif widgets to an interface
description, discuss methods and ideas for organizing UIL files, and
examine the considerations that you face when setting resources in UIL.
Finally, we present material on advanced uses of UIL lists and
user-interface prototyping.
With UIL, it is easy to define instances of any of
the Motif widgets, because their type names are built into the
compiler. However, you may need to use your own widget or a third-party
widget in an application to provide functionality that is not available
in the Motif widget set. Fortunately, it is possible to include other
widgets using the special user_defined widget class along with
the argument and reason value types.
OSF/Motif also supports non-Motif widget
descriptions using the widget meta-language (WML). These widgets are
written into a separate WML description file which is run through the
WML compiler. WML is typically used for describing alternative widget
sets; many third party widget sets include compiled WML description
files. The use of compiled WML description files is covered in
#suilwmlopt, but a complete description of WML syntax and usage is
beyond the scope of this book.
Getting back to UIL, here are the steps involved in
defining and creating a user-defined widget:
In order to create a non-Motif widget, you must
write a creation procedure and register it with Mrm. A user-defined
widget creation procedure takes the same form as the Motif widget
creation routines. The parent argument specifies the
parent of the widget to create, and the name argument
is the widget's name. The args and num_args
parameters supply the initial resource settings for the widget. Most
creation procedures create a widget simply by calling
XtCreateWidget().
Mrm must know about a new creation function before
you can create widgets with it. Widget creation functions are
registered with MrmRegisterClass(), which must be called
before any user-defined widgets are created. This function takes the
following form:
   Cardinal
   MrmRegisterClass(class_code, class_name, proc_name, create_proc,
                    widget_class)
       MrmType     class_code;
       String      class_name;
       String      proc_name;
       Widget    (*create_proc)();
       WidgetClass widget_class;
The first two arguments, class_code and
class_name, are obsolete but remain to preserve backwards
compatibility. You should always pass 0 and NULL for
these arguments, respectively. The proc_name parameter
specifies the name of the creation procedure as it appears in a UIL
module. To avoid confusion, it is a good idea to use the same name in
both application code and UIL. The create_proc argument
is the address of the creation procedure, and widget_class
is a pointer to the class structure of the widget. The function
indicates the result of the operation by returning either
MrmSUCCESS or MrmFAILURE. A failure only occurs when the
function cannot allocate memory.
MrmRegisterClass() does not take an
MrmHierarchy argument like many of the Mrm routines, which means
that any user-defined widgets that you register with this function are
accessible from all open hierarchies. Mrm does not provide a way to
register a widget class with an individual hierarchy. the source code
demonstrates the use of MrmRegisterClass().
   /* tree.c --
    * Program to show the Tree and Panner widgets.
    */

   #include <stdio.h>
   #include <X11/Intrinsic.h>
   #include <X11/Xaw/Tree.h>
   #include <X11/Xaw/Panner.h>
   #include <X11/StringDefs.h>
   #include <Mrm/MrmAppl.h>

   void pan();

   static MrmRegisterArg callback_list[] = {
       { "pan",          (XtPointer) pan },
       /* Add additional callback procedures here... */
   };

   Widget
   XawCreateTreeWidget (parent, name, args, num_args)
   Widget parent;
   String name;
   ArgList args;
   Cardinal num_args;
   {
       return (XtCreateWidget (name, treeWidgetClass, parent, args, num_args));
   }

   Widget
   XawCreatePannerWidget (parent, name, args, num_args)
   Widget parent;
   String name;
   ArgList args;
   Cardinal num_args;
   {
       return (XtCreateWidget (name, pannerWidgetClass, parent, args, num_args));
   }

   void
   pan (panner, client_data, call_data)
   Widget panner;
   XtPointer client_data;
   XtPointer call_data;
   {
       Widget tree = (Widget) client_data;
       XawPannerReport *report = (XawPannerReport *) call_data;

       /* Should use XtSetValues, but DrawingArea bug prevents us */
       XtMoveWidget (tree, -report->slider_x, -report->slider_y);
   }

   int
   main (argc, argv)
   int   argc;
   char *argv[];
   {
       XtAppContext  app_context;
       Widget        toplevel, root_widget;
       Cardinal      status;
       static String uid_file_list[] = { "tree" };
       MrmType       class_code;
       MrmHierarchy  hierarchy;

       XtSetLanguageProc (NULL, NULL, NULL);

       MrmInitialize();

       toplevel = XtVaAppInitialize (&app_context, "Demos", NULL, 0,
           &argc, argv, NULL, NULL);

       status = MrmOpenHierarchyPerDisplay (XtDisplay (toplevel),
           XtNumber (uid_file_list), uid_file_list, NULL, &hierarchy);

       if (status != MrmSUCCESS) {
           XtAppError (app_context, "MrmOpenHierarchyPerDisplay failed");
           exit (1);
       }

       MrmRegisterNames (callback_list, XtNumber (callback_list));
       MrmRegisterClass (0, NULL, "XawCreateTreeWidget",
           XawCreateTreeWidget, treeWidgetClass);
       MrmRegisterClass (0, NULL, "XawCreatePannerWidget",
           XawCreatePannerWidget, pannerWidgetClass);

       status = MrmFetchWidget (hierarchy, "root", toplevel, &root_widget,
           &class_code);

       if (status != MrmSUCCESS) {
           XtAppError (app_context, "MrmFetchWidget failed");
           exit (1);
       }

       XtManageChild (root_widget);
       XtRealizeWidget (toplevel);

       XtAppMainLoop (app_context);
   }
This program defines widget creation functions for the Tree and Panner
widgets and registers the routines with Mrm. The program also defines
the pan() callback routine for the Panner widget. This routine
is specified for the XtNreportCallback, as we'll show you
shortly.
It usually makes sense to place the declarations for
a user-defined widget in an include file so that they can be used in
more than one module. The include file for the Tree widget is shown in
the source code
   /* UIL declarations for the Xaw Tree widget. */

   ! Declare the creation procedure
   procedure
     XawCreateTreeWidget();

   ! Declare resources
   value
     XtNautoReconfigure : argument ('autoReconfigure', boolean);
     XtNhSpace          : argument ('hSpace',          integer);
     XtNlineWidth       : argument ('lineWidth',       integer);
     XtNvSpace          : argument ('vSpace',          integer);
     XtNgravity         : argument ('gravity',         integer);
       NorthGravity : 2;
       WestGravity  : 4;
       EastGravity  : 6;
       SouthGravity : 8;

     ! Constraint resources
     XtNtreeGC          : argument ('treeGC',          any);
     XtNtreeParent      : argument ('treeParent',      widget);
The Tree creation procedure is declared in a
procedure section, even though the application registers a widget
creation procedure differently from a callback procedure. Creation
procedures should be declared as taking no arguments.
The resources for the Tree widget are defined using
the UIL argument type. The syntax is the same as for any other
value, although argument values cannot be imported or
exported. The argument literal specifies the internal name of
the widget resource and the type of the resource. If a widget follows
the Xt coding conventions, the internal resource name is the name of
the resource minus the XtN prefix. The UIL compiler uses the
type argument for type checking the resource, just like the built-in
resources. UIL does not support a type that corresponds to a GC
(graphics context), so the type of the XtNtreeGC argument is
specified as any. This resource can only be set correctly
using a GC imported from the application as an identifier
. The file also contains constraint resource definitions for the
children of the Tree.
The include file also defines variables for the
possible values of the XtNgravity resource. These values are
merely a convenience, as there is no way to make the UIL compiler check
the setting of the resource for these values. (This type of checking is
possible for widget descriptions written with WML, however.) Once the
resources are defined, the UIL compiler allows you to set user-defined
resources, such as XtNtreeGC and XtNtreeParent, in
the arguments subsection of any widget, including the built-in
Motif widgets. You can also use the built-in Motif resources in a
user-defined widget definition, which is why we did not define the Tree
widget's XtNbackground or XtNforeground resources.
These resources are the same as the Motif XmNbackground and
XmNforeground resources, even though the prefix is different. The
names can be used interchangeably.
We use a separate include file for the Panner
widget. The UIL definitions for the Panner appear in the source code
   /* UIL declarations for thw Xaw Panner widget. */

   ! Declare the creation procedure
   procedure
     XawCreatePannerWidget();

   ! Declare resources
   value
     XtNallowOff          : argument ('allowOff',          boolean);
     XtNbackgroundStipple : argument ('backgroundStipple', string);
     XtNcanvasWidth       : argument ('canvasWidth',       integer);
     XtNcanvasHeight      : argument ('canvasHeight',      integer);
     XtNdefaultScale      : argument ('defaultScale',      integer);
     XtNinternalSpace     : argument ('internalSpace',     integer);
     XtNresize            : argument ('resize',            boolean);
     XtNrubberBand        : argument ('rubberBand',        boolean);
     XtNshadowThickness   : argument ('shadowThickness',   integer);
     XtNsliderX           : argument ('sliderX',           integer);
     XtNsliderY           : argument ('sliderY',           integer);
     XtNsliderWidth       : argument ('sliderWidth',       integer);
     XtNsliderHeight      : argument ('sliderHeight',      integer);

   ! Declare callbacks
   value
     XtNreportCallback    : reason   ('reportCallback');
This file declares the widget creation function and
defines a number of resources. The Panner also has a callback, so the
include file declares the callback using the UIL reason type.
The reason literal simply specifies the string name of the
callback resource. Unlike the argument literal, no type is
necessary because the type is always a callback.
A module can create instances of the user-defined
Tree and Panner widgets by including the two files shown above. the
source code illustrates a typical application of these widgets.
   module tree

   include file 'XawTree.uih';
   include file 'XawPanner.uih';

   procedure
     pan (widget);

   object root : XmForm {
     controls {
        user_defined panner;
        XmDrawingArea viewport;
     };
     arguments {
       XmNdialogTitle = "Motif Widget Classes";
     };
   };

   object panner : user_defined procedure XawCreatePannerWidget {
     arguments {
       XtNdefaultScale   = 10;
       XtNcanvasWidth    = 325;
       XtNcanvasHeight   = 300;
       XtNsliderWidth    = 200;
       XtNsliderHeight   = 200;
       XmNleftAttachment = XmATTACH_FORM;
       XmNtopAttachment  = XmATTACH_FORM;
     };
     callbacks {
       XtNreportCallback = procedure pan (motif_widgets);
     };
   };

   object viewport : XmDrawingArea {
     arguments {
       XmNmarginWidth      = 0;
       XmNmarginHeight     = 0;
       XmNwidth            = 200;
       XmNheight           = 200;
       XmNtopAttachment    = XmATTACH_FORM;
       XmNbottomAttachment = XmATTACH_FORM;
       XmNleftAttachment   = XmATTACH_FORM;
       XmNrightAttachment  = XmATTACH_FORM;
     };
     controls {
       user_defined motif_widgets;
     };
   };

   object motif_widgets : user_defined procedure XawCreateTreeWidget {
     controls {
       Primitive : XmLabel { };
       ArrowButton : XmLabel {
         arguments {
           XtNtreeParent = Primitive;
         };
       };
       Label : XmLabel {
         arguments {
           XtNtreeParent = Primitive;
         };
       };
       CascadeButton : XmLabel {
         arguments {
           XtNtreeParent = Label;
          };
       };
       DrawnButton : XmLabel {
         arguments {
           XtNtreeParent = Label;
         };
       };
       PushButton : XmLabel {
         arguments {
           XtNtreeParent = Label;
         };
       };
       ToggleButton : XmLabel {
         arguments {
           XtNtreeParent = Label;
         };
       };
       List : XmLabel {
         arguments {
           XtNtreeParent = Primitive;
         };
       };
       Sash : XmLabel {
         arguments {
           XtNtreeParent = Primitive;
         };
       };
       ScrollBar : XmLabel {
         arguments {
           XtNtreeParent = Primitive;
         };
       };
       Separator : XmLabel {
         arguments {
           XtNtreeParent = Primitive;
         };
       };
       Text : XmLabel {
         arguments {
           XtNtreeParent = Primitive;
         };
       };
       TextField: XmLabel {
         arguments {
           XtNtreeParent = Primitive;
         };
       };
     };
     arguments {
       XtNlineWidth = 2;
       XmNborderWidth = 0;
       XtNhSpace = 22;
       XtNvSpace = 10;
     };
   };

   end module;
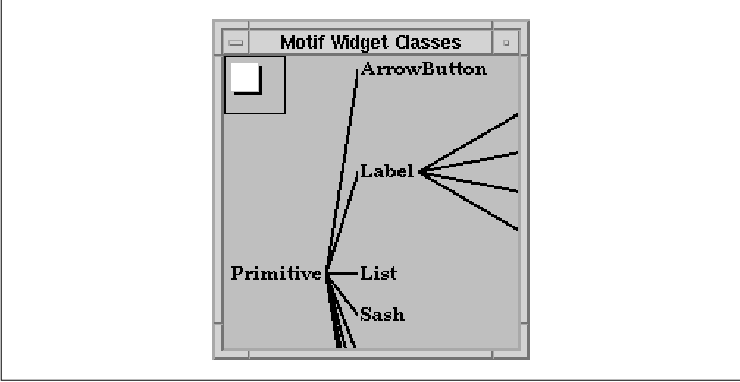
This module defines a Form that contains a DrawingArea and a Panner
widget. The DrawingArea contains a Tree widget that depicts the class
hierarchy of the Motif primitive widgets. The Panner scrolls the Tree,
so that the user can view the entire hierarchy. The output of this
example is shown in the figure.
The syntax of the Panner and Tree widget definitions
is almost the same as the many Motif widget definitions that you've
already seen. The main difference is that you replace the Motif widget
class name with user_defined procedure followed by the name of
the widget creation procedure. To reference a user-defined widget in
the controls subsection of a widget, you just use the keyword
user_defined followed by the name of the widget.
You can mix user-defined resources and built-in
resources as in the Panner definition, which contains some of its own
resource settings as well as a couple of Form constraint resource
settings. You can also specify user-defined resource names in the
arguments subsection of a built-in widget definition. For example,
the Label widget children of the Tree contain resource settings for the
user-defined XtNtreeParent resource. The Panner widget
contains a user-defined callback setting; the pan() callback
routine is invoked when the user adjusts the Panner. The syntax of
using user-defined resources and callbacks is the same as that for
built-in resources and callbacks. The main drawback of user-defined
widgets is that, unlike with the built-in Motif widgets, the compiler
does not know which resources are valid for the widget, so it lets you
set any resources. This generally is not a problem when you are only
working with a few user-defined widgets, but as the number of
user-defined widget instances increases, so does the probability of
making an error that the UIL compiler cannot catch. You can avoid this
problem by describing user-defined widgets with WML, at the expense of
learning a more complicated widget description format.
When developing an application with UIL, it is
important to think about the organization of the modules that make up
the interface. There are a number of benefits to be gained from careful
organization, such as code that is easier to edit, test, and maintain,
interface components that are reusable, and applications that are
easier to internationalize. While these benefits are not all unique to
UIL, there are specific organizational strategies that make it easier
to realize the benefits. This section presents some organizational
techniques for UIL modules. Since there are no rules when it comes to
organization, you should consider these techniques as guidelines.
You should adhere to the general principal of
grouping things by purpose or function. Some of the things you should
consider grouping in UIL are interface components, procedures, lists
and strings. Basically, it makes sense to group any collection of UIL
declarations or definitions that you consider to be logically related.
You can organize aspects of an application both in separate files and
by sections within a file.
When an application uses multiple top-level windows,
such as a main window and various dialog boxes, it makes sense to
describe each window in a separate UIL module. When a window is
especially complex, you may want to describe the interface using
several modules. For example, the menu system of an application could
be described in a separate module, as illustrated by the example in
Chapter 25, Building an Application With UIL.
When you divide an application into separate
modules, it is easier to find specific declarations or definitions
because the modules map directly to the appearance of the interface.
Multiple files also help to reduce editing conflicts when you are
working on a project with a team of programmers. Breaking components
into separate files helps to eliminate dependencies between logically
separate parts of the interface. For example, if you make a change to a
dialog, it shouldn't affect any other parts of the interface. Another
benefit is rapid prototyping and testing. With a few modifications, you
can use the showuid program from Chapter 24, Creating a User
Interface With UIL, to preview a component without needing to have
a complete application program. We'll take a closer look at prototyping
a user interface later in this chapter.
Within a UIL module, one organizational decision
involves whether widgets are declared from the top-down or from the
bottom-up. Top-down organization means that you define the parent
widgets first, followed by their children. Bottom-up is the opposite,
in that you define the child widgets and then define their parents. We
recommend using the top-down approach, since it is an extension of the
organization at the file level. In addition, it is more natural for
developers who are accustomed to creating an interface in application
code. Whichever approach you choose, you should be sure to use it
consistently in all of your modules.
Using value and list sections to
define settings for widget resources that you use or change often is
another useful practice. This technique makes a module easier to read
and maintain. As you know, UIL lets you define variables that can be
fetched by an application. It makes sense to place values that you
intend to fetch in the same module as the part of the interface to
which they correspond. Although UIL allows forward references to most
variables, you should try to define or declare variables before using
them, as it is a more familiar style. Grouping variables together at
the beginning of a module is another common practice that we recommend.
In some cases, you may need to share a variable or a
list among several modules. For most types of variables, you can place
the definition in one module and include declarations in any other
modules that use the value. For lists and for values that cannot be
exported, you must place the values directly in an include file. This
kind of reuse frees you from trying to maintain the same information in
more than one place.
Although it is a good idea to put variable
definitions in the module where you use them, we need to make an
exception to this guideline for internationalization purposes. To
support internationalization, an application should not use literal
values for strings, compound strings, character sets, fonts, and font
sets in a UIL module that contains widget declarations. You should
consolidate these values into one module per language and define a
variable for each value. Then, you can use the variables in widget
declarations instead of literal values. You can create a single include
file that contains declarations of all of these values and include it
anywhere you need to use one of the values. the source code illustrates
this technique.
   ! i18n_dialog.uil - Dialog used to prompt the user for a filename

   module savebox

   include file 'strings.uih';

   object root : XmPromptDialog {
     arguments {
       XmNokLabelString = ok_text;
       XmNcancelLabelString = cancel_text;
       XmNhelpLabelString = help_text;
       XmNselectionLabelString = save_prompt_text;
       XmNdialogTitle = save_title_text;
     };
   };

   end module;
As you can see, a variable is used everywhere that we needed to set a
language-dependent resource string. the source code shows the
corresponding strings.uih declaration file.
   ! strings.uih - Interface string declarations

   value
     ok_text          : imported compound_string;
     cancel_text      : imported compound_string;
     help_text        : imported compound_string;
     save_title_text  : imported compound_string;
     save_prompt_text : imported compound_string;
The declaration file is the same for every module that uses the
strings, so you don't have to declare them in each module. Each string
variable is declared as an imported value, which we explained
in Section #suilshare. All you need is a string definition file for
each language that is supported by the application. the source code
contains the English version of the strings for this dialog.
   ! strings.uil - English version of interface strings

   module strings

   value
     ok_text          : exported compound_string ("Ok");
     cancel_text      : exported compound_string ("Cancel");
     help_text        : exported compound_string ("Help");
     save_title_text  : exported compound_string ("Save Dialog");
     save_prompt_text : exported compound_string ("File Name:");

   end module;
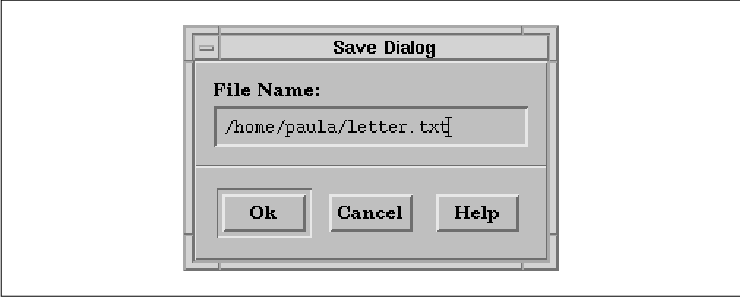
To support another language, we only need to create a new version of strings.uil for that language. The English version of the dialog is shown in the figure.
A separate subdirectory in the development
environment is typically created for each supported language. If the
directory names correspond to possible values of the LANG environment
variable, it is easy to test the interface for each language by setting
the LANG and UIDPATH variables, which are described in Chapter 22,
Introduction to UIL.
At run-time, language-dependent UID files are
normally installed in /usr/lib/X11/%L/uid/%N, where %L stands
for the LANG environment variable and %N is the application class name.
For example, if the class name of the application that uses the save
dialog is Demos, you install the English version of the strings in
/usr/lib/X11/C/uid/Demos/strings.uid. Likewise, you install the
French version in /usr/lib/X11/Fr/uid/Demos/strings.uid. The
language-dependent files, such as strings.uid, are the only ones
for which we need to have multiple versions; the rest of the UID files
are installed in the /usr/lib/X11/uid/Demos directory.
UIL include files are quite useful for organizing a
user interface. You can use include files that declare or define values
and define lists, as shown in Section #suiladvlist. You can also use
include files for information defined in the application program,
namely callback procedures and identifiers. Include files provide a
convenient place to organize these declarations by functioning like C
header files. If you use an include file, there is no need to declare
the same procedure or identifier in more than one module. Another
advantage of keeping callback declarations and identifiers in an
include file is that you can make any changes and additions in a single
file.
Reusability is another benefit of proper
organization. You can organize for reusability at a number of levels,
from complete dialogs to individual widgets. You may not have
recognized it at the time, but you've already seen an example of
reusable components in the guise of user-defined widgets. Widgets are
generally designed to be reusable items. You can extend this notion in
UIL by creating a separate include file for any user-defined widgets
that you use, as Section #suiluserdef illustrated. The other
alternative is to place the necessary definitions and declarations
directly in the module where the widget is used. Clearly, using an
include file is the more flexible of the two techniques.
If you are developing several different
applications, you may find that there are a number of common components
such as help windows, print dialogs, and various menus. While the Motif
widget set provides some reusable components, such as the
FileSelectionBox, you can create your own reusable user-interface
components using UIL. For example, if you create a reusable
context-sensitive help facility using UIL, it is easy to add help to
all of your applications. This use of UIL not only saves you time, but
it also promotes a common look and feel across your set of
applications.
You can also reuse callbacks to a certain degree.
While most callbacks are specific to the task at hand, it is possible
to write generic callbacks that you can use in multiple applications.
Section #suilproto describes several such callbacks. You are not
limited to a single callback procedure for a callback action, so it is
possible to split the behavior of a certain action over more than one
callback. For example, a typical Cancel button on a dialog might
reset the dialog contents and then pop down the dialog. These two
actions can be handled by two callbacks. Other dialogs can have their
own reset callback, but can reuse the pop down callback. If you have a
group of related callbacks, it may make sense to put the callbacks into
a single source code file and write one UIL include file for all of the
callbacks.
Even though all of the UIL examples in this book
specify widget resource settings directly in UIL modules, it is
important to realize that this approach is not always the best,
especially for real-world applications. With any application, you have
the choice of setting resources in a UIL module, in an X resource file,
or directly in application code. This section looks at the advantages
and disadvantages of setting resources in each of these places.
When it comes to error checking of resource
settings, UIL comes out on top. Anytime you attempt to set a built-in
resource or callback, the UIL compiler makes sure that the resource
exists and that it is supported by the widget in which you are setting
it. If you make a typing error or mistakenly set an unsupported
resource, the compiler issues an error message.
Neither one of these errors is caught in an X
resource file because the X resource manager waits until run-time to
perform a search of the resource database. Since resource files are not
validated, it is up to you to notice mistakes at run-time when a widget
doesn't look or act as you expect.
When you set a resource in application code, you
only get partial error checking. The C preprocessor or the C compiler
generates an undefined symbol error if you use a resource name that
does not exist, but this mechanism does not prevent you from using a
resource in the wrong context, as the compiler cannot detect this
error.
Type checking takes place for resources set in both
UIL modules and X resource files. The UIL compiler knows the expected
type for each built-in resource as well as the type of a value, so it
is able to produce an error message if you try to set a resource to a
value of an incompatible type. However, there are a few cases in which
UIL doesn't perform complete type checking. The UIL compiler only
checks resources that can be set to enumerated values, such as
XmNalignment and XmNleftAttachment, for integer
assignments. In addition, no type checking is performed on user-defined
resources of the type any or on resources that are set to
identifier variables.
The type checking in X resource files is similar,
but has slightly different limitations. The string is the only
recognized type in an X resource file. At run-time, Xt automatically
calls the appropriate resource converter, which creates a value of the
type the widget expects for a particular resource. If you specify a
string that cannot be converted, the converter function generates a
warning message. The Motif library includes a separate converter for
each of the enumerated types, so you cannot accidentally use an
incorrect value. There is no type checking for string-typed resources,
however, as their values are taken literally. For example, if you set a
string resource to False thinking that its type is Boolean
, you won't get a warning. The biggest weakness of setting resources in
an X resource file is that type checking does not occur until the
widgets are created at run-time.
There is essentially no type checking when you set
resources in application code because of the general nature of the Xt
resource-setting API. The XtSetValues() macro takes an array
of generic structures, and all of the values are represented by the
XtArgVal type. Therefore, the compiler cannot perform its usual
type checking. You can get partial type checking in C by using
convenience functions, but only a few exist compared to the total
number of resources. If you set a resource to the wrong type in
application code, the results are unpredictable. Nothing may happen,
but more likely the error will cause strange behavior and/or crash the
application. Unfortunately, the source of this kind of error is usually
difficult to track down.
You can set every resource of a Motif widget from
either a UIL module or application source code, while X resource files
allow you to set nearly every type. In source code, resource type
support is almost inherent. As long as you include the right header
file and know the format of a resource type, you can create a value.
Creating values for types in non-Motif widget sets is no different,
since you can use X, Xt, or Motif functions to create complex types.
Type support in UIL is built into the compiler; each
type is specified with a unique literal syntax. Because UIL is designed
to support Motif, the built-in types are limited to the types used by
the Motif widget set, and there is no way to add a new type short of
modifying the UIL compiler. You can work with new types imported from
the application using identifiers, but that's not quite the same as
being able to define the values directly in a module.
As we just mentioned, type support in resource files
is limited to the available resource converters. Without adding any new
converters, you can set most Motif resources. Two notable exceptions
are resources that specify widget and color pixmap values. You can add
new type converters, but in order to do so you must have a strong
knowledge about the workings of Xt. Even then, perfecting a converter
takes a good deal of work. See Volume Four, X Toolkit Intrinsics
Programming Manual, for more information on resource converters.
You can set callbacks in both UIL and application
source code, but not in X resource files. You might think of callbacks
differently because they determine the behavior of an interface, while
most other resources affect the appearance. As far as a widget is
concerned, however, a callback is just another resource whose type is
an array of function pointers. In UIL you use the callbacks
subsection to set a callback resource. With Xt, you normally use
XtAddCallback() or XtAddCallbacks(). The situation is
different in a resource file, where all values are considered equal. In
order to set a callback in a resource file, you need a callback
resource converter, but such a converter is not available by default.
Several third-party software packages provide this functionality. Most
notable is the Widget Creation Language (Wcl), which also supports
complete interface specifications with capabilities similar to UIL. For
more information on Wcl, see Issue 2 of The X Resource.
Only X resource files give you the ability to set
resources by widget class and to represent one or more widgets in the
hierarchy with wildcards. Neither of these powerful features are
available from UIL or application source code. In both UIL and
application code, you are limited to setting resources on a specific
widget instance. In an X resource file, you can write a single resource
setting that applies to a single widget, to widgets of a specific
class, or to all of the widgets in a hierarchy. This feature is
particularly useful for specifying a common appearance for a group of
widgets. Doing the same thing in UIL or source code requires a lot of
repetition. You can use a list in UIL or a convenience routine in
source code to factor out common settings, but at some point you still
need an explicit list reference or function call.
Another difference between the three methods of
specifying resources is the freedom that they give a user to customize
or override a resource setting. Any settings that you place in an X
resource file can be overridden by the user. Settings made in UIL or in
source code are fixed and cannot be changed by the user. This fact is
generally true about UIL. A user could conceivably replace a compiled
UID module with a new version that contains different settings, but it
is rather unlikely. Neither behavior is any better or worse than the
other. Allowing or disallowing user customization is just something for
you to consider when deciding where to set a resource, rather than a
limitation of the method.
Many resource settings are not just set at widget
creation time and left alone, but are continually updated to indicate
the state of the application in response to user actions. You can make
dynamic resource changes in source code using XtSetValues() or
XtVaSetValues() and application-created values. The
MrmFetchSetValues() function is the counterpart for UIL. Instead of
using application-defined values, the routine automatically loads the
data from exported values in a UIL module. (For more information on
MrmFetchSetValues() see Section #suilfetch.) With X resource files,
the resource settings are loaded and applied only when a widget is
created. Once again, it is possible to write code to dynamically fetch
and convert a value from a resource file, but the Xt library does not
provide this functionality.
Now that we have explained the capabilities and
limitations of each method of specifying resources, we can look at
where to place resource settings in some common situations. The first
thing to think about for a resource setting is whether you want to let
the user change it. If so, using an X resource file is the only way to
go. You should try to allow the user to override settings that affect
the appearance of widgets, such as colors and fonts. On the other hand,
you normally do not want to let the user change layout or behavior
settings, such as form attachments and widget sensitivity. It is fairly
common to allow changes to translation tables, however.
You should also consider which specification methods
support the resource in question, and how much work is involved in
creating the value. If you want to set a color pixmap resource, UIL is
clearly the best choice, as the values are not supported in X resource
files or application code. Compound strings are good candidates for
resource files or UIL. It is easier to specify a compound string in one
of these than it is in C code, where you must worry about creating and
freeing the values. However, X resource files only handle 8-bit
left-to-right strings, so if you need to do anything beyond that, look
to UIL. Callbacks present yet another choice where you can go with
source code or UIL.
When it is an option, UIL is generally the best
method for setting resources, as it provides the most comprehensive
error-checking capabilities. The most common reason for not using UIL
is to allow user customization. Dynamically-computed or complex
resource settings are best made in application source code. Sometimes a
combined approach is possible, in which the values are defined in UIL,
but manipulated and set within the application.
These are only a few guidelines. When you encounter
a new situation and have a choice, try to determine the consequences of
using a particular method. summarizes the features supported by each
method. Finally, don't forget to think about ease of use and
reliability for both you and the people using your application. tab(@),
linesize(2); l | l | l | l l | l | l | l.
Feature@UIL@Resource File@Application
_
Existence Checking@Yes@No@Yes Validity Checking@Yes@No@No Type
Checking@Yes@Yes@No Motif Types Supported@Yes@No@Yes New Types
Supported@No@Yes@Yes Callbacks Supported@Yes@No@Yes Wildcard
Specifications@No@Yes@No User Customization@No@Yes@No Dynamic
Updating@Yes@No@Yes
_
Lists are a powerful feature of UIL because they
give you an alternative to specifying widget children, callbacks, and
arguments directly in a widget definition. Lists also let you specify
multiple procedures for a specific callback resource. The ability to
include lists in other lists makes them even more useful, as we'll show
you in this section.
We talked about reusing interface components and
callbacks earlier. By using lists, you can take this technique one step
further to the level of widget children, resources, and callbacks. You
can reduce the size of your modules by using lists to factor out common
sets of resources. This technique is particularly useful for dealing
with Form resource settings, as this fragment illustrates:
   list attachments : arguments {
     XmNleftAttachment = XmATTACH_FORM;
     XmNleftOffset = 3;
     XmNrightAttachment = XmATTACH_FORM;
     XmNrightOffset = 3;
   };
The attachments list defines some attachments that we can
apply to a group of widgets in a Form, as shown in the following
definitions:
   object name : XmTextField {
     arguments {
       arguments attach_args;
       XmNtopAttachment = XmATTACH_FORM;
     };
   };

   object phone : XmTextField {
     arguments {
       arguments attach_args;
        XmNtopAttachment = XmATTACH_WIDGET;
        XmNtopWidget = name;
        XmNbottomAttachment = XmATTACH_FORM;
     };
Each TextField definition includes its own attachments and the list,
instead of restating the common settings. Although some of the
resources are specified twice, only the last setting has any effect.
An extension of this concept gives us another
interesting and useful way of working with lists. By including one or
more lists in another list, you can create a flexible hierarchy of
resource or callback settings. For example, you might use a list to
specify a base style for all widgets, as in the following fragment:
   list base_style : arguments {
     XmNforeground = color ('black');
     XmNbackground = color ('magenta');
     XmNtraversalOn = true;
   };
When you add components to the interface, you can build on this base
style. The following fragment shows how you might handle defining a
ToggleButton-specific style:
   list toggle_btn_style : arguments {
     arguments base_style;
     XmNindicatorSize = 10;
     XmNindicatorType = XmN_OF_MANY;
     XmNselectColor = color ('yellow');
   };
Unfortunately, it turns out that most of the resource settings that
work well in these situations are best left to resource files, as we
discussed in the previous section. This use of lists can still be
useful, however, when you are prototyping an application and don't feel
like using an X resource file. When you are done prototyping, be sure
to move the resource settings that affect appearance to a resource
file, so that they can be modified by the user.
You can also use a hierarchy of lists to specify
callback resources. If you are developing an application that supports
context sensitive help, the root of your callback hierarchy might be
specified as in the following list:
   list help_cbs : callbacks {
     XmNhelpCallback = procedure help();
   };
You can include this list in each widget that supports help. For a
group of ToggleButtons, you can augment the list as follows:
   list toggle_cbs : callbacks {
     callbacks help_cbs;
     XmNvalueChangedCallback = procedure toggle_changed();
   };
The following widget definition illustrates how both the style and
callback lists might be used:
   object hot_fudge : XmToggleButton {
     arguments {
       arguments attach_args;
       arguments toggle_args;
       XmNlabelString = "Hot Fudge";
     };
     callbacks toggle_cbs;
   };
You gain a couple of advantages by using lists this way. First, if you
decide to change a color or a callback, you only need to make the
change in one place, not in every widget definition. Second, each
widget definition is considerably shorter than it would be without the
list, which saves typing and generally makes a module shorter and
easier to read.
You can also use lists to help create reusable
components. Earlier in this chapter, we talked about reusing components
for top-level windows and dialogs. Although reusing parts of a dialog
is not very common, reusing the panel of buttons that compose the
action area of a dialog makes some sense. An application may use the
definitions of OK, Cancel, and Help PushButtons
repeatedly. Using lists, you can create a hierarchy of include files
that allows you to reuse the same definitions for each dialog that
needs them.
The first thing that needs to be defined is a
container widget to hold the buttons. We keep this example simple by
using a RowColumn manager widget. the source code shows the definition
of the RowColumn.
   ! btn_panel.uih -- Button panel container

   object button_panel : XmRowColumn {
     controls buttons;
     arguments {
       XmNorientation = XmHORIZONTAL;
       XmNpacking = XmPACK_COLUMN;
       XmNentryAlignment = XmALIGNMENT_CENTER;
       !  Assume bottom of form placement
       XmNleftAttachment = XmATTACH_FORM;
       XmNrightAttachment = XmATTACH_FORM;
       XmNbottomAttachment = XmATTACH_FORM;
       ! Provide a hook for additional arguments
       arguments button_panel_args;
     };
   };
The button_panel RowColumn is an open-ended definition, as the
children are specified as an undefined list. The definition also
contains an undefined list in its arguments subsection, which
allows the specification of additional resources. The next step is to
add the OK, Cancel, and Help buttons to the panel
using another include file, which is shown in the source code
   ! three_btn.uih -- OK, Cancel, Help button definitions

   list buttons : controls {
     OK : XmPushButton {
       arguments ok_args;
       callbacks ok_cbs;
     };
     Cancel : XmPushButton {
       arguments cancel_args;
       callbacks cancel_cbs;
     };
     Help : XmPushButton {
       arguments help_args;
       callbacks help_cbs;
     };
     ! Hook for additional buttons
     controls more_buttons;
   };

   include file 'btn_panel.uih';
So far, all of the widget definitions have been placed in include
files. This technique is necessary because UIL does not support
imported list values, so the only way you can reuse lists is by placing
them in include files. We also define the PushButtons in an include
file because they reference callback and argument lists. These lists
must be defined by the module that includes the button
definition. If the buttons were defined in a separate module, there
would be no way to specify their behavior from within UIL.
The three_btn.uih file defines the three
buttons for the panel and defines the controls list referenced
in btn_panel.uih. An important feature of this example is that
we have incorporated undefined lists in each of the widget's
callbacks and arguments subsections. These lists work like
macros in that they allow a module to use customized versions of the
standard definitions. We also keep the list of buttons open-ended by
including another undefined controls list named
more_buttons. The file ends by including the button panel
definition so that the main module does not need to include it. We
normally recommend putting the include directives at the top of a file,
but in early releases of Motif 1.2, a forward reference to a list
causes the UIL compiler to crash. Therefore, it is necessary to include
object definitions after the lists that they reference.
Now that the button panel and button definitions are
complete, we can create a dialog that uses them. the source code
demonstrates the creation of such a dialog.
   /* dialog.uil - a simple dialog that contains reusable PushButtons */

   module dialog

   include file 'procedures.uih';

   object root : XmForm {
     controls {
       XmRowColumn dialog_contents;
       XmSeparator separator;
       XmRowColumn button_panel;
     };
     arguments {
       XmNdialogTitle = "Login";
       XmNdefaultButton = OK;
     };
   };

   object dialog_contents : XmRowColumn {
     controls {
       User     : XmLabel { };
       Password : XmLabel { };
       XmTextField user_field;
       XmTextField pw_field;
     };
     arguments {
       XmNnumColumns = 2;
       XmNpacking = XmPACK_COLUMN;
       XmNtopAttachment = XmATTACH_FORM;
       XmNleftAttachment = XmATTACH_FORM;
       XmNrightAttachment = XmATTACH_FORM;
       XmNbottomAttachment = XmATTACH_WIDGET;
       XmNbottomWidget = separator;
     };
   };

   object user_field : XmTextField {
     arguments {
       XmNcolumns = 2;
     };
   };

   object pw_field : XmTextField {
     arguments {
       XmNcolumns = 2;
     };
   };

   object separator : XmSeparator {
     arguments {
       XmNrightAttachment  = XmATTACH_FORM;
       XmNleftAttachment   = XmATTACH_FORM;
       XmNbottomAttachment = XmATTACH_WIDGET;
       XmNbottomWidget     = button_panel;
     };
   };

   ! Button specific settings.
   list ok_args : arguments { };
   list ok_cbs : callbacks {
     XmNactivateCallback = procedure do_it();
   };

   list cancel_args : arguments { };
   list cancel_cbs : callbacks {
     XmNactivateCallback = procedure forget_it();
   };

   list help_args : arguments { };
   list help_cbs : callbacks {
     XmNactivateCallback = procedure help_me();
   };

   ! No additional button panel arguments
   list button_panel_args : arguments { };

   ! No more buttons
   list more_buttons : controls { };

   ! Include the button panel definition
   include file 'three_btn.uih';

   end module;
The module starts by including the files that contain the callback
procedure declarations. The top-level Form of the dialog contains the
work area, a separator, and the button_panel. The work area
consists of two labeled TextFields in a RowColumn. We complete the
button_panel by defining the lists referenced in the include files.
The arguments and callbacks lists for the OK,
Cancel, and Help buttons are defined. There are no
additional arguments for the buttons, the arguments lists are
empty. Since there are no additional button_panel arguments
and the dialog only has three buttons, the button_panel_args
and more_buttons lists are also empty. With these list
definitions in place, the module finally includes the file that defines
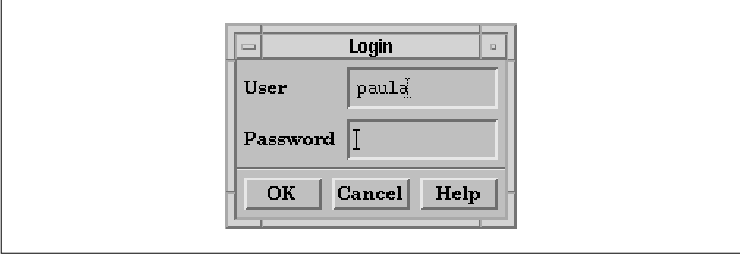
the buttons and the button panel. The output of the dialog is shown in
the figure.
You can reuse the button panel in as many dialogs as you want by following the model used in the source code Although we did not use many of the undefined lists, they make the button panel more flexible and configurable. These techniques can also be applied in a number of other situations throughout an application. This method of using lists and include files can help to reduce redundancy in an interface definition.
The showuid program in Chapter 24,
Creating a User Interface With UIL, provides a useful foundation
for prototyping a user interface. The program contains two simple
callbacks: one for printing a message and one for exiting the program.
By adding a few more callbacks, we can make the program even more
useful as a building block for developing interfaces.
Most user interfaces consist of a main application
window and several support windows or dialogs. Since dialogs are
frequently posted and unposted, we can make prototyping easier by
writing callbacks that manage and unmanage widgets. the source code
shows these routines.
   void
   manage (w, client_data,call_data)
   Widget w;
   XtPointer client_data;
   XtPointer call_data;
   {
       Widget target = (Widget) client_data;
       XtManageChild (target);
   }

   void
   unmanage (w, client_data, call_data)
   Widget w;
   XtPointer client_data;
   XtPointer call_data;
   {
       Widget target = (Widget) client_data;
       XtUnmanageChild (target);
   }
When adding new callbacks, we also need to update the list of callbacks
that the showuid application registers with
MrmRegisterNames(). With the addition of these two functions, the
list is declared as follows:
   static MrmRegisterArg callback_list[] = {
       { "quit",     (XtPointer) quit },
       { "print",    (XtPointer) print },
       { "manage",   (XtPointer) manage },
       { "unmanage", (XtPointer) unmanage },
       /* Add additional callback procedures here... */
   };
To demonstrate these new callbacks, we can create an interface with a
Quit PushButton that displays a confirmation dialog. This example
is realistic, as many applications bring up a confirmation dialog to
prevent you from quitting accidentally or making irreversible changes.
A module that uses the manage() callback is shown in the
source code
   module quitbox

   procedure
     quit();
     manage (widget);
     unmanage (widget);

   object quit_dialog : XmQuestionDialog {
     controls {
       Xm_Help {
         ! Disable the help button for now.
         arguments {
           XmNsensitive = false;
         };
       };
     };
     callbacks {
       XmNokCallback = procedure quit();
     };
     arguments {
       XmNmessageString = "Really Quit?";
       XmNdialogTitle = "Confirm Quit";
       XmNdialogStyle = XmDIALOG_FULL_APPLICATION_MODAL;
     };
   };

   object quitb : XmPushButton {
     arguments {
       XmNlabelString = "Quit";
     };
     callbacks {
       XmNactivateCallback = procedure manage (quit_dialog);
     };
   };

   object root : XmMainWindow {
     controls {
       XmPushButton quitb;
       unmanaged XmQuestionDialog quit_dialog;
     };
   };

   end module;
The output of this example is shown in the figure.
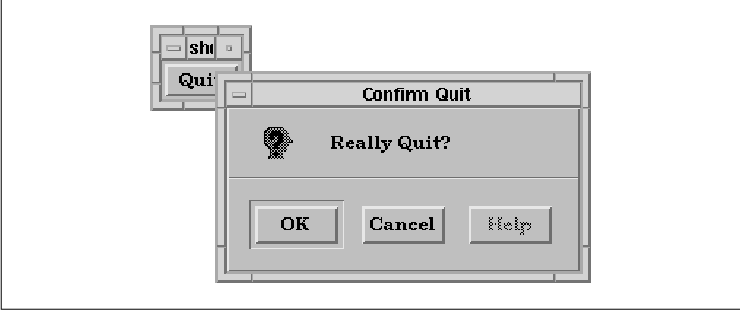
The Quit PushButton manages the dialog, which
causes it to be displayed. Pressing the OK PushButton exits the
application. There is no need to use the unmanage() callback
in this example, as the Cancel PushButton unmanages the dialog
by default. You can easily apply the manage() and
unmanage() callbacks to other dialogs in an interface.
In the source code the entire user interface is
defined in a single widget hierarchy. This technique is fine for a
small application, but for performance reasons it is not practical in a
larger application. Creating a separate hierarchy for each window
allows you to divide an interface into separate modules, as discussed
earlier in this chapter. The only drawback to distributing dialog
creation is that it takes longer for a dialog to appear the first time
it is displayed. Since this delay is typically not noticeable, we still
recommend this approach.
You can support the as-needed dialog creation policy
in UIL by adding another callback that creates a widget hierarchy. A
new widget hierarchy is created by calling MrmFetchWidget().
As a reminder, this function takes the following form:
   Cardinal
   MrmFetchWidget(hierarchy, widget_name, parent, widget_return,
                  class_return)
       MrmHierarchy   hierarchy;
       String         widget_name;
       Widget         parent;
       Widget        *widget_return;
       MrmType       *class_return;
A creation callback needs three values to be able to create a new
widget hierarchy. These values are the first three arguments to
MrmFetchWidget(). The MrmHierarchy is already available in
the application program, so we only need to make it a global variable
instead of a local variable in main(). Since the callback
accesses the hierarchy repeatedly, we also need to remove the call to
MrmCloseHierarchy(). In order to get the other two arguments, we
use an asciz_table that contains the names of the parent
widget and the widget to create. We can convert the name of the parent
to a widget ID using XtNameToWidget(). This technique only
works if we specify a unique name for each widget. Since we need the
top-level widget as an argument to this routine, it becomes a global
variable as well. The complete callback appears in the source code
   void
   create (w, client_data, call_data)
   Widget w;
   XtPointer client_data;
   XtPointer call_data;
   {
       String *args = (String *) client_data;
       String parent_name = args[0];
       Widget parent;

       /* Get a widget id for the parent widget. */
       if (strcmp (parent_name, "toplevel") != 0)
           parent = XtNameToWidget (toplevel, parent_name);
       else
           parent = toplevel;

       /* If the parent was found try to create the hierarchy. */
       if (parent == NULL)
           fprintf (stderr, "Create: No such widget '%s'0, args[0]);
       else {
           String child_name = args[1];
           Widget new_w;
           Cardinal status;
           MrmType class;

           status = MrmFetchWidget (hierarchy, child_name, parent,
               &new_w, &class);
           if (status != MrmSUCCESS)
               fprintf (stderr, "Failed to create hierarchy '%s'0, child_name);
         }

       /* After the widget is created, this callback can be removed. */
       XtRemoveCallback (w, XmNactivateCallback, create, client_data);
   }
The callback assigns the client_data argument to a String
array, since that is appropriate for the UIL asciz_table type.
The routine also converts the name of the parent widget to a widget ID
using XtNameToWidget(). Since that routine does not consider
the top-level widget in its search, the callback performs a special
test for that widget. If the routine finds the ID for the parent
widget, it attempts to create the new widget hierarchy. Once the
hierarchy is created, the callback is removed so that the widget
hierarchy is not created more than once. We make the assumption that if
the creation fails once, subsequent attempts will also fail.
With the addition of the create() callback,
we can split the source code into two modules. Unfortunately, breaking
up the module into two introduces a new problem. Now that we have two
separate widget hierarchies, the manage() callback can no
longer reference the quit_dialog widget because it is defined
in another hierarchy. One solution to this problem is to export the
widget ID of the dialog as a UIL identifier, using the
MrmNcreateCallback (illustrated in Chapter 25, Building an
Application With UIL). The problem with this approach is that you
must maintain a list of identifiers for all of the exported widgets.
Another solution, which avoids this problem, uses XtNameToWidget()
in the manage() and unmanage() callbacks to obtain a
widget ID given a widget name. The revised callbacks are shown in the
source code
   void
   manage (w, client_data,call_data)
   Widget w;
   XtPointer client_data;
   XtPointer call_data;
   {
       String name = (String) client_data;
       Widget target = XtNameToWidget (toplevel, name);
       if (target != NULL)
           XtManageChild (target);
       else
           fprintf (stderr, "Cannot manage widget named %s0, name);
   }

   void
   unmanage (w, client_data, call_data)
   Widget w;
   XtPointer client_data;
   XtPointer call_data;
   {
       String name = (String) client_data;
       Widget target = XtNameToWidget (toplevel, name);
       if (target != NULL)
           XtUnmanageChild (target);
       else
           fprintf (stderr, "Cannot unmanage widget named %s0, name);
   }
Now we can rewrite the quitbox example using two modules. The
main window definition is listed in the source code
   module mainwindow

   procedure
     manage (string);
     create (asciz_table);

   list confirm_quit : procedures {
     create (asciz_table ("toplevel", "quit_dialog"));
     manage ("*quit_dialog");
   };

   object quitb : XmPushButton {
     arguments {
       XmNlabelString = "Quit";
     };
     callbacks {
       XmNactivateCallback = procedures confirm_quit;
     };
   };

   object root : XmMainWindow {
     controls {
       XmPushButton quitb;
     };
   };

   end module;
The XmNactivateCallback of the Quit PushButton now
creates the confirmation dialog and manages it. The parent and widget
to be created are passed to the creation callback in an asciz_table
. Because the create() callback removes itself, subsequent
invocations of the callback only manage the dialog.
XtNameToWidget() expects a qualified widget name, much like
resource specifications, so we must precede the name passed to the
manage() callback with an asterisk. The quit_dialog is now
defined in a separate module, shown in the source code
   module quitbox

   procedure
     quit();

   object quit_dialog : XmQuestionDialog {
     controls {
       Xm_Help {
         ! Disable the help button for now.
         arguments {
           XmNsensitive = false;
         };
       };
     };
     callbacks {
       XmNokCallback = procedure quit();
     };
     arguments {
       XmNmessageString = "Really Quit?";
       XmNdialogTitle = "Confirm Quit";
       XmNdialogStyle = XmDIALOG_FULL_APPLICATION_MODAL;
     };
   };

   end module;
The only potential disadvantage of this method of creating dialogs is
that string-to-widget lookup is slightly slower than using a widget
pointer directly. For most moderately-sized widget trees, the
difference should not be noticeable. The creation callback is a useful
tool that can be especially helpful when you are prototyping an
interface.
Once you've learned the basics of UIL, you can begin
to take full advantage of its features. Some advanced techniques
include: defining non-Motif widgets; using lists to shorten modules and
create reusable interface components, and using UIL to rapidly
prototype the interface for an application. As UIL modules grow, it is
important to pay attention to their organization. A well-organized set
of modules can ease the task of editing and maintaining an interface.
When you develop a real-world application with UIL, it is also
important to consider the best location for resource settings. While
most fixed resources can be set in UIL and possibly modified in
application code, it is usually best to specify values that a user
might want to change in an app-defaults file.