Building web apps that respect a user’s privacy and security
Discover techniques, tools, and best practices for developing web apps that provide the privacy and security that every user deserves.
 Man looking at smartphone (source: Japanexperterna.se via Flickr)
As web developers, we are responsible for shaping the experiences of users’ online lives. By making ethical, user-centered choices, we create a better web for everyone. The Ethical Web Development series aims to take a look at the ethical issues of web development.
With this in mind, I’ve attempted to divide the ethical issues of web development into four core principles:

Learn faster. Dig deeper. See farther.
- Web applications should work for everyone.
- Web applications should work everywhere.
- Web applications should respect a user’s privacy and security.
- Web developers should be considerate of their peers.
The first three are all about making ethical decisions for the users of our sites and applications. When we build web applications, we are making decisions for others, often unknowingly to those users.
The fourth principle concerns how we interact with others in our industry. Though the media often presents the image of a lone hacker toiling away in a dim and dusty basement, the work we do is quite social and relies on a vast web dependent on the work of others.
What Are Ethics?
If we’re going to discuss the ethics of web development, we first need to establish a common understanding of how we apply the term ethics. The study of ethics falls into four categories:
- Meta-ethics
- An attempt to understand the underlying questions of ethics and morality
- Descriptive ethics
- The study and research of people’s beliefs
- Normative ethics
- The study of ethical action and creation of standards of right and wrong
- Applied ethics
- The analysis of ethical issues, such as business ethics, environmental ethics, and social morality
For our purposes, we will do our best to determine a normative set of ethical standards as applied to web development, and then take an applied ethics approach.
Within normative ethical theory, there is the idea of consequentialism, which argues that the ethical value of an action is based on its result. In short, the consequences of doing something become the standard of right or wrong. One form of consequentialism, utilitarianism, states that an action is right if it leads to the most happiness, or well-being, for the greatest number of people. This utilitarian approach is the framework I’ve chosen to use as we explore the ethics of web development.
Whew! We fell down a deep, dark hole of philosophical terminology, but I think it all boils down to this:
Make choices that have the most positive effect for the largest number of people.
Professional Ethics
Many professions have a standard expectation of behavior. These may be legally mandated or a social norm, but often take the form of a code of ethics that details conventions, standards, and expectations of those who practice the profession. The idea of a professional code of ethics can be traced back to the Hippocratic oath, which was written for medical professionals during the fifth century BC (see Figure 1-1). Today, medical schools continue to administer the Hippocratic or a similar professional oath.

In the book Thinking Like an Engineer (Princeton University Press), Michael Davis says a code of conduct for professionals:
[P]rescribes how professionals are to pursue their common ideal so that each may do the best she can at a minimal cost to herself and those she cares about…The code is to protect each professional from certain pressures (for example, the pressure to cut corners to save money) by making it reasonably likely (and more likely then otherwise) that most other members of the profession will not take advantage of her good conduct. A code is a solution to a coordination problem.
My hope is that this report will help inspire a code of ethics for web developers, guiding our work in a way that is professional and inclusive.
The approaches I’ve laid out are merely my take on how web development can provide the greatest happiness for the greatest number of people. These approaches are likely to evolve as technology changes and may be unique for many development situations. I invite you to read my practical application of these ideas and hope that you apply them in some fashion to your own work.
This series is a work in progress, and I invite you to contribute. To learn more, visit the Ethical Web Development website.
Intended Audience
This title, like others in the Ethical Web Development series, is intended for web developers and web development team decision makers who are interested in exploring the ethical boundaries of web development. I assume a basic understanding of fundamental web development topics such as HTML, CSS, JavaScript, and HTTP. Despite this assumption, I’ve done my best to describe these topics in a way that is approachable and understandable.
Introduction
All human beings have three lives: public, private, and secret.
Gabriel García Márquez, Gabriel García Márquez: A Life
If only the “controversial” stuff is private, then privacy is itself suspicious. Thus, privacy should be on by default.
We live more and more of our lives digitally. We consistently create significant portions of our social, health, financial, and work data through web services. We then link that data together by connecting accounts and permitting the services that we use to track the other sites we visit, trusting these sites implicitly. Even our use of search engines can predict patterns and provide insights into our health and personalities. In 2016 John Paparrizos MSc, Ryen W. White PhD, and Eric Horvitz MD PhD published a study in which they were able to use anonymized Bing search queries to predict diagnoses of pancreatic cancer.
In the article “With Great Data Comes Great Responsibility,” Pascal Raabe (Paz) eloquently describes how our digital data represents our lives:
We’re now producing more data on a daily basis than through all of history. The digital traces we’re leaving behind with every click, every tweet and even every step that we make create a time machine for ourselves. These traces of our existence form the photo album of a lifetime. We don’t have to rely on memory alone but can turn to technology to augment our biological memories and virtually remember everything.
In light of how much data we produce, the security of our digital information has become a point of concern among many people. Web surveillance, corporate tracking, and data leaks are now common leading news stories. In a 2016 Pew Research survey on the state of privacy in the US, it was found that few Americans are confident in the security or privacy of our data:
Americans express a consistent lack of confidence about the security of everyday communication channels and the organizations that control them – particularly when it comes to the use of online tools. And they exhibited a deep lack of faith in organizations of all kinds, public or private, in protecting the personal information they collect. Only tiny minorities say they are “very confident” that the records maintained by these organizations will remain private and secure.
In 2015, author Walter Kirn wrote about the state of modern surveillance for the Atlantic magazine in an article titled “If You’re Not Paranoid, You’re Crazy.” When I viewed the online version of the article, hosted on the Atlantic‘s website, the Privacy Badger browser plug-in detected 17 user trackers on the page1 (upper right in Figure 1-1). Even when we are discussing tracking, we are creating data that is being tracked.

Our Responsibility
As web developers, we are the first line of defense in protecting our users’ data and privacy. In this report, we will explore some ways in which we can work to maintain the privacy and security of our users’ digital information. The four main concepts we’ll cover are:
- Respecting user privacy settings
- Encrypting user connections with our sites
- Working to ensure the security of our users’ information
- Providing a means for users to export their data
If we define ethics as “making choices that have the most positive effect for the largest number of people,” putting in place strong security protections and placing privacy and data control in the hands of our users can be considered the ethical approach. By taking extra care to respect our users’ privacy and security, we are showing greater commitment to their needs and desires.
1As detected by the Privacy Badger browser plug-in
Respecting User Privacy
This has happened to all of us: one evening we’re shopping for something mundane like new bed sheets by reading reviews and browsing a few online retailers, and the next time we open one of our favorite websites up pops an ad for bed linens. What’s going on here? Even for those of us who spend our days (and nights) developing for the web, this can be confounding. How does the site have access to our shopping habits? And just how much does it know about us?
This feeling of helplessness is not uncommon. According to the Pew Research Center, 91% of American adults “agree or strongly agree that consumers have lost control of how personal information is collected and used by companies.” Many users may be comfortable giving away information in exchange for products and services, but more often than not they don’t have a clear understanding of the depth and breadth of that information. Meanwhile, advertising networks and social media sites have bits of code that are spread across the web, tracking users between sites.
As web developers, how can we work to maintain the privacy of our users? In this chapter, we’ll look at how web tracking works and ways in which we can hand greater privacy control back to our users.
How Users Are Tracked
As users browse the web, they are being tracked; and as web developers, we are often enabling and supporting that surveillance. This isn’t a case of tinfoil hat paranoia: we’re introducing the code of ad networks to support our work, adding social media share buttons that allow users to easily share our sites’ content, or using analytics software to help us better understand the user experience. Websites track users’ behavior with the intention of providing them with a more unique experience. While this may seem harmless or well intentioned, it is typically done without the knowledge or permission of the end user.
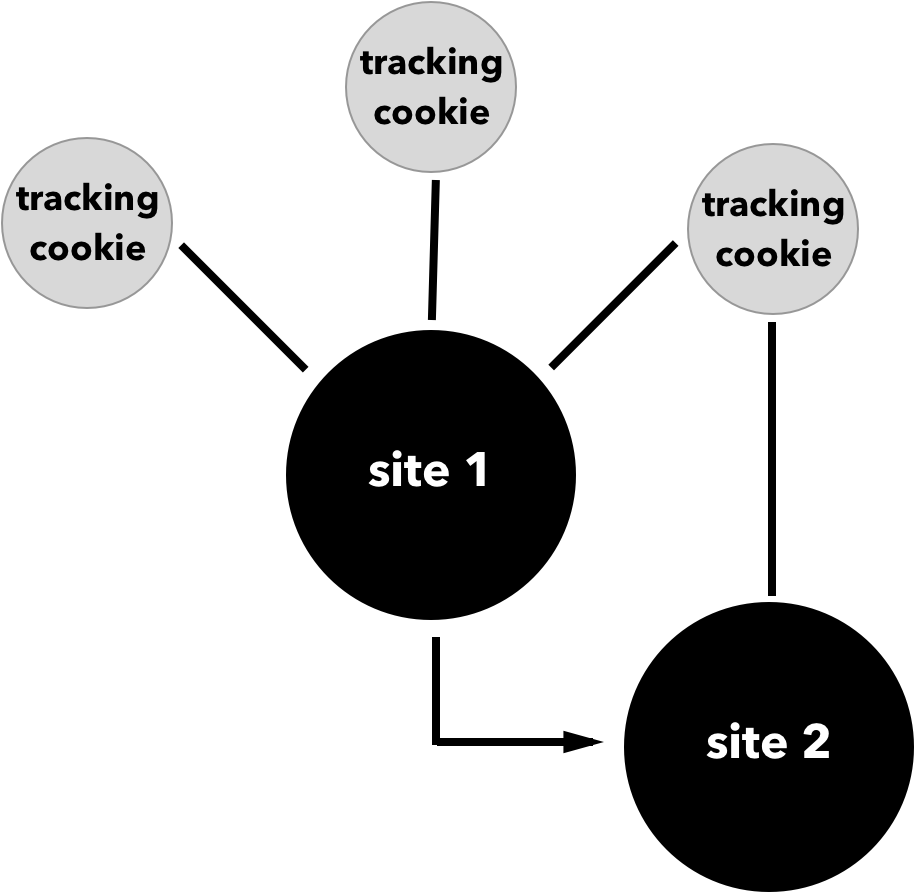
The simplest way that web tracking works is that a user visits a site that installs a cookie from a third party. When the user then visits another site with the same third-party tracker, the tracker is notified (see Figure 2-1). This allows the third party to build a unique user profile.
The intention of this tracking is typically to provide more targeted services, advertising, or products. However, the things we buy, the news we read, the politics we support, and our religious beliefs are often embedded into our browsing history. To many, gathering this knowledge without explicit permission feels intrusive.
What Does Your Browser Know About You?
Those aware of user tracking may take a few steps to beat trackers at their own game. Ad blockers such as uBlock Origin block advertisements and third-party advertising trackers. Other browser extensions such as Privacy Badger and Ghostery attempt to block all third-party beacons from any source. However, even with tools like these, sites may be able to track users based on the unique footprint their browser leaves behind. In fact, according to the W3C slide deck “Is Preventing Browser Fingerprinting a Lost Cause?” the irony of using these tools is that “fine-grained settings or incomplete tools used by a limited population can make users of these settings and tools easier to track.”
Browsers can easily detect the user’s IP address, user agent, location, browser plug-ins, hardware, and even battery level. Web developer Robin Linus developed the site What Every Browser Knows About You to show off the level of detail available to developers and site owners. Additionally, the tools Am I Unique? and Panopticlick offer quick overviews of how unique your browser fingerprint is.
Do Not Track
With this information about the ways in which users can be tracked in mind, how can we, as web developers, advocate for our users’ privacy? My belief is that the first step is to respect the Do Not Track (DNT) browser setting, which allows users to specify a preference to not be tracked by the sites they visit. When a user has enabled the Do Not Track setting in her browser, the browser responds with the HTTP header field DNT.
According to the Electronic Frontier Foundation, Do Not Track boils down to sites agreeing not to collect personally identifiable information through methods such as cookies and fingerprinting, as well as agreeing not to retain individual user browser data beyond 10 days. The noted exceptions to this policy are when a site is legally responsible for maintaining this information, when the information is needed to complete a transaction, or if a user has given explicit consent.
With Do Not Track enabled, browsers send an HTTP header response with a DNT value of 1. The following is a sample header response, which includes a DNT value:
Host: "www.example.com"
Accept: "text/html,application/xhtml+xml,
         application/xml;q=0.9,*/*;q=0.8"
Accept-Language: "en-US,en;q=0.5"
Accept-Encoding: "gzip, deflate, br"
DNT: "1"
Do Not Track does not automatically disable tracking in a user’s browser. Instead, as developers, we are responsible for appropriately handling this user request in our applications.
Detecting Do Not Track
We can easily detect and respond to Do Not Track on the client side of our applications in JavaScript by using the navigator.doNotTrack property. This will return a value of 1 for any user who has enabled Do Not Track, while returning 0 for a user who has opted in to tracking and unspecified for users who have not enabled the setting.
For example, we could detect the Do Not Track setting and avoid setting a cookie in a user’s browser as follows:
// store user Do Not Track setting as a variable
var dnt = navigator.doNotTrack;

if (dnt !== 1) {
  // set cookie only if DNT not enabled
  document.cookie = 'example';
}
The site DoNotTrack.us, created and maintained by Stanford and Princeton researchers Jonathan Mayer and Arvind Narayanan, helpfully offers web server configurations and templates for web application frameworks in ASP, Java, Perl, PHP, and Django.
Here is the recommended code when working with the Django framework, which offers a good example for any framework or language:
DoNotTrackHeader = "DNT"
DoNotTrackValue = "1"

pyHeader = "HTTP_" + DoNotTrackHeader.replace("-", "_").upper()

# request is an HttpRequest
if (pyHeader in request.META) and
   (request.META[pyHeader] == DoNotTrackValue):
    # Do Not Track is enabled
else:
    # Do Not Track is not enabled
Since DoNotTrack.us does not offer a Node.js example of detecting Do Not Track, here is a simple HTTP server that will check for the DNT header response from a user’s browser:
var http = require('http');

http.createServer(function (req, res) {

  var dnt = req.headers.dnt === '1' || false;

  if (dnt) {
    // Do Not Track is enabled
  } else {;
    // Do Not Track is not enabled
  }

    res.end();
}).listen(3000);
Additionally, the npm package tinfoilhat offers an interface for detecting the Do Not Track setting in Node and executing a callback based on the user’s setting.
Based on these examples, we can see that detecting a user’s Do Not Track setting is relatively straightforward. Once we have taken this important first step, though, how do we handle Do Not Track requests?
Respecting Do Not Track
The Mozilla Developer Network helpfully offers DNT case studies and the site DoNotTrack.us provides “The Do Not Track Cookbook,” which explores a number of Do Not Track usage scenarios. The examples include practical applications of Do Not Track for advertising companies, technology providers, media companies, and software companies.
Sites that Respect Do Not Track
Some well-known social sites have taken the lead on implementing Do Not Track. Twitter supports Do Not Track by disabling tailored suggestions and tailored ads when a user has the setting enabled. However, it’s worth noting that Twitter does not disable analytic tracking or third-party advertising tracking that uses Twitter data across the web. Pinterest also supports Do Not Track, and according to the site’s privacy policy a user with Do Not Track enabled is opted out of Pinterest’s personalization feature, which tracks users around the web in order to provide further customization of Pinterest content.
Medium.com has a clear and effective Do Not Track policy. When users with Do Not Track enabled log in, they are presented with this message:
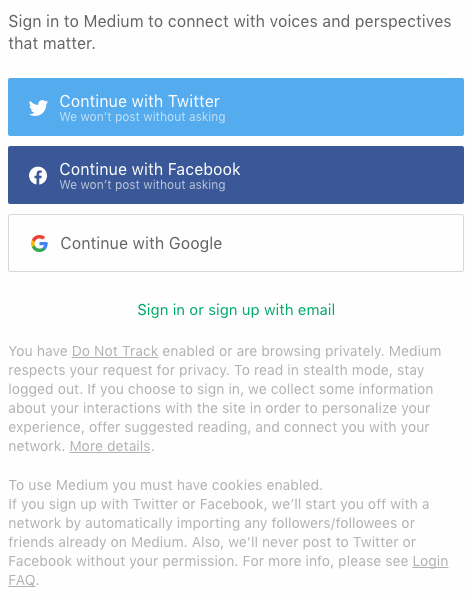
You have Do Not Track enabled, or are browsing privately. Medium respects your request for privacy: to read in stealth mode, stay logged out. While you are signed in, we collect some information about your interactions with the site in order to personalize your experience, offer suggested reading, and connect you with your network. More details can be found here.
Medium also states that it does not track users across other websites around the web. This policy is clear and consistent, providing a strong example of how a successful site can respect a user’s Do Not Track setting.
The site DoNotTrack.us offers a list of companies honoring Do Not Track, including advertising companies, analytics services, data providers, and more. Unfortunately, this list appears to be incomplete and outdated, but it offers a good jumping-off point for exploring exemplars across a range of industries.
Web Analytics
One of the biggest challenges of handling user privacy is determining best practices for web analytics. By definition, the goal of web analytics is to track users, though the aim is typically to better understand how our sites are used so that we can continually improve them and adapt them to user needs.
To protect user privacy, when using analytics we should ensure that our analytics provider anonymizes our users, limits tracking cookies to our domain, and does not share user information with third parties. The US Government’s digital analytics program has taken this approach, ensuring that Google Analytics does not track individuals or share information with third parties and that it anonymizes all user IP addresses.
As an additional example, the analytics provider Piwik actively seeks to maintain user privacy while working with user analytics through:
- Providing an analytics opt-out mechanism
- Deleting logs older than a few months
- Anonymizing IP addresses
- Respecting Do Not Track
- Setting a short expiration date for cookies
These examples provide a good baseline for how we should aim to handle analytics on our sites with any provider. By taking this extra care with user information, we may continue to use analytics to provide greater insights into the use of our sites while maintaining user privacy.
De-identification
Though it is preferable to avoid the tracking of users completely, there may be instances where this choice is outside of the control of web developers. In these cases, we may be able to guide the decision to de-identify collected user data, ensuring that user privacy remains intact. The goal of de-identification is to ensure that any collected data cannot be used to identify the person who created the data in any way.
However, de-identification is not without its limitations, as de-identified data sets can be paired with other data sets to identify an individual. In the paper “No Silver Bullet: De-Identification Still Doesn’t Work,” Arvind Narayanan and Edward W. Felten explore the limits of de-identification. Cryptographic techniques such as differential privacy can be used as another layer to help limit the identification of individual users within collected data sets.
User Consent and Awareness
In 2011 the European Union passed legislation requiring user consent before using tracking technology. Specifically, the privacy directive specifies:
Member States shall ensure that the use of electronic communications networks to store information or to gain access to information stored in the terminal equipment of a subscriber or user is only allowed on condition that the subscriber or user concerned is provided with clear and comprehensive information in accordance with Directive 95/46/EC, inter alia about the purposes of the processing, and is offered the right to refuse such processing by the data controller.
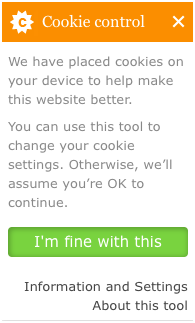
This means that any site using cookies, web beacons, or similar technology must inform the user and receive explicit permission from her before tracking. If you live in Europe or have visited a European website, you are likely familiar with the common “request to track” banner. This law is not without controversy, as many feel that these banners are ignored, viewed as a nuisance, or otherwise not taken seriously.
In the UK, the guidance has been to simply inform users that they are being tracked, providing no option to opt out. For example, the website of the Information Commissioner’s Office, the “UK’s independent authority set up to uphold information rights in the public interest, promoting openness by public bodies and data privacy for individuals,” opts users in, but clicking the “Information and Settings” link provides information about browser settings and disabling cookies on the site (see Figure 2-2).
Though based in the United States, the site Medium.com alerts users with DNT enabled how their information will be used and assumes tracking consent only when users log in to their accounts (see Figure 2-3).
Creating a Do Not Track Policy
While there is value in informing users of a site’s tracking policy, I believe that the best way to provide privacy controls is by respecting the Do Not Track browser setting. This allows users to set a privacy preference once and forget about it, rather than having to maintain individual settings across the web. Since there is no absolute definition of what Do Not Track encompasses, to effectively implement it you will likely need to develop a DNT policy for your site or application.
The Electronic Frontier Foundation (EFF) provides a sample Do Not Track policy. This document serves as a solid foundation for any site’s Do Not Track policy and can be used verbatim or adapted to suit an organization’s needs. The EFF also provides a set of frequently asked questions and a human-readable summary of the policy.
As developers, by committing to a Do Not Track policy we are able to ensure that we comply with the tracking preferences of our users.
Further Reading
- “The Emerging Ethical Standards for Studying Corporate Data” by Jules Polonetsky and Dennis Hirsch
- “Do Not Track Is No Threat to Ad-Supported Businesses” by Jonathan Mayer
- The Electronic Frontier Foundation’s guide to Do Not Track
- Mozilla: Developer Network’s
DNTheader reference - W3C: Working Draft “Tracking Compliance and Scope”
Encrypting User Connections with HTTPS
“S is for secure” may sound like a line from a children’s TV show, but when appended to HTTP that’s exactly what it means. HTTPS was first developed for use in Netscape Navigator in 1994 and quickly became an important indicator of security for ecommerce and banking sites on the developing web.
As we move an ever-increasing amount of personal data and information across the web, ensuring user privacy and the authenticity of information becomes increasingly important. Over a standard HTTP connection, users are open to advertising injection, content changes, and additional tracking that isn’t possible over HTTPS. This is bad for users and takes away control from site owners. In response, there has been a movement toward building HTTPS-only sites. Despite this, at the time of writing, less than 11% of the top million websites currently use HTTPS by default.
In this chapter we’ll explore how HTTPS works, investigate the benefits of HTTPS-only sites, and look at how we can enable HTTPS for our sites today.
How HTTPS Works
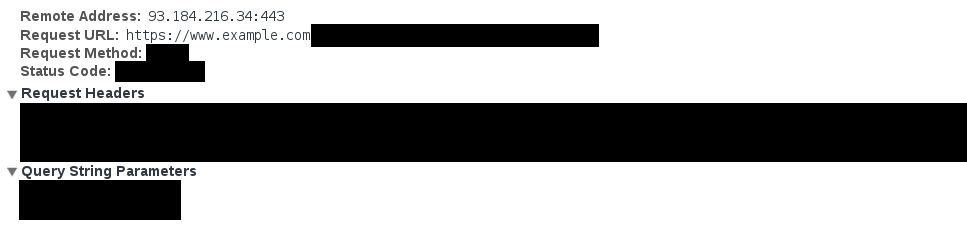
At the most basic level, the HTTP request and response cycle is when a web-connected computer requests a specific resource through a URL and a server responds with that resource, such as an HTML page (see Figure 3-1).

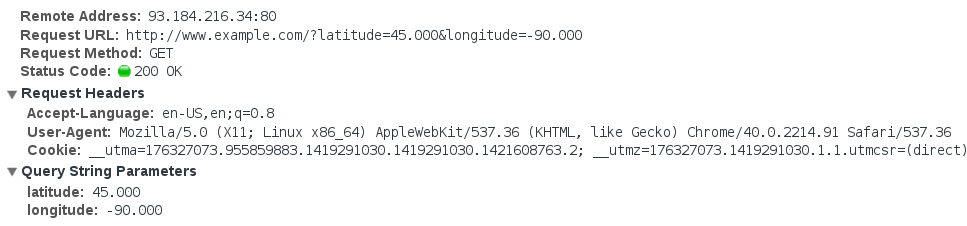
When this information is requested, not only are the files sent over the wire, but so is user information, such as the user’s IP address, location, browser information, system information, and so on. More importantly, all of this information is sent as unencrypted plain text over the public internet, meaning that any network sitting between the user’s browser and the server has access to that information. This means that when I request a website like in Figure 3-1, what I’m really saying is, “Hello, I’m user 192.00.000.001 in the United States using Mozilla Firefox 48.0.1 on an Intel Macintosh 10.11.6 and would like the /page.html resource from http://ethicalweb.org.” The server in turn responds by returning the unencrypted resource to my browser.
HTTPS works similarly to HTTP, but adds a layer of Secure Sockets Layer/Transport Layer Security (SSL/TLS) encryption. This means that requests and responses are made over a secure encrypted connection. These requests include only the user’s IP address and the domain of the requested resource, so in this case my request would appear as “Hello, I’m user 192.00.000.001 and would like a resource from https://ethicalweb.org.” The server would then respond with an encrypted version of the resource.
The United States government’s HTTPS-Only Standard helpfully demonstrates the difference between these two requests. The standard unencrypted HTTP request includes a number of headers about the client and the request, as seen in Figure 3-2.
Request headers over HTTP
By contrast, the encrypted HTTPS request limits this information (Figure 3-3).
How the TLS Connection Works
Let’s take a closer look at how the TLS connection works. To provide an encrypted connection, a site must obtain a TLS certificate. TLS certificates are used to verify the authenticity of the domain; they relay information about the certificate itself and contain a public key that will be exchanged with the user’s browser.
The steps of the process are much like the steps taken when purchasing a car (only a lot faster!):
- Greet one another.
- Exchange the certificate.
- Exchange the keys.
First, the user’s client says hello by reaching out to the server and requesting the HTTPS resource. This request contains all of the information about the user’s connection that the server will need, such as the supported TLS version. In our car metaphor, in this step we walk into the dealership, ask to buy a car, state the type of car we’d like to buy, and offer up our trade-in vehicle.
The next step is to exchange the certificate. After the initial client request, the server will respond with a TLS certificate. This certificate has been either self-signed or issued by a trusted certificate authority (CA) and contains information such as the name of the domain it is attached to, the name of the certificate owner, the dates that the certificate is valid, and a public key. In our car purchase metaphor, this is the deed to the car. With this information, we’re able to verify that the seller actually owns the car we’re purchasing.
Lastly, the browser and server exchange keys for data encryption and decryption. Along with the certificate, the server sends a public key. In response, the browser sends the server an encrypted request for the specific URL/assets it is trying to access. The web server then decrypts this information and returns an encrypted version of the resource to the client, which decrypts it locally. In our car purchasing metaphor, we are now handing over the keys to our trade-in, obtaining the key for our new vehicle, and driving away.
To a user, all of this happens seamlessly and instantly, but this process adds the important layer of encrypted protection that HTTPS provides.
Why Use HTTPS
Now that we’ve looked at what HTTPS is and how it works, we can begin to see some of the value it provides both to our users and to ourselves as site owners and maintainers. Specifically, reasons to use HTTPS include the following:
- Protecting users’ privacy and security
- Proving a site’s authenticity and integrity
- Browser deprecated HTTP
- Potential search ranking improvements
Let’s take a closer look at each of these.
User Privacy and Security
In the previous chapter we looked at the value we can provide by respecting the privacy of users who enable the Do Not Track browser setting. However, many users are simply unaware of these types of features. One way that we can aid the privacy of all users is by using HTTPS on our sites. This provides our users with private, encrypted connections to our sites. HTTPS prevents monitoring of sites on public networks and keeps passive attackers from eavesdropping on a user’s web traffic.
Site Authenticity
HTTPS aids in verifying the authenticity of a site and its content. When a site is served over HTTPS, users can feel confident that they are visiting the site they intended and receiving the content that the site owner intended for them to see.
When describing its decision to move to HTTPS, popular news website BuzzFeed detailed the authenticity benefits of HTTPS:
Verification is a lesser known, but equally important benefit of HTTPS. It helps prevent what is called a Man-in-the-Middle attack, or MITM attack. An MITM attack via your browser can change the content of any non-HTTPS website you’re visiting without you knowing. This means an attacker can modify news stories to change or remove info, or they can change the contact details on a BuzzFeed contributor’s author page so you see a fake account the attacker controls.
Browsers Deprecating HTTP
Currently, browsers display an indication whenever a site is being served securely using HTTPS. This appears as a green padlock next to the site’s URL (Figure 3-4).

However, there is no indicator for sites that are not using HTTPS (Figure 3-5).

Recently the Chromium team pointed out that “people do not generally perceive the absence of a warning sign” and consequently suggested that browsers instead mark HTTP as insecure, alerting users when sites are being served over HTTP. Calling attention to sites served over plain HTTP would send a clear signal that HTTPS is preferred, promoting the deprecation of HTTP.
The second way that browsers are beginning to deprecate HTTP is by making new browser APIs available only to sites served over HTTPS. These include offline capabilities with service workers (covered in Building Web Apps that Work Everywhere), the ability to access users’ camera and audio inputs with getUserMedia, and the ability to access user location information with the geolocation API. Looking at the types of information these APIs have access to, I’m thankful that browser vendors have decided that they should only be accessed over a secure connection. An added benefit of developing forward-thinking applications is that HTTPS will quickly become a requirement.
Improved Search Rankings
In 2014 Google announced that its search engine would begin to prioritize sites using HTTPS in search results. According to the blog post announcement:
[O]ver the past few months we’ve been running tests taking into account whether sites use secure, encrypted connections as a signal in our search ranking algorithms. We’ve seen positive results, so we’re starting to use HTTPS as a ranking signal. For now it’s only a very lightweight signal—affecting fewer than 1% of global queries, and carrying less weight than other signals such as high-quality content—while we give webmasters time to switch to HTTPS. But over time, we may decide to strengthen it, because we’d like to encourage all website owners to switch from HTTP to HTTPS to keep everyone safe on the web.
If nontechnical colleagues or clients are not yet convinced of the need for HTTPS everywhere, the potential for improved search rankings may serve as an additional selling point.
Implementing HTTPS
Now that we have examined how HTTPS works and explored why we should use it, let’s take a look at implementing HTTPS for our own sites.
Let’s Encrypt
Perhaps one of the most exciting developments in HTTPS over the past few years has been the creation of Let’s Encrypt, a free, automated, and open certificate authority created by the Internet Security Research Group (ISRG). The stated objective of Let’s Encrypt is “to make it possible to set up an HTTPS server and have it automatically obtain a browser-trusted certificate, without any human intervention.”
Though Let’s Encrypt provides an open certificate authority, the actual implementation can be challenging. Thankfully, many community clients have been created to simplify the implementation process. The most useful, and the one recommended by the Let’s Encrypt team, is Certbot. Developed by the Electronic Frontier Foundation, Certbot works by automatically fetching and deploying Let’s Encrypt-generated TLS certificates to our servers.
The excellent Certbot documentation allows us to select a specific server and operating system and provides instructions based on these conditions. Let’s look at how we would implement Certbot on an Apache server running on Ubuntu 16.04.
A version of Certbot is packaged for 16.04, meaning from our server we can run apt-get to install it:
$ sudo apt-get install python-letsencrypt-apache
Let’s Encrypt ships with a beta Apache plug-in that will automate obtaining and installing the certificate. Simply run:
$ letsencrypt --apache
And that’s it! With those few simple commands we will have installed a TLS certificate for our server. To find guidelines for installation for your specific server configuration, visit the Certbot website.
Renewal
Let’s Encrypt certificates are valid for 90 days, meaning they will need to be renewed on a regular basis. To do that, we could log into our server every 90 days and run:
$ letsencrypt renew
However, this manual process has a high likelihood of failure (what if we’re on vacation, or ill, or simply forget?). Instead, Certbot recommends running a cron job that will test for certificates that require renewal on a daily basis. First, let’s test the renewal process:
$ letsencrypt renew --dry-run
Once we’ve verified that this works, we can create the cron job. We’ll create a job that runs the renew script twice daily, at 5:17 am and 5:17 pm (Certbot requests that the jobs run at a random minute within the hour).
First, we open the crontab:
$ crontab -e
Then we add the following to the file:
17 05, 17 17 * * * letsencrypt renew
Our Let’s Encrypt-issued certificate will now automatically renew when needed.
Other Certificate Options
Though Let’s Encrypt is a fantastic and recommended option, it may not be the right one for you or your organization. Amazon Web Services (AWS) now offers free TLS certificates that are easy to set up and deploy. I have used this service, and it is a great and simple option. Another alternative, SSLMate, works similarly to Let’s Encrypt by automating certificates, but it’s not free.
For some it may be preferable to go the traditional route of purchasing the certificate from a CA and uploading it to the server. Common TLS CAs are Verisign, Thawte, and RapidSSL.
For implementing TLS on your server, Mozilla provides a Configuration Generator that outputs the settings needed for popular servers such as Apache, Nginx, and Lighttpd with a variety of TLS certificate types. Once configured, SSL Labs provides an SSL Server Test that you can use to analyze the TLS configuration of your server.
Other Considerations
Once you have implemented HTTPS, there are a few site-wide changes to take into consideration:
- Redirecting HTTP to HTTPS
- Enabling HTTP Strict Transport Security (HSTS)
- Preventing mixed content and using relative URLs
- Using secure cookies
Redirect HTTP to HTTPS
If you’re adding HTTPS to an existing site, it may be worth redirecting all HTTP requests to HTTPS. This will ensure that all existing external links are served over a secure connection.
Following our previous Let’s Encrypt example, we could redirect all links with Apache by adding the following to our Virtual Host:
ServerName www.example.com
Redirect "/" "https://www.example.com/"
HTTP Strict Transport Security
When we forward HTTP requests to HTTPS, the user is initially opening a request with the unencrypted version of our site before being redirected. Unfortunately, this opens users up to a man-in-the-middle attack. To prevent this from happening on future visits, we can pair the forward with HTTP Strict Transport Security, which ensures that users only access the site over HTTPS.
HSTS is a browser feature that allows a site to request that it only be served over HTTPS on future visits. It works by having a server provide a Strict-Transport-Security header along with a max-age. After receiving this header, the browser will only request pages from that domain over HTTPS.
Here is an example HSTS header, with an expiration of one year and instructions to include subdomains:
Strict-Transport-Security: max-age=31536000; includeSubDomains
To set the HSTS header in Apache, we would add the following to our Virtual Host:
Header always set Strict-Transport-Security "max-age=63072000;
       includeSubdomains; preload"
Mixed Content and Relative URLs
Mixed content occurs when a site is served over a secure HTTPS connection but contains links to resources such as images, CSS, or JavaScript that are served over HTTP. When this occurs, browsers display an error message to users warning them that the site contains insecure content.
This often happens in error, or may occur when a site is converted to HTTPS and has lingering absolute links. To avoid this situation, convert links beginning with http:// to https:// or use relative URLs when linking to local files.
Conclusion
HTTPS provides numerous benefits to both site owners and users, helping make the web more secure. Whatever method you choose to implement HTTPS for your sites, you are taking important steps to improve the security and privacy of your users.
Further Reading
Securing User Data
Early in my web development career I took on a freelance role with a small retail company. Part of the company’s business model was catering to corporate clients. Generally, I was doing small site maintenance that involved updating HTML, CSS, and Perl code developed a few years earlier by a (likely more expensive) consulting company. A few days into the job I was familiarizing myself with the codebase when I came across a file named cc.txt. This file contained the credit card information of hundreds of corporate clients, stored as plain text. I quickly deleted the file from my local machine and, I’m pretty sure, closed the laptop’s lid and backed away from it slowly. In the end, I asked to be let out of the contract: I advised the company that this needed to be fixed and told them they should hire someone more experienced than me to do it. I hope they took that advice.
It seems like every few weeks there’s a major breach that leaks user information. Brian Krebs does a good job of cataloging these events on his site, KrebsOnSecurity. Here a few highlights that have been heavily covered by the news media:
- In 2015 it was uncovered that the United States Government’s Office of Personnel Management (OPM) had undergone a data breach involving millions of government employee records. These records included security clearance details, personal information, and fingerprints.
- The extramarital dating website Ashley Madison was infamously breached in 2015, with the attackers revealing user information such as names, addresses, email addresses, and phone numbers.
- In 2015 the insurance provider Anthem Inc. was breached. Hackers stole over 78 million records containing names, birth dates, medical IDs, Social Security numbers, street addresses, email addresses, and employment details.
- In 2016 the professional social network LinkedIn announced that it had been breached in 2012 and that hackers had released a data set containing over 100 million users’ email addresses and hashed passwords.
- In 2016 the file syncing service Dropbox also announced a 2012 breach, which included account information for over 60 million of its users.
It’s not all doom and gloom, however. The web is a wonderful place and a reflection of both the positives and the negatives of our society. Just as we wouldn’t leave our front doors wide open when we’re not at home, there are steps we can take to lock the doors of our web applications. Taking these measures will help protect the valuable information our users share with us. In this chapter we’ll explore the basics of web development security.
Building on a Strong Foundation
Being web developers means that we are constantly learning about and using new tools. It’s an exciting perk of the job. That said, when building secure applications, we are often best served to use established frameworks that have been thoroughly vetted and that provide baked-in security support. As an example, let’s look at the security options when building a web application with Python or Node.js.
The Python environment is relatively stable, and most web applications are built using either the Django or Flask web frameworks. Django provides many security features out of the box, such as cross-site scripting (XSS), SQL injection, and clickjacking protection. As Flask is an intentionally more lightweight framework, it comes with relatively few built-in security features, such as manageable XSS protection. Additional security features can be added with the Flask-Security extension.
Node.js is notorious for its rate of change and the number of available frameworks and libraries. This can be both something to love about the platform and a frustration point for many developers. The site Node Frameworks attempts to catalog them all. Despite there being dozens of Node.js web framework options, when considering security we are likely to be best served by choosing an established framework that is used in production by other web applications, such as Express.
Similar to Flask, Express is a lightweight application framework, but there are several plug-ins that enhance its security features. The two most common are Lusca, which was developed by PayPal, and Helmet. These both add sensible defaults for features such as XSS protection, cross-site request forgery (CSRF) protection, and content security policy settings, among others.
In addition to using security-focused libraries, we should also work to ensure that our dependencies are up to date and free of known vulnerabilities.
In Python we can check for outdated pip-installed packages with:
$ pip list --outdated
Similarly, in Node.js we can list outdated packages with npm:
$ npm outdated
In addition to these manual methods, there are tools that will help maintain dependency updates and scan for security vulnerabilities. Greenkeeper will scan your project for outdated Node.js dependencies and create a pull request with the updates. Greenkeeper will also run your application’s test suite, ensuring that the updated dependencies do not break the build. Snyk is a tool that will scan Node.js packages for known vulnerabilities and alert you to insecure dependencies. The site also provides a command-line means to fixing these vulnerabilities.
Though these examples are limited to Python and Node.js, I hope that you can see how the concepts map to your web stack of choice. When we use established technologies and take advantage of built-in or plug-in-based security features, we are creating solid security foundations for our sites.
OWASP Top 10
Now that we’ve started our application off on a strong foundation, it’s worth exploring the common security vulnerabilities that we should be aware of. Every few years the Open Web Application Security Project (OWASP) publishes a list of the most critical web application security flaws. As of the most recent publication, the OWASP Top 10 is comprised of:
- Injection
- Broken authentication and session management
- Cross-site scripting
- Insecure direct object references
- Security misconfiguration
- Sensitive data exposure
- Missing function-level access control
- Cross-site request forgery
- Using components with known vulnerabilities
- Unvalidated redirects and forwards
This list of common vulnerabilities can provide us with an awareness of potential weaknesses in our own applications.
Secure User Authentication
When a user creates an account with our site, she is placing her trust in us. Often in this process the user may agree to terms of service about how she may interact with our site and services and how the site owners will use the data and information users provide within the application. One crucial step in upholding our end of this agreement is to ensure that user login information is kept secure and private. Let’s explore how we can do so.
Creating Our Own Login System
When creating our own authorization system, it is critical that we send this information over an HTTPS connection, as discussed in the previous chapter, and that we effectively obscure our users’ passwords when they are stored in our database. To effectively do this we should use a combination of hashing and salting.
Hashing is the act of obscuring a string of text by turning it into a seemingly random string. Hashing functions are “one way,” meaning that once the text is hashed it cannot be reverse engineered back to the original string. When hashing a password, the plain text version of the password is never stored in our database.
Salting is the act of generating a random string of data that will be used in addition to the hashed password. This ensures that even if two user passwords are the same, the hashed and salted versions will be unique.
bcrypt is a popular hashing function, based on the Blowfish cipher, that is commonly used in a range of web frameworks. In Node.js we can use the bcrypt module to both salt and hash our passwords.
First we install bcrypt with npm:
$ npm install bcrypt --save
Then, in our application code, we require the module and write a function to handle the salting and hashing using bcrypt:
// require the module
var bcrypt = require('bcrypt');

// the cost of processing the salting data - 10 is the default
var saltRounds = 10;

// function for hashing and salting
function passwordEncrypt(username, password) {
  // generate the salt
  bcrypt.genSalt(saltRounds, function(err, salt) {
    // generate the hash
    bcrypt.hash(password, salt, function(err, hash) {
      // store username, hash, and salt in your password DB
    });
  });
}
For example, the password PizzaP@rty99 would generate the hashed and salted output $2a$10$HF2rs.iYSvX1l5FPrX697O9dYF/O2kwHuKdQTdy.7oaMwVga54bWG (which is the salt plus the encrypted password string). Now, when checking a user’s password against the hashed and salted password, we can use bcrypt‘s compare method:
// password is a value provided by the user
// hash is retrieved from our DB
bcrypt.compare(password, hash, function(err, res) {
  // res is either true or false
});
All other major web frameworks also support the use of bcrypt. For example, Django’s documentation provides an excellent overview of integrating bcrypt into an application. Though bcrpyt is a popular and easy-to-implement hashing function, there are several other effective options available, such as PBKDF2 and scrypt. I won’t debate the benefits and merits of these individually, but when implementing a login system I encourage you to research various options and choose the one most appropriate for your application.
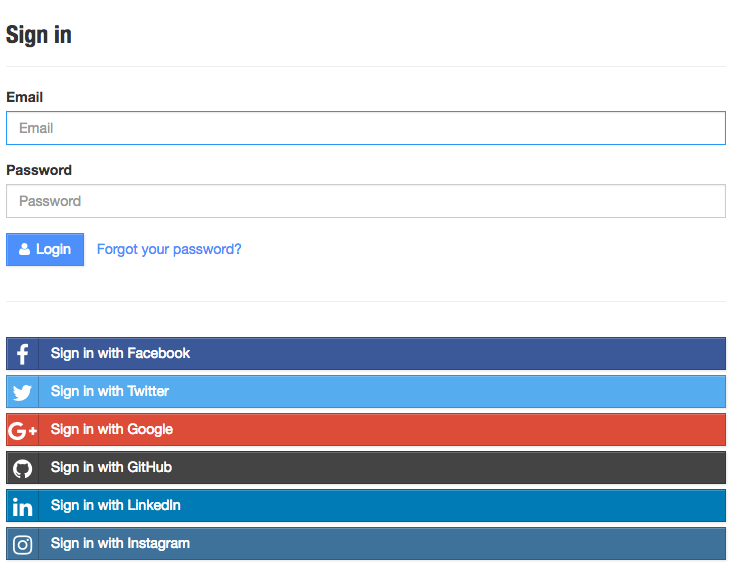
OAuth 2.0
An alternative option to providing our own login system is to use OAuth 2.0. OAuth 2.0 is a user authorization system that lets us provide a user login option through popular third-party sites such as Google, Facebook, Twitter, LinkedIn, and more. This allows us to both rely on large and trusted third parties for providing authentication and pull in useful user information, as authorized by the user, from the chosen service.
Even if you have never worked with OAuth as a developer, you are likely familiar with the flow from the perspective of a user.
First, a user clicks a login link from our application (Figure 4-1).
The user is then directed to an access request for the specified service provider, like the one in Figure 4-2. This request details the level of access to user information that the accessing application will have.
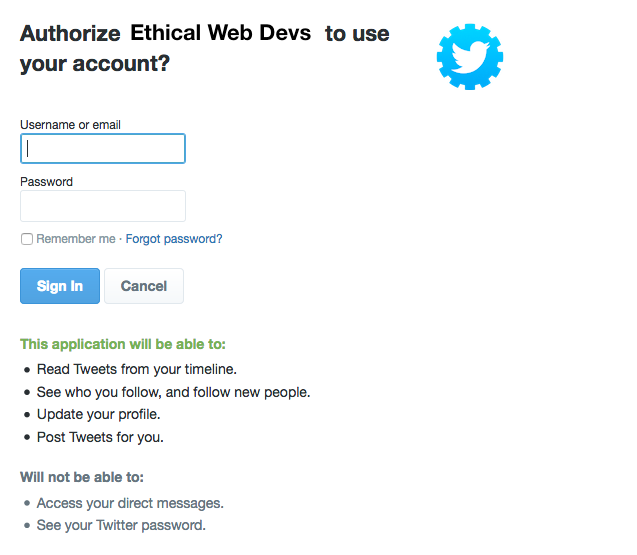
If the user grants the authorization, the service redirects the user back to our site with an authorization code. Our server will then exchange the authorization code for an access token. Once the access token has been granted, that will be used to access the user information from the third-party service.
Links to libraries for popular programming languages and web frameworks, tutorials, and documentation can be found on the OAuth website. Additionally, Aaron Parecki, the maintainer of OAuth, has written a fantastic guide called “OAuth 2 Simplified.”
Password Strength
Strong user passwords are good for security, but giving users requirements such as characters the password must contain and a required length will often frustrate them. Some password policies are even just plain silly. Worst of all, the resulting passwords may actually be less secure, as the policies provide potential hackers with guidelines for password formats when attempting brute force penetration. Additionally, users who don’t utilize password management software are likely to look for workarounds or write them down or store the passwords somewhere less secure.
If you would like to guide users toward more secure passwords, a better alternative is to use a password strength estimator. The Carnegie Mellon University study “How Does Your Password Measure Up? The Effect of Strength Meters on Password Creation” measured the impact of password strength meters and password requirements:
We found that meters with a variety of visual appearances led users to create longer passwords. However, significant increases in resistance to a password-cracking algorithm were only achieved using meters that scored passwords stringently. These stringent meters also led participants to include more digits, symbols, and uppercase letters.
I’m a big fan of the library zxcvbn, created by the team at Dropbox. The plug-in is reasonably simple to use, but more importantly it is based on a really sound methodology for determining password strength, which the Dropbox team has helpfully detailed.
If your organization is interested in password requirements, steering them instead toward password strength indicators may provide a better experience for users, as well as leading to better password security.
Multifactor Authentication
One way we can provide a more secure authentication system to our users is by making multifactor authentication available. Multifactor authentication is done by combining two more or more of the following:
- A secret known to the user, such as a password or PIN
- A physical object in the user’s possession, such as a mobile phone or a USB FIDO U2F Security Key (Figure 4-3)
- A physical characteristic of the user, such as a fingerprint or typing speed

In web applications, the most common pattern is to make two-factor authentication available by providing a physical authentication in addition to the standard username/password flow. Often, users will receive a text message on their mobile phone or install a multifactor authentication application that will provide the appropriate code for this additional verification step. Adding a physical dimension reduces the possibility of password theft providing access to a user’s account. Though many users may opt not to enable two-factor authentication, providing this option is a good step toward better security than standard username and password authentication.
Other Types of Authentication
In addition to the standard username/password and two-factor authentication models, there are less common authentication techniques such as one-time passwords and biometrics. Though uncommon, these may be worth exploring further.
One-time passwords work by generating a unique token and sending it directly to a user, typically via email or a mobile device. The popular chat application Slack makes use of one-time passwords, generating a unique link and sending it to a user when they sign into a Slack channel. This can also be paired with two-factor authentication to add an extra layer of user protection.
Another interesting approach is the use of biometrics. We’ve likely all seen science fiction movies where a retina scanner or fingerprint scanner is used to open a door, but this technology is not something unattainable. In fact, most smartphones now ship with a biometric fingerprint login. Though not currently used on the web, it’s not hard to imagine a future where there are biometric login options. If that time comes, however, there will need to be thoughtful discussions around user security and privacy.
Encrypting User Data
Depending on the types of applications we work on, they may contain sensitive user information beyond user credentials. Our applications may store user locations, journal entries, Social Security numbers, health records, or any number of private bits of information that users have entrusted us with. When this is the case, it becomes important to encrypt sensitive user information, in addition to passwords. Doing this acknowledges that we are willing to take extra steps and security precautions with our users’ information.
We’ve recently seen a rise in the popularity of services that encrypt and secure user data. The email provider ProtonMail offers secure and encrypted email accounts, and the mobile messaging application Signal is fully encrypted. We’ve also seen encryption become a selling point for mainstream applications. For instance, the popular messaging app WhatsApp now provides end-to-end encryption for user conversations. Even if a user is unaware of this feature, it is provided as an additional layer of security and privacy.
Encrypting user data can be useful for much more than messaging and email applications, however. For example, in the case of the OPM hack mentioned at the beginning of this chapter, government employees would have greatly benefited from having their records encrypted rather than stored as plain text in the database.
In Node.js we can use the built-in crypto library to encrypt and decrypt user data. Here’s a very basic example of what that might look like with a pair of functions that encrypt and decrypt some plain text using a provided password:
var crypto = require('crypto');

function dataEncrypt(password, text) {
  var cipher = crypto.createCipher('aes192', password);
  var encrypted = cipher.update(text, 'utf8', 'hex');
  encrypted += cipher.final('hex');
  return encrypted;
}

function dataDecrypt(password, encrypted) {
  var decipher = crypto.createDecipher('aes192', password);
  var decrypted = decipher.update(encrypted, 'hex', 'utf8');
  decrypted += decipher.final('utf8');
  return decrypted;
}

// encrypt some data
var encrypt = dataEncrypt('Password', 'This is encrypted!');
// returns f53a6a423a11be8f27ff86effa5ace548995866009190a90...
var decrypt = dataDecrypt('Password', encrypt);
// returns This is encrypted!
By storing user data in an encrypted format we are taking an extra step toward securing that data for our users.
Sanitizing and Validating User Input
Interactive form fields and text input are often the differentiator between a website and a web application. Introducing this type of interactivity opens a site up to both database injections and cross-site scripting attacks, two of the top three security vulnerabilities on the OWASP Top 10 list. Database injections occur when an attacker injects code or database commands (such as SQL statements) into the database. Cross-site scripting can occur when an attacker is able to inject malicious scripts into a site. Steps can be taken to prevent both of these potential attacks by sanitizing and validating user input.
To sanitize user-submitted content, we should whitelist the HTML input that our application will accept. Whitelisting is preferred to blacklisting user input as it gives us fine-grained control over the type of content being entered and stored. If users are able to add HTML to a field, we can choose the tags that should be available to the user and whitelist those. We should be sure to avoid giving users the ability to execute JavaScript or <script> tags within our applications.
In Node.js we can use the sanitize-html module to do this. First, we install the module as a project dependency:
$ npm install sanitize-html --save
Now in our project code we can include the module and sanitize using a whitelist of accepted tags:
var sanitizeHtml = require('sanitize-html');

var dirty = 'HTML entered from the client';
var clean = sanitizeHtml(dirty, {
  allowedTags: [ 'b', 'i', 'em', 'strong', 'a' ],
  allowedAttributes: {
    'a': [ 'href' ]
  }
});
To avoid database injection, we should further sanitize our user input. When using an SQL database it is important to prevent characters being entered into the database so that SQL statements cannot be injected. By contrast, NoSQL injections may be executed at either the database or application layer. To prevent attacks when using a NoSQL database, we should again ensure that executable code or special characters used by the database are not entered into it.
Cross-Site Request Forgery Attacks
Cross-site request forgery (CSRF) is a type of attack where a site utilizes a user’s browser to manipulate a web application. Through CSRF, an attacker can forge login requests or complete actions that are typically done by a logged-in user, such as posting comments, transferring money, or changing user account details. These attacks can be carried out by utilizing browser cookies or user IP address information. Whereas cross-site scripting attacks exploit a user’s trust in a site, CSRF attacks exploit the trust a site places in the user’s browser.
Wikipedia defines the following common CSRF characteristics:
- They involve sites that rely on a user’s identity.
- They exploit the site’s trust in that identity.
- They trick the user’s browser into sending HTTP requests to a target site.
- They involve HTTP requests that have side effects.
Two possible steps we can take to prevent CSRF attacks are to include a secret token in our forms and to validate the Referer header in requests.
When dealing with form submission, most web frameworks provide CSRF protection or have available plug-ins for generating and validating the tokens. The Django web framework includes default middleware for creating posts with CSRF tokens. The Node module csurf provides the same functionality for applications built using the Express framework.
The second protective measure we can take is to verify the Referer header and, if it is not present or comes from an incorrect URL, deny the request. It should be noted that this header can be spoofed, so this is not a failsafe measure, but it can add a layer of protection for users. Additionally, be aware that some users may disable this header in their browsers due to privacy concerns and thus will not benefit from Referer header validation.
Security Headers
To further harden our application’s security, we can set a number of HTTP headers that give our users’ browsers information about the types of requests possible on our site. Enabling each of these headers will provide further protection for our users against potential threats such as cross-site scripting and clickjacking.
Content-Security-Policy (CSP)
The Content-Security-Policy header is useful for mitigating XSS attacks by limiting the use of resources outside the current domain. When enabling CSP we are able to specify that all resources must come from the current domain. We can do this in our Apache configuration as follows:
header always set Content-Security-Policy "default-src 'self';"
The default-src setting is a catch-all that includes all resources, such as JavaScript, images, CSS, and media. Our policy can be more specific and use directives that specify individual resource policies. For example, the following policy would only permit requests from the origin domain ('self') for scripts, AJAX/Web Socket requests, images, and styles:
default-src 'none'; script-src 'self'; connect-src 'self';
            img-src 'self'; style-src 'self';
The Content Security Policy Quick Reference Guide provides a full list of directives.
It’s also possible to create a whitelist that will permit access to an external domain, such as a content delivery network or analytics host. The following example would permit scripts from cdn.example.com:
script-src 'self' cdn.example.com;
A helpful guide to writing content security policies is available on the KeyCDN website, and the site CSP Is Awesome provides an online generator you can use to create a custom CSP configuration.
X-Frame-Options
The X-Frame-Options header provides clickjacking protection for our sites. It works by disabling or limiting content rendered in a <frame>, <iframe>, or <object> tag.
The possible directives for X-Frame-Options are:
X-Frame-Options: DENY
X-Frame-Options: SAMEORIGIN
X-Frame-Options: ALLOW-FROM https://example.com/
In Apache, we can specify that only content from our domain can be embedded within <frame>, <iframe>, or <object> tags by using the following configuration:
header always set x-frame-options "SAMEORIGIN"
X-XSS-Protection
The X-XSS-Protection header enables the cross-site scripting filter in a user’s browser. Though this setting is typically enabled by default in modern browsers, the use of this header will enforce the policy if it has been disabled.
To configure X-XSS-Protection in our Apache configuration, we can include this line:
header always set x-xss-protection "1; mode=block"
X-Content-Type-Options
The X-Content-Type-Options header is used to enforce file content types. When a browser is unsure of a file type, the browser may do content (or MIME) sniffing to guess the correct resource type. This opens up a security risk as it can allow a user’s browser to be manipulated into running executable code concealed as another file type.
We can configure Apache to disallow content sniffing as follows:
header always set X-Content-Type-Options "nosniff"
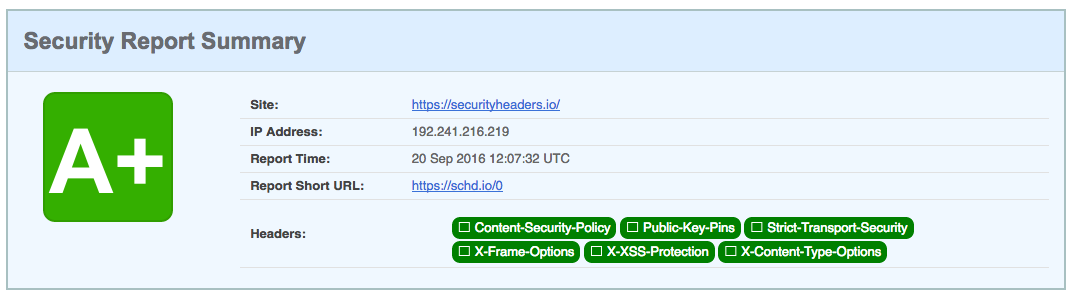
Checking Security Headers
Once our security headers have been set, we can use securityheaders.io to scan our site. The tool analyzes the site’s response headers and produces a grade indicating the level of protection. Scanning the tool’s own site results in an A+ score (Figure 4-4).
Security Disclosures and Bug Bounty Programs
No matter how diligent we are about security, there may be flaws in our application. To improve security and the user experience, we should acknowledge this potential by having a strong security disclosure plan and consider implementing a bug bounty program.
Developer Jonathan Rudenberg’s post “Security Disclosure Policy Best Practices” provides a succinct strategy for handling security disclosures. In it, he outlines the following key points for having an effective security program:
- Have a security page with an email address and PGP key for submitting security disclosures.
- Have a clear, concise, and friendly security policy.
- Disclose any reported vulnerability.
- Respond to the vulnerability quickly.
- Don’t place blame on teammates or employees.
- Alert customers and inform them of the remediation steps.
As part of this process, you may want to offer a bug bounty for security researchers who discover vulnerabilities. The site Bugcrowd has compiled a list of bug bounty programs that can serve as exemplars. Some well-known sites that offer bug bounties include Facebook, Google, GitHub, and Mozilla. Recently the United States Department of Defense has even gotten in on the action, launching the Hack the Pentagon program.
By providing clear steps for reporting security vulnerabilities and transparent communication about remediation steps, we can work to build additional trust in our users.
Conclusion
There are a dizzying number of possibilities when it comes to web application security, but by building on a solid foundation, following best practices, and providing clear security information to our users, we can work to build a more secure web. I hope that this chapter serves as a strong jumping-off point for your efforts to build and maintain secure web applications.
Further Reading
- Identity and Data Security for Web Development by Jonathan LeBlanc and Tim Messerschmidt (O’Reilly)
- Security for Web Developers by John Paul Mueller (O’Reilly)
- Awesome AppSec
- “A Practical Security Guide for Web Developers” by FallibleInc
- OWASP Testing Guide
- “Python & Django Security on a Shoestring: Resources” by Kelsey Gilmore-Innis
- “Security Tips for Web Developers” by Jesse Ruderman
- “The Password Manifesto” by Andrew A. Gill
- “Mozilla Cybersecurity Delphi 1.0: Towards a User-Centric Policy Framework”
- XATO: Security
- xkcd: Password Strength
Preserving User Data
Now that we’ve put a lot of effort into securing and ensuring the privacy of our users’ data, we should also consider our users’ ownership of and access to their data. As users pour their personal and professional lives into the applications we build, the data created can become a reflection of their lives. Our applications may store photos, documents, journals, notes, private reflections, user locations, food preferences, family relationships, meeting information, and connections between all of these things. While this information can be incredibly powerful to us in continuing to build and improve our applications, our users also have a personal investment in the data they have created and shared with us. As developers, we should respect the implicit trust that our users place in the access to and ongoing preservation of their data.
In 2009 the site GeoCities was shuttered. GeoCities was a free web-hosting platform that was considered an important piece of early web history. Though Yahoo!, which had acquired GeoCities in 1999, provided guidance to users for how to preserve their sites elsewhere, many of the sites were no longer actively maintained, so they risked being lost forever. In light of this, several projects such as the Internet Archive, Archive Team, ReoCities, and OoCities undertook Herculean efforts to archive or mirror the original GeoCities content.
In 2011 the social check-in service Gowalla announced that it would be shutting down. Gowalla was an early competitor with Facebook and had a passionate and enthusiastic user base. In a blog post, Gowalla founder Josh Williams stated, “We plan to provide an easy way to export your Passport data, your Stamp and Pin data (along with your legacy Item data), and your photos as well.” Unfortunately, despite the best intentions of the Gowalla team, the ability to export data was not added before the service was fully shut down, causing all Gowalla user data to be lost.
These are just two of many interesting examples of site closures or significant feature changes that can cause user data to be lost. As developers, we are entrusted with user information. By providing users a means to export their data, we are able to give them more control over how and where it is used.
Data Ownership
Who owns the data generated within our applications? Though it may be easiest to say “the user,” this can become an increasingly complicated question when we consider things such as collaborative documents, online discussions, and shared calendars, which may have an initial creator but ultimately may also have multiple maintainers. What about the sites themselves? Sometimes the terms of service may insist on ownership or exclusive rights to a user’s created content. As part of Facebook’s terms of service, the company enforces exclusive rights to any content created within or posted to the site:
For content that is covered by intellectual property rights, like photos and videos (IP content), you specifically give us the following permission, subject to your privacy and application settings: you grant us a non-exclusive, transferable, sub-licensable, royalty-free, worldwide license to use any IP content that you post on or in connection with Facebook (IP License).
In doing this, we take the power away from the user and assert ownership over the content they have created. Though there is a business case for this, it comes at a potential cost to our users. The creator of the World Wide Web, Tim Berners-Lee, has spoken out in favor of user-owned data, stating that “the data that [firms] have about you isn’t valuable to them as it is to you.”
If we take this perspective, we should aim to open user data to our users and provide a means of exporting it from our sites in an open format.
In his article “Rights to Your Data and Your Own Uber ‘God’ View,” Miles Grimshaw suggests adapting a Creative Commons-style license for personal data, which would be adopted by services collecting this data:
You are free to:
Download—free access to your raw data in standard file formats
Share—copy and redistribute the data in any medium or format
Adapt —remix, transform, and build upon the data
Under the following terms:
Attribution—You must provide a sign-up link to the application
The (since acquired) start-up Kifi had a forward-thinking approach to user data, stating in a blog post that:
Any service that manages your data has an implicit contract with users: you give us your data and we’ll organize it, but it’s still your data; we are just stewards for it. At Kifi, one way we try to fulfill our end of this contract is by making sure users can export their data for offline use (or so they can import it into another service).
These ideas are not limited to start-ups or small services. In 2012 Twitter introduced the ability to download an archive of your Tweets, giving users permanant access to their Twitter content as well as the potential ability to import it into another service. Google also allows users to download an archive of the data created with any of its services, including the ability to easily store the archive in common file-sharing applications such as Dropbox, Google Drive, and Microsoft OneDrive.
By giving our users access to their data, we can be better stewards of that information. This aids us in creating long-lasting user content and opens up the potential for users to adapt and use their data in novel and interesting ways. Most importantly, by providing access to user data we are able to give ownership of the data our users create directly to the users.
Deleting User Data
An inevitable reality is that some users will want to stop using the services we build. In many cases, these users may simply allow their accounts to decay, but other users will explicitly seek to delete their accounts and associated information. When a user does delete his account, we should also delete it from our databases, rather than simply hiding the user’s content within our site or application. Doing so will be more in line with user expectations and and ensures that in the case of a data breach previously deleted accounts won’t be at risk.
Archiving and Graceful Shutdown
At the beginning of this chapter, we looked at a few web application shutdowns and the resulting loss of user data. According to the United States Small Business Administration, nearly 40% of small businesses fail after three years. In the world of tech start-ups, that number is significantly higher, as reportedly 9 out of 10 start-ups fail. And this doesn’t take into account web applications that are acquired or owned and closed by large companies.
The group Archive Team works to catalog and preserve digital history, but also keeps a Deathwatch of sites risking shutdown and provides advice for individuals on backing up our data. Though this is a wonderful project, we cannot assume that users will back up their data. When our services are closing down, we can do so gracefully. For example, the music streaming service Rdio closed its doors in 2015, but in doing so offered a farewell that included the ability for users to download CSV files of things such as their playlists and saved music to be imported into another service. As the site Hi.co shuttered, its founder Craig Mod committed to keeping the archive on the web for the next 10 years, making individual contributions exportable and producing five nickel-plated books of the site to be preserved. In an article about the shutdown, Mod wrote:
At the same time we understand the moral duty we took on in creating Hi.co — in opening it up to submissions and user generated content. There was an implicit pact: You give us your stories about place, and we’ll give you a place to put your stories. This was not an ephemeral pact.
Though we may not choose to nickel-plate our own services’ contents, providing exports will ensure that users are able to preserve their data if they choose to do so.
Further Reading
- “With Great Data Comes Great Responsibility” by Pascal Raabe
- “Archiving a Website for Ten Thousand Years” by Glenn Fleishman
- “Preserving Digital History” by Daniel J. Cohen and Roy Rosenzweig
Conclusion
Thank you for taking the time to read this installment of the Ethical Web Development series. In this title, we’ve explored the value of respecting users’ privacy, using HTTPS, following security best practices, and data ownership. My hope is that you now feel empowered and excited to build applications in this way.
If during your reading you have come across things that you think are missing or could be improved, I would encourage you to contribute to the book. This title is available as open source and contributions can be made by:
- Contributing directly to the GitHub repository with a pull request
- Creating an issue in the book’s GitHub repository
- Reaching out to me through email or Twitter
Twenty percent of the proceeds from each Ethical Web Development title will be donated to an organization whose work has a positive impact on the issues described. For this title, I will be donating to the Electronic Frontier Foundation (EFF). The EFF “champions user privacy, free expression, and innovation through impact litigation, policy analysis, grassroots activism, and technology development.” The work and research of the EFF was instrumental to the writing of this report.
If you are interested in supporting the organization’s work, please consider getting involved at the EFF website.
This title is the third in a series of digital reports I am authoring on the subject of ethical web development. Other titles in the series include Building Web Apps for Everyone and Building Web Apps that Work Everywhere. You can learn more about the series at the Ethical Web Development website.