Docker security
Using containers safely in production.
 Metal cases (source: O'Reilly)
Foreword
Docker’s introduction of the standardized image format has fueled an explosion of interest in the use of containers in the enterprise. Containers simplify the distribution of software and allow greater sharing of resources on a computer system. But as you pack more applications onto a system, the risk of an individual application having a vulnerability leading to a breakout increases.
Containers, as opposed to virtual machines, currently share the same host kernel. This kernel is a single point of failure. A flaw in the host kernel could allow a process within a container to break out and take over the system. Docker security is about limiting and controlling the attack surface on the kernel. Docker security takes advantage of security measures provided by the host operating system. It relies on Defense in Depth, using multiple security measures to control what the processes within the container are able to do. As Docker/containers evolve, security measures will continue to be added.

Learn faster. Dig deeper. See farther.
Administrators of container systems have a lot of responsibility to continue to use the common sense security measures that they have learned on Linux and UNIX systems over the years. They should not just rely on whether the “containers actually contain.”
- Only run container images from trusted parties.
- Container applications should drop privileges or run without privileges whenever possible.
- Make sure the kernel is always updated with the latest security fixes; the security kernel is critical.
- Make sure you have support teams watching for security flaws in the kernel.
- Use a good quality supported host system for running the containers, with regular security updates.
- Do not disable security features of the host operating system.
- Examine your container images for security flaws and make sure the provider fixes them in a timely manner.
Security and Limiting Containers
To use Docker safely, you need to be aware of the potential security
issues and the major tools and techniques for securing container-based systems.
This report considers security mainly from the viewpoint of running Docker in
production, but most of the advice is equally applicable to
development. Even with security, it is important to keep the development and
production environments similar in order to avoid the issues around moving code
between environments that Docker was intended to solve.
Reading online posts and news items1 about Docker can give you the impression that Docker
is inherently insecure and not ready for production use. While you certainly
need to be aware of issues related to using containers safely, containers, if
used properly, can provide a more secure and efficient system than using virtual
machines (VMs) or bare metal alone.
This report begins by exploring some of the issues surrounding the security
of container-based systems that you should be thinking about when using containers.
Warning
Disclaimer!
The guidance and advice in this report is based on my opinion. I am
not a security researcher, nor am I responsible for any major public-facing
system. That being said, I am confident that any system that follows the
guidance in this report will be in a better security situation than the
majority of systems out there. The advice in this report does not form a
complete solution and should be used only to inform the development of your own
security procedures and policy.
Things to Worry About
So what sorts of security issues should you be thinking about in a container-based environment? The following list is not comprehensive, but should give you
food for thought:
- Kernel exploits
-
Unlike in a VM, the kernel is shared among all containers and the host,
magnifying the importance of any vulnerabilities present in the kernel. Should
a container cause a kernel panic, it will take down the whole host. In VMs, the
situation is much better: an attacker would have to route an attack through both
the VM kernel and the hypervisor before being able to touch the host kernel. - Denial-of-service attacks
-
All containers share kernel resources. If one
container can monopolize access to certain resources—including memory and more esoteric resources such as user IDs (UIDs)—it can starve out other containers on the host,
resulting in a denial-of-service (DoS), whereby legitimate users are unable to access
part or all of the system. - Container breakouts
-
An attacker who gains access to a container should not be able to gain access to
other containers or the host. By default, users are not namespaced, so any
process that breaks out of the container will have the same privileges on the
host as it did in the container; if you wererootin the container, you will
berooton the host.2 This
also means that you need to worry about potential privilege escalation
attacks—whereby a user gains elevated privileges such as those of theroot
user, often through a bug in application code that needs to run with extra
privileges. Given that container technology is still in its infancy, you should
organize your security around the assumption that container breakouts are
unlikely, but possible. - Poisoned images
-
How do you know that the images you are using are safe, haven’t been tampered with,
and come from where they claim to come from? If an attacker can trick you into
running his image, both the host and your data are at risk. Similarly, you
want to be sure that the images you are running are up-to-date and do not
contain versions of software with known vulnerabilities. - Compromising secrets
-
When a container accesses a database or service, it will likely require a secret, such as an API key or username and password. An attacker who can get access to this secret will also have access to the service. This problem becomes more acute in a microservice architecture in which containers are constantly stopping and starting, as compared to an architecture with small numbers of long-lived VMs. This report doesn’t cover how to address this, but see the Deployment chapter of Using Docker (O’Reilly, 2015) for how to handle secrets in Docker.
The simple fact is that both Docker and the underlying Linux kernel features it
relies on are still young and nowhere near as battle-hardened as the
equivalent VM technology. For the time being at least, do not consider
containers to offer the same level of security guarantees as VMs.3
Defense in Depth
So what can you do? Assume vulnerability and build defense in depth. Consider the analogy of a castle, which has multiple layers of defense, often tailored to thwart various kinds of attacks. Typically, a castle has a moat, or exploits local geography, to control access routes to the castle. The walls are thick stone, designed to repel fire and cannon blasts. There are battlements for defenders and multiple levels of keeps inside the castle walls. Should an attacker get past one set of defenses, there will be another to face.
The defenses for your system should also consist of multiple layers. For example, your containers will most likely run in VMs so that if a container breakout occurs, another level of defense can prevent the attacker from getting to the host or other containers. Monitoring systems should be in place to alert admins in the case of unusual behavior. Firewalls should restrict network access to containers, limiting the external attack surface.
Least Privilege
Another important principle to adhere to is least privilege: each process and
container should run with the minimum set of access rights and resources it
needs to perform its function.4 The main
benefit of this approach is that if one container is compromised, the attacker
should still be severely limited in being able to perform actions that provide
access to or exploit further data or resources.
In regards to least privilege, you can take many steps to reduce the capabilities of containers:
-
Ensure that processes in containers do not run as
root, so that exploiting a
vulnerability present in a process does not give the attacker root access. -
Run filesystems as read-only so that attackers cannot overwrite data or
save malicious scripts to file. -
Cut down on the kernel calls that a container can make to reduce the
potential attack surface. -
Limit the resources that a container can use to avoid DoS attacks whereby a compromised container or application consumes enough resources (such as memory or CPU) to bring the host to a halt.
Warning
Docker Privileges = Root Privileges
This report focuses on the security of running containers, but it is important to point out that you also have to be careful about who you give access to the Docker daemon. Any user who can start and run Docker containers effectively has root access to the host. For example, consider that you can run the following:
$ docker run -v /:/homeroot -it debian bash
...
And you can now access any file or binary on the host machine.
If you run remote API access to your Docker daemon, be careful about how you secure it and who you give access to. If possible, restrict access to the local network.
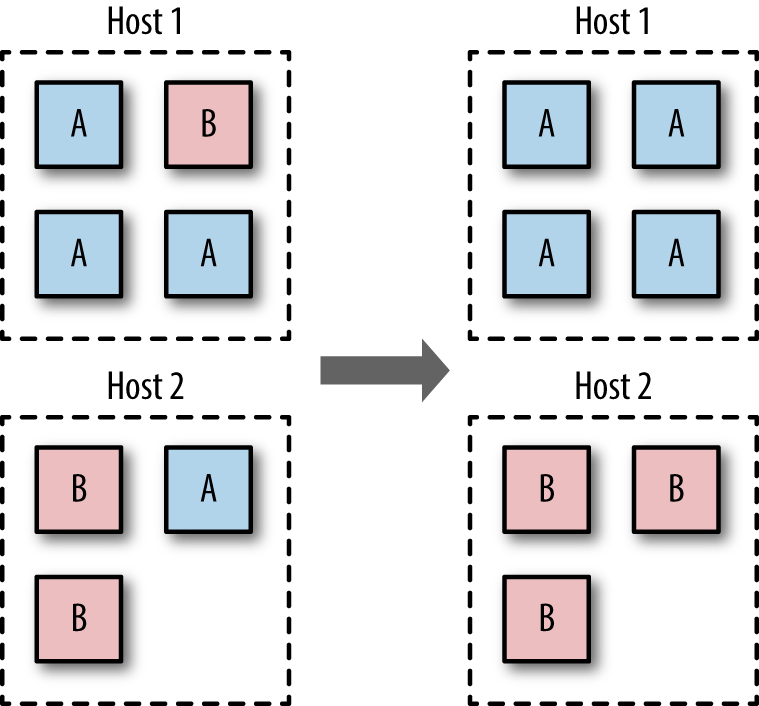
Segregate Containers by Host
If you have a multi-tenancy setup, running containers for multiple
users (whether these are internal users in your organization or external customers), ensure that each user is placed on a separate Docker host, as shown in Figure 1-1. This is less efficient than sharing hosts between users and will result in a higher number of VMs and/or machines than reusing hosts, but is important for security. The main reason is to prevent container breakouts resulting in a user gaining access to another user’s containers or data. If a container breakout occurs, the attacker will
still be on a separate VM or machine and unable to easily access containers belonging to other users.
Similarly, if you have containers that process or store sensitive information, keep them on a host separate from containers handling less-sensitive information and, in particular, away from containers running applications directly exposed to end users. For example, containers processing credit-card details should be kept separate from containers running the Node.js frontend.
Segregation and use of VMs can also provide added protection against DoS attacks; users won’t be able to monopolize all the memory on the host and starve out other users if they are contained within their own VM.
In the short to medium term, the vast majority of container deployments will involve VMs. Although this isn’t an ideal situation, it does mean you can combine the efficiency of containers with the security of VMs.
Applying Updates
The ability to quickly apply updates to a running system is critical to
maintaining security, especially when vulnerabilities are disclosed in common
utilities and frameworks.
The process of updating a containerized system roughly involves the following
stages:
-
Identify images that require updating. This includes both base images and
any dependent images. See undefined ‘1-2’ for how to do this with the Docker client. -
Get or create an updated version of each base image. Push this version to
your registry or download site. -
For each dependent image, run
docker buildwith the--no-cache
argument. Again, push these images. -
On each Docker host, run
docker pullto ensure that it has up-to-date images. -
Restart the containers on each Docker host.
-
Once you’ve ascertained that everything is functioning correctly, remove the old
images from the hosts. If you can, also remove them from your registry.
Some of these steps sound easier than they are. Identifying images that need
updating may require some grunt work and shell fu. Restarting the containers
assumes that you have in place some sort of support for rolling updates or are
willing to tolerate downtime. At the time of writing, functionality to
completely remove images from a registry and reclaim the disk space is still
being worked on.5
If you use Docker Hub to build your images, note that you can set up
repository links, which will kick off a build of your image when any linked
image changes. By setting a link to the base image, your image will
automatically get rebuilt if the base image changes.
When you need to patch a vulnerability found in a third-party image, including the official images, you are dependent on that party providing a timely update. In the past, providers have been criticized for being slow to respond. In such a situation, you can either wait or prepare your own image. Assuming that you have access to the Dockerfile and source for the image, rolling your image may be a simple and effective temporary solution.
This approach should be contrasted with the typical VM approach of using configuration management (CM) software such as Puppet, Chef, or Ansible. In the CM approach, VMs aren’t re-created but are updated and patched as needed, either through SSH commands or an agent installed in the VM. This approach works, but means that separate VMs are often in different states and that significant complexity exists in tracking and updating the VMs. This is necessary to avoid the overhead of re-creating VMs and maintaining a master, or golden, image for the service. The CM approach can be taken with containers as well, but adds significant complexity for no benefit—the simpler golden image approach works well with containers because of the speed at which containers can be started and the ease of building and maintaining images.6
Note
Label Your Images
Identifying images and what they contain can be made a lot easier by liberal use of labels when building images. This feature appeared in 1.6 and allows the image creator to associate arbitrary key/value pairs with an image. This can be done in the Dockerfile:
FROM debian
LABEL version 1.0
LABEL description "Test image for labels"
You can take things further and add data such as the Git hash that the code in the image was compiled from, but this requires using some form of templating tool to automatically update the value.
Labels can also be added to a container at runtime:
$ docker run -d --name label-test -l group=a \
             debian sleep 100
1d8d8b622ec86068dfa5cf251cbaca7540b7eaa6766...
$ docker inspect -f '{{json .Config.Labels}}'\
         label-test
{"group":"a"}
This can be useful when you want to handle certain events at runtime, such as dynamically allocating containers to load-balancer groups.
At times, you will need to update the Docker daemon to gain
access to new features, security patches, or bug fixes. This will force you to either migrate all containers to a new host or temporarily halt them while the update is applied. It is recommended that you subscribe to either the docker-user or docker-dev Google groups to receive notifications of important updates.
Avoid Unsupported Drivers
Despite its youth, Docker has already gone through several stages of
development, and some features have been deprecated or are unmaintained. Relying
on such features is a security risk, because they will not be receiving the same
attention and updates as other parts of Docker. The same goes for drivers and
extensions depended on by Docker.
Storage drivers are another major area of development and change. At the time of
writing, Docker is moving away from AUFS as the preferred storage driver. The
AUFS driver is being taken out of the kernel and no longer developed. Users of
AUFS are encouraged to move to Overlay or one of the other drivers in the near
future.
Image Provenance
To safely use images, you need to have guarantees about their provenance:
where they came from and who created them. You need to be sure that you are
getting exactly the same image that the original developer tested and that no
one has tampered with it, either during storage or transit. If you can’t verify
this, the image may have become corrupted or, much worse, replaced with
something malicious. Given the previously discussed security issues with Docker,
this is a major concern; you should assume that a malicious image has full
access to the host.
Provenance is far from a new problem in computing. The primary tool in
establishing the provenance of software or data is the secure hash. A secure
hash is something like a fingerprint for data—it is a (comparatively) small
string that is unique to the given data. Any changes to the data will result in
the hash changing. Several algorithms are available for calculating secure
hashes, with varying degrees of complexity and guarantees of the uniqueness of
the hash. The most common algorithms are SHA (which has several variants) and
MD5 (which has fundamental problems and should be avoided). If you have a secure
hash for some data and the data itself, you can recalculate the hash for the data
and compare it. If the hashes match, you can be certain the data has not been
corrupted or tampered with. However, one issue remains—why should you trust the
hash? What’s to stop an attacker from modifying both the data and the hash? The
best answer to this is cryptographic signing and public/private key pairs.
Through cryptographic signing, you can verify the identify of the publisher of an
artifact. If a publisher signs an artifact with their private key,7 any
recipient of that artifact can verify it came from the publisher by checking the
signature using the publisher’s public key. Assuming the client has already
obtained a copy of the publisher’s key, and that publisher’s key has not been
compromised, you can be sure the content came from the publisher and has not been
tampered with.
Docker Digests
Secure hashes are known as digests in Docker parlance. A digest is a SHA256
hash of a filesystem layer or manifest, where a manifest is metadata file
describing the constituent parts of a Docker image. As the manifest contains a
list of all the image’s layers identified by digest,8 if you can verify that the manifest hasn’t been tampered with, you can
safely download and trust all the layers, even over untrustworthy channels (e.g.,
HTTP).
Docker Content Trust
Docker introduced content trust in 1.8. This is Docker’s mechanism for allowing
publishers9 to
sign their content, completing the trusted distribution mechanism. When a user
pulls an image from a repository, she receives a certificate that includes the
publisher’s public key, allowing her to verify that the image came from the
publisher.
When content trust is enabled, the Docker engine will only operate on images
that have been signed and will refuse to run any images whose signatures or
digests do not match.
You can see content trust in action by enabling it and trying to pull signed and
unsigned images:
$ export DOCKER_CONTENT_TRUST=1
$ docker pull debian:wheezy
Pull (1 of 1): debian:wheezy@sha256:6ec0cac04bb4934af0e9bf...
sha256:6ec0cac04bb4934af0e9bf959ae6ccb55fb70d6a47a8aed9b30...
Digest: sha256:6ec0cac04bb4934af0e9bf959ae6ccb55fb70d6a47a...
Status: Downloaded newer image for debian@sha256:6ec0cac04...
Tagging debian@sha256:6ec0cac04bb4934af0e9bf959ae6ccb55fb7...
$ docker pull amouat/identidock:unsigned
No trust data for unsigned
-
In Docker 1.8, content trust must be enabled by setting the environment
variableDOCKER_CONTENT_TRUST=1. In later versions of Docker, this will become
the default.
The official, signed, Debian image was pulled successfully.
In contrast, Docker refused to pull the unsigned image amouat/identidock:unsigned.
So what about pushing signed images? It’s surprisingly easy:
$ docker push amouat/identidock:newest
The push refers to a repository [docker.io/amouat/identido...
...
843e2bded498: Image already exists
newest: digest: sha256:1a0c4d72c5d52094fd246ec03d...
Signing and pushing trust metadata
You are about to create a new root signing key passphrase.
This passphrase will be used to protect the most sensitive
key in your signing system. Please choose a long, complex
passphrase and be careful to keep the password and the key
file itself secure and backed up. It is highly recommended
that you use a password manager to generate the passphrase
and keep it safe.
There will be no way to recover this key. You can find the
key in your config directory.
Enter passphrase for new offline key with id 70878f1:
Repeat passphrase for new offline key with id 70878f1:
Enter passphrase for new tagging key with id docker.io/amo...
Repeat passphrase for new tagging key with id docker.io/am...
Finished initializing "docker.io/amouat/identidock"
Since this was the first push to the repository with content trust enabled,
Docker has created a new root signing key and a tagging key. The tagging key
will be discussed later. Note the importance of keeping the root key safe and
secure. Life becomes very difficult if you lose this; all users of your
repositories will be unable to pull new images or update existing images without
manually removing the old certificate.
Now the image can be downloaded using content trust:
$ docker rmi amouat/identidock:newest
Untagged: amouat/identidock:newest
$ docker pull amouat/identidock:newest
Pull (1 of 1): amouat/identidock:newest@sha256:1a0c4d72c5d...
sha256:1a0c4d72c5d52094fd246ec03d6b6ac43836440796da1043b6e...
Digest: sha256:1a0c4d72c5d52094fd246ec03d6b6ac43836440796d...
Status: Image is up to date for amouat/identidock@sha256:1...
Tagging amouat/identidock@sha256:1a0c4d72c5d52094fd246ec03...
If you haven’t downloaded an image from a given repository before, Docker will
first retrieve the certificate for the publisher of that repository. This is
done over HTTPS and is low risk, but can likened to connecting to a host via SSH
for the first time; you have to trust that you are being given the correct
credentials. Future pulls from that repository can be verified using the
existing certificate.
Tip
Back Up Your Signing Keys!
Docker will encrypt all keys at rest and takes care to ensure private material
is never written to disk. Due to the importance of the keys, it is recommended
that they are backed up on two encrypted USB sticks kept in a secure location.
To create a TAR file with the keys, run:
$ umask 077
$ tar -zcvf private_keys_backup.tar.gz \
               ~/.docker/trust/private
$ umask 022
The umask commands ensure file permissions are set to read-only.
Note that as the root key is only needed when creating or revoking keys, it
can—and should—be stored offline when not in use.
Back to the tagging key. A tagging key is generated for each repository owned by
a publisher. The tagging key is signed by the root key, which allows it to be
verified by any user with the publisher’s certificate. The tagging key can be
shared within an organization and used to sign any images for that repository.
After generating the tagging key, the root key can and should be taken offline
and stored securely.
Should a tagging key become compromised, it is still possible to recover. By
rotating the tagging key, the compromised key can be removed from the system.
This process happens invisibly to the user and can be done proactively to
protect against undetected key compromises.
Content trust also provides freshness guarantees to guard against replay
attacks. A replay attack occurs when an artifact is replaced with a previously
valid artifact. For example, an attacker may replace a binary with an older,
known vulnerable version that was previously signed by the publisher. As the
binary is correctly signed, the user can be tricked into running the vulnerable
version of the binary. To avoid this, content trust makes use of timestamp
keys associated with each repository. These keys are used to sign metadata
associated with the repository. The metadata has a short expiration date that
requires it to be frequently resigned by the timestamp key. By verifying that
the metadata has not expired before downloading the image, the Docker client can
be sure it is receiving an up-to-date (or fresh) image. The timestamp keys are
managed by the Docker Hub and do not require any interaction from the
publisher.
A repository can contain both signed and unsigned images. If you have content
trust enabled and want to download an unsigned image, use the
--disable-content-trust flag:
$ docker pull amouat/identidock:unsigned
No trust data for unsigned
$ docker pull --disable-content-trust \
amouat/identidock:unsigned
unsigned: \
Pulling from amouat/identidock
...
7e7d073d42e9: Already exists
Digest: sha256:ea9143ea9952ca27bfd618ce718501d97180dbf1b58...
Status: Downloaded newer image for amouat/identidock:unsigned
If you want to learn more about
content trust, see the
offical Docker documentation, as well as The
Update Framework, which is the underlying specification used by content trust.
While this is a reasonably complex infrastructure with multiple sets of keys,
Docker has worked hard to ensure it is still simple for end users. With
content trust, Docker has developed a user-friendly, modern security framework
providing provenance, freshness, and integrity guarantees.
Content trust is currently enabled and working on the Docker Hub. To set up
content trust for a local registry, you will also need to configure and deploy a
Notary server.
If you are using unsigned images, it is still possible to verify images by
pulling by digest, instead of by name and tag. For example:
$ docker pull debian@sha256:f43366bc755696485050c\
e14e1429c481b6f0ca04505c4a3093dfdb4fafb899e
This will pull the debian:jessie image as of the time of writing. Unlike the
debian:jessie tag, it is guaranteed to always pull exactly the same image (or
none at all). If the digest can be securely transferred and authenticated in some
manner (e.g., sent via a PGP signed e-mail from a trusted party), you can
guarantee the authenticity of the image. Even with content trust enabled, it is
still possible to pull by digest.
If you don’t trust either a private registry or the Docker Hub to distribute
your images, you can always use the docker load and docker save commands to
export and import images. The images can be distributed by an internal download
site or simply by copying files. Of course, if you go down this route, you are
likely to find yourself recreating many of the features of the Docker registry
and content-trust components.
Reproducible and Trustworthy Dockerfiles
Ideally, Dockerfiles should produce exactly the same image each time. In practice, this is hard to achieve. The same Dockerfile is likely to produce different images over time. This is clearly a problematic situation, as again, it becomes hard to be sure what is in your images. It is possible to at least come close to entirely reproducible builds, by adhering to the following rules when writing Dockerfiles:
-
Always specify a tag in
FROMinstructions.FROM redisis bad, because it pulls thelatesttag, which changes over time and can be expected to move with major version changes.FROM redis:3.0is better, but can still be expected to change with minor updates and bug fixes (which may be exactly what you want). If you want to be sure you are pulling exactly the same image each time, the only choice is to use a digest as described previously; for example:FROM redis@sha256:3479bbcab384fa343b52743b933661335448f816...
Using a digest will also protect against accidental corruption or tampering.
-
Provide version numbers when installing software from package managers.
apt-get install cowsayis OK, ascowsayis unlikely to change, butapt-get install cowsay=3.03+dfsg1-6is better. The same goes for other package installers such as pip—provide a version number if you can. The build will fail if an old package is removed, but at least this gives you warning. Also note that a problem still remains: packages are likely to pull in dependencies, and these dependencies are often specified in>=terms and can hence change over time. To completely lock down the version of things, have a look at tools like aptly, which allow you to take snapshots of repositories. -
Verify any software or data downloaded from the Internet. This means using checksums or cryptographic signatures. Of all the steps listed here, this is the most important. If you don’t verify downloads, you are vulnerable to accidental corruption as well as attackers tampering with downloads. This is particularly important when software is transferred with HTTP, which offers no guarantees against man-in-the-middle attacks. The following section offers specific advice on how to do this.
Most Dockerfiles for the official images provide good examples of using
tagged versions and verifying downloads. They also typically use a specific tag
of a base image, but do not use version numbers when installing software from
package managers.
Securely Downloading Software in Dockerfiles
In the majority of cases, vendors will make signed checksums available for
verifying downloads. For example, the Dockerfile for the official Node.js image
includes the following:
RUN gpg --keyserver pool.sks-keyservers.net \
--recv-keys 7937DFD2AB06298B2293C3187D33FF9D0246406D \
114F43EE0176B71C7BC219DD50A3051F888C628D
ENV NODE_VERSION 0.10.38
ENV NPM_VERSION 2.10.0
RUN curl -SLO "http://nodejs.org/dist/v$NODE_VERSION/node-v\
$NODE_VERSION-linux-x64.tar.gz" \  && curl -SLO "http://nodejs.org/dist/v$NODE_VERSION/\
SHASUMS256.txt.asc" \
&& curl -SLO "http://nodejs.org/dist/v$NODE_VERSION/\
SHASUMS256.txt.asc" \  && gpg --verify SHASUMS256.txt.asc \
  && grep " node-v$NODE_VERSION-linux-x64.tar.gz\$" \
SHASUMS256.txt.asc | sha256sum -c -
&& grep " node-v$NODE_VERSION-linux-x64.tar.gz\$" \
SHASUMS256.txt.asc | sha256sum -c - 
-
Gets the GNU Privacy Guard (GPG) keys used to sign the Node.js download.
Here, you do have to trust that these are the correct keys. -
Downloads the Node.js tarball.
-
Downloads the checksum for the tarball.
-
Uses GPG to verify that the checksum was signed by whoever owns the
previously obtained keys. -
Checks that the checksum matches the tarball by using the
sha256sumtool.
If either the GPG test or the checksum test fails, the build will abort.
In some cases, packages are available in third-party repositories, which means
they can be installed securely by adding the given repository and its signing
key. For example, the Dockerfile for the official Nginx image includes the following:
RUN apt-key adv --keyserver hkp://pgp.mit.edu:80 \
    --recv-keys 573BFD6B3D8FBC641079A6ABABF5BD827BD9BF62
RUN echo "deb http://nginx.org/packages/mainline/debian/\
 jessie nginx" >> /etc/apt/sources.list
The first command obtains the signing key for Nginx (which is added to the
keystore), and the second command adds the Nginx package repository to the list
of repositories to check for software. After this, Nginx can be simply and
securely installed with apt-get install -y nginx (preferably with a
version number).
Assuming no signed package or checksum is available, creating your own is easy. For example, to create a checksum for a Redis release:
$ curl -s -o redis.tar.gz \
  http://download.redis.io/releases/redis-3.0.1.tar.gz
$ sha1sum -b redis.tar.gz
fe1d06599042bfe6a0e738542f302ce9533dde88 *redis.tar.gz
-
Here, we’re creating a 160-bit SHA-1 checksum. The
-bflag tells the
sha1sumutility that it is dealing with binary data, not text.
Once you’ve tested and verified the software, you can add something like the
following to your Dockerfile:
RUN curl -sSL -o redis.tar.gz \
         http://download.redis.io/releases/redis-3.0.1.tar.gz \
    && echo "fe1d06599042bfe6a0e738542f302ce9533dde88\
 *redis.tar.gz" | sha1sum -c -
This downloads the file as redis.tar.gz and asks sha1sum to verify the
checksum. If the check fails, the command will fail and the build will abort.
Changing all these details for each release is a lot of work if you release
often, so automating the process is worthwhile. In many of the official
image repositories, you can find update.sh scripts for this purpose (for example,
https://github.com/docker-library/wordpress/blob/master/update.sh).
Security Tips
This section contains actionable tips on securing container deployments.
Not all the advice is applicable to all deployments, but you should become
familiar with the basic tools you can use.
Many of the tips describe various ways in which containers can be limited so
that containers are unable to adversely affect other containers or the host. The
main issue to bear in mind is that the host kernel’s resources—CPU, memory,
network, UIDs, and so forth—are shared among containers. If a container monopolizes
any of these, it will starve out other containers. Worse, if a container can
exploit a bug in kernel code, it may be able to bring down the host or gain
access to the host and other containers. This could be caused either
accidentally, through some buggy programming, or maliciously, by an attacker
seeking to disrupt or compromise the host.
Set a USER
Never run production applications as root inside the container. That’s worth
saying again: never run production applications as root inside the container.
An attacker who breaks the application will have full access to the
container, including its data and programs. Worse, an attacker who manages to break out of
the container will have root access on the host. You wouldn’t run an
application as root in a VM or on bare metal, so don’t do it in a container.
To avoid running as root, your Dockerfiles should always create a non-privileged
user and switch to it with a USER statement or from an entrypoint script. For
example:
RUN groupadd -r user_grp && useradd -r -g user_grp user
USER user
This creates a group called user_grp and a new user called user who belongs
to that group. The USER statement will take effect for all following
instructions and when a container is started from the image. You may need to
delay the USER instruction until later in the Dockerfile if you need to first
perform actions that need root privileges such as installing software.
Many of the official images create an unprivileged user in the same way, but do
not contain a USER instruction. Instead, they switch users in an entrypoint
script, using the gosu utility. For example, the entry-point script for the
official Redis image looks like this:
#!/bin/bash
set -e
if [ "$1" = 'redis-server' ]; then
        chown -R redis .
        exec gosu redis "$@"
fi

exec "$@"
This script includes the line chown -R redis ., which sets the ownership of
all files under the images data directory to the redis user. If the Dockerfile
had declared a USER, this line wouldn’t work. The next line, exec gosu redis "$@", executes the given redis command as the redis user. The use of exec means
the current shell is replaced with redis, which becomes PID 1 and has any
signals forwarded appropriately.
Tip
Use gosu, not sudo
The traditional tool for executing commands as another user is sudo. While sudo
is a powerful and venerable tool, it has some side effects that make it less
than ideal for use in entry-point scripts. For example, you can see what happens
if you run sudo ps aux inside an Ubuntu10 container:
$ docker run --rm ubuntu:trusty sudo ps aux
USER       PID ... COMMAND
root         1     sudo ps aux
root         5     ps aux
You have two processes, one for sudo and one for the command you
ran.
By contrast, say you install gosu into an Ubuntu image:
$ docker run --rm amouat/ubuntu-with-gosu gosu root ps aux
USER       PID ... COMMAND
root         1     ps aux
You have only one process running—gosu has executed the command and
gotten out of the way completely. Importantly, the command is running as PID 1,
meaning that it will correctly receive any signals sent to the container, unlike
the sudo example.
User Namespaces
As of Docker 1.10, you can enable user namespacing by starting the kernel with
the --userns-remap flag. This will map UIDs (including root) inside the
container to high-numbered UIDs on the host. There is a single, system-wide
mapping, meaning that root inside a container is the same UID across containers.
This is great step forward for security, but as of the time of writing it has
some issues that limit its usability:
-
It can’t be used in conjunction with a read-only container filesystem.
-
Sharing of network, IPC and PID namespaces with the host or other containers
is restricted in many cases. -
The remapped root user inside a container has
some extra restrictions, such as not being able to callmknod. -
Using Docker volumes becomes more complex as the changed UIDs affect
access privileges.
Finally, if you have an application that insists on running as root (and you
can’t fix it or use user namespaces), consider using tools such as sudo, SELinux
(see SELinux), and fakeroot to constrain the process.
Limit Container Networking
A container should open only the ports it needs to use in production, and these
ports should be accessible only to the other containers that need them. This is
a little trickier than it sounds, as by default, containers can talk to
each other whether or not ports have been explicitly published or exposed. You
can see this by having a quick play with the netcat tool:11
$ docker run --name nc-test -d \
             amouat/network-utils nc -l 5001
f57269e2805cf3305e41303eafefaba9bf8d996d87353b10d0ca577acc7...
$ docker run \
   -e IP=$(docker inspect -f \
           {{.NetworkSettings.IPAddress}} nc-test) \
   amouat/network-utils \
           sh -c 'echo -n "hello" | nc -v $IP 5001'
Connection to 172.17.0.3 5001 port [tcp/*] succeeded!
$ docker logs nc-test
hello
-
Tells the
netcatutility to listen to port 5001 and echo any input. -
Sends “hello” to the first container using
netcat.
The second container is able to connect to nc-test despite there being no
ports published or exposed. You can change this by running the Docker daemon with
the --icc=false flag. This turns off inter-container communication,
which can prevent compromised containers from being able to attack other
containers. Any explicitly linked containers will still be able to communicate.
Docker controls inter-container communication by setting IPtables rules (which
requires that the --iptables flag is set on the daemon, as it should be by
default).
The following example demonstrates the effect of setting --icc=false on
the daemon:
$ cat /etc/default/docker | grep DOCKER_OPTS= DOCKER_OPTS="--iptables=true --icc=false"
-
On Ubuntu, the Docker daemon is configured by setting
DOCKER_OPTSin
/etc/default/docker. -
The
-w 2flag tells Netcat to time out after two seconds.
The first connection fails, as inter-container communication is off and
no link is present. The second command succeeds, due to the added link. If you
want to understand how this works under the hood, try running sudo iptables -L on the host with and without linked containers.
-n
When publishing ports to the host, Docker publishes to all interfaces
(0.0.0.0) by default. You can instead specify the interface you want to bind to
explicitly:
$ docker run -p 87.245.78.43:8080:8080 -d myimage
This reduces the attack surface by only allowing traffic from the given
interface.
Remove setuid/setgid Binaries
Chances are that your application doesn’t need any setuid or setgid
binaries.12 If you can disable or remove such binaries, you stop
any chance of them being used for privilege escalation attacks.
To get a list of such binaries in an image, try running find / -perm +6000—for example:
-type f -exec ls -ld {} \;
$ docker run debian find / -perm +6000 -type f -exec \
ls -ld {} \; 2> /dev/null
-rwsr-xr-x 1 root root 10248 Apr 15 00:02 /usr/lib/pt_chown
-rwxr-sr-x 1 root shadow 62272 Nov 20 2014 /usr/bin/chage
-rwsr-xr-x 1 root root 75376 Nov 20 2014 /usr/bin/gpasswd
-rwsr-xr-x 1 root root 53616 Nov 20 2014 /usr/bin/chfn
-rwsr-xr-x 1 root root 54192 Nov 20 2014 /usr/bin/passwd
-rwsr-xr-x 1 root root 44464 Nov 20 2014 /usr/bin/chsh
-rwsr-xr-x 1 root root 39912 Nov 20 2014 /usr/bin/newgrp
-rwxr-sr-x 1 root tty 27232 Mar 29 22:34 /usr/bin/wall
-rwxr-sr-x 1 root shadow 22744 Nov 20 2014 /usr/bin/expiry
-rwxr-sr-x 1 root shadow 35408 Aug 9 2014 /sbin/unix_chkpwd
-rwsr-xr-x 1 root root 40000 Mar 29 22:34 /bin/mount
-rwsr-xr-x 1 root root 40168 Nov 20 2014 /bin/su
-rwsr-xr-x 1 root root 70576 Oct 28 2014 /bin/ping
-rwsr-xr-x 1 root root 27416 Mar 29 22:34 /bin/umount
-rwsr-xr-x 1 root root 61392 Oct 28 2014 /bin/ping6
You can then “defang” the binaries with chmod a-s to remove the suid bit. For
example, you can create a defanged Debian image with the following Dockerfile:
FROM debian:wheezy
RUN find / -perm +6000 -type f -exec chmod a-s {} \; || true
-
The
|| trueallows you to ignore any errors fromfind.
Build and run it:
$ docker build -t defanged-debian .
...
Successfully built 526744cf1bc1
docker run --rm defanged-debian \
find / -perm +6000 -type f -exec ls -ld {} \; 2> /dev/null \
| wc -l
0
$
It’s more likely that your Dockerfile will rely on a setuid/setgid binary
than your application. Therefore, you can always perform this step near the end, after
any such calls and before changing the user (removing setuid binaries is pointless
if the application runs with root privileges).
Limit Memory
Limiting memory protects against both DoS attacks and applications with
memory leaks that slowly consume all the memory on the host (such applications
can be restarted automatically to maintain a level of service).
The -m and --memory-swap flags to docker run limit the amount of memory
and swap memory a container can use. Somewhat confusingly, the --memory-swap
argument sets the total amount of memory (memory plus swap memory rather
than just swap memory). By default, no limits are applied. If the -m flag is
used but not --memory-swap, then --memory-swap is set to double the argument
to -m. This is best explained with an example. Here, you’ll use the
amouat/stress image, which includes the Unix
stress utility that is used to test
what happens when resources are hogged by a process. In this case, you will tell
it to grab a certain amount of memory:
$ docker run -m 128m --memory-swap 128m amouat/stress \
     stress --vm 1 --vm-bytes 127m -t 5s
stress: info: [1] dispatching hogs: 0 cpu, 0 io, 1 vm, 0 hdd
stress: info: [1] successful run completed in 5s
$ docker run -m 128m --memory-swap 128m amouat/stress \
     stress --vm 1 --vm-bytes 130m -t 5s
stress: FAIL: [1] (416) <-- worker 6 got signal 9
stress: WARN: [1] (418) now reaping child worker processes
stress: FAIL: [1] (422) kill error: No such process
stress: FAIL: [1] (452) failed run completed in 0s
stress: info: [1] dispatching hogs: 0 cpu, 0 io, 1 vm, 0 hdd
$ docker run -m 128m amouat/stress \
     stress --vm 1 --vm-bytes 255m -t 5s
stress: info: [1] dispatching hogs: 0 cpu, 0 io, 1 vm, 0 hdd
stress: info: [1] successful run completed in 5s
-
These arguments tell the stress utility to run one process that will grab 127 MB of
memory and time out after 5 seconds. -
This time you try to grab 130 MB, which fails because you are allowed only 128 MB.
-
This time you try to grab 255 MB, and because
--memory-swaphas defaulted to 256 MB,
the command succeeds.
Limit CPU
If an attacker can get one container, or one group of containers, to start using
all the CPU on the host, the attacker will be able to starve out any other containers on
the host, resulting in a DoS attack.
In Docker, CPU share is determined by a relative weighting with a default
value of 1024, meaning that by default all containers will receive an equal
share of CPU.
The way it works is best explained with an example. Here, you’ll start four
containers with the amouat/stress image you saw earlier, except this time they
will all attempt to grab as much CPU as they like, rather than memory.
$ docker run -d --name load1 -c 2048 amouat/stress
912a37982de1d8d3c4d38ed495b3c24a7910f9613a55a42667d6d28e1d...
$ docker run -d --name load2 amouat/stress
df69312a0c959041948857fca27b56539566fb5c7cda33139326f16485...
$ docker run -d --name load3 -c 512 amouat/stress
c2675318fefafa3e9bfc891fa303a16e72caf221ec23a4c222c2b889ea...
$ docker run -d --name load4 -c 512 amouat/stress
5c6e199423b59ae481d41268c867c705f25a5375d627ab7b59c5fbfbcf...
$ docker stats $(docker inspect -f {{.Name}} $(docker ps -q))
CONTAINER           CPU %    ...
/load1              392.13%
/load2              200.56%
/load3              97.75%
/load4              99.36%
In this example, the container load1 has a weighting of 2048, load2 has the
default weighting of 1024, and the other two containers have weightings of 512.
On my machine with eight cores and hence a total of 800% CPU to allocate, this
results in load1 getting approximately half the CPU, load2 getting a quarter,
and load3 and load4 getting an eighth each. If only one container is
running, it will be able to grab as many resources as it wants.
The relative weighting means that it shouldn’t be possible for any container to
starve the others with the default settings. However, you may have “groups”
of containers that dominate CPU over other containers, in which case, you can
assign containers in that group a lower default value to ensure fairness. If you
do assign CPU shares, make sure that you bear the default value in mind so that any
containers that run without an explicit setting still receive a fair share
without dominating other containers.
Limit Restarts
If a container is constantly dying and restarting, it will waste a large
amount of system time and resources, possibly to the extent of causing a DoS.
This can be easily prevented by using the on-failure restart policy instead
of the always policy, for example:
$ docker run -d --restart=on-failure:10 my-flaky-image
...
This causes Docker to restart the container up to a maximum of 10
times. The current restart count can be found as .RestartCount in docker inspect:
$ docker inspect -f "{{ .RestartCount }}" $(docker ps -lq)
0
Docker employs an exponential back-off when restarting containers. (It will
wait for 100 ms, then 200 ms, then 400 ms, and so forth on subsequent restarts.) By itself, this
should be effective in preventing DoS attacks that try to exploit the restart
functionality.
Limit Filesystems
Stopping attackers from being able to write to files prevents several attacks and
generally makes life harder for hackers. They can’t write a script and trick
your application into running it, or overwrite sensitive data or configuration
files.
Starting with Docker 1.5, you can pass the --read-only flag to docker run,
which makes the container’s filesystem entirely read-only:
$ docker run --read-only debian touch x
touch: cannot touch 'x': Read-only file system
You can do something similar with volumes by adding :ro to the end of the
volume argument:
$ docker run -v $(pwd):/pwd:ro debian touch /pwd/x
touch: cannot touch '/pwd/x': Read-only file system
The majority of applications need to write out files and won’t operate in a
completely read-only environment. In such cases, you can find the folders and
files that the application needs write access to and use volumes to mount only
those files that are writable.
Adopting such an approach has huge benefits for auditing. If you can be sure your
container’s filesystem is exactly the same as the image it was created from, you
can perform a single offline audit on the image rather than auditing each
separate container.
Limit Capabilities
The Linux kernel defines sets of privileges—called capabilities—that can be
assigned to processes to provide them with greater access to the system. The
capabilities cover a wide range of functions, from changing the system time to
opening network sockets. Previously, a process either had full root privileges
or was just a user, with no in-between. This was particularly troubling with
applications such as ping, which required root privileges only for opening a raw
network socket. This meant that a small bug in the ping utility could allow
attackers to gain full root privileges on the system. With the advent of
capabilities, it is possible to create a version of ping that has only the
privileges it needs for creating a raw network socket rather than full root
privileges, meaning would-be attackers gain much less from exploiting utilities
like ping.
By default, Docker containers run with a subset of capabilities,13 so, for example, a
container will not normally be able to use devices such as the GPU and
sound card or insert kernel modules. To give extended privileges to a container,
start it with the --privileged argument to docker run.
In terms of security, what you really want to do is limit the capabilities of
containers as much as you can. You can control the capabilities available to a
container by using the --cap-add and --cap-drop arguments. For example, if
you want to change the system time (don’t try this unless you want to break
things!):
$ docker run debian \
         date -s "10 FEB 1981 10:00:00"
Tue Feb 10 10:00:00 UTC 1981
date: cannot set date: Operation not permitted
$ docker run --cap-add SYS_TIME debian \
         date -s "10 FEB 1981 10:00:00"
Tue Feb 10 10:00:00 UTC 1981
$ date
Tue Feb 10 10:00:03 GMT 1981
In this example, you can’t modify the date until you add the SYS_TIME privilege
to the container. As the system time is a non-namespaced kernel feature, setting
the time inside a container sets it for the host and all other containers as
well.14
A more restrictive approach is to drop all privileges and add
back just the ones you need:
$ docker run --cap-drop all debian chown 100 /tmp
chown: changing ownership of '/tmp': Operation not permitted
$ docker run --cap-drop all --cap-add CHOWN debian \
         chown 100 /tmp
This represents a major increase in security; an attacker who breaks into a
kernel will still be hugely restricted in which kernel calls she is able
to make. However, some problems exist:
-
How do you know which privileges you can drop safely? Trial and error seems to
be the simplest approach, but what if you accidentally drop a privilege that your
application needs only rarely? Identifying required privileges is easier if you have a full test suite you
can run against the container and are following a microservices approach that has less code and moving parts in each container to consider. -
The capabilities are not as neatly grouped and fine-grained as you may wish.
In particular, theSYS_ADMINcapability has a lot of functionality; kernel
developers seemed to have used it as a default when they couldn’t find (or
perhaps couldn’t be bothered to look for) a better alternative. In effect, it
threatens to re-create the simple binary split of admin user versus normal user that
capabilities were designed to remediate.
Apply Resource Limits (ulimits)
The Linux kernel defines resource limits that can be applied to processes, such
as limiting the number of child processes that can be forked and the number of
open file descriptors allowed. These can also be applied to Docker containers,
either by passing the --ulimit flag to docker run or setting container-wide
defaults by passing --default-ulimit when starting the Docker daemon. The
argument takes two values, a soft limit and a hard limit separated by a colon,
the effects of which are dependent on the given limit. If only one value is
provided, it is used for both the soft and hard limit.
The full set of possible values and meanings are described in full in man. (Note that the
setrlimitas limit can’t be used with containers, however.) Of
particular interest are the following values:
- cpu
-
Limits the amount of CPU time to the given number of seconds. Takes a soft
limit (after which the container is sent aSIGXCPUsignal) followed by a
SIGKILLwhen the hard limit is reached. For example, again using the stress
utility from Limit Memory and Limit CPU to maximize CPU usage:
$ time docker run --ulimit cpu=12:14 amouat/stress \
              stress --cpu 1
stress: FAIL: [1] (416) <-- worker 5 got signal 24
stress: WARN: [1] (418) now reaping child worker processes
stress: FAIL: [1] (422) kill error: No such process
stress: FAIL: [1] (452) failed run completed in 12s
stress: info: [1] dispatching hogs: 1 cpu, 0 io, 0 vm, 0 hdd

real	0m12.765s
user	0m0.247s
sys	0m0.014s
The ulimit argument killed the container after it used 12 seconds of CPU.
This is potentially useful for limiting the amount of CPU that can be
used by containers kicked off by another process—for example, running computations on
behalf of users. Limiting CPU in such a way may be an effective mitigation
against DoS attacks in such circumstances.
- nofile
-
The maximum number of file descriptors15 that can be
concurrently open in the container. Again, this can be used to defend against DoS
attacks and ensure that an attacker isn’t able to read or write to the container
or volumes. (Note that you need to setnofileto one more than the maximum
number you want.) For example:
$ docker run --ulimit nofile=5 debian cat /etc/hostname
b874469fe42b
$ docker run --ulimit nofile=4 debian cat /etc/hostname
Timestamp: 2015-05-29 17:02:46.956279781 +0000 UTC
Code: System error

Message: Failed to open /dev/null - open /mnt/sda1/var/...
Here, the OS requires several file descriptors to be open, although cat requires only a single file descriptor. It’s hard to be sure of how
many file descriptors your application will need, but setting it to a number
with plenty of room for growth offers some protection against DoS
attacks, compared to the default of 1048576.
- nproc
-
The maximum number of processes that can be created by the user of the
container. On the face of it, this sounds useful, because it can prevent
fork bombs and other types of attack. Unfortunately, thenproclimits are not set
per container but rather for the user of the container across all processes.
This means, for example:
$ docker run --user 500 --ulimit nproc=2 -d debian sleep 100
92b162b1bb91af8413104792607b47507071c52a2e3128f0c6c7659bfb...
$ docker run --user 500 --ulimit nproc=2 -d debian sleep 100
158f98af66c8eb53702e985c8c6e95bf9925401c3901c082a11889182b...
$ docker run --user 500 --ulimit nproc=2 -d debian sleep 100
6444e3b5f97803c02b62eae601fbb1dd5f1349031e0251613b9ff80871555664
FATA[0000] Error response from daemon: Cannot start contai...
[8] System error: resource temporarily unavailable
$ docker run --user 500 -d debian sleep 100
f740ab7e0516f931f09b634c64e95b97d64dae5c883b0a349358c59958...
The third container couldn’t be started, because two processes
already belong to UID 500. By dropping the --ulimit argument, you can continue to add
processes as the user. Although this is a major drawback, nproc limits may still
be useful in situations where you use the same user across a limited number of
containers.
Also note that you can’t set nproc limits for the root user.
Run a Hardened Kernel
Beyond simply keeping your host operating system up-to-date and patched, you may
want to consider running a hardened kernel, using patches such as those provided
by grsecurity and PaX. PaX
provides extra protection against attackers manipulating program execution by
modifying memory (such as buffer overflow attacks). It does this by marking
program code in memory as nonwritable and data as nonexecutable. In addition,
memory is randomly arranged to mitigate against attacks that attempt to reroute
code to existing procedures (such as system calls in common libraries).
grsecurity is designed to work alongside PaX, and it adds patches related to
role-based access control (RBAC), auditing, and other miscellaneous
features.
To enable PaX and/or grsec, you will probably need to patch and compile the
kernel yourself. This isn’t as daunting as it sounds, and plenty of
resources
are available
online
to
help.
These security enhancements may cause some applications to break. PaX, in particular, will conflict with any programs that generate code at runtime. A small overhead also is associated with the extra security checks and measures.
Finally, if you use a precompiled kernel, you will need to ensure that it is recent
enough to support the version of Docker you want to run.
Linux Security Modules
The Linux kernel defines the Linux Security Module (LSM) interface, which is
implemented by various modules that want to enforce a particular security
policy. At the time of writing, several implementations exist, including
AppArmor, SELinux, Smack, and TOMOYO Linux. These security modules can be used to provide another level of security checks
on the access rights of processes and users, beyond that provided by the
standard file-level access control.
The modules normally used with Docker are SELinux (typically with Red Hat-based
distributions) and AppArmor (typically with Ubuntu and Debian distributions).
We’ll take a look at both of these modules now.
SELinux
The SELinux, or Security Enhanced Linux, module was developed by the United
States National Security Agency (NSA) as an implementation of what they call
mandatory access control (MAC), as contrasted to the standard Unix model of
discretionary access control (DAC). In somewhat plainer language, there are two
major differences between the access control enforced by SELinux and the
standard Linux access controls:
-
SELinux controls are enforced based on types, which are essentially labels
applied to processes and objects (files, sockets, and so forth). If the SELinux policy
forbids a process of type A to access an object of type B, that access will be disallowed,
regardless of the file permissions on the object or the access privileges of the
user. SELinux tests occur after the normal file permission checks. -
It is possible to apply multiple levels of security, similar to the
governmental model of confidential, secret, and top-secret access. Processes
that belong to a lower level cannot read files written by processes of a
higher level, regardless of where in the filesystem the file resides or what
the permissions on the file are. So a top-secret process could write a file to
/tmpwithchmod 777privileges, but a confidential process would still be
unable to access the file. This is known as multilevel security (MLS) in
SELinux, which also has the closely related concept of multicategory security
(MCS). MCS allows categories to be applied to processes and objects and denies access to a resource if it does not belong to the correct category. Unlike
MLS, categories do not overlap and are not hierarchical. MCS can be used to
restrict access to resources to subsets of a type (for example, by using a
unique category, a resource can be restricted to use by only a single process).
SELinux comes installed by default on Red Hat distributions and should be simple
to install on most other distributions. You can check whether SELinux is running by
executing sestatus. If that command exists, it will tell you whether SELinux is
enabled or disabled and whether it is in permissive or enforcing mode. When in
permissive mode, SELinux will log access-control infringements but will not
enforce them.
The default SELinux policy for Docker is designed to protect the host from
containers, as well as containers from other containers. Containers are assigned
the default process type svirt_lxc_net_t, and files accessible to a container
are assigned svirt_sandbox_file_t. The policy enforces that containers are able to read and execute files only from /usr on the host and cannot write to
any file on the host. It also assigns a unique MCS category number to each
container, intended to prevent containers from being able to access files or
resources written by other containers in the event of a breakout.
Note
Enabling SELinux
If you’re running a Red Hat-based distribution, SELinux should be installed
already. You can check whether it’s enabled and is enforcing rules by
running sestatus on the command line. To enable SELinux and set it to
enforcing mode, edit /etc/selinux/config so that it contains the line
SELINUX=enforcing.
You will also need to ensure that SELinux support is enabled on the Docker
daemon. The daemon should be running with the flag --selinux-enabled. If not,
it should be added to the file /etc/sysconfig/docker.
You must be using the devicemapper storage driver to use SELinux. At the time of
writing, getting SELinux to work with Overlay and
BTRFS is an ongoing effort, but they are not currently compatible.
For installation of other distributions, refer to the relevant documentation. Note
that SELinux needs to label all files in your filesystem, which takes
some time. Do not install SELinux on a whim!
Enabling SELinux has an immediate and drastic effect on using containers with
volumes. If you have SELinux installed, you will no longer be able to read
or write to volumes by default:
$ sestatus | grep mode
Current mode:                   enforcing
$ mkdir data
$ echo "hello" > data/file
$ docker run -v $(pwd)/data:/data debian cat /data/file
cat: /data/file: Permission denied
You can see the reason by inspecting the folder’s security context:
$ ls --scontext data
unconfined_u:object_r:user_home_t:s0 file
The label for the data doesn’t match the label for containers. The fix is to
apply the container label to the data by using the chcon tool, effectively
notifying the system that you expect these files to be consumed by containers:
$ chcon -Rt svirt_sandbox_file_t data
$ docker run -v $(pwd)/data:/data debian cat /data/file
hello
$ docker run -v $(pwd)/data:/data debian \
         sh -c 'echo "bye" >> /data/file'
$ cat data/file
hello
bye
$ ls --scontext data
unconfined_u:object_r:svirt_sandbox_file_t:s0 file
Note that if you run chcon only on the file and not the parent folder, you
will be able to read the file but not write to it.
From version 1.7 and on, Docker automatically relabels volumes for use with
containers if the :Z or :z suffix is provided when mounting the volume.
The :z labels the volume as usable by all containers (this is required
for data containers that share volumes with multiple containers), and the :Z
labels the volume as usable by only that container. For example:
$ mkdir new_data
$ echo "hello" > new_data/file
$ docker run -v $(pwd)/new_data:/new_data debian \
         cat /new_data/file
cat: /new_data/file: Permission denied
$ docker run -v $(pwd)/new_data:/new_data:Z debian \
         cat /new_data/file
hello
You can also use the --security-opt flag to change the label for a container
or to disable the labeling for a container:
$ touch newfile
$ docker run -v $(pwd)/newfile:/file \
         --security-opt label:disable \
         debian sh -c 'echo "hello" > /file'
$ cat newfile
hello
An interesting use of SELinux labels is to apply a specific label to a
container in order to enforce a particular security policy. For example, you
could create a policy for an Nginx container that allows it to communicate
on only ports 80 and 443.
Be aware that you will be unable to run SELinux commands from inside containers.
Inside the container, SELinux appears to be turned off, which prevents
applications and users from trying to run commands such as setting SELinux
policies that will get blocked by SELinux on the host.
A lot of tools and articles are available for helping to develop SELinux
policies. In particular, be aware of audit2allow, which can turn log messages
from running in permissive mode into policies that allow you to run in
enforcing mode without breaking applications.
The future for SELinux looks promising; as more flags and default
implementations are added to Docker, running SELinux
secured deployments should become simpler. The MCS functionality should allow for the creation of
secret or top-secret containers for processing sensitive data with a simple flag.
Unfortunately, the current user experience with SELinux is not great; newcomers
to SELinux tend to watch everything break with “Permission Denied” and have no
idea what’s wrong or how to fix it. Developers refuse to run
with SELinux enabled, leading back to the problem of having different
environments between development and production—the very problem Docker was
meant to solve. If you want or need the extra protection that SELinux provides,
you will have to grin and bear the current situation until things improve.
AppArmor
The advantage and disadvantage of AppArmor is that it is much simpler than SELinux. It should just work and stay out of your way, but cannot provide the same granularity of protection as SELinux. AppArmor works by applying profiles to processes, restricting which privileges they have at the level of Linux capabilities and file access.
If you’re using an Ubuntu host, chances are that it is running right now. You can
check this by running sudo apparmor_status. Docker will automatically apply
an AppArmor profile to each launched container. The default profile provides a
level of protection against rogue containers attempting to access various system
resources, and it can normally be found at /etc/apparmor.d/docker. At the time of
writing, the default profile cannot be changed, as the Docker daemon will
overwrite it when it reboots.
If AppArmor interferes with the running of a container, it can be turned off for that container by passing --security-opt="apparmor:unconfined" to docker run. You can pass a different profile for a container by passing --security-opt="apparmor:PROFILE" to docker run, where the PROFILE is the name of a security profile previously loaded by AppArmor.
Auditing
Running regular audits or reviews on your containers and images is a good way to
ensure that your system is kept clean and up-to-date and to double-check that no
security breaches have occurred. An audit in a container-based system should
check that all running containers are using up-to-date images and that those
images are using up-to-date and secure software. Any divergence in a container
from the image it was created from should be identified and checked. In
addition, audits should cover other areas nonspecific to container-based
systems, such as checking access logs, file permissions, and data integrity. If
audits can be largely automated, they can run regularly to detect any issues as
quickly as possible.
Rather than having to log into each container and examine each individually, you
can instead audit the image used to build the container and use docker diff
to check for any drift from the image. This works even better if you use a
read-only filesystem (see Limit Filesystems) and can be sure that nothing
has changed in the container.
At a minimum, you should check that the versions of software used are up-to-date
with the latest security patches. This should be checked on each image and any
files identified as having changed by docker diff. If you are using volumes,
you will also need to audit each of those directories.
The amount of work involved in auditing can be seriously reduced by running
minimal images that contain only the files and libraries essential to the
application.
The host system also needs to be audited as you would a regular host machine or
VM. Making sure that the kernel is correctly patched becomes even more critical in a
container-based system where the kernel is shared among containers.
Several tools are already available for auditing container-based systems, and you
can expect to see more in the coming months. Notably, Docker released the
Docker Bench for Security tool, which checks for
compliance with many of the suggestions from the Docker Benchmark document from
the Center for Internet Security (CIS).
Also, the open source Lynis auditing tool contains
several checks related to running Docker.
Incident Response
Should something bad occur, you can take advantage of several Docker features to respond quickly to the situation and investigate the cause of the problem. In particular, docker commit can be used to take a snapshot of the compromised system, and docker diff and docker logs can reveal changes made by the attacker.
A major question that needs to be answered when dealing with a compromised
container is “Could a container breakout have occurred?” Could the attacker
have gained access to the host machine? If you believe that this is possible or
likely, the host machine will need to be wiped and all containers re-created from
images (without some form of attack mitigation in place). If you are sure the
attack was isolated to the container, you can simply stop that container and
replace it. (Never put the compromised container back into service, even if it
holds data or changes not in the base image; you simply can’t trust the container
anymore.)
Effective mitigation against the attack may be to limit the container in some
way, such as dropping capabilities or running with a read-only filesystem.
Once the immediate situation has been dealt with and some form of attack
mitigation put in place, the compromised image that you committed can be
analyzed to determine the exact causes and extent of the attack.
For information on how to develop an effective security policy covering incident
response, read CERT’s
Steps
for Recovering from a UNIX or NT System Compromise and the
advice
given on the ServerFault website.
Conclusion
As you’ve seen in this report, there are many aspects to
consider when securing a system. The primary advice is to follow the principles of
defense-in-depth and least privilege. This ensures that even if an attacker manages to compromise a component of the system, that attacker won’t gain full access
to the system and will have to penetrate further defenses before being able
to cause significant harm or access sensitive data.
Groups of containers belonging to different users or operating on sensitive data
should run in VMs separate from containers belonging to other users or running
publicly accessible interfaces. The ports exposed by containers should be
locked down, particularly when exposed to the outside world, but also internally
to limit the access of any compromised containers. The resources and
functionality available to containers should be limited to only that required by
their purpose, by setting limits on their memory usage, filesystem access, and
kernel capabilities. Further security can be provided at the kernel level by
running hardened kernels and using security modules such as AppArmor or SELinux.
In addition, attacks can be detected early through the use of monitoring and
auditing. Auditing, in particular, is interesting in a container-based system,
as containers can be easily compared to the images they were created from in order to
detect suspicious changes. In turn, images can be vetted offline to make sure
they are running up-to-date and secure versions of software. Compromised
containers with no state can be replaced quickly with newer versions.
Containers are a positive force in terms of security because of the extra level of
isolation and control they provide. A system using containers properly will be more secure than the equivalent system without containers.
1I strongly recommend Dan Walsh’s series of posts at opensource.com.
2It is possible to turn on user namespacing, which will map the root user in a container to a high-numbered user on the host. We will discuss this feature and its drawbacks later.
3An interesting argument exists about whether containers will ever be as secure as VMs. VM proponents argue that the lack of a hypervisor and the need to share kernel resources mean that containers will always be less secure. Container proponents argue that VMs are more vulnerable because of their greater attack surface, pointing to the large amounts of complicated and privileged code in VMs required for emulating esoteric hardware (as an example, see the recent VENOM vulnerability that exploited code in floppy drive emulation).
4The concept of least privilege was first articulated as “Every program and every privileged user of the system should operate using the least amount of privilege necessary to complete the job,” by Jerome Saltzer in “Protection and the Control of Information Sharing in Multics.” Recently, Diogo Mónica and Nathan McCauley from Docker have been championing the idea of “least-privilege microservices” based on Saltzer’s principle., including at a recent DockerCon talk.
5A work-around is to docker save all the required images and load them into a fresh registry.
6This is similar to modern ideas of immutable infrastructure, whereby infrastructure—including bare metal, VMs, and containers—is never modified and is instead replaced when a change is required.
7A full discussion of public-key cryptography is fascinating but out of scope here. For more information see Applied Cryptography by Bruce Schneier.
8A similar construct is used in protocols such as Bittorrent and Bitcoin and is known as a hash list.
9In the context of this report, anyone who pushes an image is a publisher; it is not restricted to large companies or organizations.
10I’m using Ubuntu instead of Debian here, as the Ubuntu image includes sudo by default.
11We’re using the OpenBSD version here.
12setuid and setgid binaries run with the privileges of the owner rather than the user. These are normally used to allow users to temporarily run with escalated privileges required to execute a given task, such as setting a password.
13These are CHOWN, DAC_OVERRIDE, FSETID, FOWNER, MKNOD, NET_RAW, SETGID, SETUID, SETFCAP, SETPCAP, NET_BIND_SERVICE, SYS_CHROOT, KILL, and AUDIT_WRITE. Dropped capabilities notably include (but are not limited to) SYS_TIME, NET_ADMIN, SYS_MODULE, SYS_NICE, and SYS_ADMIN. For full information on capabilities, see man capabilities.
14If you run this example, you’ll have a broken system until you set the time correctly. Try running sudo ntpdate or sudo ntpdate-debian to change back to the correct time.
15A file descriptor is a pointer into a table recording information on the open files on the system. An entry is created whenever a file is accessed, recording the mode (read, write, etc.) the file is accessed with and pointers to the underlying files.