.NET and the Commit Status API
Read Chapter 5 from Building Tools with GitHub
 Fishing boat (source: Pixabay)
At the risk of oversimplifying things too much, one way to look at a Git repository is as just a long series of commits.
Each commit contains quite a bit of information: the contents of the source files, who created the commit and when, the author’s comments on what changes the commit introduces, and so on.
This is all good stuff, and works very well for Git’s main use case: controlling the history of a software project.
GitHub’s Commit Status API adds another layer of metadata to a commit: what various services say about that commit.
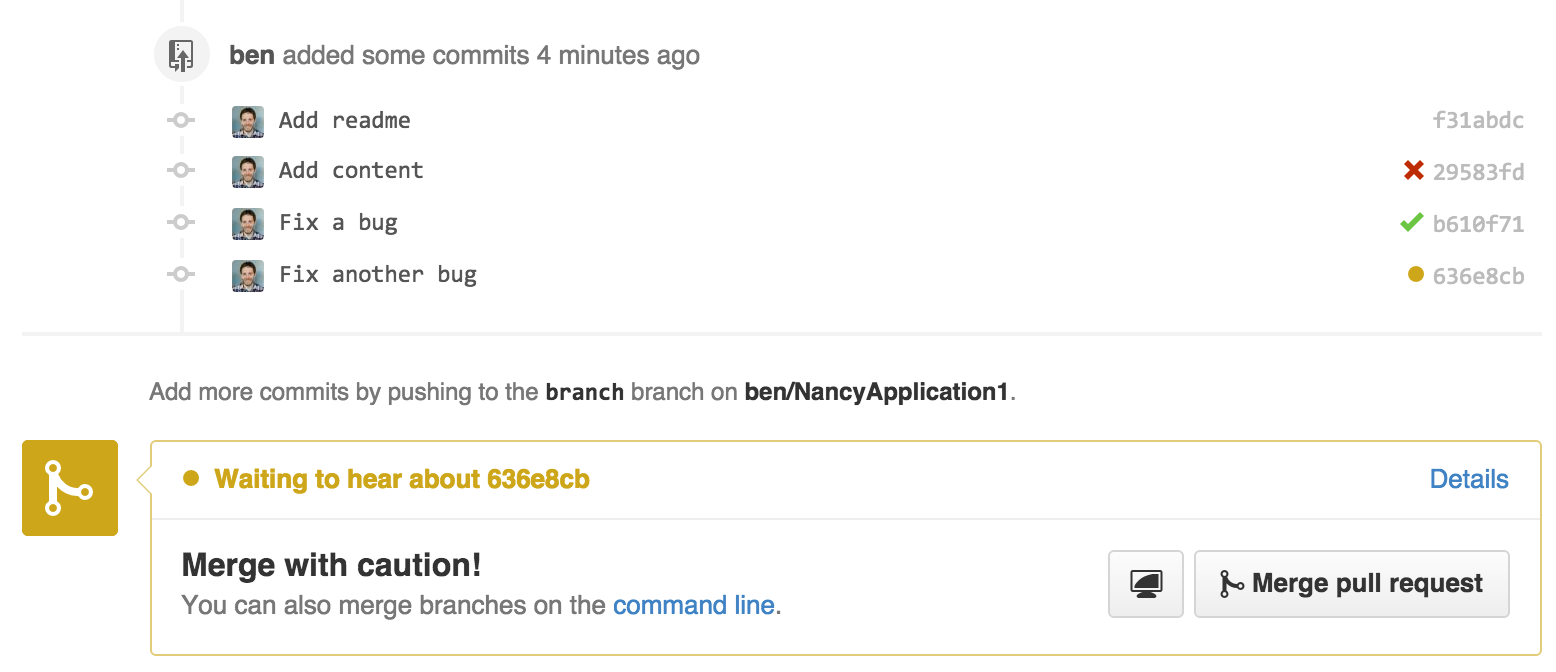
This capability primarily shows itself in the pull request UI, as shown in Figure 1-1.
Each commit in the pull request is annotated with a symbol indicating its status—a red “×” for failure or error, a green “✓” for success, or an amber “•” to indicate that a decision is in the process of being made.
This feature also surfaces at the bottom of the pull request; if the last commit in the branch is not marked as successful, you get a warning about merging the request.

Learn faster. Dig deeper. See farther.
The most obvious application for this feature is a continuous-integration service.
A program like Jenkins will get a notification when new commits are pushed to a branch, run a build/test cycle using the new code, and post the results through the Commit Status API.
An application like this can even include a link back to the build results, so the user can find out which tests failed.
This is a great way to bring together everything needed to make a decision about a proposal: what code has changed, what do people think about it, and does this change break anything?
The answer to all of these questions is available on the same page: the pull-request conversation view.
But building and testing is only the beginning; the status of a commit can be used for other purposes as well.
For example, open source projects often have a license agreement you must sign in order to submit a contribution.
These are called “contributor license agreements,” and usually contain language about licensing the contribution to the maintainers of the project.
But it’s tedious to manually check every incoming pull request to see if the author has signed the CLA, so a continuous-integration-style service can be used for this.
CLAHub is one such example: it checks to see if all of the authors of the contained commits have signed the CLA, and marks the latest commit as “error” if not.
So now that we know what the feature is, and what its intended use is, let’s take a look at how a program can interact with it.
The API
First, let’s talk about access control.
The Commit Status API exposes the need for OAuth as few others do.
Making a repository private means you want complete control of what people or applications can access it.
Naturally you trust GitHub’s internal code to do the right thing with your data, but what about some random application from the Internet?
OAuth gives you a way to grant private-repository access to an application with limits—the use of OAuth scopes allows an application to ask for a specific set of permissions, but it won’t be able to do just any old thing with your data.
Plus, this way you’re always in control of these permissions; you can revoke an application’s access at any time.
The OAuth system includes the concept of scopes, which can be requested by and granted to an application, each of which allows a certain set of actions.
The Commit Status API requires the repo:status OAuth scope, which allows an application read and write access to just commit statuses; there is no access granted to the actual contents of the repository.
This might seem strange: how can you judge the status of a commit without being able to inspect its contents?
Just remember that this feature has use cases beyond continuous integration, and an application may not need full access to make a decision.
For services that do need to be able to look at the repository contents, you can request the repo scope, which grants read and write access to the entire contents of a repository, including commit statuses.
As of this writing, there’s no way to request read-only access to repositories, so if a service needs access to your data, you have to trust it with write access.
You can also use this API in anonymous mode, without using OAuth at all.
However, in that case you’re limited to reading statuses from public repositories; there is no writing, and private repositories are off-limits.
Just to summarize:
| OAuth scope | Access to statuses | Access to repo data |
|---|---|---|
|
None (anonymous) |
Read-only on public repos |
Read-only on public repos |
|
|
Read/write |
None |
|
|
Read/write |
Read/write |
Raw Statuses
Now that we know how we get access to commit statuses, let’s see what they look like.
Commit statuses exist as atomic entities, and each commit can have a practically unlimited number of them (the actual number is in the thousands).
You can query for existing statuses by doing a GET request to the API server at /repos/<user>/<repo>/<ref>/statuses, and it will return a list of them that looks like this:
[
  {
    "url": "https://api.github.com/repos/…",
    "id": 224503786,
    "state": "success",
    "description": "The Travis CI build passed",
    "target_url": "https://travis-ci.org/libgit2/libgit2/builds/63428108",
    "context": "continuous-integration/travis-ci/push",
    "created_at": "2015-05-21T03:11:02Z",
    "updated_at": "2015-05-21T03:11:02Z"
  },
  …
]
Most of this is self-explanatory, but a couple of fields need explaining:
| Field | Description |
|---|---|
|
|
One of |
|
|
A URL for the specific decision made for this commit (in this case a build/test log), which helps the user figure out why a particular decision was reached. |
|
|
Used for correlating multiple status updates to a single service; each application sets this according to its own rules, but any process that creates statuses should post the |
This API is useful for getting the raw data involved, but it gets complicated quickly.
How do you decide if a given commit is “good?”
What if there are three pending statuses, one success, another pending, two failures, and another success, in that order?
The context field can help you correlate a single service’s updates, and you can order them by created_at to see how each one turned out, but that’s a lot of work.
Fortunately, the API server can do it for you.
Combined Status
If you instead do a GET to /repos/<user>/<repo>/<ref>/status (note that the last word is singular), you’ll instead get a response that looks like this:
{
  "state": "success",
  "statuses": [
    {
      "url": "https://api.github.com/repos/…",
      …
    },
    { … }
  ],
  "sha": "6675aaba883952a1c1b28390866301ee5c281d37",
  "total_count": 2,
  "repository": { … },
  "commit_url": "https://api.github.com/repos/…",
  "url": "https://api.github.com/repos/…"
}
The statuses array is the result of the logic you’d probably write if you had to: it collapses the statuses by context, keeping only the last one.
The state field contains an overall status that takes into account all of the contexts, providing a final value based on these rules:
| Status | Cause |
|---|---|
|
|
Any of the contexts posted a |
|
|
Any of the contexts’ latest state is |
|
|
Latest status for every context is |
This is probably exactly what you want, but if you find that your use case calls for different rules, you can always use the statuses endpoint to get the raw data and calculate your own combined status.
Creating a Status
Now obviously these statuses have to come from somewhere.
This API also includes a facility for creating them.
To do this, you simply make a POST request to /repos/<user>/<repo>/statuses/<sha>, and supply a JSON object for the fields you want to include with your status:
| Field | Description |
|---|---|
|
|
Must be one of |
|
|
A link to detailed information on the process of deciding what the state is or will be. |
|
|
A short string describing what the service is doing to make a decision. |
|
|
An application-specific string to allow the API to manage multiple services contributing to a single commit’s status. |
Notice how the last component in that URL is <sha>.
While you can query for statuses or a combined status using a ref name (like master), creating a status requires you to know the full SHA-1 hash of the commit you want to annotate.
This is to avoid race conditions: if you were targeting a ref, it may have moved between when your process started and when it finished, but the SHA of a commit will never change.
Let’s Write an App
Alright, now that we know how to read and write statuses, let’s put this API to work.
In this chapter, we’ll build a simple HTTP service that lets you create commit statuses for repositories you have access to using the OAuth web flow for authorization.
The system we’ll build will be fairly limited in scope, but it’s a great starting point to customize for your specific needs.
The language this time is C#, running on the CLR (Common Language Runtime).
At one point in the history of computing this wouldn’t have been a good choice for a book like this, since it was only available on Windows, the development tools cost quite a bit of money, and the language and libraries were fairly limited.
However, with the advent of Mono (an open source implementation of the .NET runtime), the open sourcing of the CLR core, and the availability of free tools, C# is now a completely valid and rather nice option for open source or hobby developers.
Plus, it has a vibrant ecosystem of packages we can leverage to make our jobs easier.
Libraries
You’ll be happy to know we won’t be writing an entire HTTP server from scratch in this chapter.
There are a number of open source packages that do this work for us, and in this project we’ll be using Nancy.
Nancy is a project that started as a CLR port of the Sinatra framework for Ruby (it takes its name from Frank Sinatra’s daughter, Nancy).
It’s very capable, but also very succinct, as you’ll see.
We also won’t be directly implementing access to the GitHub API, because GitHub provides a CLR library for that.
It’s called octokit.net, and it does all the right things with regard to asynchrony and type safety.
This is the same library used by the GitHub client for Windows, so it’ll definitely do the job for our little application.
It is, however, the source of a constraint on how we set up our example project: it requires a rather new version of the CLR (4.5) in order to function.
If you want some guidance on how to avoid this pitfall and follow along, continue reading the next section.
If you’ve worked with Nancy before, and have installed NuGet packages in the past, you might be able to skip to the section labeled Sending the Request.
Development Environment
If you’d like to follow along with the code examples, here’s how to set up a development environment with all the necessary elements.
The process is different on Windows (using Visual Studio) and any other platforms (using Xamarin tools).
Visual Studio
If you’re running Windows, you’ll want to visit https://www.visualstudio.com/ and download the Community edition of Visual Studio.
The installer will present you with lots of options; for this example, we’ll only need the “web developer” components, but feel free to check all the boxes that look interesting to you.
(If you have access to a higher tier of Visual Studio, or already have it installed with the web-development packages, you’re all set.)
In order to make things just a little smoother, you’ll want to install a plug-in: the Nancy project templates.
Visit https://visualstudiogallery.msdn.microsoft.com/ and search for “nancy.templates.”
Choose the search result “Nancy.Templates,” which belongs to the NancyFx organization, and click “Get Now.”
This should download a .vsix file that you can double-click to install the templates into Visual Studio.
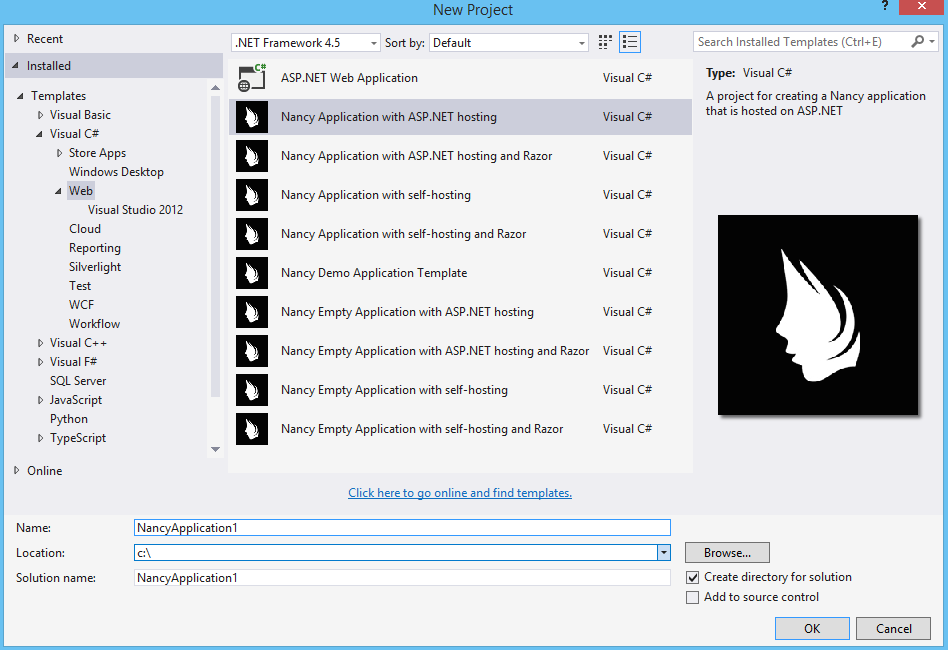
The next step is to create a new project using one of the newly installed templates.
Go to “File→New Project” and select “Visual C#→Web→Nancy Application with ASP.NET Hosting” from the template list (as shown in Figure 1-2).
Make sure the path and name settings at the bottom are to your liking, and click OK.
Next, change the target CLR framework version to something that will work with Octokit.
Right-click the project’s node in the Solution Explorer, and select “Properties.”
In the Application section, set Target Framework to be .NET 4.5 (or later), and save.
You may be prompted to reload the solution.
The very last step is to add NuGet packages for Octokit and Nancy.
Right-click the project node in Solution Explorer, and select “Manage NuGet Packages.”
Do a search for “Nancy,” and upgrade it if necessary—there’s a chance the Nancy project template specifies an out-of-date version.
Then do a search for “Octokit,” and install that.
At this point, you should have an empty solution, configured and ready for our example code.
To run it with debugging, go to “Debug→Start Debugging,” or hit F5.
Visual Studio will start the server under a debugger, and open an IE instance on http://localhost:12008/ (the port might be different), which should serve you the default Nancy “404 Not Found” page.
Xamarin Studio
On OS X and Linux, as of this writing the easiest way forward is to visit http://www.monodevelop.com/ and install MonoDevelop.
Mono is an open source implementation of Microsoft’s CLR specification, and MonoDevelop is a development environment that works much like Visual Studio, but is built on Mono, and is completely open source.
If you try to download MonoDevelop on a Windows or OS X machine, you’ll be prompted to install Xamarin Studio instead; this is a newer version of MonoDevelop with more capabilities, and will work just as well for these examples.
There are no Nancy-specific project templates for these IDEs, so you’ll just start with an empty web project.
Go to “File→New→Solution,” and choose “ASP.NET→Empty ASP.NET Project” from the template chooser, as shown in Figure 1-3.
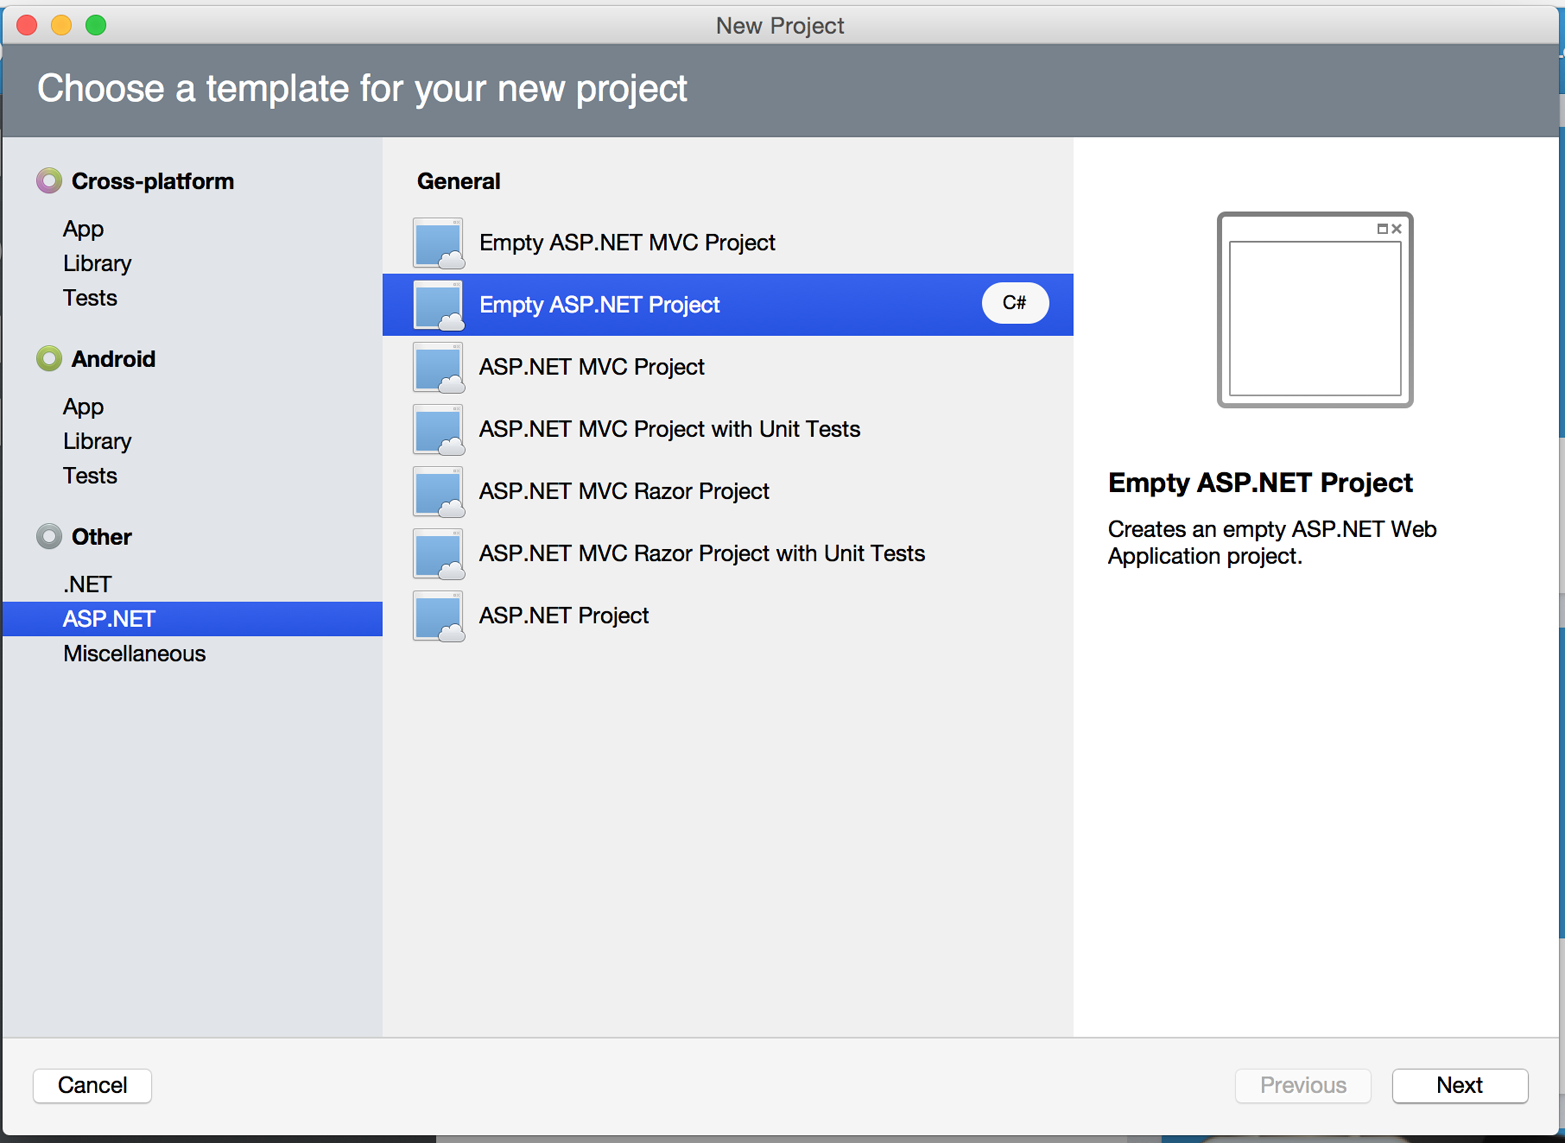
The rest of the wizard steps are about the project name and location; feel free to name and locate this project however you like.
Next, update the target framework setting.
Control- or right-click the node in the solution explorer that corresponds with your project (not your solution), and select Options from the menu.
Under “Build→General,” set the Target Framework to “Mono / .NET 4.5” (or later) and click OK.
Lastly, install the Nancy and Octokit NuGet packages.
Go to “Project→Add NuGet Packages” in the menu to open the package manager.
Search for Nancy, check the box next to it, search for Octokit, check its box, and click “Add Packages” at the bottom right.
Once the process is complete, your project is ready for our example code.
To run it under the debugger, go to “Run→Start Debugging,” or type ⌘-Enter.
Xamarin will start the server and open a browser window to http://127.0.0.1:80080 (possibly with a different port), which at this point will just show the default “404 Not Found” page.
Sending the Request
Alright, now that we have a project ready for some code, let’s get our Nancy application up and running.
Let’s be good engineers, and write our tests first.
In order to do this, generate a new unit-test project alongside your existing application project, and add a NuGet reference to the Nancy.Testing package.
You can then copy and paste the test examples over the top of the default test module that comes with that template.
The first thing we’re going to write is an endpoint that reports how many followers a user has.
In order to test it, we’ll choose a well-known user and make sure their real name is fetched.
Here’s what the test code looks like:
using NUnit.Framework;
using Nancy;
using Nancy.Testing;
using Nancy.Bootstrapper;
using System.Collections.Generic;
using Nancy.Session;
namespace NancyApplication1.Tests
{
[TestFixture ()]
public class Test
{
private Browser browser;
[SetUp]
public void Setup(){
this.bootstrapper =
new ConfigurableBootstrapper(with => {
with.Module<Handler>();
});
this.browser = new Browser (bootstrapper);
}
[Test ()]
public void FetchesUserDetails ()
{
var result = this.browser.Get ("/mojombo",  with => with.HttpRequest ());
Assert.AreEqual (HttpStatusCode.OK, result.StatusCode);
Assert.IsTrue (result.Body.AsString()
.Contains("Tom Preston-Werner"));
with => with.HttpRequest ());
Assert.AreEqual (HttpStatusCode.OK, result.StatusCode);
Assert.IsTrue (result.Body.AsString()
.Contains("Tom Preston-Werner"));  }
}
}
}
}
}
-
Here we’re using the
Browserclass provided byNancy.Testingto make a request to/mojombo, which should give us the number of likes for that GitHub user. -
Here we’re asserting that mojombo’s real name is fetched by the endpoint.
Now that we have a failing test, let’s write the code to implement that endpoint in Nancy.
Here’s what the initial version of that file will look like:
using Nancy;
using Octokit;
using System;
using System.Collections.Generic;
using System.Linq;
namespace NancyApp
{
public class Handler : NancyModule
{
private readonly GitHubClient client =
new GitHubClient(new ProductHeaderValue("MyHello"));
public Handler()
{
Get["/{user}", true] = async (parms, ct) =>  {
var user = await client.User.Get(parms.user.ToString());
{
var user = await client.User.Get(parms.user.ToString());  return String.Format("{0} people love {1}!",
user.Followers, user.Name);
return String.Format("{0} people love {1}!",
user.Followers, user.Name);  };
}
}
}
};
}
}
}
-
Here we derive a class from
NancyModule, which is all you have to do to start receiving and processing HTTP requests in Nancy. -
The
GitHubClientclass is the entry point for Octokit.
Here we create an instance we’ll use later on, using a placeholder product name—this name will not be used for the APIs we’ll be accessing. -
The module’s constructor needs to set up route mappings.
We map/{user}to a lambda function using theGetdictionary that comes withNancyModule.
The second parameter to the index operator says that the handler will be asynchronous. -
Here we see how to get the
{user}part of the request URL (it comes as a property on theparmsparameter), and how to query the GitHub User API using Octokit.
Note that we have toawaitthe result of the network query, since it may take some time. -
Nancy request handlers can simply return a text string, which will be marked as HTML for the viewing browser.
Here we return a simple string with the user’s name and number of followers.
Note
The async and await keywords bear special mention.
These comprise a syntactic nicety that encapsulates a series of functions that are running on an event loop.
The code looks like it runs in order, but really when the await keyword is reached, the system starts an asynchronous request, and returns control back to the main event loop.
Once the request has finished, and the promise is fulfilled, the event loop will then call back into the code that’s expecting the return value of the await keyword, with all the scope variables intact.
This feature was introduced in .NET 4.0 (which was released in 2012), and it lets you write asynchronous code almost as though it were synchronous.
This is but one of the features that make C# the favorite of many developers.
This example is a bit more complicated than “hello, world,” but it’s still fairly succinct and clear.
This bodes well, because we’re about to introduce some complexity, in the form of OAuth.
OAuth Flow
In order to post a status update for a commit, we’re going to have to ask the user for permission.
Apart from asking for their username and password (which gives way too much control, and if two-factor authentication is enabled may not even be enough), the only way to do this is OAuth, which isn’t entirely straightforward.
Here’s a simple outline of the OAuth process, from our little server’s point of view:
-
We need an authorization token, either because we don’t have one, or because the one we have is expired.
This is just a string of characters, but we can’t generate it ourselves, so we ask GitHub for one.
This involves redirecting the user’s browser to a GitHub API endpoint, with the kind of permission we’re asking for and some other details as query parameters. -
GitHub tells the user (through their browser) that an application is requesting some permissions, and they can either allow or deny them.
-
If the user allows this access, their browser is redirected to a URL we specified in step 1.
A “code” is passed as a query parameter; this is not the access token we want, but a time-limited key to get one. -
From inside the handler for this request, we can use a REST API to get the actual OAuth access token, which we can store somewhere safe.
We do this because if we already have a token, we can skip all the way to the last step of this process. -
Now we have permission, and we can use the GitHub API in authenticated mode.
This might seem overly complicated, but its design achieves several goals.
First, permission can be scoped—an application is almost never given full access to the user’s account and data.
Second, the whole exchange is secure; at least one part of this has to go through the user, and cannot be automated.
Third, the access token is never transmitted to the user’s browser, which avoids an entire class of security vulnerabilities.
Let’s walk through the code for our tiny little server’s implementation of this flow.
First, once we have a token, we should store it so we’re not going through the entire redirect cycle for every user request.
We’re going to store it in a cookie (though since this goes back and forth to the user’s browser, a production application would probably use a database).
Nancy can help us with this, but first we have to enable it, and the way this is accomplished is by using a bootstrapper.
We’re going to add this class to our application:
using Nancy;
using Nancy.Bootstrapper;
using Nancy.Session;
using Nancy.TinyIoc;

namespace NancyApp
{
    public class Bootstrapper : DefaultNancyBootstrapper
    {
        protected override void ApplicationStartup(TinyIoCContainer container,
                                                   IPipelines pipelines)
        {
            CookieBasedSessions.Enable(pipelines);
        }
    }
}
Nancy will automatically detect a bootstrapper class, and use it to initialize our server.
Now, from within a NancyModule, we can use the Session property to store and retrieve values that are transmitted as cookies.
Next, we have to include our application’s ID and secret in some of the requests, so we embed them in the code by adding these fields to the Handler class.
If you don’t have an application, visit https://github.com/settings/developers to create one and use http://localhost:8080/authorize (depending in your environment, the port number might be slightly different) for the callback URL—we’ll see why in a bit:
        private const string clientId = "<clientId>";
        private const string clientSecret = "<clientSecret>";
Obviously, you should use values from your own API application if you’re following along.
After that, we’ll need a helper method that kicks off the OAuth process:
private Response RedirectToOAuth()
{
    var csrf = Guid.NewGuid().ToString();
    Session["CSRF:State"] = csrf;
    Session["OrigUrl"] = this.Request.Path;

    var request = new OauthLoginRequest(clientId)
        {
            Scopes = { "repo:status" },
            State = csrf,
        };
    var oauthLoginUrl = client.Oauth.GetGitHubLoginUrl(request);
    return Response.AsRedirect(oauthLoginUrl.ToString());
}
-
CSRF stands for cross-site request forgery.
This is a mechanism by which we can be sure the OAuth request process really did originate from our site.
The GitHub OAuth API will pass this value back to us when the user authorizes access, so we store it in the cookie for later reference. -
Storing the original URL in the session cookie is a UX feature; once the OAuth process has completed, we want to send the user back to what they were trying to do in the first place.
-
repo:statusis the permission set we’re asking for.
Note that we’re also including our CSRF token in this object; this is so GitHub can give it back to us later for verification. -
Here we use Octokit to generate the redirect URL, and send the user’s browser there.
RedirectToOAuth is a method that can be called from any route handler in our module, if it’s discovered that the token is missing or invalid.
We’ll see how it’s called a bit later, but for now let’s follow the rest of the OAuth process.
In our GitHub application settings, we specified an authorization URL.
In this case, we’ve specified http://localhost:8080/authorize, and that’s where GitHub will redirect the user’s browser if they decide to grant our application the permissions it’s asking for.
Here’s the handler for that endpoint, which has been inserted into the module constructor:
Get["/authorize", true] = async (parms, ct) =>
-
This is how you map paths to handler functions in Nancy.
Any class that derives fromNancyModulehas an indexable object for every HTTP verb, and you can attach a synchronous or asynchronous handler to any one of them.
There are also ways to include dynamic portions of URLs, which we’ll see later on. -
Here we verify the CSRF token we generated before.
If it doesn’t match, something shady is happening, so we return a 401. -
This is the REST call that converts our OAuth code to an access token.
In order to verify that this really is our application asking for the token, we pass in both the client ID and secret, as well as the code given to us by GitHub. -
This is where we store the resulting token in the session cookie.
Again, this wouldn’t be a good idea for a real application, but for our purposes it’ll do. -
Here we redirect the user back to what they were originally trying to do, with as little disruption as possible.
This last endpoint is something we can test, but we’ll need to be able to handle sessions.
In order to do that, we’ll add this snippet to our test project’s namespace:
public static class BootstrapperExtensions
{
  public static void WithSession(this IPipelines pipeline,
                                       IDictionary<string, object> session)
  {
    pipeline.BeforeRequest.AddItemToEndOfPipeline(ctx =>
      {
        ctx.Request.Session = new Session(session);
        return null;
      });
  }
}
This is an extension method that allows us to provide a Session object for a request, something the CSRF handling uses.
Now that that exists, we can add a test method to our test-suite class:
[Test]
public void HandlesAuthorization()
{
  // Mismatched CSRF token
  bootstrapper.WithSession(new Dictionary<string, object> {
    { "CSRF:State", "sometoken" },
  });
  var result = this.browser.Get ("/authorize", (with) => {
    with.HttpRequest();
    with.Query("state", "someothertoken");
  });
  Assert.AreEqual (HttpStatusCode.Unauthorized, result.StatusCode);

  // Matching CSRF token
  bootstrapper.WithSession(new Dictionary<string, object> {
    { "CSRF:State", "sometoken" },
                { "OrigUrl", "http://success" },
  });
  result = this.browser.Get ("/authorize", (with) => {
    with.HttpRequest();
    with.Query("state", "sometoken");
  });
  result.ShouldHaveRedirectedTo ("http://success");
}
The first part sets up a mismatched CSRF token; it’s "sometoken" in the session (which is set before the API call is made), and "someothertoken" in the request (which should be sent from GitHub), so we assert that the status code is 401.
The second part has matching tokens, so we assert that the response is a redirect to the URL we stored in the session.
Once all that is done, we’ve got our token and are able to continue on our merry way.
All our handlers have to do to trigger an OAuth sequence is to call RedirectToOAuth() if it’s necessary, and we’ll automatically return the user to where they were when the process completes.
Status Handler
Having gone through all that OAuth business, we should now have a token that grants us permission to create commit statuses.
We’re going to add this handler to our Nancy module constructor:
Get["/{user}/{repo}/{sha}/{status}", true] = async (parms, ct) =>
{
var accessToken = Session["accessToken"] as string;
if (string.IsNullOrEmpty(accessToken))
return RedirectToOAuth();
client.Credentials = new Credentials(accessToken);
CommitState newState = Enum.Parse(typeof(CommitState),
parms.status,
true);
try
{
var newStatus = new NewCommitStatus
{
State = newState,
Context = "example-api-app",
TargetUrl = new Uri(Request.Url.SiteBase),
};
await client.Repository.CommitStatus.Create(parms.user,
parms.repo,
parms.sha,
newStatus);
}
catch (NotFoundException)  {
return HttpStatusCode.NotFound;
}
var template = @"Done! Go to <a href=""https://"
{
return HttpStatusCode.NotFound;
}
var template = @"Done! Go to <a href=""https://"  + @"api.github.com/repos/{0}/{1}/commits/{2}/status"
+ @""">this API endpiont</a>";
return String.Format(template,
parms.user, parms.repo, parms.sha);
};
+ @"api.github.com/repos/{0}/{1}/commits/{2}/status"
+ @""">this API endpiont</a>";
return String.Format(template,
parms.user, parms.repo, parms.sha);
};
-
Note the request path for this handler: a GET request to
localhost:8080/user/repo/<sha>/<status>will create a new status.
This is easy to test with the browser, but also makes it easy for web crawlers to unknowingly trigger this API.
For this example it’s okay, but for a real application you’d probably want to require this to be a POST request. -
Here’s where our OAuth helper comes in.
We redirect through the OAuth flow if the session cookie doesn’t have an authorization token.
It’s not shown here, but we’d also want to do this if we get an authorization exception from any of the Octokit APIs. -
Here we’re trying to parse the last segment of the request URL into a member of the
CommitStateenumeration.
Octokit tries to maintain type safety for all of its APIs, so we can’t just use the raw string. -
The
NewCommitStatusobject encapsulates all the things you can set when creating a new status.
Here we set the state we parsed earlier, a (hopefully) unique context value that identifies our service, and a not-very-useful target URL (which should really go to an explanation of how the result was derived). -
This is the REST call to create the new status.
It’s anasyncmethod, which means we have toawaitthe result before we can do anything with it. -
There are a number of exceptions that could be thrown from the API, but the biggest one we want to handle is the
NotFoundException, which has been translated from the HTTP 404 status.
Here we translate it back to make for a nice(r) experience for the user. -
If we succeed, we render a snippet of HTML and return it from our handler.
Nancy sets the response’scontent-typetotext/htmlby default, so the user will get a nice clickable link.
That’s it!
If you’ve typed all this into a project of your own, you should be able to run it under the debugger, or host it in an ASP.NET server, and create commit statuses for your projects by opening URLs in your browser.
We noted this a bit earlier, but it bears repeating: this particular example responds to GET requests for ease of testing, but for a real service like this you’d probably want creation of statuses to use a POST request.
Summary
Even if you haven’t written a lot of code during this chapter, you’ve learned a lot of concepts.
You’ve seen the Commit Status API, and you’ve seen how it’s used by continuous integration software, but you know that it can be used for much more.
You can read and write statuses, and you know how the API server coalesces many statuses into a single pass/fail value, and you also know how to write your own multistatus calculation if the default one doesn’t meet your needs.
You also know what’s behind the green checkmarks and red Xs you see in your pull requests.
You’ve learned how the OAuth web flow works, and why it’s designed the way it is.
OAuth is the key to many other capabilities of the GitHub API, and it’s the right thing to do with regards to trust and permissions.
This will allow you to write truly world-class GitHub-interfacing applications, whether running on the Web or on a user’s device.
You’ve gained a passing knowledge of C#, including its package system, at least one IDE, lambda functions, object initializers, and more.
C# really is a nice language, and if you use it for a while, you’ll probably miss some of its features if you write in anything else.
You’ve seen NuGet, the .NET package manager, and had a peek at the multitudes of packages in this ecosystem.
The capability you have here is astounding; libraries exist for many common activities, and lots of uncommon ones too, so no matter what you need to do, you’re likely to find a NuGet package to help you do it.
You’ve learned about Nancy, with which you can quickly build any HTTP service, from a REST API to an HTML-based interface, and all with a compact syntax and intuitive object model.
If you’ve never been exposed to the Sinatra view of the world, this probably makes you think about web servers a bit differently, and if you have, you’ll have a new appreciation for how this model can be idiomatically implemented.
And you’ve had an introduction to Octokit, a type-safe implementation of a REST API, with built-in asynchrony and OAuth helpers.
This toolkit really does make working with the GitHub API as simple and straightforward as using any .NET library, including the ability to explore it using Intellisense.
Now it’s time to switch back to Ruby.
In our next chapter, we’ll take a look at Jekyll (which is what really runs GitHub Pages), and how to use it to write a blog.