Finding vulnerable open source packages
When and how to test your application for open source vulnerabilities.
 Night Sky (source: realrox)
Finding Vulnerable Packages
Now that you understand what a known vulnerability is, let’s start going through the four steps needed to address them: find, fix, prevent, and respond.
The first step in solving any problem is acknowledging you have one! And so, with vulnerable packages, your first act should be to look for vulnerable packages your application is consuming. This chapter discusses how to test your application, when and how you should run such a test, and the nuances in running the test and interpreting the results.

Learn faster. Dig deeper. See farther.
Taxonomy
Before you start testing, let’s first discuss what you should anticipate seeing in the results.
Known Vulnerability Versus Vulnerable Path
Consider an app that uses two packages, A and B, wherein A uses B (with the same version) as well, resulting in the following dependency tree:
App
 ├─┬ A@1.0.0
 │ └── B@1.0.0
 └── B@1.0.0
Now, let’s assume B@1.0.0 has a known denial-of-service (DoS) vulnerability. When testing the app, how many vulnerabilities should we report? On one hand, the app only has one known vulnerability: DoS in B@1.0.0. On the other hand, there are two instances of this vulnerability. What should we report: one or two?
The answer, unfortunately, is both, as each number is right in its own way. Different tools may count the two differently, but for the purpose of this book I’ll use the terms known vulnerability and vulnerable path to separate the two.
A known vulnerability represents a unique ID of a vulnerability in your tree (in this example, one). For each known vulnerability, you’ll want to inspect its severity and determine how important it is for your systems. For instance, a DoS vulnerability typically matters more to a public-facing site than one on the intranet. This inspection is only needed once per known vulnerability, regardless of how many times it repeats in your dependency tree.
Once you have determined that a vulnerability is sufficiently concerning, you’ll want to inspect its vulnerable path for exploitability. Each vulnerable path implies a different potential way for an attacker to get a malicious payload to the package in question. In this example, an attacker can potentially get a malicious payload to B through App‘s direct use of it, or through A, requiring you assess both the App->B and App->A->B paths to see if they allow that to happen. Both paths also need to be fixed independently, which I’ll discuss in the next chapter.
It’s worth noting that vulnerable paths are counted on the logical dependency tree, not the number of library copies. For instance, if our sample app was a Ruby or Maven app, which use global dependencies, there would only be one instance of B@1.0.0 on disk, but there would still be two paths to assess and remediate. In fact, ecosystems which use version ranges and global dependencies, such as Ruby, Java, and Python, often have a large number of vulnerable paths for each known vulnerability.
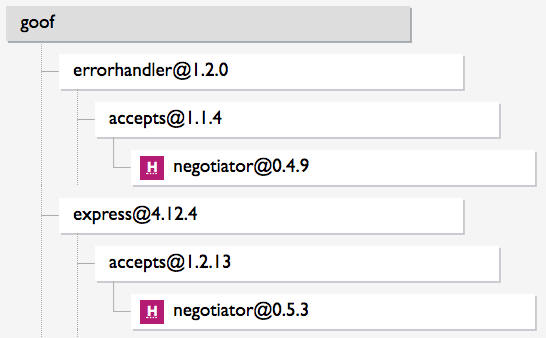
Figure 1-1 shows a dependency tree where the same vulnerable negotiator library is used (indirectly) by two direct dependencies, errorhandler and express. The application therefore has one known vulnerability, but two vulnerable paths. Attackers may be able to exploit the vulnerability through the app’s use of either errorhandler or express, and each of those would need to be independently upgraded to trigger a downstream upgrade to negotiator and fix the vulnerability.
Testing Source Versus Built Apps
Roughly speaking, there are two ways to test for vulnerable application dependencies: before you build, when you have only your source code, or after you build, when you have the resulting application and have fetched its dependencies. While logically both tests should yield a list of vulnerable dependencies, they have some important differences.
Testing source code
When testing source code, the testing tool needs to anticipate which dependencies your application will pull in when built. This means fetching the original manifest files, such as a package.json or pom.xml, extracting the specified dependencies, and building the dependency graph. This graph is then intersected with the vulnerability database, resulting in a list of vulnerable dependencies.
Extrapolating the tree has a fair bit of complexity to it. The Software Composition Analysis (SCA) tool has to mimic the logic of the package manager, along with the instructions in the manifest. For instance, it has to understand and interact with the package manager to resolve version ranges (e.g., what’s the version this npm range will yield qs@^0.5.3?), factor in multiple manifest and lock files (e.g., handle parent pom.xml files in Maven, or combine Gemfile and Gemfile.lock in Ruby), and separate between dev-time dependencies and production libraries.
While source code scanning is harder for the tool, it’s actually easier for the user to consume. Building the graph is much faster than building the application, making tests dramatically faster than deployed code tests. This speed is good all around, but is especially handy when testing code changes for vulnerabilities—for instance, built into a GitHub pull request or running in the IDE. More on that in Chapter 4.
In addition, source code scanning ensures an accurate understanding of how a package got into your system, as the testing tool is the one constructing the dependency graph. This results in a more accurate report of vulnerable paths, and better filtering of dev dependencies and other package manager subtleties. More importantly, this complete understanding of the tree is critical for automatically fixing issues, as we’ll see in the next chapter.
The weakness of source code scanning is that build processes that aren’t fully standardized may throw it off—for instance, by manually pulling in a library not specified in a manifest file or using different library sets in different contexts. In such cases, source code scanning may remain ignorant of the fact this library is being used, and won’t report on its vulnerabilities.
Fundamentally, the dependency graph built is only an approximation of what the real graph would be. Good SCA tools approximate well in the vast majority of cases, but the more complex and unique your build process is, the more likely they will miss or inaccurately report a library in your tree.
It’s worth noting that in environments that use dependency lock files, such as Ruby and Yarn, the list of libraries is explicitly defined and enforced, ensuring the approximation is accurate. In such environments, source code scanning is far more accurate.
Testing built apps
The other way to determine which dependencies are used is to look on disk. When running the scanner, it reads the relevant folders and environment variables and sees which libraries are installed. This list is intersected with the vulnerability DB to determine which vulnerabilities are present.
The key advantage of testing built apps is that it anchors on the app that was actually deployed. As long as the tool can properly identify the app’s dependencies, the list it finds is the actual list of dependencies installed, regardless of how they got there. This makes the security report inherently more accurate—there’s no guessing or approximation, just stating the facts.
The main disadvantage of this approach is that it cannot report on vulnerable paths. Detecting which vulnerable components are installed does not tell you which code parts use them, crippling your ability to assess exploitability. This is somewhat similar to testing for operating system dependencies—you can tell you’re using a vulnerable OpenSSL, but cannot tell which apps on your machine are using this library. Not mapping the vulnerable paths may flag issues in libraries you’re not really using, and eliminates the ability to calculate an automated fix, as we’ll see later on.
A more minor disadvantage is the fact it requires building the app. Depending on where you run the test, building the app may be hard or impossible, and is often slow. This limits the integration points in which you can run such a test.
Combining code and built app testing
Because neither approach is perfect, the best solution is to use both!
To combine the two, certain tools test built apps, but also look for package manifest files, build a logical tree, and try to fit the libraries found on top of the tree. As a result, you can be certain you get the built-app testing coverage, with (to the extent possible) the source code–driven depth of understanding.
Alternatively, you can use both approaches at different stages of your development. For instance, you can use source code scanning as part of your GitHub workflow, while using a built app test in your build process or as a deployment gate. In the majority of cases, the two approaches would yield the same results and act consistently. When they don’t, the built app tests will ensure you don’t deploy a vulnerability.
Testing indirect dependencies
Whenever testing for vulnerable dependencies, it’s critical you don’t just test your direct dependencies, but also the indirect ones. In other words, if you’re using package A, and it uses package B, you should make sure you’re testing B for flaws as well.
This may seem obvious, but it’s actually overlooked by many tools, especially when testing source code. Parsing manifest files is relatively easy, while expanding those files to their dependency trees is hard, and so many tools only do the former but still claim to protect your dependencies.
Only testing direct dependencies is nearly worthless. While exact stats vary by ecosystem, in all of them the vast majority of libraries you use consumed indirectly. Throughout this book I will assume testing is done on both direct and indirect dependencies, and I encourage you to make sure your tool does the same.
Finding Vulnerabilities Using the Command Line
Finally, let’s find some vulnerable libraries!
Tip
Vulnerable Demo Apps
For brevity, this book doesn’t include detailed execution of the tools, but I’d encourage you to try out the mentioned tools on your own applications. You can also use sample vulnerable applications such as goof for npm or java-goof for Java, to ensure you get results.
The lowest common denominator for OSS vulnerability scanning is the command-line interface. Most tools support a CLI (many are CLI only), including the OWASP Dependency Checker, Node Security Project, RubySec, and more. With the exception of a few tools, running a CLI test is often a quick and extremely easy action. The tool is often installed from the package manager itself (e.g., npm install -g sca-tool), and execution is typically a simple test command (e.g., sca-tool test).
Figure 1-2 shows a truncated example of running a CLI test on goof.
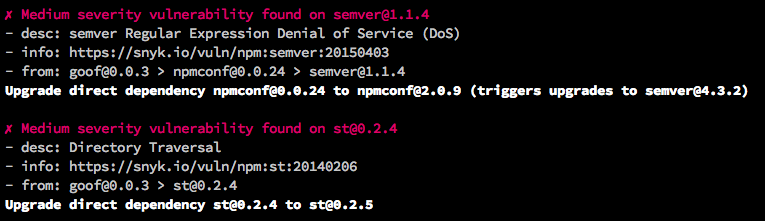
The output varies by tool, but most will list either the known vulnerabilities or vulnerable paths, and provide information for each of them. This typically includes a title, description, severity score, and more. Severity is the easiest indicator of how urgently you should address the issue, but the remaining details can help you understand the issue and how it relates to your code.
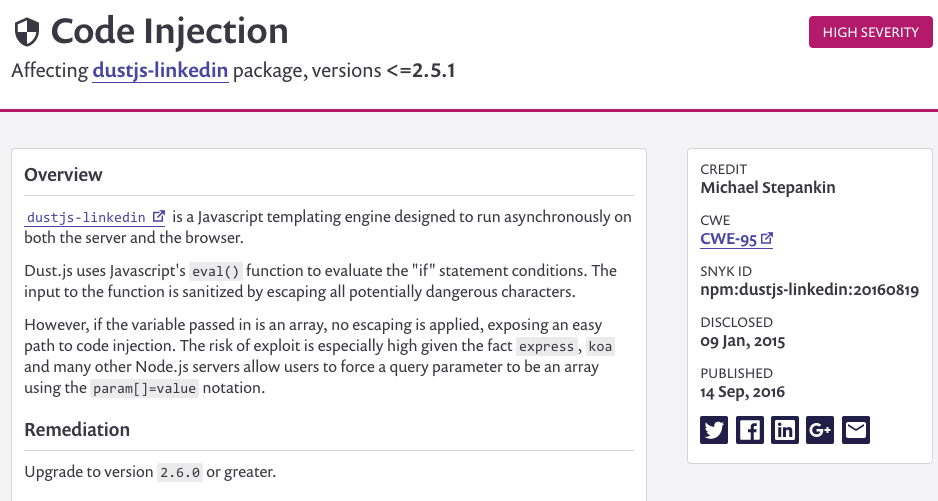
Because the terminal is a limited presentation layer, the detailed advisory is usually in a web page linked from the output, as are more details about the dependency tree. If you want to generate your own reports, look for a machine-friendly format option (e.g., --json) which lets you filter, manipulate, or reformat the results. Figure 1-3 shows an example of a detailed web-based advisory linked from the more limited command line interface
Most CLI clients test built apps, which means they need to run after you’ve completed the build to accurately report results. Note that because developers often install dependencies temporarily or for experimentation purposes, you may see issues in dependencies that aren’t actually deployed to production. Most tools default to ignore dependencies they determine are dev-only dependencies, eliminating most of the noise. However, if you see vulnerabilities in extraneous packages, make sure they’re truly a part of the app before worrying too much over them.
The command-line interface is also a very popular way to integrate vulnerable dependency testing into your continuous integration/continuous deployment (CI/CD). More on that in Chapter 4.
Finding Vulnerabilities in SCM (GitHub, BitBucket, GitLab)
The CLI tools are great and flexible, but running them on every single app—let alone integrating them continuously—takes some effort. To make testing (and fixing) even easier, some SCA tools can also integrate testing directly into source code management (SCM) platforms such as GitHub, BitBucket, and GitLab.
Testing SCM repos is almost always a matter of a few clicks via a web interface. It should include the following steps:
-
A user asking to test their repos.
-
Granting the service access to the repos, so it can extract the manifest files.
-
Choosing which repositories to test or protect.
-
Viewing a report.
Using an SCM integration offers a few advantages over the CLI:
-
Easier to test or browse multiple apps at once
-
The web interface is naturally richer than the terminal, often allowing better usability
-
It simplifies continuous testing and fixing, as we’ll see later on
That said, testing your repos isn’t always better than a CLI. For starters, many of us prefer the CLI to the web interface at times. Second, the CLI is far more flexible, while an SCM integration tends to be more opinionated. Finally, testing via SCM naturally means using source code testing, as opposed to the CLI’s built apps testing, which has the pros and cons discussed earlier.
Granting Source Code Access
If you’ve been reading carefully, you may have noticed that I glossed over a security aspect of the SCM integration: granting source code access. Testing directly against source code repos requires access, both at the network level and API tokens. Network access is an issue for on-premises source code management tools, such as GitHub Enterprise or BitBucket Server, and granting token access is additional exposure not everybody is comfortable with.
The good news is that scanning source code repositories for vulnerable dependencies doesn’t really require source code access. The trees are extrapolated from manifest files, such as package.json and pom.xml, and the tools can typically work well without having access to your actual source code. Quite a few commercial tools (such as Snyk and Code Climate) support installing portions of the service on-prem, reducing the service’s access to a minimum.
In other good news, in mid-2017 GitHub launched an alternative integrations API called “GitHub Apps”, which includes support for more granular repo access. Over time, you can expect to see more SCM platforms to launch improved access controls and SCA tools to increasingly use them, keeping your source code out of reach.
Finding Vulnerabilities in Serverless and PaaS
So far I’ve only discussed testing as part of your dev or build processes. However, newer infrastructure paradigms such as Function-as-a-Service (FaaS, a.k.a Serverless) and Platform-as-a-Service (PaaS) open up another possibility.
Both FaaS and PaaS abstract the infrastructure from the app developer, and seamlessly handle operating system dependencies. Some platforms, such as Heroku, CloudFoundry, and Google Cloud Functions, go on to build the apps for you, fetching the dependencies stated in your package manifest. However, no platform goes as far as managing those dependencies and informing you when they went out of date or vulnerable. Over time, these libraries inevitably grow stale and insecure, opening a path for attackers to walk in.
Because PaaS and FaaS apps are, in essence, only code, testing these apps is not all that different than what I’ve discussed so far. And indeed, some tools, notably Snyk and BlackDuck, added capabilities to directly test PaaS and/or Faas apps for vulnerable dependencies.
Testing FaaS/PaaS apps is somewhat similar to testing repos on an SCM. The service connects to the platform in question (e.g., AWS Lambda), the user grants access and chooses the apps to test, and a test is run on each app. Unlike SCM, however, the test consists of downloading the built app (e.g., Lambda zip, CloudFundry droplet), extracting it, and running a built-app test on it.
This approach seems promising, as it combines the ease of use of the GitHub testing with the accurate risk assessment built app testing provides. However, it suffers from the same built-app testing shortcomings, notably the lack of fix and less accurate vulnerable path assessment.
I expect this approach to grow in prevalence—stay tuned!
Finding Vulnerabilities in the Browser
This last example is a bit unique in its approach, and that is testing for vulnerable JavaScript libraries right on a web page itself.
JavaScript is the most widely used language today, and like all languages consumes many open source libraries. Over time, security flaws in these libraries surface just like they do in other platforms, except in this case the vulnerable libraries are public for everyone to see! In fact, a 2017 study shows 77% of the top websites use at least one vulnerable library—a mind-blowing number.
Unfortunately, web pages often consume libraries through simple copy/paste, linking to hosted URLs, or other messy manners, which makes detecting these libraries hard. For a while, the only option for detecting such libraries was using an open source project called Retire.js, which offers a Chrome extension (and a few other means) to detects libraries. Retire.js continues to be a great tool you should consider using.
More recently, though, Google and Microsoft integrated detection of vulnerable JS libraries into their web development tools, Lighthouse and Sonar. Lighthouse is also embedded in Chrome’s and Opera’s browser dev tools, further simplifying and raising the visibility of this test. This is a promising new development, and I encourage you to try these tools out.
Vulnerable Component Versus Vulnerable Apps
This book deals with bugs—specifically security bugs—in your dependencies. However, just because a library has a bug, doesn’t mean your code triggers it! Many packages offer rich functionality, and your application (or another one of its dependencies) may not invoke the code paths in question, and may never trigger the bug. In other words, the fact that you’re using a vulnerable library doesn’t mean your app is vulnerable.
This is an important but dangerous distinction. On one hand, it is an entirely accurate statement. In fact, I’d go as far as estimating a typical app is not vulnerable to most of the vulnerabilities in its dependencies. Many of these vulnerabilities only happen under certain configurations, and in many cases you’re consuming a full package only to use a thin slice of it.
On the other hand, a vulnerable dependency is a ticking time bomb. Applications are complicated, change frequently, and use other dependencies that are also complex and fast moving. Confidently saying your application never uses a library in a certain way, across all vulnerable paths, is hard to do. Moreover, once a dependency is included in your app, it’s likely to be used by more and more code paths. If you dismissed a vulnerability in this dependency, another code path may expose this vulnerability to attackers at a later time.
My recommendation is to bias in favor of not allowing vulnerable components in your apps. If possible, fix the vulnerability to remove all doubt and keep your system safe. In cases where you cannot fix, this distinction and the need to assess exploitability should definitely play a role.
Summary
Finding vulnerable libraries is the clear first step in addressing this risk. By taking off your blindfolds, you’ll be able to understand the risk and take the appropriate action.
Amidst the many decisions, the main point to keep in mind is comprehensiveness. The solution(s) you choose should find these loopholes across all of your apps, and then match them against a rich vulnerability DB. Without such coverage, you won’t have the visibility you need to truly address this risk.