 Container (source: StockSnap)
 In Containerizing Continuous Delivery in Java, we explored the fundamentals of packaging and deploying Java applications within Docker containers. This was only the first step in creating production-ready, container-based systems. Running containers at any real-world scale requires a container orchestration and scheduling platform, and although many exist (i.e., Docker Swarm, Apache Mesos, and AWS ECS), the most popular is Kubernetes. Kubernetes is used in production at many organizations, and is now hosted by the Cloud Native Computing Foundation (CNCF). In this article, we will take the previous simple Java-based, e-commerce shop that we packaged within Docker containers and run this on Kubernetes.
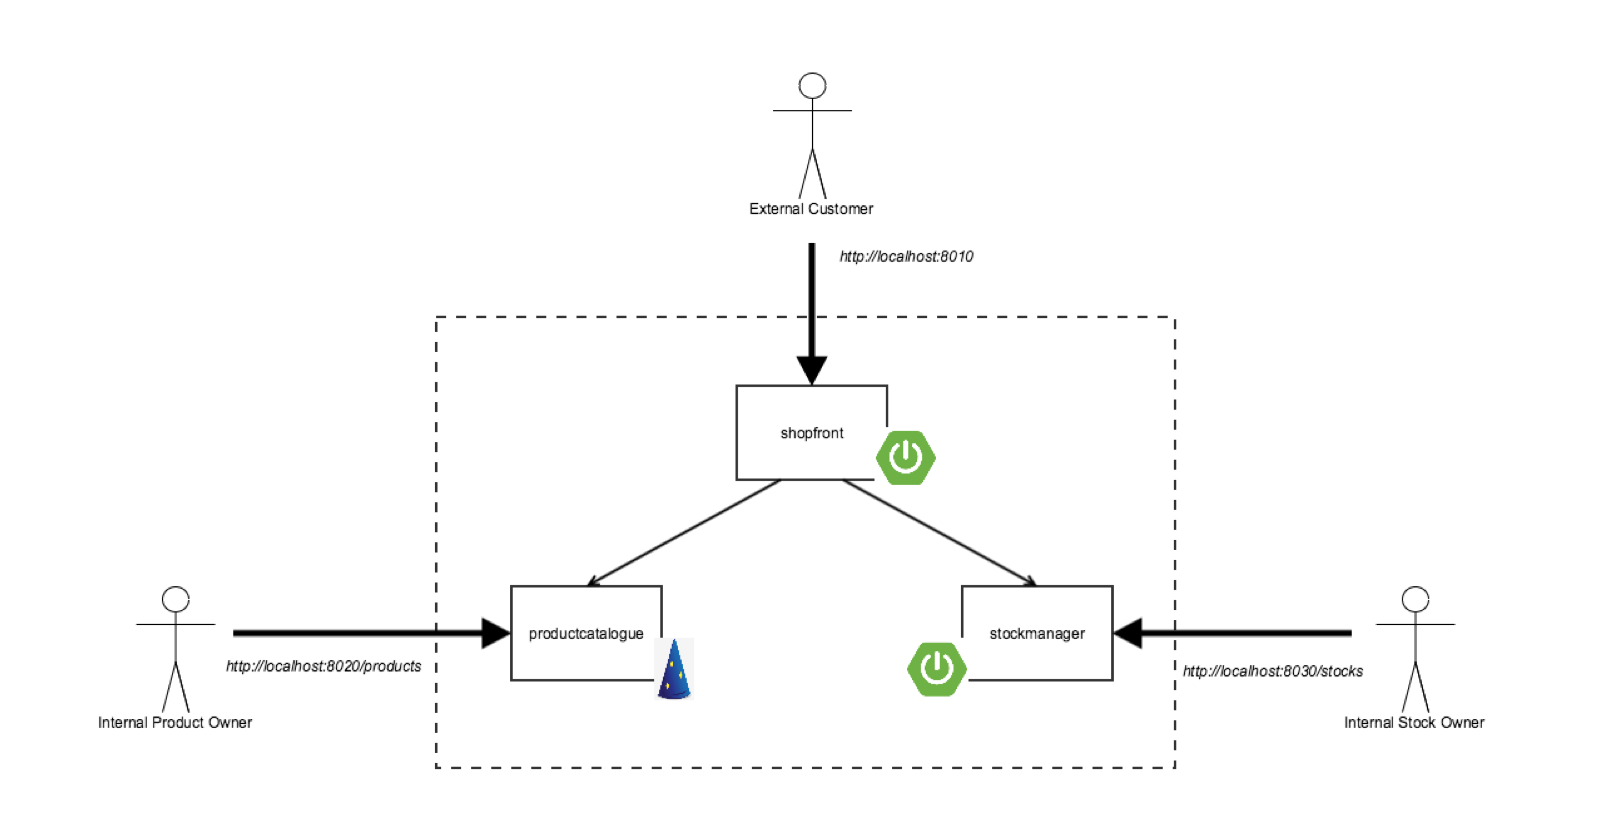
The “Docker Java Shopfront” application
The architecture of the “Docker Java Shopfront” application that we will package into containers and deploy onto Kubernetes can be seen below:
Before we start creating the required Kubernetes deployment configuration files let’s first learn about core concepts within this container orchestration platform.
Kubernetes 101
Kubernetes is an open source orchestrator for deploying containerized applications that was originally developed by Google. Google has been running containerized applications for many years, and this led to the creation of the Borg container orchestrator that is used internally within Google, and was the source of inspiration for Kubernetes. If you are not familiar with this technology then a number of core concepts may appear alien at first glance, but they actually hide great power. The first is that Kubernetes embraces the principles of immutable infrastructure. Once a container is deployed the contents (i.e., the application) are not updated by logging into the container and making changes. Instead a new version is deployed. Second, everything in Kubernetes is declaratively configured. The developer or operator specifies the desired state of the system through deployment descriptors and configuration files, and Kubernetes is responsible for making this happen – you don’t need to provide imperative, step-by-step instructions.
These principles of immutable infrastructure and declarative configuration have a number of benefits: it is easier to prevent configuration drift, or “snowflake” application instances; declarative deployment configuration can be stored within version control, alongside the code; and Kubernetes can be largely self-healing, as if the system experiences failure like an underlying compute node failure, the system can rebuild and rebalance the applications according to the state specified in the declarative configuration.
Kubernetes provides several abstractions and APIs that make it easier to build these distributed applications, such as those based on the microservice architectural style:
- Pods – This is the lowest unit of deployment within Kubernetes, and is essentially a groups of containers. A pod allows a microservice application container to be grouped with other “sidecar” containers that may provide system services like logging, monitoring or communication management. Containers within a pod share a filesystem and network namespace. Note that a single container can be deployed, but it is always deployed within a pod
- Services – Kubernetes Services provide load balancing, naming, and discovery to isolate one microservice from another. Services are backed by Replication Controllers, which in turn are responsible for details associated with maintaining the desired number of instances of a pod to be running within the system. Services, Replication Controllers and Pods are connected together in Kubernetes through the use of “labels”, both for naming and selecting.
Let’s now create a service for one of our Java-based microservice applications.
Building Java applications and container images
Before we first create a container and the associated Kubernetes deployment configuration, we must first ensure that we have installed the following prerequisites:
- Docker for Mac / Windows / Linux – This allows us to build, run and test Docker containers outside of Kubernetes on our local development machine.
- Minikube – This is a tool that makes it easy to run a single-node Kubernetes test cluster on our local development machine via a virtual machine.
- A GitHub account, and Git installed locally – The code examples are stored on GitHub, and by using Git locally you can fork the repository and commit changes to your own personal copy of the application.
- Docker Hub account – If you would like to follow along with this tutorial, you will need a Docker Hub account in order to push and store your copies of the container images that we will build below.
- Java 8 (or 9) SDK and Maven – We will be building code with the Maven build and dependency tool that uses Java 8 features.
Clone the project repository from GitHub (optionally you can fork this repository and clone your personal copy), and locate the “shopfront” microservice application: https://github.com/danielbryantuk/oreilly-docker-java-shopping/
$ git clone git@github.com:danielbryantuk/oreilly-docker-java-shopping.git
$ cd oreilly-docker-java-shopping/shopfront
Feel free to load the shopfront code into your editor of choice, such as IntelliJ IDE or Eclipse, and have a look around. Let’s build the application using Maven. The resulting runnable JAR file that contains the application will be located in the ./target directory.
$ mvn clean install
…
[INFO] ------------------------------------------------------------------------
[INFO] BUILD SUCCESS
[INFO] ------------------------------------------------------------------------
[INFO] Total time: 17.210 s
[INFO] Finished at: 2017-09-30T11:28:37+01:00
[INFO] Final Memory: 41M/328M
[INFO] ------------------------------------------------------------------------
Now we will build the Docker container image. The operating system choice, configuration and build steps for a Docker image are typically specified via a Dockerfile. Let’s look at our example Dockerfile that is located in the shopfront directory:
FROM openjdk:8-jre
ADD target/shopfront-0.0.1-SNAPSHOT.jar app.jar
EXPOSE 8010
ENTRYPOINT ["java","-Djava.security.egd=file:/dev/./urandom","-jar","/app.jar"]
The first line specifies that our container image should be created “from” the openjdk:8-jre base image. The openjdk:8-jre image is maintained by the OpenJDK team, and contains everything we need to run a Java 8 application within a Docker container (such as an operating system with the OpenJDK 8 JRE installed and configured). The second line takes the runnable JAR we built above and “adds” this to the image. The third line specifies that port 8010, which our application will listen on, must be “exposed” as externally accessible, and the fourth line specifies the “entrypoint” or command to run when the container is initialized. Let’s build our container:
$ docker build -t danielbryantuk/djshopfront:1.0 .
Successfully built 87b8c5aa5260
Successfully tagged danielbryantuk/djshopfront:1.0
Now let’s push this to Docker Hub. If you haven’t logged into the Docker Hub via your command line, you must do this now, and enter your username and password:
$ docker login
Login with your Docker ID to push and pull images from Docker Hub. If you don't have a Docker ID, head over to https://hub.docker.com to create one.
Username:
Password:
Login Succeeded
$
$ docker push danielbryantuk/djshopfront:1.0
The push refers to a repository [docker.io/danielbryantuk/djshopfront]
9b19f75e8748: Pushed
...
cf4ecb492384: Pushed
1.0: digest: sha256:8a6b459b0210409e67bee29d25bb512344045bd84a262ede80777edfcff3d9a0 size: 2210
Deploying onto Kubernetes
Now let’s run this container within Kubernetes. First, change the “kubernetes” directory in the root of the project:
$ cd ../kubernetes
Open the shopfront-service.yaml Kubernetes deployment file and have a look at the contents:
---
apiVersion: v1
kind: Service
metadata:
  name: shopfront
  labels:
    app: shopfront
spec:
  type: NodePort
  selector:
    app: shopfront
  ports:
  - protocol: TCP
    port: 8010
    name: http

---
apiVersion: v1
kind: ReplicationController
metadata:
  name: shopfront
spec:
  replicas: 1
  template:
    metadata:
      labels:
        app: shopfront
    spec:
      containers:
      - name: shopfront
        image: danielbryantuk/djshopfront:latest
        ports:
        - containerPort: 8010
        livenessProbe:
          httpGet:
            path: /health
            port: 8010
          initialDelaySeconds: 30
          timeoutSeconds: 1
The first section of the yaml file creates a Service named “shopfront” that will route TCP traffic targeting this service on port 8010 to pods with the label “app: shopfront”. The second section of the configuration file creates a ReplicationController that specifies Kubernetes should run one replica (instance) of our shopfront container, which we have declared as part of the “spec” (specification) labelled as “app: shopfront”. We have also specified that the 8010 application traffic port we exposed in our Docker container is open, and declared a “livenessProbe” or healthcheck that Kubernetes can use to determine if our containerized application is running correctly and ready to accept traffic. Let’s start minikube and deploy this service (note that you may need to change the specified minikube CPU and Memory requirements depending on the resources available on your development machine):
$ minikube start --cpus 2 --memory 4096
Starting local Kubernetes v1.7.5 cluster...
Starting VM...
Getting VM IP address...
Moving files into cluster...
Setting up certs...
Connecting to cluster...
Setting up kubeconfig...
Starting cluster components...
Kubectl is now configured to use the cluster.
$ kubectl apply -f shopfront-service.yaml
service "shopfront" created
replicationcontroller "shopfront" created
You can view all Services within Kubernetes by using the “kubectl get svc” command. You can also view all associated pods by using the “kubectl get pods” command (note that the first time you issue the get pods command, the container may not have finished creating, and is marked as not yet ready):
$ kubectl get svc
NAME         CLUSTER-IP   EXTERNAL-IP   PORT(S)          AGE
kubernetes   10.0.0.1     <none>        443/TCP          18h
shopfront    10.0.0.216   <nodes>       8010:31208/TCP   12s
$ kubectl get pods
NAME              READY     STATUS              RESTARTS   AGE
shopfront-0w1js   0/1       ContainerCreating   0          18s
$ kubectl get pods
NAME              READY     STATUS    RESTARTS   AGE
shopfront-0w1js   1/1       Running   0          2m
We have now successfully deployed our first Service into Kubernetes!
Time for a smoke test
Let’s use curl to see if we can get data from the shopfront application’s healthcheck endpoint:
$ curl $(minikube service shopfront --url)/health
{"status":"UP"}
You can see from the results of the curl against the application/health endpoint that the application is up and running, but we need to deploy the remaining microservice application containers before the application will function as we expect it to.
Building the remaining applications
Now that we have one container up and running let’s build the remaining two supporting microservice applications and containers:
$ cd ..
$ cd productcatalogue/
$ mvn clean install
…
$ docker build -t danielbryantuk/djproductcatalogue:1.0 .
...
$ docker push danielbryantuk/djproductcatalogue:1.0
...
$ cd ..
$ cd stockmanager/
$ mvn clean install
...
$ docker build -t danielbryantuk/djstockmanager:1.0 .
...
$ docker push danielbryantuk/djstockmanager:1.0
…
At this point we have built all of our microservices and the associated Docker images, and also pushed the images to Docker Hub. Let’s now deploy the productcatalogue and stockmanager services to Kubernetes.
Deploying the entire Java application in Kubernetes
In a similar fashion to the process we used above to deploy the shopfront service, we can now deploy the remaining two microservices within our application to Kubernetes:
$ cd ..
$ cd kubernetes/
$ kubectl apply -f productcatalogue-service.yaml
service "productcatalogue" created
replicationcontroller "productcatalogue" created
$ kubectl apply -f stockmanager-service.yaml
service "stockmanager" created
replicationcontroller "stockmanager" created
$ kubectl get svc
NAME               CLUSTER-IP   EXTERNAL-IP   PORT(S)          AGE
kubernetes         10.0.0.1     <none>        443/TCP          19h
productcatalogue   10.0.0.37    <nodes>       8020:31803/TCP   42s
shopfront          10.0.0.216   <nodes>       8010:31208/TCP   13m
stockmanager       10.0.0.149   <nodes>       8030:30723/TCP   16s
$ kubectl get pods
NAME                     READY     STATUS    RESTARTS   AGE
productcatalogue-79qn4   1/1       Running   0          55s
shopfront-0w1js          1/1       Running   0          13m
stockmanager-lmgj9       1/1       Running   0          29s
Depending on how quickly you issue the “kubectl get pods” command, you may see that all of the pods are not yet running. Before moving on to the next section of this article wait until the command shows that all of the pods are running (maybe this is a good time to brew a cup of tea!)
Viewing the complete application
With all services deployed and all associated pods running, we now should be able to access our completed application via the shopfront service GUI. We can open the service in our default browser by issuing the following command in minikube:
$ minikube service shopfront
If everything is working correctly, you should see the following page in your browser:

Conclusion
In this article, we have taken our application that consisted of three Java Spring Boot and Dropwizard microservices, and deployed it onto Kubernetes. There are many more things we need to think about in the future, such as debugging services (perhaps through the use of tools like Telepresence and Sysdig), testing and deploying via a continuous delivery pipeline like Jenkins or Spinnaker, and observing our running system.
This article was created in collaboration with NGINX. See our statement of editorial independence.