 Looking up from a bridge
 The Ten Guidelines
After many years of failures, the software development industry is gradually coming to understand what makes projects succeed. Best practices have started to appear, sometimes mixed with misinformation and plain technical folklore, but through trial and error, teams around the world have started to separate the chaff from the grain.
SIG is one organization that has gone through this. And not only that, it has studied the way software development projects evolve so as to identify the difference between success and failure. After analyzing business cases for years, SIG has come up with Ten Guidelines that, if followed correctly, can make the difference between success or failure.
The Ten Guidelines are easy to understand but not necessarily easy to apply. Teams may face resistance on several fronts: sometimes from management, who may not understand the value of an investment like this, and sometimes from developers, who may take badly the fact that they are being told how to work best.
However, even if everybody is on board, the Ten Guidelines require that a level of technical expertise be applied. A lot of refactoring is needed to keep applying the guidelines overtime, and refactoring is an art that is very difficult to master. There are a number of resources that can be used to increased a developer’s refactoring skills, among them the fantastic How to Work Effectively with Legacy Code by Michael Feathers (Prentice Hall).
In this chapter, we will briefly cover the Ten Guidelines and explain their usefulness; for more thorough coverage, the reader is advised to read Building Maintainable Software.
The first thing we need to note about the guidelines is that they are roughly divided into three categories. This isn’t a strict division (in fact the categorization isn’t present in the original source) but it’s a useful way to look at the guidelines since different categories require different sets of skills:
- Unit guidelines
- Write short units of code
- Write simple units of code
- Write code once
- Keep unit interfaces small
- Architectural guidelines
- Separate concerns in modules
- Couple architecture components loosely
- Keep architecture components balanced
- Keep your codebase small
- Enabling guidelines
- Automate tests
- Write clean code
Unit Guidelines
The first four guidelines are unit guidelines. In this context, a unit is the smallest group of code that can be executed independently; in object-oriented languages, a unit is a method within a class.
Write Short Units of Code
The first guideline indicates that our methods should be short, usually no more than 15 lines of code. This not only improves readability (fewer lines of code are easier to understand), but it also lowers the probability of hidden side effects. On top of this, a short method will have fewer variations, which means it will be easier to test.
The easiest way to apply this guideline is to move parts of the code in a method into other methods. Many IDEs will have an “extract method” function that makes this easier. Sometimes, however, the right answer is to move the code not to a different method but to a new class—we’ll see more of that when we get to the architectural guidelines.
Counting Lines of Code
Different teams may use different criteria when deciding what constitutes a line of code. In this report, we use the following:
The signature and closing curly bracket of the method don’t count. This is because these are lines that can’t be removed and therefore have no bearing toward measuring the complexity of the method.
Blank lines within the method do count. This is because, although blank lines don’t have any instructions, programmers tend to add them to separate groups of lines that perform closely related tasks, which means they help indicate the complexity of the method.
If an instruction is so long that it needs to be split into two or more lines, we count each of those lines independently. This is because we consider such instructions to represent extra complexity, and therefore it makes sense for them to contribute further to the total line count.
Choosing different criteria will obviously change the resulting number of lines, but the only effect will be that the triggering conditions for the guidelines will be met slightly sooner or later. In the end, a large method is a large method, regardless of how the lines are counted.
Let’s take a look at an example. The following method contains 21 lines of code, more than the recommended limit of 15. It may not be clear what this particular method does, but that’s not relevant at this point (it is part of a tool to analyze build data from a Jenkins server1).
protected void selectBuilds(String source) {
    jenkinsClient = new JenkinsClient(source);
    List<String> allBuilds = jenkinsClient.getBuildConfigurations();
    BuildSelector buildSelector = new BuildSelector(allBuilds);

    GridPane grid = new GridPane();
    grid.setAlignment(Pos.CENTER);
    grid.setHgap(10);
    grid.setVgap(10);
    grid.setPadding(new Insets(25, 25, 25, 25));
    grid.add(buildSelector, 0, 0);

    Scene scene = new Scene(grid, 250, 400);
    m_primaryStage.setScene(scene);

    Button btn = new Button();
    btn.setText("Show me hotspots!");
    btn.setOnAction(event -> {
        List<String> selectedBuilds = buildSelector.getBuilds();
        AddDrawingToScene(selectedBuilds);
    });
    grid.add(btn, 0, 1);
}
We can make this method shorter by moving the creation and setup of the Grid and the Button objects into new methods, like this:
private GridPane createGridPane() {
    GridPane grid = new GridPane();
    grid.setAlignment(Pos.CENTER);
    grid.setHgap(10);
    grid.setVgap(10);
    grid.setPadding(new Insets(25, 25, 25, 25));

    return grid;
}

private Button createButton(BuildSelector buildSelector) {
    Button btn = new Button();
    btn.setText("Show me hotspots!");
    btn.setOnAction(event -> {
        List<String> selectedBuilds = buildSelector.getBuilds();
        AddDrawingToScene(selectedBuilds);
    });

    return btn;
}

protected void selectBuilds(String source) {
    jenkinsClient = new JenkinsClient(source);
    List<String> allBuilds = jenkinsClient.getBuildConfigurations();
    BuildSelector buildSelector = new BuildSelector(allBuilds);

    GridPane grid = createGridPane();
    grid.add(buildSelector, 0, 0);

    Scene scene = new Scene(grid, 250, 400);
    m_primaryStage.setScene(scene);

    Button btn = createButton(buildSelector);
    grid.add(btn, 0, 1);
}
Now we have three small methods as opposed to one big one, which makes the code easier to manipulate.
Write Simple Units of Code
The more paths of execution a method has, the more difficult it will be to reason about all of them. And when code is difficult to reason about, misunderstandings occur, and misunderstandings lead to bugs.
It’s important to clarify, though, what a path of execution means. Paths of execution are branching points, instructions that can make the execution of the code go in one way or another. For instance, an if statement creates a branch of execution because, depending on the evaluation of a condition, different code will be executed. But not only that—if the condition in the if statement is a boolean operation involving several operators, the application of each operator will imply a new branch.
This guideline suggests that we limit branch points to a maximum of four. This will not only make the methods easier to understand but will also make them easier to test. In order to cover all different scenarios of a method, we need a number of automated tests that is at least the number of branch points plus one. Let’s take a look at the following code:
public int getDiscount(String promoCode) {
    if(promoCode == null) {
        throw new IllegalArgumentException("promoCode");
    }

    promoCode = promoCode.trim();

    if(promoCode.length() < 5 || promoCode.length() > 8) {
        throw new IllegalArgumentException("promoCode");
    }

    if(expiredPromoCodes.containsKey(promoCode)) {
        throw new ExpiredPromoException(promoCode);
    }

    if(!availablePromoCodes.containsKey(promoCode)) {
        return 0;
    }

    return availablePromoCodes.get(promoCode);
}
As can probably be guessed, this method will provide the appropriate discount to apply depending on a promotional code, throwing exceptions in particular situations. This code has five branching points, which means there are six different scenarios to be considered while testing: promotional code being null, too short, or too long; promotion having expired; promotional code not matching any existing promotion (expired or not); and promotional code applied successfully.
We can reduce the number of branching points per unit by moving the validation logic to its own method, like the following:
public boolean isPromoCodeValid(String promoCode) {
    if(promoCode == null) {
        return false;
    }

    promoCode = promoCode.trim();

    if(promoCode.length() < 5 || promoCode.length() > 8) {
        return false;
    }

    return true;
}

public int getDiscount(String promoCode) {
    if(!isPromoCodeValid(promoCode)) {
        throw new IllegalArgumentException("promoCode");
    }

    promoCode = promoCode.trim();

    if(expiredPromoCodes.containsKey(promoCode)) {
        throw new ExpiredPromoException(promoCode);
    }

    if(!availablePromoCodes.containsKey(promoCode)) {
        return 0;
    }

    return availablePromoCodes.get(promoCode);
}
With the new version, we have two methods with three branching points each, which means we’ll need four tests for each method to cover all cases. It may look as if we have more work to do now since we have a total of eight scenarios to cover, whereas before we only had six. However, analyzing effort this way can be deceiving. We don’t quite have eight scenarios to cover; we have two sets of four scenarios each. This distinction is important because in software development, effort doesn’t grow linearly with complexity—it grows exponentially. Therefore, it is easier to manage two sets of four scenarios each than one with six.
Write Code Once
Internet folklore has many ways to refer to this guideline, including “Stay DRY,” with DRY being short for Don’t Repeat Yourself, and “Don’t get WET,” with WET being short for Write Everything Twice. The truth is, there are so many ways to refer to this because this is one of the most powerful single sources of bugs.
It usually goes like this: A programmer, maybe due to time restrictions, decides to copy and paste a portion of code to make use of it somewhere else. Some time after that, a requirement arrives to modify that piece of code. The programmer that picks up this task, which might be the original one or a new one, doesn’t remember or realize that the code that needs to be modified exists in two different places, so that programmer only applies changes to one of the copies of the code. And just like that, we have created a bug: two parts of the system that are meant to do the same thing no longer do.
But even if we manage duplication well and prevent bugs, duplicate code can still hurt a team. Whenever a task is performed, if programmers know that there is duplication in the codebase, they’ll have to search for all the occurrences of the code that need to be modified and act on all of them appropriately; this is much more costly that having to change just one existing copy of the code.
The bottom line is, whenever you see duplicated code, you should refactor it into a single copy. Not only will you be saving yourself trouble and time, but also, in the process of refactoring the code, you may discover new domain concepts that fit within your overall design.
Keep Unit Interfaces Small
In the same way that unit means, in this context, a method in a class, interface here refers to the way we interact with a method; that is, the method signature. Methods with long signatures usually indicate the existence of data clumps: variables that always travel together and that in fact aren’t particularly useful if used independently. Typical examples of data clumps are colors (expressed as their red, green, and blue components) and coordinates (expressed as their x,y components).
The way to make sure we keep interfaces small and detect these data clumps is by keeping method signatures to a maximum of four parameters. The way to apply this guideline is by bundling together two or more arguments into a new class, and then to use references to this new class. The interesting side effect is that now that we have a new class, we can start adding logic to it.
Let’s consider a hotel room reservation system and, more precisely, a method to get quotes for specific rooms. Since we’re only dealing with method signatures in this guideline, we won’t include the body of the method:
public Quote getQuote(String hotelName, RoomType roomType,
                      boolean breakfastIncluded,
                      LocalDate checkInDate,
                      LocalDate checkOutDate)
This signature has five parameters, one more than the guideline allows. We can fix this by bundling check-in and check-out dates into a TimePeriod class.
public Quote getQuote(String hotelName, RoomType roomType,
                      boolean breakfastIncluded,
                      TimePeriod timePeriod) {
    // ... //
}

public class TimePeriod {
    public TimePeriod(LocalDate checkInDate,
                      LocalDate checkOutDate) {
        // ... //
    }
}
The interesting thing about the TimePeriod class is that we can easily add validation to it: ensure that check-out date is at least one day after check-in date, ensure that check-in date isn’t in the past, etc. And if we do that, we’ll have validation for free whenever we need to use the pair of check-in and check-out dates. Thus, keeping unit interfaces small not only makes for simpler and more readable methods, it also helps us encapsulate concepts that better describe the domain at hand.
Architectural Guidelines
If the first four guidelines referred to characteristics that we need to measure at the unit (or method) level, the next four focus at a higher level—namely modules, components, and codebases.
In this context, a module is a collection of units; in other words, a class. Similarly, we can understand a component as an aggregation of modules (or classes) that can be grouped to offer a higher order of functionality. For many teams, a component will be something that can be developed, deployed, and/or installed independently, and will typically refer to them as a JAR file in Java, a DLL in .NET languages or, more generally, a library. However, some other teams with larger codebases will choose a bigger unit of measurement when defining what a component is, and will typically refer to them as frameworks or systems. The definition of the concept of a component will have an impact on the applicability of some of the guidelines, so teams should choose a definition carefully and potentially review it over time.
Finally, a codebase is a version-controlled collection of software; this typically means a repository in GIT-based systems, or an independent subfolder in Subversion or CVS-based systems.
As you will see, the architectural guidelines will apply to progressively broader aspects of the software, leaving behind the fine-grained details of the unit guidelines.
Separate Concerns in Modules
Modules, or classes, are meant to be representations of domain concepts; if you can’t explain what a class does in a couple of simple sentences, then that class either represents more than one concept or represents a concept that is too general or abstract.
A class that holds too much responsibility will be troublesome in several ways. First, it is likely to become a change hotspot. Since it has so many responsibilities, it will affect a large proportion of the business logic, and therefore the probability that it needs to be modified upon any new request will be high. Change hotspots create long (and difficult to browse) change logs and increase the probability of clashes between programmers, potentially disrupting the natural team flow.
Second, big classes have the risk of becoming a dumping ground for difficult design decisions. When new functionality needs to be added to a system and programmers are unsure about where that new functionality should go, it is not uncommon for people to choose an existing big class whose purpose is not entirely clear anyway.
Finally, big classes that concentrate a lot of logic in one place will be highly utilized by other classes in one way or another. This means we are creating a class with a high degree of change (and therefore a higher risk of accidents) and high exposure (and therefore a higher impact on accidents), and creating areas of code with high risk and impact is never a good idea.
Deciding how well a team is applying “Separate Concerns in Modules” is a little subjective. The general suggestion is to try and apply the Single Responsibility Principle, for which there is plenty of documentation— although even then some people may argue whether a particular scenario represents one single but complex principle or two independent but related principles. Some heuristics that can help are the size of the class (beyond 100 lines seems suspicious for a single principle) or the rate of public versus private methods (too many private methods may expose complexities that belong somewhere else). However, each team will have to decide what their own metrics are and how they are to be applied.
Couple Architecture Components Loosely
This guideline is similar to the previous one, but it is applied at an even higher level. With “Separate Concerns in Modules,” we tried to limit the responsibilities of a class so as to limit the dependencies upon it. With “Couple Architecture Components Loosely,” we try to do the same but with regards to components.
Like it happened with the previous guideline, it’s a bit difficult to establish general parameters that highlight when architecture components are loosely coupled and when they aren’t; the final decision may be different from team to team. However, there are some general principles that can be applied.
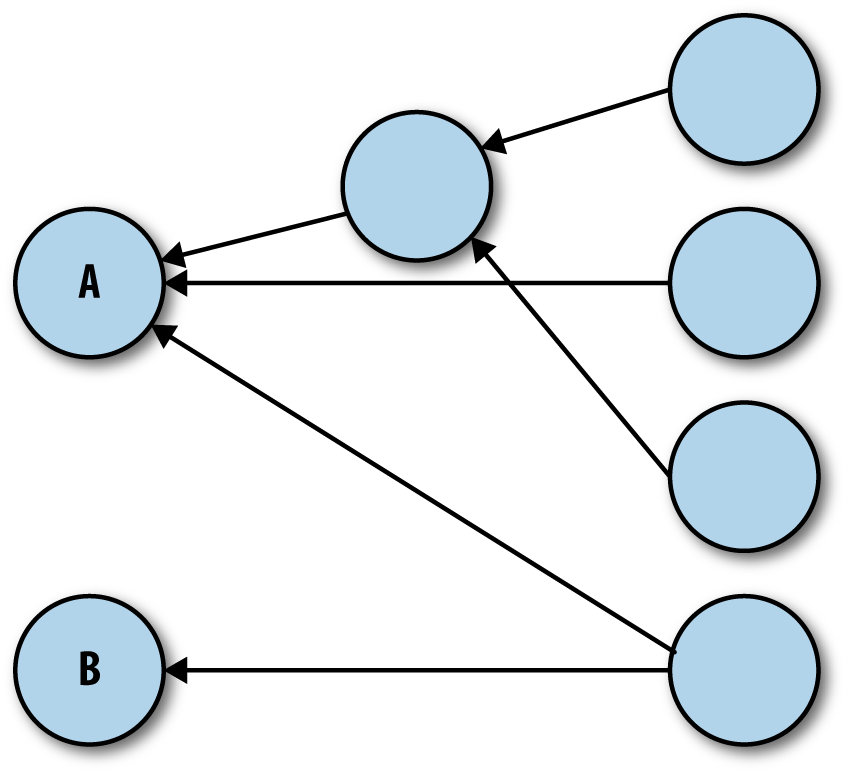
First, we can draw a diagram of all the different components in our system and connect them to represent their dependencies. With this kind of diagram, we can look for components that accumulate too many incoming dependencies. For instance, in the following diagram we can see how component A is tightly coupled with the rest of the architecture, while component B isn’t. Modifying component A can have repercussions in almost every other component of the system. This turns modifying component A into a risky affair, which makes it more difficult to maintain. Component B, on the other hand, has a much lower potential impact, which makes it more maintainable. In this situation, we probably should look into splitting component A into smaller, less tightly coupled components.
Second, we can analyze how much of each component is being exposed. For instance, if we were considering a component to be a JAR file, we would check which classes within the component are being accessed when there are calls from other components. Ideally, the exposed portion of the component will be as small as possible, since exposed classes cannot be modified safely without impact to dependent components. As an example, changing the signature of a method that is being called from a different component will instantly cause a compilation failure unless the caller is updated at the same time; if there are many callers, this may be impractical.
Unfortunately, depending on the language there may not be an easy way to analyze the proportion of a component that is being exposed. In C#, the developer can use different access modifiers for classes that are to be available only within the component (internal) or from everywhere (public). Java, however, doesn’t currently have this capability, although the new Module System in plan for Java 9 will provide it. This means that, once again, how this guideline is applied will depend on each particular team.
Keep Architecture Components Balanced
As systems grow, it may become too easy to get lost in the many facets of it, and when this happens it may become easy to miss systemic issues. This is why software needs to make sense also from a high-level point of view.
Although this sounds like a rather subjective measurement, there are objective metrics that we can apply to assess how balanced our architecture is. First of all, we can intuitively conclude that an architecture with too few components can’t really describe the multiple features of a system, whereas one with too many of them will be difficult to grasp. For this reason, SIG recommends architectures designed around having nine components, with an operating margin of plus/minus three. This means that, if we have fewer than six components, we should probably look into splitting some of them, whereas if we have more than 12, we should try to consolidate them. When components are consolidated, teams may need to revisit their definition of “component” so it maps to a bigger unit of measurement.
On the other hand, the relative size of the components is also important. There probably isn’t much we can infer from an architecture containing one really big component and eight tiny ones: the latter will probably be minor utility libraries, whereas the former will hold further substructures and divisions that are kept hidden. Components in an architecture should be as close in size as possible.
For most scenarios, the matter of assessing the size of a component can be as simple as counting the number of lines of code, and indeed this is what SIG recommends. However, there is an increasing number of organizations that, thanks to the dynamic capabilities provided by the Java Virtual Machine, develop different components using different JVM-compatible languages. In cases like this, counting the number of lines may be misleading, and teams may choose to count the number of files (as a proxy for the number of classes; therefore, of “concepts”) or even metrics not directly related to source code, like build duration.
Keep Your Codebase Small
The vast majority of programmers will maintain that smaller codebases are easier to manage. This may sound like software development folklore, but after analyzing over 1,500 systems, SIG provided statistical evidence of it. On top of this, structuring the overall systems in several, smaller codebases as opposed to a single big one will simplify some higher-order administrative tasks: for instance, if a team needs to be split as part of an organizational restructuring, the responsibilities of the new teams can be easily decided by assigning the different codebases to each of them.
It may seem that, after applying the component guidelines above, the size of the codebase has already been taken care of. This is not necessarily true, since one could be splitting components without splitting the associated codebase. For instance, the build tool Maven, popular among Java programmers, allows the management and creation of multiple JAR files within a single project, and therefore a single codebase. In fact, given that splitting components is often easier than splitting codebases, it is advisable to try and apply this guideline by preventing unnecessary growth.
There are many things that can be done to prevent a codebase growing too big. Applying the guideline “Write Code Once” is one of them. “Couple Architecture Components Loosely” can help too, since essential components with a high number of incoming dependencies, like logging or serialization, tend to have a publicly available counterpart that could be used instead. Removing unused code is another obvious way to reduce the size of the codebase.
However, one of the most effective ways to achieve this (but frequently also the most difficult to apply) is to avoid future-proofing. Future-proofing is the practice of adding functionality to the codebase that hasn’t been required but that people believe might be required at some point in the future. One common example of this is unsolicited performance optimization utilities, like caching or connection pooling, added in case workload volumes grow to unmanageable levels. While performance is a valid concern in some situations, more often than not optimizations are added without the backup of actual data.
How to decide when a codebase is too big depends on the technology at hand, since some languages are more verbose than others. For instance, SIG sets the limit for Java-based systems at 175,000 lines of code, but this may be too much or too little when using other languages. In any case, it is important to note that the number of lines of code is just a proxy to calculate the real variable: the amount of knowledge, functionality, and effort that is contained within the codebase.
Enabling Guidelines
Up to now, we’ve talked about guidelines that express how the code should be structured, both at the low and high level. Also, we’ve talked about how the code needs to be modified whenever any of the previous guidelines isn’t met. But so far we haven’t talked about the inherent risk of the very application of the guidelines.
To be able to abide by the guidelines, we need to be constantly making changes to our code. However, with every change there is the risk of accidents, which means every corrective measure is an opportunity for a bug to appear. In order to apply the guidelines safely, the code needs to be easy to understand and difficult to break. The last two guidelines address these concerns, which is why I like referring to them as enabling guidelines.
Automate Tests
Automated tests require a considerable amount of investment, but the returns are almost invaluable. Automated tests can be rerun again and again almost at no cost, which means we can frequently reassess the status of the system. Thanks to this, we can safely perform as many modifications as we deem necessary, knowing that accidents that break it won’t go unnoticed for long. There is plenty of literature on the topic of how to write automated tests, so we won’t cover that here.
What we will cover is how to make sure that our set of automated tests is a faithful representation of the requirements of the system. On one side, we can use a technique called Test-Driven Development (TDD), in which tests are written before the implementation they are testing. Moreover, when writing implementation, the programmer has to write only as little as necessary to satisfy the tests at hand. This will ensure that, if a functionality needs to be implemented, a test that verifies that functionality will be written first.
Even if we don’t use TDD, or if we inherit a legacy codebase, there are ways to assess the quality of the automated tests suite. We can use code coverage analysis tools, which tag the lines of code that are being executed while running each test; this way, the tool can highlight code that isn’t exercised by any test and which may constitute a gap in the testing suite. Unfortunately, code coverage analysis is not enough: one thing is saying that a particular section of code is executed while running a test, and another one is saying that the test performs the right checks after running. To go one step further, we can use tools like Jester for Java or Nester for .NET. Jester will make random modifications to the source code and then run the tests, expecting at least one of them to fail; if none of the tests fail after modifying the code, it will highlight this as a potential test gap.
Note, however, that automated tests don’t entirely remove the need for manual tests. Certainly, repetitive tests that can be easily scripted don’t need to be manual anymore, but qualitative assertions like usability or penetration tests will probably still need to be performed manually by an expert in the area.
Write Clean Code
Edsger Dijkstra, one of the fathers of modern programming, once said that “in programming, elegance is not a dispensable luxury but a quality that decides between success and failure”. Obscure code is difficult to grasp, and therefore difficult to maintain. On the other hand, code that can be picked up by any random programmer with no problem represents the ultimate measure of maintainability.
The problem of clean code is that it’s a rather ambiguous topic. It’s not simply a matter of code style, indentations, or variable name lengths, it’s a matter of understandability. Code should clearly show its intent and avoid any pitfalls or misgivings, so that anybody who reads it will understand it quickly and be able to modify it without making inadvertent mistakes. However, what exactly constitutes the right set of rules to decide if the code at hand is clean or not is something that has to be agreed on by the team.
To help with this, SIG provides a basic yet functional set of rules to write clean code as part of this guideline; these rules are a great starting point for any team. If further information is needed, readers can refer to the book Clean Code by Robert C. Martin (Prentice Hall). Another technique that can help teams to write clean code is doing unguided but supervised peer reviews: after writing code, a programmer can share it with a peer, who will read the code and try to understand it without help; any questions that the peer needs to ask in order to understand the code represents an area where the code isn’t self-evident, and therefore an area that needs to be modified.
1For further reference, see Build Hotspots on GitHub.