How to build an app with client-side storage
A hands-on guide that demonstrates several storage APIs in action.
 Wine cellar (source: skeeze via Pixabay)
Let’s Build Something!
Now that you’ve seen multiple types of client-side storage techniques as well as some libraries to help make using them easier, let’s build a real, if simple, application that makes use of some of these techniques. Our application will be a tool for a company intranet (“Camden Incorporated”—coming to the NYSE soon) that lets you search for your coworkers. This could be built using a traditional application server model, but we’ve decided to build something fancy using modern web standards. To make the search near instantaneous, we’ll use client-side storage to keep a copy of the employee database on the user’s browser. This, of course, opens up all kinds of interesting issues.
First off, how do we handle synchronization? Companies aren’t static. People join or leave companies all the time. How often that happens, of course, depends on the company itself, but obviously you have to consider some form of strategy for keeping the user’s copy of data in sync with the real list on the server. Luckily, in our scenario we don’t have to worry about user edits. The server side is always “truth,” which means we can ignore changes on the client side when syncs happen. For our demo we’re not going to worry about syncing at all, but in a real-world demo your application server could provide an API where the client says—and by “says” I mean via code, of course—“My copy of the data was last updated on October 10, 2015 at 8:55 AM.” The server could then respond with a set of changes that have occurred since that date. Those changes could cover deletions (people who left the company), changes (people getting married and changing their name, or getting new titles), and additions (new hires). The client-side code would apply those changes and then make a note of the current time so that the next time it speaks to the server it can correctly receive the changes.

Learn faster. Dig deeper. See farther.
The next issue is a thorny one: privacy. The company database probably has a good deal of data about you that you don’t want to share—like your salary. Remember that we are essentially sending private information to each employee, and while you may trust your employees, you still can’t send information that could put their privacy at risk. A safe metric might be, “If it is on their business card, share it,” but certainly you want to be overly cautious here. And to be clear, you cannot “filter” out the insecure data on the client side. If your app server is returning private data, anyone can clearly see it by opening up their browser developer tools. Anything the browser gets is open to inspection by the user. As a matter of habit I tend to browse the Web with my browser tools open, and I’ll naturally look at Ajax calls and the data just for curiosity’s sake. I’m a “good guy,” but you have to assume that the “not-so-good guys and gals” are looking as well.
The last issue is performance. Given a “small” company of 10,000 people, how do you handle transferring that data to the browser in a performant matter? We’ve said our hypothetical situation here is a company intranet, so we’re already kind of assuming desktop/LAN, but you’ll want to be cognizant of the size of your data packets going to the client. We’ll discuss a way to handle this later in the chapter.
OK, let’s talk data!
Our Sample Data
To keep things as easy as possible, our “server” will be a simple JSON file of data. As we said earlier, we are not going to work with synchronization and creating updates, so a flat JSON file will serve our needs just fine. To make things even easier, we’re going to use a cool, free web service to generate our data: the Random User Generator, shown in Figure 1-1.
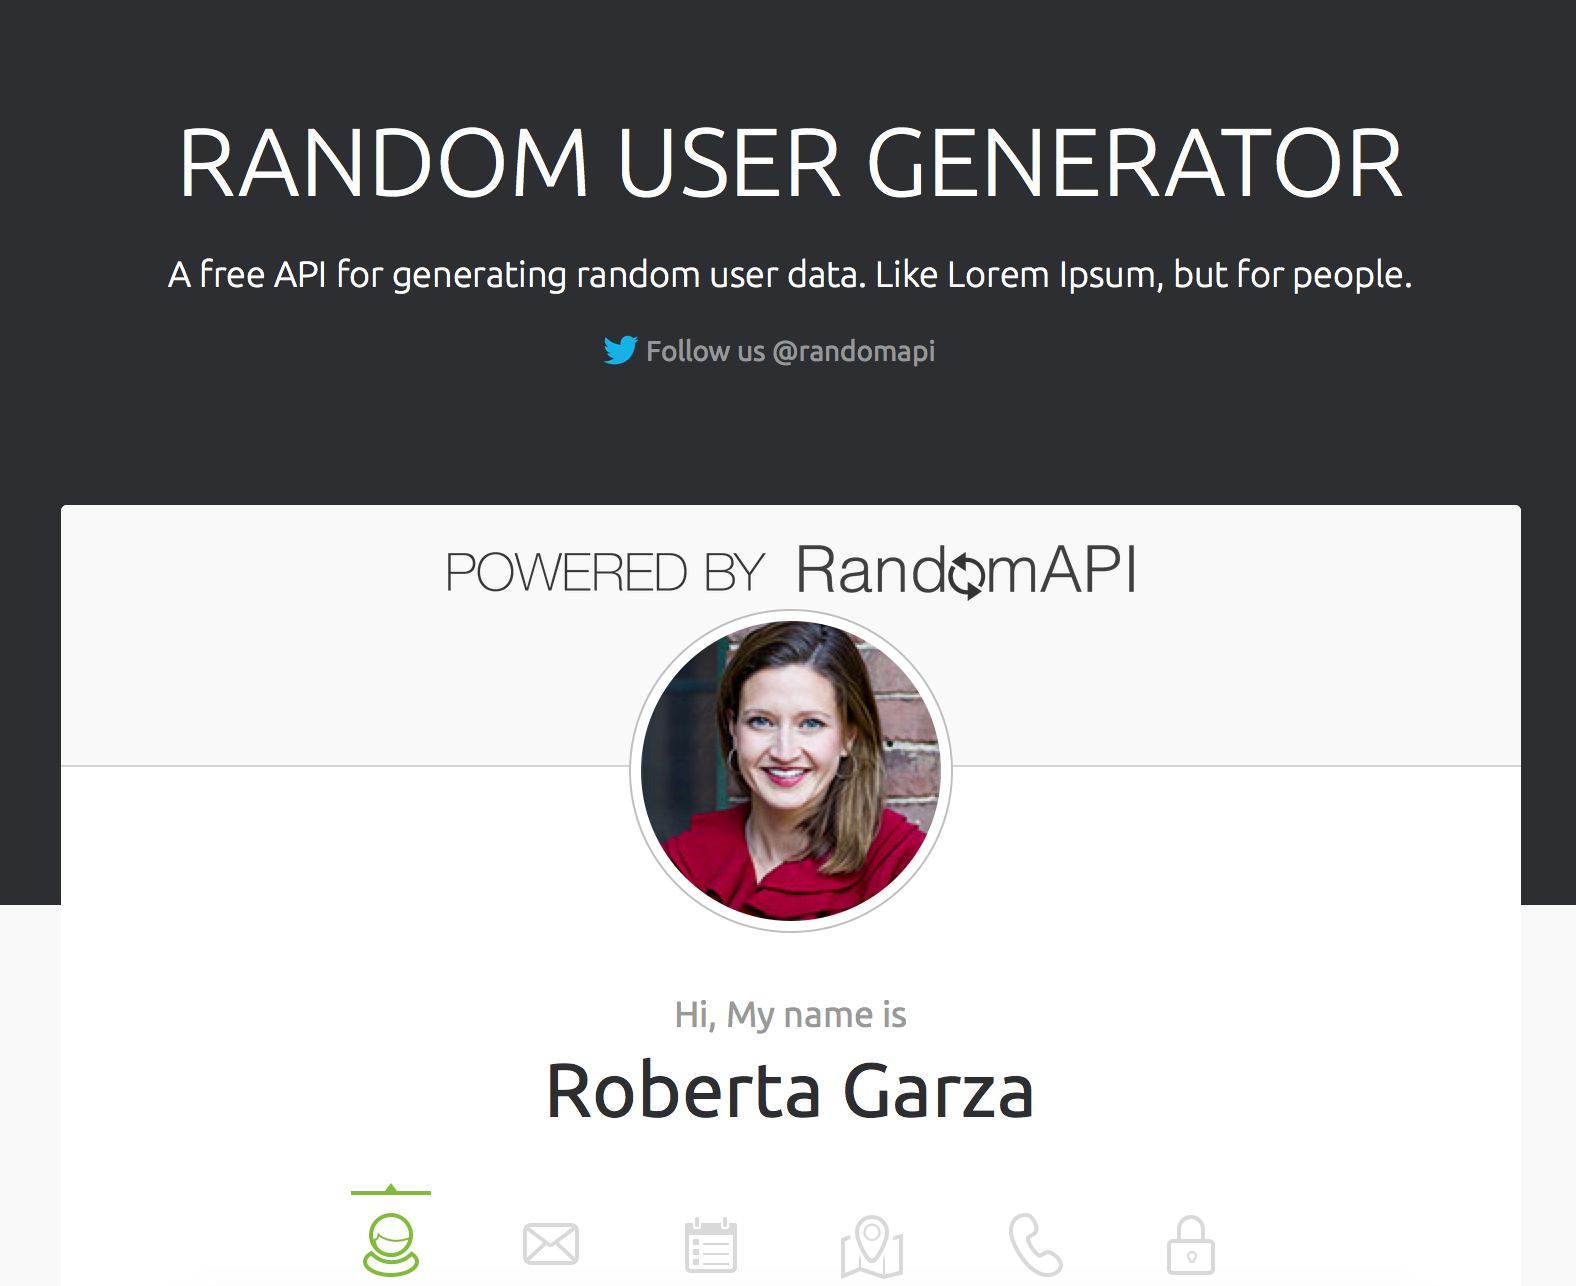
This site provides a free API that returns user information. The user information includes quite a bit of detail and can be useful for demos like the one we’re building here. Example 1-1 is a sample of the output taken from their docs.
Example 1-1. Sample API result
{
  results: [{
    user: {
      gender: "female",
      name: {
        title: "ms",
        first: "manuela",
        last: "velasco"
      },
      location: {
        street: "1969 calle de alberto aguilera",
        city: "la coruña",
        state: "asturias",
        zip: "56298"
      },
      email: "manuela.velasco50@example.com",
      username: "heavybutterfly920",
      password: "enterprise",
      salt: ">egEn6YsO",
      md5: "2dd1894ea9d19bf5479992da95713a3a",
      sha1: "ba230bc400723f470b68e9609ab7d0e6cf123b59",
      sha256: "f4f52bf8c5ad7fc759d1d415e508aa0b7946d4ba",
      registered: "1303647245",
      dob: "415458547",
      phone: "994-131-106",
      cell: "626-695-164",
      DNI: "52434048-I",
      picture: {
        large: "http://api.randomuser.me/portraits/women/39.jpg",
        medium: "http://api.randomuser.me/portraits/med/women/39.jpg",
        thumbnail: "http://api.randomuser.me/portraits/thumb/women/39.jpg",
      },
      version: "0.6"
      nationality: "ES"
    },
    seed: "graywolf"
  }]
}
While the API is incredibly easy to use, we want a static set of data for our demo. If you sign up at RandomAPI, you get permission to use the random user API for up to 10,000 results. The RandomAPI site is—as you can imagine—a collection of APIs that provide random data. All in all, both sites are really darn useful and you can use them within your own applications as well. It is a great way to work with “sensible” random data while building your application.
For this demo, I signed up and requested 10,000 users. In the zip file of sample code from this book, you can find it in c7/data/users.json. Earlier in this chapter we discussed how you would want to be careful about what data you expose in your application. Since we’re just taking the random user data as is, we definitely have information here that we would absolutely not want to share. Not only that, but our demo is only going to use about half of the user values present in the data, which means quite a bit of wasted data will be sent from the server to the frontend. These are all things you would want to be very cognizant of in a proper, production-ready application. But imagine for a moment that we’ve done that. We’ve streamlined our API down to the bare essentials required to meet the application’s needs. What else can we do to make the data load quicker?
One simple method is GZip compression. This is a setting your web server can use to enable zip compression of assets before they are sent to the browser. The web server is intelligent enough to use this feature only when the browser sends a header saying it supports it, and since almost all modern browsers support it, this is an “easy win” to help speed up your transfers. Apache, especially, makes it fairly trivial to enable. How much does it help?
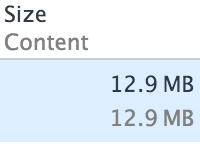
Our users.json file is 13.5 MB. That isn’t small. Poorly optimized graphics probably won’t go over a megabyte each, so you’re really looking at a big hit here to download that file. Figure 1-2 shows Chrome reporting on the size of the JSON file when it’s requested via the browser. This is before any compression is added.
And Figure 1-3 shows the size after compression is enabled in Apache.
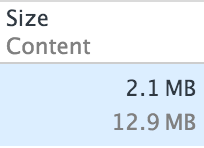
The difference is pretty staggering. Keep in mind that the browser still has to decompress that file on the client side, so you’ll want to use this approach with caution. I still wouldn’t recommend sending more than 10 MB of data over the wire. At least in our case this is an initial, “worst case” load, and later calls—again using an imaginary application server—would send only the changes.
Now that you’ve seen the data in play, let’s look at the finished application.
The Application
When you first hit the application, it will fetch the initial data set (that large JSON file) and begin inserting it into a local data store. Since this can take a little while, a modal window is used to let the user know what’s going on. For the application it is kept rather simple—just one message (Figure 1-4). You could enhance this messaging to report on whether or not the application is downloading the initial data or has moved on to inserting it for storage locally.

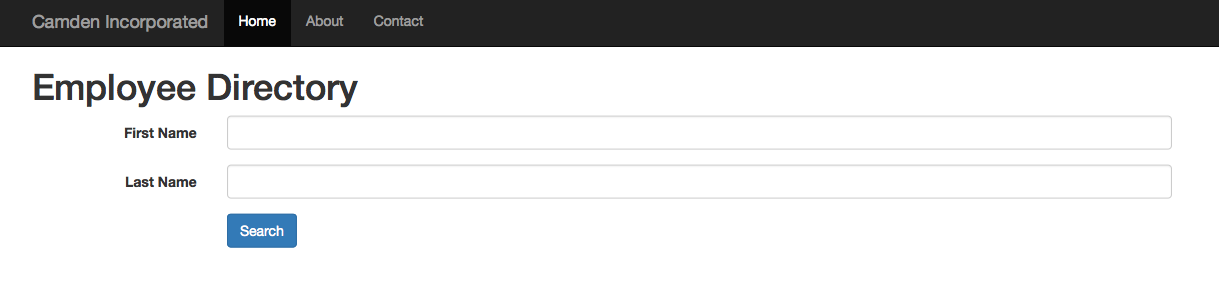
After everything is loaded, a basic form, shown in Figure 1-5, is presented to the user. In this application, you can search only by first and last name.
You can then begin searching. You can search on just the first name, last name, or both. Figure 1-6 shows some sample search results.
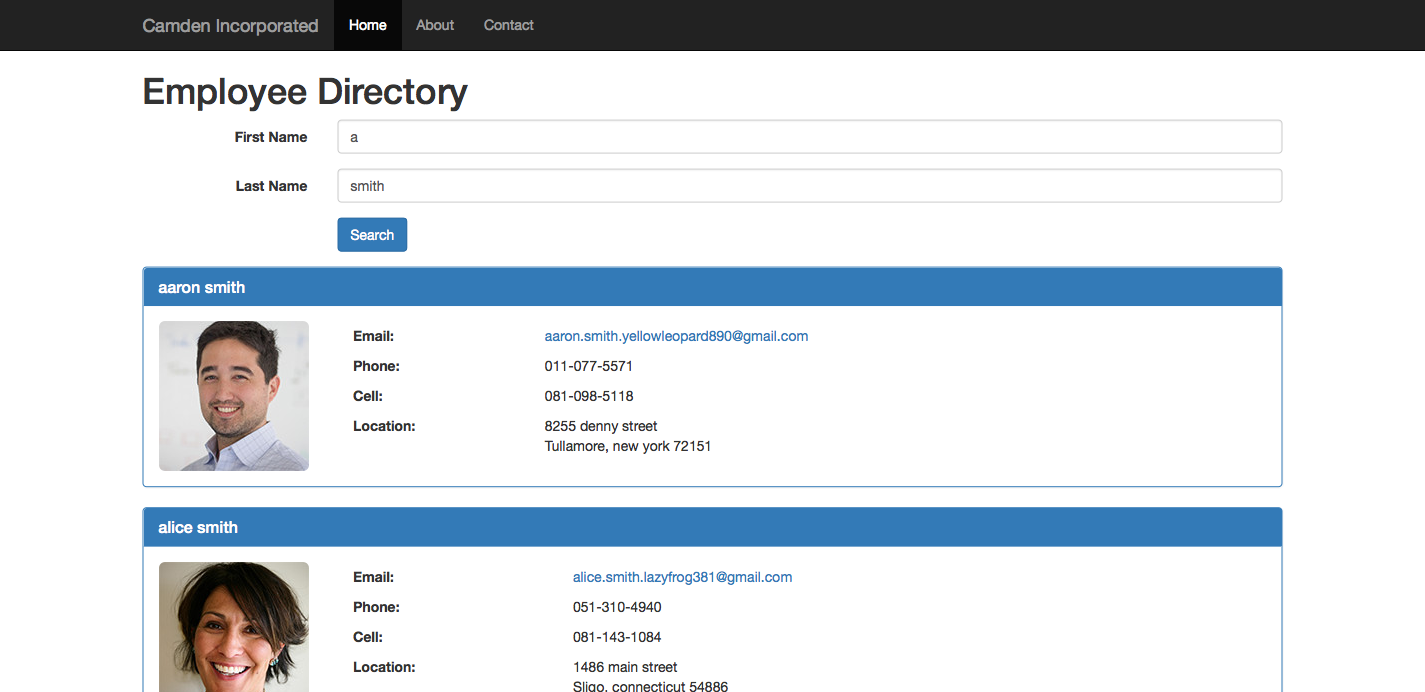
The application will also correctly let you know when nothing is found. All in all, this is a rather simple interface. You could add more filters (like business department or managers) to further enhance the searching later. In case you’re curious, those pictures all come from the Random User API itself.
Now that we’ve discussed our data and demonstrated how the application looks, let’s begin looking at the code behind it.