Using WatchKit apps
Learn about some of the fundamental watchOS elements, including interface controllers and the different types of controls.
 Pocket Watch (source: Pixabay)
Put simply, a WatchKit app is an app that runs on the watch. Apps on watchOS are separate and independent binaries that run on the watch, and communicate with their parent iOS app only when they have to. This reduces latency, and ensures that the power-hungry Bluetooth radio is used as infrequently as possible.
From the user’s perspective, apps on the watch are very similar to apps on the phone: they present information to the user, and respond to taps and other input. However, while the watch is an independent computer, it’s incredibly underpowered compared to the iPhone. You can’t do heavy processing on the watch—if you need to do hard work, you get in touch with the iPhone in the user’s pocket. Additionally, certain hardware isn’t best suited to being directly in contact with the user’s skin at all times (for example, cellular radios), due to the fact that they emit larger amounts of energy.

Learn faster. Dig deeper. See farther.
It’s for this reason that the Apple Watch requires the user to have an iPhone: without an iPhone providing information to the watch, the watch’s utility is limited.
When you’re developing an app for the Apple Watch, you’ll end up building the iOS app and the watchOS app separately. These are two different targets in Xcode, but can belong to the same project. Any code or resource that needs to run on both devices needs to be added to both of the targets.
Displaying Content on the Watch
Once you have an empty WatchKit app, the next step is to show content:
-
Open the storyboard for the WatchKit app. Find Interface.storyboard in the HelloWatchWatchKitApp folder, and open it. You’ll see four interface controllers: one labeled “Interface Controller,” one labeled “Glance Controller,” and one labelled “Static Interface,” which is connected to the final interface controller labeled “Dynamic Interface.” In this chapter, we’ll be focusing on the first one, labeled “Interface Controller.”
-
Add a label. If it isn’t already open, open the Object Library by choosing View→Utilities→Show Object Library. Scroll down the list until you find the label, and drag it into the application’s interface.
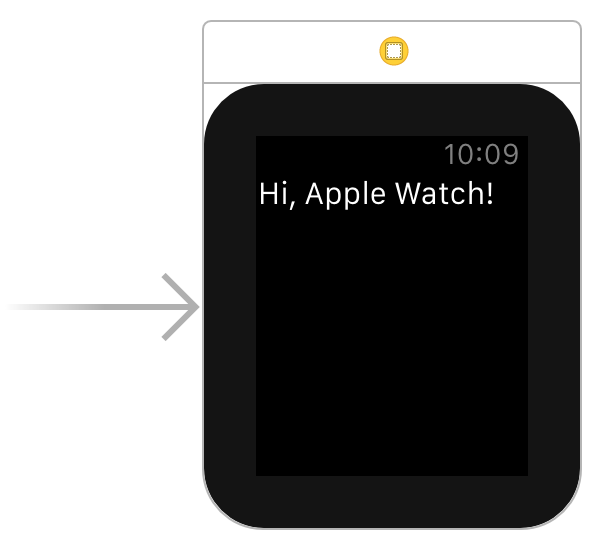
Double-click the label, and make it contain the text “Hi, Apple Watch!” When you’re done, your interface should look like Figure 1-1.
The way you design your interfaces on the Apple Watch is quite different than how you design interfaces on iOS. When you’re designing an interface on iOS or OS X—or, indeed, most operating systems—you generally position objects wherever you like on the screen. By contrast, the layout of interfaces on the Apple Watch is managed: when you add items to the screen, their position and size is determined by the system, based on where they are in the list or what type of interface object they’re contained in.
Note
This also means that you can’t overlap any interface objects. Objects are displayed next to each other, based on the order in which they’re arranged in the Interface Builder.
When you select an object in the interface, you can configure various settings for that object in the Attributes Inspector. To bring up the Attributes Inspector, choose View→Utilities→Show Attributes Inspector.
Note
There are two different sizes of Apple Watch: a 38mm model and a 42mm model. These two models have different screen sizes, which means that there are differing amounts of room on the screen for your interface. More content can be shown on the 42mm device than on the 38mm.
You can change the settings for different controls based on whether the watch is a 38mm or 42mm device by selecting them (clicking the + button at the left of each of the attributes in the Attributes Inspector).
When you run the app, you’ll now see text on the simulated Apple Watch’s screen.
Responding to Actions
Displaying stuff on the screen is good, but the real power of the Apple Watch is its ability to let users control the phone from their wrists. The most straightforward way to demonstrate this is to add a button to our “HelloWatch” app:
-
Find the Button in the Objects Library, then drag it into the interface. Place it underneath the label.
-
Open the Assistant by clicking the Assistant button at the top-right of the Xcode window—it looks like two interlinked circles (see Figure 1-2).
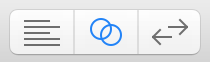
Figure 1-2. The Assistant button at the top-right of the Xcode window opens the Assistant editor -
Open InterfaceController.swift in the Assistant by clicking the leftmost element in the Jump Bar at the top of the assistant, selecting Automatic, and then choosing “InterfaceController.swift” (see Figure 1-3).
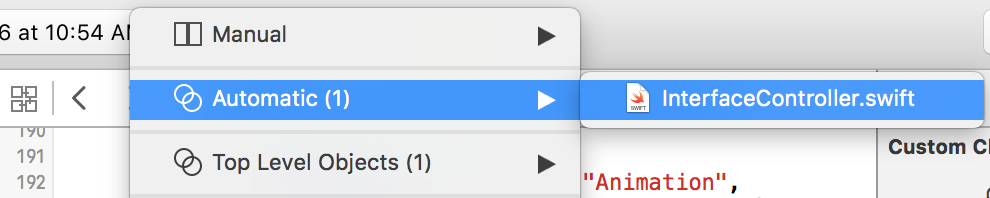
Figure 1-3. The Jump Bar, selecting the InterfaceController.swift file This object is in charge of providing the content for this page in the WatchKit app.
-
Connect the button to the code by holding down the Control key on the keyboard and drag the button into the
InterfaceControllerclass. A pop-up window will appear, allowing you to define a connection between the interface and the code (see Figure 1-4). Set the connection type to “Action” and name it “buttonTapped.” Click Connect, and a new method calledbuttonTappedwill be added to your code.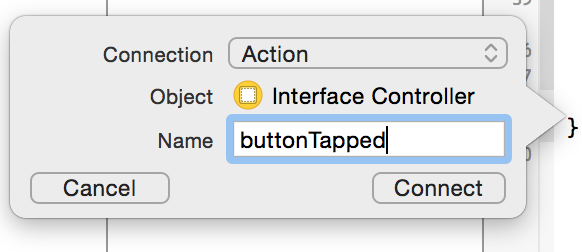
Figure 1-4. Creating the interface
An action is a method that’s run when the user interacts with the interface. For example, when the user taps a button, slides a slider, or otherwise does anything to the interface, you can hook up an action method to run in response.
The other type of connection is called an outlet. An outlet is a variable that is connected to the object in your interface at runtime, allowing your code to interact with the contents of your interface.
Create an outlet for the label by control-dragging from the label into the InterfaceController class; when the connection dialog box appears, set the connection type to “Outlet,” and name it “label.”
What we’ll do now is make the label change its text when the button is tapped. Add the code to the buttonTapped method:
  @IBAction func buttonTapped() {
      label.setText("Hi Hello Hi")
  }
Test it out by running the app, tap the button, and see it change.
Controls
When you’re designing a WatchKit app, you have quite a few tools to work with. If you scroll through the list of objects available in the Object Library, you’ll see a large collection of different elements, which you can drag into your interface and let the user interact with.
The only way you can add objects to your interfaces in WatchKit is through the Interface Builder. Unlike when programming for iOS, you can’t create them at runtime using code. The only way to work with interface objects is through outlets.
Additionally, your code never retrieves data from controls. You’ll notice that there are setter methods like setText for labels, but no getter methods like text.
In WatchKit, a “page” of content is managed by an interface controller. To create an interface controller, you subclass the WKInterfaceController class, and add your actions and outlets for that chunk of content in your WatchKit app.
There are some important methods that your WKInterfaceController subclass should implement.
-
awakeWithContextis called when the interface controller is loaded from disk. In this method, you prepare your interface objects, and give them their initial values. -
willActivateis called when the interface controller is about to be shown to the user. -
didDeactivateis called when the interface controller is no longer visible to the user.
In fact, these methods are so important that the InterfaceController.swift file that Xcode generates for you when you create a new project already includes them:
  override func awakeWithContext(context: AnyObject?) {
      super.awakeWithContext(context)

      // Configure interface objects here.
  }

  override func willActivate() {
      // This method is called when watch view controller is about to
      // be visible to user
      super.willActivate()
  }

  override func didDeactivate() {
      // This method is called when watch view controller is no longer visible
      super.didDeactivate()
  }
Once you know your way around interface controllers, it’s helpful to know about the four most useful controls available to you: labels, image views, table views, and menus.
Text and Labels
When you want to show text to to the user, you most often use a label. Labels in WatchKit are instances of the WKInterfaceLabel class.
Labels in WatchKit can display either plain text or attributed text. Attributed text is text that contains style information throughout the text, like making certain characters bold.
To update the text shown in a WKInterfaceLabel, you use the setText method:
label.setText("Hi Hello Hi")
To show attributed text using an NSAttributedString, use the setAttributedText method. You can also set the color of a label using setTextColor.
Automatically Updating labels
Some labels that appear on the screen need to be updated frequently, and it’s not especially convenient to have to perform these changes yourself.
One of the most common cases where you’d need to perform frequent updates is the case of a label that shows the current time, or shows a countdown timer. Fortunately, there are two special subclasses of WKInterfaceLabel that handle these specific situations.
-
WKInterfaceDateis a special label that shows the current time and date. -
WKInterfaceTimeris a special label that counts down to a date. When you callsetDateon this label, the label automatically begins counting down toward this date (if the date is in the future), or counting upwards from that date (if the date is in the past or is right now).
Note
WKInterfaceTimer is a display-only object. When the label is counting down toward a specific date, it won’t notify you when that date is reached. If you want to be notified when this happens, you need to set up your own NSTimer object.
Images
To display images on your watch, you use the WKInterfaceImage class. This object displays both static and animated images.
There are several methods you can use to display an image on a WKInterfaceImage:
-
setImagetakes aUIImageobject and displays it. -
setImageDatatakes anNSDataobject that contains an image. It loads the image into aUIImageand displays it. -
setImageNamedmakes the watch look for an image with the specified name, and displays it. If it can’t be found, the image view shows no image.
You can always clear the image from an image view by calling setImage and passing nil.
WKInterfaceImage supports the same image formats as iOS. However, it’s better if you use PNG and JPEG images, as these don’t need to be converted by iOS before being sent to the watch.
If you send an image that’s too big for the control, it’s scaled down so that it fits in the control (preserving the image’s aspect ratio).
Finally, images can be given a tint color using setTintColor. This allows you to save space by providing a single grayscale image, which is then filled with a color. Because this tinting is done on the watch, you can update the color of a WKInterfaceImage at any time, and without having to transfer an entirely new UIImage to the watch.
Animations
In addition to showing single images, you can also use a WKInterfaceImage to display animations. You can either configure a WKInterfaceImage to show an animated image using the Interface Builder, or you can do it with code.
To create an animated image, you first need to have all of the frames of your image ready, and add them to your application. You do this in the same way you add static images: by dragging and dropping them into an asset bundle. The key difference between static and animated images is that the frames attached to each animated image must all have the same name, suffixed with an increasing number.
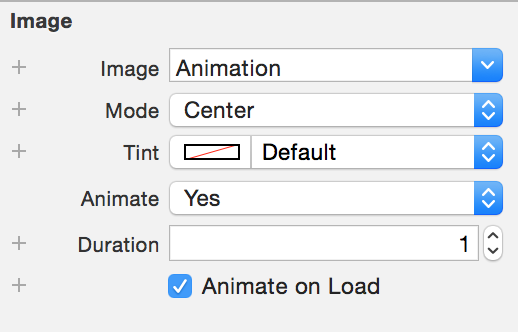
For example, if you want an animation named “Animation,” you’d add an image called “Animation0,” a second called “Animation1,” and so on (see Figure 1-5). You can have up to 1024 frames in an animation.

To set up an animated image in the Interface Builder, you set the name of the image to “Animation” (or whatever the name of your animation is)—without the frame number suffix. Next, change Animate from “No” to “Yes,” and specify how long the animation should run in seconds (see Figure 1-6: in this case, each loop of the animation will take one second). The Interface Builder won’t recognize the image, so you won’t see a preview in the window, but when you run the app, it’ll work fine.
Alternatively, you can set up an animation in code. The way that you interact with the WKInterfaceImage actually remains the same: you simply provide it with a UIImage object by calling the setImage or setImageNamed methods.
The difference is in how the UIImage object is set up. To create an animated UIImage, you use the animatedImageNamed method, and provide the name and duration of your animation:
  let animatedImage =
      UIImage.animatedImageNamed("Animation",
                                 duration: 1.0)

  self.imageView.setImage(animatedImage)
Menus
A menu is a place where you can put additional actions that the user can perform. These actions aren’t visible until the user pushes on the screen with a little extra force (a force touch). When the user does this, and the interface controller that’s currently active has a menu, menu items appear. You can see an example of a menu in Figure 1-7.

Menus are used all over the Apple Watch to provide access to extra actions that aren’t critical to the main functionality of whatever you’re using. For example, when you force-touch the notifications list, a menu appears that contains a single menu item, which lets you dismiss all notifications at once.
Note
Menus don’t include a button to close them. To close them, you tap anywhere outside the menu’s buttons, or you press the Digital Crown.
Menus are attached to interface controllers. To add a menu, you drag and drop the Menu item from the Object Library onto an interface controller.
Unlike the other controls, you don’t work with code to configure menus. In fact, you don’t really configure menus at all—you can’t customize their appearance in code, and you can’t change any properties at runtime. The only thing you can do is add them to your interface, and connect the buttons to methods in your interface controller’s code.
Each menu contains between one and four menu items. Menu items themselves contain an image and a label. You can select from a list of different built-in images, or you can add a custom image to your app’s asset catalog.
Warning
Menu items need to have both an image and a label. If the text for the label is empty, or if the custom image that you provide can’t be found, the menu item won’t appear.
Note
While a menu can contain up to four items, it’s a good idea to try to keep this number as close to one as possible. The more items you add, the smaller they all get. When you’re on a device that the user will be looking at for only a few seconds at a time, anything that reduces readability is a bad thing.
Where possible, try to avoid using menus entirely, as they’re not immediately visible to the user—remember, users have to force-touch to see if there’s anything there at all, and they may not think to try doing it.
You connect the button to the interface controller by following the same steps outlined for a WKInterfaceButton: control-drag from the item in the outline pane into your WKInterfaceController class and create an action; this action is called when the button is tapped.
To test menus in the iOS simulator, you need to indicate that you want to simulate a force touch. To do this, follow these steps:
-
Open the Hardware menu, and choose Force Touch Pressure→Deep Press.
-
Click on the screen, and the watch will react as if you’d pressed hard on it.
-
Choose Hardware→Force Touch Pressure→Shallow Press to go back to regular presses.
Tables
A table is a list of content that the user can scroll through. Tables are represented by the WKInterfaceTable class.
Tables in WatchKit work a little differently to their equivalents in iOS. In iOS, table views call back to a controller object to ask questions about how many rows there are in the list, and, for each cell, what content should be displayed. This kind of interaction would generate way too much back-and-forth traffic for the Apple Watch, which means that WKInterfaceTables are optimized to support preparing the entire content of the list all at once.
The way that it works is as follows: at design time, you define a number of row types. For each type of row, you lay out the controls that go in the row. You also give the row type an identifier, which is a string, plus the name of a row controller class that will store outlets to the controls that go in the cell.
At runtime, you tell the WKInterfaceTable about the number of cells that are in the table, and what the row type is. Doing this creates instances of all of the row controller classes. You can then ask the table for a specific row controller, and use that object’s outlets to access the controls in a specific label.
Note
Unlike in iOS, cells in a WatchKit table are empty by default. You’ll need to add controls to them yourself, and add outlets for each control that you add to the row’s controller class.
For example, let’s say you want to add a table that displays a list of words. This will mean that each cell will need a label, and you’ll need a way of sending the correct word to each cell’s label.
To do this, follow these steps:
-
Drag a table from the Objects inspector into your interface.
-
In one of your source code files, create a class called
MyRow. Make it a subclass ofNSObject. (You can create a new file for this class, or you can add the class to an existing .swift file.) -
By default, tables come with a single row controller already set up. Select the row controller in the outline—it has a yellow circular icon—and set its Identifier to
MyRowin the Attributes Inspector. Then go to the Identity Inspector, and set its Class toMyRow. -
Set up the row by dragging a label into the row’s interface. Then, open the
MyRowclass in the Assistant, hold down the control key, and drag from the label into theMyRowclass. Create a new outlet for the label calledlabel. -
In your interface controller’s
awakeWithContextmethod, add the following code:// An array of strings to show in the table let dataToDisplay = ["Hello", "World", "This", "Is", "A", "Table"] myTable.setNumberOfRows(dataToDisplay.count, withRowType: "MyRow") for i in 0 ..< dataToDisplay.count { let rowController = myTable.rowControllerAtIndex(i) as? MyRow rowController?.label.setText(dataToDisplay[i]) } -
Finally, run the application; you’ll see a scrollable list of words.
Note
In addition to simply creating rows using the setNumberOfRows method, you can also use the insertRowsAtIndexes(_, withRowType:) and removeRowsAtIndexes methods to add and remove rows.
Picker Views
A picker view displays a collection of options that the user can select from, by either swiping the screen or rotating the Digital Crown. Picker views can display text and images in a variety of ways; they can display a rotating list of captions, a stack of images, or a sequence of images.
Picker views are configured by creating a collection of WKPickerItem objects, which you provide to a WKInterfacePicker object.
To add a picker item, you drag a Picker from the Object Library into your interface controller. To provide the picker with content, you connect it to an outlet in your interface controller’s class, and call setItems to give it the list of WKPickerItems it should show.
For example, let’s say self.picker is a variable that refers to a WKPickerView. In this case, you could make it show the strings “Item 0,” “Item 1,” and “Item 2” in it by doing this:
  var listContent : [WKPickerItem] = []

  for i in 0...2 {
      let item = WKPickerItem()
      item.title = "Item \(i)"
      listContent.append(item);
  }

  self.picker.setItems(listContent)
Picker items can contain images, text, or a combination of both. The specifics of what’s shown depend on the list’s style.
As the user interacts with the picker, the picker calls whichever method is connected in the interface builder, much like a button does when the user taps on it. This method receives an Int, representing the index of the currently selected item. The first item is given the index 0, the second item is given the index 1, and so on.
Note
The WKInterfacePicker doesn’t provide a way to retrieve the WKPickerItems that you’ve provided to it. You need to keep track of those yourself.
  @IBAction func pickerSelectedItem(value: Int) {
      print ("Picker selected item \(value)")
  }
Note
You can also link animated images with the picker, so that the animation is at the first frame when the picker has selected the first item, and at the last frame when picker is at the last item. To do this, you provide the picker view with an animation, by using the WKInterfacePicker‘s setCoordinatedImages method. This method takes an array of WKInterfaceImages, which are animated as the picker rotates. To learn more about presenting an animated image, see Animations.
Playing Media
In addition to showing text and images, the Apple Watch can also play back video and audio. This is done through a media player interface controller, which you present from your interface controller.
Presenting any kind of media means loading it from a file. This means that if you want to play sound or video, the file that contains that content needs to be on the watch. The most straightforward way to do this is to embed the file in the application by following these steps:
-
Locate the video or audio file on your computer that you want to play in the Apple Watch app.
-
Drag it into the Project Navigator, at the lefthand side of the Xcode window.
-
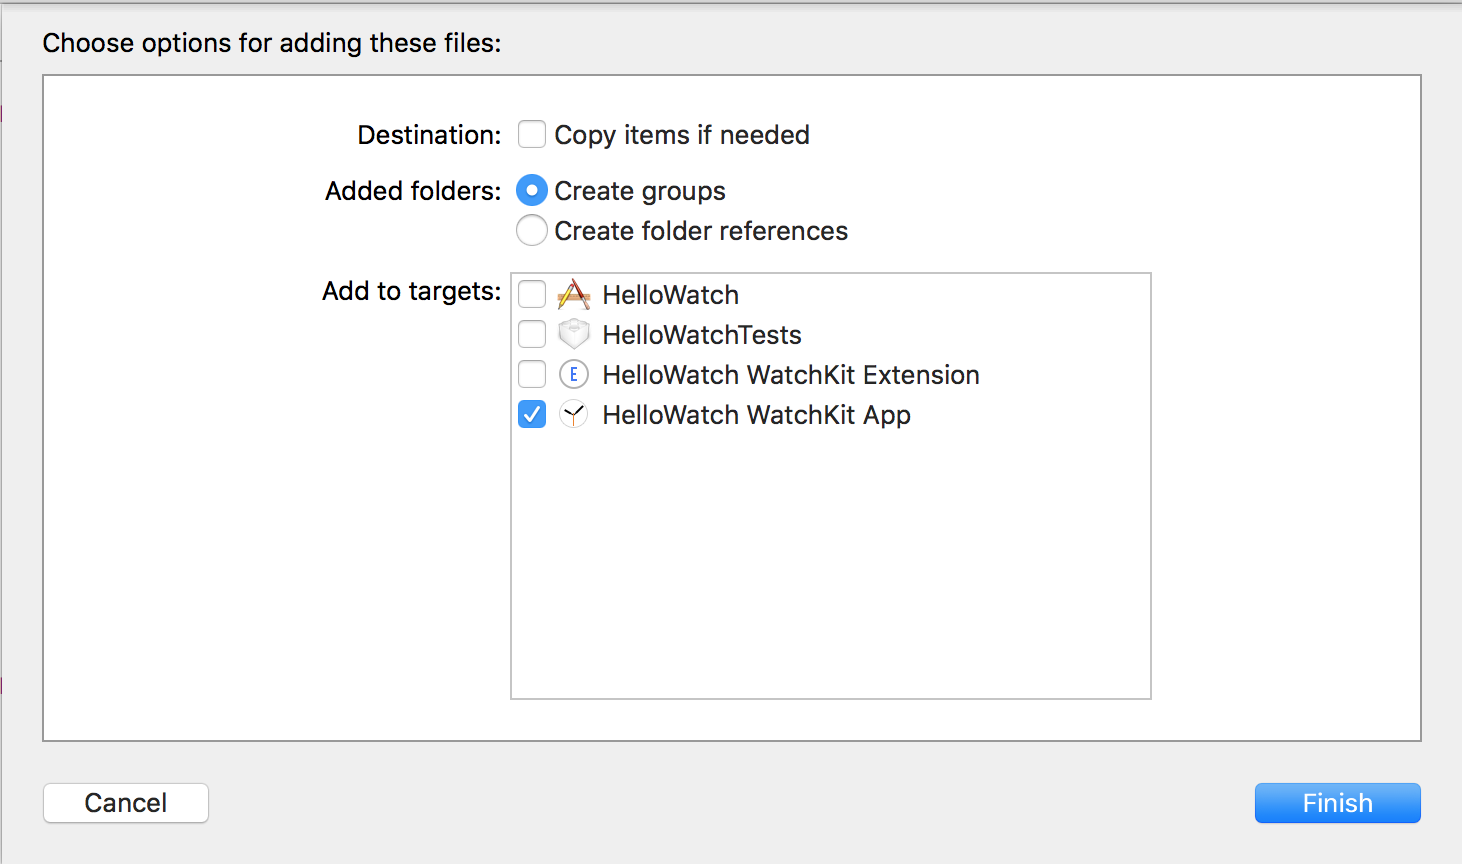
Xcode will ask you which targets the file should be added to—that is, should it be added to the iOS app, the watchOS app, or both? You can see the window in Figure 1-8.
-
Add the project to the WatchKit app. The file will then be copied to the watch when the app is installed.
To access a file that’s embedded in this way, you use the NSBundle class to get the location of the file within the watch. For example, if you’ve got a video file called Video.m4v included as part of the application’s resources, you can determine its URL like so:
  guard let videoFileURL = NSBundle.mainBundle()
      .URLForResource("Video", withExtension: "m4v") else {

      print("Couldn't find the video!")
      return
  }
Note
In this example, we’ve wrapped it in a guard statement. This means that if the file cannot be found, the code will log an error message and bail out. Doing this means that if we get past the guard statement, the videoFileURL variable is guaranteed to have a value you can use.
Once you have the location of a video file, you can present it using a media player:
  self.presentMediaPlayerControllerWithURL(videoFileURL, options: nil) {
      (didPlayToEnd, endTime, error) in

      print("Video player ended; played to end = \(didPlayToEnd), " +
          "end time = \(endTime), error = \(error)")

  }
When you call presentMediaPlayerControllerWithURL, you provide the URL of the file that you want to play, and a dictionary containing additional information on how it should be played, and a closure to run when the controller disappears. The video will then appear, allowing the user to view it.
When the user is done playing the video, the closure is called, and receives three parameters: a Bool value indicating whether the video was played through to the end, an NSTimeInterval value representing where in the video the user was when the video was closed, and an optional NSError object that describes any problem that was encountered while playing the video.
Tip
You can also use a media player controller to play audio, without video.
The options parameter lets you control how the user interacts with the media being presented. For example, if you wanted to make the video automatically play, you’d prepare a dictionary containing the WKMediaPlayerControllerOptionsAutoplayKey key set to true:
  let options = [
      WKMediaPlayerControllerOptionsAutoplayKey: true
  ]

  self.presentMediaPlayerControllerWithURL(videoFileURL, options: options) {
      (didPlayToEnd, endTime, error) in

      print("Video player ended; played to end = \(didPlayToEnd), " +
          "end time = \(endTime), error = \(error)")

  }
Using this dictionary, you can set things like whether the content loops, how video should be scaled to fit in the available space, and at what time the media starts playing. For the full list of available options, see the section “Media Player Options” in the WKInterfaceController documentation.
Getting Text from the User
In a lot of apps, you’ll often want to get some kind of text from the user. The Apple Watch is way too small to fit a keyboard on the screen, which means that there are only a couple of ways for the watch to get text input from the user.
The first method is to provide a list of predefined choices, and let the user select one. The second method is to let users speak to the device, and get their speech transcribed into text.
WatchKit combines both of these methods into one tool, called the text input controller. The text input controller displays a list of options, which your app determines, as well as letting the user choose an emoji image or use the Apple Watch’s built-in microphone to dictate a reply.
To present the text input controller, you call the method presentTextInputControllerWithSuggestions(_, allowedInputMode: completion:), which takes three parameters:
-
The first parameter is an array of strings, each of which is an option that the user can select. This array is optional.
-
The second parameter allows you to choose whether the user can provide only plain text, choose emoji images, or choose animated emoji images. You generally want to provide users with as much room to express themselves as you can, so limit their options for replying only after you’ve thought about it a great deal.
-
The third parameter is a closure that’s called by the system after the user has finished with the text input controller. This closure takes a single parameter, which is an array of
NSObjects. This array contains one or more strings andNSDataobjects—strings are selected options or the results of dictation, whereasNSDataobjects are images, which can be decoded using theUIImageclass’sUIImage(data:)method. This array can also be empty, which indicates that the user chose to cancel entering text.
Note
You can also call dismissTextInputController to get rid of the text input controller, if you decide you don’t need it anymore. Be careful about calling this, though; if the user is in the middle of dictating something, and the input controller goes away, then you risk annoying her.
If you want to try presenting a text input controller, add the following method to a button’s action method (see Responding to Actions):
  let suggestions = ["Yes", "No", "I guess?", "Huh?"]

  self.presentTextInputControllerWithSuggestions(
      suggestions, allowedInputMode: .Plain) { (results : [AnyObject]?) in

          guard let theResults = results else {
              print ("No text provided")
              return
          }

          for result in theResults {
              print ("Result: \(result)")
          }
  }
Warning
Dictation and emoji aren’t supported by the WatchKit simulator. You’ll need to use a real device to test them out.
Working with Multiple Interface Controllers
Often, a WatchKit app will only need a single screen’s worth of content. However, as an app gets more complex, you won’t want to try to fit everything into one location, and you’ll need to put some controls and information on other screens.
There are two ways that users of the Apple Watch interact with screens of content in apps:
- Hierarchical navigation
-
This works similarly to the way
UINavigationControllers do in iOS: when you want to show new content, you push a new screen, which slides in from the righthand side. When users want to go back, they tap the Back arrow at the top left of the watch display. - Page-based navigation
-
This works in a similar way to the home screen on an iPhone or iPad, in that the user can swipe left and right to see different pages of content.
Hierarchical navigation works best when you need to let the user drill down into a specific piece of information. For example, a news app could show a list of topics, and tapping on each topic would push a screen containing the relevant headlines.
Page-based navigation is good for situations where you have different screens of content that don’t necessarily need to connect to each other. For example, an app that displays the locations of the user’s friends could show a screen for each friend in a page-based way, allowing the user to swipe left and right to see each friend.
Your application can use hierarchical navigation or page-based navigation. You can’t use both in the same app, because both of these styles of navigation rely on left-right animations to change the screen’s content. When you push a new screen of content in an app that uses hierarchical navigation, the new screen slides in from the right; however, when you move from one screen to the next, the new screen would also slide in from the right. To avoid confusion, you can’t mix and match.
Regardless of whether your app uses hierarchical or page-based navigation, the interface controllers that contain each screen’s worth of content need to be connected. There are two main ways you can do this: you can connect the interface controllers in the interface builder using segues, or you can give each interface controller a name and manually summon it into existence in your code.
To create a segue, you hold down the Control button and drag from one object to another. Only certain objects can be connected via a segue:
-
Interface controllers can connect to other interface controllers via a “next page” segue.
-
Buttons, groups and table rows can connect to other interface controllers via either “push” or “modal” segues. Once you release the mouse button, you’ll be asked what kind of segue you want.
Modal Presentation
The last way to let your users get access to other screens is via a modal presentation. When you use a modal presentation to show an interface controller, the interface controller takes over the entire screen.
You use a modal presentation when you need to interrupt the user’s experience. For example, if the user is in the middle of some task, like requesting an Uber, you could present a modal interface controller to let her know that her driver was nearby.
Note
It’s important to avoid interrupting the users’ experience with alert screens as much as possible. Your users will only have a few seconds at a time to interact with your Watch Kit app, and slowing them down by popping up a modal alert box will only annoy them.
You can use either segues or code to present an interface controller modally. To use a segue, connect a button, group, or table row to an interface controller, and then create a “modal” segue. To modally present an interface controller using code, give the interface controller an identifier in the interface builder’s Identity inspector, and then call presentControllerWithName(_, context:):
self.presentControllerWithName("detailScreen", context: nil)
Note
You can also present a page-based layout modally, either with segues or with code.
To do this using segues, connect the screens that should be linked together in a page-based navigation screen using the “next page” segue, just as usual. Then, create a “modal” segue that connects the screen you want to present the screen from to the first screen that should appear.
If you’d prefer to show a page-based layout using code, call presentControllerWithNames(_, contexts:), and pass in the array of names of interface controllers.
If you simply need to present an alert (such as some text), you can also use the method presentAlertControllerWithTitle(_, message:, preferredStyle:, actions:). This method modally presents an interface controller containing a title and message, along with a number of buttons.
To show an alert, you first prepare the buttons you want it to have. You do this by creating an array of WKAlertAction objects, which each contain two things—the text that the button should display and a closure that should be run if the user taps the button:
  let actions = [
      WKAlertAction(title: "OK", style: WKAlertActionStyle.Default, handler: {
          print("OK button tapped")
      })
  ]
Note
All alerts must have at least one button.
Once you have the list of actions you want to attach to the alert, you simply need to call presentAlertControllerWithTitle, and provide the title and optional message, as well as the list of actions and the layout that the alert should have:
  let alertTitle = "Error!"
  let alertMessage = "There was a problem!"

  self.presentAlertControllerWithTitle(alertTitle,
                                       message: alertMessage,
                                       preferredStyle: .Alert,
                                       actions: actions)
Communicating with the Device
The Apple Watch is a separate computer from the iPhone. However, to access the wider world, your watchOS app will need to communicate with its counterpart iOS app. To achieve this, you use a separate framework called WatchConnectivity.
This framework is available on both iOS and watchOS, and is the mechanism for sending information to and from the other device. You use the same API on both devices, which simplifies the work you need to do.
To start using WatchConnectivity, you import the framework as follows:
import WatchConnectivity
All of your interaction with the other device is mediated through a WCSession object. You don’t construct this object yourself; instead, you ask for the default session:
let session = WCSession.defaultSession()
Additionally, to work with the session, you need to provide it with an object that conforms to the WCSessionDelegate method. One way to do this is by creating an extension that makes your interface controller conform to the protocol, like so:
  extension InterfaceController : WCSessionDelegate {

      @available(watchOSApplicationExtension 2.2, *)
      func session(session: WCSession, activationDidCompleteWithState
          activationState: WCSessionActivationState, error: NSError?) {

          print("Session activated!")
      }

      func sessionDidDeactivate(session: WCSession) {
          print("Session deactivated!")

      }

      func sessionDidBecomeInactive(session: WCSession) {
          print("Session became inactive!")
      }

      func sessionReachabilityDidChange(session: WCSession) {
          print("Reachability changed to \(session.reachable)")

      }

  }
Note
Note the @available tag on session(_, activationDidCompleteWithState: , error:). This exists to mark that the method is only part of the protocol in watchOS 2.2 and later.
When you have an object that conforms to the WCSessionDelegate, you can provide it to the WCSession as its delegate. In this example, self is an instance of InterfaceController:
session.delegate = self
A session does nothing until it’s activated. To activate it, use the activateSession method:
session.activateSession()
This call to activateSession is asynchronous: it can take a moment for the session to become active. When it does, the activationDidCompleteWithState method in WCSessionDelegate is called.
In addition to a session being active or not, the counterpart app may or may not be reachable. For example, you might activate a WCSession, and then go for a run with your watch, leaving your phone behind. The session remains active, but the phone is no longer reachable from the watch. This means that before you attempt to send any message to the other device, you need to ensure that the reachable property is true.
Tip
An iPhone can be paired with multiple watches, but only one session is active at a time between the phone and a watch.
Sending and Receiving Messages
The most straightforward way to send data from the watch to the phone, or from the phone to the watch, is by sending messages. A message is a dictionary that contains simple data: strings, numbers, dates, NSData objects, or arrays or dictionaries containing these types.
To send a message, you first construct the dictionary that represents the message you want to deliver. The message can be anything you like. For example:
  let message = [
      "message":"hi"
  ]
Once you have your message, you send it, using the sendMessage method on your WCSession:
  WCSession.defaultSession().sendMessage(message,
                                         replyHandler: nil,
                                         errorHandler: { (error) in

          print("Got an error sending to the phone: \(error)")
  })
The sendMessage method takes three parameters: the message itself, a reply handler closure (more on that in a moment!), and a closure that’s called if there was an error sending the message to the other device.
When this is called, the message is transmitted over the radio link to the counterpart app; when the message is received, the counterpart WCSession‘s delegate receives the session(_, didReceiveMessage:) method call:
  func session(session: WCSession,
       didReceiveMessage message: [String : AnyObject]) {
      print("Phone received message: \(message)")
  }
Sometimes, a message needs a reply. For example, your watchOS app may need to ask the iOS app for a list of strings to display; the iOS app will receive the request, and will then need to reply to that request.
To enable this, you provide a closure for the replyHandler parameter when calling sendMessage:
  WCSession.defaultSession().sendMessage(message,
                                         replyHandler: { (replyMessage) in
      print("Got a reply from the phone: \(replyMessage)")
  }, errorHandler: { (error) in
      print("Got an error sending to the phone: \(error)")
  })
The replyHandle takes a single parameter: a dictionary, containing the reply sent by the counterpart app. It’s up to you to interpret the contents of this dictionary.
When you send a message and provide a replyHandler, the counterpart app’s session delegate receives a slightly different method call: session(_, didReceiveMessage:, replyHandler:).
This method works identically, receiving the message sent from the other device; it also receives a replyHandler closure, which it is required to call before the method returns. When you call this closure, you provide the dictionary that you’d like to reply with:
  func session(session: WCSession,
       didReceiveMessage message: [String : AnyObject],
         replyHandler: ([String : AnyObject]) -> Void) {

      print("Phone received message that needs a reply: \(message)")

      let replyMessage = [
          "reply":"hello!"
      ]

      replyHandler(replyMessage)

  }
Moving Between Devices Using Handoff
Handoff is a technology that’s built into iOS, OS X, and watchOS, which allows the user to begin an activity on one of their devices and continue it on another.
For example, if you’re writing an email on your iPhone, your Mac is made aware of this fact, and displays an icon in the Dock. If you click on that icon in the Dock, the Mail application on OS X launches, and shows the draft email that you were just editing. You can then finish writing the email on your Mac, and send it from there.
Handoff works in both directions—you can start an activity on your Mac and finish it on your iPhone. It also supports handing off an activity between devices of the same type—for example, you can hand off from an iPhone to an iPad.
Handoff also works on the Apple Watch, and it’s a powerful technology that allows you to let users start doing something on the watch, and continue it on any of their other devices.
Before you start adding support for handoff to your applications, it’s worth taking a moment to think about what activities users might want to continue from one device to another. In the case of mail, it’s likely that users might want to continue reading or writing a specific message, but they probably won’t care about synchronizing where in the list of messages they are. Don’t forget that when you tell the system about an activity that the user is performing, an icon will appear on her iOS device’s lock screen and in her Mac’s dock. This can get a little annoying, so it pays to think about what’s important and what’s not.
Handoff works through the NSUserActivity class. A user activity contains two critical pieces of information: a string that identifies the type of the activity and a dictionary containing the context of the activity:
-
The type of the activity is a period-separated string, like com.oreilly.CoolWatchApp.chatting. The activity type needs to have your iOS application’s bundle identifier as its prefix (which, in this example, would be com.oreilly.CoolWatchApp).
-
The context of the activity is a dictionary containing additional information that describes details of what the user is doing. To continue our example, the context dictionary might contain information like the username of the person the user is chatting to.
To support receiving an activity that’s being handed off by another device, you need to add some information to your iOS app’s Info.plist file. This file provides information about an app (for example, its name and icon) to the rest of iOS.
To add support for a handoff activity, you first work out what you want to call the activity. Earlier, we used com.oreilly.CoolWatchApp.chatting; again, the type identifier can be anything you like, as long as it begins with your app’s bundle identifier. The activity’s type identifier is never shown to the user, and is only used in your code.
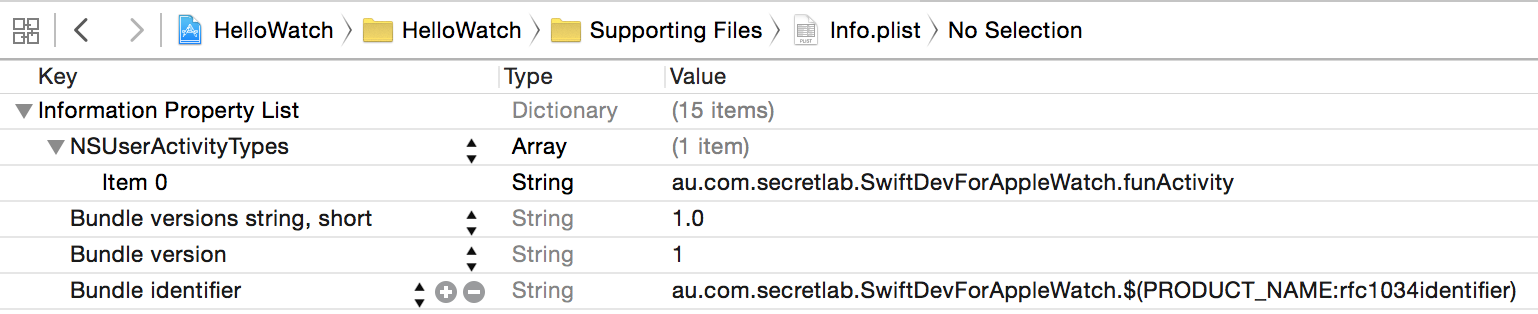
Once you’ve figured out the activity type string, you create an array inside the iOS app’s Info.plist file called NSUserActivityTypes, and add your activity type to that array (see Figure 1-9.)
Once this has been added to your iOS app’s Info.plist file, the iOS app has declared that it’s capable of receiving that type of activity from other devices. To share that activity, you use the NSUserActivity class to indicate what the user is doing.
To do this, you call updateUserActivity(_, userInfo:, webpageURL:) and pass in the activity type and context dictionary, as in the following code:
  // Define the activity that the user is doing
  let activityType = "au.com.secretlab.SwiftDevForAppleWatch.funActivity"

  // Add some additonal information that provides more context
  let activityInfo = [
      "additionalInfoForTheApp": "tennis"
  ]

  // Indicate to the system that the user
  // is now doing an activity
  self.updateUserActivity(activityType, userInfo: activityInfo, webpageURL: nil)
Note
You can also optionally pass in an NSURL object that contains the URL of a web page to load the activity in a browser; however, we’ll be focusing on using handoff with apps in this book.
When you call updateUserActivity, all other nearby devices that belong to the user and have an app installed that’s capable of handling that type of activity are notified that the user is currently performing an activity; as a result, the application’s icon is shown on the iOS lock screen, and in the OS X Dock. When the user swipes up on the icon in the iOS lock screen, or clicks on the app in the Dock, the application is activated, and its application delegate object receives the application(_, continueUserActivity:, restorationHandler:) method:
  func application(application: UIApplication,
       continueUserActivity userActivity: NSUserActivity,
                      restorationHandler: ([AnyObject]?) -> Void) -> Bool {

      print("Handling activity \(userActivity.activityType) " +
          "(parameters: \(userActivity.userInfo)")
      return true
  }
This method receives three parameters: the UIApplication or NSApplication object that represents the current app, the NSUserActivity object that was prepared on the other device, and a closure that should be called if your application created any view controllers or windows as a result of resuming the activity (for example, if you opened a chat window to continue the user’s conversation, you pass in that window to the closure).
Using handoffs, you can let your user quickly and easily move between devices with a minimum of effort. Add this feature, and your users will thank you.
Wrapping Up
In this chapter, we’ve introduced a number of fundamental watchOS elements. Interface controllers contain the content that your users will see and interact with, including the many different types of controls; additionally, interface controllers can be linked together to create more complex applications.
In the next chapter, we’ll look at a more specialized type of interface seen in watchOS: glances.