230 LESSON 11 Creating Menus
Physical media
e type of disc onto which you will record your video is important. ere are two
basic formats you should be aware of: Recordable ( DVD-R and DVD+R for DVDs,
BD-R for Blu-ray Discs) and Rewritable ( DVD-RW and DVD+RW for DVDs,
BD-RE for Blu-ray Discs). Recordable discs are single-use discs; once you record
data onto a recordable disc you cannot erase the data. Rewritable discs can be used
multiple times, much like the fl oppy disks of old.
ere are also dual-layer DVD-Recordable discs (DVD-R DL and DVD+R DL) that
off er 8.5 GB of storage space instead of the 4.7 GB of standard DVD-R, DVD+R,
DVD-RW, and DVD+RW discs. Dual-layer BD-R discs, featuring 50 GB of storage
space, will come to market soon, but you don’t need to be concerned with them at
this point.
So which format should you choose? Compatibility is one of the major issues with
these formats. On the DVD side, there are many older DVD players that may not
recognize some rewritable discs created on a newer DVD burner, for example.
Compatibility is also more of a concern with dual-layer media than with single-
layer discs. Another issue is that, as of this writing, the media for recordable discs is
less expensive than the media for rewritable discs. However, if you make a mistake
with a recordable disc, you must use another disc, whereas with a rewritable disc
you can erase the content and use the disc again. For this reason, we suggest using
rewritable discs for making your test discs, and then using recordable discs for fi nal
or extra copies.
On the Blu-ray Disc side, the technology is still fairly new and playback compat-
ibility is at least a minor issue with all media. But because the BD-R and BD-RE
formats were developed at the same time, BD-RE discs are just as likely to play in
a given player as their BD-R counterparts. Generally, the cost of BD-R and BD-RE
media is about the same, but because it is so high for both ($10–$15 per disc),
you’re better off using BD-RE discs for your projects so you can re-record if you
make a mistake.
Manually adding scene markers
When watching a DVD or Blu-ray Disc movie, you normally have the option to
jump to the beginning of the next chapter by clicking a button on the remote con-
trol. To specify the start of chapters or sections in your project, you must add scene
markers.
ADOBE PREMIERE ELEMENTS 7 CLASSROOM IN A BOOK 231
1 Scroll through the entire movie in the Timeline of the My Project panel.
is project consists of three main sections, labeled Meet the Dolphins, Lunch
Time, and Afternoon Fun. Each section has a title superimposed for the fi rst
5 seconds, and a marker that you inserted back in Chapter 5. You will place
scene markers at the beginning of each section so your viewers can access these
sections more easily during playback. You’ll start by adding the marker for the
Meet the Dolphins section.
2 Click the Home key on your keyboard to move the current-time indicator to the
start of the movie.
3 Right-click the time ruler within the fi rst few seconds of the project and choose
Go to Timeline Marker > Next. Adobe Premiere Elements will jump to the fi rst
timeline marker located at 00;00;24;01.
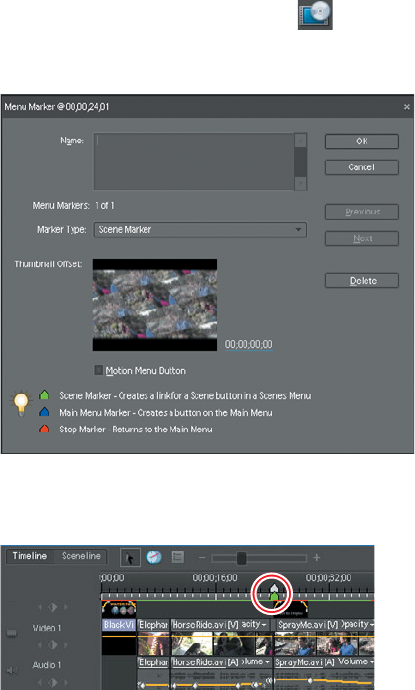
4 Click the Add Menu Marker button (
) located near the upper-right corner
of the My Project panel to open the Menu Marker dialog. You will work more
with this dialog later in this lesson; for now, just click OK to close the dialog.
5 Notice the green scene marker icon added just below the previous marker on
the time ruler.
쎲
Note: This project
is only about 2 minutes
long due to necessary
limitations on the fi le
size. Most projects
would likely be longer,
but the basic principles
remain the same.
쎲
Note: You may have
to move the current-
time indicator to better
see the green scene
marker beneath.
Get Adobe Premiere Elements 7 Classroom in a Book now with the O’Reilly learning platform.
O’Reilly members experience books, live events, courses curated by job role, and more from O’Reilly and nearly 200 top publishers.

