Chapter 1. Using Your BlackBerry
Hacks 1–21: Introduction
If you just got your first BlackBerry, you’ve probably already figured out the basics. The nice thing about the BlackBerry is that is has something for every type of user—from “wet behind the ears” newbies to the most advanced alpha-geeks. This chapter uncovers some of the tricks you may not have known your device was capable of. New users will be happy to know what’s just below the surface: a clipboard [Hack #2] , multitasking [Hack #6] , and wireless calendaring [Hack #4] . The hackers in the crowd might like to display the signal strength in decibels instead of bars [Hack #17] , use your computer as a wireless headset [Hack #16] , or get mobile Internet access on your computer [Hack #9] . Dive right in—there’s something for everyone.
Choose a Data Plan
You may know how to choose a voice plan, but what type of data plan do you need?
Mobile phones have been around long enough for people to know the ins and outs of a voice plan. By now, most of us realize what type of mobile phone user we are, how many minutes we’re likely to use in a month, and we can pick an appropriate voice plan and realize the implications.
But what about the data plan? How much data are you likely to use with your BlackBerry? What are the factors that should contribute to this decision?
BlackBerry’s Wireless Usage
One of the reasons BlackBerry has raced on the scene and become so popular is its "push” technology. Access to email from a mobile device has been around for quite a while, but it’s always been a "pull” technology. That is, when you wanted to check your email on your mobile phone, you access a mail application and then poll your server to see if any new mail has arrived. This process is usually slow due to network latency and hardware of small devices.
Research In Motion (RIM), the company that makes the BlackBerry, stepped in and developed a push technology that delivers new emails to your mobile device. This allows you to set up alerts and even be proactively notified when you receive certain email messages [Hack #30] .
While this approach to mobile email has been wildly successful, your device’s data usage using this model will be far greater since you are not in control of when to use the data connection. This is analogous to accessing the Internet with broadband versus dial-up. Your BlackBerry is like broad-band—it is on all the time.
Other Factors to Consider
If you know you’ll be using your device with your company’s BlackBerry Enterprise Server (BES), your data usage could be significantly lower. Introduced with BES 4.0 is the BlackBerry Router, a piece of software that is designed to know at any given time the best (and cheapest) route to communicate to your device. When you’re in the office and cradled, the BlackBerry Router can detect this condition and use the local IP network to send data to your device through the USB cable on your PC instead of “over the air.”
This factor will become even more important when RIM produces a much anticipated GSM/WiFi device. This device will theoretically be able to determine the optimal connection depending on your proximity to an 802.11 WiFi hotspot. When in WiFi range, it will be able to “roam to WiFi” and communicate exclusively over its 802.11 adapter. Only when it’s out of WiFi range will it use your carrier’s GPRS data network. Your company’s BlackBerry Router will be able to detect your connectivity and send data through the appropriate route.
The Case for the Unlimited Data Plan
Unless you have good reasons not to, you should go with an unlimited data plan. First of all, the price is typically not much more than the plans that are billed per megabyte (for example, at the time of this writing, Cingular’s 4-MB plan was $34.99 a month versus $44.99 for their unlimited data plan). Second, because data is pushed to your device, you have little control over the amount of data that gets sent.
You get plenty of email as it is. Add to that the increasing amount of spam and “joe-jobs” that can occur and it won’t take long to go over your monthly allotment. As an administrator who sets up jobs to alert via email, I’ve certainly been “spammed” by a job that went haywire.
As you discover the third-party software to download and install over the air, the multitude of sites that can be accessed via the BlackBerry Browser, and as the sheer volume of email continues to escalate, you’ll be more comfortable with an unlimited data plan.
Do You Have to Have a Data Plan at All?
Actually, with most carriers, the data plan and the voice plan are optional. There are some users who use the device without a calling plan and use only the data features of the device. There are others (fewer, for sure) who use the BlackBerry as a phone without a data plan. The BlackBerry loses a significant amount of its usefulness when you don’t have a voice plan and is certainly a lot less fun without a data plan. I won’t even address the situation in which one has a BlackBerry device with no voice or data plan—that’s just silly.
Warning
Although the voice plan is optional for most carriers, for technical reasons, they still have to actually assign you a telephone number even if you don’t use it. Be careful, though—when you choose to have no voice plan, you can still use the phone to make calls. Those calls you make cost an arm and a leg, too. So, when they say you have no voice plan, they really mean “The Worst Voice Plan Ever.”
Cut and Paste Text
Did you know the BlackBerry has a clipboard? Use it to save tons of keystrokes.
As convenient as RIM has made typing on your handheld, it’s still—let’s face it—typing on a handheld. Any time you can get away without typing text on your device or using shortcuts [Hack #7] , you should. This will allow you to be more efficient and crank out more messages from your device with less effort.
One of the most useful ways to save keystrokes is by using BlackBerry’s built-in clipboard to copy and paste text from one place to another on your device. Although this is a trivial task on an actual computer, it is a little more difficult on your BlackBerry. Committing these steps to memory now will definitely go a long way in your becoming the ultimate BlackBerry road warrior.
Make Your Selection and Copy It
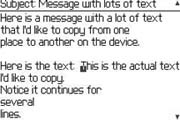
Once you have identified the text you would like to copy, you need to select it, just like on your computer. Position the cursor to the first character in the text you’d like to select. Remember that holding down the Alt key while scrolling with the trackwheel moves your cursor horizontally. Once you’ve positioned the cursor on the first character of your selection, hold down the Alt key, click the trackwheel once, then release the Alt key.
This puts the BlackBerry in selection mode. Notice the cursor covers only the bottom half of a character when in this mode as shown in Figure 1-1.
Use the trackwheel to select the text you’d like to copy to the clipboard by scrolling up and down. Notice that entire lines are selected when you scroll. Hold down the Alt key while you scroll with the trackwheel to move horizontally on the current line one character at a time.
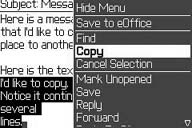
Once you’ve selected all the text you’d like to copy, click the trackwheel once to bring up the menu. Notice that when you are in “selection mode” the menu will have a couple extra items with the default selection being Copy. Choose Copy to send the selected text to the clipboard (see Figure 1-2). Notice after you copy text you are no longer in selection mode.
Paste the Copied Text
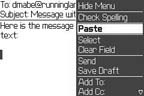
Once you’ve copied the text to the clipboard, go to the area where you’d like your selected text to appear—most likely the body of a message you are composing. When you have placed the cursor in the proper position, click the trackwheel once to bring up the menu. Notice in Figure 1-3 that when you have text on the clipboard and your cursor is in an editable field, the menu contains a paste function and it’s the default selection.
Select the Paste option on the menu to copy the text to the desired position, and voilà! The text appears as shown in Figure 1-4. Once you memorize this technique, you’ll probably want to use the keyboard shortcut for pasting (hold down the Caps Lock key and click the trackwheel).

Tip
Just like in Windows or Mac OS, the selected text remains on the clipboard after it’s been pasted until it’s replaced with another selection. Also, the clipboard lives in the operating system so it is available across applications. This lets you copy text from a web site via the BlackBerry Browser into a new message in the Mail application.
Take the Easy Way Out with Shortcuts
Cut the course with shortcuts—perhaps the most powerful and underused feature of the device.
The BlackBerry has a very rich system of using shortcuts and hotkeys to quickly navigate inside of applications, and to launch applications from the Home screen. This hack is based largely on the compilation of hotkeys and shortcuts that Mark Rejhon has been maintaining on the very useful BlackBerry Forums web site (http://www.blackberryforums.com/). Mark maintains several FAQs that are of interest to BlackBerry newbies and veterans.
To use application launch shortcuts, you may need to disable the ability to dial from the Home screen [Hack #18] in the Phone application’s options. This will mean you can’t just start dialing numbers when you pick up an idle BlackBerry, but you can quickly tap the top button on your BlackBerry to put you into the Phone application, and thus be ready for number input there as well.
The Alt key is on the left side of your keyboard. It is just below the A and to the left of the Z. The Shift key is the same as the zero on your keyboard, or it may also be on the right of the keyboard, left of the Power Button and right of the spacebar.
When I say Alt-M, I mean press and hold Alt and tap M, in that order.
When I say Alt-M,O,O, I mean to press and hold Alt, then type M, O, and O, in that order. Release Alt when you are done typing.
Tip
These shortcuts have been tested on a 7290. Because of keyboard layout differences, some of these shortcuts will not work on a 7100 series device, such as the 7100g.
Navigation
Hold the Alt key while you use the trackwheel to scroll horizontally through any field where you can enter or view text. This works in many places: when you’re editing a sentence in an email, a memo, or even a form on a web page. You can always move character by character by using Alt and scrolling the wheel. When viewing a message, list, or web page, you can scroll by page instead of by line by holding down the Alt key and scrolling. Hold the Shift key while you are scrolling through several items to select them all. This is useful for processing multiple messages at once. Table 1-1 lists some more navigation shortcuts.
|
Shortcut |
Description |
|
Alt-Escape (the button on the side beneath the scroll wheel) |
Changes the currently active application [Hack #6] . |
|
Locks the BlackBerry. | |
|
Spacebar or Return |
Scrolls down a page at a time while reading an email. |
|
Scrolls up a page at a time while reading an email. | |
|
B | |
|
T | |
|
N |
Moves to the next item (next day in Calendar, next message in Messages). |
|
P |
Moves to the previous item (previous day in Calendar, previous message in Messages). |
|
U |
Text Input
You may press Alt-Shift to activate Caps Lock. Of course, there is no need to use it in emails, since the BlackBerry capitalizes text for you automatically. When Caps Lock is on, an icon will appear in the top-right corner of your display that is a little oval with an arrow in it.
You may press Shift-Alt to activate number lock. This will let you punch the numbers on the BlackBerry keyboard with reckless abandon. The upper-right corner of your display will indicate number lock with a little oval icon with a “#” in it.
Home Screen
Table 1-2 lists the shortcuts that are available from the Home screen.
Customize the Home screen.
To rearrange the Home screen [Hack #5] , highlight an icon, press Alt, and then click the trackwheel. You can move the icon somewhere else, hide it, or show all the hidden icons. This will let you hide “Enterprise Activation” if you don’t need it, but it will not allow you to drop an item into a folder.
View.
Turn on the backlight by tapping the Power button. Some models, such as the 7290, have a two-stage backlight allowing you to set it to “off,” “lit,” and “well lit.”
Messaging.
You’ll need some shortcuts in your Messages program once your emails start piling up. With your BlackBerry being so great at email [Hack #31] , you’ll love the shortcuts to slice and dice through your mail messages. The shortcut to select items is useful in selecting several messages at a pass. Your loving mother, who forwards you a few select jokes or chain letters every now and then, usually sends them in bulk. By using Alt-scroll you can roll your way down the list of emails from Mom and tap Del to delete them [Hack #22] . Sorry, Mom. You know I love you.
While reading an email you can press spacebar or Return to scroll down a page at a time, or Alt-Return or Shift-spacebar to scroll up one page at a time. Table 1-3 shows some more shortcuts you can use while reading an email.
While composing a message or PIM item.
Press and hold a key to capitalize it. Press the spacebar twice to insert a period automatically and capitalize the next letter you type. This is one of the most underrated features of the BlackBerry.
Press the spacebar to insert @ and . while typing an email address; this works in fields that are known to require an email address.
Calendar Hotkeys
You can use hotkeys to change the view. You can, of course, pick the default view in the Calendar options, but occasionally you don’t want to see things in agenda mode (which is my favorite). Table 1-4 lists the calendar shortcuts.
Browser Hotkeys
The BlackBerry Browser has some surprisingly useful shortcut keys. Table 1-5 lists them.
Miscellaneous Keystrokes
You can change the signal strength meter from useless bars to the actual numeric of your signal strength. While in the Home screen, tap in Alt-N,M,L,L. For more information, see [Hack #17] .
To get your BlackBerry to spill its guts and tattle on what version of software it has, battery level, PIN, IMEI, device uptime, and free storage, you can type in Alt-Shift-H (think “Help me!”). These are things you may need to have available if you call in for support due to a misbehaving BlackBerry.
To see the Event Log of your BlackBerry, type Alt-L,G,L,G. See “View the Event Log” [Hack #8] for more information.
Sync Your Calendar over the Air
Have your calendar items sync to your server-based mailbox continuously over the air.
If you are a BlackBerry Enterprise Server user, you know how quickly your emails arrive to your device—almost immediately. In earlier versions of BlackBerry Enterprise Server, synchronization of all items except email had to occur through a USB or serial connection using Intellisync with Desktop Manager. With the introduction of Version 2.1 of the BES, it is possible to update your calendar items over the air without cradling your BlackBerry.
Unless your device has been provisioned over the air to a 4.0 BES server, by default, your calendar items on your device are synchronized to your Outlook calendar only when you cradle and run an Intellisync using Desktop Manager. You can change that so your calendar items synchronize continuously over the air. This turns out to be quite a convenience for heavy calendar users and for users who have multiple people managing their schedule using a server-based calendar.
Enable Wireless Calendar
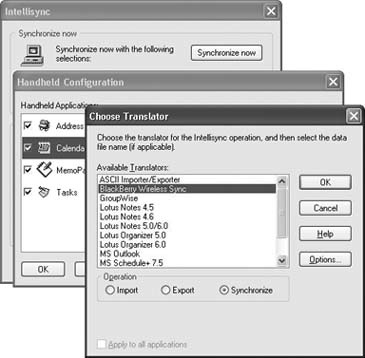
To set up wireless calendaring, you’ll need to cradle your device and bring up Desktop Manager. Double-click on the Intellisync icon, and then click Configure PIM. Under Handheld Applications, select Calendar, and then click on the Choose button on the top-right side of the dialog box. As shown in Figure 1-5, instead of choosing Microsoft Outlook (which is the default), choose BlackBerry Wireless Sync, and then click OK.
Warning
If BlackBerry Wireless Sync is not on the list, you either are not a BES user, your BES is using a version that doesn’t support the wireless calendar feature, or your administrator has configured the server not to support it.
After clicking OK, a dialog box will appear saying that you need to synchronize to enable wireless calendaring. Because there are often many calendar items in your calendar that would take a lot of airtime and server resources to sync over the air, Desktop Manager has you do a cradled sync one last time before enabling the wireless calendar feature. For syncing a large number of items, this type of sync is far more efficient.
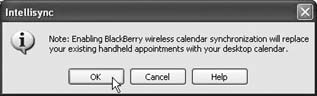
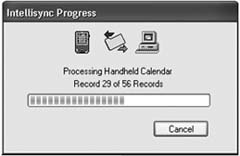
Click the Synchronize Now button to sync your device. When Desktop Manager recognizes that this is the first time you’ve synced since you first enabled the Wireless Calendar Sync, it will display a dialog box as shown in Figure 1-6. This simply explains that all your calendar items on your calendar will be overwritten with items from your server-based mailbox’s calendar. Clicking OK starts the synchronization process as shown in Figure 1-7.
Once the Intellisync is complete, your calendar items will sync over the air whether the changes are initiated from your device or from your server-based mailbox.
Organize the Icons on the Home Screen
Remove your rarely used icons from your main screen.
Part of the success of the BlackBerry has been because of RIM’s decision to use J2ME (Java 2 Micro Edition) as the OS on its devices. This decision immediately made a tremendous amount of J2ME software available for the BlackBerry and established the BlackBerry as a leading platform for application development. There are two chapters of this book dedicated to various third-party applications.
With all the programs that come with the BlackBerry software itself, plus all the third-party applications you’re likely to install, it won’t be long before you amass quite a collection. Each of these applications installs an icon on your Home screen consuming valuable screen real estate. These icons range from visually appealing to absurdly unrecognizable.
All these icons can make your Home screen difficult to navigate. Just when you get used to your icons being in a certain place, you install another application and all the icons shift around the screen so the Calculator icon shows up in the first instead of the last column. Chaos!
Fortunately, a little known feature of BlackBerry allows you to create some order in your icon wasteland by rearranging the icons and hiding others so they don’t even appear at all.
Move Icons to and fro
Let’s say you often search for messages from the Home screen by clicking the Search icon. You do it so often that you’d like to have that icon in a much more prominent position than the last row where it is by default. Here are the steps to move that Search icon to the first row right beside the Messages application.
From the Home screen, position the cursor on the Search icon (the magnifying glass).
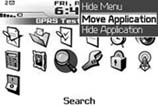
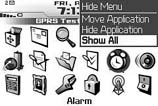
While pressing the Alt key, click the trackwheel one time. A “hidden” menu appears as shown in Figure 1-8.
Select Move Application. A border appears around the Search icon, indicating you’re moving the icon.
Use the trackwheel to position the icon beside the Messages application and press Enter. Figure 1-9 shows the Search icon in its new location.

Completely Hide Icons
There are some icons I hardly ever use. They just take up space on my Home screen and get in the way. The minimalist in me likes to run a tight ship and show icons only for the applications I use most often.
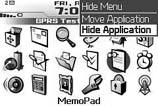
To hide any icon on your Home screen, select the icon and repeat steps 1 and 2 from the previous section. Select Hide Application instead of Move Application. Figures 1-10 and 1-11 show how to hide the Memopad application.

Poof! The Memopad icon disappears, and the trailing icons shift over to take its place. This hack goes a long way to tidying up your Home screen.
Access a Hidden Application
“Uh-oh,” I hear you say as you try this hack and realize that you’ll actually need to access the Memopad application sometime. Don’t panic!
BlackBerry makes it easy to unhide all your icons at once. Use the steps outlined earlier to access the menu you used to hide your icons. Once you’ve hidden at least one icon, the Show All option will appear on the menu (see Figure 1-12). Select this option and all your icons will now appear on the Home screen allowing you to access that hidden application. Notice each icon you’ve chosen to hide now has an X over it (see Figure 1-13).
Access the menu again to deselect the Show All option to hide the icons again.

Run Programs in the Background
“Minimize” programs using the BlackBerry equivalent of Windows’s Alt-Tab.
As BlackBerry users, we marvel at the efficiency that the BlackBerry provides. This efficiency causes even the slightest delay to seem like an eternity. Using the BlackBerry Browser to view a slowly responding web site can be frustrating when you’re used to the quick and immediate access that the BlackBerry provides to most data.
It turns out that the BlackBerry OS provides an easy way to multitask by sending applications to the background. This method is analogous to the Alt-Tab functionality that Microsoft Windows provides.
Let’s say you’re using the BlackBerry Browser to access Painfullyslowsite.com. Rather than stare at a blank screen with a slowly moving progress bar across the bottom, you can respond to some emails and have the web site load in the background. To switch to the Messages application, hold the Alt key, and then press and release the Escape key. As you continue to keep the Alt key down, a list of icons appears, as shown in Figures 1-14 and 1-15. Each icon represents an application that can currently be switched to. Use the trackwheel to choose the program you’d like to switch to (the Messages program in this case), and then release the Alt key.
This sends the BlackBerry Browser to the background, and the Messages application is started and brought to the foreground. Similar to Microsoft Windows and other modern operating systems, these applications in the background continue to execute even though they aren’t visible.
Warning
This process is called preemptive multitasking, which means the operating system uses an algorithm to intelligently decide which application gets access to system resources such as processor and memory. Typically, foreground applications receive a higher priority for getting access to resources than a background application.
Convenient Sorting
The applications that appear on the Application Switcher list appear in an intelligent order, depending on which application you’re running and whether there are programs you’ve already sent to the background. When no other applications are running, the Application Switcher shows the most common programs you’d likely want to switch to: the Home screen, the Phone application, and the Messages application.
The program you’re currently in will appear first in the list, although the icon next to it will be initially selected.
As you send more and more applications to the background, they’ll appear on the list as well. As you switch from program to program, you’ll notice that BlackBerry conveniently places the icons in the order in which they were last accessed, with the most recently accessed application selected by default.
Because this functionality exists in the BlackBerry Operating System, all applications are able to use it—even applications made by third parties.
Switching More Quickly
When you’re using one application at a time, the Escape key closes the current application and returns you to the Home screen. Once you have more than one application open, you’ll notice that the Escape key still closes the current application normally, but it brings the most recently accessed program to the foreground instead of returning to the Home screen.
This serves a couple of different purposes. First, it is often exactly what you’d want to do. But second, it’s also a nice reminder that there are other applications running that you’ve perhaps forgot were in the background.
This hack is probably most useful for minimizing the browser while accessing a slow site, but there are other convenient uses as well. The background programs are left in the same state they were in when you initially sent them to the background. This makes it especially useful for cutting and pasting text [Hack #2] between applications.
Type Less Using AutoText
Use abbreviations for commonly typed words to save time (and your thumbs).
You already realize by now that one of the main features that sets a BlackBerry apart from other handhelds is its keyboard. Its innovative keyboard design has won over millions of users because RIM was able to get a full QWERTY keyboard on a small handheld PDA. You can walk in any airport in the world and see that distinctive thumb-typing all around you.
But even as simple as the BlackBerry makes entering keystrokes, typing a long email is still cumbersome. A nifty feature called AutoText can alleviate some of that burden by replacing abbreviations with full text. This ends up saving valuable keystrokes by letting you type less.
Create a New AutoText Entry
RIM conveniently provides a slew of built-in AutoText entries that you may have already benefited from without even knowing it. For example, when you type “arent” into a new message, it immediately becomes “aren’t.” There are 108 built-in entries that provide corrections for common misspellings, add proper punctuation, and provide commonly used text snippets that you’re likely to use when you type.
You’ll definitely want to add your own custom entries to make shortcuts for text you commonly type. Suppose you often find yourself typing your mailing address into the mail messages you send via your BlackBerry. Here are the steps to create an AutoText entry to simplify that.
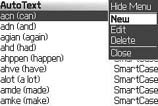
You’ll find the AutoText feature in the Options section off the Home screen. Once you are in the AutoText program, click the trackwheel once to bring up the menu. Choose New (see Figure 1-16).
The configuration screen appears. Let’s say you want your full mailing address to appear when you type “myaddr.” Type “myaddr” in the Replace field, and then type your address in the With field, as shown in Figure 1-17.
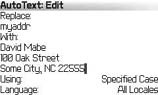
The Using field has two options: SmartCase and Specified Case. SmartCase is BlackBerry’s term for the feature that changes capitalization depending on the content you’re typing in. This feature is a big time saver when you’re typing normal text, but for your custom AutoText entries, you’ll probably already know exactly the capitalization you want to appear, so you’ll typically choose Specified Case.
The Language field is used to specify which language of the ones installed on your device this AutoText entry should work in. Click the trackwheel and choose Save.
Use Macros in AutoText
Not only can abbreviations be replaced with static text, but you can use AutoText to insert dynamic text as well. BlackBerry provides a set of 11 macros that can be used in the With field to insert the current date, owner information, or other variables. Table 1-6 shows a list of the built-in macros and what they do.
|
Macro string |
Description |
Example |
|
%d |
Short Date |
4/13/2005 |
|
%D |
Long Date |
Wed, Apr 13, 2005 |
|
%t |
2:24p | |
|
%T |
Long Time |
2:24:35 PM |
|
%o |
Owner Name |
As specified in device |
|
%O |
Owner Info |
As specified in device |
|
%p |
Phone Number |
18885551234 (from device) |
|
%P |
Device PIN |
2100000a (from device) |
|
%b |
Backspace |
(backspace) |
|
%B |
Delete |
(delete) |
|
%% |
% |
% |
To access these macros, go to the With field in a new AutoText entry and click the trackwheel. Scroll down and select Insert Macro (see Figure 1-18). A menu will appear with the list of macros and a brief description.

This hack is one you can use constantly. As you type, be on the lookout for text strings that would make good candidates for AutoText—your thumbs will thank you! An especially good use for AutoText is the text emoticons that pervade many of today’s email messages. Those difficult-to-find symbols can slow your typing down to hunt-and-peck speeds. It’s a lot easier to type “wk” than trying to type ;-) on a BlackBerry.
View the Event Log
Your device has a hidden Event Log that can be viewed using a certain key combination.
Similar to the event log on a Windows computer, there is an Event Log on your BlackBerry device where applications and the BlackBerry operating system itself can log information. Not only does this provide a central place to view all events from the system and applications, but it allows application developers to use an easy and consistent API for logging events so that each developer doesn’t have to create his own.
You can view the Event Log on your device and even filter certain events, copy them to the clipboard—even email the entire log to someone. You won’t find an icon for the Event Log viewer program. You’ll have to enter a “secret” key combination to get it to appear.
View the Log
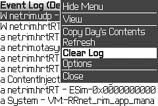
From your Home screen, type the following key sequence: Alt-L,G,L,G. This should bring up the Event Log viewer as shown in Figure 1-19.
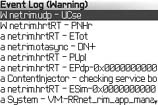
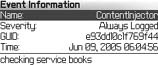
From within the Event Log, you can view the details of each event by pressing the Enter key. Figure 1-20 shows the details of an event.
You can copy specific events to the clipboard on your device by clicking the trackwheel when viewing the details of an event and selecting Copy Event. From the main viewer, you can copy a summary of the current day’s events to the clipboard by using the trackwheel to access the menu and selecting Copy Today’s Contents. Once the summary is on your clipboard, you can paste it into any other program, including in a new message, by using the trackwheel menu and choosing Paste.
Tip
When you access the Event Log, the program reads the current events and displays them on the screen. As you are viewing the events, additional events may have been logged since you started the program. Choose Refresh from the trackwheel menu to reread the events to make sure you’re displaying the most recent events.
Customize Event Log Options
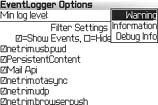
You can use a number of options to filter the events or even expand your view to include events that have a lower severity. To access the filter options, click on the trackwheel and choose Options from the menu. By default, the Event Log displays events with a severity of Warning. You can change the Minimum Log Level setting in your Event Log as shown in Figure 1-21.
Tip
Modifying the Minimum Log Level changes the threshold for any events that get logged after you make the change. So you cannot change the level from Warning to Information or Debug and expect to see additional events retroactively—only new events will be affected by your change. Also, consider the impact of setting the threshold to Debug Info: as with debugging logs on any platform, they can quickly fill and consume system resources.
You can also control which applications’ events show up in the Event Log. By default, the events from all applications are displayed in the Event Log. To modify which program events appear, uncheck the checkbox beside the applications you’d like to not appear in the log. Be sure and save your changes after you make modifications to the Options screen. This is useful for troubleshooting a specific application you’re having problems with.
The Event Log program also gives you the ability to clear the log. Choose Clear Log from the trackwheel menu to purge all entries in the Event Log as shown in Figure 1-22 to start from scratch when troubleshooting a problem.
Use Your BlackBerry as a Modem
When you’re in a bind, tether your laptop to your BlackBerry and connect at modem speeds.
Imagine you are in a remote location, far, far away from the nearest WiFi hotspot or Ethernet connection. You have a deadline and you have to send a proposal from your laptop as soon as possible. Sure, you could print out the proposal and fax it, but where is the fun in that? The BlackBerry 7290 and 7100 come with a built-in modem that can be accessed through the USB cable. It won’t connect at EDGE or EV-DO speeds (yet!), but this hack can come in handy in certain situations.
The technique of using a mobile phone’s data connection [Hack #1] is commonly known as "tethering.” Normally this is done through a wireless Bluetooth connection on a mobile phone. Despite the Bluetooth capability on recent models, the modem on the BlackBerry can, unfortunately, only be accessed through the USB cable.
Set Up a Dial-up Connection
You’ll need to set up a dial-up connection on your Windows machine to use the BlackBerry modem. When you installed the BlackBerry Desktop Manager, it should have automatically installed the modem drivers to use with your device, and you should have a modem called “Standard Modem” in the Phone and Modem Options section of your Control Panel. The drivers are located in the following folder: C:\Program Files\Common Files\Research In Motion\Modem Drivers. Use the following steps to set up your connection:
Connect your BlackBerry to your computer using the standard USB cable that came with your device and start the BlackBerry Desktop Manager software.
Go to the Control Panel, then Network Connections, and select Create a New Connection.
Select Connect to the Internet, then Set up my connection manually, then Connect using a dial-up modem, and select your BlackBerry modem from the device list.
Choose a descriptive name for the ISP Name (e.g., BlackBerry Modem Connection).
Enter the phone number for your service provider. You’ll probably have to check with your carrier to get the right number. For Cingular and other GSM carriers (AT&T, T-Mobile), it’s
*99#. For CDMA providers (Sprint, Verizon), the number will be#777.The username and password will vary by carrier as well. Cingular just accepts null values for both fields.
Complete the wizard, being sure to deselect the “Make this the default connection” checkbox.
Set Up Your BlackBerry Modem
If you have CDMA service, you can skip this step. If you have GSM service for your BlackBerry, you will need to add an extra init string for the modem to use when it connects. This string is specific to each provider, so you’ll have to contact your provider for the proper setting. Go to the Modems tab in Phone and Modem Options in Control Panel. Find the “Standard Modem” that was installed with your BlackBerry Desktop Manager installation and double-click it.
On the Advanced tab (see Figure 1-23), you’ll need to enter an extra initialization command that is specific to your carrier. Enter +cgdcont=1,"IP","APN" where APN is your carrier’s access point name.
Warning
The APN, or Access Point Name, is the name of the network to which a GPRS device connects. Check with your provider to get the value that should be used for your service. There is also a fairly comprehensive list of APNs by carrier at the following URL: http://www.opera.com/products/mobile/docs/connect/.

Establish the Connection
You should be able to use the new dial-up connection in Network Connections to establish an Internet connection. You can right-click on your new connection and choose Connect. Click Dial without entering a username or password. If all goes well, you will have an active wireless Internet connection!
The data connection that you get from your carrier typically provides access for the most popular Internet protocols (HTTP, HTTPS, POP3, IMAP, SMTP, etc.). Access to anything beyond those major protocols may or may not be allowed. Your mileage will vary widely.
Connection Speeds
Figure 1-24 shows a recent connection I’ve made on a Windows XP machine.
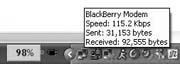
You’ll notice that Windows shows that I connected at 115 Kbps—that’s pretty fast for a GPRS connection, right? Actually, the value you’ll see for the connection speed is a little misleading. It’s referring to the connection speed between your laptop and the phone. The actual throughput you’ll experience is capped at 40 Kbps for GSM networks and roughly 143 Kbps for CDMA networks. To get a reasonable estimate of the realized bandwidth on your GPRS connection, you can use the Mobile Speed Test, available at http://text.dslreports.com/mspeed.
Warning
Pay attention to the details of your data plan, especially when using this hack. As you can imagine, you can consume a good portion of your monthly data allotment using your BlackBerry as a modem. Of course, if you have an unlimited data plan, there’s really nothing to worry about (unless you are paying for roaming).
Maximize Your Battery Life
Use these settings to disable the battery-intensive functions—your battery will thank you.
As far as batteries on mobile devices go, the BlackBerry’s is pretty good. But we all realize that the innovation in the battery industry seems to have almost stagnated. We have seen hard drive capacities skyrocket while their prices have plummeted. The same cannot be said for the capacity of the batteries we use.
We, as BlackBerry users, expect a lot from the batteries in our devices. We want to be able to go on a trip and not worry about remembering the travel charger. And heaven forbid we have to turn wireless off on our device to conserve the battery—oh the horrors!
This hack explains which functions should be avoided when you know you’re going to be without a charger for a while and you need to stretch your battery life to the limit.
- Turn wireless off
I know we hate to admit it, but the wireless modem in your device is far and away the worst battery hog of all. This will probably be called blasphemous by some, but when you’re in a bind, turn the wireless off. In my secondary device, I once turned the wireless off with a full charge and left the device on. When I checked it again a full two weeks later, the device still showed full strength.
- Never use the backlight
The backlight consumes a good deal of the battery, too. It sure is easier to look at the screen with it on, but avoid using it when you are in situations when you need your battery to last. Of course, you don’t have much choice if your device is one of the 7100 models that only have a backlit screen.
- Keep your device in the holster
When your device detects that it is in its holster (through clever use of a magnet), it immediately goes into a power save mode. The backlight timeout is ignored, the screen is turned off, and it operates on minimal power while in the holster.
- Don’t keep programs running in the background
Any programs that are running in the background on your device [Hack #6] will require and use system resources to run. Keep these to a minimum.
- Avoid programs that require wireless use
Obviously, it’s not always possible to completely shut off the wireless modem in your device. When you have to have it on, minimize its use. That means avoid using programs that use it. This includes the BlackBerry Browser and many of the third-party programs outlined in this book. Instant messaging applications are notorious for frequent use of the wireless modem while running in the background. This is a serious drain on your battery!
- Keep plenty of free space available
The BlackBerry operating system manages memory similar to a PC. Memory is swapped to a flash memory disk as RAM becomes scarcer. This swapping can be resource intensive and therefore can eat away at your battery’s charge. Go to the Status item in Options and look for the File Free field. RIM recommends maintaining a minimum of between 400 and 500 KB free for optimal usage [Hack #12] .
- Turn Bluetooth off when not in use
Just like the wireless modem, the Bluetooth function will consume a tremendous amount of your battery. Keep it off unless it’s in use.
- Turn the device off completely
This is the best way to conserve the battery! Use the Auto On/Off function in Options to have the device automatically shut off and start back up on a schedule you specify. You can even set up a different schedule for weekdays and weekends.
Optimize Your BlackBerry Browser
The browser defaults are certainly not optimal. By changing the settings on your handheld, browsing can be much quicker.
The relatively recent addition of the BlackBerry Browser to the device makes it easy to browse web sites wherever you happen to be. Some might argue the built-in browser is probably the most underused program on the device.
By default, the browser will download all images, JavaScript, and stylesheets for each web site you visit. Although some sites built with XHTML look quite nice on a handheld, there are many sites that haven’t gotten on the standards-compliant bandwagon. Many of these sites look plain silly on a handheld or are even downright unusable.
You can customize the settings on your BlackBerry Browser to provide a quicker, smoother ride no matter what virtual terrain comes your way.
How the Browser Handles Images
Many of the images in the web sites you visit aren’t optimized for handheld viewing. For each image on a web page, your device will have to initiate another HTTP request to retrieve it. On pages with just a few images, this is a serious time consumer.
When you visit a web page with images, the text of the page is rendered first and then the images are retrieved and rendered in your browser. When your browser initiates the request for a new image, it has no way of knowing the size it should allocate on the screen for that image, so it ends up allocating a very small amount of screen real estate for it.
When the image is downloaded to your device, the browser renders it and displays it on your screen. This can wreak some serious havoc when you’re viewing a web site. Images take much longer to load than the text on the page; therefore, it’s quite possible you’ve already read a good portion of the text on the page and then—bam! The image is loaded and the paragraph you were right in the middle of “disappears,” because the browser has allocated the proper amount of space for the image, displacing the text. How frustrating! You now have to scroll down and find where you were reading when you were so rudely interrupted. This often happens more than once on a page that has multiple images!
Use “Minimal” Settings on the Browser
You can turn off several features of the browser that cause it to make separate HTTP requests that take up valuable time and battery power. Go to the browser and click the trackwheel once to bring up the menu. Choose Options.
The options we are looking for can appear in a couple different places, depending on which version of the browser you have loaded. They will be on either the Browser Configuration section or the General Properties section, or a combination of the two. Look for the Show Images option as shown in Figure 1-25.
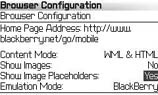
There are three options for the Show Images setting:
- No
Don’t retrieve or show images for any type of page.
- On WML Pages Only
Show images only for pages in Wireless Markup Language format.
- On WML & HTML Pages
Show images in basically all web sites.
For optimal settings, avoid the default of On WML & HTML Pages. I choose to load no images for any type of page. The On WML Pages Only is also a reasonable choice. WML pages are formatted specifically for handheld devices, so the images are already lean and mean and optimized for your device.
The other settings that will streamline your browsing pleasure are shown in Figure 1-26.
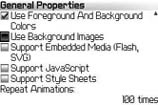
Be sure and uncheck the checkboxes to disable the following settings:
Each of these types of formats causes your browser to initiate a costly, relatively resource-intensive HTTP request for fancy content that, the majority of the time, isn’t worth the effort.
Enable Image Placeholders to Retrieve Images Only on Your Schedule
In Figure 1-25, notice the Show Image Placeholders setting. By default, this setting will be turned off. Turning it on provides a valuable function that will come in quite handy as you “pimp your browser.”
When you’ve configured your browser to show image placeholders, you’ll see a small icon where each image would go were you to download it. If
there is alternate text for text mode browsers, you’ll see that beside the icon; otherwise, it will simply say “image.” If you come across an image that you actually would like to download, there are two menu items, shown in Figure 1-27, that allow you to override your browser settings and download images on the current page only.

As you are viewing a web page with an image you would actually like to download, click the trackwheel once to bring up the menu. Use the More Images option to download the current image that your cursor is positioned on (see Figure 1-28). Alternatively, you can use the All Images item to retrieve all images in the current page. This lets you have the best of both worlds—the lean speed of a text-only browser with the ability to view an image on demand.

Maximize Your Free Memory
Use these settings so you’ll always have enough memory for the latest third-party application you want to install.
As you receive more email, install more applications, and save more pictures and ringtones to your BlackBerry, you’ll continue to consume more and more RAM on your device. Some of the devices RIM released in the early days had just 2 MB of storage or even less. Those of us who had one remember having to hand-crank them and trudge through the snow, uphill both ways to get them to work. Maybe I exaggerated a little, but they’ve come a long way.
Unfortunately, there is still only a finite amount of RAM available on devices and a seemingly unlimited supply of third-party software for the BlackBerry. This will require that you manage your storage space on your device.
Not only will you need to keep a comfortable amount of disk space available to install additional software, but there are important performance reasons to do so as well. The BlackBerry operating system uses the lightning-fast SRAM for normal memory operations. When that memory runs out, it uses the much slower flash memory for swap space. This is analogous to your PC, which will use a swap file on your computer’s hard disk when it runs out of hardware memory. Just like your PC, your BlackBerry will slow down considerably if the amount of available swap space is too small.
Determine How Much Free Space You Have
To see how much free space you have available, go to Options → Status. This shows you the total amount of storage space you have in your device and the amount of free space, as seen in Figure 1-29.
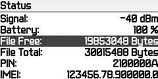
RIM recommends having at minimum of between 400 and 500 KB (400,000 to 500,000 bytes) of free space available for the operating system to swap memory efficiently. Any less than that and you’ll stare at an hourglass for an excessive amount of time for whatever function you perform.
What Data Uses the Most Space?
So you have gone to the Status area and realize that it’s time for spring cleaning. How do you determine what needs to be cleaned up? What can you delete to get the most space quickly? And we need to know fast because there’s a game of Texas Hold ‘Em [Hack #32] and its time to ante up!
Although it takes a little work to get there, there is a way to view the amount of storage space that each application is consuming on your device. You’ll need to complete these steps from your PC with your device in the cradle.
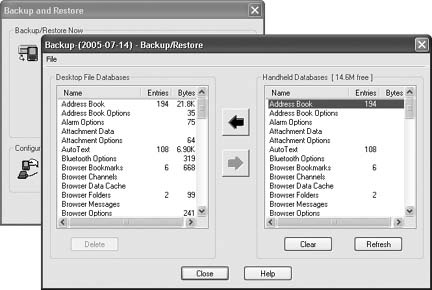
Bring up Desktop Manager and double-click on the Backup and Restore option. Click on the Advanced button to bring up the advanced backup and restore tool. On the Handheld Databases section of the tool, select all the databases in the window. Click the arrow pointing to the left to create a backup of all those databases. This will take some time to complete.
Although the main function of this tool allows you to selectively back up your handheld databases, as a side benefit, you can use the Bytes column once the backup is complete to determine which programs are using the most space. See Figure 1-30.
How to Delete an Application
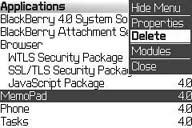
If you determine that you no longer need an application, go ahead and delete it. Go to Options → Applications on your device and view the installed applications. Click the trackwheel once to bring up the menu and choose the Delete option, shown in Figure 1-31. This will remove the application from your handheld. In most cases, you will need to reboot the device to actually purge the application and free the space it was using.
Maintain Your Free Space
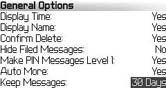
There are a couple of settings to control the two heavy hitters on your device: your messages and your calendar items. By default, the messages on your device stay around for 30 days before they are deleted automatically. You can control this setting by going to your message list and clicking the trackwheel once. Choose Options from the menu that appears and click on General Options. You can use the Keep Messages option, as shown in Figure 1-32 to choose whether messages are kept on the device for 15, 30, 60, or 90 days. You can choose to keep your messages on your device forever although, obviously, that is not recommended.
In your Calendar application, there is a similar setting called Keep Appointments where you can choose to delete appointments after a set amount of time has elapsed since the appointment.
Tip
If you’re a BlackBerry Enterprise Server user and you’re using wireless reconciliation and/or the wireless calendar [Hack #4] you may be wondering what happens to those messages when they “expire” off your handheld. Fortunately, the deletions that occur as a result of this setting are not reconciled with the server, so you’ll be able to manage the data on your server mailbox separately.
Get Things Done with the BlackBerry
Kick butt and take @names.
The David Allen Company has a fantastic productivity system called Getting Things Done, also known as GTD (http://www.davidco.com/what_is_gtd.php).
I will say this: Getting Things Done is a remarkable way to restore some balance and control over your life, and not just in the office. It works great for all occasions, and has managed to bring my stress levels from catastrophic highs to a much more reasonable pitch. It is easily the best system that I know of for chaos reduction.
Everyone implements GTD a little differently. I don’t think I’ve ever met a purist in this dark art, with the full set of tickler files, folders, and all the other paraphernalia. It is a system that can be tooled up to work pretty well with the BlackBerry, however, and it doesn’t even have to be painful.
This is a system that I cannot resist fiddling with a little bit, and most GTD nerds with an engineering and tinkering background do the same thing. These days I’m using a BlackBerry 7290 on T-Mobile, BES and BIS, and Microsoft Entourage. I am also using Microsoft Outlook 2003.
Set Up Your Categories
In both Outlook and Entourage, I have created categories for various contexts that I use in GTD. This includes but is not limited to:
- @home
Things to do when I’m at home or in the home office.
- @office
Things to do when I’m at the work office. The one with the bad lighting and a parking shortage.
- @calls
Things to do when I’m able to make phone calls but nothing else, or just calls I need to make.
- @anywhere
Things I can do anywhere, any time. Example: Think about ideas for BlackBerry Hacks.
- @errands
Things that I need to do when I’m already out and about. Example: Buy Silk Chocolate Soymilk at Whole Foods.
Organize Your Notes
In the Notes application on the BlackBerry, I also have a few lists of things I want to talk to people about. I flag those agenda items by titling them as #Name, so that #BBKing is a note that has things I want to talk to BB King about should I run into him in the hall.
Decide When to Create a Task
If it is something more pressing, that becomes a task. If it has to be done on a certain day, it becomes an all-day event on the Calendar. If it has to be done at a certain time on a certain day, it becomes a traditional appointment with a real date, time, and reminder.
The BlackBerry does a good job at facilitating this as long as you’re using BlackBerry 3.8 or 4.0, since these versions support categories.
Since I have created all those @contexts in my PIM, I must use them on every single individual task I have in my Big List of Tasks. If you don’t do this, you can easily lose track of what you should be doing!
Search and Sort
I also have a lot of projects assigned in the Entourage Project Center. It watches folders, links items to relevant data, and otherwise gets out of the way from me trying to get things done. What PocketMac for BlackBerry [Hack #61] does here is pretty neat: it calls projects in Entourage categories and syncs those along, too. This means that I can surf a Task list and filter based on category as expected, but in GTD land, this lets you filter by project.
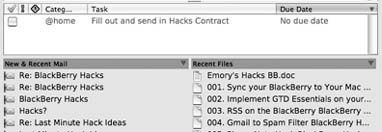
If I’m at home and I want to know what I have waiting for my attention, I just filter my Tasks to show me everything categorized @home. If I want to work on a specific project, I can also filter on the category BlackBerry Hacks, and see all the waiting tasks assigned to that project regardless of context (see Figure 1-33).
Some people will tell you that you should include the context in the title of your task, and not create categories for each context. That sounds pretty good in theory, but if you have multiple contexts for a given item, you’re going to have items that are called “@home & @calls Call Insurance Company about Flood Damage to Basement” and the BlackBerry can only show you a portion of this information. I choose to maximize my visibility by cutting out the prefix of @context and using categories for each context and the filter to show me what is relevant to my current state.
Don’t Interrupt Yourself
It turns out I don’t respond well to nagging interruptions from a PIM or handheld device. Go figure. GTD breaks things out into tasks and projects so that you can do micro-tasks on the path to a final outcome of your choosing, which is really nice. It also forces you to work things in smaller chunks, which is even nicer. For example: instead of a task that says “Write hacks for BlackBerry Hacks,” I go ahead and scribble that down in a notebook. I think and scribble a little bit about what that means, and those items become individual tasks. I may want to brainstorm about what I think should be in a Hacks book about the BlackBerry. I may have already written a bunch of information already that I can gladly hand over to the editor and author of the book. All of those steps become tasks under one project, and as I do them, I tick them off.
You see? Instead of staring at “Write hacks for BlackBerry Hacks” for a month, I actually had a long list of items that get me there. The tasks were meaningful and relevant and some of them could be done at home, some in line at the supermarket, and others required an errand. The BlackBerry presents me with options when I pull it out, based on things I can actually do depending on where I am. That is quite possibly the most important thing to remember about GTD: You get to pick what you want to do any time you want to do something, and it is always relevant. No more noise!
I don’t use the typical GTD “waiting-for” lists because, in most situations, I can note what I’m waiting for in the task detail instead of having a separate list. Your mileage may vary on this, and you may very well decide to keep a waiting-for list in your Memopad.
Everyone uses GTD a little bit differently. It is my hope that this hack will help jump-start your newfound life as a productive and contributing member of society.
For more information and tips on applying GTD to a geek’s life, see Merlin Mann’s 43 Folders weblog at http://www.43folders.com/.
—R. Emory Lundberg
Create Your Own Polyphonic Ringtones
With a little work, you can create your own polyphonic ringtones for your 7100 series device.
Who would have thought that ringtones would have become the industry that it is today? Ringtones are a $270 million industry, and that number is expected to balloon to $724 million by 2009 according to Jupitermedia. Everywhere you go you hear another mobile phone user’s silly ringtone.
Audio has had mostly primitive support on the BlackBerry—that is, until the introduction of the 7100 series that is targeted toward the consumer as opposed to the business user. The 7100 series devices have support for polyphonic ringtones, and the 7290 device has support for monophonic ringtones. This hack will show you how to get your own custom polyphonic ringtone on your 7100.
There are five steps you’ll need to take to get an audio clip in the right format and onto your device.
Get your audio into WAV format, either by recording your own sound using your computer and a microphone, ripping a track from a CD, or converting an MP3 file to WAV format.
Use a tool such as Audacity (http://audacity.sourceforge.net/) to crop your audio clip to a reasonable time for a ringtone, probably about 10 seconds.
Convert your audio clip to the Oki ADPCM audio format.
Put the converted audio clip on a web server that contains the appropriate file type for ADP files.
Use your BlackBerry Browser to access the URL of the file you placed on the web server.
If this sounds like too much work for you (not everyone has access to a properly configured web server), there is a service that you can pay for that will convert your audio clips and host them on a web server for you to download to your device. The Vodaberry service (http://www.blackberrytunes.com) costs just $18 a year for an unlimited number of MP3 conversions.
Format Your Audio
You’ll need to somehow get your audio in WAV format. There is a variety of ways to do this and, in some cases, no formatting will be needed. This format is fairly standard—it is the default format of the Windows Sound Recorder program, and most any audio program will support it. Just to get your feet wet, create a short audio clip with the microphone on your computer.
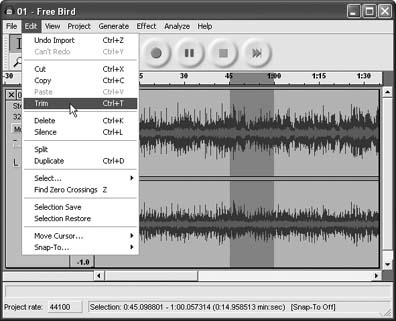
You can use Audacity to select about 10 to 15 seconds of audio and save that clip to a file. Figure 1-34 shows how I selected 15 seconds of audio from my perfectly legal copy of “Free Bird” by Lynyrd Skynyrd and used the Trim feature of Audacity to shorten the clip.
Encode into Oki ADPCM Format
Once you’ve shortened your audio to a length suitable for a ringtone, you’re ready to convert the clip to a format that your BlackBerry can use. While this seems like it should be a reasonable task, there is only one software
package that is able to convert audio into the Oki ADPCM format that the 7100 series devices use for polyphonic ringtones. It is called Mobile Phone-Tools and is currently available for $39.90 at http://www.bvrp.com/eng/products/mobilephonetools/. This software package is intended for use with specific mobile phones, communicating with them over a USB cable. You will need to specify a mobile phone that is supported by the software to purchase it. At the time of this writing, BlackBerry phones were unsupported, so pick something at random (or another phone that you own). For example, selecting a Phillips 530 will get you to the purchase page just fine.
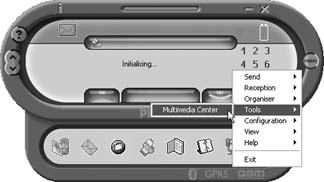
After downloading and installing Mobile PhoneTools on your Windows-based computer, run the program from the Start menu. Since it is made to synchronize data between your computer and non-BlackBerry mobile phones, it will ask you to configure a connection to your phone. Click Cancel to skip this step and go straight into the program. Click on the Menu button and select Tools → Multimedia Center as shown in Figure 1-35.
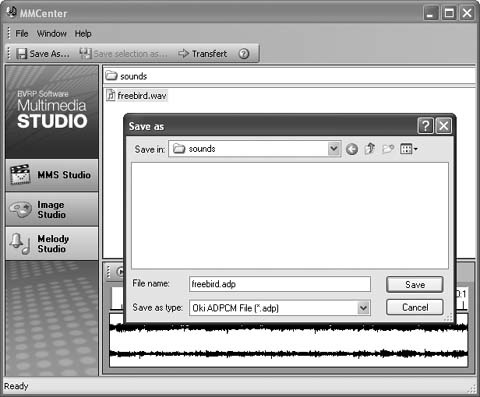
Click on the Melody Studio tab on the left side of the program. In the center section of the screen, browse your local filesystem to find your audio clip and double-click it. Click the Save As button and choose the Oki ADPCM file type in the Save As Type drop-down, as shown in Figure 1-36.
Get the Ringtone on Your Device
So you’ve got the ringtone in the right format, but how do you get it onto the BlackBerry? The only way to get a ringtone on your device is by using the BlackBerry Browser, so you’ll have to get the file onto a web server and access it through a URL. The BlackBerry Browser expects to see a MIME type of audio/adpcm for polyphonic ringtones; otherwise, your ringtone will be treated as plain text, which won’t work.
Warning
This is not a default MIME type on either Microsoft’s IIS server or Apache, so you will probably need to add the MIME type and restart the web server. Just add the audio/adpcm MIME type for files with a .ADP extension.
When you access the URL for your ringtone, the BlackBerry Browser will download the entire ringtone and automatically play it. There is a 128 KB limit for ringtones—if you try to download one bigger than that, you’ll get an error message.
Warning
Depending on your wireless connection, this can take several seconds to download. Just when you least suspect it, your device will start playing the ringtone, so don’t do this in a library or other place where you’ll cause a scene (unless that is your goal).
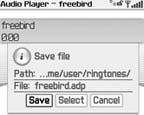
You’ll need to save the ringtone to be able to choose it for your ring in your Profiles. Click the trackwheel and choose Save from the menu. Choose a descriptive name for the ringtone or just choose the default filename and select OK, as shown in Figure 1-37.
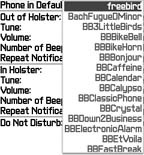
After saving it, you will be able to choose your newly crafted ringtone from the Tune option in your Profiles (see Figure 1-38).
You can even choose to play “Free Bird” whenever you receive an email message on your device! (Oh, the irony.) I’ve provided a sample ring tone of a rooster crowing at the following URL: http://dave.runningland.com/rooster.adp.
Store a Photo Collection on Your Device
Save images to your device and choose ones to display in prominent positions.
Beginning with BlackBerry 4.0, the handheld software ships with an application called Pictures. This program comes with a few stock photos to get you started. You can also add your own images to your device, although it is not at all obvious at first what steps you need to take to get them there. Use this hack to add your own pictures to your device and add them to your background.
Use the Picture Application
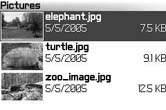
To use the Pictures program, from your Home screen, click on the Pictures icon to bring up the program, as shown in Figure 1-39. The application displays a list of the images that you have on your device. From this screen, you can choose a picture and do several things with it via the menu.
Use the trackwheel to bring up the menu. Here are the options available on the menu and their functions:
- Set As Home Screen Image
Use this option to have the current picture display as a background on your Home screen.
- Reset Home Screen Image
Reverts your Home screen background image to the factory default.
- Set As Standby Screen
Display the selected picture as the image on your standby screen. This is the screen that displays your owner information when your device is locked. The 7100 series devices don’t have this option.
- Reset Standby Screen
Reverts the standby image back to the factory defaults. The 7100 series devices don’t have this option.
- Open
Open the selected image in a full-screen view.
- Delete
Delete the selected image from the device, freeing up valuable storage space.
See Figures 1-40 and 1-41 for examples of using an image for a Home screen background and standby screen background. Note that when using a background image for the Home screen, the BlackBerry will fade the image slightly to accentuate the icons which, of course, is the main reason why you use the Home screen anyway.


Put Your Own Images on Your Device
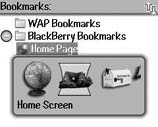
So how do you get your own images on your device and use them for your backgrounds? It’s not as easy as it probably should be. You can’t attach a picture to an email and send it to yourself; you’ll have to use Berry Pix [Hack #69] to do that. The only way to add custom images to the device is through the BlackBerry Browser. You have to actually browse to a web site that has the photo that you’d like to save on your device.
Once you find a picture on a web site that has an image you’d like to store on your device, you need to select the image. Use the trackwheel to scroll to the image until it is selected. You’ll know it is selected when a dotted line surrounds the image. Click the trackwheel once to open the menu and choose Save Image as shown in Figure 1-42.

But how do you get your own images on the Web? There are several ways: use your web space (if you have one), your weblog, or a photo-sharing service.
Many Internet service providers include web space in their packages. Upload your pictures to your space, and visit the site from your BlackBerry. You could even start a blog and upload pictures as you post blog entries.
There is also a popular, innovative service called Flickr (http://www.flickr.com) that is perfect for this purpose. Flickr allows you to upload images to the Web and then tag them with keywords that describe the photo. For example, I could upload the turtle picture and tag it with “zoo” and “turtle.” You can then search for or subscribe to photos that anyone has tagged with certain keywords. Because Flickr promotes an online community, it has quickly become quite successful.
See Also
Gallery (http://gallery.menalto.com) provides open source software for displaying photos on a PHP-enabled web site.
GIMP (http://www.gimp.org) is cross-platform, open source software for editing images.
Turn Your Computer into a Speakerphone
If you have a BlackBerry that supports Bluetooth, use your computer as a poor-man’s headset.
Up until fairly recently, RIM didn’t make a BlackBerry device that supported Bluetooth, even as it is becoming a standard feature of other smart phones. That all changed when RIM released the 7290. The BlackBerry 7290 as well as the 7100 series devices have built-in Bluetooth, and you can expect future devices to include support for the protocol as well.
Given all the data synchronization capabilities of the BlackBerry, you’d expect to be able to do lots of things with the Bluetooth adapter on the devices—but as of now, the capabilities are rather limited. You can’t tether a laptop to share its data connection using Bluetooth—you have to cradle the device for that [Hack #9] . However, you can use a Bluetooth headset so you don’t have to deal with the cord on your earpiece—or worse, hold that oddly shaped 7290 to your ear to talk on the phone. The fancy Bluetooth headsets are plentiful but still somewhat costly. If you’ve purchased a computer recently, there’s a decent chance it already has Bluetooth built in. If not, you can purchase a Bluetooth adapter for a reasonable price that allows you to do a whole host of things with computer peripherals, including acting as a headset for your BlackBerry!
Warning
Some older Bluetooth adapters made for PCs have limited Bluetooth support. Be sure that the adapter you are buying supports the Bluetooth Headset Profile. Most, if not all, Bluetooth 1.1–compliant adapters should do the trick.
Wait, you say, isn’t the goal to be more mobile—why would I want to use my computer as a speakerphone? And here comes the standard hacker’s response: “Because you can!”
Install a Bluetooth Adapter
You’ll need a Bluetooth adapter with the popular WIDCOMM chipset and software. Other chipsets may or may not work. I bought a Kensington Bluetooth USB Adapter from my local electronics store that came with the WIDCOMM software. You’ll need to install the software on your Windows XP computer before inserting the USB adapter.
After installing the adapter, you’ll find a new icon on your desktop called “My Bluetooth Places” as well as a Bluetooth logo on your task bar, as shown in Figure 1-43.
Pair with Your BlackBerry
By default, the Bluetooth adapter on your BlackBerry is disabled. You’ll need to enable and set its status to “discoverable” so that other Bluetooth adapters within range will be able to see it. On your device, go to the Options program and go to Bluetooth. Use the trackwheel to bring up the menu and choose Enable Bluetooth. After a few seconds, your device will display a dialog saying it has been enabled, and you’ll return to the Bluetooth screen with a list of Paired Devices. Use the trackwheel to select Options from the menu. You’ll need to change the Discoverable status to Yes. Optionally, you can change the Device Name that your device will advertise itself as. Click Save from the trackwheel menu.
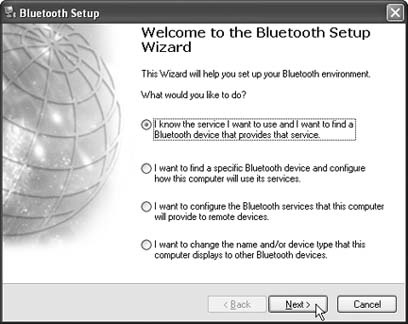
Once you’ve enabled Bluetooth on your device, go back to your desktop computer and right-click on the Bluetooth task bar icon and go to Bluetooth Setup Wizard. This brings up a wizard (see Figure 1-44) that will assist in discovering Bluetooth-enabled devices and configuring them.
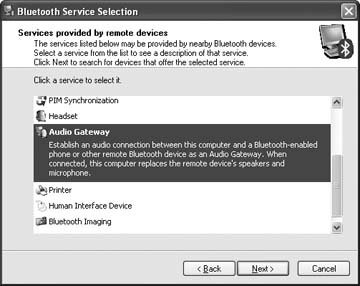
Choose the “I know the service I want to use and I want to find a Bluetooth device that provides that service” option and click Next. Scroll down through the services that your adapter is capable of using to the Audio Gateway option. Select it and click Next, as shown in Figure 1-45.
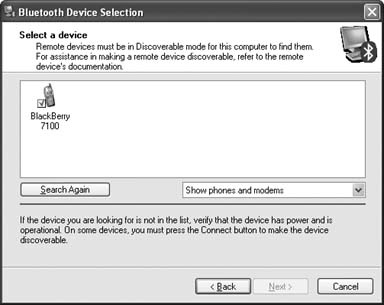
If you’ve configured your device correctly, you should see your BlackBerry along with any other Bluetooth-enabled devices within range of your adapter (see Figure 1-46)
Select your device and click Next. Now check your BlackBerry—it should have detected that your computer initiated a connection with your device. There will be a dialog on your device asking for a passkey. Enter a numeric passkey and don’t forget it—you will need to enter it again on your computer. After you enter the passkey on your device, Windows will prompt you that a device is attempting to pair with your computer. Click on the balloon icon and a dialog will appear that allows you to enter your passkey and complete the pairing of the two Bluetooth adapters. Make sure that the “Start the connection” option is selected and click Finish. Right after you click Finish, you will be prompted on your BlackBerry that your computer is initiating a connection. Choose Yes to accept the connection.
You should be able to use your computer’s speakers and microphone as a headset for your device. The LED on the 7100 series devices will flash a nice blue glow when you’re connected with Bluetooth, but the 7290 will give no outward indication that you’re connected other than a listing of your computer in the Bluetooth section of your Options. To disconnect the session, either take your device out of the computer’s range (just a few meters) or use the trackwheel to choose Disconnect from the trackwheel menu in your BlackBerry’s Bluetooth section of Options.
Display Signal Strength as a Number
Bars are for wimps! Be different and get in touch with your inner geek by displaying your wireless signal strength in decibels.
How many bars do you have? What does the number of bars actually mean? There are entire marketing campaigns by the wireless carriers about the bars that indicate the signal strength. But how does your device determine how many bars to throw up on your display? Surely there is some type of hard measurement that the device is doing to rank your wireless connection.
It turns out there is a hard number that represents the strength of your wireless signal—and there is a BlackBerry keyboard shortcut to change the bars to display the actual number. From your Home screen, type Alt-N,M,L,L.
If you are using a 7100 series device or another Sure Type predictive typing–enabled device, you’ll need to type the following sequence: Alt-B,B,M,L,L.
After typing the sequence, you should see your signal strength meter change from bars (see Figure 1-47) to a number (see Figure 1-48). You can type the sequence again to go back to the bars for your signal strength.


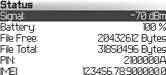
You’ll notice that this number goes higher when you coverage is poorer, and vice versa. This number is actually a reflection of what appears in the Status section of your Options program, as shown in Figure 1-49, without the dash indicating negative.
What exactly does that number mean anyway? Your signal strength is measured in units of dBm, which means decibels relative to 1 milliwatt. The GSM/GPRS radio inside your BlackBerry has a range of between–40 dBm at the highest and–120 dBm at the lowest (when you display the signal strength as a number, the BlackBerry doesn’t show the minus sign). Your device will display a certain number of bars given the current dBm value. Table 1-7 shows the ranges of values that correspond to the number of bars that are displayed.
|
dBm range |
Number of bars displayed |
|
−40 to−77 |
5 |
|
−78 to−86 |
4 |
|
−87 to−92 |
3 |
|
−93 to−101 |
2 |
|
−102 to−120 |
1 |
Your experience may vary, but you’ll probably start to notice quality problems around−100 dBm.
Dial Like a Pro
After becoming accustomed to cellular phone use, trying to use your BlackBerry as a phone may frustrate you at first. Here are some phone tips you’ll love!
When you make the upgrade from a cell phone to a BlackBerry, you may find it difficult to get used to making calls without some of the features your phone had. If you frequently make calls on your BlackBerry, take note of some settings that can ease the process of making those calls.
Call from the Home Screen
To place a call, open the Phone application. The Phone screen appears. In the empty field at the top, you can type a phone number and then click to enter to make a call. BlackBerry 7100 device users have the luxury of dialing right from the Home screen without first going into the Phone program.
Even if you aren’t lucky enough to have a 7100 series device, you can enable the same convenience of dialing from the Home screen. It saves a couple of clicks if you use the phone often!
Here’s how to do it:
Click the trackwheel and select Options
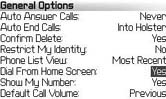
Select General Options. The General Options screen appears as shown in Figure 1-50.
Select Dial From Home Screen. Click the trackwheel and set the option to Yes.
Warning
When Dial From Home Screen is set to Yes, you cannot use shortcuts [Hack #3] for the applications on the Home screen.
Click the trackwheel and select Save.
Dial Letters in Phone Numbers—(800) LET-TERS
Have you started to dial a number that consists of letters on your BlackBerry? It won’t be long before you realize that you have no idea what numbers those letters translate into on a traditional dial pad so that you can place the call on your BlackBerry. Your handheld goes into number-lock mode on the Phone screen, and letters do not appear when they are entered in this mode. Don’t worry, there’s still an easy way to accomplish this!
To dial letters in a phone number (see Figure 1-51), you have two options:
To type one letter, press the Alt key. Press the letter key.
To type multiple letters, press the Right Shift key and the Alt key. Your handheld enters character mode and you can type the entire sequence of letters without having to hold down Alt. Press the Right Shift key again to turn off character mode.

Speed Dial Assignments
You can call a contact that appears on your Phone screen or in your address list (see Figure 1-52). Phone numbers also appear as links in messages and web pages, and therefore can be called through those as well.
For frequently used contacts, you can assign a speed dial letter so that you can make a call by simply pressing one single key. You can also add, change, or remove a speed dial key that you have assigned.
To assign a speed dial letter:
Open the Phone. The Phone screen appears.
If the number is already listed on the Phone screen, select the phone number.
If the number is not listed on the Phone screen, type the phone number.
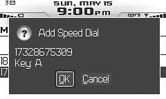
Press and hold any unassigned key. It will be assigned to the phone number.
A dialog box appears with the phone number and the key you selected.
Click OK to confirm, as shown in Figure 1-53. The number is added to the speed dial list.
View Speed Dial Assignments
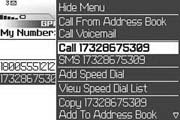
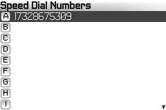
To view all of your speed dial assignments, open the Phone and click the trackwheel. A menu appears; select View Speed Dial List from this menu, and the speed dial numbers will appear (see Figure 1-54).
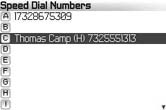
If the contact name and number also appear in your Address Book, your speed dial list will also contain that information, as shown in Figure 1-55.
—Shari Kornberg
Put Notes in the Call Log
Save notes from your phone calls and recall that information when you need it.
While you are on an active call with your BlackBerry, press in the trackwheel and choose “Notes” from the menu. You will be greeted with a nice clean slate of text input, ready to accept your notes, as shown in Figure 1-56.

This will, of course, be most convenient when you’re using a headset or speakerphone. The way I use this feature is that I jot down notes relevant to that call such as confirmation numbers or meeting notes, and save them. I can return to the Messages application, find the call in the list of calls I’ve placed, and find my notes there. From here, you can also copy text and put it into its final destination, whether an email, task, or appointment.
If you don’t remember to take notes during your call, don’t fret: you can add notes to a previous call by opening the call in the Messages list and selecting “Add Notes” from the menu. If you have decided to not show calls in your Messages list, you can magically make them appear by pressing Alt-P [Hack #24] . You can then surf your messages list and get these useful little pieces of metadata and put them to use. If you discussed a budget, an invoice, or something else that you may need to reference later, make a note of it in the call and you can find this information later. If you need to remember what you talked about last time you spoke to Client X, the notes will be right there in the call detail!
You can also highlight a phone call that has notes, click the trackwheel, and select Forward (see Figure 1-57) to forward it (notes and all) to an email address.
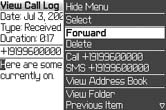
This lets you quickly shove the notes from that important conference call to your helpless subordinates.
—R. Emory Lundberg
Upgrade Your Handheld Software
Find the latest version of your device’s system software and install it.
Changes and new features are added to the system software by RIM at a pretty decent clip. RIM is constantly looking to fix bugs in the handheld code no matter how infrequently they crop up. Once RIM produces a new version of the handheld code, it does take a while to filter down to new handhelds, so you may find that your handheld software on your device is already a revision or two behind even shortly after you buy it.
The good news is that you can find and install the latest handheld code free of charge. Because the wireless carriers’ infrastructures vary, there are versions of the handheld software per carrier. So if you use a device from Cingular, you need to monitor the Cingular download area of BlackBerry’s web site for code for your device.
Find the Firmware
To ensure that you don’t install software from the wrong carrier, RIM doesn’t provide links to the various handheld software download areas from its site. You have to visit your carrier’s site to find the link to the downloads. The wireless carrier’s web sites are definitely a moving target, so to provide links here would be futile. Most of the carriers provide fairly prominent placement for the links to download the latest firmware. This can usually be found in the BlackBerry section. If you have any trouble finding the page, dial 611 (or your carrier’s tech support number) from your BlackBerry and ask.
Is Your Device Already up to Snuff?
How do you know you need an upgrade? On the handheld code download page, it will give two version numbers that you can compare to your device to see if you are behind. Look for the Software Platform version number and the Applications version number on the download page for your handheld (see Figure 1-58).
On your device, go to the Options program to find the versions of the code on your handheld. To view the software platform, click on About to view the version number, as shown in Figure 1-59. The platform version on the About screen is the version number you need to compare with what’s available on the web site. If the version on your handheld is less than the version on the web site, your handheld is a candidate for an upgrade.
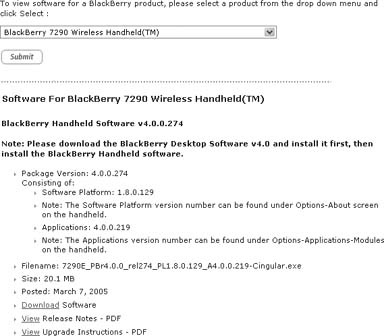
Tip
Since I’m using the BlackBerry Simulator, the version shown in Figure 1-59 is more recent than what’s currently available on the Cingular downloads area. Normally this version would be less than or equal to what you see on the web site.

Once you have decided to upgrade your device, download the latest firmware for your model number. It will be a large download—probably around 20 MB. The handheld code is an executable that installs as a Windows application. Run through the setup just as you would for any installation on Windows.
After you install the newer handheld code on your machine, bring up Desktop Manager. The new handheld code will be detected by Desktop Manager and you’ll be immediately prompted that newer system software exists, as shown in Figure 1-60.
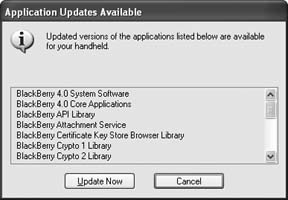
Click the Update Now button to bring up the Application Loader Wizard to install the new software on your BlackBerry. Figure 1-61 shows the new versions of the handheld code in Application Loader.
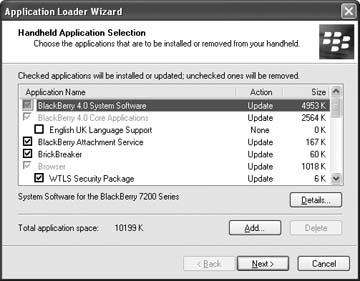
You will be prompted to back up and restore all your application data associated with your BlackBerry before upgrading the system software. Although this step is optional, it is strongly encouraged because of all the customizations to your device (browser bookmarks, AutoText entries, etc.) that will be removed if you don’t choose to do the backup.
Type on a Bluetooth Wireless Keyboard
For those long emails, use this fold up Bluetooth keyboard to crank ‘em out quicker than the best thumb typist.
While there are all types of tricks included in the BlackBerry operating system to make you type quickly with your thumbs, nothing can compare to the speed of a full size keyboard. For Bluetooth enabled BlackBerry devices, you can use a full size keyboard that makes composing those long, well thought out emails a breeze. Not only does the keyboard allow for quick typing on your BlackBerry, but you can also set up hotkey combinations that spawn certain applications.
The keyboard is made by a company called Freedom Input and costs $99. It is available for purchase at the following URL: http://www.eaccess-estore.com/store/catalog.asp?item=199. The keyboard is compact and sleek. It’s not a whole lot larger than your device when it’s folded up. When it is unfolded, your device sits on a small stand that slides out of the top right side of the keyboard as shown in Figure 1-62.
Install the Keyboard
You’ll need to do a couple of things to get your keyboard working. First, you’ll need to enable the Bluetooth adapter on your device. Second, the keyboard requires that some software be installed on your device. Along with the keyboard comes a CD with a unique key printed on the back of the sleeve. You’ll need to enter this key on the Freedom Input web site (http://www.blackberrykeyboard.com/index.htm) to register your keyboard and download the software for your BlackBerry. You’ll need to use Desktop Manager and Application Loader to install the keyboard software on your device.
Pair with the Keyboard
Once the software is installed, you’ll also need to pair with your keyboard using the Bluetooth section of your Options program. This is similar to the action taken when using your computer as a Bluetooth headset [Hack #16] . Put 2 AAA batteries in the keyboard and turn it on using the switch on the bottom-left side near the Ctrl key. In your Bluetooth settings on your BlackBerry, select “Add Device” from the trackwheel menu. As your Bluetooth adapter searches for devices within range, your keyboard should be detected and identified by the string “KEYBOARD.” Select your keyboard from the list and use “0000” for the passkey. At this point, you should be able to use the keyboard to type on your BlackBerry.
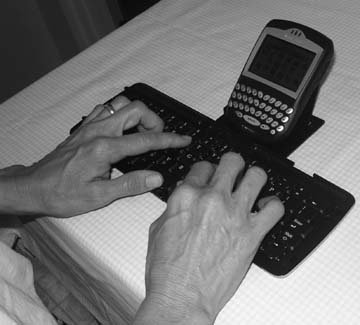
Use the Keyboard
Your keyboard should work just as you’d expect—until you try to access the BlackBerry-specific keys such as the trackwheel. Table 1-8 shows the keys on your keyboard with which you can access the device-specific keys.
|
BlackBerry key |
Bluetooth keyboard equivalent |
|
Click trackwheel |
Right arrow |
|
Scroll trackwheel |
Up and down arrows |
|
Escape key |
Left arrow |
|
Alt key |
alt gr key (beside the Fn key on the bottom row) |
You’ll find you won’t need the Symbol key, since you have every key you’d need using the Shift key just like your computer’s keyboard. There are also special symbols in yellow on some of the keys that are not found on a standard QWERTY keyboard that can be accessed using the alt gr key.
Map Function Keys
One of the nifty features of the Bluetooth keyboard is the ability to assign hotkeys to any application on your device. You can add up to 10 hotkey combinations by accessing the Bluetooth Keyboard program. Scroll down to the Function Keys section. All the available function keys can be configured by choosing a program from the list to the right of the function key. Use the Alt key to quickly choose an application. Your setting goes into effect immediately. You can also configure the repeat rate and repeat delay for the keyboard.
Get BlackBerry Hacks now with the O’Reilly learning platform.
O’Reilly members experience books, live events, courses curated by job role, and more from O’Reilly and nearly 200 top publishers.

