Adding Hooks
Shape keys work well for getting specific predefined deformations, but they can be pretty limiting if you want to have a little bit looser control over your mesh or if you're animating things that move in arcs. For these sorts of situations, you have another control mechanism: hooks. Hooks are a special kind of modifier that takes a set of vertices or control points and binds them to be controlled by another object, usually an Empty.
Creating new hooks
The workflow for adding a hook is pretty straightforward. You tab into Edit mode and select at least one vertex or control point. Then you press Ctrl+H![]() Hook to New Object. An Empty is created at a location that's the median point of all your selected vertices or control points. You also get a new modifier added to in Modifiers Properties, as shown in Figure 11-5.
Hook to New Object. An Empty is created at a location that's the median point of all your selected vertices or control points. You also get a new modifier added to in Modifiers Properties, as shown in Figure 11-5.
Figure 11-5: Control options for the Hook modifier.
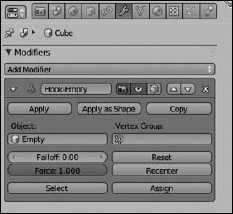
Tab back into Object mode and transform the hook. All the vertices or control points that you assigned to the hook move with it. And using the options in the Hook modifier, you can control how much influence the hook has over these vertices or control points. The following example gives you a clearer understanding of adding and modifying the influence of hooks:
- Start with the default scene in Blender (Ctrl+N). ...
Get Blender For Dummies®, 2nd Edition now with the O’Reilly learning platform.
O’Reilly members experience books, live events, courses curated by job role, and more from O’Reilly and nearly 200 top publishers.

