Chapter 1. Flash Professional Basics
Flash Professional is a popular tool used to author a wide variety of creative and interactive content that can be deployed to the Web and mobile devices. It can even be used to create desktop applications. There are many aspects to the application itself, but its most notable characteristic is a timeline and asset-centric interface that makes it ideal for creating animations. Until recently, Flash-created content was only viewable by devices with support for Flash.
Now, when combined with Wallaby, Flash Professional can be used to create HTML5-based animations as well.
At this point, you might be wondering why we would bother using an application intended to create Flash content to instead create HTML5 animations. After all, aren’t we talking apples and elephants here? The answer is both yes and no. Sure, Flash and HTML5 are different technologies with different implementations for powering content on the Web. However, if we look at creating animations from an artistic perspective, the workflow is really one and the same. Flash Professional provides an advanced visual interface to create animated content that really accelerates this workflow. This remains true regardless of whether that content is ultimately powered by Flash or by HTML5. In fact, Flash Professional is one of the first tools, if not the first tool, on the market that allows you to take a visual approach to creating HTML5 animations versus a fully programmatic approach.
As an animation tool, Flash Professional is well seasoned. The first incantation of the Flash software actually debuted in 1996 as an application called FutureSplash Animator. It was then given the name Flash after being purchased by Macromedia not long after its release. At the time, the visual capabilities of Flash went far beyond the capabilities of HTML; that led to widespread use of Flash on the Web. Today Flash Professional is part of the Adobe Creative Suite of products and has evolved into a very powerful and feature-rich tool responsible for much of the content on the Web.
Before we go any further, it bears mentioning that Flash Professional is just one tool within the family of the Flash Platform. In fact, because of the versatility of Flash Player itself, there are several tools, each of which takes a different approach to creating content. The common thread among these tools is that they all produce content that is powered by the Flash Player runtime. There is, however, one new exception to this, in that Flash Professional animation projects can now be exported to HTML5. This means that animations created with Flash can run on the standard Web without the need for a plug-in.
The Flash Platform
For the purposes of creating HTML5 animations, we will focus almost entirely on Flash Professional and the Adobe Wallaby export tool. However, creating HTML5 animations is just one capability of Flash Professional. That being said, having a basic understanding of the playing field in terms of Flash tools and technologies can help you feel more at home as you explore the Flash Professional user interface. It will also help you better understand what pertains to the HTML5 workflow and what doesn’t.
Let’s have a look at a few of the terms and technologies you’ll encounter as you build your animation:
- Flash Professional
As I mentioned, Flash Professional is a timeline-based tool for creating animations and interactive experiences that we’ll be working with to author our HTML5 content.
As of the writing of this book, the current version is Flash Professional CS5.
- FLA files
FLA files are Flash Professional project files. These are the files that Wallaby requires when converting your content.
FLA files have an extension of .fla.
- Flash Player
Flash Player is the runtime that typically executes all Flash content. Of course, the animations we export to HTML5 are the exception to this. Flash Player often comes in the form of a browser plug-in but can be standalone as well.
As of the writing of this book, the current major version is Flash Player 10.
- SWF files
SWF files are the output files that are published from Flash Professional and can be played with Flash Player. Since our output will be HTML5 markup, we won’t be exporting a SWF when we’re done. We will, however, be publishing SWFs during the creation of our animations in order to preview them before we take the final step of exporting them to HTML5.
SWF files have an extension of .swf.
- ActionScript
ActionScript is Flash’s scripting language. Although AS3 has a very broad set of capabilities, you won’t need to learn much more than a few lines. Our usage of AS3 will be more or less limited to handling buttons clicks and basic frame navigation. Anything beyond that isn’t relevant when creating our animations, and thus isn’t supported by the Wallaby Exporter.
As of the writing of this book, the current version is ActionScript 3.
Now that you have an understanding of the platform and its moving parts, Flash Professional should make a bit more sense to you. Keep in mind that the Flash Platform features many other tools beyond what I’ve covered here. You won’t need any knowledge of these as far as HTML5 animations are concerned, but feel free to explore them all the same.
Flash Professional at a Glance
Now that we’ve covered the fundamentals of the Flash Platform, let’s dive into the Flash Professional application.
As I mentioned before, you’ll be spending the majority of your time with Flash Professional. From here on out, when I refer to “Flash” I will be speaking strictly of Flash Professional. This will help to eliminate any confusion between the terms Flash and Flash Player or Flash Platform as we move forward.
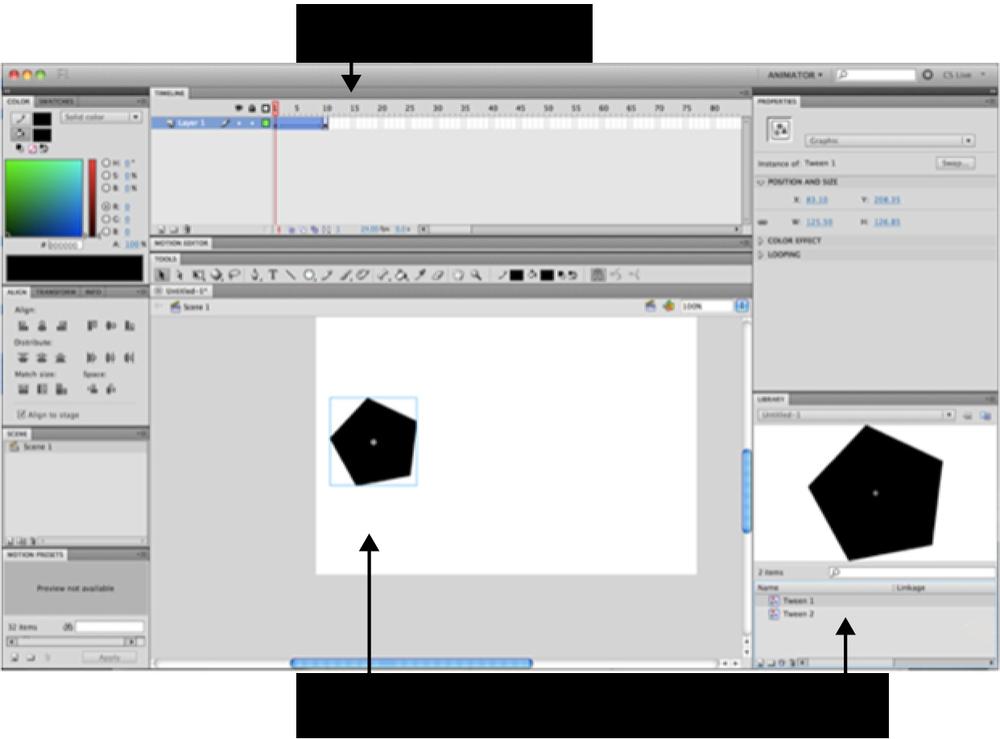
The Flash user interface has several different panels and windows for performing various tasks, but from a 1,000-foot view it is really composed of three main parts (see Figure 1-1):
The Library which is used to store assets
The Stage which is like a drawing canvas for assets
The Timeline which is used to build animations
As you create your animation, you will, for the most part, be creating assets in the Library, placing them on the Stage, and then using the Timeline to animate them. (Although that was a fairly simplistic statement, it does a good job of describing the general workflow in Flash.)
The Library
The Library in Flash is simply an area that stores all the various parts of your animation in one place. Items in the Library can be renamed, deleted, or organized into folders as needed. These items can be images, video, audio, or items called symbols. We’ll discuss symbols in more detail in just a second, but first, let’s look at how you’ll arrange these items in your animation.
The Stage
If you’ve worked with graphics programs in the past, the Stage is probably a very familiar concept. The Stage is the content area where your animation lives visually. Items can be placed anywhere on the Stage, or even off-stage. Items off-stage aren’t visible to those viewing the animation. For example, you might use off-stage items to create an effect of an item flying onto the screen from the outside.
By accessing the Modify→Document Settings menu, you can configure the Stage in terms of its dimensions and its background color to suit the needs of your animation. You can also change the units on the Stage to whatever you’re most comfortable with. Figure 1-2 shows the settings you can configure in the Document Settings window.
Keep in mind that when your animation is ultimately viewed in a browser, its dimensions can be different from what you set here. This is because additional size and scaling information may be specified within the HTML page. As such, an animation could potentially change its size and scaling options.
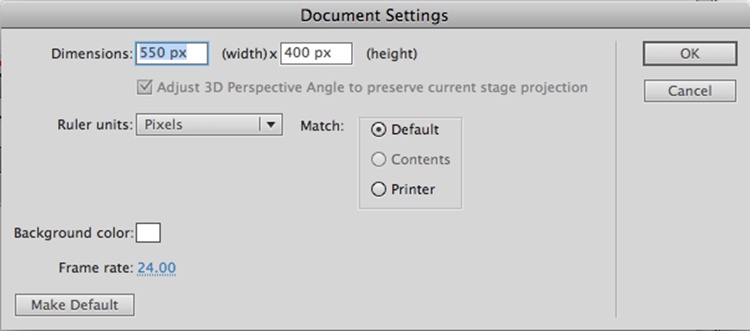
Lastly, from this window, you can change the frame rate for the animation, which brings us to our next topic.
The Timeline
The concept behind the Timeline in Flash Professional is a lot like a reel of film played on a projector. The Timeline, as shown in Figure 1-3, contains a series of movie-like cells, known as frames, which can be displayed back-to-back in order to create motion. The speed at which these frames are played is known as the frame rate or frames per second (which is often abbreviated to fps).
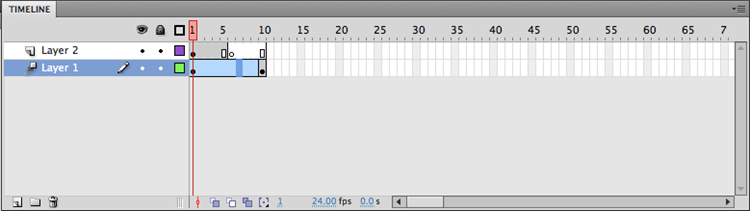
The frame rate inevitably affects how the animation appears to the eye. The lower the animation’s frame rate, the more the animation looks like a slide show. Conversely, the higher the animation’s frame rate, the more fluid the animation appears. The default frame rate for a Flash project is 24 fps, which also happens to be the standard frame rate of film. This will usually suffice for most animations. Alternatively, some users may prefer 30 fps, the standard frame rate of NTSC, as it provides some additional fluidity. If your animation requires highly fluid movement, you can set your frame rate as high as you need to; keep in mind, though, that the highest value isn’t always the best. High frame rates can tax the CPU and result in faulty playback. Also note that if you change your animation’s frame rate in the middle of your project, you will be changing the speed of all your animated parts as well. This is why it’s best to decide on a frame rate at the start of your project.
Similar to a program like Photoshop or Illustrator, the Timeline also supports layers as a means of separating visual elements into distinct levels (see Figure 1-4). Layers can be extremely useful when creating animations with many parts by giving you a means of organization. You also can move layers up and down to change their display depth.
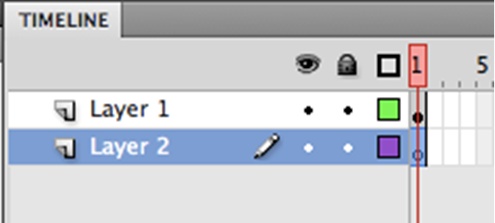
When you’re viewing the Stage with multiple layers you’re actually seeing the result of all these layers being stacked one on top of the other. However, if you were to hide all the layers and focus on a single layer, you would see that the content of that layer is, in fact, separated from the rest.
Ultimately, the Timeline, with the help of what are called keyframes, is what you’ll use to design the movement of your animations through a process called tweening. We’ll come back to keyframes and tweening later; first let’s have a closer look at how we work with assets in Flash.
Importing Assets
Provided the file you’re trying to import is supported, you can use the File→Import menu option to easily import your assets into Flash.
By default, Flash supports major media types and formats for images, video, and audio. While the application itself supports these types, we must stay mindful of what is supported by the HTML5 exporter, and more importantly, what isn’t. Specifically, Wallaby doesn’t support video and audio media types. As such, when creating animations you’ll probably want to limit your imports to images or vector graphics created in a program like Illustrator. Doing so will help to ensure that your animations export properly when you’re finished.
Drawing Shapes
Flash Professional has a toolbar similar to what you might find in Photoshop or Illustrator. From this Tools pane (see Figure 1-5), you can create shapes or text as well as manipulate their position and scale on the Stage.

Anything you draw in Flash takes the form of a shape. Shapes in Flash are vector graphics that are drawn at display time from a stored algorithm. The algorithm is essentially a blueprint; it fully describes all aspects of the shape. Figure 1-6 shows a shape with editable vertices.
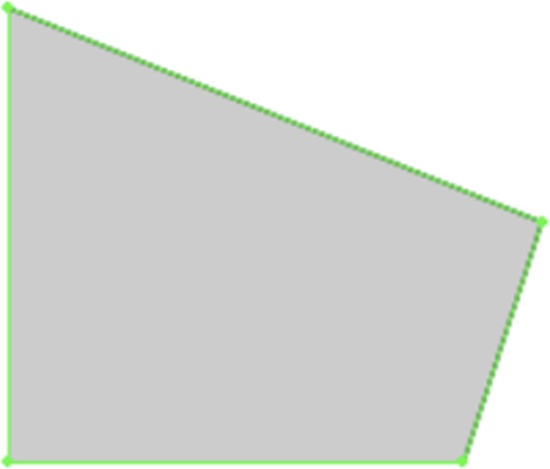
A major benefit of using vector graphics in a project is that they can be scaled and manipulated to any size or shape without losing quality. Shapes are also very malleable; you can change their shape at any time. You can even use tweens to morph between two different shapes, which we’ll cover in a bit.
Working with Images
When you want to use an existing picture or you need something that doesn’t make sense to draw in Flash, you will typically import an image. When importing an image into Flash, regardless of its format or compression, it becomes a bitmap.
Bitmaps, as opposed to graphics, are bitmapped images such as JPEGs or PNGs. Bitmaps contain per-pixel data used to describe the image rather than an algorithm. Since there is no formulaic representation of a bitmap, when a bitmap is scaled it loses image clarity, as shown in Figure 1-7. This effect is far more dramatic when scaling bitmaps above their original size because the necessary image data simply doesn’t exist; it must be intelligently guessed based on the existing pixel data. Creating data that doesn’t exist is far more difficult than throwing away data that does exist; hence scaling bitmaps down tends to generate good results. Regardless, scaling too far in either direction proves to be problematic at some point.

Knowing When to Use Bitmaps or Shapes
If bitmaps have so many constraints, you might wonder why we don’t simply rely on vector graphics entirely. The answer is that complex vector graphics come at a high performance cost. For example, you would want to refrain from converting a highly detailed photo of a person’s face into a vector graphic. The complexity of the formula needed to represent the image as a vector graphic would not only be far greater than a bitmap of the same image, but would also cause considerable strain on your CPU. In turn, this would likely cause choppy playback when viewing the animation.
Deciding when to use bitmaps or shapes depends on what you need to accomplish. If you need higher detail, using a bitmap makes sense. If you need an asset that you can change or morph, graphics are a better alternative.
If you need a mixture of both, you can actually convert an image to a graphic, although you will probably need to play around with it to see if you can maintain an acceptable level of detail without winding up with a vector representation that is too complex.
Avoiding Undesired Scaling in Bitmaps
There is also another important thing to consider when using bitmaps. As I mentioned, bitmaps can lose quality when they are scaled. With that in mind, it’s important to consider how your animation will scale when viewed at different resolutions or on different devices, and the effect it will have on the bitmaps in the animation.
Sometimes the animation isn’t scaled at all; you set a fixed width and height for the content and it’s viewed at that size regardless of the device being used. In this case, you can use bitmaps to your heart’s content and no loss of quality will occur since there is no scaling involved.
If you aren’t working with a fixed width, you’ve probably set your content to scale so as to take up as much of the screen as possible. In this case, you have to be more careful. For example, say you have an animation with a document size of 1024 × 768 that has a background image that is also 1024 × 768. The animation has been placed within a page so that it expands to the maximum size possible. If someone using an iPad views the image, there is almost no loss in quality. This is because the screen resolution of the iPad is 1024 × 768 and little to no scaling needs to occur to fill the screen. Now, if the same animation is viewed on a monitor with a higher resolution of 1920 × 1080, the animation will scale considerably to take up the full screen and a very noticeable loss of quality will occur in the background image. In a case like this, it might have made more sense to design the animation using a shape as the background so that it would maintain its quality.
As you can see, there are several considerations to keep in mind when building your animations. And there are many more beyond what I can reasonably cover here. Sometimes the best solution can only result from simple trial and error. Even so, if you put the effort into thinking through your approach before building an animation, you’re bound to save yourself a lot of time.
Converting Assets to Symbols
Once you’ve imported or drawn something on the Stage in Flash, the next step is typically to convert it into a symbol. A symbol is simply a container for content that makes it reusable within the animation by allowing you to create instances. We’ll cover instances and their benefits in just a moment, but for now, let’s look at the different forms a symbol can take.
When you create a symbol you have the option of specifying the behavior of a movie clip, graphic, or button (see Figure 1-8).
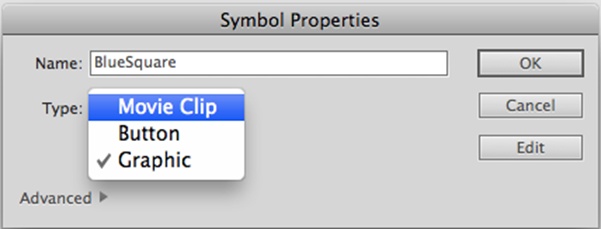
The movie clip is the most commonly used symbol in Flash. A movie clip is simply a timeline-based symbol that acts as a container for animations so that they don’t always have to live directly on the main Timeline of your document. A key thing to remember about a movie clip is that it has an independent timeline. This means its playback isn’t linked to the playback of the main Timeline in any way. A movie clip also allows frame navigation actions and interactivity using ActionScript.
A graphic is very similar to a movie clip with the exception that it does not have an independent timeline. The playback of a graphic is directly tied to the playback of the main Timeline. Additionally, a graphic doesn’t support any interactivity via ActionScript.
Buttons are more or less what they sound like. When creating a symbol with the behavior of a button, you’ll have a frame for each state of the button’s interaction; up, down, and over (see Figure 1-9). Button symbols allow you to easily build buttons with custom visual states.
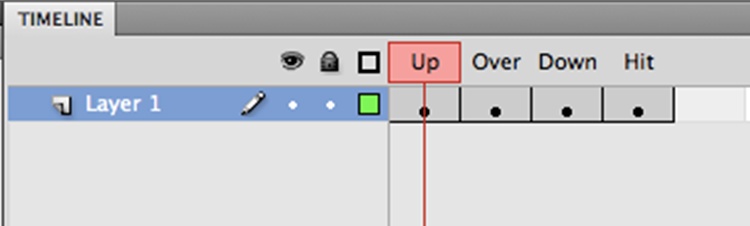
The type of symbol you choose to create depends on what you’re trying to achieve. Graphics are best suited for static assets and individual pieces of an animation. Movie clips are often ideal for constructing animations using those pieces. Buttons are used to capture user input so that you can do things like stop or replay the animation or provide a means of navigating to a specific point on the Timeline.
Instances
Any symbol in the Library that is placed on the Stage creates what is called an instance of that asset. An instance, in this case, just means that Flash uses the same description in the Library to draw the asset on the Stage, regardless of how many of those assets are actually placed. The end result of this is that you can place an item on the Stage 100 times without increasing the size needed store to the animation on disk.
Since speed is essential when viewing content on the Web, this sort of small footprint becomes very desirable. This, however, doesn’t mean there is no cost to having several instances of the same asset on the screen at once. In this case, more system resources, like CPU and memory, are required in order for the asset to be drawn; and this is as true for HTML5 as it is for anything else.
In terms of performance, modern-day desktop and laptop computers are so fast that they rarely have any trouble handling the complex content we throw at them. Mobile devices, on the other hand, have only a fraction of the power of traditional computers. This means a far greater emphasis on optimizing your content is required if you intend to produce mobile content. Thankfully, you can stay out of trouble if you understand some basics about computer resources and how they’ll be used. We’ll discuss this optimization in greater detail in Chapter 3.
Keyframes
Keyframes are nothing more than frames that are used to define what should be visible on the Stage starting at a particular point in time.
A keyframe can be several frames in length as well. The length of a keyframe instructs Flash that its contents should continue to be displayed on-screen until the last frame is reached or until a new keyframe is encountered.
Flash also has what are known as blank keyframes. These indicate that nothing is to be displayed on the Stage at that time. To create a blank keyframe you can add a new keyframe to the Timeline or take an existing keyframe and delete all of its content on the Stage. Figure 1-10 shows a keyframe and a blank keyframe.
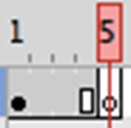
Once you have two keyframes on the Timeline, you can create a tween.
Tweening
For a cartoon animator who draws each frame by hand, a series of consecutive keyframes might do the job just fine. In fact, some animators use Flash in just this way. For the rest of us, hand-drawing frame-by-frame animations can become extremely time-consuming. To eliminate the need to draw all of the in-between parts of an animation Flash Professional offers a technique appropriately named tweening. Tweening allows you to design a transformation of a visual asset over a period of time and have all the necessary steps in between created for you.
A couple of different types of tweens are available in Flash. A motion tween can automate changes in position, rotation, scale, and skew (see Figure 1-11). It can also automate value changes for color and filter effects that are available in Flash.
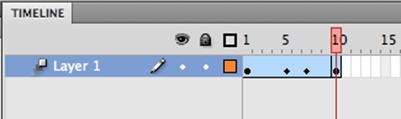
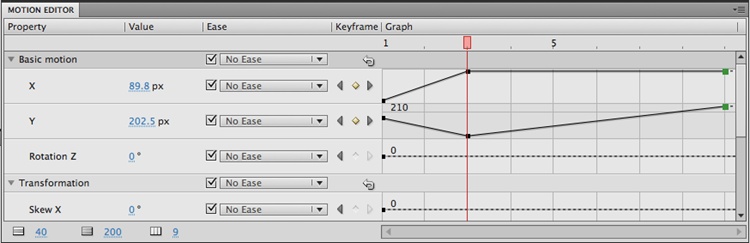
Because motion tweens can get very complex, they actually contain their own keyframes that are independent of those found directly on the Timeline. These keyframes can still be edited from the main Timeline, but a far more advanced editor called the Motion Editor exists that provides finer control when animating (see Figure 1-12).
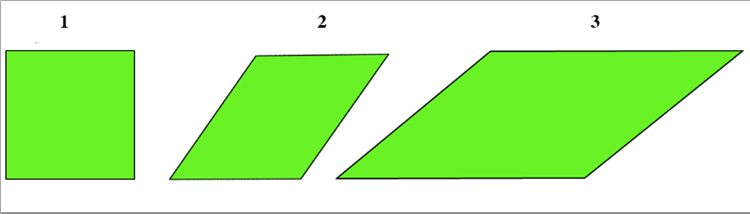
There is also another type of tween known as a shape tween. A shape tween is what it sounds like; it allows you to animate changes in a shape, as shown in Figure 1-13. This can be accomplished in two ways. The first method is to create two keyframes over which a single shape changes its form. The second method is to create keyframes with two completely different shapes, in which case Flash will blend or morph between them.
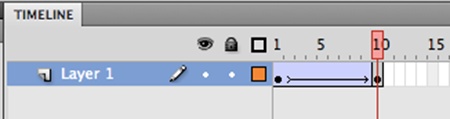
A classic tween is the much simpler predecessor to a motion tween. Classic tweens work in the same way as motion tweens except that classic tweens lack their own self-contained keyframes (see Figure 1-14). Classic tweens are also incompatible with the Motion Editor. Instead, they use keyframes placed directly on the Timeline.
Now that we’ve had a basic overview of Flash we can move right into creating our first Wallaby animation.
Get Creating HTML5 Animations with Flash and Wallaby now with the O’Reilly learning platform.
O’Reilly members experience books, live events, courses curated by job role, and more from O’Reilly and nearly 200 top publishers.

