Although every aspect of digital video production is important, none can save you more time and money than preparation. Being prepared, whether with technical know-how or physical tools, enables you to calmly deal with the real problems that inevitably occur. Throughout the various stages of producing a project, you should be prepared for a stage before you reach it.
Always keep in mind the project as a whole, from preproduction to delivery, as opposed to seeing a bunch of separate little projects that come together in the end. Anything you do during a project affects it from that point forward, and if you make a mistake, it carries through and continues to cause you problems until it is fixed.
Following a series of steps enables you to successfully complete a project, in the least amount of time and at the least expense .
When it comes to completing a project, post-production is often an area of trouble for people. Getting a project through the editing process can be challenging. It can be difficult because of a lack of experience and/or knowledge, a feeling of intimidation by the technical jargon and equipment, or simply burning out in the final phase of a project. Fortunately, an easy-to-follow process can help you get through it.
Tip
This hack is meant to be a quick hit list of steps you should follow at the very least. Cross-references to other hacks are for your use as you see fit. Iâve witnessed people (professionals, no less) needlessly spend tens of thousands of dollars because they didnât follow these guidelines in order .
Putting labels on your tapes is a no-brainer. But how you number your physical media [Hack #3] can make a world of difference in post-production. A simple numbering mistake early on can translate into having to renumber your entire library or reedit a project because the numbers are cut off by creating an edit decision list (EDL).
Avoid the pain and follow a couple simple rules:
Donât duplicate numbers.
Keep the labels simple.
You can get creative with your labeling, but donât go overboard. If you create a system that people have to repeatedly ask questions about, youâre costing yourself time and effort. Simply put, do it right the first time and put a little thought into it.
Keep a running tally of your media. You should be able to reference something to know what your tape numbers are and what they contain. Whether you use a database, a spreadsheet, or a notebook is up to you.
If you donât know what, or how many, tapes you have, youâll never know if youâre missing footage. If you number your tapes before you shoot on them, you should enter additional information into your tracking system after youâve shot on them. Just having tapes with numbers on them isnât enough.
If you donât know whatâs on your tapes, how are you going to find the footage you need? There are a number of ways to log your footage, from taking simple notes on a piece of paper, to using a spreadsheet [Hack #5] , using a third-party application, and even using your editing application.
However you log your footage, you should always be aware of one thing: regenerating timecode . This occurs when your timecode jumps backward in time and is troublesome for editing systems. If you come across regenerating timecode, you should create a digital clone of the tape [Hack #48] , with new and continuous timecode.
A paper cut equates to your edited video on paper. Before you start editing, you should have a clear idea of what footage you are going to use and where that footage is located. You can use a two-column script [Hack #7] to create your paper cut, which will greatly help with the process.
If you are working on a scripted project, such as a dramatic movie, you should have lined script [Hack #11] . If you donât have a lined script, you will probably want to watch your footage and take notes on the script. Your notes should include the tape number and timecode for the various scenes, at the very least.
Your offline cut, also known simply as offline , is essentially where you start to edit. In offline, you will assemble your story and gather all of the necessary elements to tell it. This is where you should know what footage, sound effects, graphics, and other elements are missing, and be able to determine whether or not there is a way around the problems. During offline, you shouldnât worry about mixing your audio unless itâs absolutely necessary.
You should use your paper cut or lined script as a guideline to creating your timeline. However, you should be familiar with your footage (and use your logs!) to fill in where your paper cut or lined script is lacking. Remember, what is on paper will more than likely not translate in the editing room.
Create backups of your project often [Hack #2] ; otherwise, you may discover youâve lost days, weeks, or months worth of work. Additionally, when you have completed a cut, you should output a reference copy [Hack #75] so you can make notes away from the editing system.
When you have determined you are happy with your offline cut, you should stop editing, back up, and output a reference copy. Your reference copy is not for making more notes! At this point, you should not have any temporary video elements and be ready to accept your story as it is. You should not make any video changes from this point forward.
If you have been editing in a low-resolution, such as OfflineRT on Final Cut or 10:1 on Avid, you are going to need to redigitize your footage at an uncompressed resolution. When redigitizing, you should make sure you have at least 15 frame handles as a safety net, in case there are problems you didnât see in offline. After you have transferred all of your uncompressed footage, you should digitize in your locked offline reference cut .
Place the reference cut on the top layer of video in your timeline. You then want to make sure your online matches your offline. Here are a couple of approaches you can take:
- Cropping
You can crop the reference cut about 50%, either horizontally or vertically, so you can see the online cut at the same time. When you play your timeline, youâll be able to see if any of the footage doesnât match. If it doesnât, youâll notice because the full image on screen will be split.
- Toggling
If you just want to spot check your online, you can simply jump to various sections of your timeline and toggle the visibility of the reference cut. This will allow you to see the full-screen image of the reference cut and then the online cut. Although this method wonât always alert you to minor differences, such as a one-frame difference, it will alert you of any major problems.
After you determine your online cut is correct, you should output it to a new piece of tape. This tape is your online master. Keep it safe and be proud; youâve made it farther than most people ever will.
The final two steps can be completed on the same system or, if you can afford to hire a colorist or an audio mixer, on different systems. If you will be working on different systems, you should know what types of files are expected, especially for your audio suite. You will also need to know how you will get both signals (your audio and your video) back out to tape in sync. In other words, what application is going to be used and what are its requirements?
Yes, believe it or not, you shouldnât color-correct until after you have your online master completed. The reason is simple enough: if you make a mistake, you can easily undo it. Plus, you will always have a master tape you can fall back on.
If you are color-correcting using the same system and application that you have used to online your footage, you can proceed to color-correct using the same timeline. Before you color-correct, make sure you back up your online version of the timeline first!
If you are going to be using a different system to color-correct, you should export an EDL or a copy of the timeline (depending on the system youâll be using). The EDL or timeline will provide a reference to where the cuts occur in your video. This will make the job of color-correcting much easier.
When you have finished color-correcting, you should output to yet another piece of videotape. This tape is your color-corrected master. Things are looking good!
The final step is to work with your audio. Every time I work with audio, it absolutely amazes me how much a simple tweak, such as removing the hum [Hack #56] , can make a scene come to life. When working with audio, make sure you have a good set of external speakers, so you can clearly hear what is there.
If you have done the color-correction and audio mix using the same application, you can simply output. If you have used different applications, you have two options, based on the capabilities of your audio-mixing system.
If the system is capable of outputting audio-only to videotape, while not affecting the video, you can layback the audio directly to your color-corrected master. This means that you can use the same tape that is your color-corrected master, and place your final mixed audio onto it. By doing so, you know which physical tape is your final master tape.
If the system cannot layback audio-only, you should output your mixed audio at the highest quality possible to an audio file. After you have the mixed audio as an audio file, you should import it into your video-editing application. After importing it, you should place your audio file onto your timeline and sync it with the video. After itâs in sync, you simply need to output.
Thatâs it! Youâre done.
It is a lot of work to complete a project. If you can solve problems early in the process, then you can avoid problems later. After completing a few projects, youâll discover that the later you discover a problem, the more difficult and expensive it is to fix. By following the guidelines in this hack, you can save yourself a lot of work, a lot of time, a lot of frustration, and a lot of money.
As you continue to edit your project, your timeline will inevitably become more complicated. By following a few organizational rules you will avoid confusing yourself .
Editing is an artistic process. The key word in that sentence is process . Unfortunately, many people, including professional editors, overlook the process only to discover they are confused by their own work. As a side effect, they tend to blame their editing systems for problems, instead of blaming themselves.
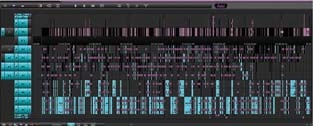
Keeping your timeline clean will help you work more efficiently, and therefore faster. To keep your timeline clean, you need to place your audio and video on specific tracks, based upon the use of your media. For example, you should place all of your title media, such as credits, on video track 5 (V5). Figure 1-1 shows a complex but well-organized Avid timeline.
There are no rules you can apply to every project, because each one is different. By keeping your tracks organized, you will be able to easily spot media you want to work with by what layer it resides on.
As a starting point, consider organizing your video tracks like this:
- Acquired
V1 and V2
- Mattes and Effects
V3 and V4
- Titles
V5 and V6
And here are some suggestions for organizing your audio:
- Dialogue and Narration
A1 and A2
- Natural Sound and Ambiance
A3 and A4
- Sound Effects
A5 and A6
- Music
A7 and A8
Also, if you are using an external mixing board to monitor your audio, make sure you are hearing what is actually on your timeline. For example, if you have placed a sound effect of a kitchen blender on an audio track that should play only on your right speaker, and you hear it coming out of both speakers, your mixing board is not configured properly. More often than not, you will want your mixing board configured so that your right and left channels are panned right and left, respectively. Rarely will you want your channels center panned.
Just as keeping a clean timeline will keep you working efficiently, so will keeping your bins organized. Just as there are near infinite ways to keep your computer organized, there are just as many ways to keep your bins organized. However, there are a few methods that have proven themselves on time-critical projects.
Keeping your bins organized by tape is possibly the most common method of organization. It involves naming each bin as a tape number and only placing footage from that tape inside that bin. For example, if you have a tape numbered DV1031, only footage from tape DV1031 would be found inside that bin.
This method is extremely efficient, because most people look for footage based on the tape number and the timecode. Using this method, along with keeping logs of your tapes [Hack #5] , will make editing your project enjoyable, even as the days turn into weeks or even months.
If you are editing a scripted project, such as a dramatic movie, you might find it more efficient to organize your bins by scene. To use this method, create a bin and name it accordingly. Then, place footage that is a part of the scene inside the bin.
When using this method, you can name your bins by scene number, such as âScene 3,â or the action occurring during the scene, such as âSamâs Grand Jury Trial.â Quite obviously, you can combine the two naming schemes, which would result in âScene 3: Samâs Grand Jury Trial.â
Taking the scene-labeling approach will allow you to concentrate and dig through only footage thatâs related to the scene you are editing. This is especially helpful when working with a producer or director who asks, âWhat other footage do we have for Samâs trial?â Instead of looking around your timeline to determine tape numbers and then locating those tape numbers in your bins, you can easily locate the requested footage.
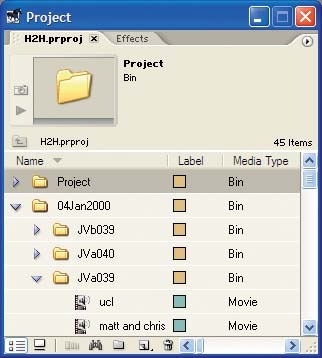
When working on a documentary or reality-style project, it is often more efficient to organize your footage by the date it was shot. When using this method, it is best to nest bins inside each other, so that you have a bin for a date and then within that bin are more bins labeled using tape numbers. For example, you would have a bin named 04Jan2000, and then inside that bin you would have additional bins for individual tapes, such as JVa039, JVb039, and JVa040, as shown in Figure 1-2.
This method is efficient for documentaries because people recall events that occurred on a certain day, as opposed to on a certain tape. For example, a producer is much more likely to say, âDid you see the footage of John and Vanessa kissing? I think it was on Tuesday, the fourth.â Heâs less likely to say, âI think itâs on tape JVa039.â
You should also have a few other bins in your project:
- B-Roll
Your B-Roll bin is where you should place any b-roll footage, such as shots you plan on using for establishing scenes or for transitions.
- Music
The Music bin should be fairly self-explanatory. It is where you should place any music you plan on using in your project.
- SFX
Your SFX bin is where you should place all of the sound effects you plan on using in your project.
- EFX
The EFX bin is where you should place any effects, such as footage you are going to use for compositing or titling.
- Project
Your Project bin is where you should save your timeline sequences. Some people like to create multiple bins inside their project bin, such as Archives (for keeping backups), Promos (for cutting short promotional material), and Scenes (for working on small sections of a project), among others.
The most important thing about organizing your bins is to discover how you, and the people you work with, locate the footage and elements you need to edit. If you want to take the extra time, you might even go so far as to combine a few of these methods.
One thing many inexperienced editors donât do is keep track of their drive space. Keeping track of your drive space means knowing how much space you have available. Although something like drive space seems like itâs unimportant (âHeck,â you might say, âIâve got 240 gigabytes in my system. What do I have to worry about?â), it is amazing how quickly video can fill a drive.
Keeping track of your drive space is important for two reasons. First, it lets you know if you have enough space to import new footage, when required. Second, it keeps you from running into a situation in which your drives fail or you are unable to work because there is no more space available. Some experienced editors have, well, experienced this second situation and vow to never experience it again.
Somewhat related to drive space, and often overlooked, is the item count inside your directories. Most editing systems create separate files for each audio or video effect you create and render. Over time, these files gather into huge collections and can cause problems.
Tip
Item counts can be costly, as a good friend of mine found out firsthand. He was working on a network prime-time television show and their editing systems started to âact funny.â After some investigating, he discovered over 500,000 files in a single directory. These files wreaked chaos with his companyâs systems, 19 Avids linked together using a fiber connection, and cost them tens of thousands of dollars in downtime (time people arenât working).
On a semi-regular basis, you should plan on removing your render files and rerendering your project.
A final method for keeping organized is more of a cover-your-bases solution. Every day, or every time you start to address notes, you should create a duplicate of your timeline and save it using some type of naming system. You can name your copies by date (14Jun2004), by cut (Offline-pass-5), or some coded system ([DVv5dc]: DV project, version 5, Directorâs Cut).
Tip
Jackson Anderer, an Emmy-nominated editor, names his sequences as Project-Act or Scene-Cut-Date-Initials. So, a sample sequence title would be:
| EMHE212-Act1-Cut10-Feb9-JA |
â¦and translate to:
| Extreme Makeover: Home Edition, Season 2, Episode 12, Act 1, Cut 10, completed on February 9, by Jackson Anderer. |
His system works extremely well for organizing large projects that involve many people.
However you choose to name your cuts, do it religiously. Sooner or later, you will want to go back to a previous cut, and if youâve continually worked on the same timeline, you wonât be able to. I witnessed a director break his hand (as he hit the floor with his fist) after being told that there wasnât a backup copy of a previous timeline; he lost a full dayâs worth of work.
You should also back up your project (not your media) to an external drive, preferably one that is portable. The small USB keychain drives are perfect for this type of use because theyâre large enough to hold even long, complicated projects and theyâre small enough that you can easily take them with you.
How you number your tapes can have long-term effects.
Just as you want continuous, nonrepeating timecode [Hack #4] on each of your tapes, you also want a unique number assigned to each tape. Although tape numbering is an easy task to accomplish, more often than not, I hear about people who have duplicate tape numbers or no tape numbers at all!
You should choose a numbering scheme that makes sense to you and the people you work with. Your numbering scheme should be easy to understand and allow you to glance at a tape and understand what the number represents. In order to make any of the following numbering schemes work, you should have a spreadsheet or database to track additional information, including the date shot and a brief synopsis of the footage.
Tip
Imagine trying to physically look through 100 MiniDV tapes, while trying to read what you printed on a small 1"x2â label. I can guarantee you will not be able to put all of the information you would like in such a small space. A spreadsheet or database can become an invaluable resource, especially when you are trying to locate footage.
Tracking information in a system that can be searched and sorted will help you manage your library over time. It is not uncommon for an independent project to amass one hundred or more hours of raw footage. Some professional projects can amass tens of thousands! Save your sanity and take an extra few minutes to enter the information in a central location.
Warning
If you are working on a project with more than just a few people, I recommend using a centralized system. Whether you create a method of checking in/out a tracking spreadsheet, use WebDAV to lock/unlock a set of files, or even design a database and place it on a server, you need to create a central location for tracking. This is because you need to take extra precautions to make sure people donât change other peopleâs information, or enter conflicting information. If you do not take such precautions, you could find yourself completely confused by your own project.
Numbering schemes are a personal endeavor. Based on my background, I still cringe when I see a tape number longer than six characters. Although nonlinear editing systems are making progress in the realm of cross-compatibility, through Advanced Authoring Format (AAF) and Media Exchange Format (MXF) files, the Edit Decision List (EDL) is still the default and most common method of moving a project from one system to another.
In order to keep peace of mind when using an EDL, a tape number should not exceed six alphanumeric characters (or eight if you donât mind taking a very small risk). A tape number should also not use any special charactersâsuch as an underscore (_) or ampersand (&)ânor should it end in a B. It is safest to simply stick with the basic set of AâZ and 0â9.
Tip
If you would like to know the reasons behind these rules, point your favorite browser at http://users.rcn.com/brooks/maxguide.html#reeln% and keep in mind that many systems export or import GVG EDLs.
If you know that you will never produce an EDL, you can be more flexible in your numbering scheme. However, you should still attempt to keep the numbers as simple as possible.
Okayâ¦on to the numbering! The following are simply suggestions, but they have all been used successfully on professional projects.
One choice for tape-tracking is to number your tapes by project, then camera number, and then a sequential number. Using such a design results in a number like PWA032, which represents the Peterâs Wedding (PW) project, camera A, tape number 32. You should take notice of the 032, as opposed to only 32. The prepending of the 0 allows up to 1,000 tapes (000â999). If you expect to exceed 1,000 tapes, you can easily prepend two 0s to your load number and reduce the project indicator to one letter (e.g., PA0032).
To number your tapes based on date, and still maintain the six-character limit, requires you to track only the load count, camera, and date in your number. For example, the fourth tape shot on March 15 in camera A would read as 4A0315. If you use this scheme, you will probably want to place supplementary information somewhere on your tapeâs label or within your tracking system.
Tip
If you choose to expand your numbering scheme to eight characters, you can gain a little more flexibility using the date numbering option.
One approach to adding information to your labels, without compromising your tape number is to simply write information, like the projectâs name, on the label. This information would be in addition to the tracking number. It is easy to tell that a tape with the label of âGoing Home 4A0315â does not belong to the same project as âSunset 3B0322.â This is an effective solution, especially if you are producing multiple projects.
When logging and/or digitizing using this scheme, you should enter only the tracking number as the tape number. Do not include the project name as a part of the tape number. Otherwise, you will have problems when creating an EDL.
A third choice is to buy or print out a series of barcode labels along with a human-readable number. I especially recommend this solution if you will be dealing with large amounts of footage. An additional advantage to this solution is you can then use a barcode scanner to help track your tapes as they move from person to person.
If you are looking to purchase a series of preprinted barcodes, I can recommend Barcode Discounters (http://www.barcodediscounters.com). I have used their products in the past and usually purchase the 2â x 1â Poly/Permanent style label. I also have the projectâs name printed above the barcode and a human-readable number printed below it, as shown in Figure 1.
If you order your labels, you will probably discover that a label of the 2â x 1â size fits onto the face of MiniDV tapes. Depending on your preference, you may want to order the barcodes in duplicate, so you can attach a barcode to both the physical tape and its plastic case.
If you would like to print your own labels, and you own Microsoft Office, you can link an Excel spreadsheet to a Word document and generate a series of labels:
Create a new Excel document.
Enter Barcode into cell A1.
Enter the formula =sum(A2+1) into cell A3.
Select cell A3 and copy it.
Paste the formula in as many cells under column A as you require:
There are 2,000 labels in an Avery 5267 package.
You can paste to cell A1002, if you want to label both tape and case.
Enter 10000 (or whatever number you desire) into cell A2.
Save your document.
Tip
I like to start my series at 10000, because some editing systems will trim your tape numbers from 00001 to simply 1; I prefer consistency.
A nice bonus with this method is you can set up your spreadsheet to track additional information about the tapes, such as the date shot and a brief description of its content. To do this, simply add your criteria to the first row of your spreadsheet. So, to the right of barcode could come Project Name, Date Shot, Description, Format, and so on.
Okay, now to pull your information into Word and print the labels. You are going to print out labels using the Avery 5267 template. These labels are technically Return Address labels, but they measure 0.5 x 1.75 inches and fit nicely on MiniDV tapes. If you are shooting on a larger format tape, feel free to substitute an appropriate template.
Tip
If you have chosen to add a Project Name, you should enter it before printing your labels. Otherwise, you will have only the tape number printed.
Create a new Word document.
Choose Tools â Labelsâ¦.
Change the Label type to Avery 5267.
Click the Data Merge button.
Using the Data Merge Manager, choose Data Source â Get Data â Open Data Sourceâ¦.
Locate the saved Excel document.
Accept the default import method.
Add the barcode to your label. If you have added a Project Name column, add it as well.
Choose Edit â Select All.
Choose Format â Paragraphâ¦.
Choose Alignment â Center.
Save your document.
After you have completed all of these steps, you can print out your labels from your Word document. Because there is only one entry per tape in your spreadsheet, only one label will be printed per tape. If you would like to label both your tape and your case, you can simply print two copies of your labels.
Over time, your tracking system will become the central location for an overview of your projects. Make sure you enter information for each tape you shoot on, as soon as possible. The more diligent you are about keeping up-to-date, the fewer problems you will have during the editing process.
You can avoid problems with digitizing your footage by prerecoding timecode on your tapes before you record footage on them .
Digital video provides you with a professional level of accuracy while editing through the use of timecode. A movie is simply a series of still images, or frames, displayed quickly and in succession. Timecode is a method of referring to, and tracking, each of those frames. The frame rate of the video is the measurement of how many frames are displayed per second.
Tip
Timecode is measured in hours, minutes, seconds, and frames. The accepted notation is HH:MM:SS:FF. So, if someone provides you with a timecode of 42:21:33:04, you know the image occurs at 42 hours, 21 minutes, 33 seconds, and 4 frames.
There are two types of timecode: drop frame (DF) and non-drop frame (NDF). The accepted notation is to use a semicolon (;) to indicate drop frame, and a colon (:) for non-drop frame. Some people also use a period (.) to indicate drop frame. Here are some examples:
| 01;00;00;00âdrop frame |
| 01:00:00;00âdrop frame |
| 01:00:00.00âdrop frame |
| 01:00:00:00ânon-drop frame |
The type of timecode is important for editing systems, and the vast a majority use drop frame as a default.
Timecode is used as a reference point for editing. If you have the same timecode occur on a tape more than once, you will have an exceptionally difficult task determining which image to use. Therefore, you want each frame of your video to be associated with a unique timecode.
Many cameras generate timecode, starting at 00:00:00;00, whenever they are turned off and turned on again. This can become a problem during production, because you might be attempting to conserve battery power while recording and consequently turning the camera off and on frequently. Because of this, you could wind up with a tape with numerous duplicate timecodes.
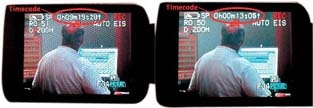
An easy way to tell if you have regenerated timecode is to simply look at the current timecode of the tape in your cameraâs viewfinder. For example, if you have recorded 10 minutes of footage, turned off and on your camera, and then notice the timecode is at or near 00:00:00;00, then you have more than likely regenerated timecode. Figure 1-4 shows the timecode displayed on an LCD both before (left) and after (right) cycling the camera off and on.
Warning
Some video cameras and decks have a feature to generate timecode internally, therefore ignoring any timecode on your tape. This feature is sometimes referred to as Regenerate Time-code. The feature is not the same as the occurrence of regenerated timecode explained herein.
In order to avoid a duplicate timecode fiasco, you can perform a simple task: black and code your tapes. Black and code refers to the process of recording a black image across your entire tape while allowing the camera, or deck, to assign a continuous timecode for every frame of video. After performing this task, you will be able to turn off your camera safely, because it will not overwrite timecode that is already present. However, it will record over the black image.
The vast majority of time, you will be dealing with video that has a frame rate of 29.97 frames per second (fps) for National Television Systems Committee (NTSC) video or 25 fps for Phase Alternation by Line (PAL) video. There is a reason for the noninteger frame rate for NTSC, but Iâll leave that for you to research. (Hint: television was not always broadcast in color.)
Here are the timecodes for the major digital video standards:
- NTSC (29.97 fps)
Used primarily in the Americas. Although the format is referred to as dropframe, frames are not really dropped. Rather, frame numbers are skipped. The calculation for drop-frame timecode is to drop one frame every minute, except when the minute is divisible by 10. When dropping a frame, the frame indicator will skip from ;29 to ;02.
- PAL (25 fps)
Used primarily in Europe. Running at a full 25 frames per second, PALâs timecode does not need much explanation, because it is straightforward.
- 24p (23.976 fps)
Stems from High Definition video. Some DV cameras are now able to record in the 24p format, which runs at 23.976 fps. This seemingly odd frame rate provides a âfilm lookâ that many people prefer, as film traditionally is shot at 24fps. Most editing systems make using this frame rate fairly straightforward.
Tip
Panasonic has a 24p Advanced format which records 24p while applying a process, known as telecine, to make the video also work at 29.97fps. Some editing systems are able to recognize the 24p Advanced format and work with it seamlessly. If you plan on using this format, then you should make sure your editing system can deal with it correctly.
To black and code your tapes, you have a few options. Whichever option you choose, you should make sure you black and code your tapes before recording actual footage on them. Yes, people have actually attempted to do so after they have recorded footageâ¦quite unsuccessfully.
If your editing system provides a Black and Code option, you should use it. Appleâs Final Cut Pro, Avid Xpress, and Adobe Premiere are a few of the mainstream editing systems that provide this functionality. If your editing system does not offer a Black and Code option, you can create a new timeline with a long black slug. Your slug should be as long as your tape, so if you are planning on recording to a 60-minute tape, your slug should be 60 minutes long as well.
After you have created the timeline, simply record it to tape. An advantage of this method, depending on the capabilities of your editing system, is that you can set the starting point of your timecode. For example, you can start the timecode of your first tape at hour one (01:00:00;00), your second tape at hour two (02:00:00;00), and so on.
If your editing system does not transfer the timecode you assign, you can still use it to send a black image while your deck or camera assigns timecode. But in such cases, you may just want to use your camera by itself, as it has a built in method of creating black.
You can create black with your camera by leaving the lens cap on and recording. Because the lens is covered, your camera will record a black image (because thereâs no image to record), while assigning continuous timecode to the tape. This will give you a functional black and coded tape.
You can save the wear on your cameraâs heads by black and coding your tapes using a digital video deck. If you are planning on acquiring a lot of footage, you should invest in a deck. When using a deck to black and code a tape, you can either use your editing systemâs built-in function (as discussed previously in âUsing your editing systemâ) or send a black signal to the tape deckâs analog video input.
Many professional post-production facilities also offer precoded tapes. There is usually an additional charge, beyond the cost of the raw tape stock. Although most facilities use these tapes for their clientsâ editing sessions, you should be able to purchase them for use outside of their facility, as well.
Logging your footage provides you with a searchable reference of your content .
Regardless of the size of your project, from a few hours of footage to a few thousand, you need to know what content you have acquired. Although there are many specialized applications to help you log your footage, you can just as easily use a simple spreadsheet.
Tip
If you do not have a spreadsheet program, you can create a tab-delimited text document that will accomplish the same goal. A tab-delimited file is a way to separate what you type into columns. In such a file, each tab is a column and each line is a row.
Before you start, make sure all of your tapes are uniquely labeled and numbered [Hack #3] . You also need to be sure the timecode on your tapes does not regenerate [Hack #4] . Although you can catch these problems while logging and fix them [Hack #48] before you begin editing, it is easier to fix these problems early in the process.
Logging your footage is a time-consuming but worthwhile endeavor. As you progress, you will become intimate with your footage. While youâre editing, you will discover that you recall seeing a particular shot, but you will not know on what tape or at what timecode the shot occurred. In such a situation, your logs will provide the necessary information.
To set up your spreadsheet assign a column name for each of the following:
- Avid
Clipname, Tape, Start TC, End TC, Tracks
- Final Cut
Reel, Clipname, Media Start, Media End, Description
- Premiere
Tape, In, Out, Clipname, Log Notes, Description, Scene, Shot/Take
To log your footage, you need to enter the in-point, description, and out-point of the footage in a row on your spreadsheet. When entering information, you should enter unique information for Clipname for each log entry. You should also enter any additional information required by your editing system.
How you view your footage while logging is completely up to you. Some people prefer to transfer their footage to VHS tapes with the timecode superimposed over the image, a process known as a window burn [Hack #75] . Others prefer to digitize all of their footage and view it on their computer.
However you choose to log your footage, I strongly recommend not using your master tapes. A simple mechanical failure with your playback machine can easily destroy your master footage, which cannot be replaced. You should treat your master tapes as prized possessions because they are irreplaceable. (Of course, you could always reshoot. But what if you are editing a wedding?)
Logging your footage is a time-consuming process, but the payoff is well worth the investment. To successfully log your footage, there are three essential criteria: the tape number, the timecode of the in-point, and the description of the content. Beyond those three criteria, the out-point is helpful in determining the length of the log entry and is mandatory for most, if not all, editing systems.
If youâve set up your logging spreadsheet properly, you can use it to create a batch digitize list to help digitize your footage into your editing system. Using the batch list will provide a breakdown of your footage, which will exactly match your logs. Therefore, you will have the same information in both your spreadsheet and your editing system.
For each new log entry, create a new row. Continue this process until the tapeâs content is completely captured in your own words. Each log entry will range from 1 minute to 60 minutes, depending on your attention to detail.
While logging, you need to make sure you enter your timecodes in the correct format. If you are working in PAL format, you can ignore the rest of this paragraph. For NTSC, the correct format for drop-frame timecode Hours:Minutes:Seconds;Frames (HH:MM:SS;FF). More often then not, you will be working in Drop-Frame mode, so you will need to use a semicolon before your frame number (;FF). If you are working in Non-Drop Frame mode, use a colon (:FF). If you do not know which mode you are working in, you should be able to safely assume you are working in Drop-Frame.
Warning
The colon/semicolon separator is important, because it indicates the type of time code with which your video has been recorded. The wrong indicator will cause problems in the long term, especially if you ever have to redigitize your footage.
If you are uncertain of which mode your tape is recorded on, you can tell by looking the timecode coming off the tape. If there is a semicolon or a period before the frame indicator, the timecode is Drop-Frame. You can think of it this way: one of the dots in the colon drops when using Drop-Frame.
You should create a new spreadsheet for each tape you log and save the spreadsheet as the name of the tape. For example, if you are logging tape number P001A, save the spreadsheet as P001A. Saving the spreadsheet with the same name as the tapeâs number will be essential for future reference.
When you have finished logging your footage, you can import your spreadsheetâs information into your editing system. Since each system is different, there will be specific steps you need to follow. To begin, you should save your spreadsheet as a tab-delimited file for either Avid or Final Cut, or as a comma-separated file for Premiere. Once you have saved your log entries as a file, you will need to edit the file in a plain text editor.
Warning
The following text involves the Tab and Return keys. Since these donât translate well to the printed word, they are indicated in bold and ALL CAPS, surrounded by brackets.
- Avid:
Delete the top line of headers, then type the following above your entries:
Heading FIELD_DELIM[TAB]TABS VIDEO_FORMAT[TAB]NTSC AUDIO_FORMAT[TAB]44kHz TAPE[TAB]TapeNumber FPS[TAB]29.97 [RETURN] Column Name[TAB]Tracks[TAB]Start[TAB]End[TAB]Tape[TAB]Descript[TAB]DateShot [TAB]Barcode [RETURN] Data - Final Cut
Change Clipname to Name
- Premiere
Delete the top line of headers
Once you have made the necessary changes, save the file. Next, you need to import the batch list into your editing system:
You will have to perform these steps for each tape you plan on using in your project. The effort, however, is well worth it. Upon successfully importing your batch list, you can easily locate shots either by referring to your spreadsheets or by searching within your editing project.
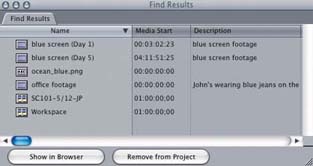
If you have located a shot using your spreadsheet, and want to see the footage as it exists in your editing system, you can easily find it [Hack #2] , because the spreadsheet matches the information in your editing system. If you donât have access to your spreadsheet, you can simply search within your editing project and have the same result. Figure 1-5 shows the Find dialog box for Final Cut Pro, and Figure 1-6 shows the result.
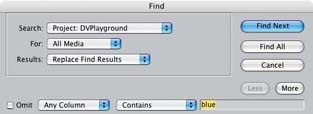
To locate footage, you should make sure you search from your Project and not your Timeline. This is because most editing systems are context sensitive, so if you are currently working in the timeline and perform a search, you will only search footage currently in the timeline.
To use the search function:
- Avid
Fast Menu â Custom Sift
- Final Cut
Edit â Findâ¦
- Premiere
Edit â Findâ¦
After locating the footage, open it in your applicationâs source view, or just drop it onto your timeline. Having a detailed, and searchable, reference to your footage both in a spreadsheet and on your editing system, will save you hours of shuffling through your footage trying to find a shot.
Using free photo software, a digital camera, paper, and a pencil, you can create a digital storyboard .
Storyboarding is an important step in producing a movie. The process requires you to envision what images you plan on capturing to tell your story and put them to paper. Although it can be a tedious process, the positive effect it has when shooting is huge, because it helps communicate your vision with the people you are working with, including yourself.
Even if you are artistically challenged, you can still create a storyboard. To get started, you simply need paper and a pencil. If you have a script, break it out, because youâll need to refer to it quite often.
Tip
You can also use a computer program to create your images, or even professional storyboarding software. StoryBoard Quick! (http://www.storyboardartist.com; $279.99) offers a library of over 300 people and objects to help you design a storyboard.
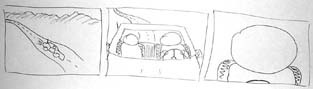
The process of storyboarding requires you to draw out each scene as you intend to capture it. For example, if you have a scene in which two people are talking in a car, you will probably want to start with an image of a car driving down a road. This would be your establishing shot. You would then draw a picture of two people talking, as viewed from the hood of the car, so your shot would capture the people from their shoulders up. Next, you would focus on one person, probably close up so you can see only his face. Figure 1-7 shows a sample, hand-drawn storyboard.
Depending on how ambitious you are, you can use a full sheet of paper for each image, fold the paper in half, fold the paper in quarters, or use index cards. I prefer the simplicity and portability of index cards and a pencil. I also like the fact that I can write notes on the back of the cards.
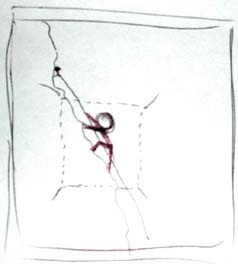
Quite obviously, drawings donât move. So, in order to demonstrate camera movement, you should draw arrows to indicate when the camera should pan, dolly, or zoom. If you want to indicate a zoom, you can also draw a square around the area you would like to zoom, as shown in Figure 1-8.
Since your storyboard is first and foremost a tool for communication, donât be shy about writing on your drawings. It is better to be clear than to discover there has been a miscommunication in the middle of shooting a scene.
After you have drawn your storyboard, you have completed half of the process. Although you have a completely functional storyboard, going digital will give you a few advantages in the end.
Your drawings are living in meatspace (the physical world) and not cyberspace (the digital world). To correct that problem, you can either use a scanner to scan all of the images or you can use a digital camera to take a picture of each image. Dr. Michael Johnson, of Pixar Animation Studios, has mentioned that some of the creative team at Pixar use the latter technique.
After you have bridged the analog-to-digital divide, you should import the images into your photo collection software of choice. For Macintosh users, this will probably be iPhoto; for Windows users, it will probably be Photo Story; and for Linux users, gPhoto. But, then again, there are numerous choices out there. The important thing is that you can import your drawings and arrange them.
When you have successfully imported your images, you will need to arrange them accordingly. Some software allows you to annotate your images, so the annotation feature can be used to transfer any notes you may have made on specific images. You should look over your storyboard to see if there are any glaring omissions. You can also try moving scenes around, to see how they affect your story.
At this point, you should have a good sense of your movie and how it is going to turn outâand you havenât shot one frame of video yet!
Once you have arranged your storyboard, you can play your storyboard as a slideshow. While watching the slideshow, sit back and try to follow the story you are attempting to tell. This is not the time to be criticizing your artistic skill.
If you are working with other people, you should attempt to read your script along with the slideshow. You should be able to get a good idea of how your movie is going to come out, and where your weak spots are located. If necessary, rewrite portions of the script, and change the storyboard as necessary.
All of this might seem like a lot of work, but it is a lot less work, and a lot less expensive, than discovering problems in the middle of a shoot schedule, or worseâ¦while editing.
Two-column scripts clearly separate the audio and video portions of a scene. This approach provides more detail to help during the preproduction and editing processes .
Most people have seen a script at some point in their lifetime, whether for a play, a television show, or a movie. These are the traditional form of script, or screenplay , which focus on dialogue. They make mere mention of the actions the actors should perform.
A two-column script focuses on both the dialogue of the scene and the specific shots to be used. The two-column format provides visual instructions, allowing directors, editors, and everyone else on the crew to know what should appear on screen. Two-column scripts can be created before or after shooting and are especially helpful when working on a documentary or reality-style project.
Dialogue in a traditional screenplay typically looks like this:
| LAFEU. |
| He cannot want the best. |
| That shall attend his love. |
| COUNTESS. |
| Heaven bless him! Farewell, Bertram. |
| [Exit COUNTESS.] |
Although you can envision this scene in your mind, it is difficult to ensure we all imagine the same setting. Storyboards are one method of communicating what you âseeâ in your mind [Hack #6] . A two-column script provides another method. The dialogue in the previous example might look like Table 1-1 in a two-column script.
Table 1-1. Dialog in a two-column script
|
Video |
Audio |
|---|---|
|
TWO SHOT Lafeu is on a blue velvet couch and Countess is standing to his left. |
Lafeu: He cannot want the best. That shall attend his love. |
|
TRACKING SHOT Countess walks toward the door and leaves. |
Countess: Heaven bless him! Farewell, Bertram. |
As you can tell, there is more detailed information about the setting. But for this type of entertainment, a two-column script is probably more work than is necessary.
So, when should you use a two-column script? Well, there is no hard and fast rule, but if you do not have a script and you have captured your footage, a two-column script could become your most prized possession.
If you own Microsoft Word, setting up a two-column script is fairly straightforward:
Create a new document.
Choose Table â Insert â Tableâ¦.
For the number of columns, enter 2.
For the number of rows, enter 10.
Click OK.
After the table has been inserted into your document, you should enter the headings of Video in the first column and Audio in the second column.
If you are writing your script before shooting your scene, you will want to include descriptions of any action to occur on screen. In addition to descriptions of action, you will want to include information about camera movements. This type of script can be tedious to write, but it will effectively communicate your vision to everyone working on the project.
When working on a documentary, or anytime you are attempting to weave a story after footage acquisition, a two-column script might become your only roadmap to successful completion. With such projects, it is important to note both the tape number [Hack #3] and timecode [Hack #48] of the footage you would like to use. A good set of tape logs [Hack #5] will also prove invaluable during this process. Table 1-2 shows an example of what a two-column script looks like, when including tape and timecode information.
Table 1-2. An example two-column script
|
Video |
Audio |
|---|---|
|
DVH001 - 02:04:14 |
(voice-over - to be recorded) |
|
David sitting at his computer, playing Solitaire. |
Working aerial search and rescue takes years of training⦠|
|
DVH032 - 00:25:15 |
DVH011 - 01:13:50 |
|
CU of walkie-talkie. |
Air Five, we have a 920-Alpha at the Crest. Please respond. |
|
DVH003 - 00:49:29 |
10-4. Responding now. |
|
David running to his helicopter, speaking into the walkie-talkie. | |
|
(conât) |
(voice-over - to be recorded) |
|
â¦and the ability to remain calm under pressure. |
Tip
Donât worry about being frame-accurate with your scripts. Frame accuracy is important only during the editing process. The preceding script uses the HH:MM:SS timecode format.
The previous script has a few interesting items. In the first row, notice the video is from footage that has already been shot but the audio is coming from a voice-over, which has yet to be recorded. We know the voice-over has not been recorded, because there is no tape number and no timecode associated with it.
In the second row, the video is a close-up shot of a walkie-talkie and the audio is coming from a different tape. Since there is no visual cue to indicate what is being said over the walkie-talkie, I have chosen to use audio from another tape that I feel moves my story in the direction I would like to take it. In fact, the audio from tape DVH011 is background audio that was obtained by accident.
Rows four and five are of the subject, David, running toward his helicopter while speaking into his walkie-talkie. Again, the voice-over portion has not yet been recorded.
If you are editing a project and you have a two-column script, your job is going to be a lot easier than without one. You are provided both the tape number and timecode of the audio or video you need, so most of your initial decisions will be made for you. The majority of your early work will require you to locate the most suitable out-point for your edits, and then you will just have to make your edits smooth [Hack #46] . For the most part, however, you should be able to concentrate on the storyline of the project.
After you have digitized your footage, you simply need to locate the referenced audio or video and add it to your timeline appropriately. As you move down your script, you will move to the right on your timeline, continually layering in the audio and video together. If youâve ever worked with a lot of footage and no script, youâll love the focus a two-column script provides⦠not to mention the amount of time it saves.
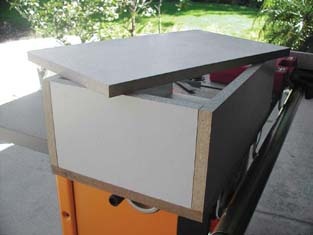
Apple boxesâsimple wooden boxes, commonly found around television and film setsâcan be used for a variety of purposes on any shoot. Theyâre also easy to build .
Some common items you might find lying around your home can become indispensable tools when shooting your video. Items such as clothespins [Hack #25] are not only cheap, but highly functional as well. The same holds true for scrap pieces of wood.
Apple boxes are wood boxes that are used for everything from propping up cameras to being used as stepstools, and they are practical workhorses on any shoot. Using some scrap wood, or wood bought from a lumberyard, you can build your own. If you donât want to build your own apple boxes, they can be purchased from places such as FilmTools (http://www.filmtools.com; $31.00) or B&H (http://www.bhphotovideo.com; $34.95).
The supplies necessary to build an apple box are pretty limited. If you have some scrap wood lying around, use it. Otherwise, purchase the required wood at a local home improvement store or lumberyard. The price of the wood will vary depending on the type of wood and current market conditions. However you go about getting your wood, you will need six pieces per apple box, two pieces in each of the following dimensions:
1/2â x 7â x 11â
1/2â x 7â x 20â
1/2â x 12â x 20â
The resulting full apple box should measure 8 inches high, 12 inches wide, and 20 inches long. You could also build smaller half (4 inches high), quarter (2 inches high), and eighth apple (1 inch high) sizes. Figure 1-9 shows pieces of scrap wood, cut to size for a full apple box and placed together to check the dimensions.
In addition to the wood, you will also need some nails or screws, along with a hammer or screwdriver. If you have access to other woodshop tools, and are comfortable using them, you can use them as you see fit.
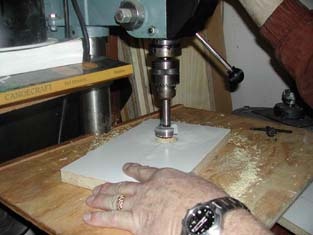
Although itâs not necessary, having a drill will help you to create handles in the sides of the box. To create a handle, drill two holes in the center of the 7â x 11â pieces, with the holes about 3 inches apart. Then saw across, from one hole to another, and punch out the bridge. Figure 1-10 shows a hole being drilled in one of the 7â x 11â pieces in order to create a handle.
If you plan on using the boxes heavilyâand after needing one once, youâll probably never want to be without themâI recommend you use higher-quality wood.
After youâve gathered your supplies, you need to assemble your box. You might want to use some wood glue on the edges of your pieces. The glue will help keep the pieces in place, prior to nailing or screwing them together.
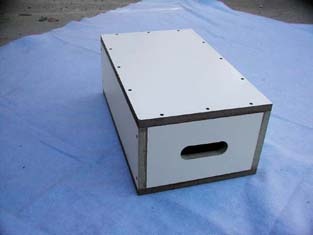
To assemble the box, place a 12â x 20â piece as the base. Then, place the 7â x 20â pieces on each side, so that the 20-inch lengths line up, and the 7â x 11â pieces on the ends. Finally, place the second 12â x 20â piece on top and nail or screw the pieces together, to ensure the box doesnât fall apart. Figure 1-11 shows a completed full apple box.
When you are finished, file down any sharp edges and clean off the remnants of any glue, if necessary.
There are no rules to how you should use apple boxes, so how you use them is up to you. You can stand on them, use them to prop up items, use them as small tables or chairs, and even staple or nail items to them. Iâve seen people run cable through the handles, and even place green fabric over one stood on end to make items âfloatâ in front of a green screen [Hack #22] .
Ultimately, you should abuse them for whatever purpose you need.
Using a small dry-erase board, you can keep track of your footage visually .
A slate is a record of information that is visually recorded onto video. In the physical sense, a slate is usually a plastic or wooden board with areas marked off for someone (usually a camera assistant) to write. When shooting on film, the slate will often have a small moving plank on top of it to make a clack sound and is sometimes referred to as a clapboard .
Tip
Clapboards are used so the audio and film images can be synchronized. Film captures only an image, so the audio is recorded separately. When you are watching the image, you can visually see the plank hit the slate, which indicates where the clack sound should be heard. When you synchronize the sound of the clack and the image of the plank hitting, the audio and film images are âin sync.â
The reason to use a slate is simple. When you are watching footage, it is helpful to know what you are watching. For example, if you were to pick up a videotape, place it in a deck, and press the Play button, it would be helpful if something were to appear on screen to inform you what you were about to watch. This is why movies and television shows have opening title sequences and why your raw footage should have a slate as well.
There are a couple of ways to make your own slate.
If youâre looking to be crafty and save as much money as you can (maybe to feed your crew?), you can use a few common household items:
One small piece of cardboard (around 8â x 11â)
One black marker
One roll of wax paper
One roll of tape
You will use the pen to draw sections onto the cardboard, almost like creating a grid. These sections will need to be labeled appropriately (as noted later). After creating and labeling your sections, cover the cardboard with the wax paper and then tape it so that it is taut. The wax paper should be tight enough against the cardboard so you can see the sections through it.
When using wax paper, you might discover that both dry-erase and permanent-ink markers can be used, and wiped off. However, the longer the ink sits on the paper, the harder it is to wipe off.
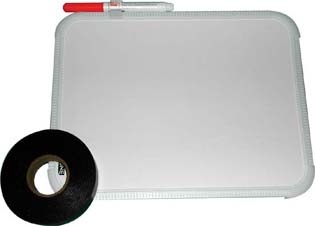
If youâre willing to spend a little money to make your slate, you will need these items:
One small whiteboard (office supply store; $5â$10)
One roll of 1/4-inch black electrical tape (home improvement store; $1â$3)
One pair of scissors
You will need to cut the black tape into a few strips of the length and width of your whiteboard. For example, if you have an 8â x 11â whiteboard, you should cut piece of tape in 8-inch and 11-inch lengths. You will be using the strips to section off areas on the whiteboard. Figure 1-12 shows the items required to make your own slate.
The amount of information you want to keep on your slate will determine how you section it off. At the very least, you will want sections to write the projectâs title, the date, the scene, and the take number. You might to keep track of the camera (if you are shooting with more than one), the directorâs name, and the audio configuration (for example, Bobâs microphone is on audio channel 1 and Sallyâs microphone is on audio channel 2). Figure 1-13 shows the slate, as completed and filled out for a shoot.

To use your slate, simply write the appropriate information on it and hold it in front of your camera before you begin to shoot. You should do this for every take . The nice feature about using either of these techniques is that you can wipe it clean when necessary. So, when shooting a lot of takes, or even a lot of scenes, itâs easy to simply wipe the previous writing off and write something new. Because itâs so easy to do, you wonât become reluctant to slate your shots, which will pay dividends when you go to watch and log your footage [Hack #5] .
Tip
If you are in dire need of a slateâif youâre on set and forgot a slate, for exampleâuse a piece of paper and a pen. Some information is better than none at all.
If you forget to use the slate before your take, you can still use it afterward. By holding the slate in front of the camera at the end of the take, you can capture the information. Even though it wonât appear where you expect it, the information is still valuable. If you want to indicate that a slate is being used at the end of a take, you can hold it upside down.
It isnât difficult to control every aspect of your camcorder from some distance away. In fact, you can shoot video without having to touch your camcorder .
Sometimes, you need to take the camcorder out of your hand and stick it somewhere. For instance, you might be trying to film an animal that doesnât like people, or you might want to film a party from the far corner of a room, while remaining in the shot yourself. Whatever the reason, being able to control the camcorder remotely makes recording more flexible.
Most camcorders come with a remote control that allows you to control many of the features they offer remotely. But these remote controls arenât generally that good; many of the ones Iâve used worked only from a few feet away. Fortunately, there are ways to get around this limitation: use a programmable remote control or use an infrared (IR) extender.
As the name implies, programmable remote controls are smarter than the average remote. They can learn the special codes that camcorder understands, allowing you to control the camcorder without the original remote. The more sophisticated models, such as the Philips Pronto range (http://www.pronto.philips.com/), can be programmed by a PC and configured to control several devices. These remotes can even string several commands together in a macro, so, you could, for instance, create a macro to switch the camcorder to low light mode and start recording from one touch of the remoteâa big timesaver.
Programmable remotes can be a real boon if youâve lost the remote, because many web sites offer downloadable configuration files for a huge range of devices. Check out sites such as Remote Central (http://www.remotecentral.com). The IR emitters in these remotes are also usually much stronger than the ones in the remote that came with the camcorder, which means that you can control the camcorder from further away.
IR remote controls work only where there is a line of sight, and thatâs not much use if you are in one room and the camcorder is in another. Fortunately, there is another simple solution: add an IR extender, such as the SmartHome 8220A (http://www.smarthome.com/8220A.html; $50).
IR extenders have two parts: a transmitter that picks up the IR signal from the remote and converts it to a radio signal, and a receiver that takes this radio signal and converts it back to infrared, which the camcorder picks up. By using radio signals, they can send remote control commands through walls or other obstacles.
If you are comfortable with a soldering iron, itâs not difficult to build one yourself. Youâll find plans for several different IR extenders at http://www.mitedu.freeserve.co.uk/Circuits/Interface/candi.htm.
If you combine a programmable remote with an IR extender and a wireless video transmitter, youâve got a remote control camcorder that you can easily put somewhere, and then retire to a nearby location to watch the video. And you can even control the camcorder, zooming in and out and stopping and starting the recording as required.
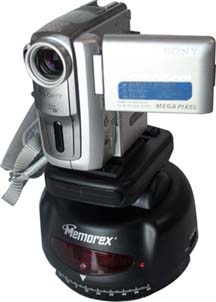
While youâre building the ultimate remote-controlled camcorder, why not add the ability to pan and tilt the camera? You can do this with a remote-con-trolled pan and tilt head: a device that fits under the camcorder and allows you to pan the camcorder left and right or tilt it up and down.
I picked up a Memorex Pan-O-Matic on eBay. It can pan 120 degrees left to right and up and down 20 degrees, and it comes with a remote control. When combined with the programmable remote (programmed to control the pan and tilt head, as well as the camcorder) and the IR extender, I have a fully controllable camcorder that could pan and tilt for maximum coverage. It also runs off batteries and fits onto a tripod to make it even easier to mount and use. Figure 1-14 shows my personal setup.
Although the particular model I use is no longer manufactured, there are other wireless pan and tilt heads available, such as the X10 (yes, they are the people behind all of those annoying web ads) Ninja Pan Tilt head (http://www.x10.com/products/x10_vk74a.htm; $99.00). This one uses a radio remote control, so you wonât need to use the IR extender to control it.
Warning
Pan and tilt heads arenât strong enough to move a large camcorder (such as a Canon XL1). They should be used only with smaller, palm-style camcorders. If you have a larger camcorder, youâll need to invest in a professional pan and tilt head that can handle the weight.
Secondhand pan and tilt heads from CCTV system also pop up on eBay a lot. You could pick up one for less than $40. However, most of them are wired models, in which you need to run a cable between the pan and tilt head and the controller. If you buy one, make sure that it comes with the controller and that you are confident about wiring it up.
âRichard Baguley
Knowing what you are recording while you shoot can save you hours, and even days, of frustration and money during the editing process .
Practically every video camera has audio and video outputs, but most people use them only when transferring video after itâs been shot. By using these outputs while you shoot, you can monitor what is being recorded. Not only does this allow you to take care of troubles immediately, such as fixing a bad audio connection, but it also enables you to take field notes that you can refer to when editing.
There are a variety of connections for carrying an audio and/or video signal. If you plan on monitoring your camera while youâre recording, you should run out to your local Radio Shack and grab the necessary cables and adaptors for your camera ASAP. While youâre there, pick up a couple of spares, since youâll lose or break one at the most inopportune time.
Monitoring your video requires you to send your cameraâs signal to a television or professional monitor. Some cameras have simple RCA jacks for audio and video, while others have either a combined A/V/Phones jack or something proprietary. Whatever your situation is, you will need to transmit the signal from your camera to your monitor.
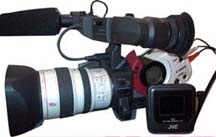
Although the image of whatâs being recorded is important, you should also turn on the cameraâs display so that the current timecode appears superimposed over the image. By displaying the timecode, you will be able to reference it in your notes. Without it, your notes will be less useful. Figure 1-15 shows a Canon XL-1 and a JVC 3-inch LCD monitor connected together via an RCA cable, which allows for great mobility.
Unless youâre setting up in a location for a long period of time, portability is key. A small, 13- to 15-inch television works well in most situations. However, if you plan on following a cameraman aroundâto shoot a documentary, for exampleâyou should use a smaller, portable LCD monitor in the 3- to 7-inch range.
When you are monitoring your audio, you will want to use headphones. The obvious reason for this is so that your microphone doesnât pick up whatâs being recorded, because your microphone will probably pick-up the audio emitting from your headphones. That would result in an echo and possibly even feedback.
The less obvious reason is that headphones allow you to hear whatâs being recorded, as opposed to whatâs being heard. The two are not the same; your microphone might pick up sounds you either canât hear or wouldnât normally pick up on.
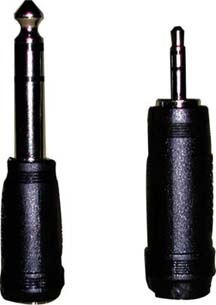
Your camera will most likely have a jack that will allow you to plug in a pair of headphones. The most common connections for your audio will be a standard headphone jack (1/4â) or a mini-headphone jack (3.5 mm), and adaptors are available to go from one to the other. Because adaptors are available, you are not limited to the type or style of headphone you choose. Figure 1-16 shows the male end of a 1/4â microphone adaptor and a 3.5 mm mini-adaptor, respectively.
If you are not personally working with the cameraâif youâve hired a cameraman, for exampleâyou should run an audio line to where you are located. If you are shooting with multiple cameras, you should at least monitor the camera (or deck) where your primary audio, such as a boom microphone, is being routed.
Getting your equipment gathered is only half of the equation. The other half involves putting the equipment to use. To do so, you need to know about the location you will be shooting. Knowing about your location will help you determine how you will power your equipment and how to run the signal from the cameras, among other factors.
A good practice is to set up a rolling cart with your equipment on it. Using a three-shelf cart, you can use the top shelf to hold your monitor, place your cup of coffee and other supplies on the middle shelf, and a bin with a variety of cables on the bottom shelf along with a surge protector. This basic setup allows you to move from one location to another quickly. If you want to be resourceful, you can even add a VCR to the mix and record a reference copy of your footage while youâre shooting.
The easiest setup is to run power and the audio/video signal via cabling. If you are near a power outlet, youâll just plop your equipment down, plug it in, and go. Depending on how far you are from the camera or power outlet, you might need a long AV cable or extension cord, respectively.
If you canât run cable from your camera to your monitor, you can still send the signal using a wireless transmitter and either display it on a television set or a compatible video receiver. There are many wireless transmitters on the market. Here are a few places to look:
- X10
VideoSENDER package (http://www.x10.com;$79.99)
- Studio 1 Productions
ShotWatcher video transmitter (http://www.studio1productions.com/shotwatcher.htm; $495)
- The Spy Store
A variety of video transmitters available at http://www.thespystore.com/videotransmitter.htm
Tip
NuTex Communications also offers a good, small, wireless video solution. NuTex is a Taiwan-based company, so if you want to purchase their products, you need to find a retailer who can import them. More information about their video sender is available at http://www.nutex.com.tw/mini.htm
Going wireless has its advantages, but there are disadvantages as well. The most obvious is the fact that some wireless frequencies can interfere with your audio/video signal. In the extreme case, I have seen cell phones with built-in walkie-talkies, such as those from Nextel, tear a video signal, rendering the video useless. Studio 1 Productions is up front about how the ShotWatcher causes problems with Canonâs XL-1. Whatever choice you make, you should run tests before you go into production.
Being able to see and hear whatâs being recorded on tape will help you fix troubles before they become problems. But it also enables you to take notes while action is occurring, which you can use when editing to refresh your memory or communicate with your editor (kind of a âmessage in a bottleâ).
In addition to the current timecode, you want to be aware of what tape is in the camera. If you have prelabeled your tapes [Hack #3] , you should note the tape number along with the timecode displayed in your monitor. If you have not prelabeled your tapes, you should be diligent about noting at least the date shot somewhere on the tape as soon as possible (such as when removing the tape from the camera).
You can take notes however you choose, but if you have a script to follow, you can use the same approach professional Script Supervisorâs use: create a lined script . If you are shooting a documentary or unscripted video, you can write down the date and time of an occurrence in an ad hoc fashion. Both approaches will enable you to create a reminder of when something occurred that you found significant to your project.
To create a lined script, you need a physical copy of the script you are shooting. You also need a pencil, a sharpener, a three-ring binder (to hold the script), and a ruler.
When shooting a scene, mark the starting timecode just above the first line of dialogue being spoken. During the scene, follow along by drawing a line down the script, until the scene ends. At that point, write down the ending timecode. You can also write notes in the margins or on the back of the page. Such notes might include continuity notes, such as how full a glass of water is, or production notes of unexpected events, such as actors improvising. Figure 1-17 shows a lined script after a few takes have taken place.
You continue the process of noting timecodes for every take, for the entire script. If you decide that a certain take is good, simply circle the timecode, as shown in Figure 1-17 This is known as a circle take and is usually an indicator of a directorâs preference. When you go to edit your project, you can refer to your lined script and immediately know where your good takes occur on tape.
Even if you donât have a script, you can (and should) still take notes while shooting. The simple fact is, you wonât remember everything that happens. This is especially true if youâre shooting over a period of days or months.

For example, you might make a mental note that Bob and Sarah kissed for the first time at 3:15 p.m. on Tuesday. But when you start editing, their kiss will be one of probably hundreds of mental notes floating around your head. Taking notes early and often will free you to concentrate on other aspects of your project.
If you are under a serious time crunch, you might not have time to log your footage [Hack #5] . In such a circumstance, your field notes will prove to be invaluable. Their worth is compounded by each hour of footage you have.
With a lined script, you can log your footage quite quickly, because you have both in and out points for your takes. Moreover, you can enter a quick note in your log comments about which takes were deemed good when they were recorded. You can even try editing together your scene using your circle takes first and finesse it from there.
Using ad hoc notes isnât as straightforward as using a lined script, but they could prove even more valuable. Unscripted projects often amass much more footage than those that are scripted. In fact, some reality television shows acquire thousands of hours of footage. Imagine sifting through 10 hours of footage with and without notes. Which would you prefer to do? Now, compound that to 20, 200, or even 2,000 hours, and Iâm sure you can begin to appreciate the value of field notes.
No matter how small your project is, you should take the to time to set up and monitor what your camera is recording.
Build an inexpensive enclosure to protect your outdoor security cameras from the weather .
A few years ago, my home burned down while I was out of town. As a longtime home automation enthusiast, I used the opportunity to rebuild my home with as much automation equipment and provisions for future expansion as I could. One of the additions was to have security video cameras scattered all around the property and outside the home. With that in mind, I installed more than two miles of RG-6 cable and Category 5 wire, one length of each to every potential camera location so that I can expand my system simply by adding cameras.
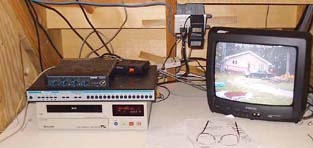
My current video setup consists of eight cameras connected to a 16-camera video controller, a 960-hour time-lapse VHS recorder, and a video-to-TV modulator for each camera. With this system, I can view the video from the cameras on my television sets, as shown in Figure 1-18.
Each camera is connected to an input on the video controller, and each output from the controller is connected to a TV channel modulator. Each modulator rebroadcasts the camera picture on a different TV channel, so to view a camera I simply turn on a TV and tune in. The modulators are programmable and can broadcast on any channel from 14 through 64, so itâs easy to set them to use unused channels on your cable system.
Tip
ChannelPlus (http://www.channelplus.com) makes a wide variety of TV modulators and camera controllers.
The cameras I use donât have microphones, but the Category 5 wire that runs to each camera could carry sound back to the modulator if I decide to buy cameras that do have microphones. Currently, I use two wire pairs, of the four available in the Category 5 cable, to run electrical power to the cameras. The camera power supplies are plugged in near the video command center, as described earlier.
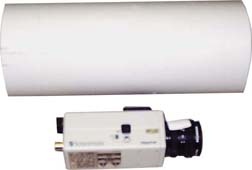
So far, everything Iâve described is standard equipment for video monitoring. The biggest challenge was the outside enclosures for the cameras. Instead of spending $50 to $100 each for commercial enclosures, I decided to build my own. These enclosures cost about $5 each and work just as well.
Hereâs what youâll need for this hack:
One length of Schedule 40 PVC pipe cut to 4 inches longer than the camera and lens
Two end caps that fit the PVC pipe
One piece of standard window glass cut to fit inside the test cap
I use 4-inch diameter pipe, which should be big enough for almost any camera, but check to make sure your cameras will fit inside the pipe you select, as shown in Figure 1-19. You can cut the PVC pipe with just about any saw, but it might require two passes with the blade, given its size. Be careful, and make the cuts nice and even. Go slowly and make sure the pipe doesnât bind and shatter.
Carefully measure the location of the cameraâs mounting hole, and then drill a corresponding hole in the pipe that will result in the cameraâs lens being set about 1 inch inside one end of the pipe. Youâll use this mounting hole with a bolt to securely mount the camera inside the pipe, during final assembly.
Drill another hole, just slightly larger than the coax cable you are using, 1 inch from the back end of the pipe. Add just one more hole, for the Category 5 wire that carries power to the camera.
Mount the camera inside the pipe and connect all the wires before you cap the end of the pipe. For the front cap, use a drill hole saw to cut a 2-inch hole in the center of the cap. Put a small bead of tub caulk around the test cap, place the glass inside, and press tightly. The caulk should spread around so that it is waterproof. Remove any caulk that has leaked onto the glass.
While the caulk is setting, which takes about an hour, connect the camera and adjust its iris and focus. A small piece of duct tape will hold the settings in place. After the lens cap has dried, slide it onto the end of the pipe. It helps to coat the edge of the cap with petroleum jelly so that it slides more easily.
Mount the case on an L-bracket, and you are in business, as shown in Figure 1-20.
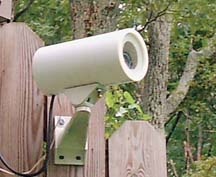
âDon Marquardt
If you have 100 hours of footage to capture and only two days to capture it, using more than one computer to transfer the footage will buy you more time .
Although digital video has promised the ability to transfer footage from tape to disk faster than real time, no editing systems have included the feature. To overcome a shortage of time, many people use multiple editing systems to transfer their footage from tape to disk. The problem is, unless you have a shared disk array and the software to share it among your computers, thereâs no way for one computer to âseeâ the footage digitized on another machine. Fortunately, you can work around this limitation by following a few easy steps.
Unfortunately, to use this hack, you canât overcome the fact that you need more than one computer and an equal number of video cameras or decks. So, gather as many as you can and set them up just as you would if they were going to be used to edit. There are two approaches to configuring your systems, depending on how you plan to edit. Both involve how you name the drives where you will be digitizing your footage.
If you have a lot of external hard drives and plan on using them to edit, make sure each drive is named differently. All of the drives will be attached to your editing system when you are finished, so you do not want conflicting drive names.
If you do not have a lot of external drives, or if you plan on keeping your footage on a single drive (or array), give your drives the same name. Taking this approach will allow you to transfer your footage to a new drive, while tricking your editing system into reading the footage off the new drive.
On average, the time it takes to digitize your footage is 1.25 to 1.50 times longer than the length of footage you have acquired. For example, one hour of footage takes up to one and a half hours to digitize. This average takes into account the physical act of loading a tape, rewinding it if necessary, organizing bins, dealing with timecode breaks, and so on.
If you have 100 hours of footage, you can safely assume it will take 125 to 150 hours to digitize. Therefore, if you have only two days before you are scheduled to edit, you can gather three systems and more than likely be done in time. The math breaks down like this:
3 (systems) x 48 (hours) = 144 available digitizing hours
Of course, to utilize every hour in the day, youâll either need a lot of caffeine or someone to work a couple of graveyard shifts.
When digitizing your footage, you need to make sure that you have enough drive space available. If you have 100 hours of footage and three available systems, you will need at least 34 hours of available space per system. Considering that one hour of DV footage takes approximately 13 GB of space, you will need about 450 GB of storage per system. The math breaks down like this:
| 100 (hours) ÷ 3 (systems) = 33.33 hours per system |
| 33.33 (hours) x 13 (GB) = 433.29 GB per system |
Plan on being able to move the drives you use to digitize to your editing system, or to have an equivalent amount of storage available on your editing system.
After you have configured your systems and checked that you have enough drive space, run a final check to ensure your footage will all be digitized as expected. Basically, make sure each system is set to digitize the footage with identical settings. For example, each system should be set to digitize NTSC DV footage at 29.97 frames per second and 48kHz two-channel audio. If your systems have different settings, your footage will more than likely be incompatible with each other.
After you have captured all of your footage, you need to consolidate it to your editing system. There are a few steps involved to accomplish this, some of which depend on how your drives are set up. In a nutshell, you need to move the footage from your digitizing systems to your editing system and import the references to your digitized footage into your project.
Depending on how you set up to digitize your footage, you have to do one of two things to move your footage. If you have elected to digitize your footage to differently named drives, you simply need to detach the drives from their respective systems and attach them to your editing system. If you have digitized to identically named drives, you have a couple steps to follow.
First, you need to copy the footage from your digitize systems to your editing system. You can do this by setting up a network connection between the machines and copying the footage, or by using a large portable drive and copying the footage from the digitize systems to the portable drive. Either way, you should initially name the drive you are copying to something different than the drive you are copying from . Only after you have copied all of your footage should you rename the drive to its originally intended name. For example, if your digitize drives are named AVD, then name the drive you are transferring to XFER . Once all the media is transferred, rename the XFER drive to AVD.
After all of your footage has been moved from your digitize systems to your editing system, you need to be able to access it. Because the footage was captured on your digitizing systems, you should go back to them and obtain the necessary information. Again, you have two options:
Copy the projects from your digitizing systems to your editing system.
Export a digitize list from each digitizing system and import it to your editing system.
The preferred and easiest method is to copy the projects. You need to open the digitize projects on your editing system and copy the bins from your digitizing projects to your editing project. When you have finished copying the bins, you should close your digitize projects and keep your editing project open. When using this solution, your media should automatically link.
If you choose to export digitize lists, you need to import the lists into your editing project and relink your media.
Export a digitize list:
- Avid
File â Export â Avid Log Exchange
- Final Cut
File â Export â Batch List
- Premiere
Project â Export Batch Listâ¦
Import a digitize list:
- Avid
File â Import
- Final Cut
File â Import Batch List at 29.97 fpsâ¦
- Premiere
Project â Import Batch Listâ¦
Relink media (you might need to select the clips that are offline):
- Avid
Avid â Bin â Relink
- Final Cut
File â Reconnect Media
- Premiere
Project â Link Media
After moving, importing, and linking your footage, you will be able to start editing your projectâsooner than if you had pursued digitizing with only one system. When youâre against a submission deadline for a film festival, editing time is a precious commodity. At times like those, a few systems to help you start editing sooner can be priceless.
If you have a set of tape logs [Hack #5] , you can import them into your digitizing systems. The best approach is to break up the logs by importing sets of tapes into each system. This approach effectively breaks up your digitizing task into manageable pieces and keeps you organized (and less confused) during what is usually a hectic time.
People who are lucky enough to have a shared disk among their systems can still use part of this approach to transfer information from one system to another. Since digitizing information isnât shared between systems automatically, you must either open one project in another or copy the bins between the two.
You can build a largeâin this case, 24â x 8'âremovable, disposable blue screen for under $30 .
As a child in the late 70s, I was first introduced to the concept of using a blue screen in film and video while watching The Making of Star Wars . The compositing technique of filming action against a solid blue background, which could be replaced by any environment or other action filmed later, opens endless possibilities to the filmmaker. Today, off-the-shelf software provides consumers with the ability to put this technique to use in amateur films.
Professional-grade compositing material can be costly, but almost any solid color material can serve as a small blue screen. One popular solution is to use fluorescent green or blue poster board to create small backdrops suitable for close-ups, but what about larger scenes?
Building your own blue screen is actually easy, and the whole project can be completed within a couple hours. The finished screen constructed in this hack is about 24 feet wide (including the wraparound to a second wall) by 8 feet high. Being made of cheap, common materials, the screen is also disposable.
The materials are lightweight, making it possible to build a portable version if needed. In fact, I produced a martial arts instructional DVD that actually employed a portable, green screen version of this setup.
I strongly recommend attempting to shoot a few shots against a small piece of material and testing how well you can composite with it using your lights [Hack #22] , camera, and software [Hack #70] before spending the time and energy to build a large screen. Once youâre confident that it will work, go ask your parent or spouse for permission to cover one or two walls with the stuff. Most of all, have fun!
In order to construct your blue screen, youâll obviously need a set of materials. This will require a run to your local strip mall to pick up the following supplies:
One blue plastic tablecloth roll, around 100â x 40â (party supply store; $13)
Nine 1â x 3â pine furring strips (home improvement store; $10)
One hardware-style stapler (the kind used for stapling insulation) with staples (home improvement store; $20)
One saw (home improvement store; $20)
One level (home improvement store; $3â$10)
Optional for mounting on basement walls: one can of Liquid-Nails (home improvement store; $4)
You should make sure you get a parent or spouse-approved room for the project. My spouse-approved room was an unused storage room in the basement. This was good for me, because it also happens to be the largest room in the house! Figure 1-21 shows me assessing the concrete wall.
The strips used to mount the blue screen are removable, but the Liquid-Nails will leave a mark on (or strip the surface of) concrete. If you screw the strips into drywall, the screws will leave holes and the strips are likely to leave a crease. If youâre mounting on concrete, youâll need to choose your poison.
The blue plastic is thin enough to see through if it lies against the wall, so you might want to use the strips even if youâre mounting on plain drywall. I couldnât really mount the plastic against the brick wall; plus, the wall would show through. The strips leave a gap between the plastic and the wall, and they make it easy to mount the plastic by just using staples.
Before mounting the strips to the wall (as shown in Figure 1-22), make sure you measure for fit and cut the strips to size. Also, use a level to mark off a horizontal line for each set of strips. Make sure to leave room for overlap at the center, so if the plastic is 40 inches wide, space the about strips 36 inches apart.

Finally, mount the strips along your markings. If youâre mounting to drywall, you could use drywall screws to mount the strips to the wall. Just remember that they will leave marks. If the drywall is a solid, light color, you might be able to staple the plastic directly to the wall. The staples will leave only small holes, but there will be lots of them.
I was mounting to cinder blocks, so I used a can of Liquid-Nails. Liquid-Nails is like caulk, but it becomes much harder and stronger. It bonds extremely well to brick, concrete, and wood. I applied the glue to the wall and the wood before mounting, which yielded good results. The glue takes 10 to 30 minutes to set, so you might want to have some extra wood around to lean against the strips to hold them in place while the glue dries.
Now, we can finally mount the blue screen itself, as shown in Figure 1-23. Roll out the length of material needed and start stapling! Work across from one side to the other. Use three or four staples per foot to prevent tearing as you pull tension on the material. After going a foot or two on the top end, work the bottom end too.
Tip
The strips are mounted horizontally for two reasons. First, this creates a single seam, horizontally, in the finished screen. This is much easier to address in post-production than several vertical seams. Second, itâs easier to work from side-to-side along two strips of material, than up-and-down and up-and-down for several shorter vertical strips.
Make sure you pull the material as tight as possible without tearing for each staple to keep the finished screen flat. I goofed when placing the pine strips, and they were too far apart to completely overlap the two pieces. To fill the gap, I just used some blue, painterâs masking tape. Figure 1-24 shows the completed blue screen, along with the painterâs tape to cover the goof.
Hopefully, you will learn from my mistake and measure it properly from the start.
To finish, I added some excess material to the top and bottom as well as to the adjacent wall. I did cover over the basement door, but the strips are screwed into the door frame rather than glued to the wall.
But does it work? Sure it does! Figures 1-25 and 1-26 show two examples of composites done using this blue screen room.

If you would like to see some of the video created using this blue screen, you can check out the movie at the following URLs:
- Windows Media
- QuickTime
You just have to love digital video technology!

âNick Jushchyshyn
Using a monopod, your video camera, and a 5- to 10-pound weight, you can create your own shot stabilizer .
If you have ever attempted to walk and record video at the same time, you have probably noticed the inevitable jiggle in you footage. In order to overcome this highly distracting result, a number of companies have brought products to market. Most notable is the SteadiCam, which is a professional solution to allow the cameraperson to move around freely while maintaining a smooth image. The problem is, SteadiCam gear is quite expensive and the knowledge of how to use it is not readily available.
Fortunately, you can couple a monopod and a standard weight (the type you might find in a gym) to create a solution to stabilize your shots. By attaching a weight to the bottom of a monopod, you will be able to counterbalance your camera when it is attached to the top. There are a great number of monopods available, but I prefer those by Bogen-Manfrotto (http://www.bogenimaging.us/) because you can really abuse them and the end cap is removable on certain models.
Once you have selected and purchased your monopod, you will want to attach a weight to the bottom of it. If your modopod has a removable end cap, you can remove the end-cap from the monopod, slide the weight onto the bottom, and reattach the end-cap. Figure 1-27 shows the result.
If your monopod doesnât have a removable cap on the bottom, then you can drill a hole through the bottom portion of the monopod, slide the weight on, and then place a bolt through your hole to keep the weight attached.
Warning
It is important that you attach the weight to the bottom of the monopod; otherwise, you will not counter the weight of your camera.
Once you have assembled your monopod and weight, place your camera on top of the monopod and secure it appropriately, as shown in Figure 1-28.
To use the stabilizer, lift and hold the monopod off the ground. As you walk around, your arm and shoulder will act as a type of shock absorber, allowing the shot to remain steady. You might even be able to jog alongside a subject while still capturing usable footage.
You should practice using this solution to understand how it affects the final look of your video. For example, try walking up a flight of stairs both while using the monopod and using just the camera by itself. You should notice a tremendous amount of difference between the two shots, but both could have their place in certain situations.
There are additional benefits of using the setup described here:
You can use the monopod in the traditional manner, by resting the bottom of the rig on the ground. Doing so will allow you to maintain the âhandheldâ look of your video, while still steadying your shots.
By extending or retracting the monopod, you can alter the counter-balance effect of the weight. This provides you the ability to refine the stabilization to your liking.
You will find you get a bit of a workout if you use the monopod for an extended period of time. If youâve got âchicken arms,â make sure you switch off from right-to-left, so you can bulk up each arm equally.
A pair of wheels, and a way to roll around on them, can make a great dolly .
When attempting to capture a scene where your subjects are separated from the background, the camera needs to be moving. If you have ever tried to record footage while walking, you have probably noticed you get a very shaky shot. Your footage is probably the equivalent of step-shake-step-shakeâ¦
Most digital video cameras come with a feature to help stabilize your footage, which is especially useful for when you are standing in one place and holding the camera. When walking, however, you usually do not wind up with the shot you envisionedâeven with the stabilization feature turned on.
Many professional camerapeople use a dolly to capture footage when they need to be moving. A dolly is basically a small, wheeled cart on which a cameraperson can sit while rolling along a given path. A variety of sporting goods, or even a wheelchair, can easily be substituted for the real thing.
Many of us do not have the luxury of having a dolly, but we can make do with a pair of rollerblades and a trustworthy friend. Strapping on a pair of rollerblades and hitting the Record button on your video camera might seem like a simple feat, but there are a few caveats of which you should be aware.
Tip
Peter Smokler, an Emmy Awardâwinning cameraman, is known to throw on a pair of rollerblades, instead of using a dolly, to film some of his moving shots.
If you plan on skating and shooting, think long and hard about where you will be concentrating. Looking through the eyepiece of your camera will greatly restrict your vision. Even looking at an LCD monitor will probably distract you from noticing any obstacles in your path. Figure 1-29 shows a cameraperson on rollerblades being pulled backward by an assistant.
Tip
Skateboards, especially longboards, are good for low-angle shots. You can sit, lay, or simply attach the camera to one, in order to obtain the shot you want.
To be blunt, find a friend you can trust, and have her push, pull, and steer you around while you concentrate on the scene you are recording. Doing so will result in far fewer bruises, scraped knees, and broken bones. Whether you have a friend help you along, or you go it alone, make sure you use a broom and sweep the path you intend to take. A very small rock can cause a very big fall.
If your subjects are walking toward you, you will need to be skating away from them in order to keep them in frame and in focus. Because you will want to capture your subjectsâ faces, more often than not, you will be required to skate backward. Even though you will have your trusty friend pulling you from behind (you did read the previous paragraph, right?), you should be comfortable moving backward on skates.
A wheelchair also makes a great dolly, because it is comfortable, stable, and requires no assembly. The use of a wheelchair as a dolly does not require much explanation: sit, point, shoot, and roll. As with rollerblades, it is best if you have someone push or pull you as you are shooting your scene.
Warning
You should avoid the temptation of a motorized wheelchair, because the motorâs noise will most likely end up mixed in with your audio.
You will also find a wheelchair works especially well on more difficult surfaces, such as carpet, grass, and dirt.
If you have a child in the family, you more than likely also have a baby stroller. Depending on the type of stroller, you can alter it to hold your camera while you push the stroller along, recording your footage. Since each type and model of stroller is different, you will need to evaluate the situation to determine the best method to attach your camera. I have found jogging strollers to be the most versatile and easiest to work with. Figure 1-30 shows a Canon XL1 camera attached to a jogging stroller.
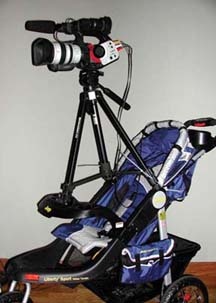
There are a great number of other possibilities for creating your own dolly. Some people go so far as to create tracks out of PVC pipe to guide their dollies along a given path. Whatever your solution, you and your audience will appreciate the look a dolly shot provides.
Get Digital Video Hacks now with the O’Reilly learning platform.
O’Reilly members experience books, live events, courses curated by job role, and more from O’Reilly and nearly 200 top publishers.

