Editing can be one of the most exhilarating aspects of a digital video project. It is also one of the most technically involved and, therefore, most error prone.
Almost all point-and-shoot digicams capture video footage in addition to still photos. But how do your turn those short snippets into your own personal movie?
If it comes down to a choice between bringing along a camcorder or a digital camera, Iâm going to choose the camera. Even though I enjoy shooting video, I like still photos even more. Plus, digital cameras are smaller, and managing pictures is easier than dealing with hours of video.
But there are times when I also want to capture a few snippets of video. Certain special eventsâsuch as a speech at a wedding, a greeting from an old friend, or a childâs first stepsâare communicated better with moving pictures and sound. Fortunately for us, most digital cameras have a respectable Movie mode, and some even have great ones.
The problem is, once you have captured the footage in your camera, what do you do with it? Before I answer that question outrightâand I willâlet me explain the difference between the video your digicam captures and the footage from a digital camcorder.
These days, most people shoot video with a digital video (DV) camcorder. DV is becoming the format of choice. After you record your movie clips, you can plug the camcorder into your personal computer and an application on your computer launches, ready to download and edit your footage. On the Windows platform, you might use Microsoftâs Movie Maker; on the Mac, you could use Appleâs iMovie or Final Cut Express.
But when you plug in your digital still camera, these applications donât seem to recognize it, even when itâs full of video. One of the reasons for this is that youâre probably plugging your still camera into an USB port, while your camcorder uses the FireWire port. Most video-editing applications look for devices connected via FireWire. But thatâs not the only difference.
Digital camcorders typically record in the DV format. Your digital still camera is using a completely different format, such as Motion JPEG OpenDML, which is an extension of the AVI file format. You can play these files on your computer by using QuickTime Player; in fact, this format is part of the QuickTime media layer. Thatâs why almost every digicam under the sun provides you with QuickTime on its bundled CD.
Playing the files is one thing, but hooking them together and editing them is another altogether. If you canât use the DV-editing software that came with your computer, then what do you do?
In this hack, the answer is QuickTimeâthe Pro version (http://www.apple.com/quicktime/buy; $29.99), that is. Sure, the free QuickTime Player you download from Apple lets your watch the movies. But the Pro version that you buy online lets you edit them too, plus do a lot more. QuickTime Pro is an extremely versatile digital-media application. But for the moment, weâll focus on editing, stitching, and trimming.
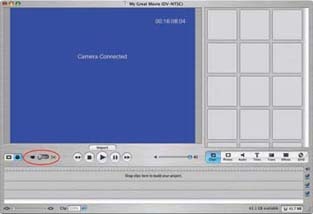
The first thing you need to do is transfer the movie files from your camera to your computer. If you donât know how to do this already, youâll have to crack open your ownerâs manual. Every camera/computer combination is a little different. If youâre lucky, your camera has what we call Mass Storage Device connectivity. That means it appears on your computer like a regular hard drive. Nikon, Olympus, and Kyocera cameras usually have this feature. In those cases, you simply open the âhard drive,â drag the movie files out, and save them on your computer. In case you donât know which ones are the movie files, they will usually have an .avi extension.
Now, you need to purchase the Pro version of QuickTime. Go to http://www.apple.com/quicktime/ and click Upgrade to QuickTime Pro. Youâll receive a software key that unlocks the Pro features in the Player version of QuickTime.
Okay, youâre in business. You need to learn only three commands in QuickTime Pro to edit your movies:
- Trim
This command enables your to snip off the yucky stuff on either end of your movie. Simply move the bottom triangles on the scrubber bar to the endpoints of the content you want to keep, as shown in Figure 4-1. When you then go to the Edit drop-down menu and select Trim, the gray area will be kept and the white area on the scrubber bar will be trimmed away. Youâve successfully snipped off the content you didnât want to keep.
- Add
Most digital cameras allow you to shoot only a few minutes of video at a time. So, to construct your movie, you have to combine these short clips into a longer presentation. Use the Add command for this purpose.
The procedure is similar to copying and pasting in a text document. First, move the bottom triangles to select the section of the video you want to copy, as shown in Figure 4-1. Then, go to the Edit drop-down menu and select Copy. That will put the snippet on the clipboard.
Now, open the snippet to which you want to add the copied content. Move the top triangle on the scrubber bar to the end of that clip; then, go to the Edit menu and select Add. The video that you copied to the clipboard is now added to the second snippet, including the sound that was recorded with it.
- Make Movie Self-Contained
After you build your movie from the snippets you captured with your camera, choose the Save As command from the File drop-down menu. Give your movie a name, and be sure to click on the Make Movie Self-Contained button. This will flatten all the layers youâve added into one movie, without any dependencies.
Congratulations! You just made your first featurette from short clips captured with your digital still camera. Regardless of the platform on which you created the movie, you can play the movie on both Mac and Windows. If you want, you can even burn it to CD and share with friends.
To help you make the best mini movies possible, here are a few shooting tips:
Capture all your video at the same frame rate, preferably 15 fps (frames per second) if possible.
Hold the camera steady and donât pan. You canât lock in the exposure when shooting video with most digicams, so you donât want lighting changes in your shots. The camera will try to adjust, creating annoying lighting shifts. Instead, focus on your subject, shoot 15 to 60 seconds of video, and then pause. Set up your next shot and go from there.
Donât use Automatic White Balance. You could get color shifts in the middle of your clip, which you will find most annoying. Instead, choose one of the presets, such as Cloudy, to lock in the white balance setting.
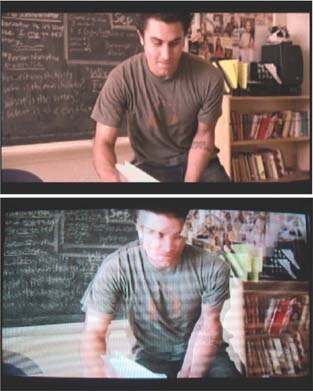
Frame your subjects tightly, as shown in Figure 4-1. Digicam movies are usually only 320 x 240 pixels in dimension, so you canât afford to stand back too far; if your frame is too wide, your viewers wonât recognize the subject.
Beware of the microphone port. Itâs usually close to your fingers. Donât cover it up or run your hand across it while recording.
Now itâs time to go shoot something and combine those clips into a movie. Look out, Martin Scorsese!
âDerrick Story
You can make better home movies and other videos with XPâs built-in video maker.
XP is Microsoftâs most media-aware operating system, and it comes with built-in software for making and editing videos and home movies: Windows Movie Maker. (To run it, choose Start â Programs â Windows Movie Maker.) But making videos properly with it can be tricky, so check out these tips on how to make better home movies and videos.
Tip
For many more multimedia hacks specific to Windows XP, check out Windows XP Hacks by Preston Gralla (OâReilly), from which this hack is excerpted.
Windows Movie Maker lets you edit movies, and add special effects and titles, but it all starts with capturing the video properly. So, first make sure you bring the video into your PC in the best way.
If you have an analog video camera or videotape, you need some way of turning those analog signals into digital data [Hack #37] . You can do this via a video capture board, or by using a device you can attach to your FireWire or USB port. If youâre going the route of a video capture board, make sure the board has XP-certified drivers; otherwise, you might run into trouble. To find out whether a board has XP-certified drivers, search the Windows Compatibility List at http://www.microsoft.com/windows/catalog.
If you have a USB port, you can import analog video with DVD Express, Instant DVD 2.0, or Instant DVD+DV, all available from http://www.adstech.com. Theyâre hardware/software combinations; to get the video into your PC, connect the analog video device to the USB Instant Video or USB Instant-DVD device, and then connect a USB cable from the device to the USB port on your PC. (A similar product, called the Dazzle Digital Video Creator, will do the same thing. For details, go to http://www.dazzle.com.)
Check your system documentation to see what type of USB port you have. If you have a USB 1.1 port, you wonât be able to import high-quality video, and youâd be better off installing a video capture card. USB 2.0 will work fine, though.
If you have a FireWire-enabled PC, youâre also in luck, because its high-speed capacity is also suitable for importing video. Youâll have to buy extra hardware, called SCM Microsystems Dazzle Hollywood DV-Bridge. Plug your RCA cable or S-Video cable into Hollywood DV-Bridge, and then plug a FireWire cable from Hollywood DV-Bridge into your FireWire port, and youâll be able to send video to your PC. Itâs available at online stores such as http://www.buy.com.
Once youâve set up the hardware and your camera, recording the video is easy. Open Windows Movie Maker, turn on your camera or video converter, and choose File â Capture Video.
If you have a digital video camera or webcam, you shouldnât need any extra hardware to capture video from it, as long as you have a FireWire port on your PC. These devices generally include built-in FireWire ports (the cameras might call the port an IEEE-1394 port or an i. LINK port). If you donât have a FireWire port on your PC, you can install a FireWire port card. These generally cost much less than $100. Make sure the card is Open Host Controller Interface (OHCI)-compliant.
When you plug your digital camera into a FireWire port and turn it on, Windows will ask you what you want to do with the camera. Tell it you want to Record in Movie Maker, and it will launch Movie Maker to the Record dialog box.
Before you start recording, youâll need to name your video file, as well as select where to save it. Windows should default to your Videos folder, which is a good place. After assigning your video a name, along with a place on your hard drive, you need to select how you want Movie Maker to record your video.
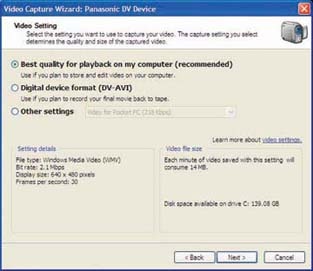
You will then be able to select how Movie Maker should digitize your footage, as shown in Figure 4-2. This is your chance to change your video settings, and choosing the proper setting is perhaps the most important step in creating your video.
Look at the Other Settings drop-down box in Figure 4-2. By clicking on the radio button, the drop-down box becomes active and you choose the quality of the video youâre creating, which is the most important setting. What you choose for this setting will depend on the input source; digital video cameras, for example, let you record at a higher quality than analog video cameras, so they will give you a wider range of options. Movie Maker comes with a number of preset profiles, including three basic ones: âDV-AVI (NTSC),â âHigh quality video (NTSC),â and âVideo for broadband (512 Kbps).â When you choose your profile, Movie Maker tells you how many hours and minutes of recording time you have, based on your disk space and the disk requirements of the profile. For example, you might have 193 hours of recording time based on the DV-AVI setting, but 1,630 hours based on the âVideo for broadbandâ setting.
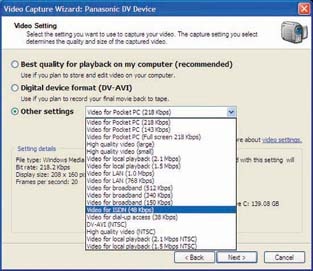
Those three profiles arenât your only choices, though. You can choose from a much wider variety of profiles (as a general rule, I suggest doing that), based on what you plan to do with the eventual video. Do you plan to post the video on the Web? Just play it back at home? Run it on a personal digital assistant? These other profiles are designed for specific purposes like those.
To select a profile, choose one from the Other Settings drop-down list, shown in Figure 4-3, with a range of profiles from which you can choose. Theyâre prebuilt for specific uses. For example, if youâre recording video to post on the Web, select one of the âVideo for broadbandâ profiles. If youâre recording for color PDA devices, select one of the âVideo for Pocket PCâ profiles. And, if youâre recording to display your project on a standard TV, choose the DV-AVI profile.
Whenever you choose a profile, youâll see underneath it the frame size of the video and the frames per second. Hereâs what the settings mean:
- File type
The format of the file that will be created. Some formats can play using only certain media players, like Windows Media Player.
- Bit rate
The bit rate of the recorded videoâthe higher the bit rate, the greater the quality.
- Display size
The size of the video, in pixelsâfor example, 740 x 480, or 320 x 240.
- Frames per second
The number of frames captured per second. For smooth video, you need 30 frames per second, which is the âhigh-qualityâ setting. The medium-and low-quality settings record at 15 frames per second.
To help you make the best choice among profiles, Table 4-1 shows the settings for all the Movie Maker profiles.
Table 4-1. Settings for Movie Maker profiles
|
Display size |
Bit rate |
Frames per second |
Disk space per minute | ||
|---|---|---|---|---|---|
|
Video for Pocket PC (218Kbps) |
208 x 160 pixels |
218.2 kilobits per second (Kbps) |
20 |
1MB | |
|
Video for Pocket PC (143Kbps) |
208 x 160 pixels |
143.3Kbps |
8 |
1MB | |
|
Video for Pocket PC (Full screen 218Kbps) |
320 x 240 pixels |
218Kbps |
15 |
1MB | |
|
High quality video (large) |
640 x 480 pixels |
variable |
30 |
variable | |
|
High quality video (small) |
320 x 240 pixels |
variable |
30 |
variable | |
|
Video for local playback (2.1Mbps) |
640 x 480 pixels |
2.1Mbps |
30 |
14MB | |
|
Video for local playback (1.5 Mbps) |
640 x 480 pixels |
1.5Mbps |
30 |
10MB | |
|
Video for LAN (1.0Mbps) |
640 x 480 pixels |
1.0Mbps |
30 |
7MB | |
|
Video for LAN (768Kbps) |
640 x 480 pixels |
768Kbps |
30 |
5MB | |
|
Video for broadband (512Kbps) |
320 x 240 pixels |
512Kbps |
30 |
3MB | |
|
Video for broadband (340Kbps) |
320 x 240 pixels |
340Kbps |
30 |
2MB | |
|
Video for broadband (150Kbps) |
320 x 240 pixels |
150Kbps |
15 |
1MB | |
|
Video for ISDN (48Kbps) |
160 x 120 pixels |
48Kbps |
15 |
351KB | |
|
Video for dial-up access (38Kbps) |
160 x 120 pixels |
38Kbps |
15 |
278KB | |
|
DV-AVI |
720 x 480 pixels |
25.0Mbps |
30 |
178MB | |
|
High quality video (NTSC) |
720 x 480 pixels |
variable |
30 |
variable | |
|
Video for local playback (2.1Mbps NTSC) |
720 x 480 pixels |
2.1Mbps |
30 |
14MB | |
|
Video for local playback (1.5Mbps NTSC) |
720 x 480 pixels |
1.5Mbps |
30 |
10MB |
After selecting your profile, you need to choose whether to capture the entire tape or just part of it. If you choose to capture the entire tape, Movie Maker will rewind your tape for you (if youâre using DV), and capture your footage automatically. If you choose to capture only part of it, you will need to cue your tape to the section you would like to capture. You can capture more than one section manually, without having to go through the entire process of naming your video and selecting a profile again. Figure 4-4 shows the Capture Wizard dialog box, set to capture the entire tape currently in the camera.
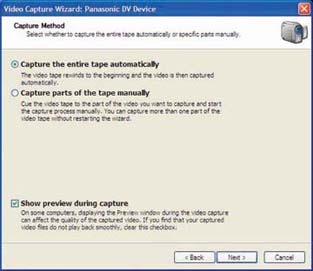
You can also select to view your footage while Movie Maker is performing the capture sequence. This is a nice feature because you can make sure you are capturing the footage you expect to useâ¦no surprises later on. Once youâve made your selection, click the Next button and Movie Maker will proceed to capture your footage.
If you use Movie Maker to make or copy your own videos and burn them to DVDs [Hack #79] , consider these tips:
The USB 1.0 standard is not fast enough to connect a camera or other video input to your PC. Its throughput of 11Mbps isnât fast enough for capturing high-quality video, which is 30 frames per second with 24-bit color at a resolution of 640 x480, and requires speeds of at least 210Mbps. USB 2.0, which has a speed of 480Mbps, and FireWire, which has a speed of 400Mbps, will work, however.
Make sure you have a substantial amount of free hard-disk space if youâre going to burn your videos to DVDs. The video will be cached onto your hard disk before itâs burned to DVDs, so youâll typically need several free gigabytes.
Defragment your hard drive before creating and burning DVDs for best performance. If you have a second hard drive, use that for DVD creation rather than your primary hard drive. Regardless of the speed of your CPU, turn off any background applications that are running when you import video and create your DVD.
If youâre burning high-quality video to a DVD, figure that youâll be able to fit about an hourâs worth on a single DVD. At a lower quality (lower bit rate), you can fit up to about two hours on a DVD. Keep in mind, though, that if you write at the lower bit rate, the DVD might not be able to be played on a set-top DVD player, though it will work on your PCâs DVD player.
Thereâs no single accepted standard for DVD burning, so not all DVD disks that you burn will work on all set-top DVD players. Generally, most set-top DVD players will play DVD-R discs, but all of them might not play DVD-RW or DVD+RW disks. Manufacturer information canât always be trusted, but check the companiesâ web sites for the latest details.
After youâve created your video and youâre ready to burn it to a DVD, set aside plenty of time. It can take up to two hours to burn a one-hour DVD, depending on your CPU and drive speed.
If you want features beyond those offered by Windows Movie Maker, try a variety of software from Ulead Software, including Ulead VideoStudio, Ulead DVD Movie Factory, and Ulead DVD Workshop. They go far beyond basic video-editing tools, and they let you use transitions and add special effects and menus. The software also includes backgrounds, preset layouts, and music you can add to your videos. In addition, they will burn to DVD, VCD, and SVCD and can save files in a variety of video formats. Theyâre shareware and available to try for free, but youâre expected to pay if you keep using them. For details, go to http://www.ulead.com.
âPreston Gralla
Apple includes its iMovie video-editing application with its computers. You can use it to create movies of almost any length.
If youâve purchased a new Macintosh computer, the iMovie HD application can be found in the Applications folder. If you have an older Mac, or an older version of iMovie, you can purchase it as a part of the iLife application suite for $79. The iLife suite includes iDVD (for creating DVDs), GarageBand (for creating music), iTunes (for organizing music), and iPhoto (for organizing digital pictures), in addition to iMovie HD.
Using iMovie HD, you can edit your digital video and then distribute it on videotape, on the Web [Hack #82] , via email, or even on a cell phone [Hack #89] . But to do so, you first have to transfer your video to your computer. You can import video into iMovie using USB, IEEE-1394 (a.k.a. FireWire, i.LINK), or directly from an iSight camera.
In order to get video from your camera to your computer, you need to connect the two using the appropriate cable.
If you have connected your camera using a USB cable, you can import your video by dragging the files off your camera (which appears as a hard disk on your Desktop) and into the iMovie window. You can also drag the files onto your hard disk and then import them into iMovie at a later date.
If you are using a DV, HDV, or iSight camera, you should import your video using a FireWire cable and iMovieâs built-in process. Once your camera is connected, launch iMovie HD, name your project, and then switch to Camera mode. You can switch to Camera mode by clicking on the switch located just below the large video view. Figure 4-5 shows the iMovie interface and highlights the Camera mode switch.
If you want to transfer your entire tape, make sure your videotape is rewound to the beginning before proceeding to transfer your footage. You can rewind your tape by manually doing so on your camera or by pressing the Rewind button in the iMovie window.
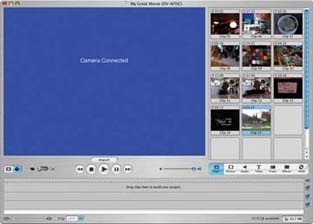
To start the video transfer, click the Import button. The process will begin by playing your video, which will appear in the large monitor view just above the Import button. While importing, iMovie will perform Automatic Scene Detection and separate your footage into individual clips based on breaks in your video. These separate clips will appear on the right side of the iMovie window, in the Clips view, as shown in Figure 4-6.
iMovie HD also has two features that will place your clips in your timeline automatically. The first simply places your clips on your timeline while you transfer your footage. To enable the feature, choose iMovie HD â Preferences â Import â Movie Timeline.
The other feature, called Magic iMovie, will not only place your clips on your timeline, but will also place transitions (such as dissolves) and add a sound track. If you want, iMovie will also create a DVD for you, or you can refine the timeline that has been created for you.
Both of these features can give you a jump-start on your project.
To start editing your movie, switch from Camera mode to Cutting mode (this is the other setting on the Camera mode switch). You will then be able to work with your timeline. To add a clip to your timeline, simply drag it from the clips view onto your timeline. You can also alter the length of a clip by trimming, cropping, or splitting it.
While editing, youâll be able to add transitions and sound effects, create titles, and even add special effects. All of these features are available through buttons located under the Clips view.
- Clips
- Photos
Enables you to access and use pictures from your iPhoto library. You can also apply the Ken Burns effect when placing pictures on your timeline. This effect performs a pan and zoom over your picture to add motion to an otherwise static image.
- Audio
Lists audio built-in to iMovie, such as sound effects, as well as music and audio files in your iTunes library.
- Titles
Allows you to add a variety of titles to your movie, including titles as simple as those used for music videos to ones that spin in 3D and bounce around the screen.
- Trans
Makes a list of transitions available, to be used between clips on your timeline.
- Effects
If you want to alter the look of your video, you can select from a variety of effects, including Aged Film, Fog, and Letterbox.
- iDVD
iMovie and iDVD are well integrated, so you can add Chapters to be used on a DVD directly from the iMovie interface. You can also create an iDVD project by simply clicking one button.
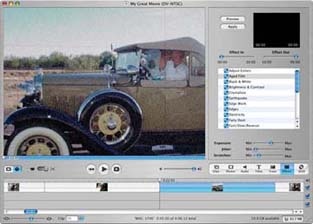
The Clips view will change based on the button you select. Figure 4-7 shows the Effects view after the Aged Film effect has been applied to a clip in the timeline.
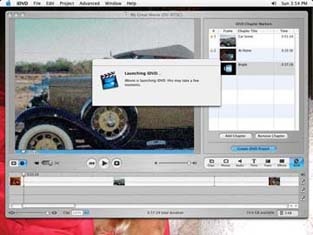
As previously mentioned, iMovie and iDVD are well integrated. From the one-click DVD feature of Magic iMovie, to the easy creation of Chapters and iDVD project files, iMovie provides an easy transition to create a complete DVD for viewing on a DVD player. To create a DVD from your iMovie project, click the iDVD button and then press the Create iDVD Project button. Figure 4-8 shows iMovie in the process of creating an iDVD project.
After creating your iDVD project, you will need to author your DVD [Hack #79] . Once youâre satisfied with your DVD, click the Burn button on the iDVD window, insert a DVD, and wait for your disc to be created.
iMovie is an incredibly powerful and feature-rich editing application. However, it does have limitations. When you find those limitations too discouraging, you should evaluate other editing applications available. Two of the more powerful applications are Appleâs Final Cut Express (http://www.apple.com/ finalcutexpress/; $299) and Avidâs Xpress DV (http://www.avid.com/products/ xpressdv/; $695). Avid also offers a more limited, but free, version of its software called Avid FreeDV (http://www.avid.com/freedv/; free).
These applications are essentially âlightâ versions of applications that are used by television and film professionals on a daily basis.
Who says you have to shoot all your movies horizontally? Just as with stills, sometimes itâs fun to turn the camera on its side. But when you upload your movies to your computer, theyâre turned the wrong way! Hereâs how to fix that.
When making movies with your digicam, you donât want your compositions limited any more than you do when shooting stills. Imagine if someone told you that you could shoot only horizontal pictures for the rest of your life. Youâd tell them where to go stick their memory card.
The problem with movie making is, you might shoot your video with a vertical orientation, but when you upload the snippets to your computer, everything is horizontal. And 9 out of 10 chiropractors will tell you not to crane your neck sideways to watch these movies.
Fortunately for the health of your entire viewing audience, there is a simple fix.
After you upload the video to your computer, open a snippet in QuickTime Pro, the versatile movie viewing/editing application.
Tip
If youâve not yet upgraded to QuickTime Pro (http://www.apple.com/quicktime/buy; $29.99), I canât recommend the move more highly.
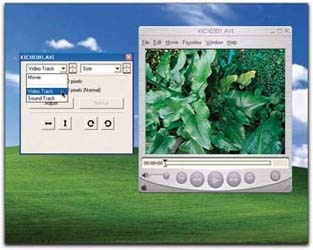
From the Movie drop-down menu, choose Get Movie Properties. Youâve just tapped into one of the most powerful areas of QuickTime Pro. There are two drop-down menus at the top of this dialog box. From the left one, choose Video Track, and from the right one, select Size, as shown in Figure 4-9.
Youâll see that the dialog box changes content and options as you choose different items from the drop-down menus. In this case, two of the goodies you can access are found in those rotation arrows in the lower-right corner. Click on the one that rotates your movie in the desired direction, as shown in Figure 4-10. Like magic, your movie and its controls are now oriented the way you originally intended.
Either way you do it, you can now edit, trim, and stitch together movie clips to your heartâs content. Of course, all of your movies have to be oriented the same way; otherwise, youâll get some strange-looking results.
Your editing system is expecting ânormalâ video in a horizontal position, so you need to create a custom setting. Fortunately, this is an easy task to achieve; the only setting youâll have to change is the height and width of the video. In fact, all you have to do is switch the two numbers.
To edit your vertical footage, you need to create a new project and change your timeline settings accordingly. For example, if you shot on DV, change your width and height from 720 x 480 (720 x 576 PAL) to 480 x 720 (576 x 720 PAL):
- Final Cut
Sequence â Settings â General
- Premiere
Custom Settings â General â Editing Mode â Video for Windows

Tip
If your editing system does not allow you to alter the timeline settings, and you are stuck at a resolution such as 720 x 480, you can edit your video as is and then export it as a QuickTime movie. You can then perform a rotation on the complete project.
After setting up your project to handle a vertical video, you need to alter your footage to match.
Even though youâve shot your video vertically, neither your camera nor your editing system will be aware of that fact. Therefore, it is essential that you rotate your video 90 degrees, as outlined previously. Because your video has already been transferred to your computer, and rotated, all you need to do is import the footage into your editing system.
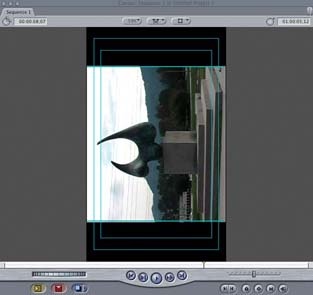
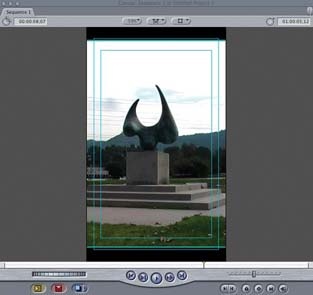
After importing your footage, you can proceed to edit your movie just as you normally would. You will know if your video imports correctly as soon as you place it on your timeline. Figure 4-11 shows a vertical video as imported by an editing system without rotation, and Figure 4-12 shows the same image after it has been rotated appropriately.
Thereâs something inherently interesting about a vertically framed movie. And itâs an option I encourage you to try as appropriate subjects present themselves.
Simple Rotate (http://www.imovieplugins.com/plugs/simplerot.html) is a $1.50 shareware iMovie special effects plug-in.
âDerrick Story
easily manage a project. Submastering helps editors deal with these situations.
Whether you are dealing with a small project or a large one, changes are an inevitable result of the editing process. As you are editing, the more changes you make, the more your mind begins to swirl. This is especially true when your changes are being influenced by a third party, such as a director or producer. By creating a submaster, you will limit the number of tapes you need to handle over time.
Tip
The practice of submastering can be confusing. In order to avoid confusion, make sure you have a good tape numbering scheme [Hack #3] in place and you are exceptionally organized.
When youâre dealing with a lot of footage, thatâs a perfect time to create a submaster. You can create a timeline and go through your footage to locate selects (i.e., footage that you know you want to use). You should not be editing this footage into anything really meaningful, but rather grabbing the footage you find you will use in your final timeline.
Tip
You can create a select reel by digitizing only the footage you plan to use or by sifting through all of your footage. If you are going to digitize only what you plan to use, you will probably log your footage ahead of time [Hack #5] .
When you have created a timeline that contains enough footage to fill a tape, you can output and create your submaster. After creating your submaster, you can then create a new timeline and continue the selection process. You should not delete your timeline, as it is a reference to where your footage originated.
The process of creating a submaster is the same as the process of creating a master tape. Once you have assembled your timeline, simply output it to tape.
Warning
If you have digitized your footage using compression, such as OfflineRT for Final Cut or 15:1 for Avid, you cannot submaster your footage. In order for the process to work, your footage must be uncompressed.
- Avid
Clip â Digital Cut
- Final Cut
File â Print to Videoâ¦
- Movie Maker
File â Save Movie Fileâ¦
- Premiere
File â Export â Export to Tape
- iMovie
File â Share â Videocamera â Share button
The result is a tape you can use to edit with in the future. Keeping a copy of your project that relates to the tape you have created is a good process. In other words, save a copy of your editing project immediately after outputting to tape.
If you want to continue to work on the project after outputting your submaster, you should work on a copy of the saved project. Otherwise, if you continue to work on the project, you will lose any references you may need at a later date. This is an essential step and a good habit to get into, even if you are not using the submaster process.
You use a submaster exactly as you use master tapes. A submaster effectively becomes a master tape within your project. The only difference is that it is a compilation of footage from various master tapes.
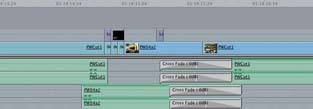
When using a submaster, what is most important is that you can distinguish it from your other tapes. You should make sure your tape-numbering scheme allows for you to make the required distinction. A simple number like PWCut1, representing Peterâs Wedding Cut #1, works quite well. Figure 4-13 shows a timeline utilizing a submaster.
If you have created a submaster from an edited project, you can create a new timeline, digitize the submaster, and then cut into the submaster. By doing this, you will have a much cleaner timeline and, if your system has been slowing down (i.e., dropping frames), possibly allow your system to perform better. The performance improvement will occur because your hard drive will not have to jump around so much to play a lot of different files.
A computer monitor doesnât operate in the same way as a television. When editing, if you use only a monitor, you might get a few surprises when you watch your project on a TV.
Televisions display images using interlacing to create an image on screen. With interlacing, every frame of video is made up of two fields: an upper and a lower. These fields are drawn to the screen in alternating patterns, so that one field draws and then the other draws, to create a frame of video. So, if your television displays 29.97 frames per second, it displays 59.94 fields per second.
Computer monitors display images using progressive scanning, and at variable rates. Progressive scanning draws the image to the screen in one pass. Because of the difference between a television and a computer monitor, what you view on your computer monitor when editing isnât necessarily what will appear on your television. By attaching a television to your editing system, you wonât run into any surprise images when youâre done. Figure 4-14 shows an image in which each field is from a different frame.
Warning
When attaching your camera to your editing system, you might discover that your video displays on your cameraâs LCD viewfinder (if it has one). The vast majority of LCD viewfinders do not interlace the image they display. If you want to use the LCD viewfinder, instead of attaching an actual television, make sure the LCD is interlacing the image.
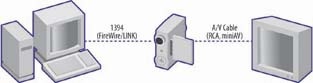
To wire your system together, attach your camera to your editing system using an IEEE-1394 cable (a.k.a. FireWire or i.LINK). From your camera, run a video cable to your television, just as you would if you were going to play video directly from your camera. This might involve using RCA cables or a specific cable supplied by the manufacturer of your camera. For example, the Panasonic PV-GS120 uses a mini-AV cable to send its audio/video signal, whereas the Canon XL2 provides options of BNC, S-Video, and RCA connections.
Once youâve wired your system, your audio and video signal should be traveling in the following way:
From your editing system to your camera (where it converts from digital to analog)
From your camera to your television
Figure 4-15 illustrates the connections required for viewing video on an external television.
You can then turn on your editing system, your camera, and your television. (Yes, your electric company should send you a nice holiday gift to say, âthank you,â but they wonât.)
To send your video signal from your editing system to your television, you need to configure your system appropriately:
- Avid
Automatically configures for external sources
- Final Cut
View â External Video â All Frames
- Premiere
Project â Project Settings â General â Playback Settings ⦠button âVideo Playback â Play Video on DV Hardware
- iMovie
iMovie HD â Preferences⦠â Playback â Play DV project video through to DV camera
Once configured, the video you are working with on your editing system will appear on the television.
When using this setup, you might notice that the audio and video seem out of sync. More than likely, you are viewing the video on your television, while you are hearing the audio from your computer. Because the signal from your editing system needs to travel over the various cables and hardware (such as your camera) to your television, there is a slight delay from the time the signal is sent to the time it is displayed. Because the audio is not being heard from the same source (your television), it is out of sync with what you are viewing.
The solution to the problem is to monitor both your audio and your video from the same source. So, if you are using the television for video reference, you should make sure your audio is being heard through it as well. This might require you to configure your system to send the audio signal externally, in addition to your video signal.
Working with an external television provides a few more benefits, beyond being able to avoid incorrectly interlaced frames. For one, your television will display only the video image, so it will probably appear larger than it does on your monitor. Additionally, if you are working with other people, they wonât have to peer over your shoulder while you work. Finally, being able to view your video on a television can be gratifying, even if it is in a narcissistic way.
If youâve closed captioned your project, you can use a small amount of Perl code to extract a script for others to read.
In the business of video entertainment, if you sell a project to someone, she will probably request a script with timing information, also known as an As Broadcast Script in television. However, with a documentary or reality-style program, you might not have a script to give them.
Creating an As Broadcast Script is a time-consuming and tedious process. It involves listening to a section of audio and typing exactly what is heard. Often, a transcriber has to listen to a section of audio three or more times in order to accurately capture what is being said.
However, a closed caption file is regularly created in order to fulfill government requirements. With this hack, you can use the information in that closed caption file to create a script after the fact.
Even if youâve never programmed a computer before, you might someday find yourself motivated enough to type a few lines of Perl, a computer programming language. If faced with transcribing for hours on end, tediously listening to audio over and over, or spending 5 minutes typing in a program and another 20 minutes formatting its results, Iâll bet 9 times out of 10, youâll choose the program. In fact, once youâve used the program once, you might become addicted to using it.
Tip
The following Perl program was written for a television production company that had 140 hours of video that needed As Broadcast Scripts within two weeks. A rough estimate is that it takes 5 hours for a transcriber to complete one hour of video. Therefore, there was roughly 560 hours of work to be completed.
The process of closed captioning involves inserting codes onto line 21 of a video signal. If that doesnât make sense, think about how NTSC DV is 720 x 480, which means the video signal is 720 lines wide by 480 lines high. Closed caption data would be placed on line 21 of 480.
Just like most computer documents, a closed caption file can be opened in a regular text editor. The results, however, arenât pretty. Hereâs an excerpt from an actual closed caption file (.tds file extension):
	ù01000013
	úFû14,û14)û13tû17"û11.Coming up:û14tû17"Whoa, wait.
	ù01000112
	úFû14 û14.û14tû17!û11.That's got meû14,û14/
	ù01000209
	úFû14 û14rû17#a little nervous.û14,û14/
	ù01000316
	úFû14 û14RThese guys are not likeû14rû17!my friends back home.û14,û14/
Looking at the contents, you can see where there are sentences being spoken. In this example, you can clearly see the words Coming up. The rest of it is messy.
But if you look closely, you might discover that there is a pattern: ù(some number), then a sentence, then another ù(some number), and so on. The number following the ù is eight characters long. Coincidentally, so is timecode.
So, you can read ù01005108 as 01:00:51;08.
Perl works well with text. It can be intimidating to look at and difficult to read, but it can perform wonderful tasks and save a lot of time when used. If you are using Mac OS X or Linux, Perl is most likely already installed on your computer. If you are using Windows, you can download Perl from Active State (http://www.activestate.com/Products/ActivePerl/; free).
The following is a Perl script to reformat .tds closed caption files:
#!/usr/bin/perl
# for Caption Center (.tds) files
while (<>) {
# remove everything before and including BeginData
$_ =~ s/.*BeginData//g;
# remove all of the >>
$_ =~ s/>> //g;
# remove all of the úF
$_ =~ s/\x9cF//g;
# remove all of the û followed by 3 characters
$_ =~ s/\x9e(â¦)/ /g;
# reformat the timecodes⦠i.e. ù01005108 to 01:00:51;08
$_ =~ s/\x9d([0-9][0-9])([0-9][0-9])([0-9][0-9])([0-9][0-9])
/\r\1:\2:\3\;\4\t\t/g;
# replace all of the places where there is a tab-tab-return with a single tab
$_ =~ s/\t\t\r/\t/g;
# print everything back out
print $_;
}Thatâs it. Thatâs the entire application. Fin. Done. Out.
Save the file to your computer and name it CCConverter.plâor whatever you want; itâs your application after all.
Once youâve written your Perl application, all you have to do is run your closed caption files through it. To do so, enter the following on the command line:
               perl CCConverter.pl
               <MyScriptCC.tds>MyScript.txt
Tip
To run a command line program on:
Mac OS X: open the Terminal application, located in the Utilities folder.
Windows: open the Run⦠item from the Start menu, then type command.
When running the Perl application, it will be easiest to do so from the same directory where the application resides.
Youâll want to enter the name of your closed caption file for MyScriptCC.tds and then name the resulting file as MyScript.txt. The < indicates to Perl which file you want to read and the > indicates which file you want to write.
Here is the original excerpt, as converted by the Perl program:
01:00:00;13 Coming up:  Whoa, wait.
01:00:01;12 That's got me
01:00:02;09 a little nervous.
01:00:03;16 These guys are not like  my friends back home.
So, with the three or more hours, you save per script, you should find plenty of time to explore more hacks, spend time with your family, or maybe even get outdoors and breathe some fresh air.
Whether youâre working from a single source or multiple sources of video, occasionally an edit âfeelsâ wrong. Using a simple editing technique, you can help an edit become less jarringâor even unnoticeable.
Every edited piece of video attempts to tell a story, from the 30-second commercial to the three-hour documentary. To tell a story using video, it is necessary to cut from one section of video to another. Yet, the two sections of video you edit together donât always flow together. To overcome the jarring nature of some edits, you can use a technique called a split edit (sometimes referred to as an L-cut or J-cut) to help smooth the transition.
To create a split edit, you need to be able to edit the audio and video portions of your footage separately in your timeline. This means that for some editing systems, such as Final Cut Pro, you need to either unlink or lock your audio and video tracks. Other systems, such as Avid Xpress, allow you to create split edits with no additional steps.
You can create a split edit by continuing the audio section of your footage after the video section has been cut, or vice versa. In other words, the audio (or video) will continue playing after the video (or audio) has ended. To do this, you need to roll the appropriate track backward or forward in your timeline.
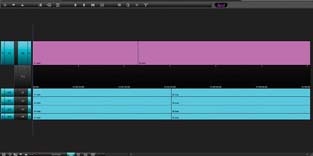
To create an L-cut, you need to have the audio portion of your footage play longer than the video portion. You can either roll the video track backward in your timeline or roll the audio track forward in your timeline. You can use this type of edit to cut to someone listening during a conversation. Figure 4-16 shows an L-cut in an Avid timeline. Notice the audio trailing the video.
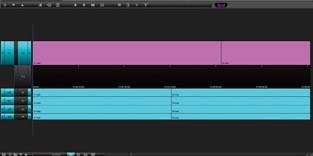
As you might expect, a J-cut is the opposite of an L-cut. Therefore, you need to roll your video forward in your timeline or roll your audio backward. A J-cut is useful to cover jarring edits, as the audio prepares the viewerâs mind for a change in imagery. Figure 4-17 shows a J-cut in an Avid timeline. Notice the video trailing the audio.
Although audio comprises only a small amount of an audio-video signal, it is a vital part of the movie-making process. Using audio, you will be able to smooth over cuts that would otherwise be jarring and disruptive to your story. The composition of your footage, along with the type of transition you are attempting to accomplish, will determine which type of cut to use.
If you are editing a conversation, you can use a split-edit to transition from one speaker to another. The result is that the person listening is on screen for a portion of the conversation. Using a split edit in this situation creates a much more visually appealing scene, even though the reason for the appeal is the underlying audio.
You can use also split edits to overcome bad video or audio. For example, if your footage has an unwanted composition, such as someone talking underneath a shot, you can use a J-cut to introduce another angle of the shot, or perhaps a shot of a commentator, while still keeping the necessary audio.
After learning to use split edits effectively, youâll not only use them regularly, but youâll also become more aware of their use in the movies you watch.
In Rope, Alfred Hitchcock attempted to produce a cut-free movie. Although he was limited by the size of the film magazines, resulting in only 10 minutes of useable footage at one time, he created a true piece of art. Of the nine cuts in the movie, only four are noticeable.
Hitchcock accomplished the feat by planning ahead and shooting action that would fill the frame at the points he needed to make a cut. For example, he would have someone walk in front of the camera when he was running out of film. When the person filled the frame, and the viewer was unable to see anything other than the fabric of actorâs clothing, a cut would occur. The following shot would simply continue where the previous one ended: a full frame of fabric.
By combining Hitchcockâs seamless style with the technique of split edits, you can create your own, modern-day, cut-free video.
Weâve all seen dramatizations of, or heard about, the day when you could be watching a television show and click on an actorâs shirt to find out about it or even buy it. That day is today.
When viewing digital video on a computer, you gain some cool features not available on a DVD or videotape, such as linking to a URL [Hack #84] and allowing people to jump to bookmarks in a movie [Hack #49] . Another feature, called a hotspot, enables viewers to make parts of a video react when they click on corresponding sections of the image on screen. By combining hotspots with URLs and bookmarks, you can create an interactive video catalog.
Producing a video is challenging. With the addition of interactivity, another dimension comes into play. If you know you will be producing an interactive catalog, keep a few (hopefully, obvious) thoughts in mind when shooting.
First, attempt to keep the item you are making interactive unobstructed by other objects. This will allow viewers to click on the item at any point during a scene. For example, if you would like a viewer to click on a television, donât have someone standing in front of it.
You should also keep the item stable within the scene. The best solution is to use a tripod, even if you are shooting with multiple cameras. Keeping the item steady within the frame allows viewers to easily click on it because they wonât be chasing it around with their mouse.
Finally, keep in mind the size of the object in relation to the rest of the image. If your viewers are going to be able to buy a television, make sure the television isnât off in the distance or obscured somewhere in the background.
If your item is smaller than you would prefer, you can help it stand out in the frame when editing. One method is to briefly superimpose a circle around the item at the beginning of a scene. Another method is to make everything in the scene black and white, except the item [Hack #74] . Whatever your approach, you should have it in mind before your shoot your scene.
How you create your hotspots depends on the application you choose to use. There are three capable applications available: LiveStage Pro (http://www.totallyhip.com/; $449), cleaner (http://www.discreet.com/cleaner/; $549), and VideoClix (http://www.videoclix.com/; $349). Unfortunately, all of the applications are available only on Macintosh.
Tip
A previous version of cleaner for Windows (Version 5) did include the ability to create hotspots, as well as other interactive elements, using a feature called EventStream. To create hotspots using Windows, you need to either obtain a copy of cleaner 5 or pressure Discreet to incorporate EventStream into an update.
Because tutorials for creating hotspots are available online for both LiveStage Pro and VideoClix, this hack will cover cleaner only.
After launching cleaner, you can import video by selecting Batch â Add Files⦠and choosing your video file from your hard drive. To create a hotspot, you need to edit the EventStream data. To do so, either double-click on the videoâs icon or select Windows â Project. This brings the Project window forward.
Within the Project window, choose EventStream â Edit (the Edit button is just below and to the right of the tab) to bring up the EventStream window. To add a hotspot, you need to locate the section of video where you would like to place the hotspot and click the Add button to create a new event.
In the Event Type pop-up menu, select Hotspot. You can then click and drag over the section of video you would like to allow your viewers to click. Additionally, you can choose whether the shape of the hotspot, as well as assign it a Label for reference. Figure 4-18 shows a hotspot being created with an Oval shape.
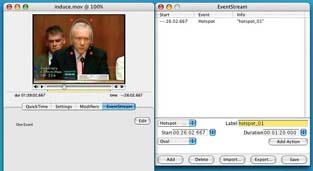
Even though youâve now created a hotspot, you still have a few other tasks to complete. First, unless you want the hotspot to last for the length of your video, you need to decide its duration. Fortunately, cleaner makes it fairly simple to determine how long to enable a hotspot: just click on the small pop-up menu to the right of the Duration text field. The menu offers three choices: To In Point, To Out Point, or To Current Time. Selecting any of these will enter the respective duration into the Duration text field.
Finally, create an action for your hotspot by clicking on the Add Action button. This creates a related event, which executes when the viewer clicks on the hotspot. The two types of actions you will be interested in, at least when creating a catalog, are the Open URL action and the Go to Time action. Figure 4-19 shows an Open URL action being entered for the referenced hotspot. This action causes the specified URL to open in a viewerâs web browser.
The way in which you implement your catalog will determine which action you choose. If you are planning to integrate a web site into the processâto allow viewers to make a purchase online, for exampleâuse the Open URL
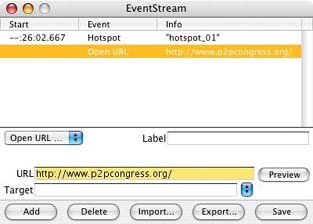
action and enter the URL where you would like your viewers to be sent. If you plan on having your video display within a web page, use the Target entry to have the URL opened in a separate frame (HTML knowledge is helpful in this instance).
If, on the other hand, you would like to provide more information on the item, use the Go to Time action. This action makes your video jump to another section within itself, such as a video of the item close up, along with dialogue explaining the item in detail. The Go to Time action can be jarring, yet exciting, when experienced for the first time.
When used together in the same video, the Open URL and Go to Time actions can create quite compelling content. To create more hotspots in your video, just rinse and repeat. When youâre finished, donât forget to click on the Save button in the EventStream window! Otherwise, all of your events will be missing when you do finally encode your video for delivery.
LiveStage Pro (http://www.totallyhip.com; $449.95)
Video Clix (http://www.videoclix.com; $349â499)
Just because you can use hotspots to create a catalog, that doesnât mean theyâre limited to that use. One alternative is to create a âchoose your own adventureâ type of movie. By using a hotspot and an action to jump to another section of your movie, you can allow viewers to click on areas of the video to influence the story.
For example, you could create a scene in which a character needs to choose between two doors to possibly win a prize (think Letâs Make a Deal). Upon reaching the decision stage, you could allow the viewer to click on a door and, based on her selection, jump to the appropriate section of your video. Quite obviously, you need to shoot two scenes, one for each door.
However you use hotspots, one thing is certain: your project will take a step beyond traditional âpassiveâ video.
Broken timecode will cause you headaches in the long run. Fix it early or invest in Excedrin.
If you have timecode that jumps from one time to an earlier time, you will encounter problems when digitizing your footage. For example, if your tapeâs timecode is 00:34:23;00 and jumps to 00:00:00;00, you have a problem. It is best to fix problems in your process as early as possible. One way to avoid this problem is to black and code your tapes ahead of time.
Some people attempt to overcome timecode problems while digitizing by using tape numbers to indicate which breakpoint to locate. For example, tape TCP001 would be the section of tape before the jump and tape TCP001.1 would be the section of tape after the break. They continue to increase the last number for each break. Not only does this approach not solve the problem, but it might cause additional problems in the future with tape numbering and EDLs [Hack #3] .
If you are going to fix timecode on a tape, you have to transfer it to another tape or onto your computer. The process of transferring your footage can cause you to lose quality, which you do not want to do. You only want to fix the timecode.
In the past, with analog formats such as VHS and Beta, video footage would lose quality when it was copied from one tape to another. Many people refer to this loss of quality as generation loss. Fortunately, in the digital world, you can create a copy of your footage without losing any quality.
In order to avoid generation loss, you need to make a digital copy of your footage. To create a digital copy, you must first create a digital connection between two capable devices. Most digital video cameras and decks have an IEEE-1394 connector to create a digital connection.
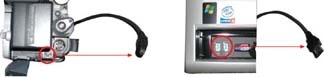
IEEE-1394 connectors come in three types:
4-pin
6-pin
9-pin
For the most part, you will not have to deal with 9-pin connections. The fun part, though, is figuring out what type of cable you need to connect your two machines. You have three options:
4-pin to 4-pin
4-pin to 6-pin
6-pin to 6-pin
Many sales people I have encountered do not know the difference between the connections, so you should take the time to figure out what you need before shopping for your connection cable. Figure 4-20 illustrates the differences between these different cable types.
If you are fortunate enough to have more than one digital video machineâeither a camera or a deckâyou can create a digital duplicate of your tape.
Warning
To create a digital copy, you cannot use RCA connections, because those connections are analog. If you use RCA cables for your connection, you will lose a generation of quality.
To duplicate your tape, connect your two machines using the IEEE-1394 cable. Place your master in one machine and a blank tape in the other. Press Play on the machine with your master tape and Record on the machine with the blank tape. While your master tape has broken timecode, only the footage (both audio and video) will be recorded to your new copy. The new copy will have an exact digital copy of you footage, but with new, continuous timecode. If you have a black and coded tape, you can use it to ensure your time-code is continuous.
If you have only your digital video camera, all is not lost. You can still fix your timecode problem by using your editing system to digitize your footage and then performing a digital output. To create a digital copy of your footage, you have to digitize your tape using the same codec it was acquired with. For example, if you are using DVCPRO, you should capture your footage using the DVCPRO setting.
Warning
There are different types of digital video. You should be aware of which type you are using. Most consumer digital video cameras record DV, but there are also DVCPRO, DVCAM, and HDV formats.
You should also make sure you have enough hard drive space to hold a complete tape. For DV, you will need approximately 13GB of space per hour of footage.
To digitize your footage, connect your camera or deck to your editing system. Once connected, you need to capture the footage from your tape to your system. Each editing system is different, but the end result is the same. Hereâs how to get started in a variety of popular editing systems:
- Avid
Tools â Capture
- Final Cut
File â Log and Captureâ¦
- Movie Maker
File â Capture Video
- Premiere
File â Capture
- iMovie
Switch to Camera mode and then click the Record button
Once you have digitized your footage, place the entirety of it on a timeline and then export your footage to a new tape:
- Avid
Clip â Digital Cut
- Final Cut
File â Print to Videoâ¦
- Movie Maker
File â Save Movie Fileâ¦
- Premiere
File â Export â Export to Tape
- iMovie
File â Share â Videocamera â Share button
Warning
You could record back out to your original tape, but if something goes horribly wrong, such as an ugly power surge, you could lose your footage.
Just like using two cameras or decks, when you output your footage to tape, you will have an exact digital copy of the footage on your master tape⦠except for the timecode problems.
When the process is complete, make sure you label the duplicate tape as your new master and keep track of which tape is which. As always, proper labeling and organization are key to successfully completing your project [Hack #1] .
Both QuickTime and Windows Media have a feature to allow viewers to jump to specific points in a video. Using this feature, you can create a casting reel for your movie.
When casting for a movie, you have to audition a lot of people. Even after narrowing down your list of candidates, you still want to view their auditions easily. You might even want to distribute video to your colleagues for their input. You can either pass along one videotape or DVD per candidate, or you can create a single digital video file and allow people to jump from one candidate to another easily.
To enable people to move from one section of video to another, you need to create locators in the video. In QuickTime these locators are called chapters, and in Windows Media they are called markers. For the sake of consistency, I will refer to them as bookmarks when referring to their use in both systems.
Although both QuickTime and Windows Media provide functionality for bookmarks, the way you create them is completely different in each platform. For QuickTime, you use QuickTime Pro (http://www.apple.com/quicktime/upgrade/; $29.99) and a text editor. For Windows Media, you use the Windows Media File Editor, which is a part of the Windows Media Encoder 9 Series of tools available from Microsoft (http://www.microsoft.com/windows/ windowsmedia/9series/encoder/default.aspx; free). If you plan on distributing both types of video, you can use Discreetâs cleaner (http://www.discreet.com/products/cleaner; $549) to create bookmarks and have both types of video created from it.
Tip
If you are using Final Cut Pro or Premiere to edit, you can easily create chapters using markers within your editing system. After adding the appropriate markers, your bookmarks will automatically be included when exporting your sequence to a compatible media format.
Within Final Cut, you can to edit a marker by choosing Mark â Markers â Edit⦠Then, you can type <CHAPTER> in the Comment text box or click the Add Chapter Marker button.
Within Premiere, you can edit a marker by selecting Marker â Edit Sequence Marker⦠Then, you simply enter the chapterâs title in the Chapter text field.
If you have QuickTime and a text editor installed on your computer, you have the tools to create a chapter track. However, you will need to upgrade QuickTime Pro to unlock the features necessary to create chapter tracks. Upgrading also unlocks the ability to perform minor editing, apply filters and effects [Hack #89] , export movies for use on a cell phone, and a slew of other features.
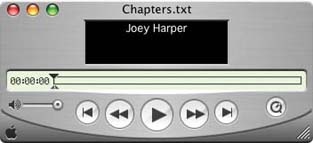
To create the chapter track, you need to create a list of chapters you would like people to be able to access. Using a text editor, such as Text Edit, simply create a list of chapters, each separated by a line break.
For example, on a casting reel, you would create a chapter for each actor, most likely by name:
Oxford Wells
Tony Clark
Rich Gable
Joey Harper
After creating your list, save it as a text file.
After you have created your initial chapter list, launch QuickTime Player, choose File â Importâ¦, and then select the text file containing your chapters. This action will import the text file and create a QuickTime movie from it. Figure 4-21 shows a text file, as imported by QuickTime Player.
Oddly enough, immediately after importing the chapter list, you need to export it. Selecting File â Export opens an export window with a few options. The configuration of these options is important, because they will affect the chapter track.
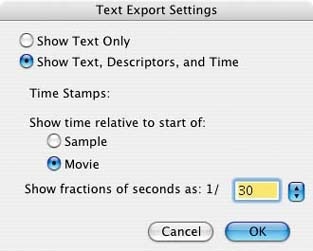
Select Export â Text to Text, and then choose Use â Text with Descriptors from the available pop-up menus to create an appropriate text file. Additionally, you should click the Options⦠button and select to Show Text, Descriptors, and Time. Also select âShow time relative to start of:â â Movie and âShow fractions of seconds as:â â 1/30 from the Options window, as shown in Figure 4-22.
After exporting the QuickTime descriptors file, you need to open the file in a text editor. You also need to open the movie you want to add the chapter track to in QuickTime Player. Once the movie is opened in QuickTime Player, choose Movie â Get Movie Properties and then select Movie from the first pop-up menu and Time from the second pop-up menu.
Tip
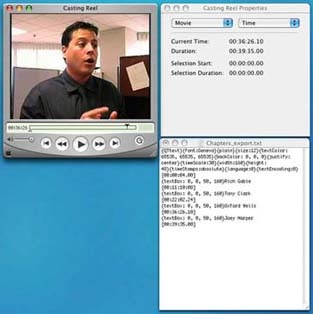
When you open the text file, as exported from QuickTime Player, you will notice a bunch of words and numbers enclosed in braces and brackets, as well as a particular format to the text. Do not alter any of the information except for the time-code inside the brackets ([]) and the respective chapter title, unless you feel comfortable experimenting. For example, the following is for a chapter at 00:11:10.08 and titled Tony Clark:
| [00:11:10.08] |
| {textBox: 0, 0, 50, 160}Tony Clark |
Take note that the timecode is formatted as [HH:MM:SS.FF] and the title of the chapter appears on the line below the time-code, just after some QuickTime required formatting.
The Properties window displays the Current Time (where you are in the movieâs timeline), the Duration of the movie, and the Selection Start and Duration times, which is basically representative of In and Out points. As you change your location in the timeline of the movie, the Current Time will change accordingly.
When you have found a position where you would like a viewer to jump to, such as the beginning of a personâs audition, type the Current Time into the appropriate location in your text file. You should continue the process of locating the time and typing it, until you have entered information for all of the chapters in your movie. Figure 4-23 shows a movie, its Properties window, and a text file being edited for use as a chapter track.
Warning
You cannot have times in your chapter track run out of order. Therefore, if your initial list is not in the same order as your video, you need to rearrange the list as necessary. For example, if you initially had Joey Harper listed first, but discover he appears fourth in the video, you need to move his name to fourth in the list.
The last timecode in your text file should be the duration of the movie. So, if your movieâs Duration is 00:39:35.00, enter your final timecode as [00:39:35. 00]. When youâre finished, save your text file and then import it into QuickTime Player by choosing File â Import⦠and selecting that file from the dialog box.
After importing your descriptor file into QuickTime Player, choose Edit â Select All and then Edit â Copy.
Then, paste the copied movie into the movie you would like to add the chapter track. Selecting the movie and then choosing Edit â Add Scaled enables your movie to use the imported text as a chapter track.
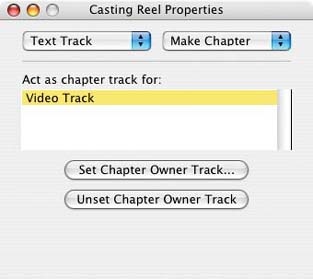
In the Properties window of your movie, choose your newly added Text Track from the first pop-up menu and Make Chapter from the second pop-up menu. Then, click the Set Chapter Owner Track button and select either the audio or video track as the Owner. Figure 4-24 shows the Properties window with a newly created chapter track.
A feature called Preloading makes sure your chapter track loads before your movie does. Although QuickTime Player might automatically enable Preloading on your chapter track, you should make sure it is enabled. From the second pop-up menu in the Properties window, select Preload and make sure the Preload checkbox is checked.
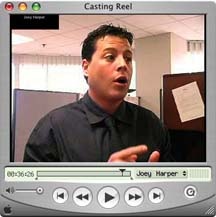
After creating the chapter track, you will notice a small pop-up menu inside your movieâs window. As shown in Figure 4-25, this pop-up contains the chapter titles and will allow a viewer to easily jump from one section of your movie to another. You will also notice that there is a small black box in the corner of your movie with the title of each chapter.
You most likely donât want the side effect of the black box, so you can turn it off by choosing Edit â Enable Tracks and turning off the Text Track. Then, use the chapter track pop-up to jump from one place in your movie to another, to make sure it works as you expect. If it does not, you will need to repeat the process until it does and pay careful attention to the timecodes you enter as well as their respective chapter titles.
When you are satisfied with your movie, choose File â Save As⦠and select the âMake movie self-containedâ radio button. Whew! That was fun.
The Windows Media File Editor is installed, along with a suite of other applications, when you download and install the Windows Media Encoder 9 Series of tools. Using the File Editor is straightforward, but it does require your video to be in the correct format, either WMV or ASF. Within the application, you can also add commands to display text, open applications, open URLs, or perform other scripting events.
After launching Windows Media File Editor, you need to open a video file to edit. To do so, choose File â Open⦠and locate your movie. The application opens Windows Media Files (.wmv and .wma extensions) or ASF files only. If your video is in another format, youâll need to transcode it [Hack #29] You can also transcode between various Windows Media formats using Microsoftâs Windows Media Encoder 9 Series. Figure 4-26 shows a Windows Media Video named Audition being opened using Windows Media File Editor.

After opening your video, you can play it just as you would in a media player. However, this is more than a media player, so you will notice that you can add markers, add script commands, and enter information for various attributes like the Title, Author, and Copyright information.
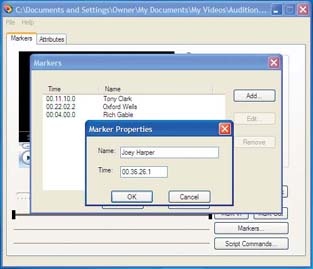
To add markers, scan the video and stop at a point where you would like to add a marker. Then, click the Markers⦠button to open the Markers window. If you know the times for each marker you would like to add, you will be able to add your markers a lot faster.
The Markers window provides a list of all the markers associated with the video file. Clicking on the Add button brings up a dialog box to enter the Marker Properties for both the Name and Time. The current time (where you are in your movie) will be entered in the Time field, so the only thing you need to do is enter the Name for the specific marker, such as an actorâs name. Figure 4-27 shows a marker with the Name of Joey Harper and the Time of 00:36:26.1 being entered.
When you have entered the Name and Time, click the OK button to close the Marker Properties window. If you do not know the time for any additional markers, click the OK button to close the Markers window and locate the next point in your movie. You will need to repeat the process for each marker you would like to add.
After entering all of your markers, you need to save your video file. To save the markers inside the current file, choose File â Save and Index. This will save your markers to the video file you are currently working on.
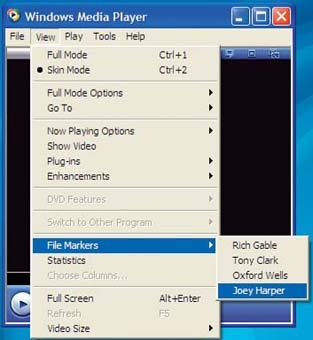
After youâve saved and indexed your movie, you will be able to jump from one marker to another by choosing View â File Markers and choosing a marker. Figure 4-28 shows the markers for the actors in the Audition video.
If you would like to save your movie in a different format, choose File â Save As and Index. Performing the Save As function enables you to export your video as either a Windows Media file or an ASF file. Although not a big deal, and limited, it is a nice feature to know about when itâs needed.
If you own Discreetâs cleaner, and you want an easier-to-understand solution, or you plan on distributing both QuickTime and Windows Media files, using cleaner to create bookmarks is the perfect solution. cleaner refers to the feature as a chapter event.
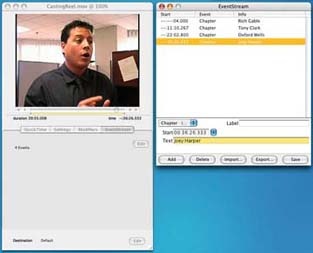
To begin, launch cleaner and simply drag the movie you would like to work with to the Batch window. Then, choose Windows â Project or double-click on the movieâs icon to activate the Project window.
From the Project window, click the EventStream tab and then click the Edit button, which brings up the EventStream window, allowing you to add the Chapter information. Figure 4-29 shows chapters being added to a movie using EventStream.
To create a new chapter, locate the position on the movieâs timeline (in the Project window) where you would like the Chapter to start. Then, in the EventStream window, click the Add button and select Chapter (QT, WM) from the pop-up menu. cleaner will automatically enter the Start time for you, so you just need to type the Text entry as you would like it to appear in your movieâs chapter list.
Merely continue the process of locating the start time, clicking the Add button, and adding Text until you have added all of the chapters you want. When you have finished, click the Save button and close the EventStream window.
To create your final movie, choose Batch â Encode or click the Start button in the Batch window.
Thatâs all you need to do with cleanerâstraightforward and easy.
Just because Iâve presented this for use as a casting-reel solution doesnât mean itâs limited to such use. You can create a video catalog, where people can jump to various products. Or, you can create a how-to video, where viewers can jump from one step to the next.
If you want to get creative, you can combine the bookmark feature along with the ability to open a URL [Hack #84] and open a web page related to the scene in the movie. For example, if you have created a video catalog, when a user is presented with an item on screen, a web page could open with details about the item, such as the current price or ordering information. You can also take your approach one step further by creating an interactive video catalog [Hack #47] .
Navigating DVD menus doesnât have to be slow and tedious. You can use a simple setting in your authoring software to speed up the next/previous page actions.
Weâve all seen them: pages and pages of menus for jumping to a particular chapter in a movie. Many of the extra features, such as cast bios and original scripts, also contain multiple pages of information. DVD menus require the user to interact with on-screen buttons.
You use directional controls (up, down, left, right) to navigate to a particular button and then use a Select or Enter control to activate the button. The process is fairly straightforward, but it can be a bit tediousâ¦especially if youâre trying to get to page 5 of 7 quickly.
What if you could skip the activate step? Most DVD authoring tools support an option known as auto-activation. When the user navigates to the button using a remote control and a consumer player, the button is automatically activated. On a computer using a software DVD player, this feature is usually disabled; otherwise, simply passing your mouse over a button would send you flinging off to some distance section of the DVD.
Tip
Well, itâs not that bad, but it would be annoying if you had to be careful where you moved your mouse when trying to use the DVD menu on your computer.
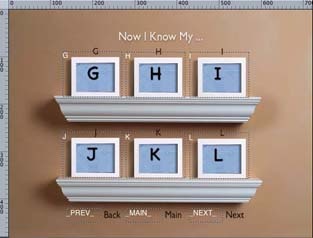
Consider Figure 4-30. When the user lands on this menu, the currently selected button is the Main button. You can move up to select an actual chapter, or you can move left or right to go to the previous or next page of chapters, respectively. Rather than making the user press the Right button on the remote and then the Select button, you can trigger the Next Page button automatically when the user navigates to it.
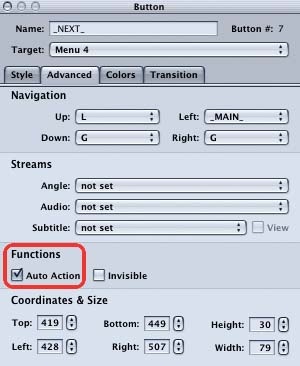
Figure 3-31 shows the property inspector for the Next button in Appleâs DVD Studio Pro. The Auto Action option has been highlighted. Check that box and youâre done! When the menu comes up, pressing the Right button on the remote control immediately navigates to the next page of the menu.
Do the same for the Previous button, but donât set that action on any other buttons. You want to use the Auto Action sparingly. If, for example, you set the Auto Action on all of the chapter buttons, you could never get to all of the chapters. Pressing the Up button on your remote control would take you to the K chapter index and you would immediately jump to the K section of the video clip. You would never have the chance to navigate to any of the other chapters.
Any interesting variation on this hack can be used to produce reasonably functional slide shows with your DVD. Consider the slide shown in Figure 4-32. You can make the slide the background image of your menu and place the same Previous, Main, and Next buttons on it. Default to the Main button as before, and now you can navigate your entire slide show using the Left and Right arrows on your remote control.
Notice how big the proposed buttons are. If you play this DVD on your laptop, you will want a large target area, to make it easy to navigate with your mouse.
Of course, youâll also want to use the Invisible option in your authoring software, to make sure the buttons donât obscure the slides. Figure 4-33 highlights this option in DVD Studio Pro.
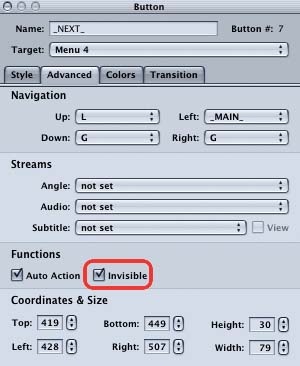
Even if your authoring tool doesnât have an explicit Invisible option, you can usually trick it by supplying a completely transparent GIF or PNG as the image to display for the button.
âMarc Loy
Get Digital Video Hacks now with the O’Reilly learning platform.
O’Reilly members experience books, live events, courses curated by job role, and more from O’Reilly and nearly 200 top publishers.

