The humble hyperlink may not raise eyebrows anymore, but the notion that you can navigate a whole sea of information, jumping from one island of information to another with a simple click, is a very recent and powerful invention. Interested in a particular band? Go to Yahoo.com , type in the band’s name, click to go to its Web site, click to go to the page that lists its upcoming gigs, click to go to the Web site for the club where the band’s currently playing, and click to buy tickets.
Although links are a basic part of building pages, and although Dreamweaver, for the most part, shields you from their complexities, they can be tricky to understand. The following section provides a brief overview of links, including some of the technical distinctions between the different types. If you already understand links, or are just eager to start using Dreamweaver, jump to “Adding a Link” on (Section 4.2).
A link is a snippet of computer code that gives a Web browser directions for how to get from one page to another on the Web. What makes links powerful is the fact that the distance those directions take doesn’t matter. A link can just as easily lead to another page on the same site or to a page on a Web server halfway around the globe.
Behind the scenes, a simple HTML tag called the anchor (<a>) tag makes each and every link. Links come in three different flavors: absolute, document-relative, and root-relative. (See Section 4.1.4) for some examples of each link type in practice.
When people need to mail you a letter, they ask for your address. Suppose it’s 123 Main St., New York, New York 12001. No matter where in the country your friends are, if they write 123 Main St, NY, NY 12001 on an envelope and mail it, their letters will get to you. That’s because your address is unique—just like an absolute link.
Similarly, every Web page also has a unique address, called a URL (most people pronounce it “You Are El”), or Uniform Resource Locator. If you open a Web browser and type www.sawmac.com/dwmx2004/index.html into the Address bar, the home page for this book opens.
This URL is an absolute link; it’s the complete, unique address for a single page. Absolute links always begin with http://, and you’ll use them anytime you link to a Web page outside of your own site. Absolute links always lead to the same page, whether the link to it is on a page in the current site or an entirely different site.
The bottom line: Use absolute links when you want to link to a page on another Web site.
Suppose you, the resident of 123 Main Street, drop in on a couple who just moved into the neighborhood. After letting them know about all the great restaurants nearby, you tell them about a party you’re having at your place.
When they ask you where you live, you could, of course, say, “I live at 123 Main St., NY, NY 12001,” but your neighbors would probably think you needed a little psychiatric help. More likely, you would say something like, “Just go across the street and turn left. I’m the second house on the right.” Of course, you can’t use these instructions as your mailing address, because they work relative only to your neighbors’ house.
When you want to create a link from one Web page to another within the same Web site, you can use similar shorthand: a document-relative link. In essence, a documentrelative link—like the directions you give your neighbor—simply tells the browser where to find the linked page relative to the current page. If two pages are in the same folder, for instance, the path is as simple as “Go to that page over there.” In this case, the link is simply the name of the file you wish to link to: index.html. You can leave off all that http:// and www.sawmac.com business, because you’re already there.
Document-relative links can be finicky, however, because they’re completely dependent on the location of the page containing the link. If you move the page to another part of the site—filing it in a different folder, for example—the link won’t work. That’s why working with document-relative links has traditionally been one of the most troublesome chores for a Web designer, even though this kind of link is ideal for linking from one page to another in the same site.
Fortunately, Dreamweaver makes working with document-relative links so easy, you may forget what all the fuss is about. For example, whenever you save a page into a different folder—a maneuver that would normally shatter all document-relative links on the page—Dreamweaver quietly rewrites the links so they still work. Even better, using the program’s site management tools, you can cavalierly reorganize your Web site, moving folders and files without harming the delicate connections between your site’s files. Dreamweaver’s site management features are discussed in depth in Part IV.
Root-relative links describe how to get from one page to another within the same site, just like document-relative links. However, in this case, the path is described relative to the site’s root folder—the folder that contains the home page and other pages, folders, and files that make up your site. (For a detailed description of the root folder and structuring a Web site, see Chapter 14.)
Imagine you work in a big office building. You need to get to a co-worker’s office for a meeting. You call him up for directions. Now, he may not know the precise directions from your office to his, but he can tell you how to get from your building’s entrance to his office. Since you both know where your building’s front door is, these directions work well. Think of the office building as your site, and its front door as the root of your site.
Root-relative links always begins with a slash, /like this. This slash is a stand-in character for the root folder—the front door—of the site. The same root-relative link always leads to the same page, no matter where it is on your Web site.
If you use Dreamweaver for all of your Web page development, you probably won’t find a need for root-relative links, but they can come in handy. For example, suppose you’re asked to create a new page for an existing Web site. Your client gives you text, some graphics, and a list of the other pages on the site that this page must link to. The problem is, your client doesn’t know where on the site the new page is supposed to go, and their Webmaster won’t return your calls.
You could use root-relative links to get around this dilemma. Since these links work no matter where the page is on your site, you could complete the page and let the client put it where it belongs. The links will still work.
Note, though, that there are some major drawbacks to using root-relative links in Dreamweaver. For example:
They don’t work when you test them on your own computer. Clicking a root-relative link in a Web browser on your own machine produces only a “File not found” error. Such links work only after they’re moved to a Web server. Web servers understand root-relative links, but your local computer doesn’t.
Note
There’s one exception. Dreamweaver MX 2004 provides two ways of previewing a Web page: with a temporary file or without one. The temporary file option gives you a couple of advantages: you get to preview a page without having to save it first, and you gain the ability to preview on your local computer any root-relative links you’ve created. To turn this feature on, open Preferences (Edit→Preferences or, on the Mac, Dreamweaver→Preferences), click the Preview in Browser category, and turn on the Preview Using Temporary File checkbox. Behind the scenes, Dreamweaver secretly rewrites root-relative links as documentrelative links whenever it creates a temporary file.
They don’t work if the site you’re working on isn’t located at the Web server root. Suppose, for example, that your buddy gives you space on his Web server for your pages. He says that you can put your site in a folder called my_friend, so your URL is www.my_buddy.com/my_friend/ . In this case, your Web pages don’t sit at the root of the site—they’re in a folder inside the root. If you try to use root-relative links, they won’t work even after you’ve moved your pages to the Web server.
Stick to document-relative links for your pages, but keep this discussion in mind. You’ll see later that Dreamweaver’s site management features use root-relative paths to track your site’s files behind the scenes.
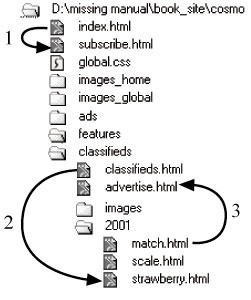
Figure 4-1. Here are a few examples of links for a fictitious Web site located at www.cosmofarmer.com . Notice that although the root folder (cosmo) is nested inside several other folders—book_site and missing manual—it’s still the top level folder for the site, since it holds the home page and all of the other files that go on the site. Keep this distinction in mind: the site root is not the same as the top level of your hard drive.
Figure 4-1 shows a Web site as it lies on a hard drive: folders filled with HTML documents and graphics. Here’s a closer look at some links you might find on the pages there, and how they might work:
The home-page document is usually called index.html or index.htm. (The exact name depends on the configuration of your Web server. Contact your Web host, or the person in charge of your Web server, to confirm the file name used on your Web server.). You could create the link from it to the subscribe.html page—identified by the number 1 in Figure 4-1—using any of the three link types:
Absolute. www.cosmofarmer.com/subscribe.html . What it means: Go to the Web site at www.cosmofarmer.com and download the page subscribe.html.
Document-Relative. subscribe.html. What it means: Look in the same Web site and folder and download the page subscribe.html.
Root-Relative. /subscribe.html. What it means: Go to the top level folder of this site (called cosmo, in this case) and download subscribe.html.
Tip
If you can write an absolute URL, you can easily create a root-relative URL. Simply strip off the http:// and Web server name. In the above example, erasing the www.cosmofarmer.com in the absolute address leaves /subscribe.html—the root-relative path.
Now imagine that you’re building a Web page that’s in a folder inside another folder. Here’s how you’d use each of the three link types to open a document that’s nested in a subfolder (called 2001, in this case), as identified by the number 2 in Figure 4-1:
Absolute. www.cosmofarmer.com/classifieds/2001/strawberry.html . What it means: Go to the Web site at www.cosmofarmer.com , look in the folder classifieds, and then in the folder 2001; download the page strawberry.html.
Document-relative. 2001/strawberry.html. What it means: From the current page, look into the folder 2001 and download the page strawberry.html.
Root-relative. /classifieds/2001/strawberry.html. What it means: Go to the top level folder of this site, look in the folder classifieds, and then in the folder 2001; download the page strawberry.html.
Now suppose you’re building a Web page that’s in a deeply nested folder; you want it to link to a document that’s outside of its folder, a link labeled 3 in Figure 4-1:
Absolute. www.cosmofarmer.com/classifieds/advertise.html . What it means: Go to the Web site at www.cosmofarmer.com , look in the folder classifieds, and download the page advertise.html.
Document-Relative.. ../advertise.html. What it means: Go up one level—outside of the current folder—and download the page advertise.html. In links, a slash / represents a folder or directory. The two dots (..) mean, “Go up one level,” into the folder that contains the current folder.
Root-Relative. /classifieds/advertise.html. What it means: Go to the top level folder of this site; look in the folder classifieds, and download the page advertise.html.
If all that talk of links got you confused, don’t worry. Links are confusing, and that’s one of the best reasons to use Dreamweaver. If you can navigate to a document on your own computer or anywhere on the Web, you can create a link to it in Dreamweaver, even if you don’t know the first thing about URLs and don’t intend to learn.

To create a link from one a page to another on your own Web site, use the Browse for File button on the Property inspector (see Figure 4-2) or its keyboard shortcut (see the steps below). To browse for a file in Dreamweaver, you use the same type of dialog box that you already use to open or save a file, making this the easiest way to add a link. (To link to a page on another Web site, you’ll need to type the Web address into the Property inspector. Turn to Section 4.2.3 for instructions.)
In the document window, select the text or image you want to use for the link.
You can select a single word, a sentence, or an entire paragraph. When this process is over, the selected words will show up blue and underlined (depending on your visitors’ Web-browser settings), like billions of links before them.
In addition, you can turn a picture into a link—a great trick for adding attractive navigation buttons.
In the Property inspector, click the folder (Browse for File) icon.
Alternatively, choose Modify→Make Link or press Ctrl+L (
 -L). In any case, the Select File dialog
box opens (see Figure
4-3).
-L). In any case, the Select File dialog
box opens (see Figure
4-3).Navigate to and select the file you’ll want the link to open.
The file should be a Web page that’s part of your Web site. In other words, it should be in the local root folder (see Section 1.3), or in a folder therein.
If you try to link to a file outside the root folder, Dreamweaver alerts you to this problem, and offers to copy the file into the root folder. Accept the offer. Remember: For a Web site, the root folder is like the edges of the known universe; nothing exists outside it.
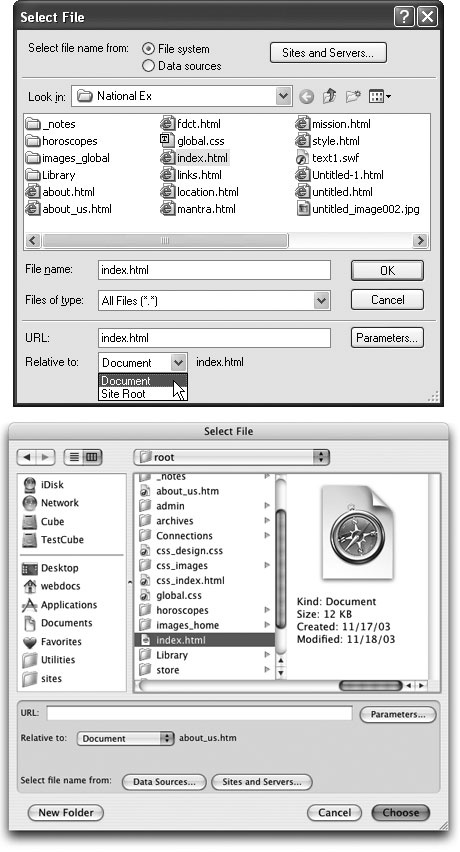
Figure 4-3. The Select File dialog box looks slightly different in Windows (top) and Mac OS X 10.3 (bottom), but either way, it lets you browse your computer to select the file you wish to link to. From the Relative To pop-up menu, you can choose what type of link to create—Document or Site Root relative. Since root-relative links may not work when you preview your pages on your computer, choosing Document from the pop-up menu is almost always your best bet. Whichever you choose, Dreamweaver remembers your selection and uses it the next time you create a link. Keep this quirk in mind if you suddenly find that your links are not working when you preview your pages. Odds are you accidentally selected Site Root at some point, and Dreamweaver continued writing site root-relative links.
From the Relative To menu, choose the type of link—Document or Site Root.
As noted earlier in this chapter, document-relative links are the best choice. Rootrelative links (which is short for Site Root-relative links) don’t work when you preview the Web site on your own computer. (They do, however, work once you move them to your Web server.)
Note
Get in the habit of double-checking this pop-up menu. As discussed in Figure 4-3, Dreamweaver remembers your selection and uses it the next time you create a link. If you inadvertently choose Site Root here, Dreamweaver will quietly continue to use Site Root-relative paths for creating hyperlinks and inserting graphics. Furthermore, you may not realize your mistake; depending on your Preferences setting (Section 4.1.4), root-relative links may work just fine when you press F12 to preview your pages in your Web browser. However, if you were to open your Web site directly using your Web browser’s Open command, the same root-relative links and graphics would suddenly stop working. To avoid such confusion, use document-relative links in Dreamweaver.
Click Select (Windows) or Open (Mac) to apply the link.
The text or image now links to another Web page. If you haven’t yet saved the Web page, Dreamweaver doesn’t know how to write the document-relative link. Instead, it displays a dialog box saying that it will assign a temporary path for the link until you save the page—see the box on Section 4.3.
After you apply a link, graphics don’t look any different, but linked text appears underlined and colored (using the color defined by the Page Property window, which is shown in Figure 1-11). If you want to take the link for a spin, press F12 to preview the page in your browser, where you can click the link.
You can also create links in Dreamweaver by dragging from the Property inspector to the Files panel (shown in Figure 4-4). If your site involves a lot of links, learning the Point-to-File tool will save you time and energy.
To use this trick effectively, position your document window and Files window sideby- side, as shown in Figure 4-4.
In the document window, select the text or image you want to turn into a link.
Make sure that both the Property inspector and Files window are open. To open the Property inspector if it’s not on the screen, choose Window→Properties. To open the Files window, choose Window→Files. (Before using the Files window, you need to first create a local site, as described on Section 1.3.1.)
Drag the Point-to-File icon from the Property inspector onto a Web page in the Files window (see Figure 4-4).
Alternatively, you can Shift-drag the selected text or image in the document window to any Web page in the Files panel—a method that bypasses the Property inspector altogether.
Figure 4-4. In this figure, the text “Horoscopes” is selected in the document window (left). To link to another page, drag from the Point-to-File icon in the Property inspector to a Web page in the Files panel (right). In this example, Dreamweaver creates a link to the Web page called index.html inside the horoscopes folder. You could also Shift-drag from the text “Horoscopes” to the page mowers.html in the Files window.
After dragging over the correct Web page, release the mouse button.
The selected text or image in your Web page turns into a link to the file you just pointed to.
If you need to link to another Web site, or you feel comfortable with how document- relative links work, you can also simply type the URL or path to the page in the Property inspector. Note that this is the only way to add a link to a page outside of the current Web site.
In the document window, select the text or image you want to make into a link.
In the Property inspector, type the URL or path to the file in the Link field (see Figure 4-1).
If the link leads to another Web site, type an absolute URL—that is, a complete Web address, starting with http://.
Tip
An easier approach is to copy a complete URL—including the http://—from the Address bar in your browser window. Then paste the address into the Link field.
To link to another page on your own site, type a document-relative link (see Section 4.1.4 for some examples). You’ll be less prone to error if you let Dreamweaver write the correct path using the browsing or point-to-file techniques described above; but typing the path can come in handy when, for instance, you want to create a link to a page you haven’t yet created.
Tip
If you’re adding an absolute link to a Web site without specifying a Web page, always add a final / to the address. For example, to link to Yahoo, type www.yahoo.com/ . The final slash tells the Web server that you’re requesting the default page (home page) at Yahoo.com.
Although leaving out the slash works too ( www.yahoo.com ), the server has to do a little extra work to figure out what page to send back, resulting in a slight and unnecessary delay.
Also include the slash when you provide a link to the default page inside a folder on a site like this: www.sawmac.com/dwmx2004/ .
Press Enter (Return) to apply the link.
The text or image now links to another Web page.
Dreamweaver MX 2004 provides yet another way to add a link. The Hyperlink object on the Common tab of the Insert bar lets you insert a link with many optional properties (see Figure 4-5).
Unfortunately, only Internet Explorer 6, Mozilla, Netscape 6, and later versions of these actually understand all of these additional properties, and you can only use the hyperlink object to create a new text link. You can’t use it to add a link to an image or to text you’ve already placed on the page.
If you want to give this feature a spin anyway, here’s how it works. Start by clicking on the page where you wish to insert a new link. Then:
Choose Insert→Hyperlink or click the icon on the Insert bar.
The Hyperlink dialog opens (see Figure 4-5).
Type the text you want to appear in the Text box.
This is the text that you’ll see on the page, and that your audience will click to follow the link.
Figure 4-5. To apply these optional properties to an image or existing text, you have a couple of options. You can always go into Code view (as described in Chapter 10) and hand-edit the HTML, but it’s easier to use the Tag inspector to access all the properties available to a particular link. (For details see Section 10.6.)
Click the folder icon and search for the page you want to link to.
Alternatively, you can type a URL in the Link box.
Set the target for the link.
If you want the link to open in the same window, like most links, don’t select anything. The targeting option works just like a regular link (see Section 4.2.2).
The last three options are more interesting.
In the Tab Index box, type a number for the tab order.
In most newer browsers (Internet Explorer, Mozilla, Safari, and Opera to name a few), you can press the Tab key to step through the links on a page (and boxes on a form). This feature not only provides useful keyboard control of your Web browser, but it’s also important for people who can’t use the mouse due to disability.
Normally when you press Tab, the browser highlights links in the order in which they appear in the HTML of the page. The Tab Index, by contrast, lets you control the order in which links light up as a visitor tabs through them.
For example, you can make your main navigation buttons the first things to highlight when someone presses Tab, even if the buttons are not the first links on the page.
For the first link in order, type 1 here; number other links in the order you want the Tab key to follow. If you aren’t concerned about the order of a particular link, leave this option blank or type 0. The Web browser will highlight that link after the visitor has tabbed through all links that do have a Tab index.
Type a title for the page you’re linking to.
This property is optional. Some Web browsers, like Internet Explorer for Windows and Netscape 7, display this property in a small tooltip window when you move your mouse over the link. Many Macintosh Web browsers, on the other hand, don’t display this title at all.
Type a key to define an access key.
An access key provides a way to trigger a link from the keyboard. Internet Explorer, Netscape 6 and later, and Mozilla understand this property in conjunction with the Alt key. For example, if you type h in the Access key box, a visitor to your page could press Alt+H to mouselessly open that link. Of course, unless those who visit your site are psychic, it’s a good idea to provide instructions by adding the access key information to the link: Home Page (Alt+H). In addition, the Macintosh doesn’t recognize access keys at all, so no Mac browsers can use this feature.

Whenever you want to invite your visitors to email you, an email link is the perfect solution. When someone clicks an email link, her email program launches automatically, and a new message opens with your email address already in the To field. She can then just type her message and send it off.
An email link looks like this: mailto:nessie@nationalexasperater.com. The first part, mailto:, indicates the type of link, while the second part (nessie@nationalexasperater.com) specifies the email address.
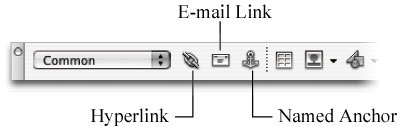
Figure 4-6. The Common tab of the Insert bar includes three link-related objects: The Hyperlink for adding text links, the email link for adding links for email addresses, and the Named anchor for adding links within a page.
Note
Email links work only if the person who clicks the link has an email account and an email program that understands the mailto: link. If someone visits your site from a computer at the public library, for example, he might not be able to send email. If this drawback troubles you, remember that you can also collect information using a form (as discussed in Chapter 11), a feedback method that has neither the limitations nor the easy setup of an email link.
You can create an email link much the way you’d create any other Dreamweaver link: by selecting some text or an image and typing the mailto address, as shown above, into the Link field in the Property inspector. To simplify this process, Dreamweaver has a quick method of inserting an email link:
On the Common tab of the Insert bar, click the Email Link icon, which looks like an envelope (see Figure 4-6).
Alternatively, choose Insert→Email link. In either case, if you’ve already typed the text (Email me!) on your Web page, select it first. The Email Link dialog box opens (see Figure 4-7).
In the Text field, type the text that you’ll want to appear on the Web page.
You’ve just indicated the link’s purpose, like Email the Webmaster. (If you selected text in the document first, it automatically appears in the Text field.)
Type an email address into the E-Mail field.
This is the address that appears in your visitors’ email program when they click the link. (You don’t have to type mailto:—Dreamweaver adds it automatically.)
Click OK.
Dreamweaver adds the text to the page, complete with a mailto link.
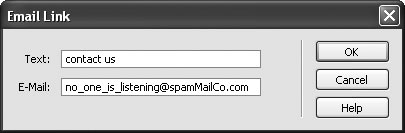
Figure 4-7. The Email Link dialog box lets you specify the text that appears on the Web page and the email address for a mailto link. You can also select some text you’ve already added to the document and click the Email Link icon on the Objects panel. The text you selected is copied into the Text field in this dialog box.
FREQUENTLY ASKED QUESTION: Adding Objects to the Favorites Tab
The Favorites tab on the Insert bar is a marvelous new addition to Dreamweaver MX 2004. It lets you collect all of your most-used objects into a single place, without any interference from HTML tags and objects you never use. Maybe you use the Email Link object on the Insert bar all of the time, but never touch the Named Anchor object.
To add objects to the Favorites tab, right-click (Control- Click) anywhere on the Insert bar. From the shortcut menu, choose Customize Favorites to open the Customize Favorite Objects window. All of the objects available in all of the Insert bar categories appear in the left-hand list. Select an object and click the >> button to add it to your Favorites. (You can view the objects for just one category by selecting it from the Available Objects menu.) Repeat with other objects, if you like.
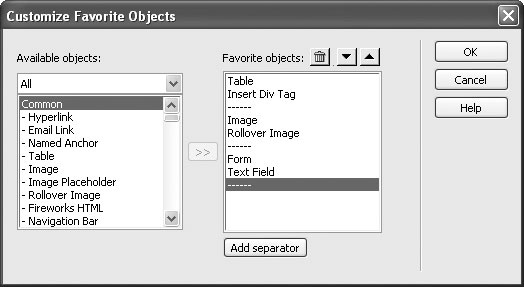
To rearrange toolbar buttons, click one and then click the up or down arrow to move it left or right on the toolbar. (Buttons at the top of the list appear on the left side of the Insert bar.) You can even use the Add Separator button to insert a thin gray line between buttons on the Insert bar—to separate one group of similar objects (graphic-related objects, say) from another (such as form objects), for example. Unfortunately, you can’t group favorite objects into submenus. Each item you add is a single button on the Insert bar.
To delete a button or separator from the list, select it and click the little Trash icon. Click OK to close the window and create your new list of Favorite objects, which are now available under the Favorites tab of the Insert bar.
After you’ve created your Favorites tab, you can always add more objects (or delete ones you no longer need) by right-clicking (Control-clicking) the Insert bar and choosing Customize Favorites from the shortcut menu.
Clicking a link usually loads a Web page into the browser window. But what if you want to link not only to a Web page, but to a specific spot on the page? See Figure 4-8 for an example.
Introducing the anchor link, a special link type that’s designed to auto-scroll to a particular spot on a particular page.
Creating an anchor link is a two-step process: First add and name an anchor, thus identifying the destination for the link; then add a link that goes to that named anchor. For instance, in the Answers page example of Figure 4-8, you would place a named anchor at the beginning of each answer.
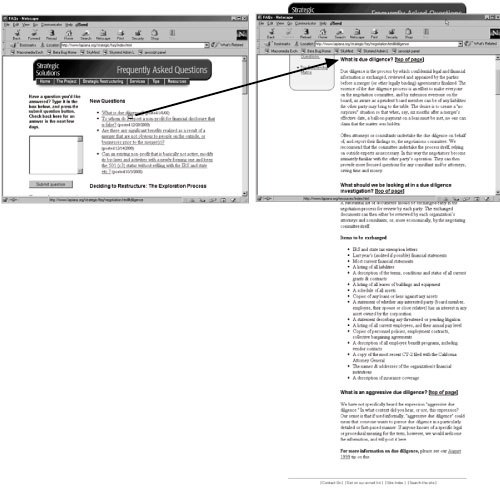
Figure 4-8. Imagine a Web page with a list of Frequently Asked Questions (right). To make it easier to update, all of the answers are listed together on a single page. Adding anchors to the Answers page makes it possible to jump from the Questions page to the precise location of the answer on the Answers page.
To create a named anchor:
In the document window, click where you want to insert the named anchor.
The named anchor is the place where you want the link to jump to.
Insert a named anchor.
You can do so using any of three methods. Using a menu: Choose Insert→Named Anchor. From the keyboard: Press Ctrl+Alt+A (Option-
-A). In the Insert
bar: Select the Common tab and click the Named Anchor
icon—see Figure
4-6.Type the name of the anchor in the Insert Named Anchor dialog box.
Each anchor on a page should have a unique name, something short and easy to remember. No spaces or punctuation is allowed. If you violate any of these regulations, Dreamweaver will remind you with an error message.
Click OK to insert the named anchor.
You’ll see a gold shield with an anchor on it at the point where you created the anchor. Click this icon to show the name of the anchor in the Property inspector. (If you don’t see it, see the facing page for detail on hiding and showing anchors.)
The icon is the key to removing or editing the anchor later: Just click the icon and press Delete to get rid of it, or click it and change its name in the Property inspector. (Deleting the name in the Property inspector deletes the anchor from the page.)
Creating a link to a named anchor is not all that different from linking to a Web page. Once you’ve created and named an anchor, you can link to it from within the same Web page, or from a different page.
To link to an anchor on the same page:
In the document window, select the text or image you want to make into a link.
For example, drag across some text, or highlight a graphic.
In the Property inspector’s Link field, type #, followed by the anchor name.
(Alternatively, use the Point-to-File icon, as shown in Figure 4-9.) The # sign indicates that the link goes to a named anchor. In other words, if you wish to link to an anchor named directions, the link would be #directions.
You can also link from one Web page to a particular location on another Web page in your site. The process is the same as linking to an anchor on the same page, except that you have to specify both the path to the Web page and the name of the anchor:
In the document window, select the text or image you want to turn into a link. In the Link field of the Property inspector, type or choose the URL or path of the page you wish to link to.
You can use any of the methods described above: browsing, point-to-file, or typing the path. Unfortunately, if you browse to select the linked file, Dreamweaver doesn’t display any anchors on that page, so you need to perform one extra step:
Click at the end of the URL or path. Type #, followed by the anchor name.
The Link field should look something like this: contact.html#directions.
A named anchor isn’t visible in a Web browser; it appears in Dreamweaver as an anchor-on-a-gold-shield icon. Like other invisible elements—line breaks, for instance —you can hide named anchors in Dreamweaver by choosing View→Visual Aids→Invisible Elements, or choosing Visual Aids→Invisible Elements from the Options menu in the toolbar (see Section 1.2.1). (If anchors still don’t appear, visit the Preferences window , pictured in Figure 1-8, and in the Invisible Elements category, make sure the Anchor box is turned on.)
At some point, you may need to change or edit a link. Perhaps the URL you were linking to has changed, or you simply no longer need that link.
As you’ll read in Part IV, Dreamweaver provides some amazing tools for automatically updating your links so that your site stays in working order, even if you move files around your site. But even Dreamweaver isn’t smart enough to know when a page on someone else’s Web site is moved or deleted. And you may decide you simply need to change a link so that it points to a different page on your own site. In both of these cases, you’ll need to change the links on your Web pages by hand.
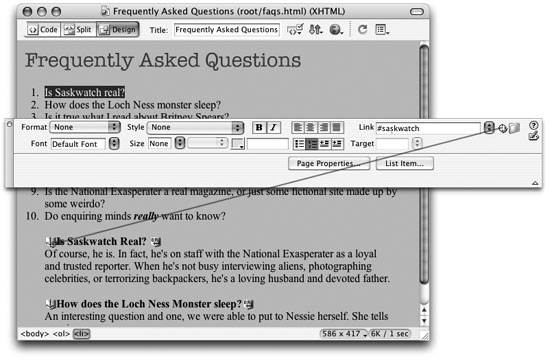
Figure 4-9. You can use the Property inspector’s Point-to-File icon to link to a named anchor on a page. Simply select some text or an image in an open page. Then drag the Point-to-File icon to an anchor on any other open document to set the link. If you can’t see the shield icons that mark anchors, see above for instructions on how to make them visible.
Select the text link or picture link.
The existing link path appears in the Link field in the Property inspector.
Use any of the techniques described on Section 4.2 for specifying the link’s target.
For example, click the Browse-for-File button in the Property inspector and locate a different Web page in your site. The destination of the link changes to the new URL, path, or anchor.
Sometimes, you want to stop a link from linking—when the Web page you were linking to no longer exists, for example. You want the text or image on your Web page to stay the same, but you want to remove the disabled link. In that case, just select the link text or image, and then use one of these tactics:
The text or image remains on your Web page, but it no longer links to anything. If it’s a text link, the color changes from your site’s link color (see the box below) to the normal text color for the page.
Of course, if you’re feeling particularly destructive, you can also delete the link text or image itself; doing so also gets rid of the link.
Get Dreamweaver MX 2004: The Missing Manual now with the O’Reilly learning platform.
O’Reilly members experience books, live events, courses curated by job role, and more from O’Reilly and nearly 200 top publishers.

