The World Wide Web continues to evolve, growing in scope and complexity, with new technologies popping up every year to make the Web look and work better. Even people building personal Web sites now employ various programming languages and server technologies to dish up content. Throughout its history, Dreamweaver has managed to keep pace with this changing technological landscape with each new version.
Dreamweaver MX 2004 is no exception: it’s capable of working with more technologies than any previous version. Whether you’re creating database-enabled Active Server Pages, using Cascading Style Sheets for cutting-edge design effects, or simply sticking to straightforward HTML pages, Dreamweaver has just about all the tools you need.
Any enterprising designer can create Web pages, Cascading Style Sheets, and even JavaScript programs with a simple text editor. In fact, Dreamweaver MX 2004 provides powerful text-editing abilities for creating basic text files or complex Java server pages. But why go to all that trouble when Dreamweaver’s visual page-building approach makes your job of creating beautiful and complex Web sites so much easier? Whether you’re new to building Web pages or a hard-core, hand-coding HTML jockey, Dreamweaver is a powerful tool that lets you build Web sites quickly and efficiently, without compromising the quality of your code.
If you’ve never used Dreamweaver before, see Chapter 1 for a welcome and grand tour. If you’re upgrading from Dreamweaver 4 or some other version, you’ll find that Dreamweaver MX 2004 offers a host of new features aimed at both the novice Web designer and the seasoned HTML guru.
Dreamweaver MX 2004’s most significant changes come to its Cascading Style Sheet tools. Dreamweaver does a much better job of displaying CSS designs, so you can create advanced layouts without constantly jumping to a Web browser to preview your page.
Creating and editing styles is easier, too. You can use the basic word processing controls of the Property inspector to format text and create new CSS styles at the same time.
The new CSS rule inspector lets you see which CSS rules affect the current selection. As a result, it’s easier to figure out how formatting rules interact, and to understand why elements on a page look the way they do.
To make sure your pages work with a wide variety of Web browsers, the improved cross-browser validation feature can warn you if the HTML or CSS you’ve used in building a page won’t work with a certain browser.
Bringing material in from Microsoft Word and Excel just got easier. You can copy and paste information from Word or Excel documents while preserving basic formatting like paragraphs, headlines, bold, italics, and bulleted lists. You can even use an advanced paste option to retain more detailed formatting options, like fonts and colors.
A new start page makes it easier to open recent documents, create new documents, and access help and tutorial files.
New PHP/MySQL commands let you add password-protection to your PHP/ MySQL Web sites.
Tip
Macromedia occasionally issues updates to Dreamweaver. To make sure you’re using the latest version, visit the Macromedia Web site at www.macromedia.com/support/dreamweaver/downloads_updaters.html .
Underneath the hood of any Web page—whether it’s your Uncle’s “Check out this summer’s fishin’” page or the home page of a billion-dollar online retailer—is nothing more than line after line of ordinary typed text. With its use of simple commands called tags, HTML (Hypertext Markup Language) is still at the heart of most of the Web.
The HTML code that creates a Web page can be as simple as this:
<html>
<head>
<title>Hey, I am the title of this Web page.</title>
</head>
<body>
Hey, I am some body text on this Web page.
</body>
</html>
While it may not be exciting, the HTML shown here is all you need to make an actual Web page.
In the example above—and, indeed, in the HTML code of any Web page you examine—you’ll notice that most commands appear in pairs that surround a block of text or other commands.
These bracketed commands constitute the “markup” part of the Hypertext Markup Language and are called tags. Sandwiched between brackets, tags are simply instructions that tell a Web browser how to display the Web page.
The starting tag of each pair tells the browser where the instruction begins, and the ending tag tells it where the instruction ends. Ending tags always include a forward slash (/) after the first bracket symbol (<), which tells the browser that this is a closing tag.
Fortunately, Dreamweaver can generate all of these tags automatically. There’s no need for you to memorize or even type these commands (although many programmers still enjoy doing so for greater control). Behind the scenes, Dreamweaver’s all-consuming mission is to convert your visual designs into underlying codes like these:
The <html> tag appears once at the beginning of a Web page and again (with an added slash) at the end. This tag tells a Web browser that the information contained in this document is written in HTML, as opposed to some other language. All of the contents of a page, including other tags, appear between the opening and closing <html> tags.
If you were to think of a Web page as a tree, the <html> tag would be its trunk. Springing from the trunk are two branches that represent the two main parts of any Web page: the head and the body.
The head of a Web page, surrounded by <head> tags, contains the title of the page. It may also provide other, invisible information (such as search keywords) that browsers and Web search engines can exploit.
In addition, the head can contain information that’s used by the Web browser for displaying the Web page and for adding interactivity. Cascading Style Sheet information, used for formatting text and other elements, may be defined in the head of the document (see Chapter 6). In addition, JavaScript scripts, functions, and variables can be declared in the head of the document. In fact, Dreamweaver Behaviors (Chapter 12) achieve their interactive effects with the help of JavaScript code stored in a page’s head.
The body of a Web page, as set apart by its surrounding <body> tags, contains all the information that appears inside a browser window—headlines, text, pictures, and so on.
In Dreamweaver, the body area is represented by the blank white area of the document window (see Figure I-1). It resembles the blank window of a word processing program.
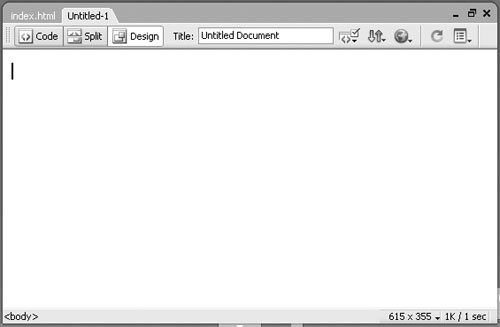
Figure I-1. The document window displays your page as you build it. You can add text, graphics, and other elements to it, and—thanks to Dreamweaver’s visual approach—see a close approximation of how the page will appear in a Web browser.
Most of your work with Dreamweaver involves inserting and formatting text, pictures, and other objects in the body of the document. Many tags commonly used in Web pages appear within the <body> tag. Here are a few:
You can tell a Web browser where a paragraph of text begins with a <p> (opening paragraph tag), and where it ends with a </p> (closing paragraph tag).
The <strong> tag is used to emphasize text. If you surround some text with it and its partner tag, </strong>, you get boldface type. The HTML snippet <strong>Warning!</strong> would tell a Web browser to display the word “Warning!” in bold type on the screen.
The <a> tag, or anchor tag, creates a link (hyperlink) in a Web page. A link, of course, can lead anywhere on the Web. How do you tell the browser where the link should point? Simply give the browser address instructions inside the <a> tags. For instance, you might type <a href="http://www.missingmanuals.com/">Click here!</a>.
The browser knows that when your visitor clicks the words “Click here!,” it should go to the Missing Manual Web site. The href part of the tag is called, in Dreamweaver, a property (you may also hear the term attribute) and the URL (the Universal Resource Locator or Web address) is the value. In this example, http://www. missingmanuals.com is the value of the Href property.
Fortunately, Dreamweaver exempts you from having to type any of these codes, and provides an easy-to-use window called the Property inspector for adding properties to your tags and other page elements. To create links the Dreamweaver way (read: the easy way), turn to Chapter 4.
Like any technology, HTML is showing its age. Although it has served its purpose well, it’s always been a somewhat sloppy language. Among other things, it allows uppercase, lowercase, or mixed case letters in tags (<body> and <BODY> are both correct, for example, and permits unclosed tags (so that you can use a single <p> tag without the closing </p> to create a paragraph). While this flexibility may make page writing easier, it also makes life more difficult for Web browsers, PDAs, and other technologies that must interact with data on the Web. Additionally, HTML doesn’t work with one of the hottest up-and-coming Internet languages: XML or Extensible Markup Language.
To keep pace with the times, an improved version of HTML, called XHTML is finding its way into more and more Web sites. Once again, Dreamweaver MX 2004 is right on the cutting edge: it can create and work with XHTML files. If you only understand HTML, don’t worry—XHTML isn’t a revolutionary new language that takes years to learn. It’s basically HTML, but with somewhat stricter guidelines. For example, the HTML page code shown in Section 0.2 would look like this in XHTML:
<!DOCTYPE html PUBLIC "-//W3C//DTD XHTML 1.0 Transitional//EN"
"http://www.w3.org/TR/xhtml1/DTD/xhtml1-transitional.dtd">
<html xmlns="http://www.w3.org/1999/xhtml">
<head>
<title>Hey, I am the title of this Web page.</title>
<meta http-equiv="Content-Type" content="text/html; charset=iso-
8859-1" />
</head>
<body>
<p>Hey, I am some body text on this Web page. </p>
</body>
</html>
Notice that everything below the <head> is exactly the same as the HTML page. The information that begins the page, however, is how the page identifies which standards it conforms to. In this case, it merely says that the page is a type of XML document, in particular, an XHTML document. (Don’t worry, Dreamweaver automatically writes all of this code when you create a new XHTML page.)
As you can see, the real code used to make the page is much like HTML. To make an XHTML file comply with XML, however, there are a few strict rules to keep in mind.
Begin the page with a document type declaration and a namespace. That’s the first few lines in the code above. They simply state what type of document the page is and points to files on the Web that contain definitions for this type of file.
Tags and tag attributes must be lowercase. Unlike in HTML, typing the tag <BODY> in an XHTML file is incorrect.
Quotation marks are required for tag attributes. For example, a link written like this: <a href=http://www.missingmanual.com> is valid in HTML, but won’t work in XHTML. You have to enclose the value of the Href property in quotes: <a href="http://www.missingmanual.com">.
All tags (even empty tags) must be closed. To create a paragraph in XHTML, for example, you must begin with <p> and end with </p>. However, some tags don’t come in pairs. These tags, called empty tags have no closing tag. The line break tag is one example. To close an empty tag, you must include a backslash at the end of the tag, like this: <br />.
If all this seems a bit confusing, don’t worry. All of these strict XHTML rules are built into Dreamweaver, so creating an XHTML page using Dreamweaver’s visual design tools won’t feel one bit different from creating an old-style HTML page. (For more information on creating an XHTML page in Dreamweaver, see Section 1.3.3.)
HTML used to be the only language you needed to know. You could build pages with colorful text and graphics and make words jump out using different sizes, fonts, and colors. But today, you can’t add much visual sophistication to a site without Cascading Style Sheets (CSS). CSS is a formatting language used to make text look good, add sophisticated layout to pages, and basically add style to your site.
From now on, think of HTML as merely the language you use to give organization to a page. It helps identify and structure the stuff you want the world to know about. Tags like <h1>, <h2>, and <h3> denote headlines and assign them relative importance: a heading 1 is more important than a heading 2. The <p> tag indicates a basic paragraph of information. Other tags provide further structural clues: a <ul> tag identifies a bulleted list (to make a list of recipe ingredients more intelligible, for example).
Cascading Style Sheets, on the other hand, add design flair to the highly structured HTML content, making it more beautiful and easier to read. In fact, Dreamweaver MX 2004’s biggest changes are in the realm of CSS. Essentially, a CSS style is just a rule that tells a Web browser how to display a particular element on a page—for example, to make a <h1> tag appear 36 pixels tall, in the Verdana font and the color orange.
But CSS is more powerful than that. You can use it to add borders, change margins, and even control the exact placement of an element on a page.
If you want to be a Web designer, you need to get to know Cascading Style Sheets. You’ll learn more about this exciting technology in Chapter 6.
You’ll find very little jargon or nerd terminology in this book. You will, however, encounter a few terms and concepts that you’ll encounter frequently in your computing life:
Clicking. This book gives you three kinds of instructions that require you to use your computer’s mouse or trackpad. To click means to point the arrow cursor at something on the screen and then—without moving the cursor at all—press and release the clicker button on the mouse (or laptop trackpad). To double-click, of course, means to click twice in rapid succession, again without moving the cursor at all. And to drag means to move the cursor while pressing the button continuously.
Keyboard shortcuts. Every time you take your hand off the keyboard to move the mouse, you lose time and potentially disrupt your creative flow. That’s why many experienced computer fans use keystroke combinations instead of menu commands wherever possible. Ctrl+B (
 -B), for example, is a keyboard shortcut for
boldface type in Dreamweaver (and most other programs).
-B), for example, is a keyboard shortcut for
boldface type in Dreamweaver (and most other programs).When you see a shortcut like Ctrl+S (
_S), it’s telling you to hold down the Ctrl or
key, and, while it’s down, type the letter S,
and then release both keys. (This command, by the way, saves changes
to the current document.)Choice is good. Dreamweaver frequently gives you several ways to trigger a particular command—by selecting a menu command, or by clicking a toolbar button, or by pressing a key combination, for example. Some people prefer the speed of keyboard shortcuts; others like the satisfaction of a visual command array available in menus or toolbars. This book lists all of the alternatives, but by no means are you expected to memorize all of them.
Despite the many improvements in software over the years, one feature has grown consistently worse: documentation. Until version 4, Dreamweaver even came with a printed manual. But since MX 2004, all you get is a Getting Started booklet. To get any real information, you need to delve into the program’s online help screens.
But even if you have no problem reading a help screen in one window as you work in another, something is still missing. At times, the terse electronic help screens assume you already understand the discussion at hand, and hurriedly skip over important topics that require an in-depth presentation. In addition, you don’t always get an objective evaluation of the program’s features. Engineers often add technically sophisticated features to a program because they can, not because you need them. You shouldn’t have to waste your time learning features that don’t help you get your work done.
The purpose of this book, then, is to serve as the manual that should have been in the box. In this book’s pages, you’ll find step-by-step instructions for using every Dreamweaver feature, including those you may not even have quite understood, let alone mastered, such as Libraries, Layout view, Behaviors, and Dreamweaver’s Dynamic Web site tools. In addition, you’ll find clear evaluations of each feature that help you determine which ones are useful to you, as well as how and when to use them.
Dreamweaver MX 2004: The Missing Manual is designed to accommodate readers at every technical level. The primary discussions are written for advanced beginner or intermediate computer users. But if you’re a first-timer, special sidebar articles called Up To Speed provide the introductory information you need to understand the topic at hand. If you’re an advanced user, on the other hand, keep your eye out for similar shaded boxes called Power Users’ Clinic. They offer more technical tips, tricks, and shortcuts for the experienced computer fan.
Throughout this book, and throughout the Missing Manual series, you’ll find sentences like this one: “Open the System Folder→Library→Fonts folder.” That’s shorthand for a much longer instruction that directs you to open three nested folders in sequence, like this: “On your hard drive, you’ll find a folder called System. Open that. Inside the System folder window is a folder called Library; double-click it to open it. Inside that folder is yet another one called Fonts. Double-click to open it, too.”
Similarly, this kind of arrow shorthand helps to simplify the business of choosing commands in menus, as shown in Figure I-2.
Dreamweaver MX 2004 works almost precisely the same way in its Macintosh and Windows versions. Every button in every dialog box is exactly the same; the software response to every command is identical. In this book, the illustrations have been given even-handed treatment, alternating between the two operating systems where Dreamweaver is at home (Windows XP and Mac OS X).
One of the biggest differences between Mac and Windows software
is the keystrokes, because the Ctrl key in Windows is the equivalent
of the Macintosh ![]() key. And the key labeled Alt on a PC (and on
non-U.S. Macs) is the equivalent of the Option key on American Mac
keyboards.
key. And the key labeled Alt on a PC (and on
non-U.S. Macs) is the equivalent of the Option key on American Mac
keyboards.
Whenever this book refers to a key combination, therefore,
you’ll see the Windows keystroke listed first (with + symbols, as is
customary in Windows documentation); the Macintosh keystroke follows
in parentheses (with - symbols, in time-honored Mac fashion). In other
words, you might read, “The keyboard shortcut for saving a file is
Ctrl+S (![]() -S).”
-S).”
Dreamweaver MX 2004: The Missing Manual is divided into six parts, each containing several chapters:
Part I, Building a Web Page, explores Dreamweaver’s interface and takes you through the basic steps of building a Web page. It explains how to add text and format it, how to link from one page to another, and how to spice up your designs with graphics.
Part II, Building a Better Web Page, takes you deeper into Dreamweaver and explains how to gain greater control of the design of a Web page. You’ll learn how to use more advanced features such as tables, layers, Cascading Style Sheets, and frames. In addition, you’ll get step-by-step instruction in creating advanced page layouts, as well as how to view and work with the underlying HTML code of a page.
Part III, Bringing Your Pages to Life, helps you add interactivity to your site. From using forms to collect information from your site’s visitors, to adding complex JavaScript programs, this section guides you through adding animation, multimedia, and other interactive effects with ease.
Part IV, Building a Web Site, covers the big picture: managing the pages and files in your Web site, testing links and pages, and moving your site onto a Web server connected to the Internet. And since you’re not always working solo, this section also covers features that let you work with a team of Web developers.
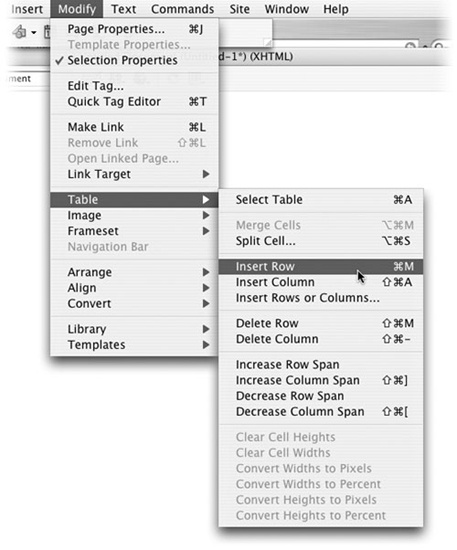
Figure I-2. When you read in a Missing Manual, “Choose Modify→Table→ Insert Row,” that means: “Click the Modify menu to open it. Then click Table in that menu; choose Row in the resulting submenu.”
Part V, Dreamweaver Power, shows you how to take full advantage of such timesaving features as Libraries, Templates, and History panel automation. It also covers Dreamweaver’s Extension Manager, a program that can add hundreds of new free and commercial features to the program.
Part VI, Dynamic Dreamweaver, presents a gentle introduction to the often confusing and complex world of database-driven Web sites. You’ll learn what you need to build a dynamic Web site; how to connect Dreamweaver to a database; and how to use Dreamweaver to build pages that can display database information as well as add, edit, and delete database records.
At the end of the book, an appendix provides a list of Internet resources for additional Web design help. At the Missing Manual Web site, you’ll find a free, downloadable bonus appendix: a menu-by-menu explanation of the Dreamweaver MX 2004 commands, in both Windows and Macintosh versions.
This book is designed to get your work onto the Web faster and more professionally; it’s only natural, then, that half the value of this book also lies on the Web.
As you read the book’s chapters, you’ll encounter a number of living examples—step-by-step tutorials that you can build yourself, using raw materials (like graphics and half-completed Web pages) that you can download from www.sawmac.com/dwmx2004/ . You might not gain very much by simply reading these step-by-step lessons while relaxing in your porch hammock. But if you take the time to work through them at the computer, you’ll discover that these tutorials give you an unprecedented insight into the way professional designers build Web pages.
You’ll also find, in this book’s lessons, the URLs of the finished pages, so that you can compare your Dreamweaver work with the final result. In other words, you won’t just see pictures of Dreamweaver’s output in the pages of the book; you’ll find the actual, working Web pages on the Internet.
At the missingmanuals.com Web site, you’ll find articles, tips, and updates to the book. In fact, you’re invited and encouraged to submit such corrections and updates yourself. In an effort to keep the book as up-to-date and accurate as possible, each time we print more copies of this book, we’ll make any confirmed corrections you’ve suggested. We’ll also note such changes on the Web site, so that you can mark important corrections into your own copy of the book, if you like. (Click the book’s name, and then click the Errata link, to see the changes.)
In the meantime, we’d love to hear your own suggestions for new books in the Missing Manual line. There’s a place for that on the Web site, too, as well as a place to sign up for free email notification of new titles in the series.
Get Dreamweaver MX 2004: The Missing Manual now with the O’Reilly learning platform.
O’Reilly members experience books, live events, courses curated by job role, and more from O’Reilly and nearly 200 top publishers.

