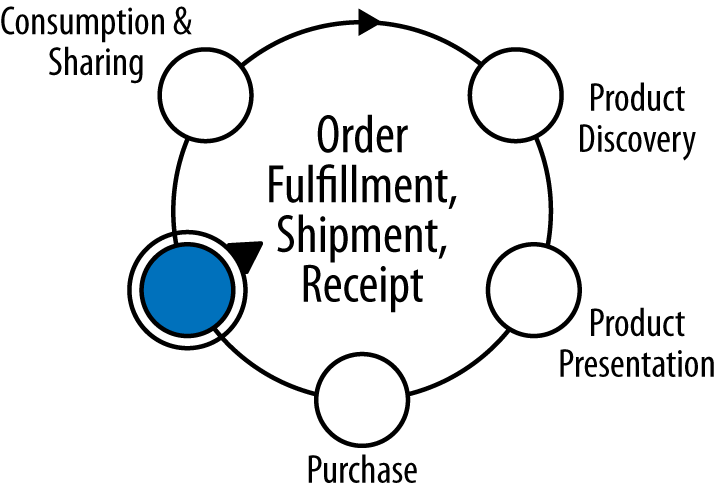
The fourth stage in the simplified commerce lifecycle, as shown in Figure 4-1, involves the fulfillment, shipment, and receipt of orders. Merchants sometimes consider the steps after the purchase transaction as simply routine actions to fulfill the order, and think that at this point the work of receiving a new order and cementing a new customer relationship is complete. However, given the competitive landscape of the Internet and the ease with which consumers can review their experiences with a merchant, this step in the commerce lifecycle is critical to establishing an extensive base of repeat customers and referrals.
The range of APIs available to support the fulfillment process is growing rapidly as third-party payment providers, shipping firms, and merchants recognize the value of providing tighter integration into their platforms through APIs. In this chapter we will look at streamlining the fulfillment process through automated notifications for faster packaging, adding flexible shipping options to a Magento cart, and delivering orders faster by leveraging chained payments through PayPal to pay suppliers. In the end, this automation and the added efficiency due to the use of APIs can result in a simpler process for the merchant, and a positive customer experience.
In the back office, several processes are triggered once the sale of a product takes place. Automating these tasks can reduce the time taken and any errors in fulfilling orders. It would be helpful if there were a way to determine automatically when a transaction cleared, was rejected, or was cancelled so that shipping slips could be printed, emails automatically sent, and accounts updated.
As part of a PayPal business account, merchants have access to a service for automated notifications: the Instant Payment Notification, or IPN for short. This service is able to notify a URL on the merchant’s side of transaction status changes and pass along specific order information. In this example we will use the IPN service to notify a web page when transactions are completed. If the transaction is via a shopping cart and has a completed status, the page will create a shipping slip or invoice based on a previously designed template. The shipping invoices can then be emailed, printed, or reviewed in an administration interface.
When a transaction is performed on behalf of a business by PayPal, whether through a virtual terminal, express checkout, recurring payment, or some other form, a notification can be sent from the PayPal servers to a handler or listener web page. The notification is built as a posted series of key and value pairs. The fields contain a variety of information including the transaction ID, type, and payment status. Depending on the transaction type and status, the data transmitted can include shipping information, detailed shopping cart information (item name, quantity), and currency information.
After receiving an IPN, your listener will need to post the IPN back to PayPal in a validation request. There are two reasons for posting the IPN back to PayPal:
Validation of the authenticity of the IPN
Verification for PayPal that the IPN was received
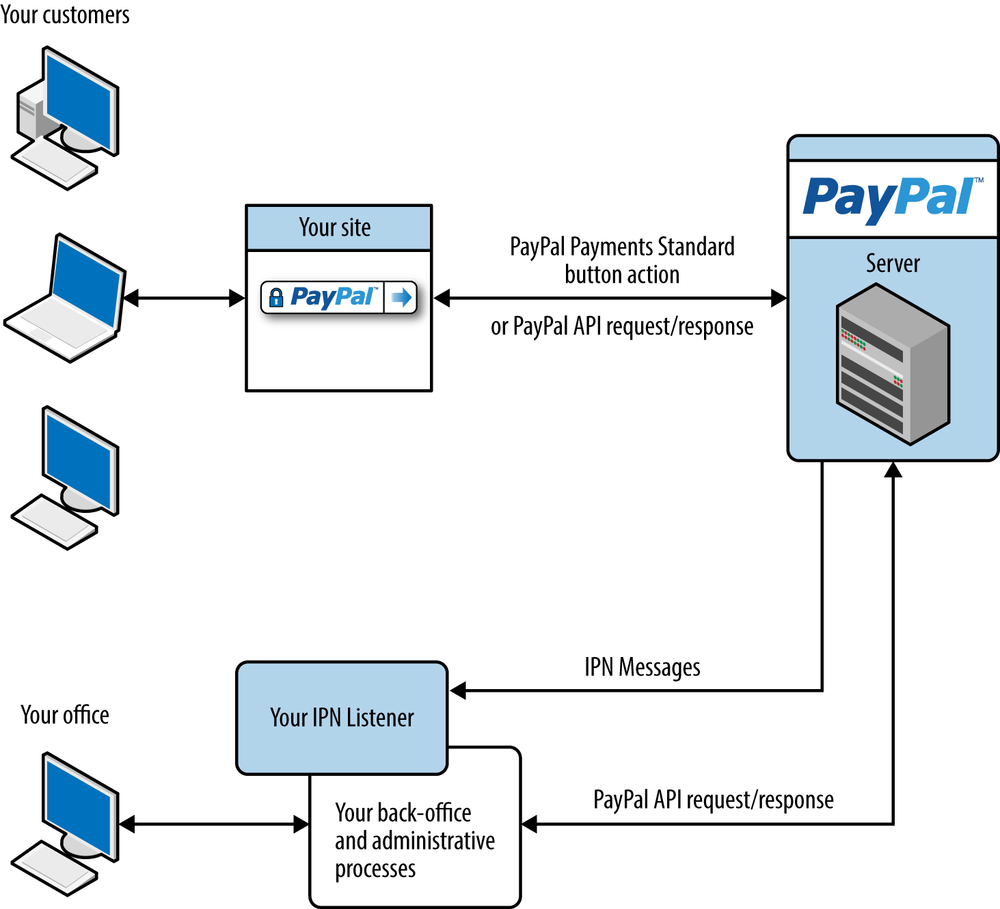
If your listener does not ask PayPal to verify the IPN, there is the potential that a fictitious IPN could be injected into your listener, which could kick off any automated processing in place. When the PayPal servers receive the validation request, they will mark the request as either valid or invalid based on what was sent in the IPN. If the IPN is verified, you can parse out the values, store the information in database tables for orders, message other back office systems, and kick off other processes (such as creating a shipping form, as demonstrated in this solution). This IPN flow is illustrated in Figure 4-2.
In this example, a PHP file will be installed on the web server to handle notifications from PayPal. When a notification is sent to the listener, the IPN data will be processed and a static shipping invoice HTML page will be created in a slips directory. The structure of the invoice is based on shipping_slip.html, which is a template shipping invoice HTML file.
To create your IPN listener, open an empty PHP file named IPNListener.php. This will be the page in the URL that you direct PayPal to send the IPNs to when notifications occur. Add the code in Example 4-1 to the file.
Example 4-1. IPNListener.php
<?php/****************************************************IPNListener.phpThis file receives IPNs from PayPal and processesthem. Since this is from server to server, there isno UI for this file. The only output is the log file,which is for basic logging only.****************************************************/// flag to define if working in sandbox (debug mode)$FLG_DEBUG_MODE=true;// set our log file (could replace with PEAR)$logfile="./IPNListener.log";$fh=fopen($logfile,'a')ordie("can't open log file");logWrite("New IPN");// create validate request with command$req='cmd='.urlencode('_notify-validate');// add back all fields of the posted stringforeach($_POSTas$key=>$value){$value=urlencode(stripslashes($value));$req.="&$key=$value";}// set if using the sandbox or production for validationif($FLG_DEBUG_MODE){$val_server='https://www.sandbox.paypal.com/cgi-bin/webscr';}else{$val_server='https://www.paypal.com/cgi-bin/webscr';}// launch the curl request to PayPal servers to verify$ch=curl_init();curl_setopt($ch,CURLOPT_URL,$val_server);curl_setopt($ch,CURLOPT_HEADER,0);curl_setopt($ch,CURLOPT_POST,1);curl_setopt($ch,CURLOPT_RETURNTRANSFER,1);curl_setopt($ch,CURLOPT_POSTFIELDS,$req);curl_setopt($ch,CURLOPT_SSL_VERIFYPEER,1);curl_setopt($ch,CURLOPT_SSL_VERIFYHOST,2);$res=curl_exec($ch);curl_close($ch);// check if PayPal verified the IPN receivedif(strcmp($res,"VERIFIED")==0){// log out IPN in a JSON formatlogWrite("Verified: ".json_encode($_POST));// assign posted variables to local variables$txn_id=$_POST['txn_id'];$txn_type=$_POST['txn_type'];$payment_status=$_POST['payment_status'];$receiver_email=$_POST['receiver_email'];// TODO: check that receiver_email is your primary PayPal email// dispatch based on status of paymentswitch($payment_status){case"Completed":// completed sale// TODO: check that payment_amount/payment_currency are correct// TODO: check that txn_id has not been previously processed// check if the type of transaction is cartif($txn_type=='cart'){// set up our holding arrays for keys and values$arrShipKeys=array();$arrShipValues=array();// set our shipping header informationarray_push($arrShipKeys,"<<DATE>>");array_push($arrShipValues,date("M j, Y",strtotime($_POST['payment_date'])));array_push($arrShipKeys,"<<STATUS>>");array_push($arrShipValues,"PAID");array_push($arrShipKeys,"<<TXNID>>");array_push($arrShipValues,$txn_id);// get payer information and add to arrays// TODO: check if following funcs required$first_name=$_POST['first_name'];$last_name=$_POST['last_name'];$payer_email=$_POST['payer_email'];$address_street=$_POST['address_street'];$address_city=$_POST['address_city'];$address_state=$_POST['address_state'];$address_zip=$_POST['address_zip'];$address_country=$_POST['address_country'];array_push($arrShipKeys,"<<ADDRESS>>");array_push($arrShipValues,$first_name." ".$last_name."<br/>".$address_street."<br/>".$address_city.", ".$address_state." ".$address_zip."<br/>".$address_country);// get rest of transaction details$shipping_method=$_POST['shipping_method'];if(isset($_POST['num_cart_items'])){$num_cart_items=$_POST['num_cart_items'];}elseif($FLG_DEBUG_MODE){// catch defect with simulator-based IPN$num_cart_items=1;}else{$num_cart_items=0;}// get the items in the cart$subtotal=0;$items="";for($i=1;$i<=$num_cart_items;$i+=1){// get fields of items in transaction and store each set$item_order_id=$i;$item_number=$_POST['item_number'.$i];$item_name=$_POST['item_name'.$i];$quantity=$_POST['quantity'.$i];$mc_gross=$_POST['mc_gross_'.$i];$subtotal+=$mc_gross;$items.='<tr><td align="right" valign="top"class="borderBottomLeftRight"><p class="sliptabledata">'.$item_number.'</p></td>'.'<td align="left" valign="top"class="borderBottomRight"><p class="sliptabledata">'.$item_name.'</p></td>'.'<td align="center" valign="top"class="borderBottomRight"><p class="sliptabledata">'.$quantity.'</p></td>'.'<td align="right" valign="top"class="borderBottomRight"><p class="sliptabledata">'.$mc_gross.'</p></td>'.'</tr>';}array_push($arrShipKeys,"<<ITEMS>>");array_push($arrShipValues,$items);// set the financial section numbersarray_push($arrShipKeys,"<<SUBTOTAL>>");array_push($arrShipValues,number_format($subtotal,2));$mc_shipping=$_POST['mc_shipping'];if($mc_shipping==""){$mc_shipping=0;}array_push($arrShipKeys,"<<SHIPPING>>");array_push($arrShipValues,number_format($mc_shipping,2));$mc_handling=$_POST['mc_handling'];if($mc_handling==""){$mc_handling=0;}array_push($arrShipKeys,"<<HANDLING>>");array_push($arrShipValues,number_format($mc_handling,2));$tax=$_POST['tax'];if($tax==""){$tax=0;}array_push($arrShipKeys,"<<TAX>>");array_push($arrShipValues,number_format($tax,2));$mc_gross=$_POST['mc_gross'];array_push($arrShipKeys,"<<TOTAL>>");array_push($arrShipValues,$mc_gross);// finished parsing IPNlogWrite("Finished IPN");// call the function to create shipping labelcreateShipping($txn_id,$arrShipKeys,$arrShipValues);}// end if txn_type is cartbreak;// some other possible IPN transaction statuses:case"Reversed":// sale was reversed - mark order as suchbreak;case"Refunded":// refunded: you refunded the paymentbreak;}// end switch payment status}elseif(strcmp($res,"INVALID")==0){// PayPal responded with invalid requestlogWrite("INVALID REQUEST: ".json_encode($_POST));}// close log filefclose($fh);// function to create the shipping formfunctioncreateShipping($txn_id,$arrShipKeys,$arrShipValues){// read in template file$ship_contents=file_get_contents("shipping_slip.html");// verify the template was read inif($ship_contents){// merge in fields from IPN$ship_contents=str_replace($arrShipKeys,$arrShipValues,$ship_contents);// set output file to txn # and output merged content$shipping_file="./slips/".$txn_id.".html";file_put_contents($shipping_file,$ship_contents);}}// function to add log entryfunctionlogWrite($log_msg){global$fh;$log_entry=date("y/m/d G:i:s")." - ".$log_msg."\n";fwrite($fh,$log_entry);}?>
To prevent security issues and the possible injection of fictitious IPNs, the first action taken when the file receives an IPN is to repackage the posted fields of the transaction from PayPal and ask the PayPal servers to verify that the IPN is valid. If a validation request is not sent back to the PayPal system, PayPal will attempt to resend the IPN for a period of time.
To request PayPal validation of the IPN, cURL is used to send the IPN fields in a new query string containing an additional key and value, cmd=_notify-validate. The addition of this new key and value asks the PayPal servers to validate the IPN that was received as having come from PayPal:
<?php// create validate request with command$req='cmd='.urlencode('_notify-validate');// add back all fields of the posted stringforeach($_POSTas$key=>$value){$value=urlencode(stripslashes($value));$req.="&$key=$value";}
Note
In this example a log file is used for debugging purposes since the IPN listener being called by PayPal will not display any visual queue when an IPN is received. In the log file we will put brief messages, including a JSON version of the IPN payload. To read the payload of a received IPN copy, paste the JSON into a JSON viewer.
You can replace this logger with a more powerful and production-ready version using PEAR or the like.
In this code a flag is added, $FLAG_DEBUG_MODE, to indicate whether we are
running in debug mode. PayPal provides a testing sandbox here from which we can send
test IPNs, as we will explore later. The script sets the correct
endpoint based on the mode in which we are running. This allows you to
test your IPN handler by sending and validating IPNs from the PayPal
sandbox prior to releasing the handler to production, at which time you
would set the debug flag to false.
Note
It is a good practice to give the listener file an obscure name and to have the file located in an orphaned, unsearchable directory so that anyone looking will not accidentally locate it.
Upon receiving a response from PayPal and validating that the IPN
is VERIFIED, the script will log the
JSON version of the payload and begin to parse the payload fields.
Before getting too far into the
transaction, however, the script checks the payment_status to
determine if this is a Completed
transaction, meaning that a payment has been successful. PayPal
provides IPNs on several different transaction statuses and types. You
can review the list of available payment statuses and transaction types
in the online documentation.
In this case we want to also check that this is a completed payment from
a shopping cart, so the code also verifies that the transaction type is
of type cart ($txn_type=='cart').
Once all the fields have been parsed and pushed into arrays with
their corresponding keys for the shipping form template, the script
calls the createShipping function,
passing in the transaction ID and arrays. The createShipping function then reads in the
template HTML file, shipping_slip.html (Example 4-2), and replaces the matching keys
from the key array with the corresponding values in the value array. The
newly merged shipping invoice is then saved out to a new file in the
slips directory and named with the
unique transaction ID provided by PayPal.
Example 4-2. Shipping invoice template
<!DOCTYPE html><html><head><metacharset="UTF-8"/><title>Shipping Invoice Template</title><style>body{font-family:Verdana,Arial,Helvetica,sans-serif;font-size:10pt;margin:50px0px;padding:0px;text-align:center;}H1{margin:0px;font-weight:bold;font-size:18px;color:#332B26;}label{display:block;padding:005px;width:110px;}#slip{width:744px;margin:0pxauto;text-align:left;padding:15px;}.sliptableheader{margin:5px10px5px10px;font-weight:bold;}.sliptabledata{margin:5px10px5px10px;}#shipto{clear:both;padding-top:40px}#shiptolegend{font-size:1.1em;padding-left:5px;padding-right:5px;position:relative;}#shiptofieldset{border:1pxsolid#000;border-radius:5px;float:left;padding:10px;width:360px;}#invoice{float:right}#invoicelegend{font-size:1.5em;position:relative;text-align:right}#invoicefieldset{border:1pxsolid#000;border-radius:5px;width:250px;padding:10px}#invoiceli{clear:both;list-style-type:none;margin:0;padding:0;}#invoiceol{padding:0;margin:0}#invoicelabel{display:block;padding:5px;width:63px;border:1pxsolid#000;float:left;text-align:right}#invoicespan{display:block;padding:5px;width:237px;border:1pxsolid#000;text-align:right}.borderBottomLeftRight{border-left:1pxsolidBlack;border-bottom:1pxsolidBlack;border-right:1pxsolidBlack;font-family:Arial,Helvetica,sans-serif;font-size:9pt;font-style:normal;line-height:normal;font-weight:normal;color:#000000;text-decoration:none;}.borderBottomRight{font-family:Arial,Helvetica,sans-serif;font-size:9pt;font-style:normal;line-height:normal;font-weight:normal;color:#000000;text-decoration:none;border-bottom:1pxsolidBlack;border-right:1pxsolidBlack;}.borderAll{font-family:Arial,Helvetica,sans-serif;font-size:9pt;font-style:normal;line-height:normal;font-weight:normal;color:#000000;text-decoration:none;border:1pxsolidBlack;}.borderBottomLeft{font-family:Arial,Helvetica,sans-serif;border-bottom:1pxsolidBlack;border-left:1pxsolidBlack;font-size:9pt;font-style:normal;line-height:normal;font-weight:normal;color:#000000;text-decoration:none;}</style></head><body><!-- page break always for printing --><brstyle="page-break-before:always;"/><divid="slip"><divid="headerLogo"style="float:left; padding-right:10px;"><imgsrc="logo.png"></div><divid="headerCompany"style="float:left"><H1>Your Company</H1><br/>yourcompany.com<br/>support@yourcompany.com<br/>1-800-852-1973</div><divid="invoice"><fieldset><legend>Shipping Invoice</legend><ol><li><label>Date</label><span><<DATE>></span></li><li><label>Status</label><span><<STATUS>></span></li><li><label>Txn ID</label><span><<TXNID>></span></li></ol></fieldset></div><!-- address blocks --><divid="shipto"><fieldset><legend>Ship To</legend><pstyle="margin:5px 0px 5px 10px;"><<ADDRESS>></p></fieldset></div><!-- order details --><divstyle="clear:both; padding-top:50px;"><tablewidth="100%"border="0px"cellpadding="0"cellspacing="0"><tr><tdcolspan="4"align="left"class="borderAll"><pclass="sliptableheader">Order Details</p></td></tr><tr><tdwidth="12%"align="center"class="borderBottomLeftRight"><pclass="sliptableheader">Item #</p></td><tdalign="center"class="borderBottomRight"><pclass="sliptableheader">Item</p></td><tdalign="center"class="borderBottomRight"><pclass="sliptableheader">Quantity</p></td><tdwidth="10%"align="right"class="borderBottomRight"nowrap><pclass="sliptableheader">Ext Price</p></td></tr><<ITEMS>><tr><tdalign="rigt"valign="top"class="borderBottomLeftRight"></td><tdalign="left"valign="top"class="borderBottomRight"><pclass="sliptabledata"> </p></td><tdalign="center"valign="top"class="borderBottomRight"><pclass="sliptabledata"> </p></td><tdalign="center"valign="top"class="borderBottomRight"><pclass="sliptabledata"> </p></td></tr><tr><tdcolspan="2"align="center"class="borderBottomLeft">Thank you for your order. We look forward to serving you in the future.</td><tdalign="right"class="borderBottomRight"><pclass="sliptabledata">Subtotal<br/>Shipping<br/>Handling<br/>Tax</p></td><tdalign="right"valign="top"class="borderBottomRight"nowrap><pclass="sliptabledata"><<SUBTOTAL>><br/><<SHIPPING>><br/><<HANDLING>><br/><<TAX>></p></td></tr><tr><tdcolspan="3"width="90%"align="right"class="borderBottomLeftRight"><pclass="sliptableheader">Total ($ USD)</p></td><tdwidth="10%"align="right"valign="top"class="borderBottomRight"nowrap><pclass="sliptableheader"><<TOTAL>></td></tr></table></div></div></body></html>
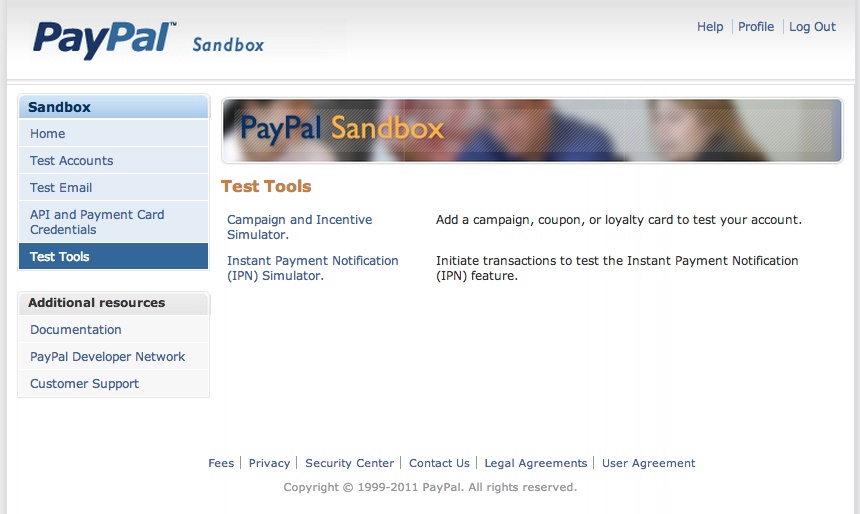
Now that we have the IPN listener and the template shipping invoice HTML file in place, we can send a test IPN from the PayPal sandbox. If you do not have a developer login to the sandbox, go to https://developer.paypal.com and create an account.
After logging into the PayPal sandbox, navigate to the Test Tools section in the site menu. On the Test Tools page, select the Instant Payment Notification (IPN) Simulator as seen in Figure 4-3.
The IPN Simulator provides prebuilt forms with the required fields for a variety of transaction types, including express checkout, cart checkout, and eBay checkout. More importantly, you can set the payment status of the transaction to test refunds, cancelled payments, and other statuses if needed.
When the IPN Simulator loads, enter the URL of your IPN listener in the IPN Handler URL field and select “Cart Checkout” as the transaction type. The test IPN form will open with prefilled entries where appropriate. Update any of the fields you would like, and then click “Send IPN.” The simulator will refresh and inform you whether the IPN was sent successfully to the listener. If the IPN delivery failed, the IPN Simulator will typically display the reason, such as “HTTP error code 404: Not Found.” Make sure that you have entered the URL of your listener correctly.
Note
Note that IPNs sent from the IPN Simulator will include an extra key/value pair in their payload, test_ipn=1, which designates that the IPN has come from the simulator and allows you to catch test IPNs independently in your code if desired.
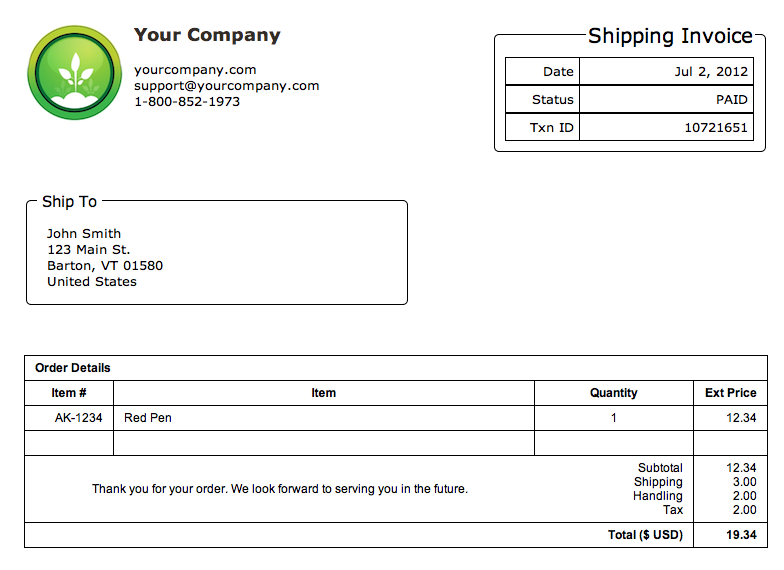
If the IPN delivery is successful, the resulting shipping invoice will be found in your slips directory. Figure 4-4 shows how the individual fields from our test IPN have been taken and put into the shipping invoice in their appropriate places.
Remember, to put this example into production you will need to
change the debug flag in the listener to false to set the correct PayPal account to
send IPNs to when transactions are received. You can also tell PayPal to
send IPNs via a notification URL field on individual transactions if you
want to programmatically set the notification URL.
Note
In this example a single listener is employed to handle all IPNs
that are sent, but multiple IPN listeners can be employed to handle
different transaction types. In this manner, a different listener
could handle refund transactions launched from a refund page, for
example. The notification_url field
can be used in many of the PayPal API calls to designate an IPN
listener.
This scenario provides a brief example of leveraging the IPN functionality built into PayPal transactions to automate your backend systems. Your specific listener could perform a number of desired functions, including customer order database updates, customer emailings, recurring payment status notifications, refund administration, and account management.
Setting up a storefront is made extremely easy with the many features of Magento. One of the most powerful yet underutilized features of the Magento commerce system is the ability to customize it by adding your own extension or module. An area that people often want to enhance or add their own custom logic to is the available shipping methods. Magento covers quite a few of the standard shipping carriers, including DHL, UPS, and FedEx, but you may have your own packer/shipper or want to set up your own charging structure for different methods.
The code structure of Magento has been set up to allow for fairly straightforward extension of functionality through the addition of configuration files and PHP code. You may have a shipper with an accessible API for shipping method calculations, or want to structure your own calculated methods. With Magento, you can add the new shipping carrier or methods by adding a new module, which will automatically be picked up by Magento and integrated into the administration area and shopping cart.
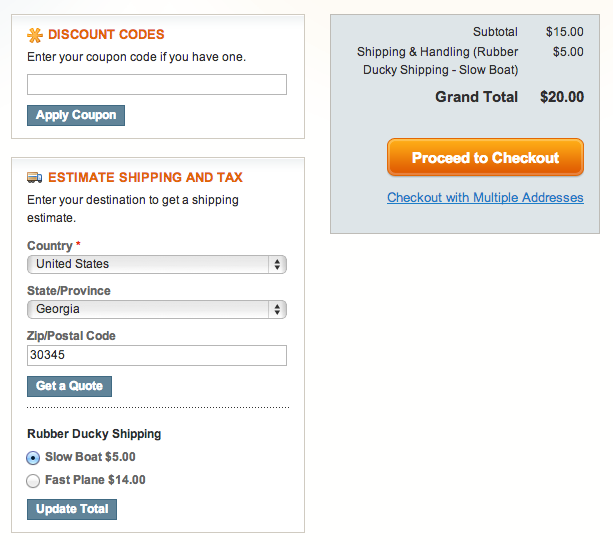
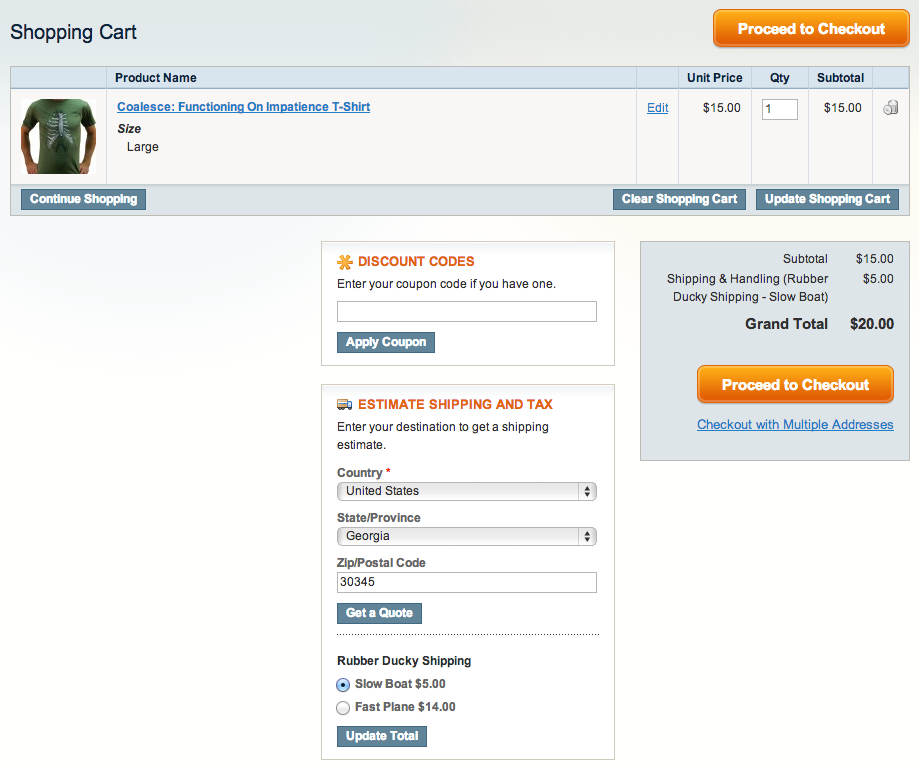
In this example a new shipping carrier module will be created for a fictitious carrier, “Rubber Ducky Shipping.” The carrier offers two simple shipping methods, “slow boat” and “fast plane,” as seen in the bottom of the checkout page shown in Figure 4-5.
After completing the module, using the code provided as a basis you will be able to create your own version and change the shipping method logic to support your own carrier API or custom shipping methods.
To create a full shipping carrier solution, the new shipping module will also appear in the system configuration shipping methods section for setup and will automatically be pulled into the list of available shipping methods when a customer checks out with his cart. The shipping method calculations will be simple and be based on a formula of a base fee plus a percentage of the cart subtotal. You’ll be able to set the fee and percentage amounts for the formula in the Magento system configuration for the shipping carrier methods. The example will be broken into the following four steps:
Create the Magento module directory structure.
Add the module definition through configuration files.
Add the module settings to the Magento system configuration.
Create the shipping method logic and validate the functionality in a cart.
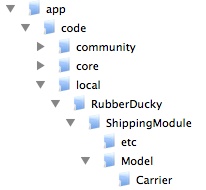
The first step is to prepare the directory structure for the module configuration and logic files that will be added to define the module. In a default community installation of Magento the app/code directory structure will only contain community and core subdirectories, which represent the code pools used by default.
Note
For this example we are using the latest version of Magento Community Edition, version 1.7.0.2, with the optional sample data, version 1.6.1.0. The Magento Community Edition and sample data are available for download.
A third code pool is available, named local. The local code pool is for extensions to the core code that are only for this specific, or local, instance of Magento. The local code pool will be the home for our shipping module, so we will need to add the local subdirectory and the child subdirectory structure, as seen in Figure 4-6.
In addition to adding the local subdirectory and the module
subdirectories under the local
folder, it is important to inform the PHP server about the local path so that Magento can find the new
module. You will need to make sure that the local subdirectory is in the include_path variable of your PHP
implementation.
Warning
It is essential that the include_path of your PHP environment contain
the app/code/local path so that
Magento can locate and execute the module. You can verify the path
contents by checking the
include_path variable of the phpinfo method.
Once the directory structure is set in the Magento installation, you can define the module by adding two configuration files. The first configuration file defines the module, the current active status, and which code pool the module files may be found in. The XML configuration file is named based on your module’s name; for this example it will be called RubberDucky_ShippingModule.xml and is shown in Example 4-3. Once you have created this file, you should copy it into the /app/etc Magento directory.
Example 4-3. RubberDucky_ShippingModule.xml definition
<config><modules><RubberDucky_ShippingModule><active>true</active><codePool>local</codePool></RubberDucky_ShippingModule></modules></config>
The second configuration file required for the Magento system to recognize the module is config.xml, shown in Example 4-4. The config.xml file defines the version of the module, the class model to use, and the resources for the module. This file should be placed in the /app/code/local/RubberDucky/ShippingModule/etc folder.
Example 4-4. config.xml for ShippingModule/etc folder
<?xml version="1.0"?><config><modules><RubberDucky_ShippingModule><version>1.0.0</version></RubberDucky_ShippingModule></modules><global><models><shippingmodule><class>RubberDucky_ShippingModule_Model</class></shippingmodule></models><resources><shippingmodule_setup><setup><module>RubberDucky_ShippingModule</module></setup><connection><use>core_setup</use></connection></shippingmodule_setup></resources></global><default><carriers><shippingmodule><active>1</active><model>shippingmodule/carrier_shippingmodule</model></shippingmodule></carriers></default></config>
Once these two configuration files are in place, the system will recognize the extension. However, we have not told the system how to present the module in the administration side of Magento or the frontend, so nothing will be seen as yet in the Magento frontend.
Note
If you are working on a development system, it may be easier when working with extensions and modules to turn caching off in Magento through System → Cache Management. Otherwise, as you make changes to the module you will need to flush the Magento cache to pick up the new modifications.
To enable management of the module’s settings through System
→ Configuration → Shipping Methods in the administration area,
the Magento system needs to be told what properties can be set. This is
done through an XML configuration file called system.xml, shown in Example 4-5. This file should be placed
in the module etc directory, like
the config.xml file (i.e., in
/app/code/local/RubberDucky_ShippingModule/etc).
The purpose of this file is to define the specific settings of the
module, including an active switch, title, and presentation sort order.
In this case other fields are also included, which will allow the
administrator to set the shipping method base fees and percentages to be
used. The fields for the shipping methods are defined as slow_boat_base_fee, slow_boat_base_percent, fast_plane_base_fee, and fast_plane_base_percent. The fields defined in
the system.xml file will be used in
the logic of the module for doing the calculations we need for each
shipping rate.
Example 4-5. system.xml configuration file
<?xml version="1.0"?><config><sections><carriers><groups><shippingmoduletranslate="label"module="shipping"><label>Rubber Ducky Shipping</label><frontend_type>text</frontend_type><sort_order>13</sort_order><show_in_default>1</show_in_default><show_in_website>1</show_in_website><show_in_store>1</show_in_store><fields><activetranslate="label"><label>Enabled</label><frontend_type>select</frontend_type><source_model>adminhtml/system_config_source_yesno</source_model><sort_order>1</sort_order><show_in_default>1</show_in_default><show_in_website>1</show_in_website><show_in_store>1</show_in_store></active><titletranslate="label"><label>Title</label><frontend_type>text</frontend_type><sort_order>2</sort_order><show_in_default>1</show_in_default><show_in_website>1</show_in_website><show_in_store>1</show_in_store></title><slow_boat_base_feetranslate="label"><label>Slow boat base fee</label><frontend_type>text</frontend_type><sort_order>10</sort_order><show_in_default>1</show_in_default><show_in_website>1</show_in_website><show_in_store>1</show_in_store></slow_boat_base_fee><slow_boat_percenttranslate="label"><label>Slow boat percent add (0.05 = 5 percent)</label><frontend_type>text</frontend_type><sort_order>11</sort_order><show_in_default>1</show_in_default><show_in_website>1</show_in_website><show_in_store>1</show_in_store></slow_boat_percent><fast_plane_base_feetranslate="label"><label>Fast plane base fee</label><frontend_type>text</frontend_type><sort_order>12</sort_order><show_in_default>1</show_in_default><show_in_website>1</show_in_website><show_in_store>1</show_in_store></fast_plane_base_fee><fast_plane_percenttranslate="label"><label>Fast plane percent add (0.15 = 15 percent)</label><frontend_type>text</frontend_type><sort_order>13</sort_order><show_in_default>1</show_in_default><show_in_website>1</show_in_website><show_in_store>1</show_in_store></fast_plane_percent><specificerrmsgtranslate="label"><label>Displayed Error Message</label><frontend_type>textarea</frontend_type><sort_order>80</sort_order><show_in_default>1</show_in_default><show_in_website>1</show_in_website><show_in_store>1</show_in_store></specificerrmsg><showmethodtranslate="label"><label>Show method if not applicable</label><frontend_type>select</frontend_type><sort_order>92</sort_order><source_model>adminhtml/system_config_source_yesno</source_model><show_in_default>1</show_in_default><show_in_website>1</show_in_website><show_in_store>1</show_in_store></showmethod><sort_ordertranslate="label"><label>Sort order</label><frontend_type>text</frontend_type><sort_order>100</sort_order><show_in_default>1</show_in_default><show_in_website>1</show_in_website><show_in_store>1</show_in_store></sort_order></fields></shippingmodule></groups></carriers></sections></config>
If you review the other shipping carriers in the Magento shipping methods configuration area, you will find many other fields that could be added. The fields that you add will be determined by what your logic requires. For example, if your shipping calculations leverage an outside API set that requires a set of credentials, your settings may include fields for the remote service login credentials.
Note
If you’d like to see the system.xml definition files for some of the other shipping carriers, the default system.xml for the included carriers is available at app/code/core/Mage/Usa/etc/system.xml. This file includes the shipping carrier properties for all the out-of-box services, such as FedEx and UPS.
After uploading the config.xml file to the proper location, you can verify that Magento has loaded the module and the settings are available by logging into the administration side of Magento and navigating to the System → Configuration → Shipping Methods area. If the module has been configured correctly, you should see the Rubber Ducky Shipping carrier listed among the possible carriers, with the settings defined in the config.xml file (as seen in Figure 4-7).
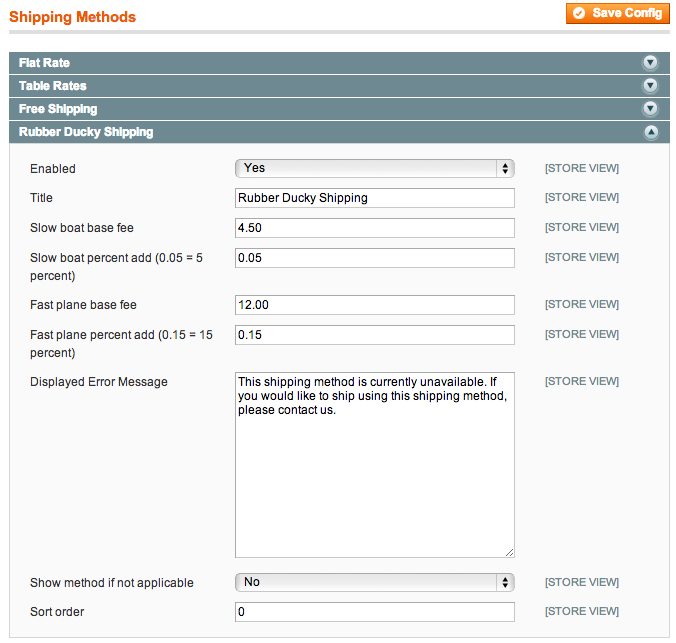
When you open the Rubber Ducky Shipping carrier settings the first time, the values for the properties will be empty. The Enabled field should be set to Yes and the title to the name of the carrier. The base fee and percentage can be filled in with the values you would like to be used for your calculations. Here, the values $4.50 and 5 percent and $12.00 and 15 percent have been used for the slow boat and fast plane methods, respectively. A text block can be added for display when an error occurs, and you can select to hide the method if not applicable. Lastly, to give the carrier top billing in the list of carriers displayed in the cart, set the sort order to zero. Click “Save Config” to save the settings. The module settings should now be configured.
Now that the module has been configured in the administration console, the last step is to add the logic for doing the actual calculations for our two shipping methods, slow boat and fast plane. To add the logic for the new module, we have to add the shipping module class PHP file into the /app/code/local/RubberDucky/ShippingModule/Model/Carrier directory. The name of the file will be Shippingmodule.php, and the contents are shown in Example 4-6.
Warning
The naming scheme for a module is required to be consistent throughout the configuration files, directory structure, and class file. This is how Magento will locate your class file and module definitions. The actual names used in this example are for demonstration purposes and can be replaced by your own names, as long as they are consistent throughout. If the naming is not consistent, Magento will not be able to properly load and execute your module class, resulting in system errors.
Example 4-6. Shippingmodule.php
<?php/*** Shippingmodule.php** PHP file for implementing the new shipping model in the cart* and checkout.** @method RubberDucky_ShippingModule_Model_Carrier_Shippingmodule* collectRates(Mage_Shipping_Model_Rate_Request $request)* @method array getAllowedMethods()** @author Chuck Hudson*/classRubberDucky_ShippingModule_Model_Carrier_ShippingmoduleextendsMage_Shipping_Model_Carrier_Abstract{/*** Code of the carrier** @var string*/constCODE='shippingmodule';/*** Code of the carrier** @var string*/protected$_code=self::CODE;/*** Collect the rates for this shipping method to display.** @param Mage_Shipping_Model_Rate_Request $request* @return Mage_Shipping_Model_Rate_Result*/publicfunctioncollectRates(Mage_Shipping_Model_Rate_Request$request){// Return now if this carrier is not active in the configured// shipping methods.if(!Mage::getStoreConfig('carriers/'.$this->_code.'/active')){returnfalse;}// Create the container for holding rates for this shipping method.$result=Mage::getModel('shipping/rate_result');// Get shipping method settings (base fee and percentage add// of subtotal).$slow_boat_base_fee=Mage::getStoreConfig('carriers/'.$this->_code.'/slow_boat_base_fee');$slow_boat_percent=Mage::getStoreConfig('carriers/'.$this->_code.'/slow_boat_percent');$fast_plane_base_fee=Mage::getStoreConfig('carriers/'.$this->_code.'/fast_plane_base_fee');$fast_plane_percent=Mage::getStoreConfig('carriers/'.$this->_code.'/fast_plane_percent');// Retrieve cart subtotal for calculating additional percentage.$subtotal=$this->_getCartSubtotal();// Calculate "Slow Boat" method rate and append to the collection.$rate=Mage::getModel('shipping/rate_result_method');$rate->setCarrier($this->_code);$rate->setCarrierTitle($this->getConfigData('title'));$rate->setMethod('slowboat');$rate->setMethodTitle('Slow Boat');$rate->setCost($slow_boat_base_fee);$rate->setPrice(number_format($slow_boat_base_fee+($subtotal*$slow_boat_percent)),2);$result->append($rate);// Calculate "Fast Plane" method rate and append to the collection.$rate=Mage::getModel('shipping/rate_result_method');$rate->setCarrier($this->_code);$rate->setCarrierTitle($this->getConfigData('title'));$rate->setMethod('fastplane');$rate->setMethodTitle('Fast Plane');$rate->setCost($fast_plane_base_fee);$rate->setPrice(number_format($fast_plane_base_fee+($subtotal*$fast_plane_percent)),2);$result->append($rate);// Return the collection of shipping rates for display.return$result;}/*** Get order subtotal** @return float*/protectedfunction_getCartSubtotal(){// Retrieve the totals of the current cart.$cartTotals=Mage::getSingleton('checkout/cart')->getQuote()->getTotals();// Get the subtotal value from the totals array.$cartSubtotal=$cartTotals["subtotal"]->getValue();return$cartSubtotal;}/*** Get allowed shipping methods** @return array*/publicfunctiongetAllowedMethods(){returnarray($this->_code=>$this->getConfigData('name'));}}?>
The Shippingmodule.php file
defines the class for the RubberDucky_ShippingModule_Model_Carrier_Shippingmodule
module, and the class name follows the subdirectory structure. Inside
the module logic class are two functions that are required for working
with shipping methods, the getAllowedMethods and collectRates functions. The getAllowedMethods function simply informs
Magento of the allowed methods. The collectRates function is called from the cart
and checkout process to “collect the rates” for the different shipping
methods of this carrier. In this case the logic is fairly simple: it
requires the retrieval of the shipping method fee and percentage to be
used from the stored configuration data that was set in the
administration console. The code will retrieve the current cart subtotal
via a helper function, _getCartSubtotal. The values are then used to
calculate the slow boat rate and the fast plane rate, which are added to
the result object. The result object is then returned to the caller of
the class for display, as shown in Figure 4-8.
This example has shown an easy way to add your own shipping module into a Magento installation. The shipping methods used here are quite simple, but the logic and calculations can be replaced with your own matrix of calculations, or rates calculated through a remote service and looped through to add them to the result to be displayed in the cart or checkout. This can be a powerful way to customize the shipping experience for your customers.
For many product-based businesses, the inventory or goods they sell may be sourced from multiple suppliers that can ship directly to customers. An opportunity exists to minimize inventory on hand, expedite customer shipments, and automate processing if product suppliers can be paid at the time of sale. The profit margin can remain with the seller while the suppliers can ship the goods when they are paid. In essence, one primary receiver of the funds exists from the buyer’s viewpoint, and the funds are then split accordingly among other receivers.
In this scenario a customer chooses a range of products and completes the purchase at company XYZ’s online store. When the purchase is made, the customer pays company XYZ the total amount. Behind the scenes, the funds are automatically split between company XYZ and the other companies that are supplying the products the customer has selected. For example, two products may come from company XYZ, while two come from company A and the fifth product from company B. The payment is automatically split among these companies based on the costs negotiated in a “chained payment,” as shown in Figure 4-9.
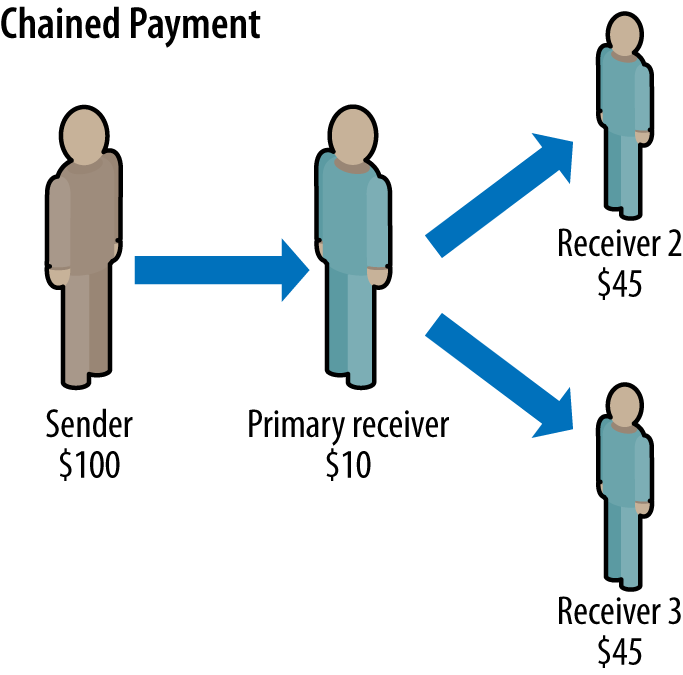
The PayPal Adaptive Payments API and SDK make this scenario easy to implement through a robust set of chained payment functionality. In a single API call, a payment can be sent to a primary receiver and then separate amounts passed on to other designated receivers.
Note
If you want to use the Adaptive Payments API in a production environment, PayPal must preapprove your PayPal account and application for security purposes.
For this example a rudimentary order form will be used to trigger the chained payment processing. On the order form we will include an extra field, Receiver, which represents the supplier of the item that is being ordered and will not be shown to a normal viewer. This field will be used in the processing to determine how much money is passed on to the specific suppliers. In a production environment this information will be stored with the products in your database. A receiver ID of 0 represents our store, so we will need to take into account cases where goods are coming directly from us. Figure 4-10 shows the order form as displayed from orderForm.php.
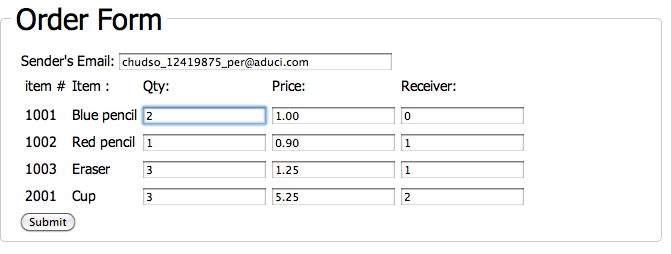
In Example 4-7 you can see the HTML behind the order form, which includes additional hidden fields for each item. The input values are structured as arrays so that the PHP page to which the form is posted can loop through the items. This shopping cart experience would normally be implemented with a database and session variables, but it is simplified here to show the process for setting up and kicking off a chained payment using the Adaptive Payments API.
Example 4-7. orderForm.php
<?php/************************************************************orderForm.phpSample order form that kicks off chained payment. In practicethis would be your shopping cart checkout page.Calls processOrder.php from form submittal.************************************************************/?>
<!DOCTYPE html><html><head><title>Order Form - Chained Payments</title><style>*{margin:0;padding:0;}body{background:#fff;color:#000;font:normal90%/1.5tahoma,verdana,sans-serif;}h1{font-size:2.9em;font-weight:bold;margin:1em01em10px;}form{padding:010px;width:700px;}legend{font-size:2em;padding-left:5px;padding-right:5px;position:relative;}fieldset{border:1pxsolid#ccc;border-radius:5px;float:left;padding:10px;width:640px;}td{padding:2px;}</style></head><body><divid="orderForm"><fieldset><legend>Order Form</legend><formid="orderForm"name="orderForm"action="processOrder.php"method="post"><div>Sender's Email:<inputtype="text"size="50"maxlength="64"name="email"placeholder="Sandbox account email"value="chudso_1241987592_per@aduci.com"></div><tablealign="center"><thead><tr><td>item #</td><td>Item :</td><td>Qty:</td><td>Price:</td><td>Receiver:</td></tr></thead><tr><td><inputtype="hidden"name="item[]"value="1001"/>1001</td><td>Blue pencil</td><td><inputtype="text"name="qty[]"value="2"/></td><td><inputtype="text"name="price[]"value="1.00"/></td><td><inputtype="text"name="source[]"value="0"/></td></tr><tr><td><inputtype="hidden"name="item[]"value="1002"/>1002</td><td>Red pencil</td><td><inputtype="text"name="qty[]"value="1"/></td><td><inputtype="text"name="price[]"value="0.90"/></td><td><inputtype="text"name="source[]"value="1"/></td></tr><tr><td><inputtype="hidden"name="item[]"value="1003"/>1003</td><td>Eraser</td><td><inputtype="text"name="qty[]"value="3"/></td><td><inputtype="text"name="price[]"value="1.25"/></td><td><inputtype="text"name="source[]"value="1"/></td></tr><tr><td><inputtype="hidden"name="item[]"value="2001"/>2001</td><td>Cup</td><td><inputtype="text"name="qty[]"value="3"/></td><td><inputtype="text"name="price[]"value="5.25"/></td><td><inputtype="text"name="source[]"value="2"/></td></tr></table><div><inputtype="submit"value="Submit"/></div></form></fieldset></div></body></html>
When submitted, the order form is posted to a processing page,
processOrder.php, that will process
the items and execute the Adaptive Payments Pay call. The processing page will leverage a
code library from the PayPal Adaptive Payments SDK. The SDK provides a
production-ready framework and examples on which you can base your
Adaptive Payments solutions.
Once you have downloaded the SDK for Adaptive Payments from the X.com developer site, place the lib folder in the same location as the order form and the new processOrder.php page, which will be created shortly.
Note
The processOrder.php, APIError.php, and PaymentDetails.php pages are based on files that are included in the samples folder of the Adaptive Payments SDK. The samples folder also includes examples of other uses of the Adaptive Payments API.
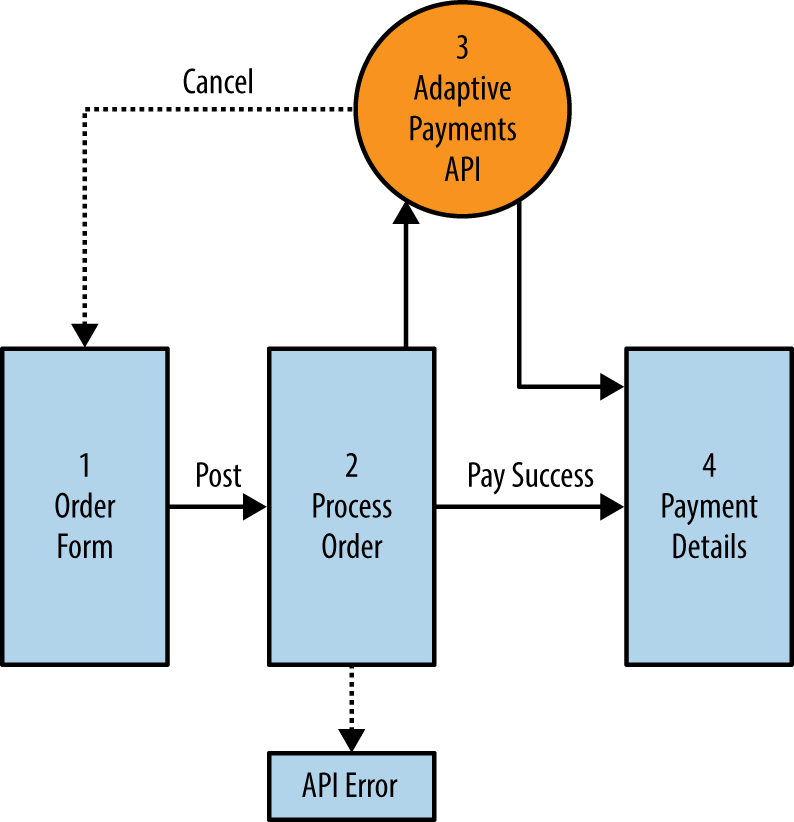
Figure 4-11 shows the process flow that we will end up with. The order form on the site will post items in the cart to the processing page, which will call the PayPal Adaptive Payments API. Depending on the PayPal payments method, on success the API may direct the user to the payment details, or return the API results to the processing page. If there is a failure in the API call, the API error page will be shown. The customer may also cancel the PayPal transaction during the process, which will bring her back to the order form.
The processOrder.php page has been modified from a copy of the payChainedReceipt.php page found in the SDK samples. The new page will perform the following steps:
Set the endpoint for the API calls.
Create a
PayRequestmessage envelope.Create the receiver list for the payments.
Set any optional
PayRequestfields.Execute the
PayAPI call with thePayRequest.Check the results of the call and redirect the page accordingly.
The complete processOrder.php is included in Example 4-8.
Example 4-8. processOrder.php
<?php/***********************************************processOrder.phpCalled by orderForm.php.Calls APIError.php on error.Based on PayChainedReceipt.php from SDK samples.***********************************************/require_once'lib/AdaptivePayments.php';require_once'web_constants.php';session_start();try{/* The servername and serverport tell PayPal where the buyershould be directed back to after authorizing payment. In thiscase, it's the local web server that is running this script. Usingthe servername and serverport, the return URL is the first portionof the URL that buyers will return to after authorizing payment.*/$serverName=$_SERVER['SERVER_NAME'];$serverPort=$_SERVER['SERVER_PORT'];$url=dirname('http://'.$serverName.':'.$serverPort.$_SERVER['REQUEST_URI']);/* The returnURL is the location where buyers return when apayment has been succesfully authorized. The cancelURL isthe location buyers are sent to when they hit the cancelbutton during authorization of payment during the PayPal flow.*/$returnURL=$url."/PaymentDetails.php";$cancelURL="$url/orderForm.php";=$_REQUEST["email"];/* Set a couple of arrays of item costs and receivers, since weare not using a real database in this example. Normally thisinformation would come from the shopping cart and/or databasebeing used to track items being sold and sources.*/$arrItemCosts=array('1001'=>1.00,'1002'=>0.60,'1003'=>1.00,'2001'=>4.00);// Set array of receivers with us first (based on order).$arrReceivers=array('wppm_1341107399_biz@aduci.com','sell1_1341107573_biz@aduci.com','servic_1241987644_biz@aduci.com');$arrReceiverAmounts=array();// Determine and set amounts for each receiver.$totalSale=0;$itemCount=count($_POST['item']);for($idxItem=0;$idxItem<$itemCount;$idxItem++){/* Get each item's data. This would typically comefrom the cart/database.*/$itemSku=$_POST['item'][$idxItem];$itemQty=$_POST['qty'][$idxItem];$itemSource=$_POST['source'][$idxItem];$itemPrice=$_POST['price'][$idxItem];$itemCost=$arrItemCosts[$itemSku];// Update total sale amount.$totalSale+=$itemQty*$itemPrice;// Calculate amount for this item and add to receiver amounts.$itemAmount=$itemQty*$itemCost;$arrReceiverAmounts[$itemSource]+=$itemAmount;}// Set the total sale to our own primary receiver.$arrReceiverAmounts[0]+=$totalSale;/* Make the call to PayPal to get the Pay token.If the API call succeeded, then redirect the buyer to PayPalto begin to authorize payment. If an error occurred, show theresulting errors.*/$payRequest=newPayRequest();$payRequest->actionType="PAY";$payRequest->cancelUrl=$cancelURL;$payRequest->returnUrl=$returnURL;$payRequest->clientDetails=newClientDetailsType();$payRequest->clientDetails->applicationId=APPLICATION_ID;$payRequest->clientDetails->deviceId=DEVICE_ID;$payRequest->clientDetails->ipAddress="127.0.0.1";$payRequest->currencyCode="USD";$payRequest->senderEmail=;$payRequest->requestEnvelope=newRequestEnvelope();$payRequest->requestEnvelope->errorLanguage="en_US";// Set the receivers.$arrReceiverList=array();for($idxReceivers=0;$idxReceivers<count($arrReceivers);$idxReceivers++){$tmpReceiver=newreceiver();$tmpReceiver->=$arrReceivers[$idxReceivers];$tmpReceiver->amount=$arrReceiverAmounts[$idxReceivers];if($idxReceivers==0){// If receiver is us, set primary to true.$tmpReceiver->primary=true;}else{$tmpReceiver->primary=false;}// Create a unique invoice per receiver (replace with yours).$tmpReceiver->invoiceId="12009-".$idxReceivers;// Add this receiver to the array.array_push($arrReceiverList,$tmpReceiver);}// Set the array of receivers into the Pay Request.$payRequest->receiverList=$arrReceiverList;// Set optional Pay Request fields.$payRequest->feesPayer="EACHRECEIVER";$payRequest->memo="Chained Payment";/* Make the call to PayPal to get the Pay token.If the API call succeeded, then redirect the buyer to PayPalto begin to authorize payment. If an error occurred, show theresulting errors.*/$ap=newAdaptivePayments();$response=$ap->Pay($payRequest);if(strtoupper($ap->isSuccess)=='FAILURE'){$_SESSION['FAULTMSG']=$ap->getLastError();$location="APIError.php";header("Location:$location");}else{$_SESSION['payKey']=$response->payKey;if($response->paymentExecStatus=="COMPLETED"){$location="PaymentDetails.php";header("Location:$location");}else{$token=$response->payKey;$payPalURL=PAYPAL_REDIRECT_URL.'_ap-payment&paykey='.$token;header("Location: ".$payPalURL);}}}catch(Exception$ex){$fault=newFaultMessage();$errorData=newErrorData();$errorData->errorId=$ex->getFile();$errorData->message=$ex->getMessage();$fault->error=$errorData;$_SESSION['FAULTMSG']=$fault;$location="APIError.php";header("Location:$location");}?>
In the processOrder.php page,
the key difference from a normal PayPal transaction is the creation of a
list of receivers. The list of receivers is added to the PayRequest to tell the API method who the
primary and secondary receivers are and the appropriate amounts to
transfer to each. In this example the script will cycle through the list
of items ordered and add to each receiver’s amount the wholesale cost of
the item multiplied by the quantity. The item costs are pulled from an
embedded array, $arrItemCosts, but
normally this information would be pulled from your product database or
be available in the shopping cart with other item information.
The script marks the account of the first receiver, which represents the storefront, as the primary receiver. This receiver will be the initial recipient of all funds, so the total order amount must be set as the amount for this receiver. PayPal will automatically transfer from the primary receiver the designated amounts for the other receivers.
Note
The primary receiver’s amount set for the transaction must be equal to or greater than the amounts of all receivers combined, or the payment transaction will fail.
To allow for easier identification of the amounts for each receiver, the script also adds an optional invoice ID with a unique extension for each receiver. You will want to generate the invoice IDs dynamically in your own solution.
Note
In a chained payment, PayPal allows a maximum of five receivers to be designated in one request.
After adding the array of receivers to the pay request, the script
sets some optional parameters for the payment. A field titled feesPayer instructs PayPal which model to use
for charging transaction fees for the chained payment. In this case the
value of EACHRECEIVER is used to
signify that each receiver will pay a proportional amount of the total
fees for its received monies. Two other options for fee payment are
available: PRIMARYRECEIVER signifies that the primary
receiver will pay all fees, while SECONDARYONLY designates
that the secondary receiver will pay all fees when only one
secondary receiver is included.
The second field, memo, is for
any memo that you would like to be added with the transaction. The memo
field will be shown to the payer upon checkout and has a limit of 1,000
characters.
Note
In Recipe 4.1, we specified the URL for our IPN
listener in the PayPal IPN Simulator. In the Pay request we can also add an optional
field, ipnNotificationUrl, to
designate an IPN listener for the chained payment transaction.
To run this example we will need a couple of supporting files: web_constants.php, which has the PayPal service endpoints defined and should not need to be changed from the version in the SDK samples directory; PaymentDetails.php, which is the landing page to which a user is sent after a successful payment; and APIError.php, which is used to display any errors that occur while calling the API. The files used in this example are direct copies from the SDK samples folder, with the links modified for the locations of the web_constants.php file (Example 4-9) and the lib folder.
Example 4-9. web_constants.php
<?php/****************************************************web_constants.phpDefine constants used by web pages in this file.****************************************************//* Define the PayPal URL. This is the URL that the buyer isfirst sent to to authorize payment with his PayPal account.Change the URL depending on whether you are testing in thesandbox or going to the live PayPal site.For the sandbox, the URL is:https://www.sandbox.paypal.com/webscr&cmd=_ap-payment&paykey=.For the live site, the URL is:https://www.paypal.com/webscr&cmd=_ap-payment&paykey=.*/define('PAYPAL_REDIRECT_URL','https://www.sandbox.paypal.com/webscr&cmd=');define('DEVELOPER_PORTAL','https://developer.paypal.com');define('DEVICE_ID','PayPal_Platform_PHP_SDK');define('APPLICATION_ID','APP-80W284485P519543T');?>
To test the chained payment, we will use buyer and seller accounts
created in the PayPal
sandbox. In your sandbox account, create four accounts: a
personal buyer account and three business seller accounts. Take the
email addresses generated for the seller accounts and place them in the
$arrReceivers array in the processOrder.php page, with the first one
being your primary receiver. Lastly, put the personal buyer email
address in your orderForm.php for
the input value of “Sender’s Email.”
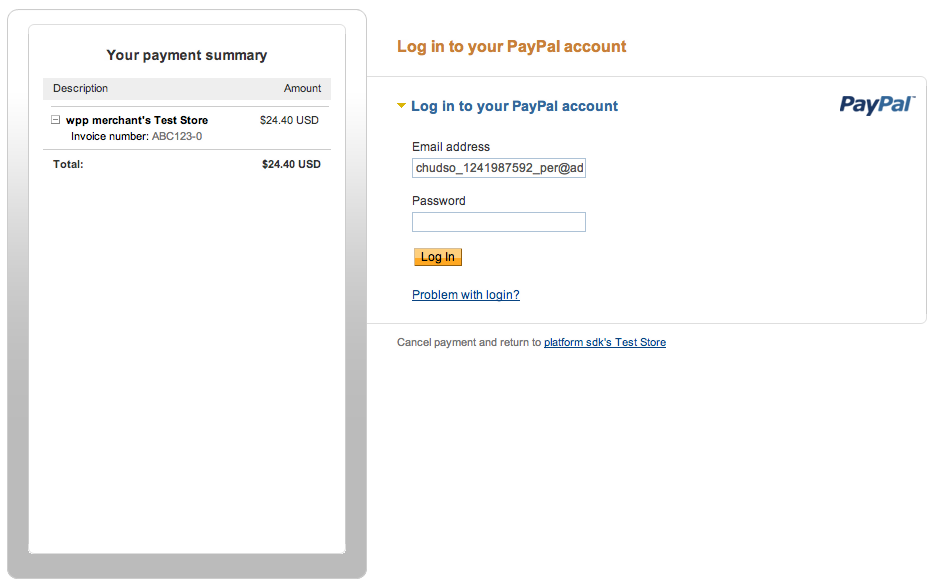
Now that the accounts are set, you can launch orderForm.php in a browser. Confirm that the sender’s email matches the one generated in the PayPal sandbox and click “Submit.” When submitted, the process order page should handle the form post and redirect to the PayPal sandbox for payment completion, as seen in Figure 4-12.
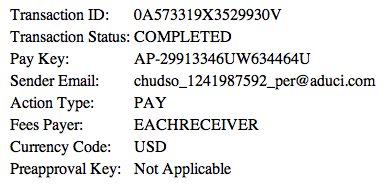
Once the PayPal payment is complete, the customer is brought to the payment details page seen in Figure 4-13, showing the debug information. You can easily substitute a receipt or other landing page for a successful payment.
In this example we have seen how easy it is to set up chained
payments, where a buyer interacts with a single seller but the funds are
split between different suppliers. In this case the payment has taken
place immediately. The Adaptive Payments API also allows for holding
payment to secondary receivers for up to 90 days. To hold the payment to
secondary receivers, change the action type in the request to PAY_PRIMARY. This can allow for goods to be
paid for upon receipt. Chained payments have been designed to fit a
variety of buyer-to-seller-to-seller business models.
The examples shown in this chapter provide a glimpse of what can be done to automate and streamline the fulfillment step of the commerce lifecycle, for the benefit of both the merchant and the consumer. Instant Payment Notifications allow you to keep your customer information databases up-to-date, know when payments have cleared, and take care of transactions that fall outside of the normal payment flow (reversals, refunds, etc.). The Magento extension shows how easy it is to customize your shipping options and provide shipping algorithms for your customers based on your specific needs. Instead of making a set of prescribed shipping options match your product orders, you can now customize those options to fit your business. Lastly, product fulfillment can leverage new payment models such as chained payments to allow product manufacturers to easily fulfill orders from other sites.
With these and other APIs the fulfillment process can be automated and integrated, shortening the time to ship, reducing shipping errors, expediting payments to vendors, and encouraging customers to come back and buy from sellers again.
Get eBay Commerce Cookbook now with the O’Reilly learning platform.
O’Reilly members experience books, live events, courses curated by job role, and more from O’Reilly and nearly 200 top publishers.

