One of the many reasons to choose a native app over a web app is to have access to the features available exclusively to native apps. This chapter focuses on these features and what it takes for you to implement them into your app.
Just like the previous chapter, I will be using the Bing Image Search application for context when describing these features. As the name states, search is a critical component to the application and it is where I will start. Once the user has performed a search, the app will have images that can be used throughout the operating system in places like tiles, file pickers, and sharing requests. Table 4-1 shows a list of the features that are leveraged by the Bing Image Search app. All of these features will be described in detail in this chapter.
Table 4-1. Windows 8 Features used by the Bing Image Search app
| Features | Description |
|---|---|
Search | Search is a charm on the Start Bar that enables searching within any application. Search is activated in different ways depending on whether your app is already running or not. |
Tiles | Tiles become Live Tiles when you dynamically send updates to them with relevant content for your application. Tiles can be updated with a variety of templates, in the case of the Bing Image Search application, Tiles can be updated with a single image or a collage of images. |
Pickers | Pickers are used throughout Windows to provide
information to and from applications and the operating system. The
Bing Image Search app uses the |
Share | Apps can act as either sharing sources or targets. The Bing Image Search application will be used as a share source, meaning that it can share images to other applications. This app will not be used as a share target since it has no use for input data from other apps. |
Devices | Windows 8 supports a number of devices such as cameras,
light sensors, and accelerometers. The Bing Image Search application
uses the |
In Chapter 2, I used a TextBox and a Button to load results from the Bing Search API.
Although this worked, it didn’t fit into the Windows 8 experience. Windows
8 has completely redesigned search on the operating system and has exposed
a consistent experience for all applications and files alike. Windows 8
Search can communicate with your app in two ways:
- Your app is in the foreground and currently running
Windows 8 fires an event via the
SearchPane.QuerySubmittedhandler- Your app is not running
Windows 8 launches your app with the expressed intent of searching and launches via the overridden
OnSearchActivatedmethod within your application (App) class.
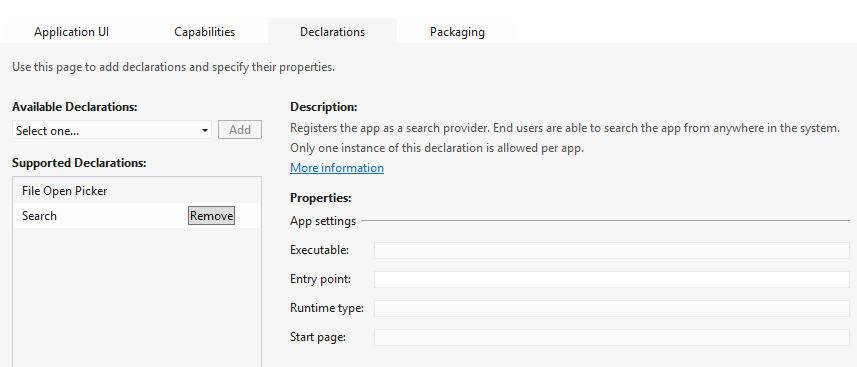
In order to display the app’s tile in the SearchPane, you need to
specify your intentions via the application manifest file (Package.appxmanifest). This manifest file is
located in the root folder of your app and Visual Studio will open a
custom screen for defining your app when you open it. Navigate to the
Declarations tab, Figure 4-1, select Search from the
drop-down menu, and click Add. In the case of the Bing Image Search app,
I did not need to specify any parameters because the search logic is
handled by the default App entry
point. In the event that your app needs an alternative entry point for
searching, you could specify it here.
SearchPane.QuerySubmitted is an
event on a statically accessible object triggered by the operating
system. This type of object is not testable because you don’t know when
or how the operating system will fire the event. More importantly, you
are unable to trigger the event from an automated test. In order to make
these events more testable, they need to be converted into messages and
routed through the messaging system. When the app runs, the message is
sent directly to the handler that performs the actual search. To test
the handler, you can easily create a fake message and execute the
handler with that message. The mechanism for converting the operating
system events into messages that can be handled is the SearchPaneMessagePump (Example 4-1). In addition, this pump can be started when the
application launches and can respond to search requests from the
operating system regardless of the current page.
Example 4-1. MessagePump adapter to route Windows 8 Searches to the app (SearchPaneMessagePump.cs)
publicclassSearchPaneMessagePump:IMessagePump{privatereadonlyIHub_messageHub;privateSearchPane_searchPane;publicSearchPaneMessagePump(IHubmessageHub){_messageHub=messageHub;}publicvoidStart(){_searchPane=SearchPane.GetForCurrentView();_searchPane.QuerySubmitted+=OnQuerySubmitted;}publicvoidStop(){if(_searchPane!=null){_searchPane.QuerySubmitted-=OnQuerySubmitted;}}privateasyncvoidOnQuerySubmitted(SearchPanesender,SearchPaneQuerySubmittedEventArgsargs){await_messageHub.Send(newSearchQuerySubmittedMessage(args.QueryText));}}
When started, the SearchPaneMessagePump listens for any QuerySubmitted events on the current SearchPane. When the event occurs a new
message is created and sent to the message hub for routing. The logic
here is purposefully simple. When creating testable code, it’s
imperative that you isolate the operating system from the application;
this layer, similar to the adapter pattern mentioned previously, allows
the remainder of the code to adapt independently from the operating
system. Once a message is sent to the MessageHub, it’s routed to its respective
handler. Handlers are where all the work happens.
Example 4-2. Handler code for responding to a Search query from Windows 8 (SearchQuerySubmittedHandler.cs)
publicclassSearchQuerySubmittedHandler:IAsyncHandler<SearchQuerySubmittedMessage>{privatereadonlyApplicationSettings_settings;privatereadonlyIImageSearchService_imageSearchService;privatereadonlyINavigationService_navigationService;privatereadonlyIStatusService_statusService;publicSearchQuerySubmittedHandler(ApplicationSettingssettings,IImageSearchServiceimageSearchService,INavigationServicenavigationService,IStatusServicestatusService){_settings=settings;_imageSearchService=imageSearchService;_navigationService=navigationService;_statusService=statusService;}publicasyncTaskHandleAsync(SearchQuerySubmittedMessagemessage){if(!NetworkInterface.GetIsNetworkAvailable()){_statusService.SetNetworkUnavailable();return;}_statusService.Message="Loading Images for "+message.Query;_statusService.IsLoading=true;try{// Remove any existing searches for this queryvarsearches=_settings.Searches;varexisting=searches.FirstOrDefault(s=>s.Query.Equals(message.Query,StringComparison.CurrentCultureIgnoreCase));if(existing!=null){searches.Remove(existing);}// Search Bingvarimages=await_imageSearchService.Search(message.Query,_settings.Rating,_settings.ImageResultSize);if(!images.Any()){_statusService.SetBingUnavailable();return;}// Store results in app settingsvarinstance=newSearchInstance(){Images=images,SearchedOn=DateTime.Today,Query=message.Query};searches.Insert(0,instance);_settings.Searches=searches;_settings.SelectedInstance=instance;await_settings.SaveAsync();// Navigate_navigationService.Navigate(typeof(SearchResultsPage));}catch(InvalidOperationExceptionex){varbaseEx=ex.GetBaseException();if(baseExisWebException){_statusService.SetBingUnavailable();return;}throw;}finally{_statusService.IsLoading=false;}}}
The SearchQuerySubmittedHandler
(Example 4-2) performs the following steps:
Checks for a valid Internet connection
Notifies the application of its status
Executes the search against the Bing Search API
Stores the results in the settings for retrieval by the ViewModel
Navigates to the
SearchResultsPage
In the event that a user has already searched for an item, it will
be removed from the history before proceeding to avoid duplicates. All
the logic in the handler is specific to the application and isolated
here from any outside influence. In addition, you’ll notice that none of
the code in this handler is specific to Windows 8. The primary input is
a Message, which just contains a string containing
the search query.
Note
Using the message hub for searching helps provide more testable
code. Unfortunately the topic is far too broad and subjective to
discuss here in detail. If you’re interested in my approach to testing
the code, you can see the tests for the SearchQuerySubmittedHandler by viewing them
online at http://github.com/bendewey/GettingStartedWithMetroApps/blob/master/BingImageSearch/BingImageSearch.Tests/Message/Handlers/SearchQuerySubmittedHandlerTests.cs.
One of the goals from Chapter 3 was to ensure
an optimal experience when the users are offline. In order to interact
with the app, users would first need to perform a search. This means the
SearchQuerySubmittedHandler is an
ideal place to verify Internet connectivity before executing the web
service call. In addition, I am trapping WebException here and allowing the _statusService to provide a friendly message
to the user stating that the application is offline. Figure 4-2 and Figure 4-3 show the messages
that are displayed to the user when the app encounters an error
performing a search.


In the original version of this class, I tried to optimize the
code by using an async void method to
save the settings in parallel with navigation. This turned out to have
numerous issues with regards to my unit tests, but more importantly it
caused issues with the handling of exceptions (see the note below for
the reasons to avoid the async void
method).
Note
An async method has no return
type and simply calls an await on
some other code that can use async void
RunSomethingAsync() and async Task
RunSomethingAsync() interchangeably. Returning a Task allows other code to await on your
method, making it appear synchronous, where returning void signifies a fire-and-forget
asynchronous block. It’s also important to note that using async void is an anti-pattern because
exceptions thrown from within an async
void don’t currently bubble up to the application unhandled
exception handler and the thread is aborted with no notice. I have a
post on the Windows Developer forum that references this issue, and
hopefully it will be resolved in a future version (http://social.msdn.microsoft.com/Forums/en-US/winappswithcsharp/thread/bea154b0-08b0-4fdc-be31-058d9f5d1c4e).
The second way to interact with the Windows 8 SearchPane is through the OnSearchActivated override method on your
application class. This method provides the same information as the
SearchPane.QuerySubmitted, but it has
a different argument called SearchActivatedEventArgs. The testability
concerns and logic are almost identical to the static event, and luckily
the approach from the previous section can be completely reused by
simply sending a message to the exact same message hub. Example 4-3 shows the App.xaml.cs code
needed to send the message.
Example 4-3. OnSearchActivated override (App.xaml.cs)
partialclassApp{publicstaticViewModelLocatorViewModelLocator{get{return(ViewModelLocator)Current.Resources["ViewModelLocator"];}}protectedoverrideasyncvoidOnSearchActivated(SearchActivatedEventArgsargs){awaitEnsureShell(args.PreviousExecutionState);awaitViewModelLocator.Hub.Send(newSearchQuerySubmittedMessage(args.QueryText));}privateasyncTaskEnsureShell(ApplicationExecutionStatepreviousState){// setup Container, Shell, and set Window.Current.Content}}
There isn’t much to expand upon here except for the fact that when
the application launches, it loads the UI and sends the same message as
the SearchPaneMessagePump. Similarly,
this message gets routed to the SearchQuerySubmittedHandler, which navigates to the SearchResultsPage, except this time it happens
immediately upon launching the app.
In addition to these two entry points, applications can provide
autocomplete information to the Windows 8 SearchPane. This can help users find
information relevant to your content. I can envision an email
application that will provide terms present in recent emails as
autocomplete hints. This information is also available via events on the
SearchPane and would fit nicely into
the existing messaging implementation.
Tiles are the first view your user will get of your app. From the moment she sees it in the Windows Store to the first time she launches the app, the Tile is your place to make a first impression. Furthermore, once you’ve engaged your user, it’s important to bring her back; Live Tiles offer a way to update users with current information without having to launch the app again.
Tiles come in two sizes: square and wide. Each size has its own set of templates that can be updated independently or as a single update. Templates come in a number of different formats, from simple text updates to multiple images with text. A full list of templates is available online at http://msdn.microsoft.com/en-us/library/windows/apps/windows.ui.notifications.tiletemplatetype.aspx. The Bing Image Search application will utilize three templates listed in Table 4-2.


After performing a search, the user will be navigated to the
SearchResults page. This page shows a list of images based on the
search. From this list, you can provide your first tile update. The
template you choose is entirely up to you; I chose to take a random
sampling of six images and update the tile with the TileWidePeekImageCollection06 template. You’ll
also need to determine whether you want to update the tile automatically
or via some user interaction, for example, when the user clicks on an
AppBar button. I chose to update the user’s tile automatically when he
performs a search. When the SearchResultsPage loads, the IoC container
creates a new instance of the SearchResultsPageViewModel. In the constructor
of this view model, and Example 4-4, a message is sent to
the message hub to update the tile.
Example 4-4. SearchResultsPageViewModel constructor (SearchResultsPageViewModel.cs)
publicSearchResultsPageViewModel(ApplicationSettingssettings,IHubhub/* other dependencies */){_settings=settings;_hub=hub;// setup other depedencies and commands_hub.Send(newUpdateTileImageCollectionMessage(_settings.SelectedInstance));}
Sending this message activates the handler, shown in Example 4-5, which is made up of three steps. The first step
retrieves the template for the tile. The second updates the content’s template with the URLs for the data
you would like to update. Finally, the item is sent to the TileUpdateManagerAdapter to update the primary
live tile. The TileUpdateManagerAdapter is an adapter over
the static TileUpdateManager that is
available in the Windows. Example 4-6 shows the TileUpdateManagerAdapter.
Note
The code in Example 4-5 uses
NotificationExtensions, a project that was provided by Microsoft as
part of their App tile and badges sample, which
can be found at http://code.msdn.microsoft.com/windowsapps/App-tiles-and-badges-sample-5fc49148.
The default API for updating tiles uses a TileUpdateManager.GetTemplate(type) to
return an XmlDocument for the
template, which can be updated manually.
Example 4-5. Handler code for setting a collection of images to your app tile (UpdateTileImageCollectionHandler.cs)
publicclassUpdateTileImageCollectionHandler:IHandler<UpdateTileImageCollectionMessage>{privatereadonlyITileUpdateManager_tileUpdateManager;publicUpdateTileImageCollectionHandler(ITileUpdateManagertileUpdateManager){_tileUpdateManager=tileUpdateManager;}publicvoidHandle(UpdateTileImageCollectionMessagemessage){varcontent=TileContentFactory.CreateTileWidePeekImageCollection06();content.RequireSquareContent=false;content.TextHeadingWrap.Text="Search for "+message.Instance.Query;varimages=message.Instance.GetRandomImages(6).ToList();UpdateImage(content.ImageMain,images[0]);UpdateImage(content.ImageSecondary,images[1]);UpdateImage(content.ImageSmallColumn1Row1,images[2]);UpdateImage(content.ImageSmallColumn1Row2,images[3]);UpdateImage(content.ImageSmallColumn2Row1,images[4]);UpdateImage(content.ImageSmallColumn2Row2,images[5]);_tileUpdateManager.UpdatePrimaryTile(tile);}privatevoidUpdateImage(INotificationContentImageimageContent,ImageDetailimage){imageContent.Src=image.Thumbnail.Url;imageContent.Alt=image.Title;}}
Example 4-6. Adapter code to send an update to the Windows8 TileUpdateManager (TileUpdateManagerAdapter.cs)
publicclassTileUpdateManagerAdapter:ITileUpdateManager{publicvoidUpdatePrimaryTile(ITileNotificationContentcontent){varnotification=content.CreateNotification();TileUpdateManager.CreateTileUpdaterForApplication().Update(notification);}}
Note
The Bing Image Search application provides updates to the tile
via publicly accessible (HTTP) URIs. Tiles can also be updated with
local content using the ms-appx://<local-path> syntax.
In the previous example of the image collection, I chose not to
provide square tile content by assigning the RequireSquareContent to false. The main reason for this is there
aren’t any square tiles that allow for a collection of images. This
means the default square tile will continue to be used. What I’d like to
do is allow the user to update the square tile on her own via an
AppBar button. When the user selects
an image, she is navigated to the DetailsPage. This page allows users to do a
task specific to the image, such as save, share, update tile, etc. (See
Figure 4-4). On the AppBar of the DetailsPage (Example 4-7), there
is a button to set the tile. This button links to a command, which can
be found on the view model, as seen in Example 4-8.

Example 4-7. Set Tile AppBar Button (DetailsPage.xaml)
<ButtonCommand="{Binding SetTileCommand}"Style="{StaticResource SetTileAppBarButtonStyle}"/>
Example 4-8. SetTile Command (DetailsPageViewModel.cs)
publicclassDetailsPageViewModel{// constructor and dependencies omittedpublicICommandSetTileCommand{get;set;}publicvoidSetTile(){_messageHub.Send(newUpdateTileMessage(_settings.SelectedImage));}}
As you’ve seen in previous examples, the update tile command is
handled by a dedicated message handler in response to the message from
the ViewModel. This keeps the ViewModel’s responsibilities constrained
to just communicating between the View. Once the message is sent to the
message hub, the hub executes the handler with the message. Example 4-9 shows the UpdateTileHandler, which is responsible for
performing the actual tile update against the operating system.
Example 4-9. Message handler for updating the title to a single image (Update TileHandler.cs)
publicclassUpdateTileHandler:IHandler<UpdateTileMessage>{privatereadonlyITileUpdateManager_tileUpdateManager;publicUpdateTileHandler(ITileUpdateManagertileUpdateManager){_tileUpdateManager=tileUpdateManager;}publicvoidHandle(UpdateTileMessagemessage){varurl=message.Image.MediaUrl;if(message.Image.Width>800||message.Image.Height>800){// Images > 800px cannot be used as tilesurl=message.Image.Thumbnail.Url;}varcontent=TileContentFactory.CreateTileWidePeekImageAndText01();content.TextBodyWrap.Text=message.Image.Title;content.Image.Src=url;content.Image.Alt=message.Image.Title;// Square image substitutevarsquareContent=TileContentFactory.CreateTileSquareImage();squareContent.Image.Src=url;squareContent.Image.Alt=message.Image.Title;content.SquareContent=squareContent;_tileUpdateManager.UpdatePrimaryTile(content);}}
With the exception of a change in the template, the logic in the
single update Tile handler is very similar to the handler for updating a
collection of images. I’m retrieving the template, setting its values,
and updating the Tile through the TileUpdateManagerAdapter. Depending on the
size of your images you may have to perform some resizing. Live tiles do
not work with images larger than 800 pixels tall or wide. In the case of
the Bing Image Search app, this was easy to resolve by verifying the
metadata of the image and downgrading it to the thumbnail view in those
scenarios.
It’s also important to note that in Example 4-9 I am
specifying an alternative SquareContent tile. The content is identical
to the wide content and allows the user to change the tile size on the
start screen and still receive the tile updates.
Tiles are a great way to make your app stand out. In addition to updating your Live Tile when the app is running, you can also specify a timer or push notification-based background task to update your tiles as well. Background Tasks are declared in the application manifest similar to how search was declared in the previous section. This is a handy way to provide updates to your app’s Tile in the event that your app hasn’t been launched recently. In addition to providing these images to the Tile, these images can also be provided to other apps directly via pickers.
Pickers are used to provide information to and from your app. For
example, your app can provide information to the FileOpenPicker, in which case other apps can use
your content. Conversely, your app can be the one consuming the content
from a FileOpenPicker, which in turn
allows your app to receive content from any installed app on the user’s
system that is providing information. Typically speaking handling a picker
is far more difficult than consuming one. The Bing Image Search app will
leverage two of the pickers.
- FileOpenPicker
The Bing Image Search app will support the
FileOpenPickerfor any app that requests image files. This will utilize a custom page that will provide aTextBoxand aButtonfor searching.- FileSavePicker
The Bing Image Search app will utilize the
FileSavePickerfrom theDetailsPageto save an image. This can be used to save a picture to the local filesystem or to save it to another app, like the SkyDrive app, which allows users to save files to the cloud directly through this mechanism.
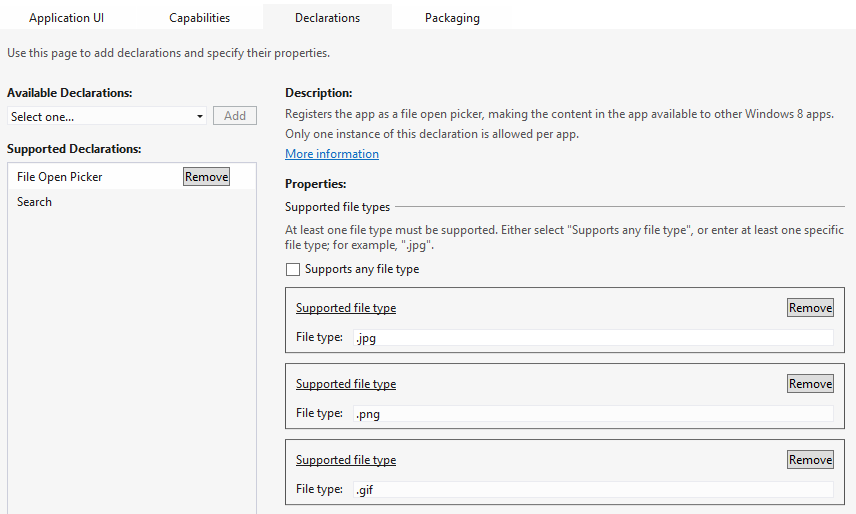
Before you can support the FileOpenPicker, you must specify your
intentions via the application manifest. This will make your
application icon appear in the list of available apps when a user
launches a FileOpenPicker. To
specify your declaration, open the Package.appxmanifest on the root of your
project, and select the Declarations tab. Select File Open Picker from
the drop-down list and click Add. In the case of the Bing Image Search
app, the FileOpenPicker is limited
to supplying only image files (see Figure 4-5), but
depending on your needs you can specify other types or choose to
support any file type by checking the Supports Any File Type
checkbox.
Once you’ve declared your app, you are ready to hook up the
entry point. The Bing Image Search application doesn’t supply any
explicit entry point for the FileOpenPicker. In that case, the app will
launch the App class as its entry
point. In the App class, there is
an override void
OnFileOpenPickerActivated (Example 4-10), which
will execute. The Bing Image Search app will create a custom FilePickerPage, rather than the typical
Shell page, and set the current
window’s content to that page. In order to handle adding and remove
items to/from the picker, you need to use the supplied FileOpenPickerActivatedEventArgs, which
provides access to the FileOpenPickerUI. This is the only time you
can access this object, so you’ll need to hang on to it. I’ve created
a custom wrapper that is registered in the container and is
initialized with the current FileOpenPickerUI. This wrapper will also
serve as an adapter to allow testability of the FilePickerPageViewModel. Example 4-11 and Example 4-12 show the interface
and wrapper used for adding and removing items to/from the
picker.
Example 4-10. OnFileOpenPickerActivated override (App.xaml.cs)
protectedoverridevoidOnFileOpenPickerActivated(FileOpenPickerActivatedEventArgsargs){ViewModelLocator.FileOpenPickerUiManager.Initialize(args.FileOpenPickerUI);Window.Current.Content=newFilePickerPage();Window.Current.Activate();}
Example 4-11. IFileOpenPickerUiManager interface (IFileOpenPickerUiManager.cs)
publicinterfaceIFileOpenPickerUiManager{voidInitialize(FileOpenPickerUIfileOpenPicker);FileSelectionModeSelectionMode{get;}IReadOnlyList<string>AllowedFileTypes{get;}AddFileResultAddFile(stringid,IStorageFilestorageFile);voidRemoveFile(stringid);}
Example 4-12. FileOpenPickerUiManager implementation (FileOpenPickerUiManager.cs)
publicclassFileOpenPickerUiManager:IFileOpenPickerUiManager{privateFileOpenPickerUI_fileOpenPicker;publicvoidInitialize(FileOpenPickerUIfileOpenPicker){_fileOpenPicker=fileOpenPicker;}publicFileSelectionModeSelectionMode{get{return_fileOpenPicker.SelectionMode;}}publicIReadOnlyList<string>AllowedFileTypes{get{return_fileOpenPicker.AllowedFileTypes;}}publicAddFileResultAddFile(stringid,IStorageFilefile){return_fileOpenPicker.AddFile(id,file);}publicvoidRemoveFile(stringid){_fileOpenPicker.RemoveFile(id);}}
The FilePickerPage is similar
to the Bing Simple Search app from Chapter 2. This
page contains a TextBox, a Button, and a GridView (Example 4-13). Unlike
the first example, this page needs to handle adding and removing files
from the picker upon user selection. In addition, the page also needs
to support multiple selections. Because this is difficult to
accomplish with data binding, I resorted to using the code behind and
routing custom events to the ViewModel based on the user selection.
Example 4-14 shows the code-behind necessary to
facilitate the ItemGridView_SelectionChanged event
handler.
Example 4-13. FilePickerPage XAML (FilePickerPage.xaml)
<Gridx:Name="LayoutRoot"><Grid.RowDefinitions><RowDefinitionHeight="87"/><RowDefinition/></Grid.RowDefinitions><GridVerticalAlignment="Center"Margin="120,0,0,0"><Grid.ColumnDefinitions><ColumnDefinition/><ColumnDefinitionWidth="Auto"/></Grid.ColumnDefinitions><TextBoxText="{Binding SearchQuery, Mode=TwoWay}"/><ButtonContent="Search"Command="{Binding SearchCommand}"Margin="12,0,60,0"Grid.Column="1"/></Grid><Gridx:Name="ItemPickerContentPanel"Grid.Row="1"Margin="120,0,0,34"><GridViewx:Name="ItemGridView"ItemsSource="{Binding Source={StaticResource CollectionViewSource}}"ItemTemplate="{StaticResource ThumbnailItemTemplate}"ItemContainerStyle="{StaticResource GridTileStyle}"BorderThickness="0"VerticalAlignment="Stretch"Grid.Row="1"SelectionMode="Multiple"SelectionChanged="ItemGridView_SelectionChanged"/></Grid></Grid>
Example 4-14. FileOpenPickerPage code behind showing the custom routing needed in lieu of data binding commands (FileOpenPickerPage.xaml.cs)
publicsealedpartialclassFileOpenPickerPage{protectedFileOpenPickerPageViewModelViewModel{get{returnDataContextasFileOpenPickerPageViewModel;}}privatevoidItemGridView_SelectionChanged(objectsender,SelectionChangedEventArgse){varvm=ViewModel;if(vm==null)return;foreach(varimageine.AddedItems){vm.AddImage(image);}foreach(varimageine.RemovedItems){vm.RemoveImage(image);}}}
Now that the XAML and page are set up to communicate with the
ViewModel, the actual files can be sent to the picker. In addition to
searching, the FileOpenPickerPageViewModel (Example 4-15) handles adding and removing items to and from the
FileOpenPickerUiManager shown
earlier. This object is injected by the container into the constructor
of the ViewModel, and when an item is added by the page, the ViewModel
downloads the item and adds it to the manager.
Example 4-15. ViewModel for the FileOpenPicker page (FileOpenPickerPageViewModel.cs)
publicclassFileOpenPickerPageViewModel:BindableBase{privatereadonlyApplicationSettings_settings;privatereadonlyIFileOpenPickerUiManager_fileOpenPicker;publicFileOpenPickerPageViewModel(ApplicationSettingssettings,IFileOpenPickerUiManagerfileOpenPicker/* other dependenceies */){_settings=settings;_fileOpenPicker=fileOpenPicker;// ViewModel setup code omitted}// Search code omitted for claritypublicasyncvoidAddImage(objectitem){varimage=itemasImageResult;if(image==null)return;if(_fileOpenPicker.AllowedFileTypes.Any(ext=>ext=="*"||image.MediaUrl.EndsWith(ext))){varfile=await_settings.GetTempFileAsync(image.MediaUrl);varresult=_fileOpenPicker.AddFile(image.MediaUrl,file);}}publicvoidRemoveImage(objectitem){varimage=itemasImageResult;if(image==null)return;_fileOpenPicker.RemoveFile(image.MediaUrl);}}
It’s important to note that not all requests can handle the
supported file types. Your app is responsible for handling these cases
and providing only files that are contained within the AllowedFileTypes list. In the event that you
supply an invalid file, you can check the AddFileResult object that is returned from
the call to AddFile.
The downloading of the file is an asynchronous method handled by
the ApplicationSettings class and
shown in Example 4-16. This method uses an extremely
useful API, the BackgroundDownloader, this object is used as
the primary method for downloading static content. The BackgroundDownloader is extremely easy to
use, and with only a few lines of code I am able to download a file
and provide it to anything that needs a StorageFile. The actual code for the
BackgroundDownloader is accessed
via the BackgroundDownloadAdapter,
which can be found in Example 4-17.
Example 4-16. ApplicationSettings GetTempFileAsync method to download files for the file picker (ApplicationSettings.cs)
publicasyncTask<StorageFile>GetTempFileAsync(stringuri){returnawaitCreateAndDownloadFile(uri);}privateasyncTask<StorageFile>CreateAndDownloadFile(stringuri,stringfilename=null){filename=filename??Regex.Replace(uri,"https?://|[/?&#]","");StorageFilefile=awaitApplicationData.Current.LocalFolder.CreateFileAsync(filename,CreationCollisionOption.ReplaceExisting);await_backgroundDownloader.StartDownloadAsync(newUri(uri),file);returnfile;}
Example 4-17. BackgroundDownloader Adapter (BackgroundDownloaderAdapter.cs)
publicclassBackgroundDownloaderAdapter:IBackgroundDownloader{publicIAsyncOperationWithProgress<DownloadOperation,DownloadOperation>StartDownloadAsync(Uriuri,IStorageFilestorageFile){returnnewBackgroundDownloader().CreateDownload(uri,storageFile).StartAsync();}}
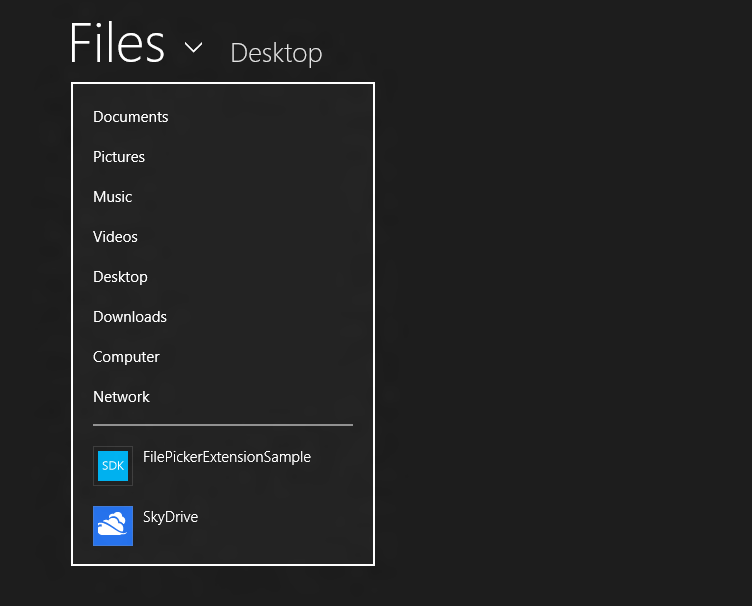
Now that the page is successfully adding and removing content to
the picker its job is done. Testing the FileOpenPicker can be tricky, though. In
Visual Studio, if you run you app, you will launch the app using the
standard OnLaunching entry point.
To trigger the OnFileOpenPickerActivated entry point, you
need to access your app from the FileOpenPicker. Microsoft provides a sample
app, which can aid in testing, but I’ve found that the mail
application is a great tool for testing the FileOpenPicker (http://code.msdn.microsoft.com/windowsapps/File-picker-app-extension-0cb95155).
Just launch the mail app, create a new message, and click Add
Attachment. This will launch the FileOpenPicker.
The Bing Image Search application uses the FileSavePicker to save an image. Consuming the
pickers is far easier than supporting them. All that you need to do is
open the dialog with your necessary parameters and handle the response.
The beauty is that your app doesn’t really care where the StorageFile is coming from, just that you can
write some data to it. In addition, you don’t have to create any
declarations, to use a picker you just create one, tell it to pick
files, and leverage the results in any app. Example 4-18
shows XAML and Example 4-19 shows the code in the DetailsPageViewModel that sends the SaveImageMessage.
Example 4-18. Save Image AppBar (DetailsPage.xaml)
<Buttonx:Name="SaveCommand"Command="{Binding SaveCommand}"Style="{StaticResource SaveAppBarButtonStyle}"/>
Example 4-19. Save Command (DetailsPageViewModel.cs)
publicclassDetailsPageViewModel{// constructor and dependencies omittedpublicICommandSaveCommand{get;set;}publicasyncTaskSave(){await_messageHub.Send(newSaveImageMessage(_settings.SelectedImage));}}
In line with other messages in the system, the SaveImageMessage is handled by the
corresponding SaveImageHandler (Example 4-20). The SaveImageHandler is responsible for opening
the FileSavePicker. However, before
it can do this, it needs to create a new FileSavePicker object, define the file type
filters, and provide a suggested name. In the case of the Bing Image
Search app, I am using the actual filename from the URL as the suggested
filename. Once the picker is defined, you can call PickSaveFileAsync, which will actually prompt
the user with a new Windows 8 file save dialog (Figure 4-6). The result of this call will be a StorageFile for the selected file, or null if
the user clicks Cancel. With that selected file, I can kick off a
download from a remote location, which will automatically save directly
to the selected file. When the process is complete, I update the
_statusService for the
application.
Example 4-20. SaveImageHandler
publicclassSaveImageHandler:IAsyncHandler<SaveImageMessage>{privatereadonlyIPickerFactory_pickerFactory;privatereadonlyIBackgroundDownloader_backgroundDownloader;privatereadonlyIStatusService_statusService;publicSaveImageHandler(IPickerFactorypickerFactory,IBackgroundDownloaderbackgroundDownloader,IStatusServicestatusService){_pickerFactory=pickerFactory;_backgroundDownloader=backgroundDownloader;_statusService=statusService;}publicasyncTaskHandleAsync(SaveImageMessagemessage){// Set up and launch the Open Pickervarfilename=GetFilenameFromUrl(message.Image.MediaUrl);varextension=System.IO.Path.GetExtension(filename);varpicker=_pickerFactory.CreateFileSavePicker();picker.SuggestedFileName=filename;picker.FileTypeChoices.Add(extension.Trim('.').ToUpper(),newstring[]{extension});varsaveFile=awaitpicker.PickSaveFileAsync();if(saveFile!=null){await_backgroundDownloader.StartDownloadAsync(newUri(message.Image.MediaUrl),saveFile);_statusService.TemporaryMessage=string.Format("Image {0} saved.",saveFile.Name);}}privatestringGetFilenameFromUrl(stringurl){varuri=newSystem.Uri(url);returnuri.Segments[uri.Segments.Length-1];}}
In the SaveImageHandler, you
may have noticed that I didn’t create a new
FileSavePicker in the handler directly. This is not testable
for a number of reasons. First off, the FileSavePicker launches a new dialog and
requires user interaction. This workflow cannot be automated. In
addition, just creating a new FileSavePickerAdapter in the Handle method wouldn’t allow for providing
alternative implementations. In order to solve these concerns, I create
a PickerFactory object, which returns
a new FileSavePickerAdapter for every
request in production. This factory can then be customized by a test to
return whatever is needed. The PickerFactory and FileSavePickerAdapter can be seen in Example 4-21 and Example 4-22, respectively. The
FileSavePickerAdapter is a bit more
in depth than other adapters because it contains properties that need to
be mapped as well. It purposefully has no external business logic
because this class cannot be tested.
Example 4-21. PickerFactory
publicclassPickerFactory:IPickerFactory{publicIFileSavePickerAdapterCreateFileSavePicker(){returnnewFileSavePickerAdapter();}}
Example 4-22. FileSavePickerAdapter
publicclassFileSavePickerAdapter:IFileSavePickerAdapter{publicFileSavePickerAdapter(){CommitButtonText=String.Empty;FileTypeChoices=newDictionary<string,IList<string>>();SuggestedFileName=String.Empty;// The system default is DocumentsLibrary, but this app is all about imagesSuggestedStartLocation=PickerLocationId.PicturesLibrary;}publicstringCommitButtonText{get;set;}publicstringDefaultFileExtension{get;set;}publicIDictionary<string,IList<string>>FileTypeChoices{get;set;}publicstringSuggestedFileName{get;set;}publicPickerLocationIdSuggestedStartLocation{get;set;}publicasyncTask<IStorageFile>PickSaveFileAsync(){varpicker=newFileSavePicker();picker.CommitButtonText=CommitButtonText;picker.SuggestedFileName=SuggestedFileName;picker.SuggestedStartLocation=SuggestedStartLocation;if(DefaultFileExtension!=null){picker.DefaultFileExtension=DefaultFileExtension;}foreach(varchoiceinFileTypeChoices.Keys){picker.FileTypeChoices.Add(choice,FileTypeChoices[choice]);}returnawaitpicker.PickSaveFileAsync();}}
Pickers are a compelling reason to develop a native app over a web app. Communicating with a user’s filesystem is not likely to be included in modern web browsers. Pickers also allow apps to communicate with other applications on the user’s machine regardless of the intent and without any knowledge of each other. This is not something that is typically done in Windows, or something that is easily accomplished in any other operating system for that matter.
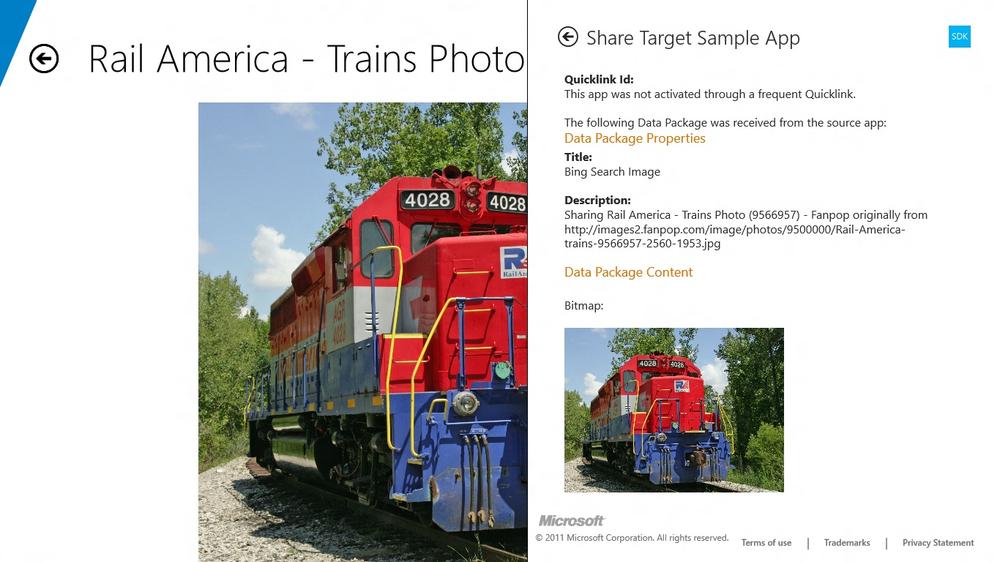
If you have ever written code that communicated with the Windows Clipboard, then sharing should be very familiar. When the user activates the Share charm, an event fires where you can assign text, URIs, data, images, or raw data. On the other end, apps can set up a declaration in their app manifest, which will show the Tile on the share page when the specified type is shared by another application. That target app can then use the content however it sees fit, for example, to send an email.
The Bing Image Search app will act as a sharing source and will provide links and images, also known as bitmap data to other applications. Figure 4-7 shows a screenshot of the sharing pane in action. If the user activates sharing when he is on the search results page, then the app will provide a link to Bing’s image search site for that query. If he selects an image and navigates to the details page, then the app will provide the bitmap data for the selected image.
When the user opens the Sharing pane, the DataTransferManager.DataRequested event fires.
This is very similar to Search from earlier in this chapter, so I
followed the same pattern. The event is handled by an application-level
message pump. The message pump’s job is to convert system events into
application messages and route them through the message hub. Unlike the
message pump from Search, which acted on information from the event,
sharing requires some information be provided to the event. Example 4-23 shows a simplified comparison. Notice how only the
DataRequested—Sharing—event requires some content, in this case a string
called "MyAppContent".
Example 4-23. Windows 8 Event Differences
// event registration code omittedprivatevoidOnQuerySubmitted(SearchPanesender,SearchPaneQuerySubmittedEventArgsargs){// use args.QueryText to search}privatevoidOnDataRequested(DataRequestManagersender,DataRequestManagerArgsargs){// use args.Request.SetText("MyAppContent") or equivalent.}
Since the app will be sending different types of content, the event handler will send out one of two messages:
ShareUriMessageSharing from the search results page will provide a
Uri. The handler will just supply theUridirectly.ShareImageDetailsMessageSharing from the details page will provide an object of type
ImageResult. The handler will download the image and provide the data from there.
These messages are sent based on the ShareDataRequestedMessagePump.DataToShare
property, which any page can supply. The current data to share will
always be set to the last item specified. Example 4-24
shows how the ShareDataRequestedMessagePump creates a
message based on the DataToShare.
Another thing to note, is that unlike the search message pump, the share
message pump registers its event on an adapter. The reason for this
extra level of abstraction is because this message pump isn’t as simple
as the one for search, so there are areas that I want to test. In
addition to test the handlers, we need to have access to create mocks of
the DataRequestedEventArgs so that we
can ensure that the handlers are working. To do this, the DataTransferManagerAdapter implements the
IDataTransferManager interface and
wraps the event args in a new SettableDataRequestedEventArgs, which is
supplied to the message. Now the handler test can create a test message
with a fake event args.
Example 4-24. ShareDataRequestedPump(ShareDataRequestedPump.cs)
publicclassShareDataRequestedPump:IShareDataRequestedPump{privatereadonlyIDataTransferManager_dataTransferManager;privatereadonlyIHub_hub;publicShareDataRequestedPump(IDataTransferManagerdataTransferManager,IHubhub){_dataTransferManager=dataTransferManager;_hub=hub;}publicvoidStart(){_dataTransferManager.DataRequested+=OnDataRequested;}publicvoidStop(){_dataTransferManager.DataRequested-=OnDataRequested;}publicobjectDataToShare{get;set;}voidOnDataRequested(DataTransferManagersender,SettableDataRequestedEventArgsargs){if(DataToShare==null)return;if(DataToShareisUri){varmessage=newShareUriMessage((Uri)DataToShare,sender,args);_hub.Send(message);return;}if(DataToShareisImageResult){varmessage=newShareImageResultsMessage((ImageResult)DataToShare,sender,args);_hub.Send(message);return;}}}
Each of these messages has a dedicated handler. The ShareUriHandler is the easiest, so I will
start with that. The ShareUriHandler
handles the ShareUriMessage. This
message contains the data to share—in this case, the URI to share—and
the event args, which I will use to set the URI on. Example 4-25 shows the ShareUriHandler and the code needed to respond
to the message. This code is fairly straightforward. When the message is
received, the handler sets the Title and the URI for the specified data
and its job is done.
When the Bing Image Search app shares images, more specifically images from the Web, these images need to be downloaded before they can be shared. This becomes slightly complicated because downloading the image data to provide a stream is an asynchronous process.
The new async and await keywords make the code very simple from a
readability standpoint, but the code still executes the way it always
has. The reason this is important is because DataRequestManager is expecting the user to
set some shareable content before the completion of the event. Example 4-26 shows a very rough translation of what I’m trying to
say. The OnDataRequestedWithoutAsync
handler sets the data on the event in the second phase of the operation,
which is inside a lambda expression. The event handler has already
returned control to the caller without anything being set. The way to
get around this is to use a new feature in the Windows Runtime called a
Deferral. OnDataRequestedWithDeferral. Example 4-26 shows an example of a Deferral.
Example 4-26. Example of why deferrals are needed with async code
// BAD: This code will not work because of the awaitprivateasyncvoidOnDataRequested(DataRequestManagersender,DataRequestManagerArgsargs){// code before awaitvarfile=awaitDownloadFile();// code after awaitargs.Request.SetBitmap(file);// event handler returned to caller}// BAD: This code will not work because event handler returns prematurelyprivatevoidOnDataRequestedWithoutAsync(DataRequestManagersender,DataRequestManagerArgsargs){// code before awaitDownloadFile().ContinueWith(file=>{// code after awaitargs.Request.SetBitmap(file);});// event handler returned to caller}privatevoidOnDataRequestedWithDeferral(DataRequestManagersender,DataRequestManagerArgsargs){vardeferral=args.Request.GetDeferral();try{// code before awaitvarfile=awaitDownloadFile();// code after awaitargs.Request.SetBitmap(file);}finally{deferral.Complete();}// event handler returned to caller}privateasyncTask<IStorageFile>DownloadFile(){}
Example 4-27 shows the full ShareImageDetailsHandler. This handler sets
the title and the description of the data being shared. It also defines
a callback to lazily load the share image when the caller needs it. This
will potentially save the user from downloading the image if he
prematurely exits out of the Sharing pane. Inside the callback, the
handler downloads the image and applies it using the deferral
pattern.
Example 4-27. Handler code for sharing and image (ShareImageResultsHandler.cs)
publicclassShareImageResultsHandler:IHandler<ShareImageResultsMessage>{privatereadonlyApplicationSettings_settings;publicShareImageResultsHandler(ApplicationSettingssettings){_settings=settings;}publicvoidHandle(ShareImageResultsMessagemessage){varimage=message.Image;if(image.MediaUrl!=null){varrequest=message.DataRequestedEventArgs.Request;request.Data.Properties.Title="Bing Search Image";request.Data.Properties.Description=string.Format("Sharing {0} originally from {1}",image.Title,image.MediaUrl);request.Data.SetDataProvider(StandardDataFormats.Bitmap,asyncdpr=>{vardeferral=dpr.GetDeferral();varshareFile=await_settings.GetShareFileAsync(image.MediaUrl);varstream=awaitshareFile.OpenAsync(FileAccessMode.Read);dpr.SetData(RandomAccessStreamReference.CreateFromStream(stream));deferral.Complete();});}}}
The beauty of sharing is that the Bing Image Search app can provide links and images without any knowledge of how consuming applications may use the information. While the Bing Image Search app is providing standard links and images, you could also envision providing more proprietary file type information and opening up the entire ecosystem of Windows apps that communicate with your apps, content, or files in ways you hadn’t imagined.
Note
The Bing Image Search app doesn’t support being a share target.
You will need to setup a declaration in your app manifest to display
your Tile on the list, then your app will be activated with the entry
point specified or into your App.OnSharingTargetActivated override as the
default. For more information on handling Sharing as a target, see the
samples online at http://code.msdn.microsoft.com/windowsapps/Sharing-Content-Target-App-e2689782.
WinRT is meant to support modern hardware and sensors in a way
Windows has never done in the past. One of those sensors that is of
interest to the Bing Image Search app is the Accelerometer. The API for this sensor allows
you to see when the user is physically shaking the device.
The events from the Accelerometer
is different from other events like Search and Sharing because it happens
so rapidly and subscribing to these events can, in some cases, actually
turn on the physical hardware and ultimately drain the user’s battery.
Because of this, you want to be sparing in the use of the Accelerometer. In the case of the Bing Image
Search app, I will be using this event only on the SearchResultsPage to load more images. Example 4-28 shows the registration and handling of the Accelerometer event.
Example 4-28. Accelerometer registration (SearchResultsPageViewModel.cs)
publicclassSearchResultsPageViewModel:BindableBase{privatereadonlyINavigationService_navigationService;privatereadonlyIAccelerometer_accelerometer;publicSearchResultsPageViewModel(INavigationServicenavigationService,IAccelerometeraccelerometer/* other depedencies */){_navigationService=navigationService;_accelerometer=accelerometer;_accelerometer.Shaken+=accelerometer_Shaken;_navigationService.Navigating+=NavigatingFrom;}privatevoidNavigatingFrom(objectsender,NavigatingCancelEventArgse){_accelerometer.Shaken-=accelerometer_Shaken;_navigationService.Navigating-=NavigatingFrom;}privatevoidaccelerometer_Shaken(objectsender,objecte){LoadMore();}}
The SearchResultsPageViewModel
registers the Accelerometer.Shaken
event when the ViewModel loads. Luckily, the ViewModel has an AppBar already set up for loading more images,
so when the Shaken event occurs, I just
call the same method for the LoadMoreCommand. The final piece of the Accelerometer is remembering to unsubscribe from
the event when you no longer need it. To handle this, you’ll notice an
event called NavigatingFrom, which is
fired whenever the NavigationService
changes pages. I use this event to shut down the Accelerometer.
In addition to the high level native features that I’ve already
discussed, Windows 8 has quite a few little features that apps may want to
leverage. One of these features is the LockScreen. This screen displays a custom image
for the user before they log in. On the DetailsPageViewModel, there is an AppBar button
(Example 4-29 and Example 4-30). Similar to Set
Tile and Save Image buttons, this button sends a SetLockScreenMessage to the message hub.
Example 4-29. Set Lock Screen AppBar Button (DetailsPage.xaml)
<Buttonx:Name="SetLockScreenCommand"Command="{Binding SetLockScreenCommand}"Style="{StaticResource SetLockScreenAppBarButtonStyle}"/>
Example 4-30. SetLockScreen command (DetailsPageViewModel.cs)
publicclassDetailsPageViewModel{// constructor and dependencies omittedpublicICommandSetLockScreenCommand{get;set;}publicasyncTaskSetLockScreen(){await_messageHub.Send(newSetLockScreenMessage(_settings.SelectedImage));}}
The message is handled by the SetLockScreenHandler (Example 4-31), which saves the image, updates the lock screen, and
sets the status to display to the user. I’m using the ApplicationSettings to save the selected image
as a new image in application storage called
LockScreen.jpg. The reason I am storing it in
application storage as a single name rather than using the actual name of
the image, has to do with file storage. If I saved a unique image every
time the user set the LockScreen, then
I would have to clean up any other images and ensure I wasn’t retaining
unnecessary copies of files. By using the same name, when a user updates
the lock screen to a new image, any old image is automatically
overwritten. To make this handler testable I’ve also created a LockScreenAdapter, and as you can see in Example 4-32, it is very simple.
Example 4-31. Message Handler for setting the Lock Screen to the specified image (SetLockScreenHandler.cs)
publicclassSetLockScreenHandler:IAsyncHandler<SetLockScreenMessage>{privatereadonlyApplicationSettings_settings;privatereadonlyILockScreen_lockScreen;privatereadonlyIToastNotificationManager_toastNotification;publicSetLockScreenHandler(ApplicationSettingssettings,ILockScreenlockScreen,IStatusServicestatusService){_settings=settings;_lockScreen=lockScreen;_statusService=statusService;}publicasyncTaskHandleAsync(SetLockScreenMessagemessage){varfile=await_settings.GetLockScreenFileAsync(message.Image.MediaUrl);await_lockScreen.SetImageFileAsync(file);_statusService.TemporaryMessage=string.Format("Image {0} set as lock screen.",message.Image.Title);}}
Example 4-32. LockScreenAdapter (LockScreenAdapter.cs)
publicclassLockScreenAdapter:ILockScreen{publicasyncTaskSetImageFileAsync(IStorageFilefile){awaitLockScreen.SetImageFileAsync(file);}publicasyncTaskSetImageStreamAsync(IRandomAccessStreamstream){awaitLockScreen.SetImageStreamAsync(stream);}}
Now that your app can take advantage of native features and participate in the new Windows 8 experience, you should get ready to start deploying your app. In the past, this meant creating installers, preparing deployment servers, and possibly creating CD-ROMs. Luckily this is not the case for Windows 8, and the Windows Store can help resolve the deployment issues from the past.
Get Getting Started with Windows 8 Apps now with the O’Reilly learning platform.
O’Reilly members experience books, live events, courses curated by job role, and more from O’Reilly and nearly 200 top publishers.

