The phrase “web page” is often used to describe a location on the Internet; you can think of a website as a whole load of web pages. However, you have seen that what is displayed on a particular “page” can be different every time you visit it. That is because the server creates the HTML before it eventually sends it back to the browser to be displayed.
In other words, web pages are often not just files of HTML that are sent back, but are constructed as a request arrives. The Gadgeteer approach to web serving is to construct the HTML it serves in response to a web request coming from the browser.
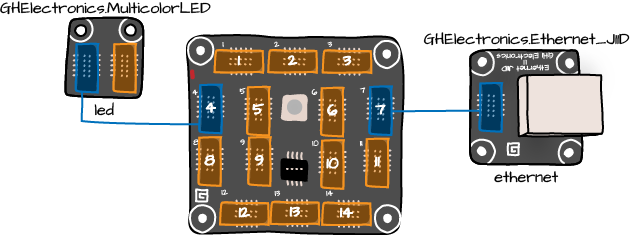
To learn a little about using the Ethernet module, we are going to start with a much simpler project, involving just the Ethernet module and a multicolor LED. We are going to make a minimal web server that will display a page that says “Hello World!!” (see Figure 4-3).

Figure 4-4 shows the modules from the Visual Studio designer.
When making a web server, we need to connect our Gadgeteer to the Internet, or at the very least to our local network. If you have Broadband Internet, then you are likely to have a modem/switch that may provide you with wireless access to the Internet, but more importantly for this project, a set of RJ45 sockets on the back (often four of them) to which we can connect the Gadgeteer using an Ethernet patch lead.
While we are programming it, the Gadgeteer will also be connected to our computer, which will probably also be providing it power from the USB connection. Once the Gadgeteer is programmed we don’t need the USB connection anymore, and could power the Gadgeteer from an external power supply. All these connections are summarized in Figure 4-5.
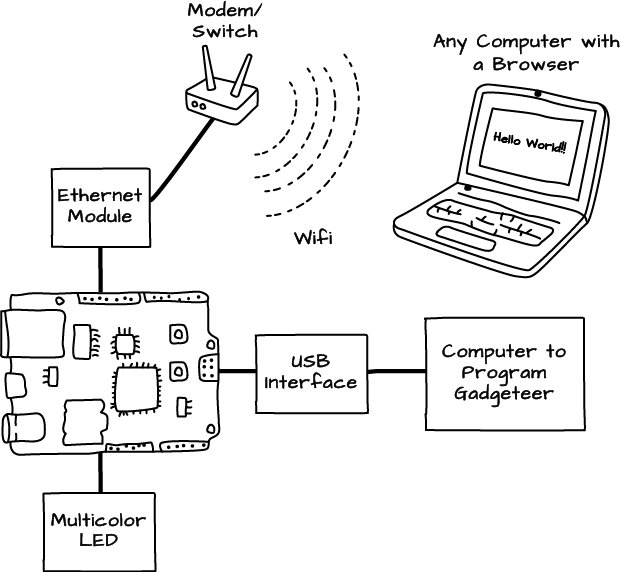
The Gadgeteer Mainboard will be assigned an IP address on the local network. You will then be able to visit a page on the Gadgeteer from a browser on any computer or mobile Internet device connected to the same network.
It is actually remarkably easy to turn a Gadgeteer into a web server. So, without further ado, let’s have a look at some of the code.
We have already seen how useful it is to attach event handlers to objects. For instance, to attach a listener to a button, so that when it is pressed a method is run. The .NET Gadgeteer approach to web serving also makes good use of event handlers:
namespace HelloWebServer
{
  public partial class Program
  {
    GT.Networking.WebEvent sayHello;

    void ProgramStarted()
    {
      ethernet.UseDHCP();
      ethernet.NetworkUp += new GTM.Module.NetworkModule.NetworkEventHandler(ethernet_NetworkUp);
      ethernet.NetworkDown += new GTM.Module.NetworkModule.NetworkEventHandler(ethernet_NetworkDown);
      led.TurnBlue();
    }

        void ethernet_NetworkUp(GTM.Module.NetworkModule sender, GTM.Module.NetworkModule.NetworkState state)
    {
      led.TurnGreen();
      string ipAddress = ethernet.NetworkSettings.IPAddress;
      WebServer.StartLocalServer(ipAddress, 80);
      sayHello = WebServer.SetupWebEvent("hello");
      sayHello.WebEventReceived += new WebEvent.ReceivedWebEventHandler(sayHello_WebEventReceived);
    }

        void sayHello_WebEventReceived(string path, WebServer.HttpMethod method, Responder responder)
    {
      string content = "<html><body><h1>Hello World!!</h1></body></html>";
      byte[] bytes = new System.Text.UTF8Encoding().GetBytes(content);
      responder.Respond(bytes, "text/html");
    }

        void ethernet_NetworkDown(GTM.Module.NetworkModule sender, GTM.Module.NetworkModule.NetworkState state)
    {
      led.TurnRed();
    }
  }
}
The ProgramStarted method first
tells the ethernet module to use DHCP.
DHCP is a mechanism that automatically assigns an IP address to a device
when it is connected to the network. If you have a home network, chances
are it will be set up for DHCP.
A device’s Internet Protocol (IP) address uniquely identifies the device on the network, which is why it is important that the Gadgeteer does not end up with an IP address that is already in use.
IP addresses are strange looking numbers that come in four parts. A typical IP address for use inside the network (the case here) might look something like: 192.168.1.106 and as you can see from Figure 4-3 you can use this in a URL instead of a domain name.
ProgramStarted also attaches
handlers to the events NetworkUp and
NetworkDown.
The handler for NetworkUp sets
the LED to green and then starts a web server running determining the IP
address of the Gadgeteer.
Tip
In some early LED modules, the green and blue LEDs are swapped
over, and so the wrong color is displayed. If you have such an LED, then
you can fix it by adding this line to the start of the ProgramStarted method:
led.GreenBlueSwapped = true;
To understand the rest of what ethernet_NetworkUp does, we need to step back a
little and look at the top of the program where we define sayHello:
GT.Networking.WebEvent sayHello;
The event sayHello is a WebEvent and to some extent, it is similar to
the idea of a web page. In this example, we always display the same thing
in the browser, but in a more complex example, we might set up several
WebEvents for different actions on the
web server.
The method ethernet_NetworkUp
makes the web server aware of the sayHello WebEvent using the following line:
sayHello = WebServer.SetupWebEvent("hello");The string “hello” associates the name “hello” with this web event.
That means that if we put “/hello” on the end of our URL in the browser,
it is this WebEvent that will be
invoked. That is why we attach yet another handler, this time to the event
WebEventReceived of sayHello.
The handler method needs to construct some HTML to be displayed on the browser. The HTML that we are going to return is:
<html><body><h1>Hello World!!</h1></body></html>
The bits between “<” and “>” are called tags and should come in matching beginning and ending tags. Notice how the end tags have a “/” right after the “<”.
A web page should always contain a <body> tag within an <html> tag. That just leaves the text “Hello World” inside the <h1> tag. The tag “h1” is used to indicate a level 1 heading, which is why our browser displays it in a large font (see Figure 4-3).
There is much more to HTML than the few tags we have looked at here. Search the Internet for “HTML Tutorial” for more information on writing HTML.
The sayHello_WebEventReceived event handler is
supplied with an argument of responder.
It is this that we must use to send the HTML back to the browser. The
method to do this is not unsurprisingly called Respond:
void sayHello_WebEventReceived(string path, WebServer.HttpMethod method, Responder responder)
{
    string content = "<html><body><h1>Hello World!!</h1></body></html>";
    byte[] bytes = new System.Text.UTF8Encoding().GetBytes(content);
    responder.Respond(bytes, "text/html");
}
However, Respond does not take a
string, but rather a byte array, so we need to do a little magic to
convert our string into a byte array:
byte[] bytes = new System.Text.UTF8Encoding().GetBytes(content);
The second argument to Respond
tells the browser what kind of response to expect to be contained in the
byte array, and “text/html” is the standard way of saying it is HTML. In
other circumstances, for example, it could be an image. We will be sending
images later, when we combine this with our finger painting code.
We haven’t described the ethernet_NetworkDown event handler. All it does
is set the LED color to red to show that we do not have a network
connection.
Get Getting Started with .NET Gadgeteer now with the O’Reilly learning platform.
O’Reilly members experience books, live events, courses curated by job role, and more from O’Reilly and nearly 200 top publishers.

