Chapter 1. Start Building with C#: Build something great…fast!

Want to build great apps…right now?
With C#, you’ve got a modern programming language and a valuable tool at your fingertips. And with Visual Studio, you’ve got an amazing development environment with highly intuitive features that make coding as easy as possible. Not only is Visual Studio a great tool for writing code, it’s also a really valuable learning tool for exploring C#. Sound appealing? Turn the page, and let’s get coding.
Why you should learn C#
C# is a simple, modern language that lets you do incredible things. When you learn C#, you’re learning more than just a language. C# unlocks the whole world of .NET, an incredibly powerful open source platform for building all sorts of applications.
Visual Studio is your gateway to C#
If you haven’t installed Visual Studio 2019 yet, this is the time to do it. Go to https://visualstudio.microsoft.com and download the Visual Studio Community edition. (If it’s already installed, run the Visual Studio Installer to update your installed options.)
Note
Make sure you’re installing Visual Studio, and not installing Visual Studio Code.
Visual Studio Code is an amazing open source, cross-platform code editor, but it’s not tailored to .NET development the way Visual Studio is. That’s why we can use Visual Studio throughout this book as a tool for learning and exploration.
If you’re on Windows...
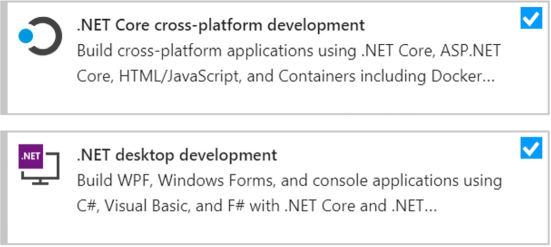
Make sure to check the options to install support for .NET Core cross-platform development and .NET desktop development. But don’t check the Game development with Unity option—you’ll be doing 3D game development with Unity later in the book, but you’ll install Unity separately.
If you’re on a Mac...
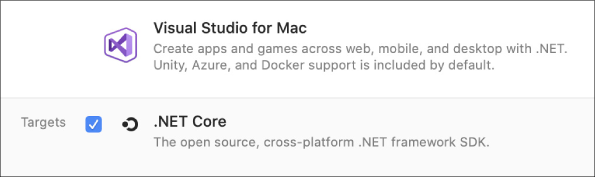
Download and run the Visual Studio for Mac installer. Make sure the .NET Core target is checked.
Note
You can do the ASP.NET projects on Windows too! Just make sure that the “ASP.NET and web development” option is checked when you install Visual Studio.
Most projects in this book are .NET Core console apps, which work on both Windows and Mac. Some chapters have a project—like the animal matching game later in this chapter—that are Windows desktop projects. For these projects, use the ASP.NET Core Blazor projects appendix. It has a complete replacement for #start_building_with_chash_build_somethin, and ASP.NET Core Blazor versions of the other WPF projects.
Visual Studio is a tool for writing code and exploring C#
You could use Notepad or another text editor to write your C# code, but there’s a better way. An IDE—that’s short for integrated development environment—is a text editor, visual designer, file manager, debugger…it’s like a multitool for everything you need to write code.
These are just a few of the things that Visual Studio helps you do:
Build an application, FAST. The C# language is flexible and easy to learn, and the Visual Studio IDE makes it easier by doing a lot of manual work for you automatically. Here are just a few things that Visual Studio does for you:
Manages all your project files
Makes it easy to edit your project’s code
Keeps track of your project’s graphics, audio, icons, and other resources
Helps you debug your code by stepping through it line by line

Design a great-looking user interface. The Visual Designer in the Visual Studio IDE is one of the easiest-to-use design tools out there. It does so much for you that you’ll find that creating user interfaces for your programs is one of the most satisfying parts of developing a C# application. You can build full-featured professional programs without having to spend hours tweaking your user interface (unless you want to).
Build visually stunning programs. When you combine C# with XAML, the visual markup language for designing user interfaces for WPF desktop applications, you’re using one of the most effective tools around for creating visual programs... and you’ll use it to build software that looks as great as it acts.
Note
If you’re using Visual Studio for Mac, you’ll build the same great-looking apps, but instead of using XAML you’ll do it by combining C# with HTML.
Note
Visual Studio is an amazing development environment, but we’re also going to use it as a learning tool to explore C#.
Note
The user interface (or UI) for any WPF is built with XAML (which stands for eXtensible Application Markup Language). Visual Studio makes it really easy to work with XAML.
Learn and explore C# and .NET. Visual Studio is a world-class development tool, but lucky for us it’s also a fantastic learning tool. We’re going to use the IDE to explore C#, which gives us a fast track for getting important programming concepts into your brain fast.
Note
We’ll often refer to Visual Studio as just “the IDE” throughout this book.
Create your first project in Visual Studio
The best way to learn C# is to start writing code, so we’re going to use Visual Studio to create a new project…and start writing code immediately!
Create a new Console App (.NET Core) project.
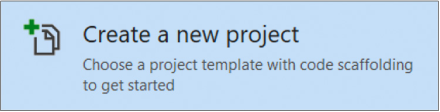
Start up Visual Studio 2019. When it first starts up, it shows you a “Create a new project” window with a few different options. Choose Create a new project. Don’t worry if you dismiss the window—you can always get it back by choosing File >> New >> Project from the menu.
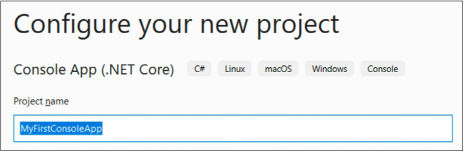
Choose the Console App (.NET Core) project type by clicking on it, then press the Next button.

Name your project MyFirstConsoleApp and click the Next button, then click the Create button.
Note
If you’re using Visual Studio for Mac, the code for this project—and all .NET Core Console App projects in this book—will be the same, but some IDE features will be different. Go to the Visual Studio for Mac Learner’s Guide appendix for the Mac version of this chapter.
Look at the code for your new app.
When Visual Studio creates a new project, it gives you a starting point that you can build on. As soon as it finishes creating the new files for the app, it should open a file called Program.cs with this code:
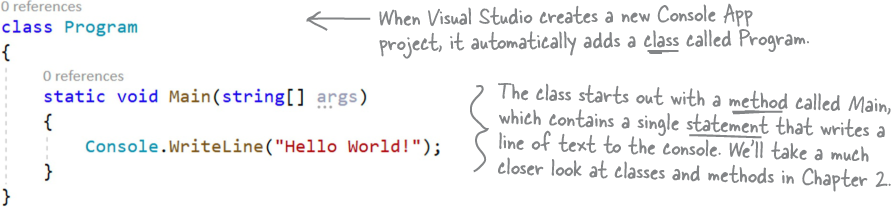
-
The app Visual Studio created for you is ready to run. At the top of the Visual Studio IDE, find the button with a green triangle and your app’s name and click it:

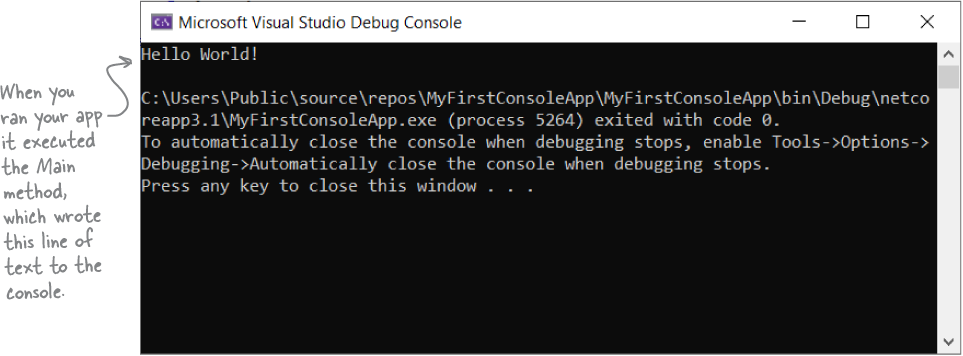
Look at your program’s output.
When you run your program, the Microsoft Visual Studio Debug Console window will pop up and show you the output of the program:
The best way to learn a language is to write a lot of code in it, so you’re going to build a lot programs in this book. Many of them will be .NET Core Console App projects, so let’s have a closer look at what you just did.
At the top of the window is the output of the program:
Hello World!
Then there’s a line break, followed by some additional text:
C:\path-to-your-project-folder\MyFirstConsoleApp\MyFirstConsoleApp\bin\Debug\
netcoreapp3.1\MyFirstConsoleApp.exe (process ####) exited with code 0.
To automatically close the console when debugging stops, enable Tools->
Options->Debugging->Automatically close the console when debugging stops.
Press any key to close this window . . .
You’ll see the same message at the bottom of every Debug Console window. Your program printed a single line of text (Hello World!) and then exited. Visual Studio is keeping the output window open until you press a key to close it so you can see the output before the window disappears.
Press a key to close the window. Then run your program again. This is how you’ll run all of the .NET Core Console App projects that you’ll build throughout the book.
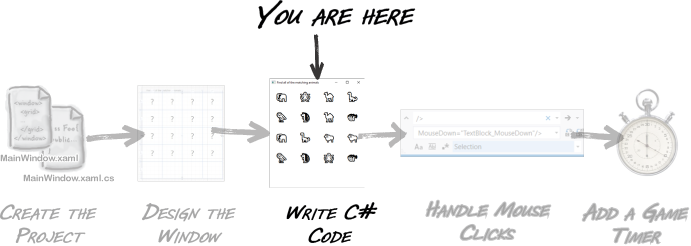
Let’s build a game!
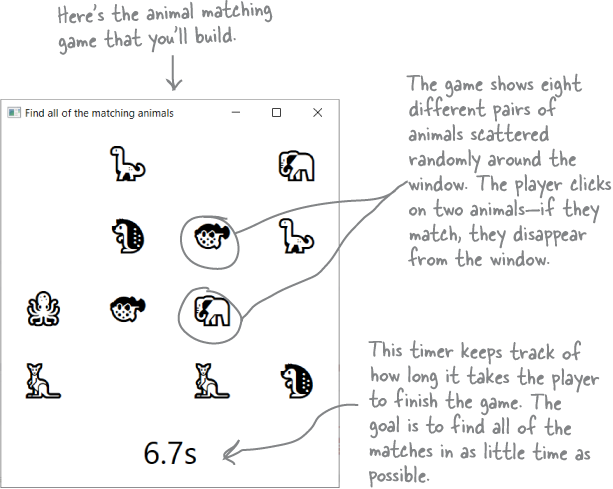
You’ve built your first C# app, and that’s great! Now that you’ve done that, let’s build something a little more complex. We’re going to build an animal matching game, where a player is shown a grid of 16 animals and needs to click on pairs to make them disappear.
Note
The Mac versions of the WPF projects use ASP.NET Core. You can build ASP.NET Core projects on Windows, too.
Your animal matching game is a WPF app
Console apps are great if you just need to input and output text. If you want a visual app that’s displayed in a window, you’ll need to use a different technology. That’s why your animal matching game will be a WPF app. WPF—or Windows Presentation Foundation—lets you create desktop applications that can run on any version of Windows. Most of the chapters in this book will feature one WPF app. The goal of this project is to introduce you to WPF and give you tools to build visually stunning desktop applications as well as console apps.
By the time you’re done with this project, you’ll be a lot more familiar with the tools that you’ll rely on throughout this book to learn and explore C#.
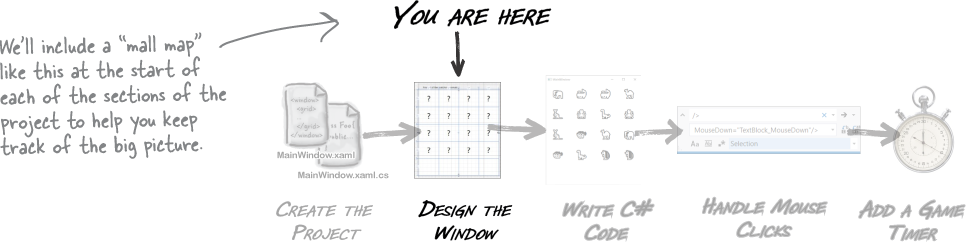
Here’s how you’ll build your game
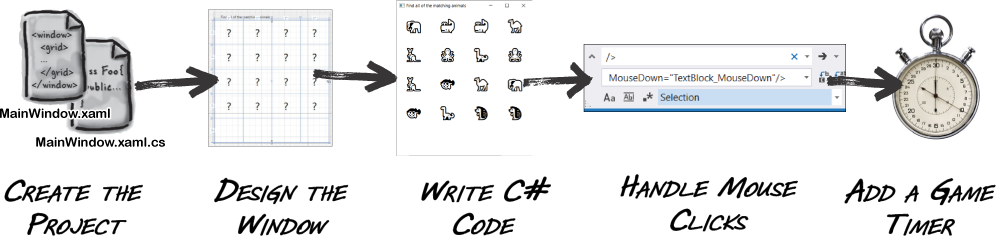
The rest of this chapter will walk you through building your animal matching game, and you’ll be doing it in a series of separate parts:
First you’ll create a new desktop application project in Visual Studio.
Then you’ll use XAML to build the window.
You’ll write C# code to add random animal emoji to the window.
The game needs to let the user click on pairs of emoji to match them.
Finally, you’ll make the game more exciting by adding a timer.
Note
This project can take anywhere from 15 minutes to an hour, depending on how quickly you type. We learn better when we don’t feel rushed, so give yourself plenty of time.
Note
Keep an eye out for these “Game design…and beyond” elements scattered throughout the book. We’ll use game design principles as a way to learn and explore important programming concepts and ideas that apply to any kind of project, not just video games.
Create a WPF project in Visual Studio
Go ahead and start up a new instance of Visual Studio 2019 and create a new project:
Note
We’re done with the Console App project you created in the first part of this chapter, so feel free to close that instance of Visual Studio.
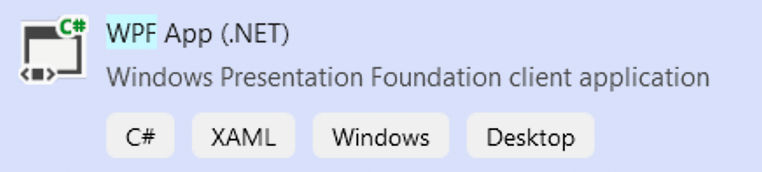
We’re going to build our game as a desktop app using WPF, so select WPF Application and click Next:
Visual Studio will ask you to configure your project. Enter MatchGame as the project name (and you can also change the location to create the project if you’d like):
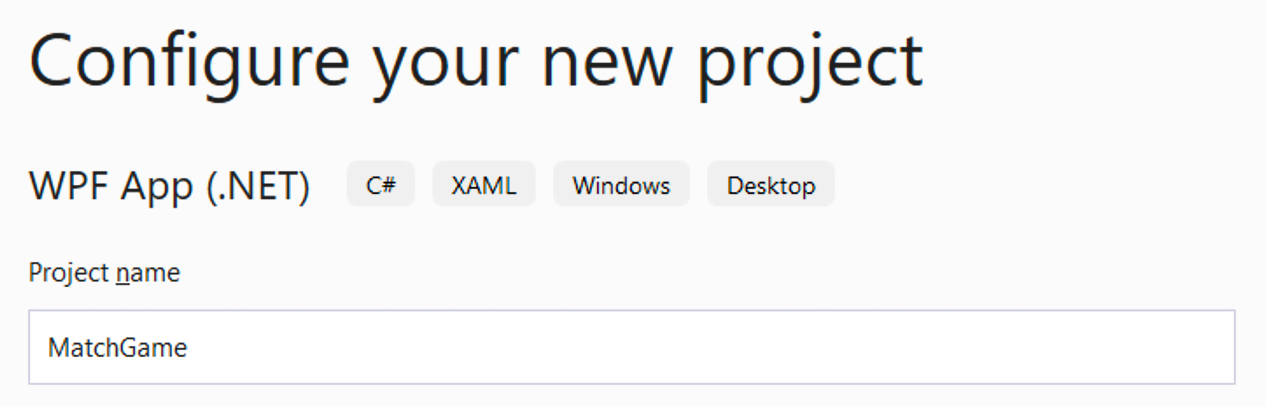
Click the Create button. Visual Studio will create a new project called MatchGame.
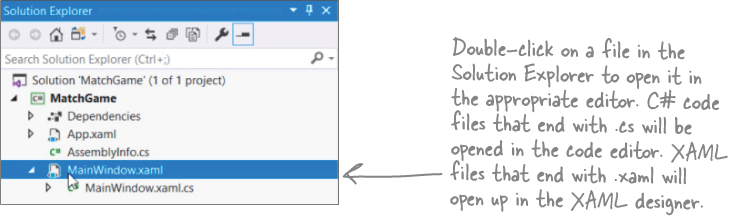
Visual Studio created a project folder full of files for you
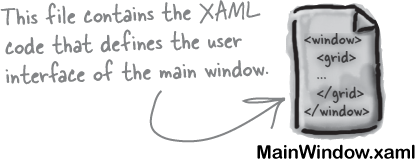
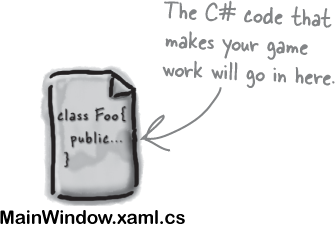
As soon as you created the new project, Visual Studio added a new folder called MatchGame and filled it with all of the files and folders that your project needs. You’ll be making changes to two of these files, MainWindow.xaml and MainWindow.xaml.cs.
If you run into any trouble with this project, go to our GitHub page and look for a link to a video walkthrough: https://github.com/head-first-csharp/fourth-edition.
Adjust your IDE to match the screenshot below. First, open MainWindow.xaml by double-clicking on it in the Solution Explorer window. Then open the Toolbox and Error List windows by choosing them from the View menu. You can actually figure out the purpose of many of these windows and files based on their names and common sense! Take a minute and fill in each of the blanks—try to fill in a note about what each part of the Visual Studio IDE does. We’ve done one to get you started. See if you can take an educated guess at the others.
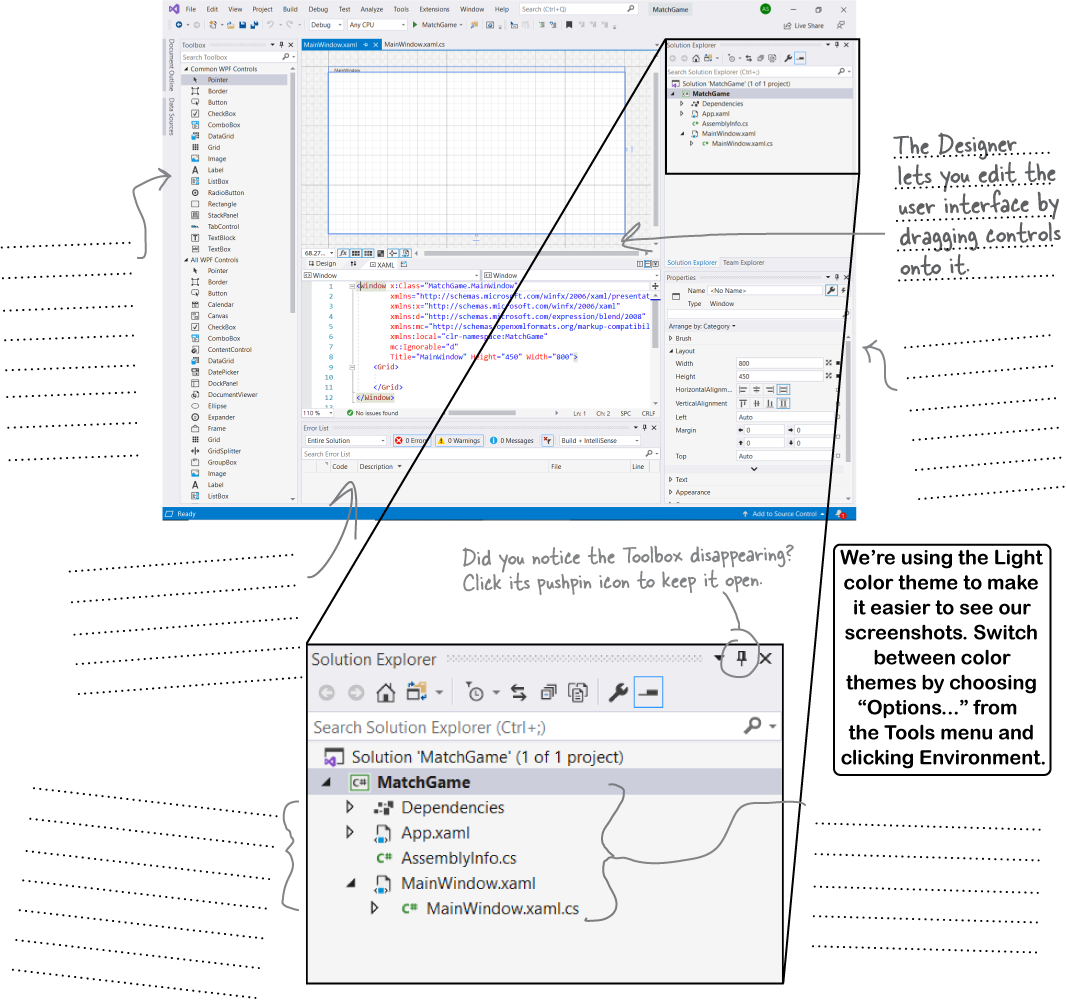
![]() Sharpen your pencil Solution
Sharpen your pencil Solution
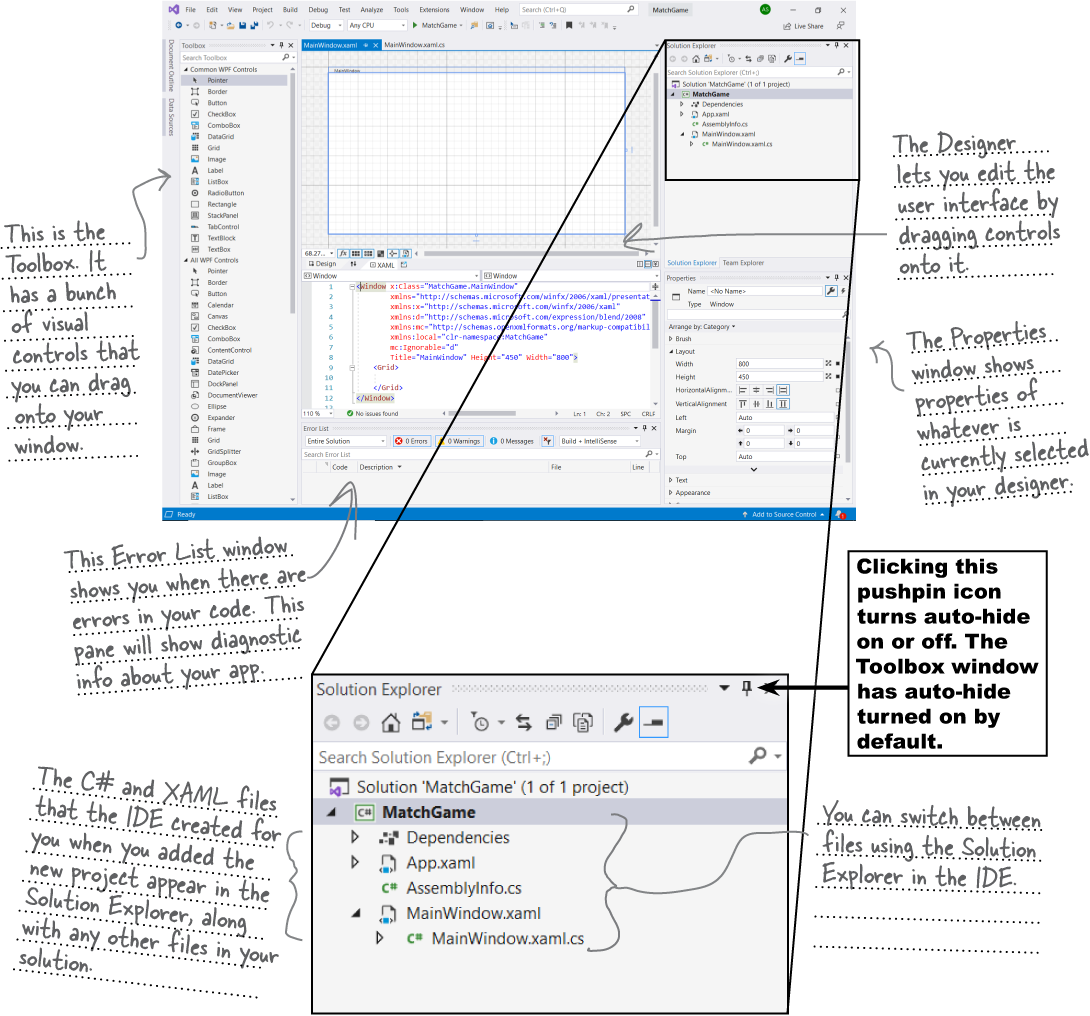
We’ve filled in the annotations about the different sections of the Visual Studio C# IDE. You may have some different things written down, but hopefully you were able to figure out the basics of what each window and section of the IDE is used for. Don’t worry if you came up with a slightly different answer from us! You’ll get LOTS of practice using the IDE.
And just a quick reminder: we’ll use the terms “Visual Studio” and “the IDE” interchangeably throughout this book—including on this page.
Use XAML to design your window
Now that Visual Studio has created a WPF project for you, it’s time to start working with XAML.
XAML, which stands for Extensible Application Markup Language, is a really flexible markup language that C# developers use to design user interfaces. You’ll be building an app with two different kinds of code. First you’ll design the user interface (or UI) with XAML. Then you’ll add C# code to make the game run.
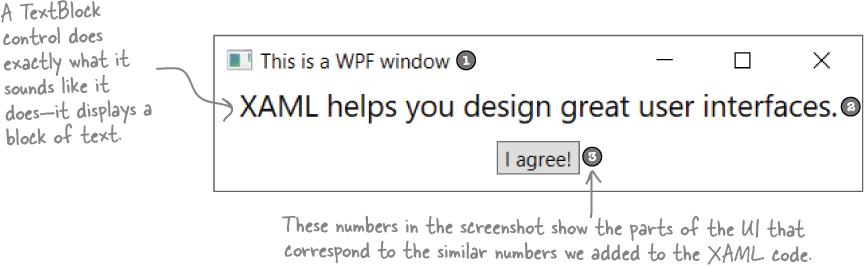
If you’ve ever used HTML to design a web page, then you’ll see a lot of similarities with XAML. Here’s a really quick example of a small window layout in XAML:

Here’s what that window looks like when WPF renders it (or draws it on the screen). It draws a window with two visible controls, a TextBlock control that displays text and a Button control that the user can click on. They’re laid out using an invisible StackPanel control, which causes them to be rendered one on top of the other. Look at the controls in the screenshot of the window, then go back to the XAML and find the TextBlock and Button tags.
Design the window for your game
You’re going to need an application with a graphical user interface, objects to make the game work, and an executable to run. It sounds like a lot of work, but you’ll build all of this over the rest of the chapter, and by the end, you’ll have a pretty good handle on how to use Visual Studio to design a great-looking WPF app.
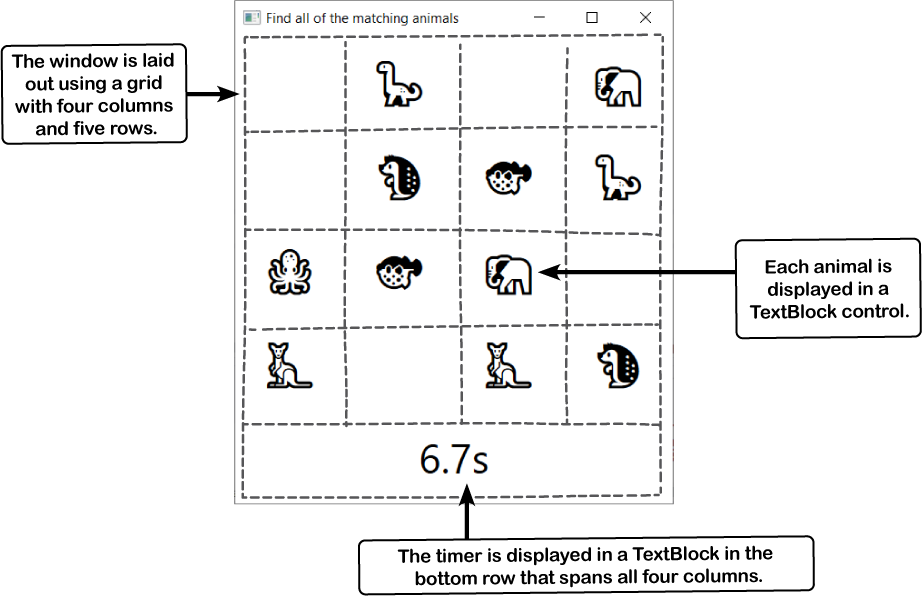
Here’s the layout of the window for the app we’re going to create:
Set the window size and title with XAML properties
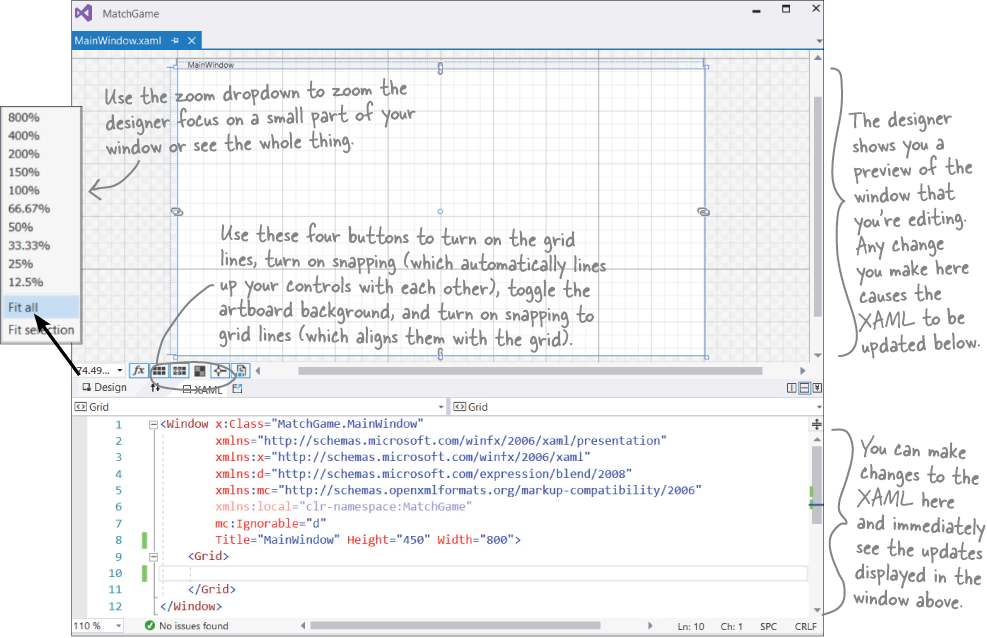
Let’s start building the UI for your animal matching game. The first thing you’ll do is make the window narrower and change its title. You’ll also get familiar with Visual Studio’s XAML designer, a powerful tool for designing great-looking user interfaces for your apps.
Select the main window.
Double-click on MainWindow.xaml in the Solution Explorer.
As soon as you do, Visual Studio will open it up in the XAML designer.
Change the size of the window.
Move your mouse to the XAML editor and click anywhere in the first eight lines of the XAML code. As soon as you do, you should see the window’s properties displayed in the Properties window.
Expand the Layout section and change the width to 400. The window in the Design pane will immediately get narrower. Look closely at the XAML code—the Width property is now 400.
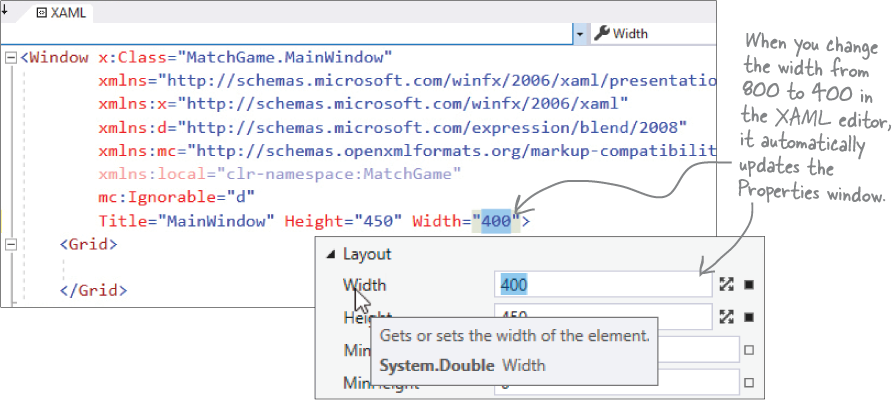
Change the window title.
Find this line in the XAML code at the very end of the
Windowtag:Title="MainWindow" Height="450" Width="400">
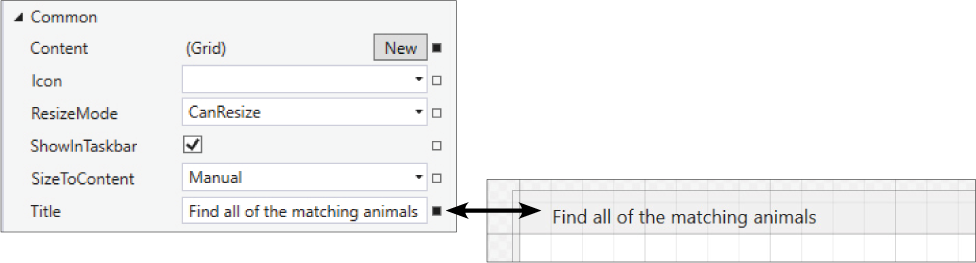
and change the title to Find all of the matching animals so it looks like this:
Title="Find all of the matching animals
" Height="450" Width="400">You’ll see the change appear in the Common section in the Properties window—and, more importantly, the title bar of the window now shows the new text.
When you modify properties in your XAML tags, the changes immediately show up in the Properties window. When you use the Properties window to modify your UI, the IDE updates the XAML.
Add rows and columns to the XAML grid
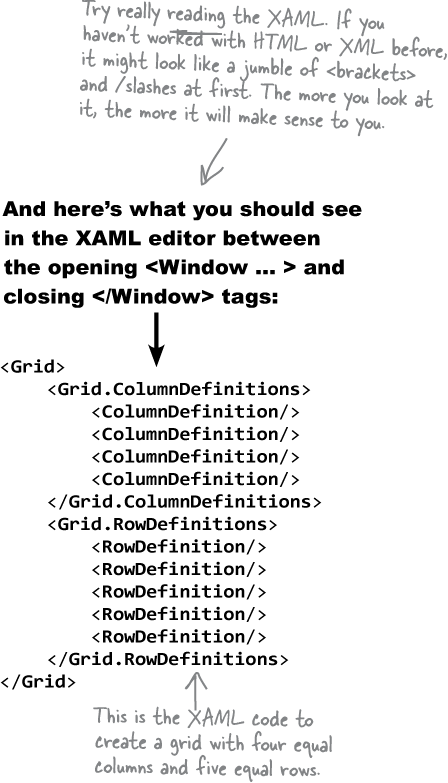
It might look like your main window is empty, but have a closer look at the bottom of the XAML. Notice how there’s a line with <Grid> followed by one with </Grid>? Your window actually has a grid—you just don’t see anything because it doesn’t have any rows or columns. Let’s go ahead and add a row.
Move your mouse over the left side of the window in the designer. When a plus appears over the cursor, click the mouse to add a row.
Note
Your WPF app’s UI is built with controls like buttons, labels, and checkboxes. A grid is a special kind of control—called a container—that can contain other controls. It uses rows and columns to define a layout.
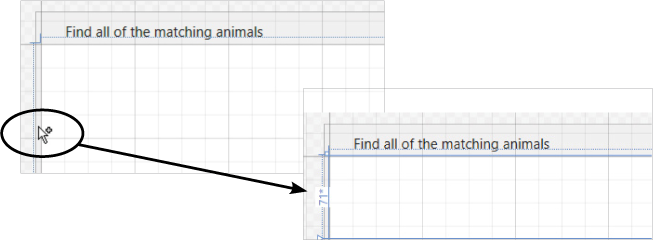
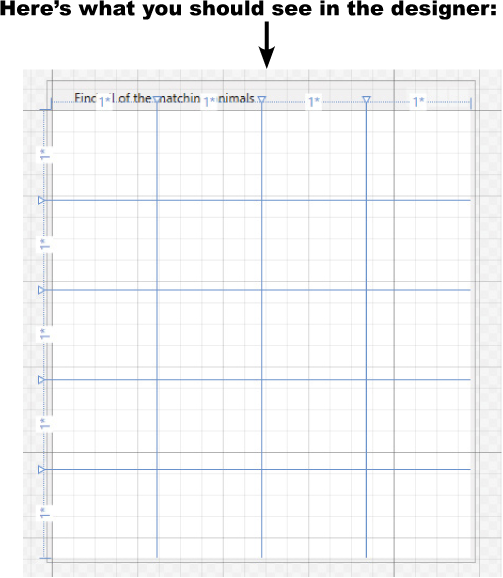
You’ll see a number appear followed by an asterisk, and a horizontal line across the window. You just added a row to your grid! Now add the rows and columns:
Repeat four more times to add a total of five rows.
Hover over the top of the window and click to add four columns. Your window should look like the screenshot below (but your numbers will be different—that’s OK).
Note
These “Watch it!” elements give you a heads-up about important, but often confusing, things that may trip you up or slow you down.
Make the rows and columns equal size
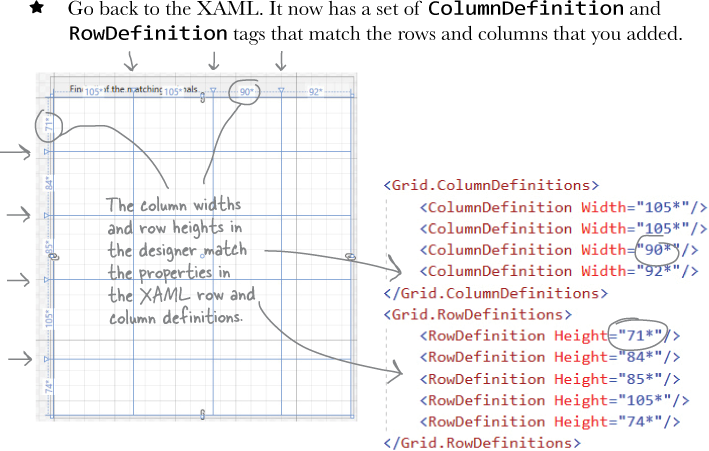
When our game displays the animals for the player to match, we want them to be evenly spaced. Each animal will be contained in a cell in the grid, and the grid will automatically adjust to the size of the window, so we need the rows and columns to all be the same size. Luckily, XAML makes it really easy for us to resize the rows and columns. Click on the first RowDefinition tag in the XAML editor to display its properties in the Properties window:
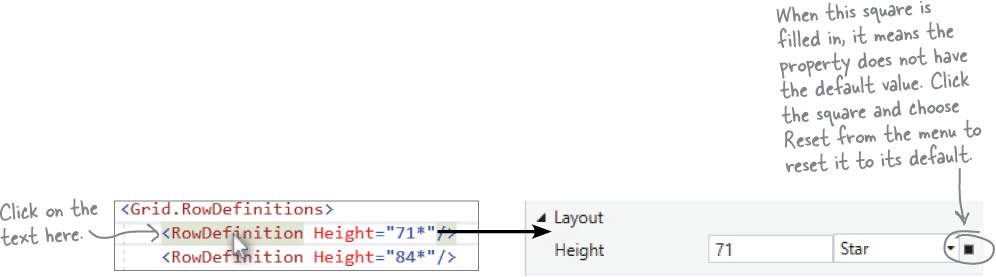
Go to the Properties window and click the square to the right of the Height propert, then choose Reset from the menu that pops up. Hey, wait a minute! As soon as you did that, the row disappeared from the designer. Well, actually, it didn’t quite disappear—it just became very narrow. Go ahead and reset the Height property for all of the rows. Then reset the Width property for all of the columns. Your grid should now have four equally sized columns and five equally sized rows.
Add a TextBlock control to your grid
WPF apps use TextBlock controls to display text, and we’ll use them to display the animals to find and match. Let’s add one to the window.
Expand the Common WPF Controls section in the Toolbox and drag a TextBlock into the cell in the second column and second row. The IDE will add a TextBlock tag between the Grid start and end tags:
<TextBlock Text="TextBlock"
   HorizontalAlignment="Left" VerticalAlignment="Center"
   Margin="560,0,0,0" TextWrapping="Wrap" />
The XAML for this TextBlock has five properties:
Texttells the TextBlock what text to display in the window.HorizontalAlignmentjustifies the text left, right, or center.VerticalAlignmentaligns it to the top, middle, or bottom of its box.Marginsets its offset from the top, sides, or bottom of its container.TextWrappingtells it whether or not to add line breaks to wrap the text.

Your properties may be in a different order, and the Margin property will have different numbers because they depend on where in the cell you dragged it. All of these properties can be modified or reset using the IDE’s Properties window.
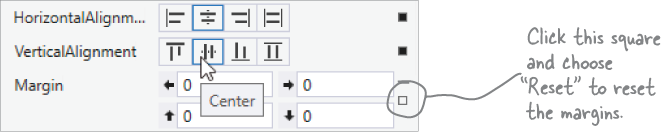
We want each animal to be centered. Click on the label in the designer, then go to the Properties window and click ![]() to expand the Layout section. Click Center for both the horizontal and vertical alignment properties, and then use the square at the right of the window to reset the Margin property.
to expand the Layout section. Click Center for both the horizontal and vertical alignment properties, and then use the square at the right of the window to reset the Margin property.
We also want the animals to be bigger, so expand the Text section in the Properties window and change the font size to 36 px. Then go to the Common section and change the Text property to ? to make it display a question mark.

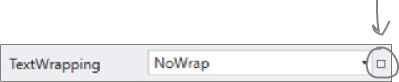
Click on the search box at the top of the Properties window, then type the word wrap to find properties that match. Use the square on the right side of the window to reset the TextWrapping property.

Note
You’ll see many exercises like this throughout the book. They give you a chance to work on your coding skills. And it’s always OK to peek at the solution!

Generate a method to set up the game
Now that the user interface is set up, it’s time to start writing code for the game. You’re going to do that by generating a method (just like the Main method you saw earlier), and then adding code to it.
Open MainWindow.xaml.cs in the editor.
Click the triangle
 next to MainWindow.xaml in the Solution Explorer and double-click on MainWindow.xaml.cs to open it in the IDE’s code editor. You’ll notice that there’s already code in that file. Visual Studio will help you add a method to it.
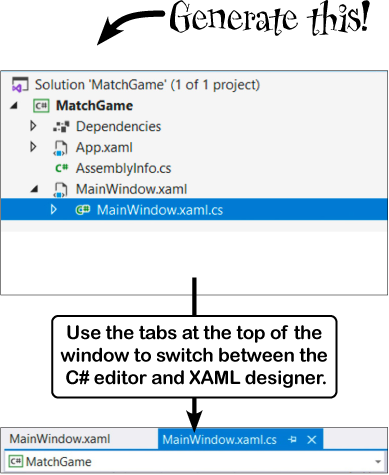
Generate a method called SetUpGame.
Find this part of the code that you opened:
Note
It’s OK if you’re not 100% clear on what a method is yet.
Try running your code.
Click the button at the top of the IDE to start your program, just like you did with your console app earlier.

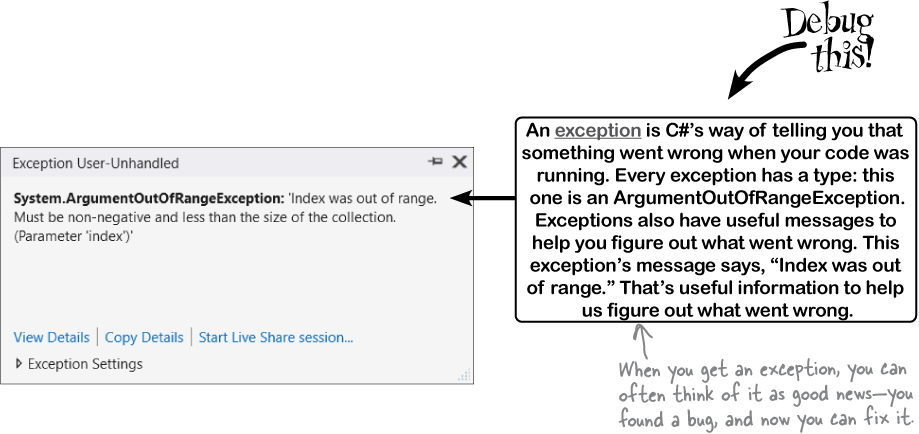
Uh-oh—something went wrong. Instead of showing you a window, it threw an exception:
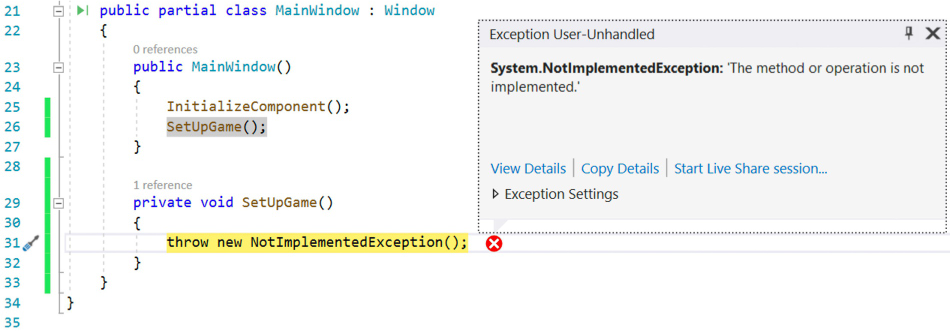
Things may seem like they’re broken, but this is actually exactly what we expected to happen! The IDE paused your program, and highlighted the most recent line of code that ran. Take a closer look at it:
throw new NotImplementedException();
The method that the IDE generated literally told C# to throw an exception. Take a closer look at the message that came with the exception:
System.NotImplementedException: 'The method or operation is not implemented.'
That actually makes sense, because it’s up to you to implement the method that the IDE generated. If you forget to implement it, the exception is a nice reminder that you still have work to do. If you generate a lot of methods, it’s great to have that as a reminder!
Click the square Stop Debugging button
 in the toolbar (or choose Stop Debugging (F5) from the Debug menu) to stop your program so you can finish implementing the SetUpGame method.
Note
When you’re using the IDE to run your app, the Stop Debugging button immediately quits it.
Finish your SetUpGame method
You put your SetUpGame method inside the public MainWindow() method because everything inside that method is called as soon as your app starts.
Note
This is a special method called a constructor, and you’ll learn more about how it works in #encapsulation_keep_your_privateshellippr.
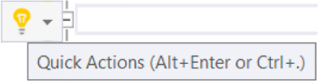
Start adding code to your SetUpGame method.
Your SetUpGame method will take eight pairs of animal emoji characters and randomly assign them to the TextBlock controls so the player can match them. So the first thing your method needs is a list of those emoji, and the IDE will help you write code for it. Select the
throwstatement that the IDE added, and delete it. Then put your cursor where that statement was and typeList. The IDE will pop up an IntelliSense window with a bunch of keywords that start with “List” :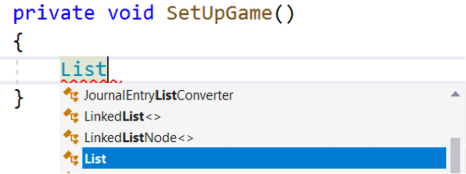
Choose
Listfrom the IntelliSense pop-up. Then type<str—another IntelliSense window will pop up with matching keywords:
Choose
string. Finish typing this line of code, but don’t hit Enter yet:
-
Your C# statement isn’t done yet. Make sure your cursor is placed just after the
)at the end of the line, then type an opening curly bracket{—the IDE will add the closing one for you, and your cursor will be positioned between the two brackets. Press Enter—the IDE will add line breaks for you automatically: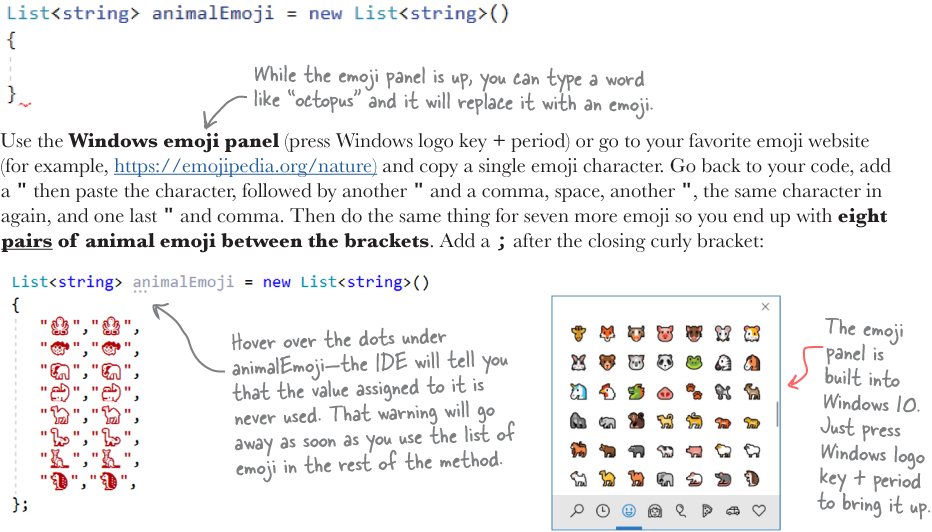
Finish your method.
Now add the rest of the code for the method—be careful with the periods, parentheses, and brackets:
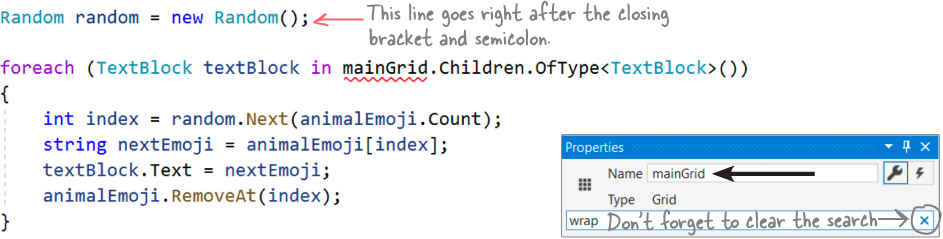
The red squiggly line under
mainGridis the IDE telling you there’s an error: your program won’t build because there’s nothing with that name anywhere in the code. Go back to the XAML editor and click on the<Grid>tag, then go to the Properties window and entermainGridin the Name box.Check the XAML—you’ll see
<Grid x:Name="mainGrid">at the top of the grid. Now there shouldn’t be any errors in your code. If there are, carefully check every line—it’s easy to miss something.Note
If you get an exception when you run your game, make sure you have exactly 8 pairs of emoji in your animalEmoji list and 16 <TextBlock ... /> tags in your XAML.
Run your program
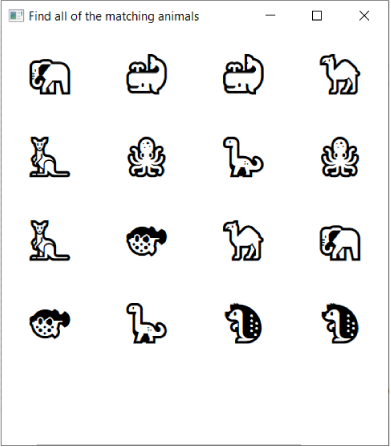
Click the ![]() button in the IDE’s toolbar to start your program running. A window will pop up with your eight pairs of animals in random positions:
button in the IDE’s toolbar to start your program running. A window will pop up with your eight pairs of animals in random positions:
The IDE goes into debugging mode while your program is running: the Start button is replaced by a grayed-out Continue, and debug controls ![]() appear in the toolbar with buttons to pause, stop, and restart your program.
appear in the toolbar with buttons to pause, stop, and restart your program.
Stop your program by clicking X in the upper-right corner of the window or the square Stop button in the debug controls. Run it a few times—the animals will get shuffled each time.
Note
You’ve set the stage for the next part that you’ll add.
When you build a new game, you’re not just writing code. You’re also running a project. A really effective way to run a project is to build it in small increments, taking stock along the way to make sure things are going in a good direction. That way you have plenty of opportunities to change course.
Note
Here’s another pencil-and-paper exercise. It’s absolutely worth your time to do all of them because they’ll help get important C# concepts into your brain faster.

Note
Working on your code comprehension skills will make you a better developer.
The pencil-and-paper exercises are not optional. They give your brain a different way to absorb the information. But they do something even more important: they give you opportunities to make mistakes. Making mistakes is a part of learning, and we’ve all made plenty of mistkaes (you may even find one or two typos in this book!). Nobody writes perfect code the first time—really good programmers always assume that the code that they write today will probably need to change tomorrow. In fact, later in the book you’ll learn about refactoring, or programming techniques that are all about improving your code after you’ve written it.
Note
We’ll add bullet points like this to give a quick summary of many of the ideas and tools that you’ve seen so far.
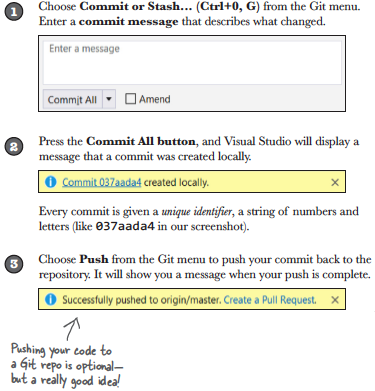
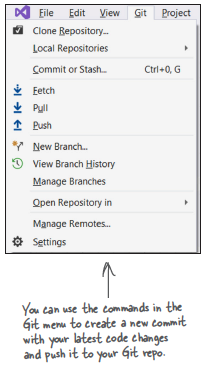
Add your new project to source control
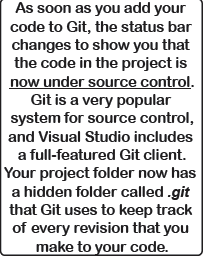
You’re going to be building a lot of different projects in this book. Wouldn’t it be great if there was an easy way to back them up and access them from anywhere? What if you make a mistake—wouldn’t it be really convenient if you could roll back to a previous version of your code? Well, you’re in luck! That’s exactly what source control does: it gives you an easy way to back up all of your code, and keeps track of every change that you make. Visual Studio makes it easy for you to add your projects to source control.
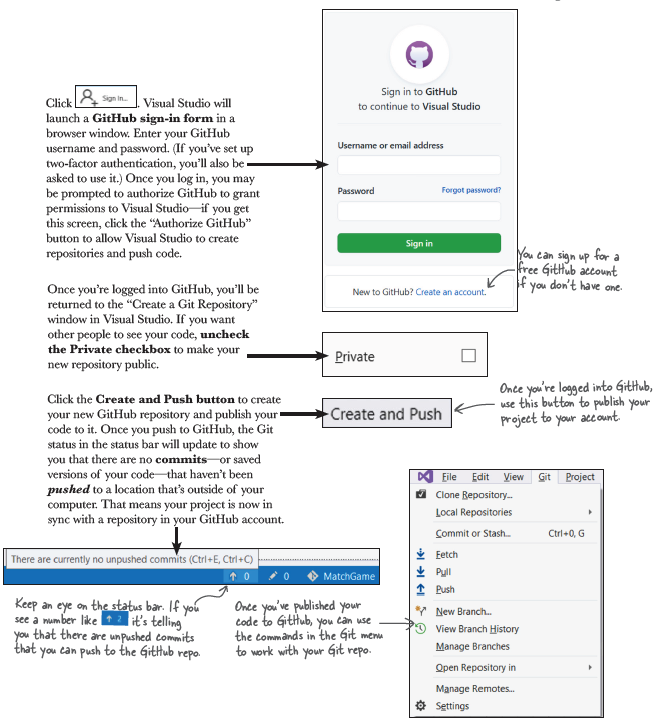
Git is a popular version control system, and Visual Studio will publish your source to any Git repository (or repo). We think GitHub is one of the easiest Git providers to use. You’ll need a GitHub account to push code to it, but if you don’t have one you’ll be able to create it shortly.
Find Add to Source Control in the status bar at the bottom of the IDE:

Click on it—Visual Studio will prompt you to add your code to Git:

Click Git. Visual Studio will display the Create a Git repository window:

Visual Studio will create a repository in your GitHub account. By default it will have the same name as your project.
Note
Git is an open source version control system. There are multiple third-party services like GitHub that provide Git services (like storage space for your code and web access to your repositories). You can go to https://git-scm.com to learn more about Git.
Note
Go to https://github.com/head-first-csharp/fourth-edition to view and download the complete code for this project and all of the other projects in this book.
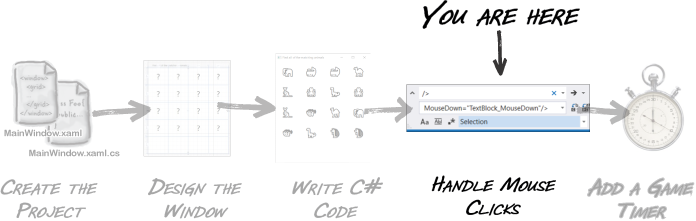
The next step to build the game is handling mouse clicks
Now that the game is displaying the animals for the player to click on, we need to add code that makes the gameplay work. The player will click on animals in pairs. The first animal the player clicks on disappears. If the second animal the player clicks on matches the first, that one disappears too. If it doesn’t, the first animal reappears. We’ll make all of this work by adding an event handler, which is just a name for a method that gets called when certain actions (like mouse clicks, double-clicks, windows getting resized, etc.) happen in the app.
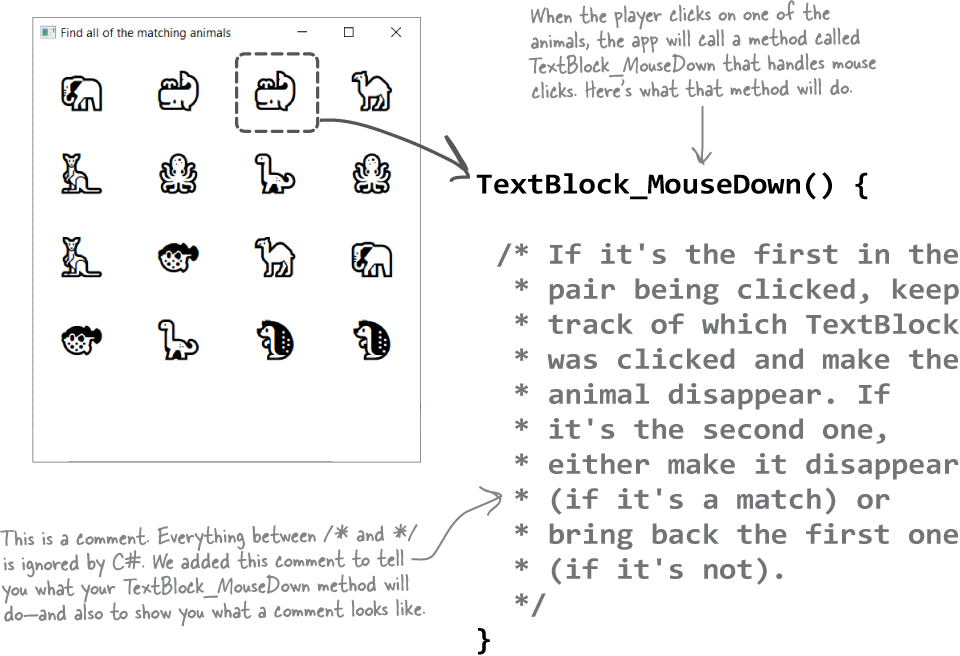
Make your TextBlocks respond to mouse clicks
Your SetUpGame method changes the TextBlocks to show animal emoji, so you’ve seen how your code can modify controls in your application. Now you need to write code that goes in the other direction—your controls need to call your code, and the IDE can help.
Go back to the XAML editor window and click the first TextBlock tag—this will cause the IDE to select it in the designer so you can edit its properties. Then go to the Properties window and click the Event Handlers button (![]() ). An event handler is a method that your application calls when a specific event happens. These events include keypresses, drag and drop, window resizing, and of course, mouse movement and clicks. Scroll down the Properties window and look through the names of the different events your TextBlock can add event handlers for. Double-click inside the box to the right of the event called MouseDown.
). An event handler is a method that your application calls when a specific event happens. These events include keypresses, drag and drop, window resizing, and of course, mouse movement and clicks. Scroll down the Properties window and look through the names of the different events your TextBlock can add event handlers for. Double-click inside the box to the right of the event called MouseDown.
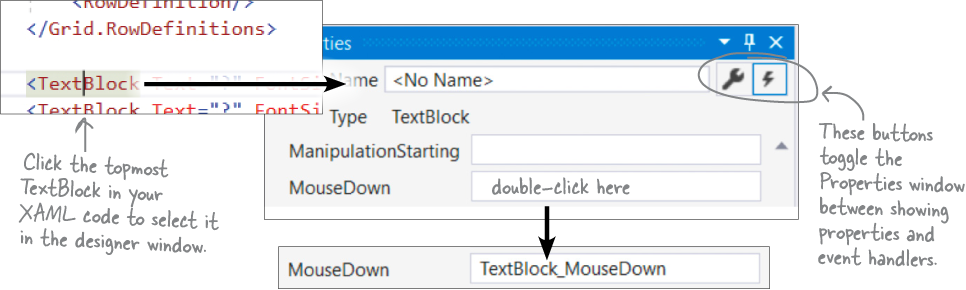
The IDE filled in the MouseDown box with a method name, TextBlock_MouseDown, and the XAML for the TextBlock now has a MouseDown property:
<TextBlock Text="?" FontSize="36" HorizontalAlignment="Center"
      VerticalAlignment="Center" MouseDown="TextBlock_MouseDown"/>
You might not have noticed that, because the IDE also added a new method to the code-behind—the code that’s joined with the XAML—and immediately switched to the C# editor to display it. You can always jump right back to it from the XAML editor by right-clicking on TextBlock_MouseDown in the XAML editor and choosing View Code. Here’s the method it added:

Whenever the player clicks on the TextBlock, the app will automatically call the TextBlock_MouseDown method. So now we just need to add code to it. Then we’ll need to hook up all of the other TextBlocks so they call it, too.
Note
An event handler is a method that your app calls in response to an event like a mouse click, keypress, or window resize.
Add the TextBlock_MouseDown code
Now that you’ve read through the code for TextBlock_MouseDown, it’s time to add it to your program. Here’s what you’ll do next:
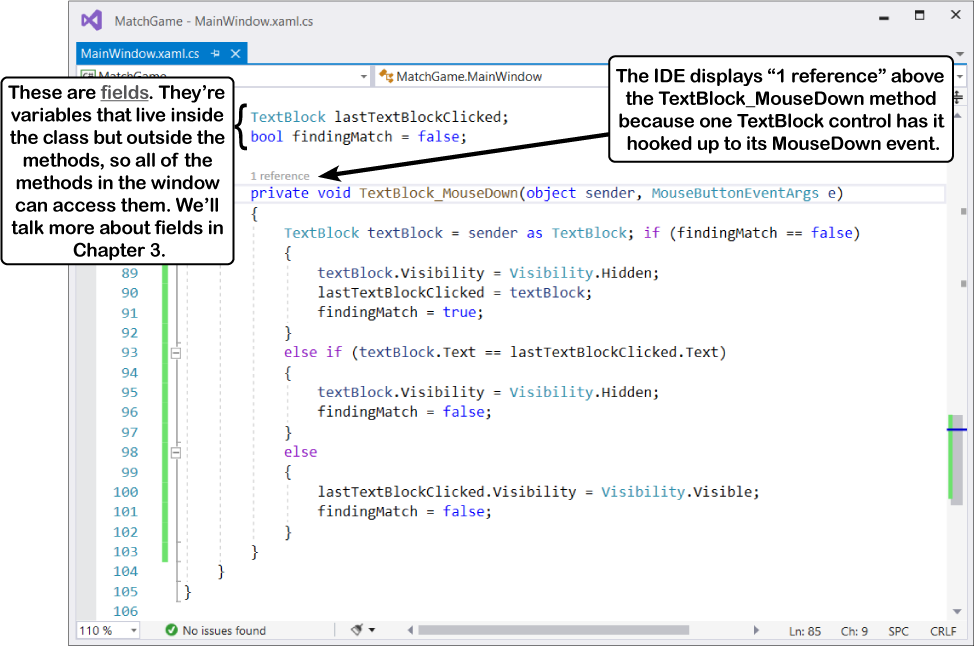
Add the first two lines with
lastTextBlockClickedandfindingMatchabove the first line of the TextBlock_MouseDown method that the IDE added for you. Make sure you put them between the closing curly bracket at the end of SetUpGame and the new code the IDE just added.Fill in the code for TextBlock_MouseDown. Be really careful about equals signs—there’s a big difference between = and == (which you’ll learn about in the next chapter).
Here’s what it looks like in the IDE:
Make the rest of the TextBlocks call the same MouseDown event handler
Right now only the first TextBlock has an event handler hooked up to its MouseDown event. Let’s hook up the other 15 TextBlocks to it, too. You could do it by selecting each one in the designer and entering TextBlock_MouseDown into the box next to MouseDown. We already know that just adds a property to the XAML code, so let’s take a shortcut.
Select the last 15 TextBlocks in the XAML editor.
Go to the XAML editor, click to the left of the second
TextBlocktag, and drag down to the end of the TextBlocks, just above the closing</Grid>tag. You should now have the last 15 TextBlocks selected (but not the first one).Use Quick Replace to add MouseDown event handlers.
Choose Find and Replace >> Quick Replace from the Edit menu. Search for
/>and replace it withMouseDown="TextBlock_MouseDown"/>—make sure that there’s a space beforeMouseDownand that the search range is Selection so it only adds the property to the selected TextBlocks.
Run the replace over all 15 selected TextBlocks.
Click the Replace All button (
 ) to add the MouseDown property to the TextBlocks—it should tell you that 15 occurrences were replaced. Carefully examine the XAML code to make sure they each have a MouseDown property that exactly matches the one in the first TextBlock.
Make sure that the method now shows 16 references in the C# editor (choose Build Solution from the Build menu to update it). If you see 17 references, you accidentally attached the event handler to the Grid. You definitely don’t want that—if you do, you’ll get an exception when you click an animal.
Run your program. Now you can click on pairs of animals to make them disappear. The first animal you click will disappear. If you click on its match, that one disappears, too. If you click on an animal that doesn’t match, the first one will appear again. When all the animals are gone, restart or close the program.
Note
When you see a Brain Power element, take a minute and really think about the question that it’s asking.
Finish the game by adding a timer
Our animal match game will be more exciting if players can try to beat their best time. We’ll add a timer that “ticks” after a fixed interval by repeatedly calling a method.
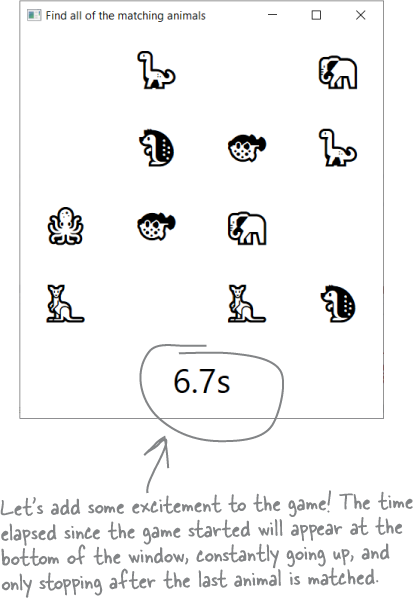
Timers “tick” every time interval by calling methods over and over again. You’ll use a timer that starts when the player starts the game and ends when the last animal is matched.

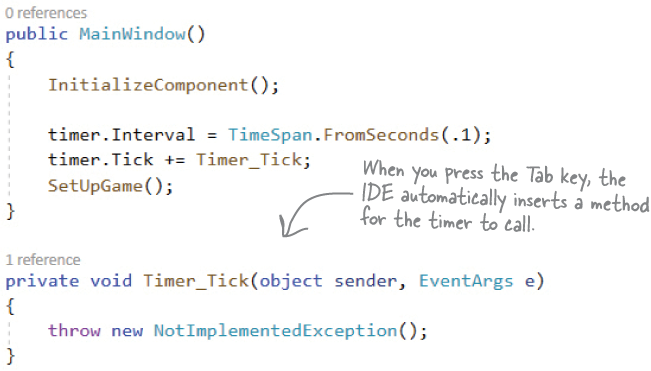
Add a timer to your game’s code
Start by finding the
namespacekeyword near the top of MainWindow.xaml.cs and add the lineusing System.Windows.Threading;directly underneath it:namespace MatchGame { using System.Windows.Threading;
Add this!
Find
public partial class MainWindowand add this code just after the opening curly bracket{:public partial class MainWindow : Window { DispatcherTimer timer = new DispatcherTimer(); int tenthsOfSecondsElapsed; int matchesFound;Note
You’ll add these three lines of code to create a new timer and add two fields to keep track of the time elapsed and number of matches the player has found.
We need to tell our timer how frequently to “tick” and what method to call. Click at the beginning of the line where you call the SetUpGame method to move the editor’s cursor there. Press Enter, then type the two lines of code in the screenshot below that start with
timer.—as soon as you type+=the IDE will display a message:
Press the Tab key. The IDE will finish the line of code and add a Timer_Tick method:
The Timer_Tick method will update a TextBlock that spans the entire bottom row of the grid. Here’s how to set it up:
Drag a TextBlock into the lower-left square.
Use the Name box at the top of the Properties window to give it the name
timeTextBlock.Reset its margins, center it in the cell, and set the FontSize property to 36px and Text property to “Elapsed time” (just like you did with other controls).
Find the ColumnSpan property and set it to 4.
Add a MouseDown event handler called TimeTextBlock_MouseDown.
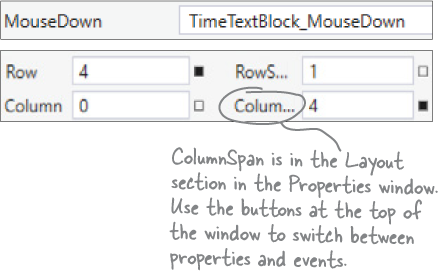
Here’s what the XAML will look like—carefully compare it with your code in the IDE:
<TextBlock x:Name="timeTextBlock "Text="Elapsed time" FontSize="36"
    HorizontalAlignment="Center" VerticalAlignment="Center"
    Grid.Row="4" Grid.ColumnSpan="4" MouseDown="TimeTextBlock_MouseDown"/>
When you added the MouseDown event handler, Visual Studio created a method in the code-behind called TimeTextBlock_MouseDown, just like with the other TextBlocks. Add this code to it:
private void TimeTextBlock_MouseDown(object sender, MouseButtonEventArgs e)
{
    if (matchesFound == 8)
    {
        SetUpGame();
    }
}
Note
This resets the game if all 8 matched pairs have been found (otherwise it does nothing because the game is still running).
Now you have everything you need to finish the Timer_Tick method, which updates the new TextBlock with the elapsed time and stops the timer once the player has found all of the matches:
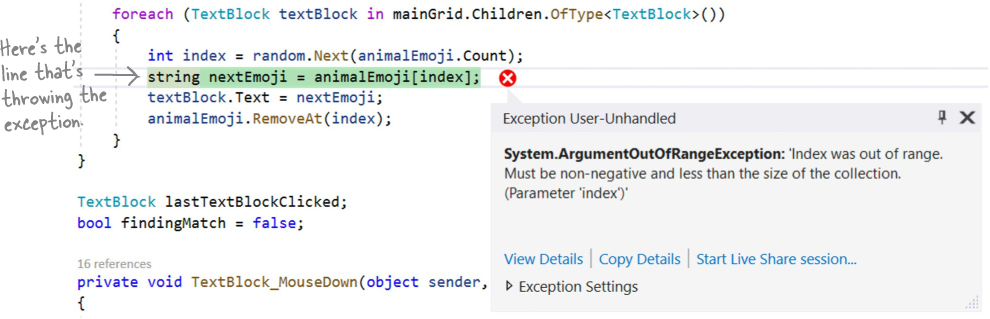
private void Timer_Tick(object sender, EventArgs e)
{
    tenthsOfSecondsElapsed++;
    timeTextBlock.Text = (tenthsOfSecondsElapsed / 10F).ToString("0.0s");
    if (matchesFound == 8)
    {
        timer.Stop();
        timeTextBlock.Text = timeTextBlock.Text + " - Play again?";
    }
}
But something’s not quite right here. Run your code... oops! You get an exception.
We’re about to fix this problem, but first look closely at the error message and highlighted line in the IDE.
Can you guess what caused the error?
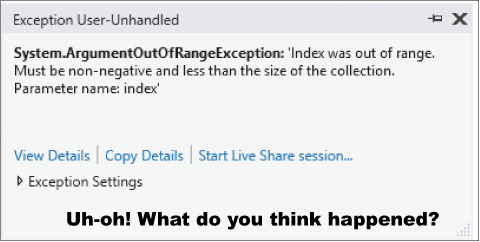
Use the debugger to troubleshoot the exception
You might have heard the word “bug” before. You might have even said something like this to your friends at some point in the past: “That game is really buggy, it has so many glitches.” Every bug has an explanation—everything in your program happens for a reason—but not every bug is easy to track down.
Understanding a bug is the first step in fixing it. Luckily, the Visual Studio debugger is a great tool for that. (That’s why it’s called a debugger: it’s a tool that helps you get rid of bugs!)
Restart your game a few times.
The first thing to notice is that your program always throws the same type of exception with the same message:
If you move the exception window out of the way, you’ll see that it always stops on the same line:
This exception is reproducible: you can reliably get your program to throw the exact same exception, and you have a really good idea of where the problem is.
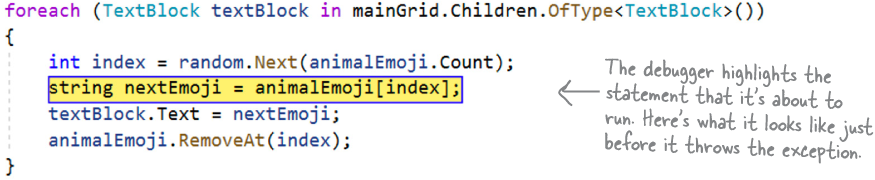
Add a breakpoint to the line that’s throwing the exception.
Run your program again so it halts on the exception. Before you stop it, choose Toggle Breakpoint (F9) from the Debug menu. As soon as you do, the line will be highlighted in red, and a red dot will appear in the left margin next to the line. Now stop your app again—the highlight and dot will still be there:

You’ve just placed a breakpoint on the line. Your program will now break every time it executes that line of code. Try that out now. Run your app again. The program will halt on that line, but this time it won’t throw the exception. Press Continue. It halts on the line again. Press Continue again. It halts again. Keep going until you see the exception. Now stop your app.
Gather evidence so you can figure out what’s causing the problem.
Did you notice anything interesting in the Locals window when you ran your app? Restart it and keep a really close eye on the
animalEmojivariable. The first time your app breaks, you should see this in the Locals window:
Press Continue. It looks like the Count went down by 1, from 16 to 15:

The app is adding random emoji from the
animalEmojilist to the TextBlocks and then removing them from the list, so its count should go down by 1 each time. Things go just fine until theanimalEmojilist is empty (so Count is 0), then you get the exception. So that’s one piece of evidence! Another piece of evidence is that this is happening in aforeach loop. And the last piece of evidence is that this all started after we added a new TextBlock to the window.Time to put on your Sherlock Holmes cap. Can you sleuth out what’s causing the exception?
Figure out what’s actually causing the bug.
The reason your program is crashing is because it’s trying to get the next emoji from the
animalEmojilist but the list is empty, and that causes it to throw an ArgumentOutOfRange exception. What caused it to run out of emoji to add?Your program worked before you made the most recent change. Then you added a TextBlock…and then it stopped working. Right inside of a loop that iterates through all of the TextBlocks. A clue…how very, very interesting.

So when you run your app, it breaks on this line for every TextBlock in the window. So for the first 16 TextBlocks, everything goes fine because there are enough emoji in the collection:
But now that there’s a new TextBlock at the bottom of the window, it breaks a 17th time—and since the
animalEmojicollection only had 16 emoji in it, it’s now empty:
So before you made the change, you had 16 TextBlocks and a list of 16 emoji, so there were just enough emoji to add one to each TextBlock. Now you have 17 TextBlocks but still only 16 emoji, so your program runs out of emoji to add…and then it throws the exception.
Fix the bug.
Since the exception is being thrown because we’re running out of emoji in the loop that iterates through the TextBlocks, we can fix it by skipping the TextBlock we just added. We can do that by checking the TextBlock’s name and skipping the one that we added to show the time. Remove the breakpoint by toggling it again or choosing Delete All Breakpoints (Ctrl+Shift+F9) from the Debug menu.

Add the rest of the code and finish the game
There’s one more thing you need to do. Your TimeTextBlock_MouseDown method checks the matchesFound field, but that field is never set anywhere. So add these three lines to the SetUpGame method immediately after the closing bracket of the foreach loop:
             animalEmoji.RemoveAt(index);
          }
       }
       timer.Start();
       tenthsOfSecondsElapsed = 0;
       matchesFound = 0;
   }
Note
Add these three lines of code to the very end of the SetUpGame method to start the timer and reset the fields.
Then add this statement to the middle block of the if/else in TextBlock_MouseDown:
else if (textBlock.Text == lastTextBlockClicked.Text)
{
    matchesFound++;
    textBlock.Visibility = Visibility.Hidden;
    findingMatch = false;
}
Note
Add this line of code to increase matchesFound by one every time the player successfully finds a match.
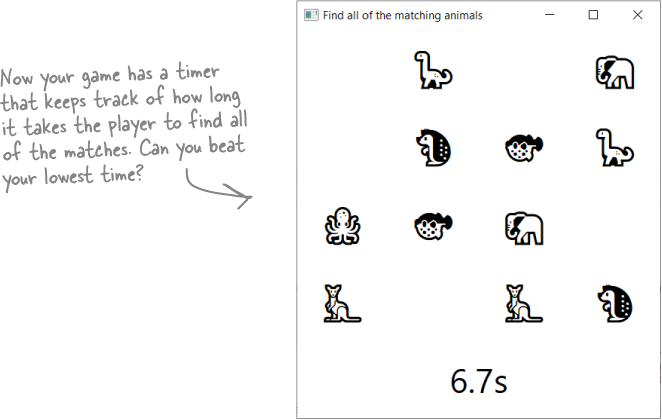
Now your game has a timer that stops when the player finishes matching animals, and when the game is over you can click it to play again. You’ve built your first game in C#. Congratulations!
Note
Go to https://github.com/head-first-csharp/fourth-edition to view and download the complete code for this project and all of the other projects in this book.
Update your code in source control
Now that your game is up and running, it’s a great time to push your changes to Git, and Visual Studio makes it easy to do that. All you need to do is stage your commits, enter a commit message, and then sync to the remote repo.
Choose Commit Staged and Sync from the commit dropdown (it’s right under the commit message box). It may take a few seconds to sync, and then you’ll see a success message in the Team Explorer window.
Whenever you have a large project, it’s always a good idea to break it into smaller pieces.
One of the most useful programming skills that you can develop is the ability to look at a large and difficult problem and break it down into smaller, easier problems.
It’s really easy to be overwhelmed at the beginning of a big project and think, “Wow, that’s just so…big!” But if you can find a small piece that you can work on, then you can get started. Once you finish that piece, you can move on to another small piece, and then another, and then another. As you build each piece, you learn more and more about your big project along the way.
Even better ifs…
Your game is pretty good! But every game—in fact, pretty much every program—can be improved. Here are a few things that we thought of that could make the game better:
Add different kinds of animals so the same ones don’t show up each time.
Keep track of the player’s best time so they can try to beat it.
Make the timer count down instead of counting up so the player has a limited amount of time.
Note
We’re serious—take a few minutes and do this. Stepping back and thinking about the project you just finished is a great way to seal the lessons you learned into your brain.
Note
Just a quick reminder: we’ll refer to Visual Studio as “the IDE” a lot in this book.

Get Head First C#, 4th Edition now with the O’Reilly learning platform.
O’Reilly members experience books, live events, courses curated by job role, and more from O’Reilly and nearly 200 top publishers.

