
72 IBM Enterprise Workload Manager
Application Server. It uses EJB, Servlet, JSP, and the Cloudscape™ database. You have to
install the following feature to run the Plants by WebSphere application on your application
server:
Application Server
– Application Server samples
3.7.1 Configure Trade3 JDBC driver
Trade3 uses the DB2 JDBC driver, db2java.zip, by default. This driver does not propagate the
ARM correlator to the next hop; therefore, we modify Trade3 to use the JCC driver which
pass the ARM correlator to the database server. The JCC driver, db2jcc.jar, is the DB2
Universal JDBC driver which supports both JDBC type 2 and type 4 mode and is shipped as
part of DB2 Universal Database V8.2.
You have to install JCC driver V2.3.42 or higher and configure the data source in order for an
application using db2java.zip as its JDBC driver to work with EWLM. For your reference, we
provide the procedure required to modify the Trade3 data source configuration to use the
JCC driver:
1. Change the current data source JNDI name.
a. Log in to the WebSphere Administrative Console.
b. Click Resources
→ JDBC Providers.
c. Select Node and click Apply.
d. Select DB2 Universal JDBC Driver Provider (XA)
→ Data Sources → DB2
Universal JDBC Driver XA DataSource.
e. Change the current JNDI name from jdbc/TradeDataSource to another to prevent
Trade3 uses this old data source. For example, change the name to jdbc/dummy.
f. Click Apply or OK.
2. Create a new JDBC provider and data source.
a. Click Resources
→ JDBC Providers again.
b. Select Scope and click Apply.
c. Click New to create a new JDBC provider.
d. Select DB2 Universal JDBC Driver Provider (XA) from the drop-down list and click
OK.
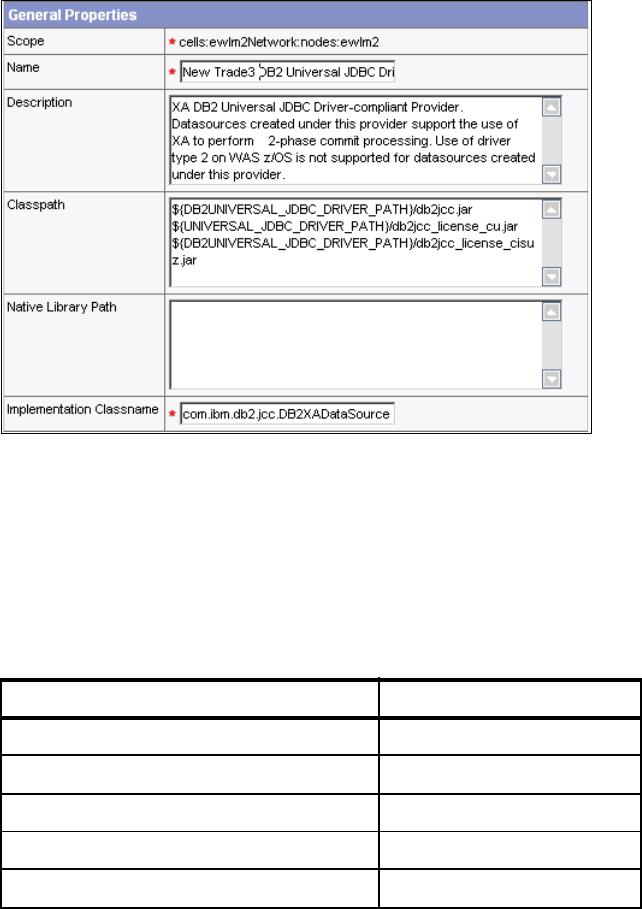
e. The settings page for the new JDBC provider appears. Update the Classpath
properties with the actual path of your JCC driver jar files, or alternatively, set the value
of those variables as shown in Table 3-4 and Figure 3-5, and click OK. Leave the other
properties as they are.
Table 3-4 JDBC Provider properties for Trade3
Note: The Trade3 and other application server samples are for demonstration purposes
only. The code provided is not intended to run in a secure production environment.
Property name Value
Name New Trade3 DB2 Universal JDBC Driver Provider
Classpath ${DB2UNIVERSAL_JDBC_DRIVER_PATH}/db2jcc.jar
${UNIVERSAL_JDBC_DRIVER_PATH}/db2jcc_license_cu.jar
${DB2UNIVERSAL_JDBC_DRIVER_PATH}/db2jcc_license_cisuz.jar
Chapter 3. Enabling middleware for EWLM 73
Figure 3-5 Create JDBC provider
f. Click Apply.
g. Select Data Sources.
h. Click New to create a new data source within the JDBC provider.
i. Enter properties as shown in Table 3-5 and Figure 3-6, and click Apply. Leave other
properties as is.
Table 3-5 Data source properties for Trade3
Property name Value
Name TradeDataSource
JNDI name jdbc/TradeDataSource
Description Trade3 Datasource
Component-managed Authentication Alias TradeDataSourceAuthData
Container-managed Authentication Alias TradeDataSourceAuthData

74 IBM Enterprise Workload Manager
Figure 3-6 Create data source
j. Select Custom Properties.
k. Change custom properties as shown in Table 3-6.
Table 3-6 TradeDataSource custom properties
l. Click Save.
m. Check Synchronize changes with nodes and click Save to save all your changes.
3. Test the data source connection.
a. Click Resources
→ JDBC Providers.
b. Select Scope and click Apply.
c. Select New Trade3 DB2 Universal JDBC Driver Provider → Data Sources.
d. Check TradeDataSource and click Test Connection to ensure connection for the
datasource is successful.
Figure 3-7 Connection test message
e. Click Save.
Property name Value
databaseName trade3db
driverType 4
serverName ewlm4.itso.ibm.com
portNumber 50000
Chapter 3. Enabling middleware for EWLM 75
f. Check Synchronize changes with nodes and click Save to save all your changes.
4. Restart the application server.
5. Log in to Trade3. Now you can see the correlation information in the application server’s
SystemOut.log and IBM HTTP Server’s access.log.
If you set com.ibm.websphere.pmi.reqmetrics.loggingEnabled to true at “Enable PMI
Request Metrics” on page 63, you will see the timing information in the server’s
SystemOut.log as shown in Example 3-6 on page 65 and Example 3-7 on page 66.
76 IBM Enterprise Workload Manager
Get IBM Enterprise Workload Manager Release 1 now with the O’Reilly learning platform.
O’Reilly members experience books, live events, courses curated by job role, and more from O’Reilly and nearly 200 top publishers.

