Chapter 1. Importing Video
Let’s say you’ve filmed something. You’ve captured some video on your camcorder, digital camera, or Flip, or maybe you’ve just assembled some videos on your hard drive. Now it’s time for the heart of this book: editing your footage on the Mac using iMovie. This chapter introduces you to iMovie and its importing window, which can slurp in video from tape camcorders, tapeless camcorders, and old iMovie projects. It can also record video live, in real time, from a camcorder or an iSight video camera.
iMovie: The Application
So far in your moviemaking adventures you’ve probably thought about nothing but hardware—the equipment. In the end, however, the iMovie story is about software, both the footage as it exists on your Mac and the iMovie program itself.
iMovie on a New Mac
If you bought a new Mac since February 2009, iMovie ’09 is probably already on your hard drive. Open the Macintosh HD icon → Applications folder. Inside is the star-shaped icon for iMovie itself. Its icon is probably in your Dock, too.
iMovie for an Existing Mac
If your Mac didn’t come with iMovie ’09, you can buy it as part of the $80 iLife ’09 software suite. That’s one DVD containing the latest versions of GarageBand, iMovie, iPhoto, iWeb, and iDVD. (It’s available from Apple’s Web site, Apple stores, or popular Mac mail-order sites like www.macmall.com and www.macwarehouse.com.)
Apple says that iMovie requires a Mac (running Mac OS X version 10.5.6 or later) in one of these categories:
Any Mac with an Intel processor (MacBook, MacBook Pro, Mac Pro, recent iMacs). An Intel-based Mac is required if you want to work with AVCHD video (AVCHD, MPEG-2, and Other Such Jargon).
A Power Mac G5 with dual 2.0-gigahertz chips or faster.
An iMac G5 whose chip runs at 1.9 gigahertz or faster.
Apple also recommends a machine with at least 1 gigabyte of memory—and requires it if you want to work with high-def video. It goes without saying, of course, that the more memory you have, the bigger your screen, and the faster your processor, the happier you and iMovie will be. This program is seriously hungry for horsepower.
If you’ve bought iLife, now run its installer and choose which programs you want.
Tip
Consider installing GarageBand even if you’re not a musician. You may use it to assist iMovie with things like editing sound.
When the installer is finished, you’ll find an icon called iMovie in your Applications folder and in your Dock.
Tip
If you’ve got iMovie ’08 already on your Mac, the ’09 version replaces it. If you have iMovie HD (also known as iMovie 6), though, the installer thoughtfully preserves it. You’ll find a folder called “iMovie (previous version)” in your Applications folder, ready to run when necessary. To find out why Apple left the old version on your hard drive, read Parallel cutting.
“.0.1” Updates
Like any software company, Apple occasionally releases new versions of iMovie: version 8.1, version 8.2, and so on (or even 8.1.1, then 8.1.2, etc.). Each free upgrade adds better reliability to the program. They’re well worth installing for any program, but they’re especially important for iMovie; Apple does more than squash bugs with these updates, they often add features to iMovie that you’ll want to use.
You don’t have to look far to find these updates. One day you’ll be online and the Mac’s Software Update dialog box will appear, letting you know that a new version is available and offering to install it for you. You can also download the updates from within iMovie by choosing iMovie → Check for Updates.
When the updater finishes, your original copy of iMovie ’09 has morphed into the newer version of the program. (One way to find out what version of iMovie you have is to open the program and then choose iMovie → About iMovie.)
This book assumes that you have at least iMovie 8.0.3.
Getting into iMovie
After you’ve installed iMovie, open it by double-clicking its icon in the Applications folder, or by single-clicking its star-shaped icon in the Dock.
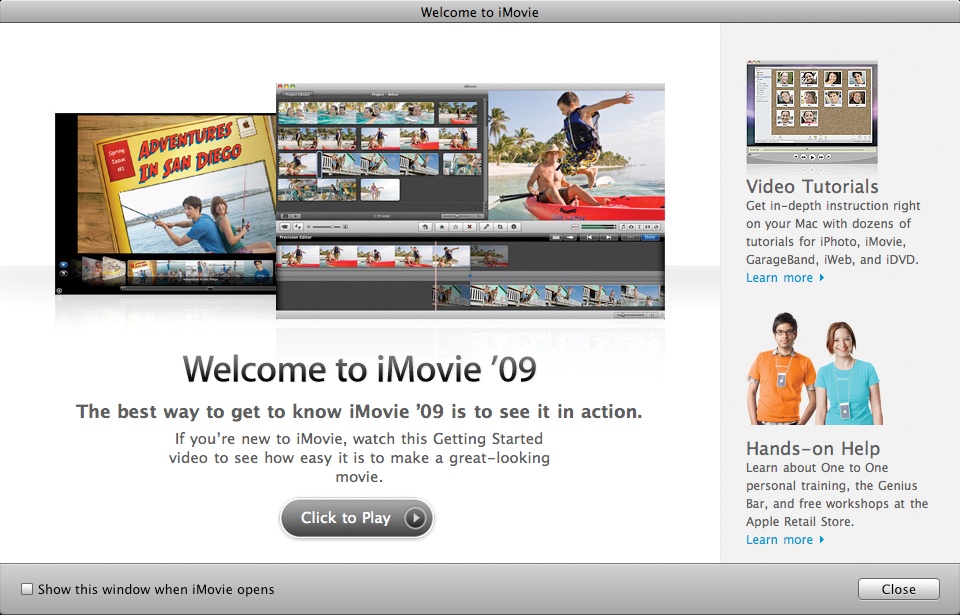
Now, just in case it had somehow slipped your attention that iMovie is a totally new program, a special starter screen appears to let you know (Figure 1-1).
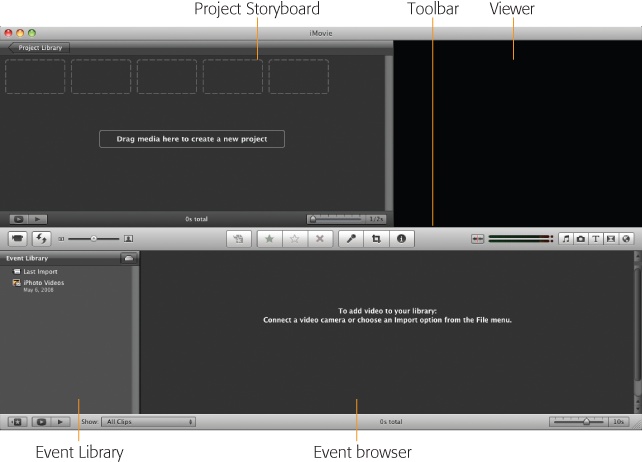
When you click Close, you arrive at the main iMovie screen. Figure 1-2 is a cheat sheet for iMovie’s various screen elements, but don’t spend time memorizing their functions now; the rest of this book covers each of these tools in context and in depth:
Project Library. If you’re used to the old iMovie, the new iMovie’s way of doing things may come as a shock. You create new movie projects the same way as always, by choosing File → New Project (or pressing ⌘-N). But now, after you type a name for the new movie, you’re not asked where you want to save it. Instead, iMovie just adds its name to this Project Library list, alongside all of your projects, past and present. More on projects in the next chapter.
Project storyboard. You’ll spend most of your editing time up here. Here’s where you see your movie represented as filmstrips—short sequences of representative frames from each clip. Parallel colored strips indicate blocks of sound that play simultaneously.
Viewer. You watch your footage in this window.
Toolbar. Here’s where you’ll find most of iMovie’s onscreen controls.
Event Library. In the new iMovie scheme, all your raw footage is available to all your movie projects at all times. The Event Library lists all the video you’ve ever imported into iMovie ’09, on all your hard drives. It’s organized by event—wedding, vacation, graduation, and so on. You can read much more about Events on Fine-Tuning the Events List; for now, it’s enough to know that your Events are listed here, organized into folders by year.
Event browser. This area stores the raw, unedited clips—“filmstrips” of footage, individual shots—that you’ll rearrange into a masterpiece of modern storytelling. Exactly what you see here changes; it shows the contents of the Event whose name you click in the Event Library.
Playhead. The Playhead is like the little handle of a normal scroll bar. It shows exactly where you are in the footage.
If you’ve just opened iMovie, it probably looks pretty barren at the moment. But you’ll fix that.
Importing from a Tape Camcorder
If you have a MiniDV tape camcorder, high-def or not, transferring your recordings to the Mac for editing is straightforward. All you have to do is connect your two machines—the camcorder and the Mac—with a cable.
It’s called a FireWire cable, and it looks like the one in Figure 1-3. The big end of the cable goes into
the FireWire jack on the front, side, or back of your Mac; it’s marked by a
radioactive-looking ![]() symbol.
symbol.
Tip
Unfortunately, not all Mac models have FireWire jacks anymore, or they use a newer version called FireWire 800. If your Mac has a FireWire 800 jack, you can find a cable that works with your camera. The MacBook Air and the regular aluminum MacBook, though, lack any FireWire jack. If you have MiniDV tapes full of recorded video, you’re out of luck: There’s no adapter box or converter that can connect your camcorder’s FireWire jack to a Mac that doesn’t have this jack. Your best bet is to borrow a Mac model that has a FireWire jack, dump all of your tapes into it, and then sell your old camcorder.
On the other end is a much smaller, squarish plug (the four-pin connector). Plug this tiny end into the FireWire connector on your camcorder, which, depending on the brand, may be labeled “FireWire,” “i.Link,” or “IEEE 1394.” It’s almost always hidden behind a plastic or rubber door or flap on the camcorder.
This single FireWire cable communicates both sound and video from the camcorder to the Mac. Once it’s connected, proceed like this:
Turn on the camcorder. Switch it into Play mode (Figure 1-4).
The camcorder’s playback mode may be labeled Play, VCR, VTR, or just ►.
At this point, iMovie’s big blue Import window is supposed to open automatically. If it doesn’t, run through the troubleshooting checks described on iMovie Doesn’t See the Tapeless Camcorder.
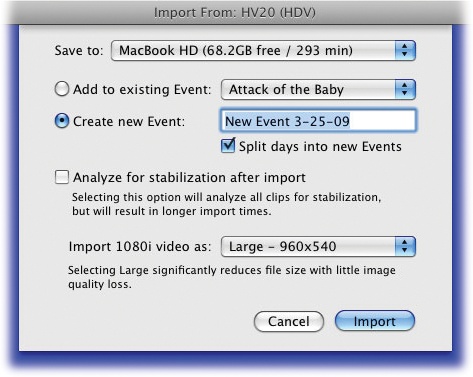
Specify what you want to import.
If you want to import the whole tape, make sure the Automatic/Manual switch (lower left) is on Automatic, and then click Import. This is a convenient option, since you can walk away and do other things while iMovie works. The “Save to” dialog box appears (Figure 1-5); skip to step 3.
If you want to import only some of what’s on the tape, set the Automatic/Manual switch to Manual. At this point, the window sprouts a set of playback control buttons (Figure 1-6). You can actually use the
 ,
,  , ■, and ► buttons on the screen to control the
camcorder.
, ■, and ► buttons on the screen to control the
camcorder.Tip
You have to keep the mouse button down on the
and buttons continuously to make them work. If
you use these buttons while the video is playing, you scan through the video; if you
click Stop (■) first, these buttons zoom much faster through the tape, but of course
you can’t see where you are until you hit ► again.What you’re doing now, of course, is scanning your tape to find the sections that you want to include in your edited movie. When you find a shot that’s worth bringing onto the Mac, click the Import button at the lower-right corner of the window. The “Save to” dialog box appears (Figure 1-5); read on.
Indicate where you want to save the imported video clips.
Most people, most of the time, save incoming video onto the main Mac hard drive. But true iMovie addicts wind up buying additional hard drives to hold their movies. That’s why the “Save to” pop-up menu appears here—so that you can choose a different hard drive to hold your video.
Specify an Event.
The pair of choices shown in Figure 1-5 let you answer these questions: Were the scenes you’re about to import filmed at a new Event? Or should they more properly be filed along with scenes you’ve already imported as part of an existing Event?
Answering this question, of course, requires that you know what Apple means by an Event. See the box on Importing from Tapeless Camcorders.
Turn on “Analyze for stabilization after import”, if you’ve got the time.
The built-in footage stabilizer is one of iMovie’s most important and most effective new features. It converts unsteady video into footage that looks as though the camera was on a tripod.
The downside of this miraculous option is that your Mac requires a long period of thoughtful analysis before it can do this stabilizing. It literally studies the first frame of video, compares each pixel to what’s on the second frame, and so on. And that takes a long time—hours, in some cases.
Fortunately, you can always apply the stabilization feature to individual parts of the movie, which saves huge amounts of time. In other words, the only reason to turn on “Analyze for stabilization after import” at this stage is because you intend to let the Mac crunch away for half a day (or night) after the importing is complete.
If you have a high-definition camcorder, choose either “Large - 960 x 540” or “Full - 1920 x 1080”.
This final option appears only when you’re importing video from a high-definition camcorder, one that captures video in the so-called 1080i format. (That term refers to the fact that it reproduces a scene using 1,080 fine horizontal lines, which is very sharp indeed. Actually, the “i” means that you see two sets of 540 lines, odds and evens, interlaced with each other, flashed alternately on the screen.)
iMovie is offering you the chance to import a quarter-scale version of that gigantic video canvas, for the purposes of saving hard drive space. For assistance in making the Large vs. Full decision, see the box on Automatic Scene Detection.
Click Import.
If you chose the Automatic option, iMovie now rewinds the tape to the beginning, then commands the camcorder to begin playback. As it plays, iMovie captures the video and stores it on your Mac. You can interrupt the process by clicking Stop, if necessary; at this point, iMovie displays a little congratulations message, revealing how many minutes’ worth of video you imported. You can click OK and then import some more, if you like, starting from step 2.
Or you can walk away while iMovie works. You can even surf the Web, crunch some numbers, organize your pictures in iPhoto, or whatever you like. Since iMovie is a Mac OS X program, your Mac doesn’t have to devote every atom of its energy to capturing video. It continues to give priority to capturing video, so your other programs may act a little drugged. But you can get meaningful work or reading done while you’re dumping your footage into iMovie in the background.
If you let the Automatic importing proceed without interruption, iMovie auto-rewinds the tape when it reaches the end.
If you chose the Manual setting, you can use playback controls to operate the tape, shuttling through it to find the parts you want; use the Import button (and its alter ego, the Stop button) to capture only the good parts.
Tip
When you come to a scene you want to bring into iMovie, capture 3 to 5 seconds of footage before and after the interesting part. Later, when you’re editing, that extra leading and trailing video (called trim handles by the pros) will give you the flexibility to choose exactly the right moment for the scene to begin and end. Furthermore, you need extra footage at the beginnings and ends of your clips if you want to use crossfades or similar transitions between them.
Unfortunately, the process isn’t the speedy joyride it was in the previous version of iMovie, where you could just tap the space bar (or click Import) every time you wanted to start or stop importing during playback.
In iMovie ’09, each time you click Stop, iMovie locks you out for a minute or two while it displays the “Generating Thumbnails” message. That’s iMovie’s way of saying, “I’m processing this video and making some live, ’skimmable’ filmstrips” (which are described on Filmstrips).
Once that message disappears, you can use the playback controls to find the next bit of video that’s worth importing—but you’ll have to fill out the box shown in Figure 1-5 all over again, every time.
These frequent “Generating Thumbnails” and “Save to” interruptions are, for many people, a pretty strong argument for avoiding the Manual settings. The Automatic setting winds up saving you a lot of time—and doesn’t cost you any extra disk space. (See the box on Importing from DVD Camcorders.)
When you and iMovie are both finished, click Done.
The Import window goes away. You return to the iMovie screen, where you can click the name of the Event you specified in step 4 to see the newly imported clips within it. Proceed to Chapter 2.
Automatic Scene Detection
You’ll notice a handy iMovie feature when the importing is all over: It automatically creates an individual filmstrip (clip) for each scene you shot. An hour’s worth of tape doesn’t wind up as a single, mega-chunk of video—instead, you wind up with 30 or 40 individual clips, just the way you shot them.
What iMovie is actually doing is studying the date and time stamp that digital camcorders record into every frame of video. When iMovie detects a break in time, it assumes that you stopped recording, if only for a moment, and therefore that the next piece of footage should be considered a new shot. It turns each new shot into a new clip.
In general, this feature doesn’t work if you haven’t set your camcorder’s clock. Automatic scene detection also doesn’t work if you’re playing from a nondigital tape using one of the techniques described on Dragging Video In from the Finder.
Importing from Tapeless Camcorders
The beauty of tapeless camcorders is that, because they store video as computer files on a hard drive, on a DVD, or in memory, you don’t have to wait for them to play into your Mac in real time. Instead, the importing process takes only as much time as iMovie needs to copy those files onto your Mac’s hard drive. (At least in theory; read on.)
Note
If your camcorder records onto miniature DVDs, see Importing from DVD Camcorders for some additional notes.
Once you’re ready to transfer some video from your camcorder, here’s what to do:
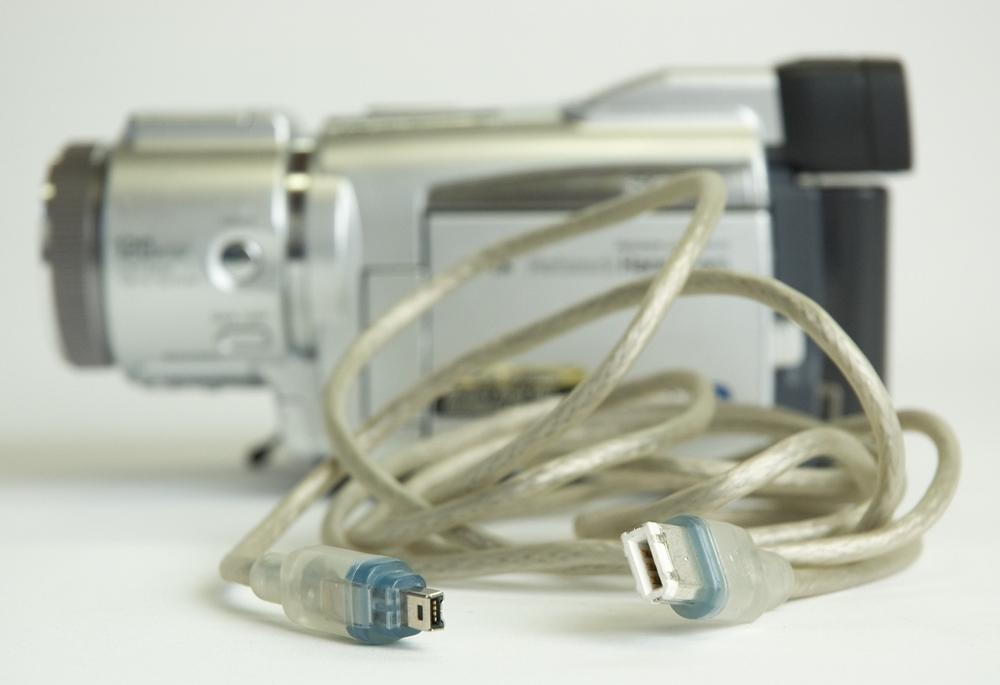
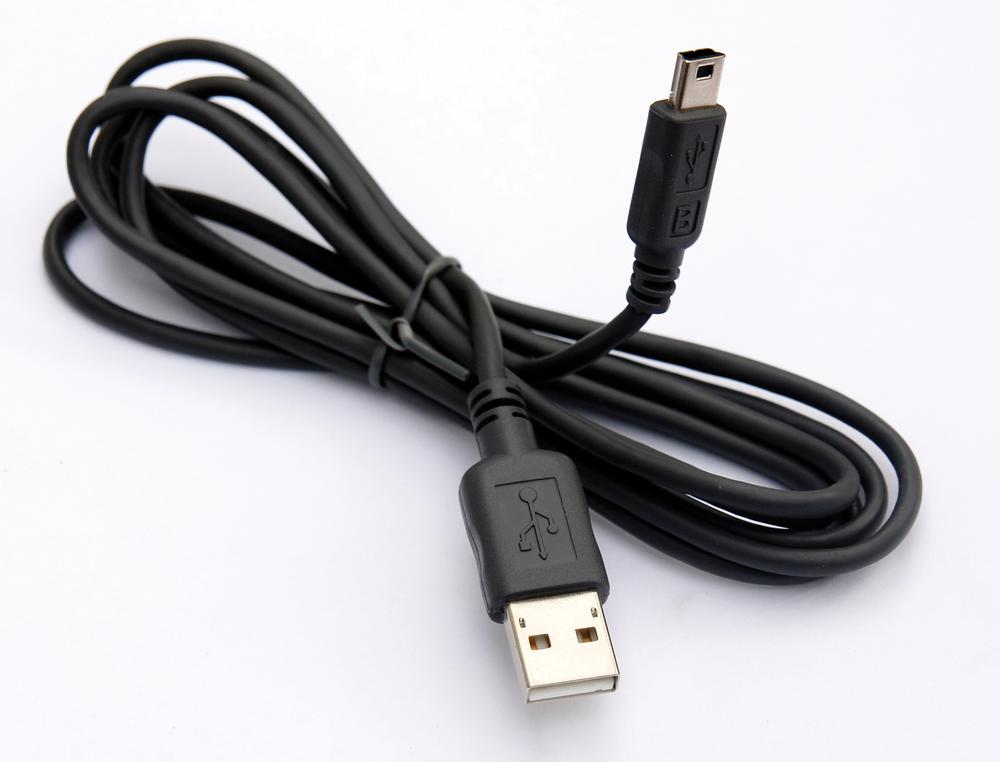
Connect the camcorder’s USB cable to your Mac.
Most tapeless camcorders connect to the Mac using a USB cable, which comes right in the box. It connects to any of the Mac’s skinny rectangular USB jacks, as shown in Figure 1-7. (If you have one of those tiny, very popular Flip camcorders, plug in its pop-out USB jack instead.)
Figure 1-7. Tapeless camcorders generally come with a USB cable. The little end plugs into the camcorder (you may have to open some tiny plastic doors on the camera to find the jack). The big end plugs into any of your Mac’s USB jacks.Note
If you’re using an original Flip or Flip Ultra camera, you need to install the 3vix codec software that comes with your camera. When your Flip is connected, find its icon on your desktop. Double-click it to open a window containing the “Flip Video for Mac” installer software. Double-click the installer icon to get the necessary codec (The Export Pop-up Menu). Once you’ve done that, iMovie can talk to your Flip camera without a problem.
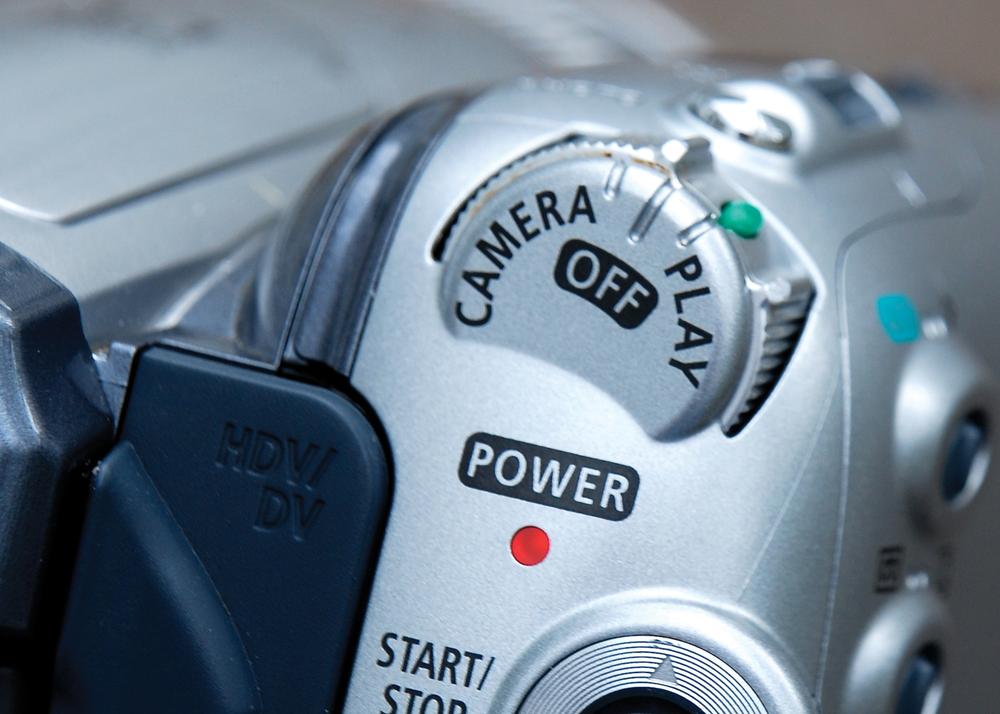
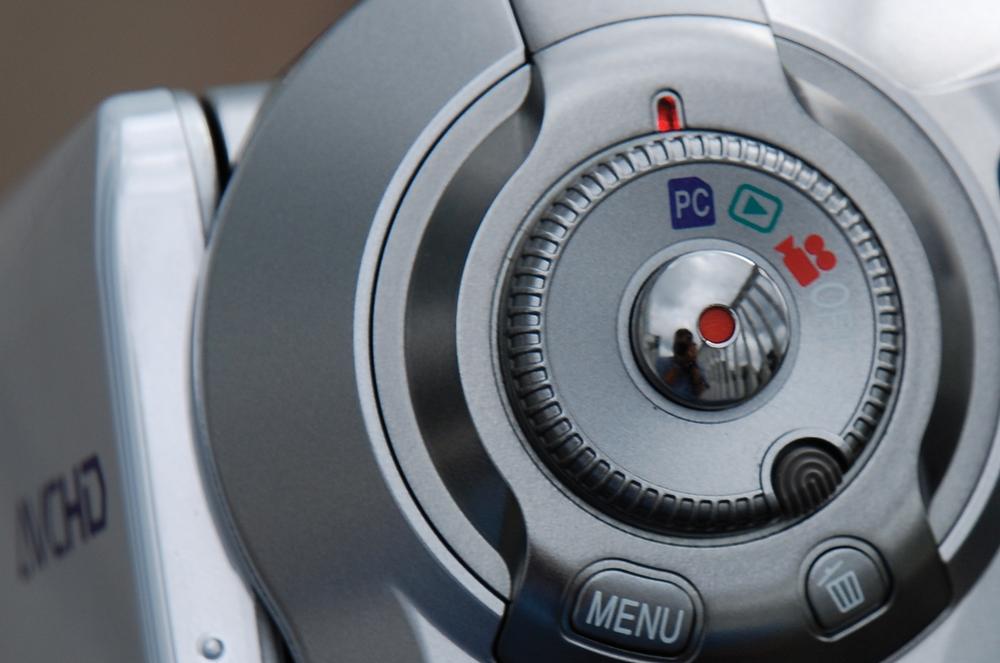
Turn on the camcorder. Switch it into PC mode.
The wording might vary, but every tapeless camcorder has a mode for making PC or Mac connections (Figure 1-8).
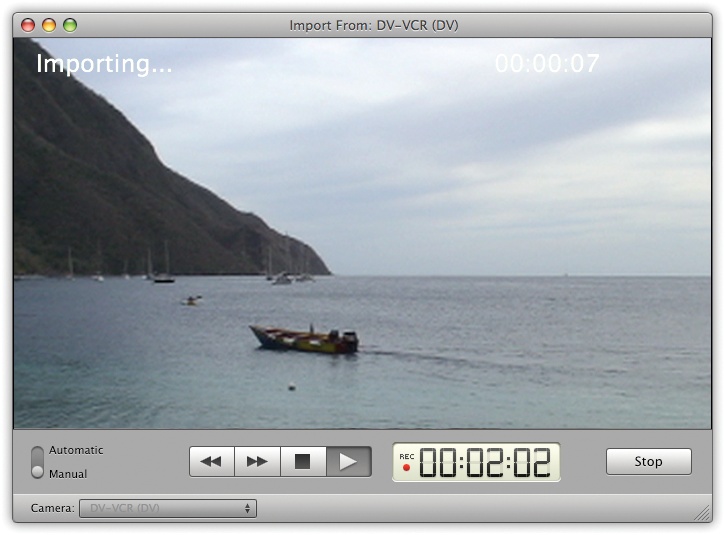
At this point, iMovie should open automatically, if it wasn’t open already. If everything is going well, a message appears at the top of the screen that says, “Generating thumbnails.” Then, after a minute, you see the Importing screen depicted in Figure 1-9.
If iMovie doesn’t open, or if the Importing screen doesn’t appear, then choose File → Import From Camera, or run through the troubleshooting steps described on iMovie Doesn’t See the Tapeless Camcorder.
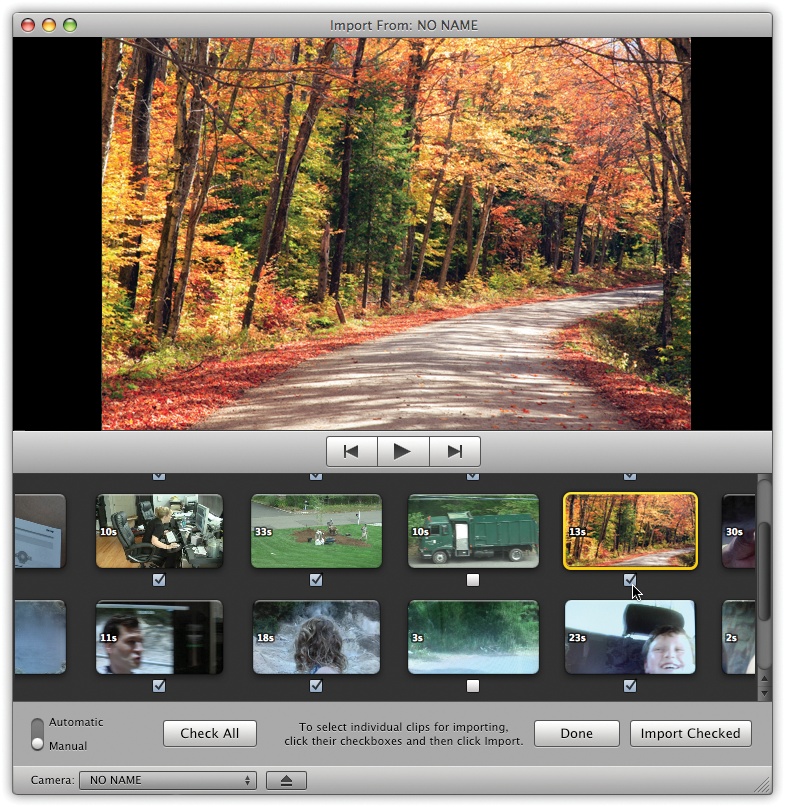
Figure 1-8. Every camcorder has a switch or command that lets you connect it to a PC (or, in this case, a Mac). Most tapeless camcorders have a dedicated position on the main mode dial for this purpose, like this one.Figure 1-9. You can select individual scenes for importing without rewinding or fast-forwarding. You can also preview the recorded scenes before you bother importing them to the Mac. If your intention is to bring in most of the clips, just turn off the checkboxes that you don’t want. If you want to import less than half of them, though, click Uncheck All, and then turn the checkboxes back on for the shots that you do want.You’re about to experience one huge payoff of using a tapeless camcorder: instant access to individual scenes on the camcorder. That means, first of all, that you don’t have to rewind or fast-forward to find a certain shot. Furthermore, as you can see in Figure 1-9, iMovie lets you import only the shots you want, leaving the duds behind. That feature alone can represent a huge time savings over the old “import the whole tape” method.
Tip
If your camcorder stores its video on memory cards—SD cards, for example—then you have another option at this juncture. You could remove the card from the camcorder and insert it into a card reader that’s attached to your Mac. (Card readers are super cheap—under $10. They’re like tiny disk drives that attach to your Mac’s USB jack.) The advantage of the card-reader method is that you don’t use up the camcorder’s battery power while you’re transferring your video.
Inspect the shots on the camcorder to see what’s worth importing.
To play a shot, click its thumbnail and then click the ► button. Click the
 or
or  buttons to skip to the previous or next shot
on the camcorder (or just click the thumbnails on the screen in front of you).
buttons to skip to the previous or next shot
on the camcorder (or just click the thumbnails on the screen in front of you).Specify which shots you want to import.
If you want to import everything on the camcorder, click Import All; then skip to step 5.
If you want to import only some of the shots, move the Automatic/Manual switch in the lower-left corner of the Import window to Manual. Now you’ll see little checkboxes appear on the shot thumbnails. All of them start out with checkmarks, meaning that iMovie intends to import all of them. See Figure 1-9 for tips on selecting the scenes you want. Once the correct shots have checkmarks, click Import Checked.
At this point, the top of the window sprouts a little sheet of options (see Figure 1-10).
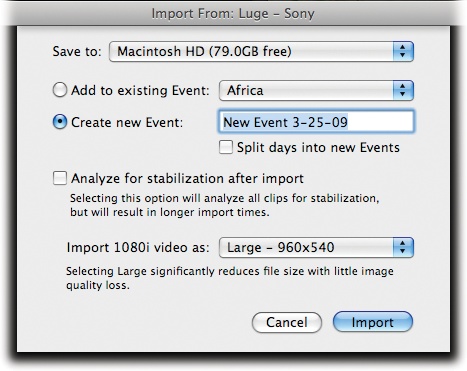
Indicate where you want to save the transferred video clips.
Most people save the incoming clips onto the main Mac hard drive. But if you’ve bought additional hard drives to hold your movies, you can use the “Save to” pop-up menu to choose a different hard drive to hold your video.
Specify an Event.
The pair of choices shown in Figure 1-10 lets you answer these questions: Were the scenes you’re about to import filmed at a new Event? Or should they more properly be filed along with scenes you’ve already imported as part of an existing Event? See the box on Importing from Tapeless Camcorders for the definition of an Event—and suggestions on what to choose here.
If you have a high-def camcorder, choose either “Large – 960 x 540” or “Full – 1920 x 1080”.
You may not see the final option shown in Figure 1-10. It appears only when you’re importing video from a high-definition camcorder, one that captures video in the so-called 1080i format. See the box on Automatic Scene Detection for a discussion of this option and advice on what to choose.
Turn on “Analyze for stabilization after import”, if you’ve got the time.
The built-in footage stabilizer is one of iMovie’s most important, and most effective, new features. It converts unsteady video into footage that looks as though the camera was on a tripod—but this “analysis” can take hours. See step 5 on page 30 for help in making this decision.
Click Import.
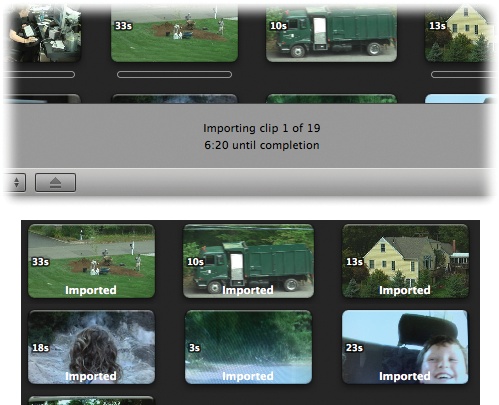
Now iMovie swings into action. It begins slurping in the video from the camcorder’s hard drive, DVD, or memory card. As it works, a progress counter ticks off the remaining shots left to import (Figure 1-11).
Figure 1-11. Top: The counter here not only tells you how much longer you have to wait in “minutes:seconds” format, but also shows you how many video shots remain to be imported. Bottom: When it’s all over, the word “Imported” appears on each thumbnail.That’s a handy reminder when you’ve only opted to import some of the clips.Considering that fact that a tapeless camcorder is supposed to spare you the real-time importing process of a tape, you may be surprised at how much time the importing takes. AVCHD footage, in particular (Camcorder Features: Which Are Worthwhile?), takes a long time because iMovie has to convert it into an editable format; depending on the speed of your computer, you may wind up waiting 2.5 minutes for each minute of video. An hour’s worth of video, in other words, can take two and a half hours to import. You’ve been warned.
But never mind that; once the job is done, a message appears to congratulate you. It lets you know how many minutes and seconds of video you’ve imported, total, and how many clips (Figure 1-12).
Click OK.
The congratulations message goes away.
Click
 to eject the camcorder, and then click Done.
The Import screen goes away. You arrive at the main iMovie screen, where your new video appears in the Events list at the left side of the screen. Fine-Tuning the Events List describes this structure in more detail.

You can now turn off the camcorder to save battery power, if you like.
Importing from DVD Camcorders
In general, DVD camcorders are a mess. They’re fussy, they take a long time to “initialize” and “finalize” a blank DVD, each disc doesn’t hold very much footage, the recorded discs may not have a very long lifespan in your closet, and the miniature DVDs can actually damage your Mac.
If that’s what you’ve got, though, the routine for importing video from a DVD camcorder—at this writing, the most popular format on the market—is exactly the same as it is for other tapeless camcorders. The instructions begin on Importing from Tapeless Camcorders.
There are, however, a few caveats:
iMovie can’t import video from DVD camcorders that use the AVCHD video format (AVCHD, MPEG-2, and Other Such Jargon). Unfortunately, that pretty much rules out all the high-definition DVD camcorders.
Thanks to the hostility of the engineers who dreamed up the recordable DVD camcorder disc, most DVD camcorders offer multiple recording formats, with such cheerful names as DVD-Video and DVD-VR. Each has tradeoffs: One plays back in more DVD players, another lets you erase scenes before committing the DVD to plastic, and so on.
The thing is, you have to choose which format you want when you put the blank DVD into the camcorder. That’s when the screen offers you the choice of formats. The key here is to choose the DVD-Video format, sometimes called Standard. If you choose VR or DVD-VR instead, iMovie won’t be able to import your recorded video. (When you connect the camcorder, it thinks that you’ve just inserted a DVD, rather than thinking that you’ve attached a disk full of video.)
Recording Live from a Camcorder or iSight Camera
iMovie is also happy to capture video straight from a tape camera, sending whatever it “sees” directly into iMovie, live. You can perform this stunt in either of two ways:
Using an iSight camera. All recent Mac laptops and iMacs have this tiny Apple video camera built right in, just above the screen (Figure 1-13).
Using a camcorder. Alternatively, you can connect a MiniDV camcorder to your Mac and use it as a glorified eyeball. (This doesn’t work with tapeless and USB camcorders, and doesn’t work if your Mac lacks a FireWire jack [Importing from a Tape Camcorder].)
Here are the steps:
If you’re using a camcorder, set its mode switch to Camera or Record (rather than VCR or Play, as you would if you were importing something you’d already recorded).
If you’re using an iSight or a FireWire Webcam, you can skip this step.
Choose File → “Import from Camera” (⌘-I), or click the camcorder-shaped button at the left side of the screen.
Either way, the Import window opens. If everything’s going your way, you’ll see a live video image from your camera.
Click Capture.
Now the usual “Save to” dialog box appears, just as shown in Figure 1-5.
From the “Save to” pop-up menu, choose a hard drive’s name.
You’re specifying where you want the imported video to be saved.
Specify an Event.
The pair of choices shown in Figure 1-5 lets you answer these questions: Were the scenes you’re about to import filmed at a new Event? Or should they more properly be filed along with scenes you’ve already imported as part of an existing Event? See the box on Importing from Tapeless Camcorders for details on this choice.
Click OK.
iMovie begins to import the live video image.
To end the recording, click Stop.
iMovie enters its usual “Generating Thumbnails” state of catatonia for a few minutes.
To record some more, repeat all this from step 2.
When you’re finished recording, click Done.
Your video recording appears in the Event you specified, ready for editing.

Importing Old iMovie Projects
Most software companies, most of the time, stick with certain time-honored traditions concerning software upgrades. One of them happens to be compatibility: If you release BeeKeeper Pro 7, it goes without saying that it can open files created by BeeKeeper Pro 6.
iMovie ’08 and ’09, though, are not actually updated versions of iMovie 6 (also known as iMovie HD); they’re versions 1.0 and 2.0 of a completely different program, written from scratch. Their ability to import older iMovie projects is extremely limited.
To bring in an older iMovie project, choose File → Import → iMovie HD Project. The dialog box shown in Figure 1-14 appears. Here, you should make two decisions before choosing the old iMovie project you want to open:
Where you want to save the imported, converted project. The “Save to” pop-up menu lists your hard drives and shows you how much space is available on each one.
How you want iMovie to handle high-definition video projects. See Automatic Scene Detection for details on making a choice here.
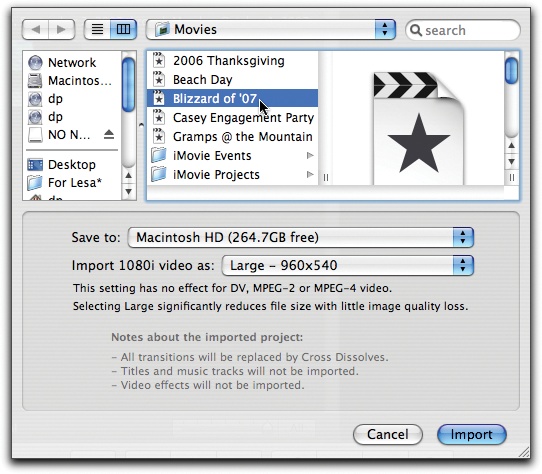
Once you’ve made those choices, navigate to the iMovie project you want to import, and double-click its name or icon.
iMovie ’09 springs into action, importing the video clips (making a new copy of them) and generating the filmstrip thumbnails that you’ll work with as you edit. This process can take a good long time.
When it’s all over, whatever clips you had placed into the iMovie timeline appear in the Project (storyboard) area, in the correct sequence, correctly trimmed. Leftover clips (the ones that were left unused on the Clips pane of the old project) are brought in, too. They show up in the Event that contains your project, just in case you want to add them to the project later.
On the other hand, iMovie brings in only a few basic elements of the original iMovie project. To be precise:
You get only the clips. iMovie ’09 ignores all effects, titles, and credits. (Ouch.)
You lose all audio work you’ve done. iMovie ’09 ignores everything in the old iMovie’s two audio tracks, including music, narration, sound effects, or the audio “paste-over” cutaways.
You lose all special transitions. If you used any transition effects in your older iMovie project, iMovie ’09 replaces them all with generic crossfade dissolves.
If you really, truly want to go to all this trouble, you can now start over again, repairing and reconstructing the movie, restoring the elements that got lost during the import process. You might find the effort worthwhile if you want to use some of the iMovie ’09 tools that aren’t available in the old iMovie, like video cropping, stabilization, rotation, or one-click exporting to YouTube.
Otherwise, though, you might want to consider leaving your old iMovie projects just as they are. As Chapter 11 makes clear, the old iMovie version is still perfectly usable and freely available to you, so it might make more sense to leave it in its original format.
Dragging Video In from the Finder
iMovie can import movies directly from your hard drive, too—no camcorder needed. Position the iMovie window so that you can see the movie files in the Finder, and then drag their icons directly onto an Event in the Event list.
Alternatively, use the File → Import → Movies command to find and select the movies you want to import. You’ll be asked at that point which Event you want to contain the imported flicks.
Either way, you wind up with your digital movie files installed in an Event and ready to edit.
Importing Footage from Old Analog Tapes
We live in a transitional period. Millions of the world’s existing camcorders and VCRs require VHS, VHS-C, or 8mm cassettes—that is, analog tapes instead of digital.
These days, people are buying only digital camcorders. But in the meantime, how are you supposed to import and edit the footage you shot before the digital era? Fortunately, this is fairly easy to do if you have the right equipment. You can take any of these four approaches, listed roughly in order of preference.
Note
When you use any of these approaches, iMovie won’t be able to chop up the video into individual scene clips automatically, as it does for digital video. That’s because old analog camcorders didn’t stamp every frame of every shot with an invisible time code, so iMovie doesn’t know when you stopped the camcorder.
Approach 1: Use a Camcorder with Pass-Through Conversion
If you’re in the market for a new digital camcorder, here’s a great idea: Buy a Sony or Canon MiniDV tape camcorder that has analog-to-digital pass-through conversion. In other words, the camcorder itself acts as a converter that turns the signal from your old analog tapes into a digital one that you can edit in iMovie.
The footage never hits a tape. Instead, it simply plays from your older VCR or camcorder directly into your Mac. (Not all camcorders have this feature, so ask before you buy. And on some models, you have to use the camcorder’s own menu system to enable the live pass-through. And this requires a Mac model that has a FireWire jack.)
If you’ve got a drawerful of older tapes, such a camcorder is by far the most elegant and economical route, especially if you’re shopping for a new camcorder anyway.
Approach 2: Record onto Your DV Camcorder
Even if your newish digital camcorder doesn’t offer real-time analog-to-digital conversion, it may have analog inputs that let you record your older material onto a MiniDV tape in your new camcorder. If so, your problem is solved:
Unplug the FireWire cable from the DV camcorder.
Most camcorders’ analog inputs switch off when a FireWire cable is hooked up.
Connect RCA cables from the Audio Output and Video Output jacks on the side of your older camcorder or VCR. Connect the opposite ends to the analog inputs of your DV camcorder.
Put a blank tape into your DV camcorder.
Tip
If both your old camcorder and your DV camcorder have S-video connectors (round, dime-sized jacks), use them instead. S-video connections offer higher quality than RCA connections. (Note that an S-video cable doesn’t conduct sound, however. You still have to connect the red and white RCA cables to carry the left and right stereo sound channels.)
Switch both camcorders into VTR or VCR mode.
You’re about to make a copy of the older tape by playing it into the camcorder.
By now, every fiber of your being may be screaming, “But analog copies make the quality deteriorate!” Relax. You’re only making a single-generation copy. Actually, you’re only making half an analog copy; it’s being recorded digitally, so you lose only half as much quality as you would with a normal VCR-to-VCR duplicate. In other words, you probably won’t be able to spot any picture deterioration. And you’ll have the footage in digital format now forever, ready to make as many copies as you want with no further quality degradation.
Press the Record button on the DV camcorder, and press Play on the older camcorder or VCR.
You can monitor your progress by watching the LCD screen of your camcorder. Remember that a DV cassette generally holds only 60 minutes of video, compared with 2 hours on many previous-format tapes. You may have to change DV cassettes halfway through the process.
When the transfer is finished, you can rewind the newly recorded DV cassette in the DV camcorder and then import it into iMovie exactly as described in this chapter.
Approach 3: Use a Media Converter
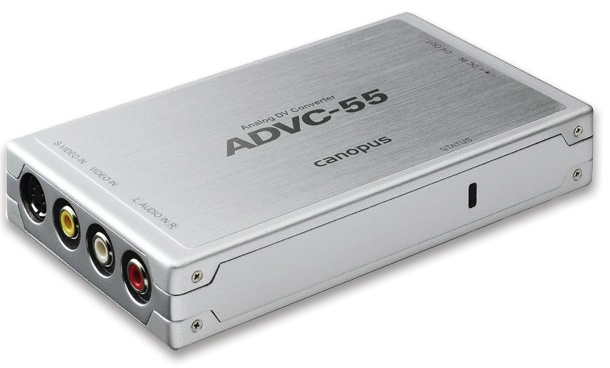
If your digital camcorder doesn’t have analog inputs, you can buy an analog-to-digital converter—a box that sits between your Mac and your VCR or older camcorder (Figure 1-15). It’s an unassuming half-pound gray box, about 3 by 5 inches. Its primary features include analog audio and video (and S-video) inputs, which accommodate your older video gear, and a FireWire jack, whose cable you can plug into your Mac.
You’ll be very pleased with the video quality. And when it comes to converting older footage, the media-converter approach has a dramatic advantage over DV camcorders with analog inputs: You have to sit through the footage only once. As your old VCR or camcorder plays the tape through the converter, the Mac records it simultaneously. (Contrast with Approach 2, which requires you to play the footage twice: once to the DV camcorder, and then from there to the Mac.)
Unfortunately, you can’t control these devices using iMovie’s playback controls, as described earlier in this chapter. Instead, you have to transfer your footage manually by pressing Play on your VCR or old camcorder and then clicking Import on the iMovie screen. In that way, these converters aren’t as convenient as an actual DV or Digital8 camcorder.
Approach 4: Use a Digital8 Camcorder
Sony’s Digital8 family of camcorders accommodate 8mm, Hi-8, and Digital8 tapes, which are 8mm cassettes recorded digitally. (Low-end models may not offer this feature, however, so ask before you buy.) Just insert your old 8mm or Hi-8 cassettes into the camcorder and proceed as described in this chapter. iMovie never needs to know that the camcorder doesn’t contain a DV cassette.
Actually, a Digital8 camcorder grants you even more flexibility than that. Most Digital8 camcorders also have analog inputs, which let you import footage from your VCR or other tape formats, as described in Approach 2.
Get iMovie '09 and iDVD: The Missing Manual now with the O’Reilly learning platform.
O’Reilly members experience books, live events, courses curated by job role, and more from O’Reilly and nearly 200 top publishers.

