Chapter 4. Video Chunks: Keywords, Favorites, and Rejects
In iMovie ’09, all the imported footage on all your hard drives is sitting there, like paints on a palette, to inspire your editorial brilliance. But that blessing is also a curse, because it’s such a huge pile of video to manage—and a lot of it’s dreck.
Fortunately, iMovie comes with a set of tools—unusual in a video editing program—that are specifically designed to help you sort and manage these vast chunks of video. Working in the Event browser, you can:
Flag pieces of clips as your favorites, to make them easy to find.
Flag pieces of your clips as rejects—bad footage that you’ll either probably or definitely never want to incorporate into an edited project.
The “probably” stuff you can just hide from view. The “definitely” stuff you can tell iMovie to delete, freeing up space on your hard drive, even if that entails snipping off only portions of clips.
Flag pieces of clips with keywords of your choosing—your children’s names, adjectives, characterizations like “action” or “moody”—whatever you like. Later, you can summon all matching keywords with a single click.
This short chapter explores these clip-flagging tools, and also describes the proper way to get rid of bad shots forever.
Marking Favorites and Rejects: Two-Step Method
Most people, most of the time, flag a clip, or a piece of one, as a favorite or a reject using this technique:
In the Event browser, select the video you like (or don’t like).
You can use any of the selection techniques described on Phase 2: Select the Good Bits. That is, you can select an entire clip, multiple clips, or only part of one.
Flag it.
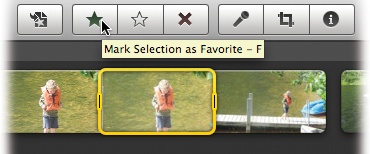
To flag the selection as a favorite, click the black star button (Figure 4-1) or just press the letter F on your keyboard.
To flag it as a reject, either click the X icon, press the letter R key, choose Edit → Reject Selection, or press the Delete key.
Tip
You can also choose Edit → Reject Entire Clip (or press Option-Delete) to flag the entire clip as worthless. This method saves you a little time, because it means that you can select any old sloppy slice of the clip first, rather than highlighting the entire thing.
If you flag something as a favorite, it sprouts a green line across the top edge (Figure 4-1).
If you mark something as a reject, it sprouts a red line across the top edge—and promptly disappears from view. (If it doesn’t disappear, you must have changed the pop-up menu shown in Figure 4-3 to say Show: All Clips.)
Marking Favorites and Rejects: One-Step Method
The usual method of flagging your best and worst footage takes only two steps. But believe it or not, even that’s excessive in the eyes of Apple’s Faster Editing team.
Hidden in the motley assortment of options known as the iMovie Advanced Tools lies another method, which reduces the favoriting and rejecting process down to one step.
To set up this method, turn on “Show advanced tools,” as described on The Orange Stripe.
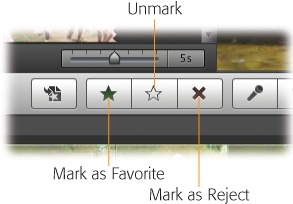
Now have a look at the horizontal toolbar that divides the iMovie screen. It has sprouted a few additional tools, as shown in Figure 4-2. But you’re not interested in the new icons. You’re interested in the new behavior of three original buttons, the ones near the center—solid star, hollow star, and X. They now represent virtual paintbrushes that turn anything you touch with your cursor into a favorite or a reject.
For example, here’s an amazingly fast way to zoom through a freshly imported pile of footage, marking favorite scenes as you go:
Click the Favorite button (the black star), or press the letter F key.
The black star icon darkens to show that you’ve selected it. Your cursor is now loaded with green favorite paint, so be careful.
Take a moment to skim (move your cursor over the filmstrip without clicking) and play (tap Space) to identify the good parts, and then:
Drag across the filmstrip to indicate the good stuff.
The green “favorite” stripe appears instantly. Instead of “select, then flag as favorite,” you’ve managed to select and flag-as-favorite all in one stroke.
Marking sections as rejects is just as easy, except you click the X button in step 1 (or press the letter R key). Now, when you drag across filmstrips in step 2, they instantly become rejects, which usually means that they disappear from view.
Tip
To mark an entire clip as a favorite or a reject, Option-click it. That’s a lot faster than dragging.
For best results, then, you should plow through your footage, riding the F and R keys (favorite and reject modes), painting across good and bad sections of video as you go. Later, this prescreening process makes assembling your movie a heck of a lot easier and faster.
Note
If you mark something as a reject or a favorite by mistake, you can unmark it quickly: hold down the ⌘ key. iMovie switches temporarily to the Unmark tool described in the next section, just long enough for you to paint over (or Option-click) the mismarked footage.
Release the ⌘ key to return to the tool you were using.
Unmarking
No matter which method you used to mark favorites or rejects, it’s easy to change your mind later. Just repeat the original process, but use the hollow star (or the letter U key) as your paintbrush.
To use the “select, then flag” method, select the piece of filmstrip that you want to unmark and then click the hollow-star icon (or press the letter U).
If you prefer the Advanced-tools, “paintbrush” method, turn on the Advanced Tools. Then click the hollow-star icon (or press the letter U), and begin painting. When you drag your cursor across a piece of filmstrip, you remove all colored stripes from it—both the favorite and the reject stripes.
Selecting Marked Footage
In time, your Event footage will be twinkling with green, red, blue, and even orange bars, corresponding to the various ways you’ve flagged or used your footage.
But these colored stripes aren’t just labels; they’re also handles. Carefully double-click directly on one of the colored stripes, and presto: iMovie neatly selects just the piece of filmstrip that’s marked by that bar, ready for unmarking, cutting, deleting, placing in your project, or whatever.
Hiding and Showing Favorites and Rejects
Flagging clips as favorites and rejects wouldn’t save you any time if all it did was draw colored stripes on your filmstrips. The real payoff comes when you tell iMovie to hide everything except your favorites or rejects, making it exceptionally easy to work with a big pool of extraordinary footage, or to review all the lousy footage before you delete it for good.
You can access these various hide/show modes in two places: in the View menu, or in the Show pop-up menu on the bottom edge of the iMovie window.
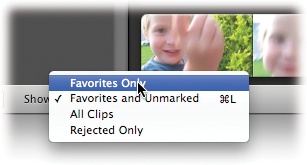
Show only favorites. Choose Favorites Only, either from the View menu or the Show pop-up menu (Figure 4-3).
Show everything except rejects. Choose Favorites and Unmarked, either from the View menu or the Show pop-up menu.
This is what you see most of the time: iMovie shows you everything that you’ve marked as favorite and everything you haven’t marked either way. Only the rejects are hidden.
Show everything. Choose All Clips, either from the View menu or the Show pop-up menu.
Now you’re seeing everything: favorites, rejects, and unmarked. This can be a handy anti-desperation view when you can’t find a certain shot that you’re sure you had before. It rules out the possibility that you’ve flagged it as a favorite or reject and then hidden it.
Show only rejects. Choose Rejected Only, either from the View menu or the Show pop-up menu.
Now you’re seeing only the bad stuff. Everything else is hidden.
You’d summon this view when hunting for a clip you can’t seem to find among the good stuff (maybe you rejected it by mistake), or when reviewing your rejected footage before deleting it for good, as described on Deleting Footage for Good.
Keywords
In iPhoto, iMovie’s sibling in the iLife suite, keywords play an important role in helping you manage tens of thousands of photos.
A keyword is a text label that you can slap on a picture, a tag that will help you pluck that photo (and ones like it) out of a haystack later. Some people make keywords for the people in the pictures: “Casey,” “Mom,” “Robin,” and so on; others use them to identify what’s going on in the photo: “Vacation,” “Home,” “Kids.” Either way, the point is that if you’re consistent in using keywords, you can later round up all photos bearing a certain keyword (“Robin”) with one click.
Well, iMovie works with keywords as well, but you wouldn’t know it at first. iMovie keywords belong to the handful of miscellaneous efficiency features that Apple calls the Advanced Tools, so most people don’t even know that they exist. To make them appear, turn on Advanced Tools as described on The Orange Stripe.
Now, if you look carefully, you’ll see that a new button has appeared on iMovie’s central toolbar—one that looks like an old-fashioned key. Click it to open the Keywords window (Figure 4-4).
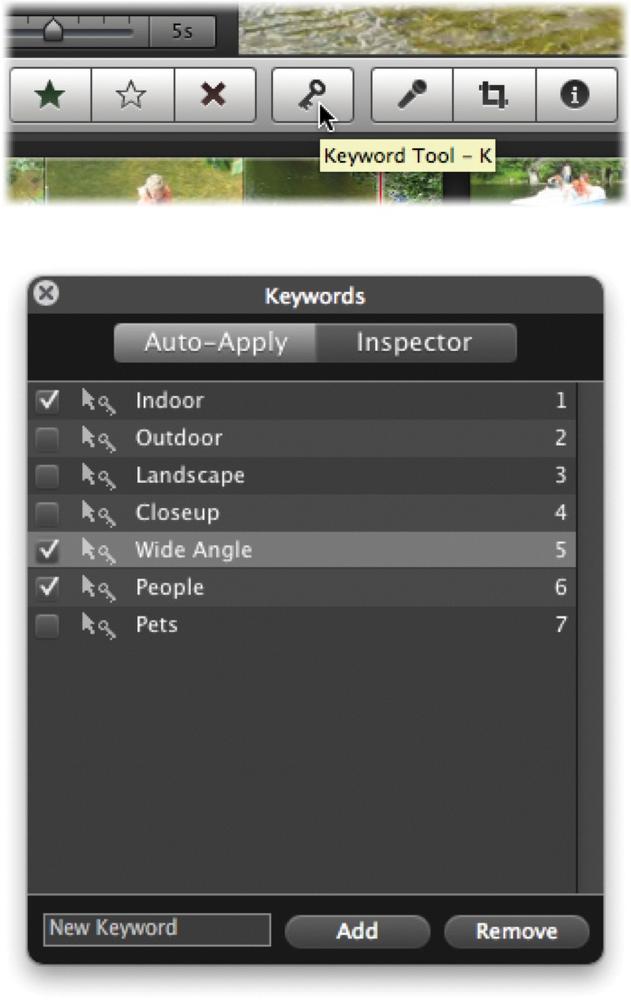
You can see that Apple has started you out with several sample keywords: Indoor, Outdoor, Landscape, People, Pets, and so on. You can also see that the Keywords window has two tabs at the top, Auto-Apply and Inspector. They correspond to the two ways that you can apply keywords to your filmstrips: by “painting” across them, or using the select-then-apply method.
Editing the Keyword List
To make up new keywords, click the Auto-Apply tab. Click in the Keyword box (lower-left), type a keyword, and press Enter. Type the next keyword, and press Enter. And so on.
To edit a keyword name, double-click it.
You can also rearrange the keyword list—to put the most common ones at the top, for example. (The top nine keywords get numeric keyboard shortcuts.) Just drag the keywords themselves up or down the list.
To remove keywords that you’re not using, click the Auto-Apply tab, click the keyword you want to eliminate (not its checkbox) and then click Remove. If that keyword is actually in use—if you’ve applied it to some footage—iMovie warns you in a confirmation box. Click Yes to proceed with the keyword vaporization.
“Painting” Keywords onto Clips
This method is wicked fast. It’s especially good if you want to apply the same set of keywords to a slew of different filmstrips. When you get back from your Disney World vacation, for example, chances are good that a lot of your video will fall into the categories “Vacation,” “Family,” and “Kids.” Using this method, you can leave those keyword checkboxes turned on and then whip through the clips, "painting on” the keywords as necessary.
Start by opening the Keywords window and then:
Click the Auto-Apply tab.
If you want to add a new keyword to the list, type it into the box at the bottom of the list and then click Add (or press Enter).
Turn on the checkboxes for the relevant keywords.
As noted above, you can turn on as many as you like.
Drag across the filmstrip sections that should have those keywords.
As always, you can skim and play to review a clip before you paint the keywords onto it.
As you drag, a blue line appears at the top of the filmstrip, indicating that you’ve applied keywords to it.
The Select-then-Apply Method
When you have a more motley assortment of video and you’ll be applying a lot of different keywords as you go, it might make more sense to use this second method. Here, you highlight some video first and then turn on the keyword checkboxes.
Start by opening the Keywords window, and then:
Click the Inspector tab.
The keyword list appears.
Select some video.
You can use any of the techniques described on Phase 2: Select the Good Bits. Of course, you can skim and play to see what you’ve got before you apply a keyword.
Turn on the appropriate keyword checkboxes.
Click to select the checkboxes—or press the number keys on your keyboard that correspond to the numbers in the keyword list.
Once again, a blue line appears at the top of the filmstrip, indicating that you’ve applied keywords to it.
If you see a hyphen (-) in one of the checkboxes, it’s because part of the selected video has that keyword, and part doesn’t. Click that checkbox once to apply the keyword to the entire selection, or twice to remove the keyword from the entire selection.
Now you can repeat steps 2 and 3, selecting, then applying keywords; selecting, then applying keywords.
The Keyword Filter
The payoff for painstakingly categorizing your footage with keywords comes when you need just the right clip, and you don’t have time to review the 6 hours of footage you took during your 11-day cruise. You want to see all the footage of museums (or beaches, or shipboard fake Broadway shows), now.
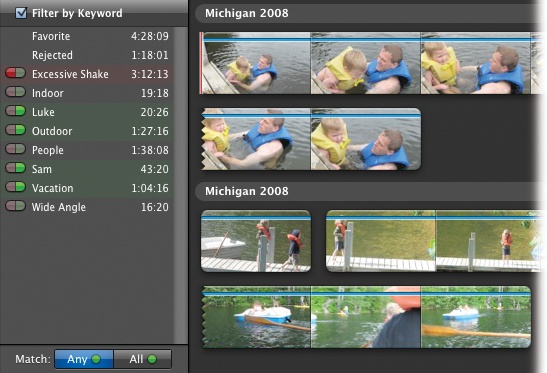
That’s easy. Choose Window → Show Keyword Filter, or click the magnifying-glass button under the Event Browser display. Either way, iMovie opens up a strange little keyword panel, wedged in between the Events list and the Event browser (Figure 4-5).
The minutes:seconds display down the right side is a cumulative tally of all the video in your library that bears each keyword.
Even handier are the red and green pill-shaped things down the left side. These traffic lights affect what footage you see in the Event Browser. When you click the green light, the Event browser shows only the clips marked by that keyword. The red light, naturally, has the opposite effect, hiding all clips with that keyword.
Tip
Clicking the keyword itself acts just like clicking the green light. A bigger target means more efficiency.
At least, that’s what it does fresh from the factory. By clicking the buttons below the list, you can manipulate what’s hidden and what’s visible in several creative ways:
Any means “show me video with any of the keywords I’ve selected.” If you turn on Vacation and Kids, you’ll see footage that has either of those keywords applied.
All means “show me only the video that has all of these keywords.” If you turn on Vacation and Kids, you’ll see only footage to which you’ve applied both those keywords.
Note
Ordinarily, you can filter out shaky footage by clicking the red squiggly button below your event footage. When the Keyword Filter is turned on, however, that button disappears, replaced by a faux-keyword called Excessive Shake. Now you can not only hide shaky footage, you can also green-light it so you only see shaky footage—the better to quickly reject all the blurry stuff.
Deleting Footage for Good
When you mark a shot as a reject, iMovie generally hides it from you, so that you can spend less time wading through mountains of video as you build your project.
But marking shots as rejects has another payoff, too: It’s the gateway to iMovie’s video deletion feature. If a shot is really bad, and you’re sure you’ll never need it again, you can delete it from your Mac completely, thereby reclaiming a substantial amount of hard drive space.
iMovie ’09 can even delete part of a clip on the hard drive, leaving the rest for you to work with. Technically speaking, that’s quite a trick. (See the box on Space Saver.)
To purge your rejected clips and clip portions, do this:
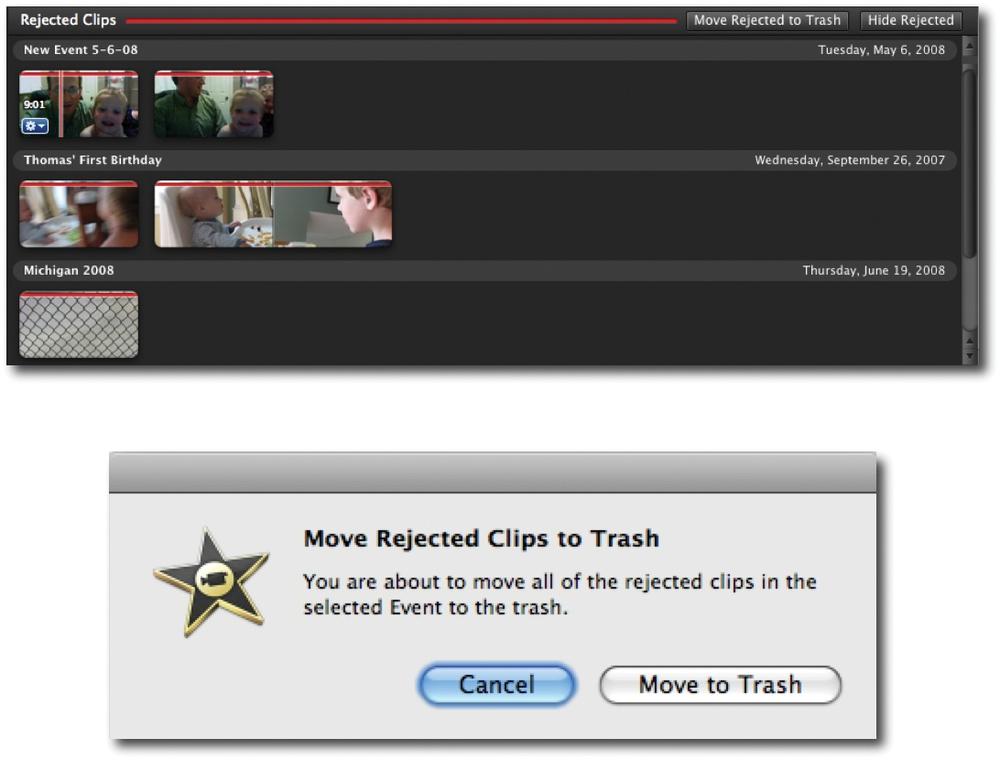
Choose View → Rejected Only.
As shown in Figure 4-6 (top), the Rejected Clips window appears. Skim or play these clips to double-check their worthlessness. The point is to review the rejects to make sure you’re not about to nuke anything you’ll regret losing.
Click “Move Rejected to Trash”.
You’ll find this button in the upper-right corner of the Rejected Clips window. iMovie immediately asks if you’re sure (Figure 4-6, bottom).
After a moment of processing, iMovie places all of the rejected footage in your Macintosh Trash. The filmstrips disappear from the window before you.
Note
At this point, the video isn’t yet gone from your hard drive. You have one last, desperate chance to resurrect it. Click the Trash icon on your Dock, and then open the iMovie Temporary Items folder within. There you’ll find both the deleted clip and the mini filmstrip movie thumbnail that iMovie ’09 generated for it.
To rescue some video, drag it out of this Trash folder and back into the appropriate folder in your Movies → iMovie Events folder. (Refresh your memory on how these folders work on Undeleting a Project.) The next time you open iMovie, you’ll see it listed in the Event browser.
Empty your Macintosh Trash.
In other words, switch to the Finder (click the first icon on your Dock), and choose Finder → Empty Trash. Or, if you can see the Trash icon on your Dock right now, hold down your cursor on it; from the shortcut menu, choose Empty Trash.
Space Saver
Now you know how to permanently vaporize all the footage you’ve flagged as useless. But as it turns out, iMovie offers an additional tool for reclaiming hard drive space—a little something called Space Saver.
It’s a little complicated, thanks to the double-negative wording of its options (“Reject if a clip is not this”), but here goes:
Space Saver’s function is to mark all unused, unfavorited, or unkeyworded video in an Event as rejects, all in one fell swoop. That way, you can use the previous steps to empty your Rejected Clips window and get a lot of hard drive space back.
The most useful application of this powerful command is to purge your Event of leftover footage after you’re really, truly finished editing a project. Space Saver can help you throw away all of the imported video that didn’t wind up being used in the project. In essence, you’re locking down your project in its current form, removing any chance of expanding the clips you’ve used in it—but you’re getting a lot of hard drive space back.
Note
If you have a tape camcorder, and you still have the original tape, this is a no-lose, no-risk proposition. If you’re ever desperate to re-edit your movie years from now, you can always reimport the original clips from the tape. In the meantime, you’re not filling up your hard drive with a lot of video deadwood.
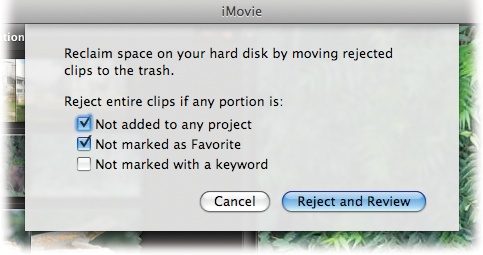
To get started, choose File → Space Saver. The dialog box shown in Figure 4-7 appears. It’s offering to mark everything as a reject unless it’s:
Part of a project. This is the example described in the box "Deleting Partial Clips: The Mixed Blessing.” Turn on “Not added to any project” if you want to get rid of all video clips in this Event that you haven’t used in any movie project.
One of your favorites. If you’ve been using the Favorites feature religiously, and have marked all usable video as Favorite, then you can turn on “Not marked as Favorite”. Anything you did not mark as a favorite now becomes a reject. (Pretty harsh!) The only footage left in this Event will be your favorites.
Categorized with a keyword. This option is for people who categorize everything useful with one keyword or another, as described on Keywords. Turning on “Not marked with a keyword” marks everything else as a reject, and puts it on the road to deletion.
There probably aren’t very many people who always keyword everything that’s useful, which is why the factory setting for this checkbox is off.
Once you’ve made your selections, click Reject and Review. You arrive in the Rejected Clips window (Figure 4-6, top), where you’ll see all the clips that Space Saver has marked for termination.
If you’re puzzled by what’s here and what’s not, keep these eccentricities in mind:
Space Saver marks a clip as a reject only if the entire thing meets the criteria you selected. If part of it is flagged as a favorite, for example, and you’ve selected “Not marked as Favorite”, then no part of the clip will be moved to the Rejected Clips window.
The checkboxes are cumulative. You can turn on as many of the Space Saver checkboxes as you like. But in keeping with Space Saver’s double-negative thinking, turning on more checkboxes rejects fewer clips. That is, if you turn on all three boxes, a clip won’t be deleted unless it’s unused in a project and not a favorite and doesn’t have a keyword. This quirk, too, may explain why some clips don’t wind up in the Rejected Clips window when you expected them to.
Once you’ve skimmed or played the filmstrips in the Rejected Clips window, and you’ve assured yourself that they’re all expendable, you can delete them just as you’d delete any rejected clips. Deleting Footage for Good has the full details, but the gist is this: Click “Move Rejected to Trash”, click “Move to Trash” in the confirmation box, and then empty the Macintosh Trash.
Get iMovie '09 and iDVD: The Missing Manual now with the O’Reilly learning platform.
O’Reilly members experience books, live events, courses curated by job role, and more from O’Reilly and nearly 200 top publishers.

