If you have a MiniDV tape camcorder, high-def or not, transferring your recordings to the Mac for editing is straightforward. All you have to do is connect your two machines—the camcorder and the Mac—with a cable.
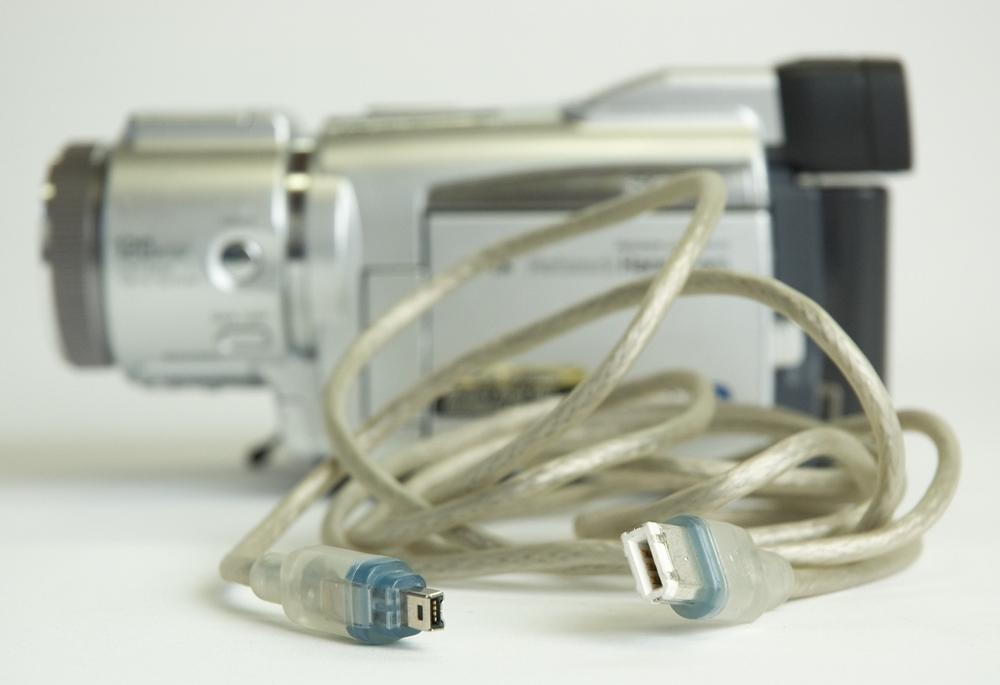
It's called a FireWire cable, and it looks like the one in Figure 1-3. The big end of the cable goes into
the FireWire jack on the front, side, or back of your Mac; it's marked by a
radioactive-looking ![]() symbol.
symbol.
Tip
Unfortunately, not all Mac models have FireWire jacks anymore, or they use a newer version called FireWire 800. If your Mac has a FireWire 800 jack, you can find a cable that works with your camera. The MacBook Air and the regular aluminum MacBook, though, lack any FireWire jack. If you have MiniDV tapes full of recorded video, you're out of luck: There's no adapter box or converter that can connect your camcorder's FireWire jack to a Mac that doesn't have this jack. Your best bet is to borrow a Mac model that has a FireWire jack, dump all of your tapes into it, and then sell your old camcorder.
Figure 1-3. Plug the larger end of the FireWire cable—the six-pin end, as Apple calls it—into the corresponding jack on the Mac. The tiny end may look almost square, but it fits in only one particular way, thanks to a little indentation on one side. Be gentle with it.
On the other end is a much smaller, squarish plug (the four-pin connector). Plug this tiny end into the FireWire connector on your camcorder, which, depending on the brand, may be labeled "FireWire," "i.Link," or "IEEE 1394." It's almost always hidden behind a plastic or rubber door or flap on the camcorder.
This single FireWire cable communicates both sound and video from the camcorder to the Mac. Once it's connected, proceed like this:
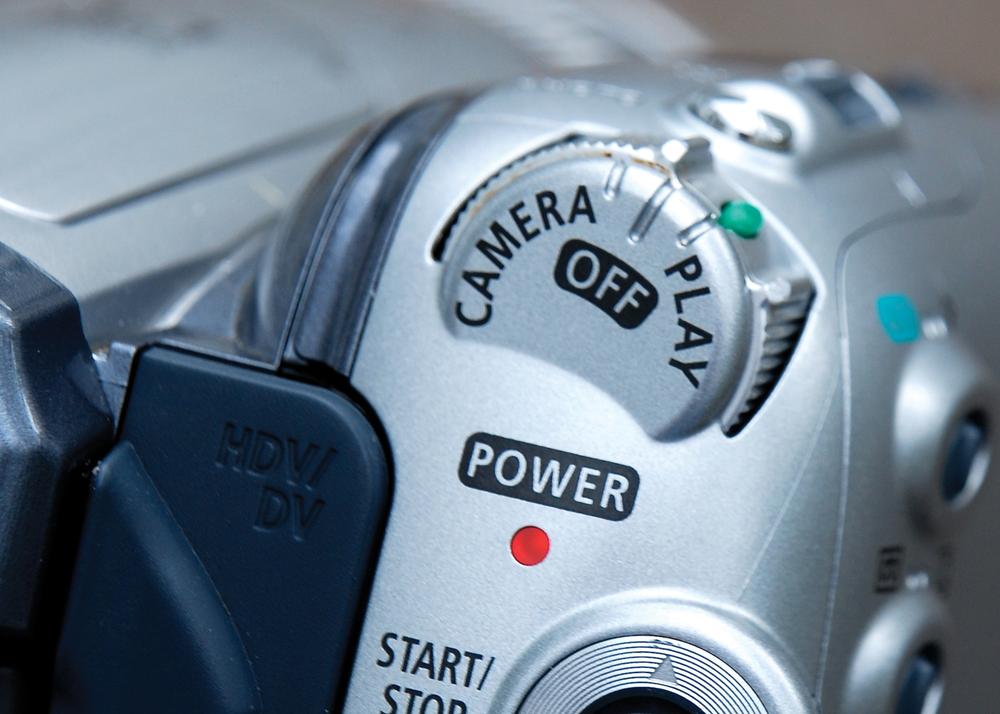
Turn on the camcorder. Switch it into Play mode (Figure 1-4).
The camcorder's playback mode may be labeled Play, VCR, VTR, or just ►.
At this point, iMovie's big blue Import window is supposed to open automatically. If it doesn't, run through the troubleshooting checks described on iMovie Doesn't See the Tapeless Camcorder.
Specify what you want to import.
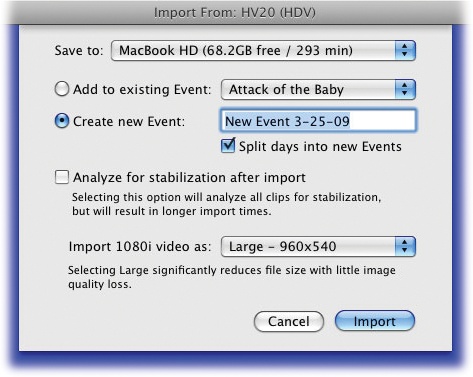
If you want to import the whole tape, make sure the Automatic/Manual switch (lower left) is on Automatic, and then click Import. This is a convenient option, since you can walk away and do other things while iMovie works. The "Save to" dialog box appears (Figure 1-5); skip to step 3.
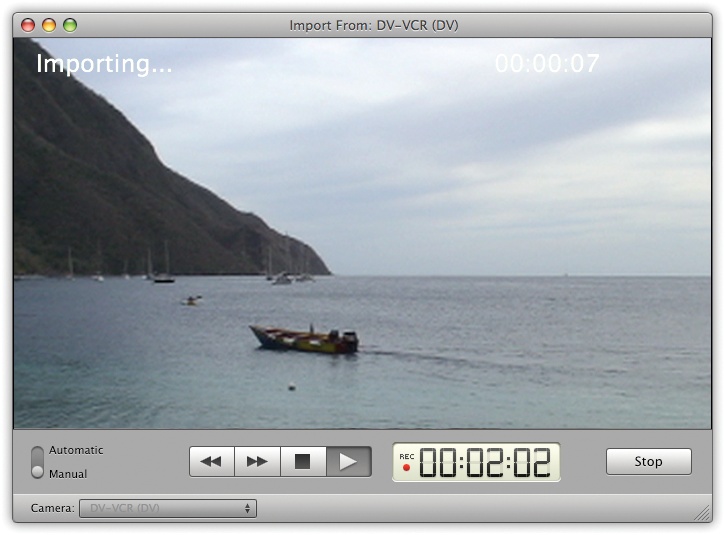
If you want to import only some of what's on the tape, set the Automatic/Manual switch to Manual. At this point, the window sprouts a set of playback control buttons (Figure 1-6). You can actually use the
 ,
,  , ■, and ► buttons on the screen to control the
camcorder.
, ■, and ► buttons on the screen to control the
camcorder.Tip
You have to keep the mouse button down on the
 and
and  buttons continuously to make them work. If
you use these buttons while the video is playing, you scan through the video; if you
click Stop (■) first, these buttons zoom much faster through the tape, but of course
you can't see where you are until you hit ► again.
buttons continuously to make them work. If
you use these buttons while the video is playing, you scan through the video; if you
click Stop (■) first, these buttons zoom much faster through the tape, but of course
you can't see where you are until you hit ► again.What you're doing now, of course, is scanning your tape to find the sections that you want to include in your edited movie. When you find a shot that's worth bringing onto the Mac, click the Import button at the lower-right corner of the window. The "Save to" dialog box appears (Figure 1-5); read on.
Indicate where you want to save the imported video clips.
Most people, most of the time, save incoming video onto the main Mac hard drive. But true iMovie addicts wind up buying additional hard drives to hold their movies. That's why the "Save to" pop-up menu appears here—so that you can choose a different hard drive to hold your video.
Specify an Event.
The pair of choices shown in Figure 1-5 let you answer these questions: Were the scenes you're about to import filmed at a new Event? Or should they more properly be filed along with scenes you've already imported as part of an existing Event?
Answering this question, of course, requires that you know what Apple means by an Event. See the box on Importing from Tapeless Camcorders.
Turn on "Analyze for stabilization after import", if you've got the time.
The built-in footage stabilizer is one of iMovie's most important and most effective new features. It converts unsteady video into footage that looks as though the camera was on a tripod.
The downside of this miraculous option is that your Mac requires a long period of thoughtful analysis before it can do this stabilizing. It literally studies the first frame of video, compares each pixel to what's on the second frame, and so on. And that takes a long time—hours, in some cases.
Fortunately, you can always apply the stabilization feature to individual parts of the movie, which saves huge amounts of time. In other words, the only reason to turn on "Analyze for stabilization after import" at this stage is because you intend to let the Mac crunch away for half a day (or night) after the importing is complete.
If you have a high-definition camcorder, choose either "Large - 960 x 540" or "Full - 1920 x 1080".
This final option appears only when you're importing video from a high-definition camcorder, one that captures video in the so-called 1080i format. (That term refers to the fact that it reproduces a scene using 1,080 fine horizontal lines, which is very sharp indeed. Actually, the "i" means that you see two sets of 540 lines, odds and evens, interlaced with each other, flashed alternately on the screen.)
iMovie is offering you the chance to import a quarter-scale version of that gigantic video canvas, for the purposes of saving hard drive space. For assistance in making the Large vs. Full decision, see the box on Automatic Scene Detection.
Click Import.
If you chose the Automatic option, iMovie now rewinds the tape to the beginning, then commands the camcorder to begin playback. As it plays, iMovie captures the video and stores it on your Mac. You can interrupt the process by clicking Stop, if necessary; at this point, iMovie displays a little congratulations message, revealing how many minutes' worth of video you imported. You can click OK and then import some more, if you like, starting from step 2.
Or you can walk away while iMovie works. You can even surf the Web, crunch some numbers, organize your pictures in iPhoto, or whatever you like. Since iMovie is a Mac OS X program, your Mac doesn't have to devote every atom of its energy to capturing video. It continues to give priority to capturing video, so your other programs may act a little drugged. But you can get meaningful work or reading done while you're dumping your footage into iMovie in the background.
If you let the Automatic importing proceed without interruption, iMovie auto-rewinds the tape when it reaches the end.
If you chose the Manual setting, you can use playback controls to operate the tape, shuttling through it to find the parts you want; use the Import button (and its alter ego, the Stop button) to capture only the good parts.
Tip
When you come to a scene you want to bring into iMovie, capture 3 to 5 seconds of footage before and after the interesting part. Later, when you're editing, that extra leading and trailing video (called trim handles by the pros) will give you the flexibility to choose exactly the right moment for the scene to begin and end. Furthermore, you need extra footage at the beginnings and ends of your clips if you want to use crossfades or similar transitions between them.
Unfortunately, the process isn't the speedy joyride it was in the previous version of iMovie, where you could just tap the space bar (or click Import) every time you wanted to start or stop importing during playback.
In iMovie '09, each time you click Stop, iMovie locks you out for a minute or two while it displays the "Generating Thumbnails" message. That's iMovie's way of saying, "I'm processing this video and making some live, 'skimmable' filmstrips" (which are described on Filmstrips).
Once that message disappears, you can use the playback controls to find the next bit of video that's worth importing—but you'll have to fill out the box shown in Figure 1-5 all over again, every time.
These frequent "Generating Thumbnails" and "Save to" interruptions are, for many people, a pretty strong argument for avoiding the Manual settings. The Automatic setting winds up saving you a lot of time—and doesn't cost you any extra disk space. (See the box on Importing from DVD Camcorders.)
When you and iMovie are both finished, click Done.
The Import window goes away. You return to the iMovie screen, where you can click the name of the Event you specified in step 4 to see the newly imported clips within it. Proceed to Chapter 2.
You'll notice a handy iMovie feature when the importing is all over: It automatically creates an individual filmstrip (clip) for each scene you shot. An hour's worth of tape doesn't wind up as a single, mega-chunk of video—instead, you wind up with 30 or 40 individual clips, just the way you shot them.
What iMovie is actually doing is studying the date and time stamp that digital camcorders record into every frame of video. When iMovie detects a break in time, it assumes that you stopped recording, if only for a moment, and therefore that the next piece of footage should be considered a new shot. It turns each new shot into a new clip.
In general, this feature doesn't work if you haven't set your camcorder's clock. Automatic scene detection also doesn't work if you're playing from a nondigital tape using one of the techniques described on Dragging Video In from the Finder.
Get iMovie '09 & iDVD: The Missing Manual now with the O’Reilly learning platform.
O’Reilly members experience books, live events, courses curated by job role, and more from O’Reilly and nearly 200 top publishers.


