Chapter 4. Core Data
Every application needs to store information, whether during the course of a single session or permanently. To aid in the difficult task of managing and searching stored data, Apple has developed a whole framework called Core Data, which you might already be familiar with. In iOS 10 SDK, Core Data, especially in Swift, has been changed a little bit, so in this chapter we will have a look at these changes as well as some basics of accessing Core Data.
Before we go further, ensure that you have added the necessary Core Data code to your application. When you create your project file, make sure to tell Xcode to import Core Data into your application. You do this where you enter your product’s name in Xcode’s new project dialog, as shown in Figure 4-1. Core Data is one of the three features you can choose at the bottom of the dialog.
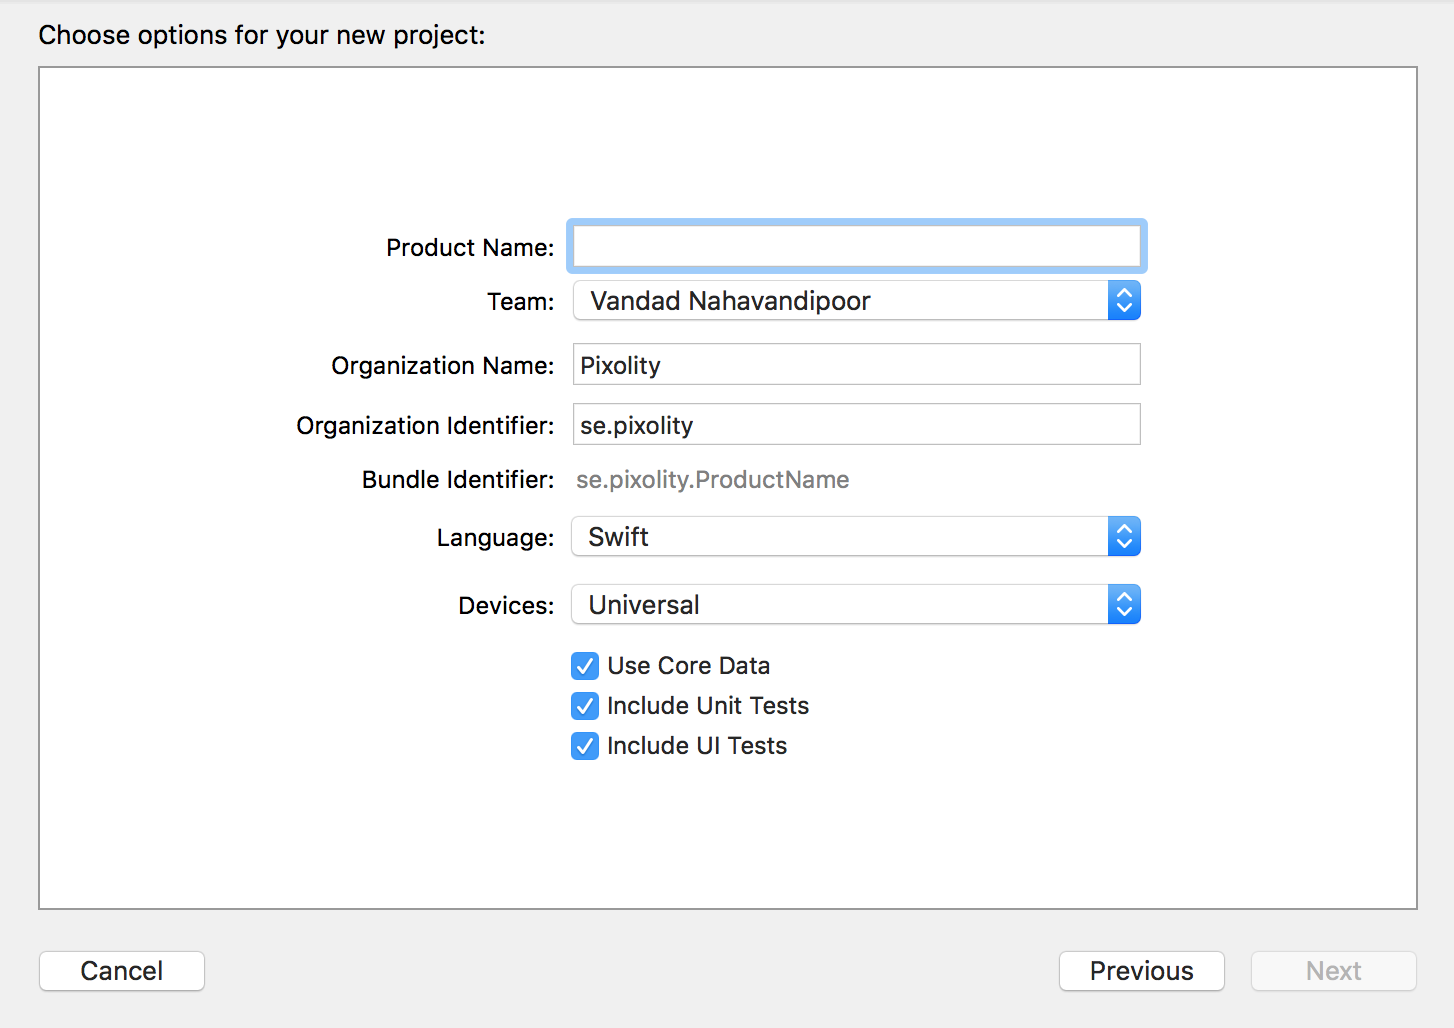
Figure 4-1. At the bottom of this dialog, you can ask Xcode to add Core Data to your project
4.1 Designing Your Database Scheme
Solution
The idea behind Core Data is that your data is organized and stored in the database through what are known as schemes. Schemes tell Core Data how your data is structured, and can be designed through a visual editor that’s part of Xcode.
Note
Ensure that you have added Core Data to your project by following the instructions given in this chapter’s introduction.
Discussion
When you create a project with Core Data already added to it, you should be able to see a file with the .xcdatamodel extension in your project. If you cannot find this file, press Command-Shift-O in Xcode and then type in xcdatamodel. Once you find the file, press the Enter button on your keyboard to open it (Figure 4-2).
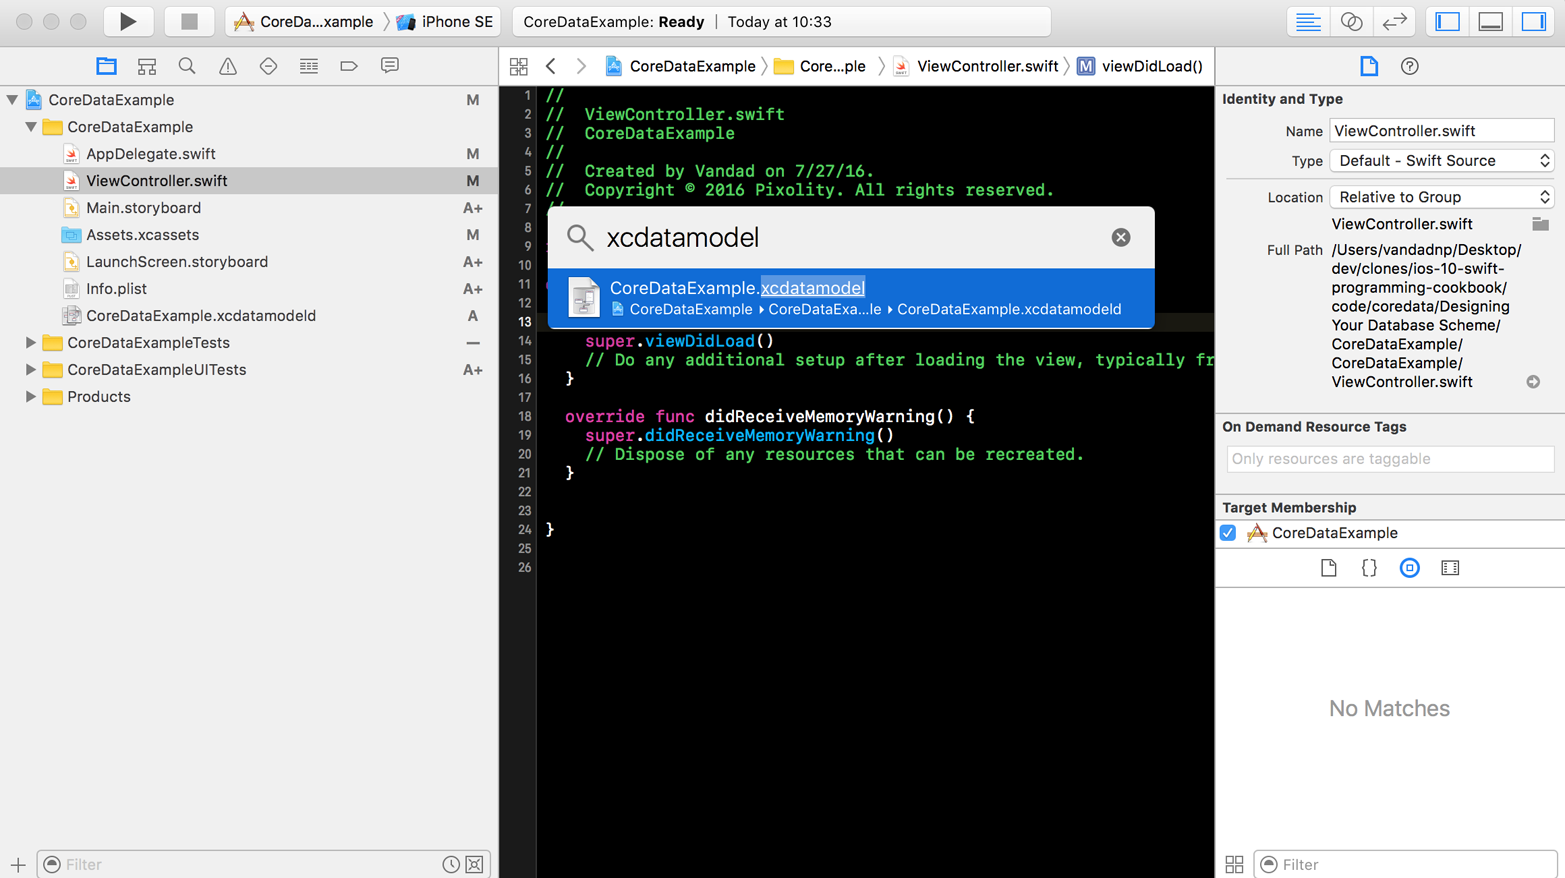
Figure 4-2. We have now found our Core Data model file
Figure 4-2 shows the visual editor for your Core Data scheme file, where you can create entities. An entity is similar to a table in a database, where you can define the columns and their data types. Let’s create a Car entity that has a maker and a model name of type String:
-
In the visual editor of your scheme, press the Add Entity button at the bottom of the screen. This will create a new entity for you called
Entity. From the data model inspector on the righthand side of Xcode, change this name fromEntitytoCar(Figure 4-3). The data model inspector allows you to change many aspects of your entities and their columns.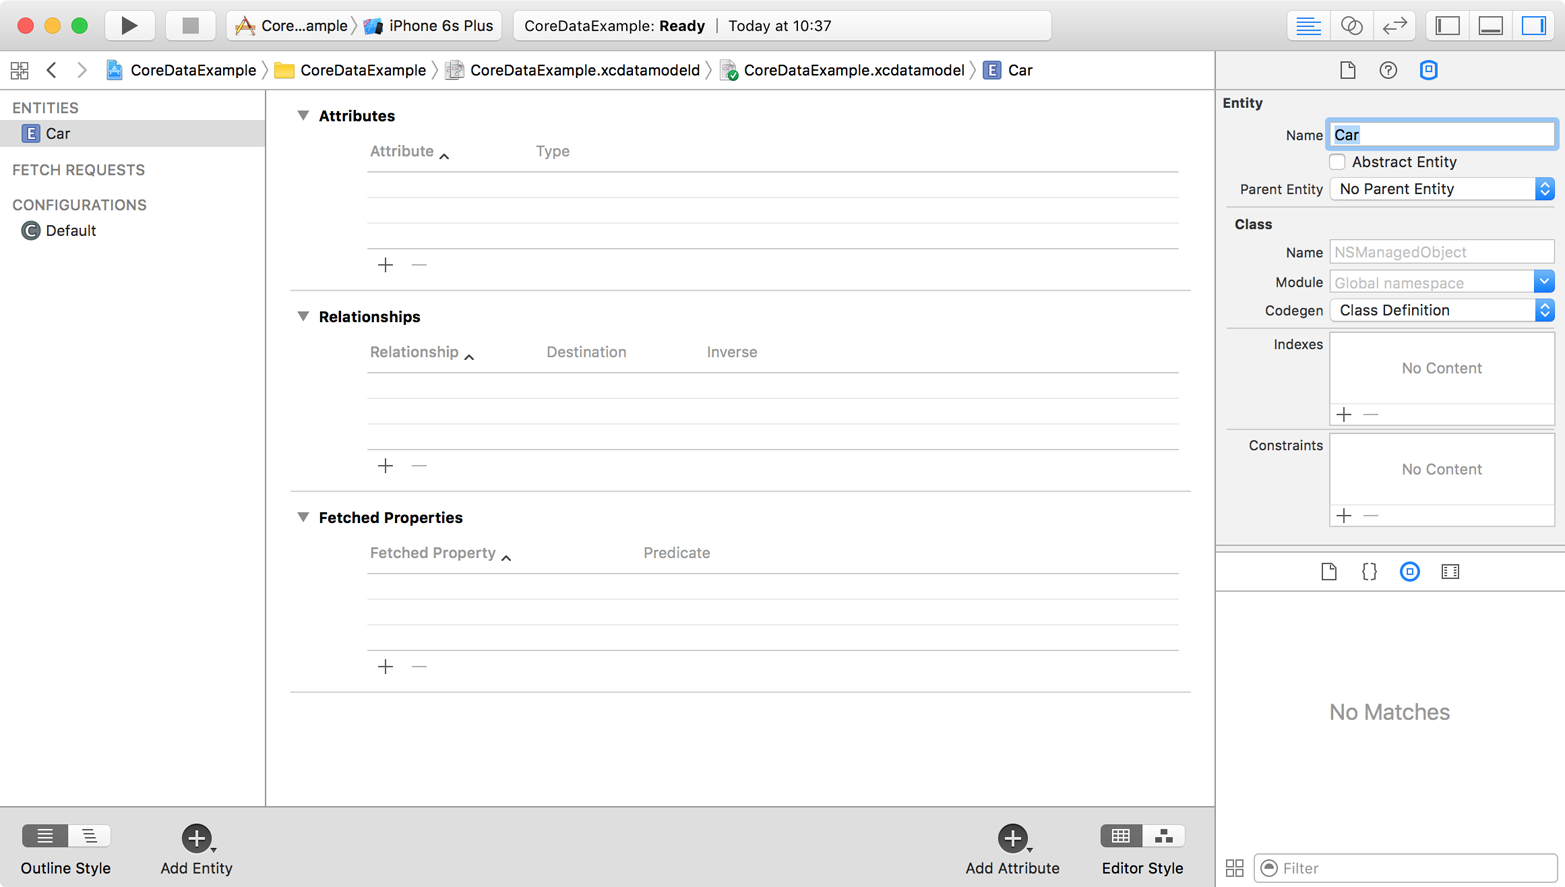
Figure 4-3. Setting the name of your entity on the right side of the screen
-
Under the Attributes section of the editor on top, press the little + button to create a new attribute, name this new attribute
maker, and change its type toString. Also, on the data model inspector on the right side, uncheck the Optional box so that the maker of the car becomes a mandatory attribute (Figure 4-4).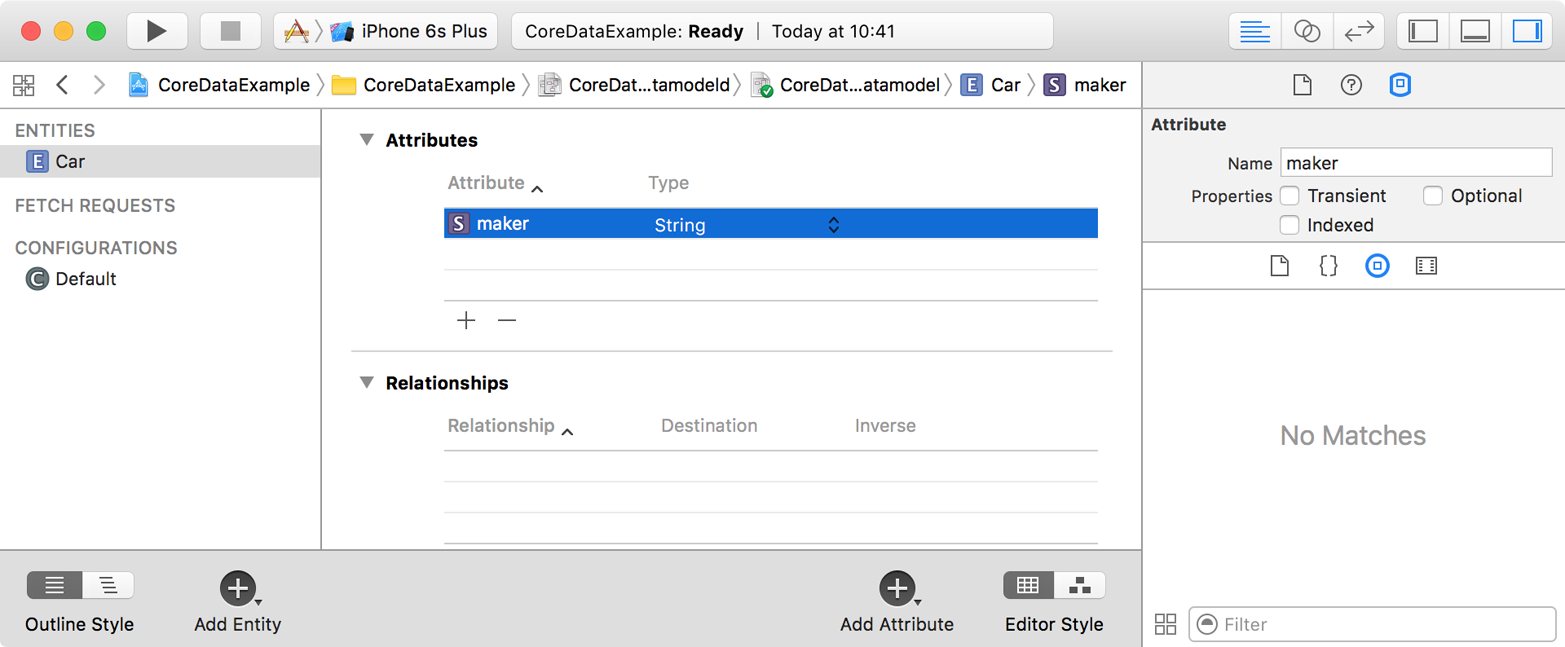
Figure 4-4. The car has a new mandatory attribute called maker of type String
-
Do the same thing that you did with the
makerattribute and create another mandatory attribute of typeString, calledmodel(Figure 4-5).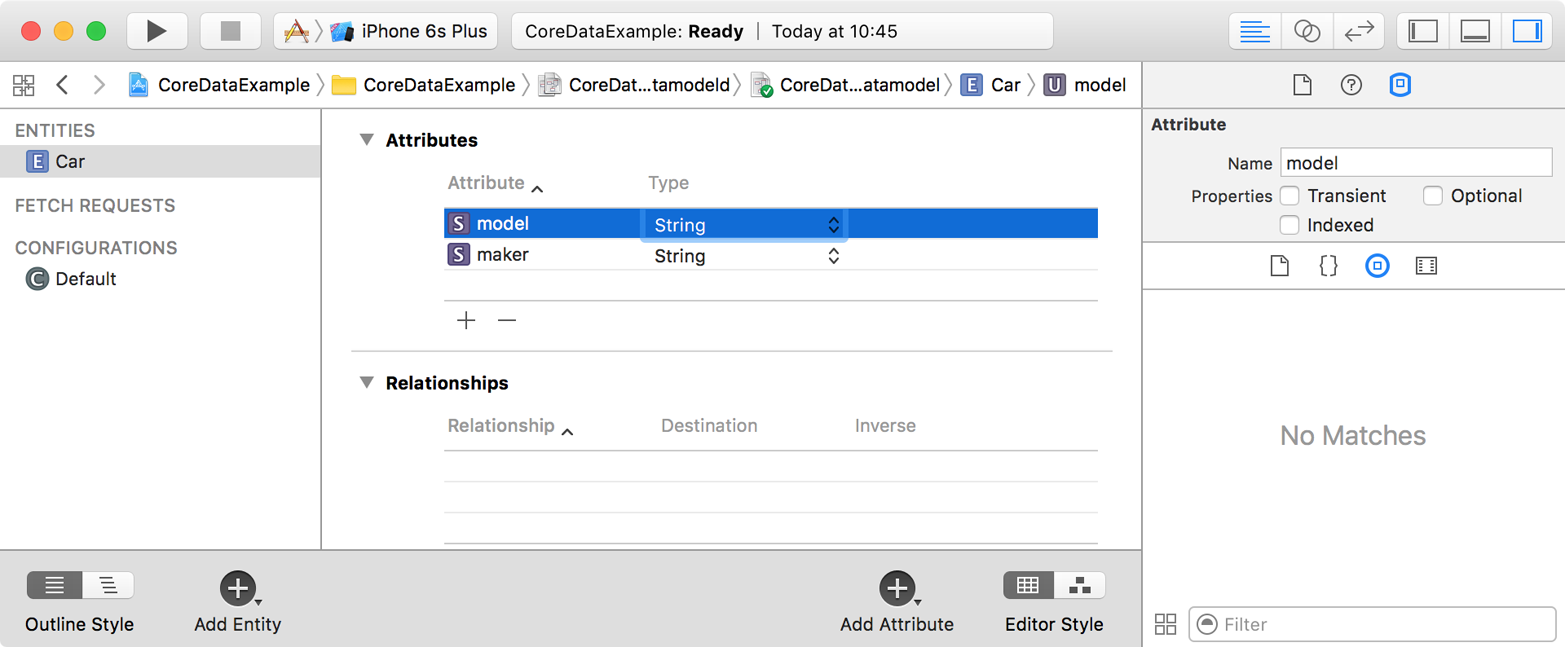
Figure 4-5. Now the car has a maker and a model
-
Create another entity now, call it
Person, and add two new mandatory attributes of typeStringcalledfirstNameandlastName(Figure 4-6).
Figure 4-6. The Person model has two mandatory fields
-
In real life, a person can have multiple cars, although a car generally has one owner. This ownership status can be defined as a relationship between the two entities. Start by opening the
Carentity. Under the Relationships section of the editor, press the + button and name the new relationshipownerwith the destination ofPerson(Figure 4-7). Make the relationship mandatory by unchecking the Optional checkbox in the data model editor. Leave the Inverse section empty for now.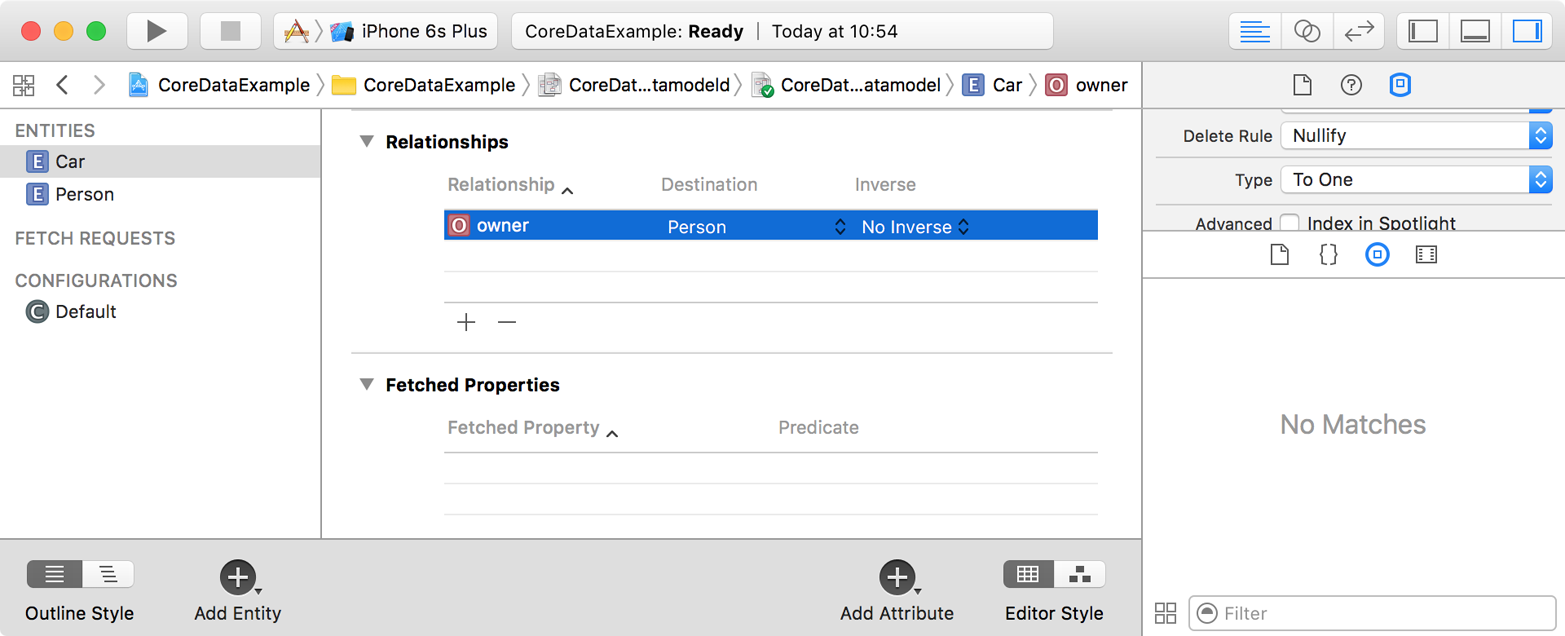
Figure 4-7. The Car entity now has an owner!
-
Open the
Personentity and create a new optional relationship there. Name itcarsand set the destination as theCarentity. Also set the Inverse field to theownerfield of theCarentity. Then, under the data model editor, under the Relationship section, choose the Type checkbox and set the type of this relationship to “To Many”. Because this relationship is optional, a person does not necessarily have to have cars. Because the relationship is “To Many”, every person can have more than one car. On the other hand, because a car’sownerrelationship is mandatory, each car always has to have an owner, and only one owner at a time.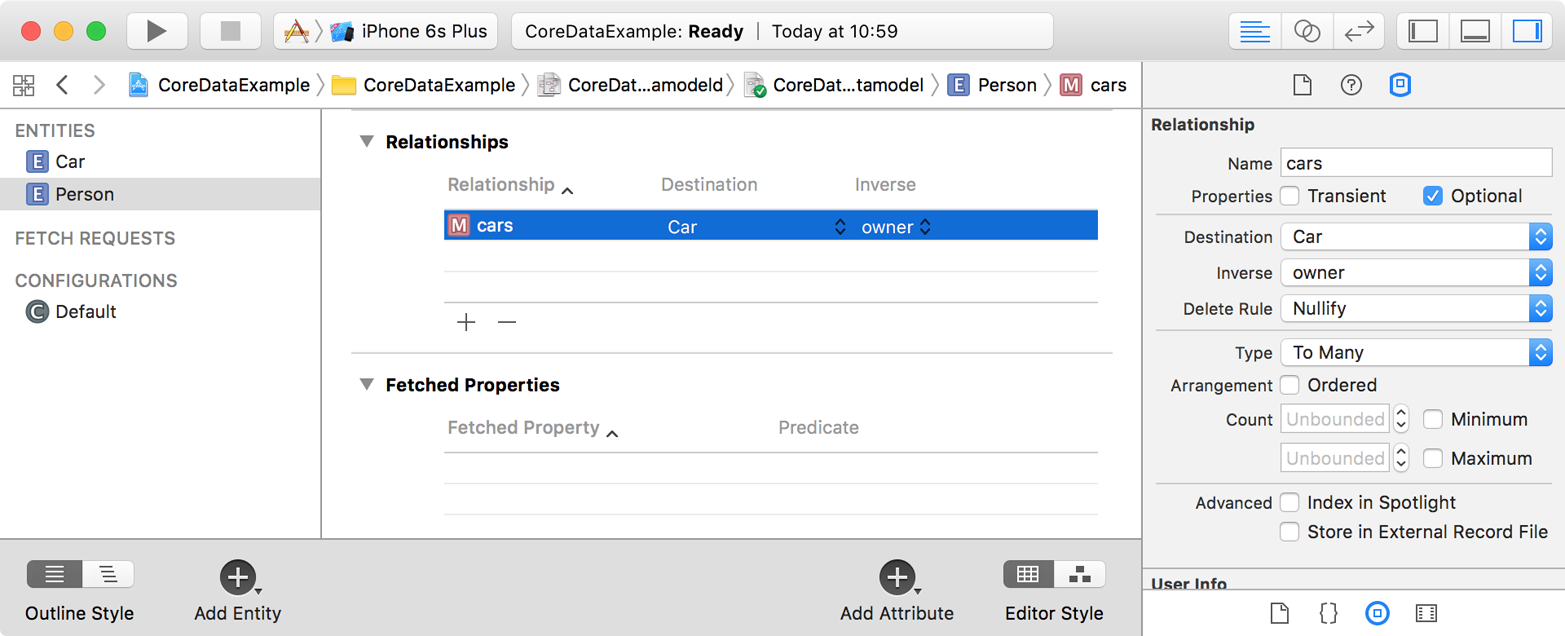
Figure 4-8. Every person can have more than one car
- Last but not least, for both the
Carand thePersonentities in the editor, go to the data model inspector under the Class section, and enterCarandPerson, respectively, into the Name text field. Core Data creates a class in your project’s automatically generated code to represent each entity in your scheme, assigning the class the name you provide. Each class also has one property for each attribute in the entity. For instance, theCarclass has amakerproperty and amodelproperty, each set to the value you store for it in the database.
After designing your entities and their relationships and attributes, you can go to your Swift code and import the Core Data module if it’s not already imported. Then you can start instantiating your entities, as I’ll explain in this chapter.
4.2 Writing Data to the Database
Problem
You have created your model objects and would now like to insert instances of those models into your database for later retrieval.
Note
This recipe is based on the data scheme that we designed in Recipe 4.1.
Solution
Follow these steps:
-
Your app delegate has your Core Data stack, so if you are in another class and would like to save your objects from there, you need to get a reference to your app delegate’s context using the
persistentContainer.viewContext: NSManagedObjectContextproperty like so:varcontext:NSManagedObjectContext?{return(UIApplication.shared().delegateas?AppDelegate)?.persistentContainer.viewContext} -
You can insert an object into your database using the
(context:)initializer that is coded for you automatically by Xcode. Pass a managed object context to this initializer to create your object on that context. Let’s create an instance of ourPersonobject now and set the person’sfirstNameandlastNamemandatory properties. If you attempt to save your data into the database without setting a value for all the object’s mandatory properties, your app will crash by default.letperson=Person(context:context)person.firstName="Foo"person.lastName="Bar" -
Now let’s extend our
Carclass so that we can configure an instance of it with a simple method instead of having to set all the properties one by one:extensionCar{funcconfigured(maker_maker:String,model_model:String,owner_owner:Person)->Self{maker=_makermodel=_modelowner=_ownerreturnself}} -
Then we can create two cars for the current person:
person.cars=NSSet(array:[Car(context:context).configured(maker:"VW",model:"Sharan",owner:person),Car(context:context).configured(maker:"VW",model:"Tiguan",owner:person)]) - Once you are done with that, you can save your data into the database by calling your app delegate’s
saveContext()function.
Discussion
By default, the saveContext() function crashes your application if something goes wrong. I prefer not to do that and instead make this function throw an exception that I can catch later. So let’s change this function’s definition:
funcsaveContext()throws{letcontext=persistentContainer.viewContextifcontext.hasChanges{trycontext.save()}}
Then, every time you call this function to save your data, ensure that you catch the possible exceptions that might occur:
do{trysaveContext()}catch{// something bad happened, handle this situation appropriately}
See Also
4.3 Reading Data from the Database
Problem
You have saved some data to your Core Data database and would like to read it back.
Note
This recipe’s database scheme is based on what was described in Recipe 4.1.
Solution
Follow these steps:
- Call the
fetchRequest()class method of your managed object (such as theCarobject) to get an object of typeNSFetchRequest<T>, whereTis your class name such asCar. - Once the fetch request is returned to you, configure it using some of the properties described here:
fetchLimit: Int- The maximum number of instances of the current class to fetch as the result of the search.
relationshipKeyPathsForPrefetching: [String]?- An array of strings that denote the relationships of the current object whose results must also be fetched. For instance, our
Personobject has an optional one-to-manycarsrelationship. So if you want to find what cars this person owns (if any), as well as the person herself, insert the name of thecarsrelationship into this array. propertiesToFetch: [AnyObject]?- This is an array of the attribute names of the managed object whose values you want to pre-fetch. For instance, the
firstNameand thelastNameproperties of thePersonobject can be passed to this array to ensure that their values are pre-fetched for you.
- Once your fetch request is ready, execute it on your managed object context using its
fetch(_:)function.
Discussion
-
Let’s have a look at an example. First ensure that you have completed the steps described in Recipe 4.2. Now you should be able to read the data you wrote to your database. Imagine that you want to read the instances of the
Personentity, represented by a class of the same name. Let’s put the code that writes these instances to the database, into a function so that we can easily call it from another place:funcwriteData()throws{letcontext=persistentContainer.viewContextletperson=Person(context:context)person.firstName="Foo"person.lastName="Bar"person.cars=NSSet(array:[Car(context:context).configured(maker:"VW",model:"Sharan",owner:person),Car(context:context).configured(maker:"VW",model:"Tiguan",owner:person)])trysaveContext()} -
And then start by writing a function that can read only one
Personobject back from the database if one exists:funcreadData()throws->Person{// we are going to code this function now} -
In this function, assuming it is being written in your app delegate’s class where you have access to your managed object context, construct a fetch request on your
Personobject like so:letcontext=persistentContainer.viewContextletpersonFetchRequest:NSFetchRequest<Person>=Person.fetchRequest() -
Tell Core Data that you want to pre-fetch the
carsrelationship of thePersonentity and that you want to fetch only one instance of thePersonobject:personFetchRequest.fetchLimit=1personFetchRequest.relationshipKeyPathsForPrefetching=["cars"] -
Then call the
fetch(_:)function of your managed object context to retrieve the results:letpersons=trycontext.fetch(personFetchRequest) -
We are also going to check that we fetched only one
Personinstance from the database. Otherwise, we will throw a new exception, since our function is marked withthrows:guardletperson=persons.first,persons.count==personFetchRequest.fetchLimitelse{throwReadDataExceptions.moreThanOnePersonCameBack}Note
ReadDataExceptionsis an enumeration that we have defined ourselves like so:enumReadDataExceptions:Error{casemoreThanOnePersonCameBack} - Once you are done, return this new person object:
returnperson
Now that we have both the writeData() and the readData() functions ready, we can call them in one place as shown here:
funcwriteData()throws{letcontext=persistentContainer.viewContextletperson=Person(context:context)person.firstName="Foo"person.lastName="Bar"person.cars=NSSet(array:[Car(context:context).configured(maker:"VW",model:"Sharan",owner:person),Car(context:context).configured(maker:"VW",model:"Tiguan",owner:person)])trysaveContext()}
And the results will be printed to the console like so:
Successfully read the person
Optional("Foo")
Optional("Bar")
Car #1
Optional("VW")
Optional("Tiguan")
Car #2
Optional("VW")
Optional("Sharan")
See Also
4.4 Searching for Data in the Database
Solution
- Call the
fetchRequest()function of your entity to create a fetch request. - Instantiate the
Predicateclass and create your search format. - Set this predicate as the
predicateproperty of your fetch request. - Execute your fetch request using the
fetch(_:)function of your managed object context.
Discussion
The Predicate class’s format initializer parameter is very important. It defines your search and what you want to find in the database. Without overwhelming you with too much information, I will introduce the various searches that you can perform on your database by providing you with different examples.
Note
I assume that you have already gone through the earlier recipes in this chapter, especially Recipe 4.3, in order to be able to read your data back from the database.
As the first example, let’s write a function that can find any Person instance in the database with a given first and last name:
funcpersonsWith(firstNamefName:String,lastNamelName:String)throws->[Person]?{letcontext=persistentContainer.viewContextletrequest:NSFetchRequest<Person>=Person.fetchRequest()request.predicate=NSPredicate(format:"firstName == %@ && lastName == %@",argumentArray:[fName,lName])returntrycontext.fetch(request)}
Here we are constructing a Predicate instance using its (format:argumentArray:) initializer. The format is a String and the argument array is of type [AnyObject]?. The format of the predicate is quite interesting, though, if you have a closer look. The == operator is being used to compare strings and %@ is used as a placeholder for the given first and last name, which are placed in the arguments array. In addition, && is used to ensure both the first and last name conditions have been satisfied by this search.
For our next example, let’s write a function that can find all instances of the Person object in the database whose first name starts with a specific character:
funcpersonsWith(firstNameFirstCharacterchar:Character)throws->[Person]?{letcontext=persistentContainer.viewContextletrequest:NSFetchRequest<Person>=Person.fetchRequest()request.predicate=NSPredicate(format:"firstName LIKE[c] %@",argumentArray:["\(char)*"])returntrycontext.fetch(request)}
There are a few things to explain about this predicate:
- The
LIKEsyntax - This is a pattern matching syntax. If you want to look for any string whose first character is M followed by anything else, you can use
LIKEwith the value ofM*. - The
[c]syntax - This tells Core Data to search case-insensitively in the database.
"\(char)*"- This takes the given character and makes it a pattern by appending an asterisk to its end.
In the next example, we want to find all instances of the Person model who have at least one car from a specific maker:
funcpersonsWith(atLeastOneCarWithMakermaker:String)throws->[Person]?{letcontext=persistentContainer.viewContextletrequest:NSFetchRequest<Person>=Person.fetchRequest()request.relationshipKeyPathsForPrefetching=["cars"]request.predicate=NSPredicate(format:"ANY cars.maker ==[c] %@",argumentArray:[maker])returntrycontext.fetch(request)}
And these are the interesting statements in this predicate:
ANY- This is an aggregate operation that operates on collections. Other operations exist as well, such as
ALL,NONE, andIN, whose names indicate what they do. In the case ofANY, it indicates that we are looking for a person who has at least one car with a given maker (maker: String). cars.maker- This is a key path operation that allows us to perform our search on the
Personentity but dig into itscarsrelationship and read themakerattribute’s value. ==[c]- This makes sure the maker of the car is a given value, searched case-insensitively.
The preceding examples should give you a feel for the rich interface Core Data offers for search, and should help you find your way through the documentation for other options.
See Also
4.5 Performing Background Tasks with Core Data
Solution
- You first need to get a reference to your app’s persistent container, which should be of type
NSPersistentContainer. - Call the
newBackgroundContext()function on your container to get a new background context where you can do your background Core Data work. This should be of typeNSManagedObjectContext. - Set the
automaticallyMergesChangesFromParentproperty of your new context totrue, so that the new objects from the view context will be automatically brought into yours. This lets you get the latest objects if any changes are made to the view context. - Call the
perform(_:)function on your new background context and do your background work in the block that you pass to this function. - Once you are done, call the
save()function on your background context.
Note
I’m basing this recipe’s code on what you learned in Recipe 4.4.
Discussion
Background tasks are very important in Core Data programming. Without a doubt, they are one of those weapons that you must have in your arsenal before going wild with Core Data.
Let’s write a function that allows us to save many Person instances in our database and, when done, call a completion handler on the main thread so the thread can pick up work on the new data. Here is the function’s definition:
funcwriteManyPersonObjectsToDatabase(completion:@escaping()->Void)throws{// we are going to code this function now...}
We are then going to create a new background context and make sure it merges changes automatically from the view context:
letcontext=persistentContainer.newBackgroundContext()context.automaticallyMergesChangesFromParent=true
After this, we will write our Person instances into this new background context and then save it. Once that is done, we call the completion handler:
context.perform{lethowMany=999forindexin1...howMany{letperson=Person(context:context)person.firstName="First name\(index)"person.lastName="First name\(index)"}do{trycontext.save()DispatchQueue.main.async{completion()}}catch{// catch the errors here}}
To confirm that these objects were successfully saved to the coordinator and that they are present on the view context as well, we will write a function that can count the total number of Person object instances in the database, with the following definition:
funccountOfPersonObjectsWritten()throws->Int{// we will code this function now}
In this function, we will create a new fetch request of type NSFetchRequest<Person>. But since we are interested in counting only the Person instances, we will not fetch the instances themselves, but instead set the resultType: NSFetchRequestResultType property of the fetch request to .countResultType:
letrequest:NSFetchRequest<Person>=Person.fetchRequest()request.resultType=.countResultTypeletcontext=persistentContainer.viewContext
Because we set the resultType: NSFetchRequestResultType property of the fetch request to .countResultType, the result of the execute(_:) function of our context will be of type NSAsynchronousFetchResult<NSNumber>. One of the properties of NSAsynchronousFetchResult<NSNumber> is finalResult: [ResultType]?. We’ll read the first item in this optional array and ensure that it is an instance of Int. This Int instance will be the count of the items that were essentially found in the database:
guardletresult=(trycontext.execute(request)as?NSAsynchronousFetchResult<NSNumber>)?.finalResult?.firstas?Intelse{return0}returnresult
We can then put all of this together, write all our objects to the database, and get the count of those objects back and print it to the console:
do{trywriteManyPersonObjectsToDatabase(completion:{[weakself]inguardletstrongSelf=selfelse{return}do{letcount=trystrongSelf.countOfPersonObjectsWritten()(count)}catch{("Could not count the objects in the database")}})}catch{("Could not write the data")}
See Also
Get iOS 10 Swift Programming Cookbook now with the O’Reilly learning platform.
O’Reilly members experience books, live events, courses curated by job role, and more from O’Reilly and nearly 200 top publishers.

