Sure, you’ve seen the concept of the iPad before. It’s a popular prop in futuristic science-fiction shows like Star Trek: The Next Generation: a flat slab of a computer, wirelessly connected to a network that instantly pulls down any information you need, right then and there. (In fact, in the Star Trek universe, this device was called a PADD, short for Personal Access Display Device.)
But one thing those movie and TV gadgets never seemed to have is a manual so you could find out things like, say, how to turn down the sound when someone asks a question during your game of Bejeweled 2, or how to get back to the screen where your photos live.
Here on 21st-century Earth, these things may not be obvious for new iPad owners, but that’s where this book—and, in particular, this chapter—comes in. In this chapter, you’ll learn how to navigate your iPad so you can find the programs you want, jack it into your computer to load movies and photos, and make sure you get it charged up for a full day of fun.
The science fiction is no longer fiction; the future is now.
Think of the iPod, the iMac, and the iPhone. In addition to making products that start with “i,” Apple loves to make sleek devices that have a minimum of buttons to disrupt their smooth skin. The iPad is no exception.
Run your finger along the iPad’s top edge and you’ll find a small black button on the right (circled). It’s got a long name: On/Off, Sleep/Wake.

Here are all the things this button does:
It turns the iPad off and on. To turn the iPad totally off, so it gobbles no power at all, press and hold this button for a few a seconds. If you’re not going to use your ‘Pad for a few days, this is the way to conserve as much battery life as possible.
When you do go for the total shutdown, the iPad presents you with an on-screen arrow to confirm your request. Touch the arrow with your finger and slide it along the screen from left to right.
To turn the iPad back on, press the button again for a second or two. After a minute or so of boot-up gyrations, you’re back in business.
It puts the iPad to sleep and wakes it up. To save its strength, the iPad turns off its screen and slips into Sleep (standby) mode when you tap the button. Press the button quickly to wake it up from its power nap. (If you leave your ‘Pad untended for more than a minute or so, it goes to sleep then, too. To change its nod-off settings, see General.

Whenever you turn on the iPad or wake it up from its electronic slumber, you end up on a locked Home screen. To get to the iPad’s goodies, swipe your finger along the slider in the direction of the Unlock arrow. Why is the Home screen always locking itself? Because on a touchscreen device, one unintended tap when the ‘Pad’s in your backpack or pocketbook can turn on a program without you knowing it, and poof, there goes that battery charge.

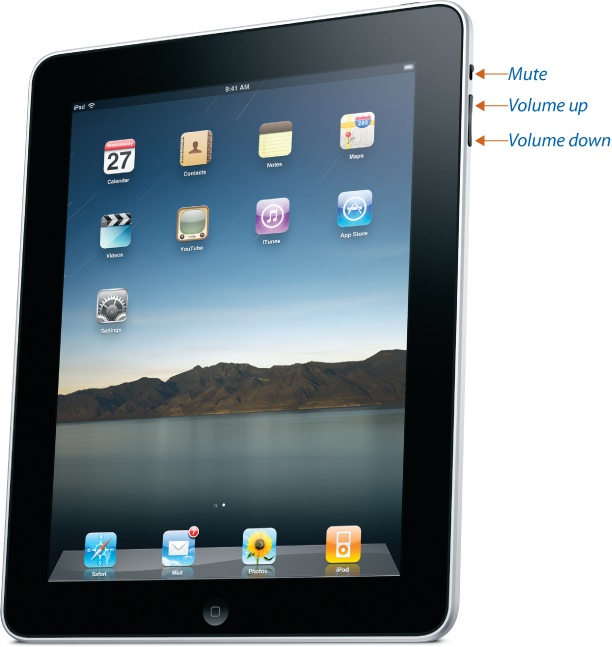
The buttons on the right edge of the iPad control the audio for movies, music, and other apps that make noise.
Here they are, from top to bottom:
Mute. Need to turn off the audio immediately? Flip the Mute button down so that the orange dot shows. Slide the button up to restore your sound.
Volume. Press the top half of this rocker-style switch to increase the volume through the iPad’s speaker or the earbuds you may be wearing (see General). Press the bottom half of the switch to lower the volume. The iPad displays a little volume graphic onscreen so you can see where you are on the Relative Scale of Loudness.
The iPad’s original software used the Mute switch to lock the screen in either the vertical or horizontal orientation. Now you lock the screen by double-clicking the Home button, swiping right-to-left in the panel of apps that appears, and tapping the Screen Orientation Lock icon (
 ).
).

While the iPad’s innards are full of state-of-the-art hardware, the outside isn’t very complex at all—just four buttons (On/Off-Sleep/Wake, Volume, Mute, and, discussed on Find the Home Button, the Home button). The outside of the iPad sports two jacks where you plug in cords. Here’s what you do with ‘em.
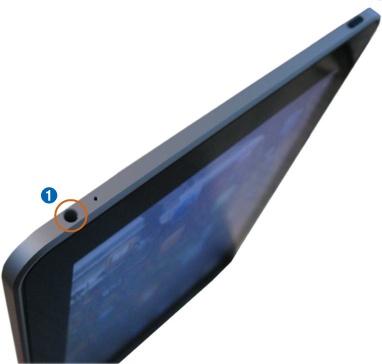
Headphone Jack. Although it doesn’t come with its own headphones, as iPods and iPhones do, the iPad does offer a headphone jack on its top-left edge. You can plug in any pair of earbuds or headphones that come with the standard 3.5-millimeter stereo miniplug. Add Earbuds and Earphones has more on that.
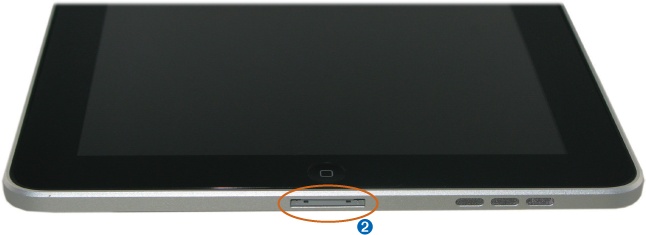
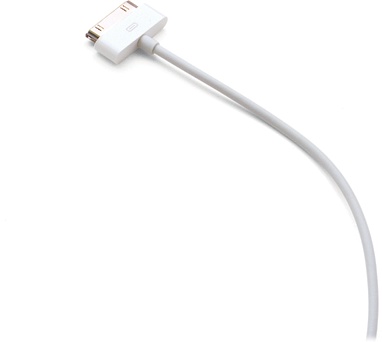
Dock Connector. The flat port on the iPad’s bottom edge is called the Dock Connector. You plug the provided USB cable in here to connect your iPad to your computer for battery-charging, as well as for music, iBook, and video fill-ups from your iTunes library. This thin port has been a fixture on iPods since 2003, which means that certain accessories, like stereo-audio docks meant for an iPod, may work for the iPad just fine—but check the tech specs before you buy anything new. The Dock Connector snaps right into the tablet’s optional external keyboard, too.
Note
You may notice two other features on the iPad’s outer edges (no, sadly, neither’s a USB port or an SD card slot). The small hole near the headphone jack is the iPad’s microphone for Voice Memos and other "listening” apps. And behind that trio of mesh-covered holes near the Dock Connector hides the iPad’s external speaker.
Want to use your iPad for private listening? Back in the old days, the only headphones you could get came with a cord attached, and those still work just fine. But if you want to free yourself from wires while you lay back, relax, and listen to a Bach cello suite, get a pair of stereo Bluetooth headphones that connect wirelessly to the Bluetooth chip inside the iPad. Your only entanglement then will be mind with music.
Here’s how you get either type of headphone to work on the iPad:
Wired. Pretty much any pair of headphones or earbuds with the ubiquitous 3.5mm stereo plug fits the iPad’s headphone jack. (Why, yes, you can use the familiar white earbuds from your iPod if you want.) Just be sure to push the plug firmly into the headphone jack so it fully connects.
Bluetooth. When you shop for stereo Bluetooth headphones, look for those advertised as A2DP; they’re designed to play back music in stereo. To get them to work, you need to pair the headphones with your iPad. (Pairing means introducing two Bluetooth devices so they can communicate with each other; you only have to do this the first time you use the two devices together.)
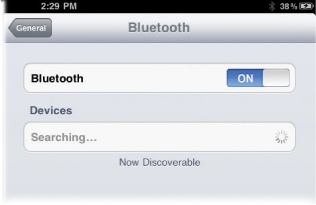
The ‘phone manual tells you which button to push on the headphones to pair the two. As for the iPad, start on the Home screen and tap Settings→General→Bluetooth. Turn Bluetooth on. The iPad looks around and once it finds the ‘phones, it lists them by name. If the headphones require a passkey (listed in the manual), the iPad keyboard appears so you can type in the digits. Once paired, the iPad screen says Connected next to the headphones icon and the sound now plays over your wireless connection.

There’s only one button on the front of the iPad: the Home button. This round, gently indented switch sits in the bottom-center of the iPad’s black picture frame (known as the bezel in geek-speak). This is the button you’ll probably use most often in your iPad adventures.
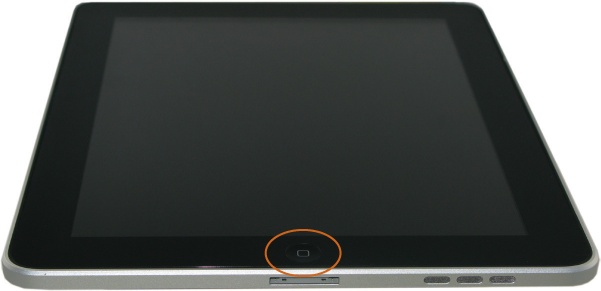
Pressing the Home button does a few things. For one, it always takes you Home—back to the iPad’s main screen, where you can get to all your program icons. Since the iPad lets you run only one application at a time, you use the Home button to switch programs, too. You could be waist-deep in a Keynote presentation (see Create Presentations in Keynote) and want to take a break with an episode of Glee. Just press the Home button to close Keynote (and automatically save your file, by the way) and go back to the main iPad screen, then tap open your Videos icon to get to your shows.
The Home button is also your ticket to switching among active apps, also known as multitasking. This means you can work in one app and switch easily to another without having to close the first app or take an interim trip through the Home screen. Just double-click the Home button to see a panel of apps appear at the bottom of the screen.
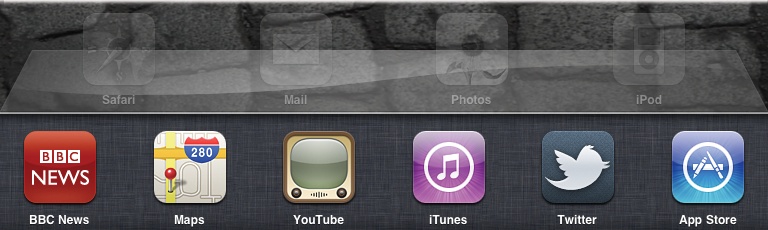
After you open the app panel, flick your finger along the icons
and tap open a second app to switch to it. When you flick as far as you
can from left to right in the panel, you see the Screen Orientation Lock
icon, plus icons for adjusting the screen brightness and iPod playback
controls. You can force-quit a misbehaving app (like one that hangs up
when you switch back to it) from the app panel, too. Just press and hold
the app icon until the ![]() icon appears, and then tap that icon to close the
app.
icon appears, and then tap that icon to close the
app.
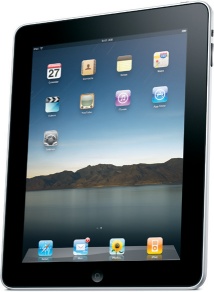
Even before you add a single app to the iPad, it comes with a whole bunch of programs ready to use. These include personal-organization tools like Calendar, Contacts, and Notes, a Maps app so you can find your way around, YouTube to catch up on the latest in online videos, and a Videos program to play movies you sock away on the iPad itself.
The iTunes and App Store icons take you to Apple’s online stores, while the Settings icon lets you adjust the way the iPad and its programs behave. Along the bottom of the screen, you’ll find icons for Safari (the iPad’s web browser), Mail, Photos, and iPod—the latter’s where all your iTunes music hangs out. Don’t worry, you’ll learn about all these apps and icons in Chapter 6.
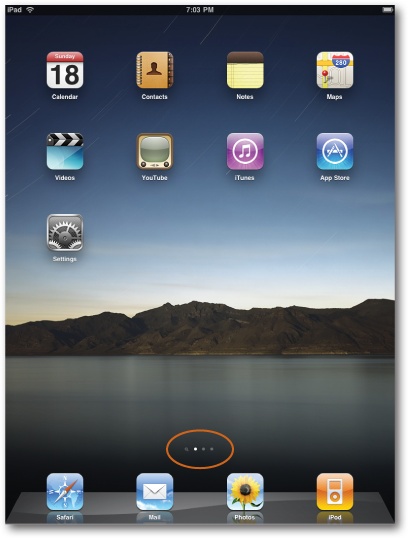
Once you start adding programs to the iPad, you may find your Home screen getting a little crowded. Fortunately, the iPad lets you have more than one Home screen—in fact, you can have 11 of ‘em.
To navigate among them, flick your finger across the iPad’s surface. The small white dots at the bottom of the screen (circled) show you how many Home screens you have and which one you’re on.
Want to rearrange your icons? Press and hold any icon for a few seconds until all the icons start wiggling and jiggling. Use your finger to drag them around to new locations—or off the edge of one screen and onto the next. Press the Home button to stop the Dance of the Icons.
If you filled all your Home screens with apps, you can regain some of that real estate by storing related apps (or any apps, for that matter) in folders, the electronic equivalent of a filing system. Get the app icons wiggling as described above, and drag one icon onto another to automatically create a folder. Type in a name for the folder (like “Games”) and drag more apps into it—up to 20 of ’em. To delete a folder, drag all the apps out of it.
To copy the music, videos, photos, and other stuff from your Windows PC or Mac over to your iPad, you need to install Apple’s iTunes multimedia, multifunction jukebox program on your computer (you’ll set up iTunes on your iPad in just a sec). With iTunes, you also get Apple’s QuickTime software—a video helper for iTunes. Don’t worry, it’s all free and just a web download away:
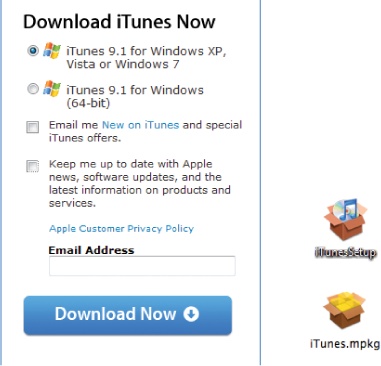
Fire up your computer’s web browser and point it to www.itunes.com/downloads.
Click the “Download Now” button. (Turn off the “Email me…” and “Keep me up to date…” checkboxes to spare yourself future marketing missives.) Wait for the file to download.
When the file lands on your hard drive, double-click the iTunesSetup.exe file. If you use a Mac, double-click the iTunes.dmg file and then open the iTunes.mpkg file to start the installation. If your Mac’s younger than six years old, you probably already have iTunes installed. Go to
 Menu→Software Update and ask your Mac to see
if there’s a newer version of iTunes, just in case.
Menu→Software Update and ask your Mac to see
if there’s a newer version of iTunes, just in case.Follow the screens until the software installer says it’s done.
You may need to restart your computer after you install iTunes. Once that’s done, you’re ready to connect your new iPad to your computer.
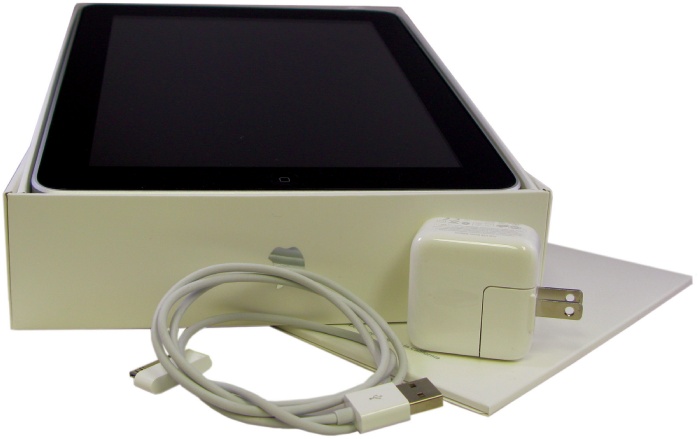
Odds are you had that iPad out of its box about five seconds after you got it. Yeah, you’ve been running your hands over its smooth edges, turning it on and tapping your way around the screen. In addition to that sleek tablet, you’ll find the following in the box:
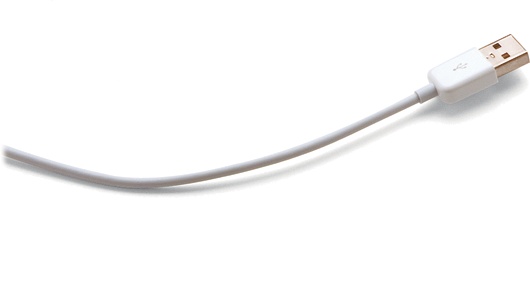
What you want right now is the USB cable. Connect the small, narrow end to your computer’s USB port and the wide, flat end to the iPad. The first time you connect your iPad to a computer, the iTunes Setup Assistant walks you through a few steps to get your iPad ready to go.
Note
While the iPad connects to your computer with its USB/Dock Connector cable, it lacks a USB port of its own, which would let you connect your iPad to other devices, like, oh, say, a printer. When Apple previewed iOS 4.2, it promised so-called AirPrint technology that would make wireless printing from the iPad a reality. Alas, the promise fell short when the update arrived. True, you can print wirelessly from your iPad—but only if you have an HP printer, and specifically a certain model of HP printer, like the Photosmart Plus e-AIO (D110) or the LaserJet Pro CP1525n. To see a full list of compatible printers and get instructions for using AirPrint with apps like Safari, Mail, and iWork, visit Apple’s support page at http://tinyurl.com/25tz3su. And hopefully, more printing options will arrive in future iOS updates.
The first time you plug in your new iPad (after you install iTunes, of course), the Setup Assistant leaps into action, asking you to name your iPad, and if you’d like to sync all the photos, videos, and other content on your computer to the tablet. If you use iTunes already to manage an iPod or iPhone, odds are you already have a healthy media library on your computer.
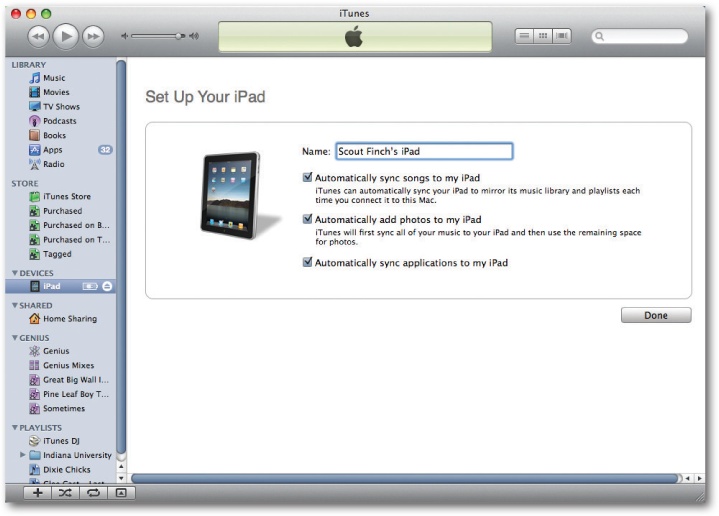
Depending on the size of your iPad’s drive, you may be able to fit all your stuff on it—or maybe not, if you have more than 16, 32, or 64 gigabytes of digital treasures on your computer. If you have less than that and want to take it all with you, just click the Finish button in the Setup box. iTunes loads a copy of everything in its library that fits onto your iPad.
During this process, the Setup Assistant lets you turn on the iPad’s VoiceOver feature, which is part of Apple’s accessibility software for its products, described at www.apple.com/accessibility/voiceover. VoiceOver is a screen reader for the visually impaired that announces menu names and titles out loud. It basically narrates what’s on the iPad screen, speaks up when you get new messages, and describes whatever icon you touch. (If you want to try the feature later, choose Settings→General→ Accessibility→VoiceOver→On.)
When it comes time to disconnect your iPad from the computer, you don’t really have to do anything special: Just unplug the cable and take off, iPad in hand. The only time you don’t want to unplug the cable is when the iPad screen says Sync in Progress. This means the iPad and computer are exchanging data and if you disconnect the USB cable, one of those devices is not going to get all the files you’re trying to copy between the two.
Now, the simplicity of this disconnection process may sound scary to longtime iPod owners who remember ominous error messages and sometimes scrambled iPods if they pulled the plug. If you want to go old-school with an Eject button, iTunes gives you a couple of options:
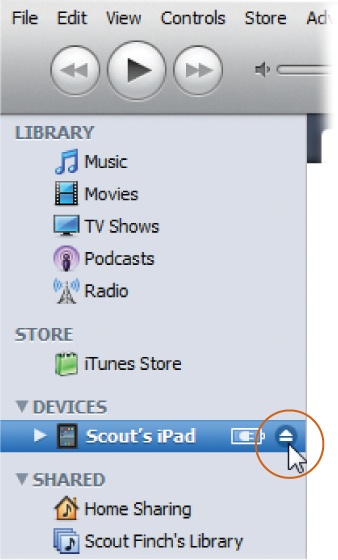
Now you can unplug your iPad without fear.
iTunes not only lets you decide which songs, books, and videos end up on your iPad, it also helps you keep your iPad’s internal software up to date, shows you how much space you have left on your tablet, and lets you change your music, video, and podcast synchronization options.
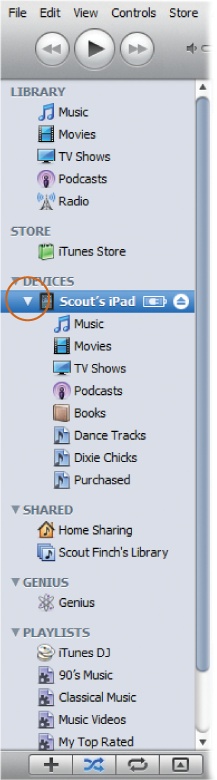
When you connect your ‘Pad to your computer, it shows up in the iTunes Source list (in the Devices area), Click the iPad icon to see your options, represented by a series of tabs at the top of the screen. Each tab lets you control a different kind of content, like music, photos, or games.
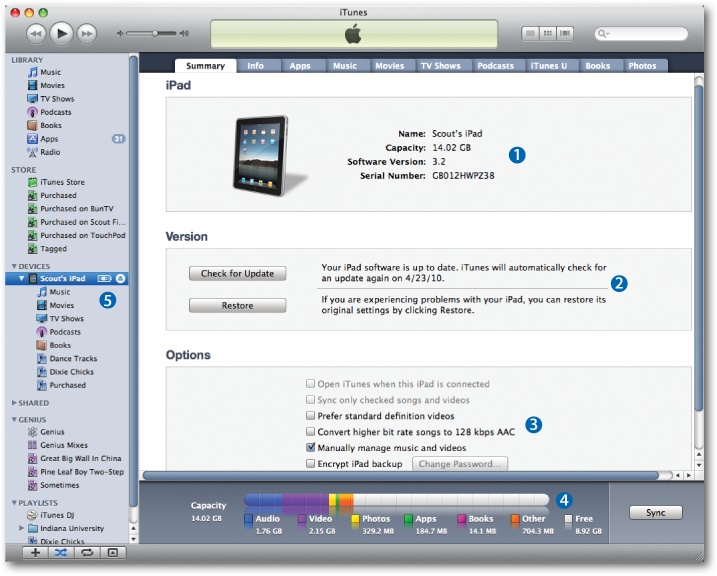
Here, on the Summary screen, iTunes tells you:
The size of your iPad’s storage space and its serial number.
Whether your ‘Pad has the latest software on it (and if you’re having problems with your iPad, you get the chance to reinstall the software).
Whether you set iTunes to automatically synchronize with your iPad or whether you need to update its contents manually. (Automatic means everything in iTunes ends up on your iPad—space permitting, of course; manual means you get to pick and choose what gets transferred.)
The different media types filling up your iPad. This info comes in the form of a bar at the bottom of the screen. iTunes color-codes your media types (blue for Audio, yellow for Photos, and so on) and shows you how much space each takes up using the appropriate color in the bar. For even more detail, click the bar to see your media stats in terms of number of items, the amount of drive space they use, or the number of days’ worth of a particular type of media you have.
Your iPad’s contents and playlists. Click the flippy triangle next to the iPad (circled right).
So that’s what you can learn about your iPad and its contents from looking at iTunes. Later in this book, you’ll learn how to transfer different types of media to the iPad and how to use them on the tablet.
For example, Chapter 13 is all about playing your favorite music on the iPad, Chapter 14 covers syncing and playing videos, while Chapter 15 explains copying your photos from computer to iPad—which makes a great handheld picture frame to show off your shots.
To learn more about iTunes and how it works, take a trip to Chapter 11 for a detailed tour through the program. And if you want to explore the virtual shelves of the iTunes App Store so you can load up your iPad, skip to Chapter 7.
Note
After this book originally went to press, Apple updated the iTunes software. Most of the images in this book show the more colorful iTunes 9, but iTunes 10 works almost identically—the most noticeable difference is iTunes 10’s drab gray interface.
Many Apple devices ship with enough power to run them for a short while. But as you poke and prod your new gadget, that charge won’t last long, so you’ll want to get the iPad connected to a power source to refill its battery properly. You can charge your ‘Pad in one, or maybe two, ways:
Charge by AC adapter. Look! Another charger for your collection! Your iPad comes with a square little 10-watt AC adapter ready to keep your tablet charged. It has a USB port on one side, and a plug on the other. To boost your battery, plug the flat end of the iPad’s USB cable into the cube’s USB port. Then plug the cube’s pronged end into an electrical outlet. Hitch up the Dock Connector side of the USB cable to the bottom of your iPad and charge away. (Older, smaller adapters from iPhones and older iPods may work if you turn the iPad screen off to direct the full stream of juice to the iPad’s battery, but their low flow will likely charge the iPad much more slowly than its native adapter.)
Charge by computer. Unlike iPods and iPhones, charging the iPad over your computer’s USB port isn’t a sure thing anymore. While USB ports on some newer computers—like late-model iMacs—have enough juice, many older ones don’t. To see for sure, grab the USB cable and plug your iPad into your PC or Mac’s USB port. If you see a “Not Charging” message in the top corner of your iPad, you know your port is underpowered. (The USB port will probably “trickle charge” if the iPad screen is off, but very slowly.)


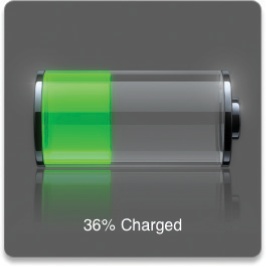
It takes only a few hours to fully gas up your iPad’s battery. When you plug it in, the iPad displays a translucent battery that fills up with green power. A smaller, black-and-white battery icon up in the iPad’s status bar displays a lightning bolt, along with a percentage of the battery’s current charge.
The iPad is fully charged when the battery icon in the menu bar shows 100%. Apple says a full battery charge lasts up to 10 hours for web browsing, videos, and listening to music. Your results may vary.
Apple posts various recommendations on its iPad website to ensure long battery life:
Don’t expose your iPad to extreme hot or cold temperatures—keep it between 32 and 95 degrees Fahrenheit. (In other words, don’t leave it in a hot, parked car, and don’t expect it to operate on Mt. Everest.)
Use your iPad regularly (not that you wouldn’t). And be sure to charge it at least once a month to keep that battery chemistry peppy.
Put the iPad to sleep to conserve power (press the Sleep/Wake button on top).
Take the iPad out of any heat-trapping cases before you charge it up.
Dim the screen when you don’t need it at total brightness (see Brightness & Wallpaper).
When you see the Low Battery icon or message, plug your iPad into an electrical outlet using the AC adapter. The iPad battery indicator shows roughly how much charge the battery has left.
Features like the music equalizer—or jumping around within your media library—can drain your battery faster, as can using big, uncompressed file formats, like AIFF (see Change Import Settings for Better Audio Quality). To cut back on the equalizer, see iPod.
That wireless chip inside the iPad saps power even if you’re not trawling the Web. Save energy by turning it off when you don’t need it; go to Settings→Wi-Fi and tap Off. Lower the frequency with which you check email or have data pushed to the iPad from the Internet to save some energy as well—make those adjustments at Settings→Mail, Contacts, Calendars. Bluetooth and Location Services also take their toll, and you can turn them off by visiting the Settings icon.
Like the iPhone and iPod Touch, the iPad’s glass touchscreen is the main way you communicate with the device. Each time you surf the Web or send some email, your fingers tap, slide, and flick across this smooth surface. Do this sort of thing on a normal piece of glass and you end up with a smudged and sticky window or mirror, gunked up from finger grease, moisturizer, and whatever else you may have on your hands.
Thanks to a special coating (explained in the Note on the opposite page), the iPad’s screen tries to repel fingerprints. But with enough use, even that has its limits; your screen begins to look like a small child who’s eating a glazed doughnut has been touching your iPad repeatedly — with both hands. If this happens, wipe the screen gently with a soft, lint-free cloth—the kind you use to clean a flat-panel TV screen, camera lens, or pair of glasses.
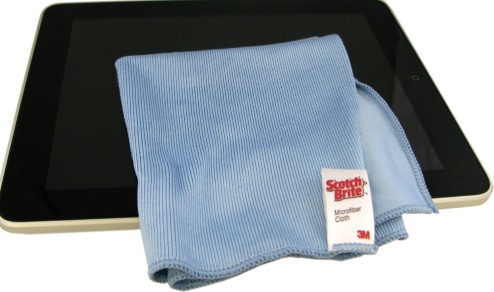
Whatever you do, don’t use products like Windex, Formula 409, stuff from spray cans, ammonia- or alcohol-based cleansers, solvents, or a scratchy cleaning pad. These types of cleaning products will only compromise the iPad’s special coating, and you don’t want that.
If the rest of the iPad gets schmutzed up, a quick cleaning session can return its shine. To buff it up, turn it off (Turn the iPad On and Off) and unplug it from any connected docks or USB cables. Then take a lightly water-dampened lint-free cloth and wipe down the iPad’s back and sides. Be careful not to slop water into openings like the headphone jack, Dock Connector port, or speaker grills. Then wipe your slab down with a dry lint-free cloth.
Tip
Smears and screen glare got you down? A thin sheet of plastic screen-protector film from your favorite accessory dealer could be your ticket to iPad happiness—and extra protection as well. For example, there’s Zagg’s $40 military-grade invisibleSHIELD at www.zagg.com.
The iPad screen is scratch-resistant, but it could break if you accidentally bounce the tablet off a concrete floor or have some other gravity-related mishap. If disaster strikes and you crack or chip the screen, don’t use the iPad or try to pry out the broken glass. Put it in a box or wrap it up to prevent glass shards from falling out, then take it to your nearest Apple Store or authorized Apple service provider for repair. Appendix B has more on iPad care and repair.
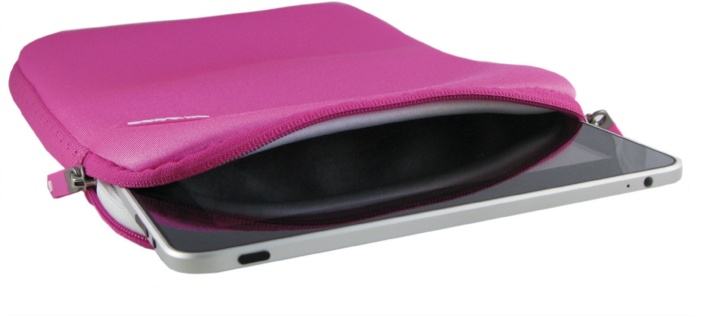
To protect your iPad as much as possible, both from accidental drops or even bouncing around in your shoulder bag alongside house keys, sunglass cases, and loose credit cards, consider a case for it. Accessory makers have already come up with a huge selection of cases, from stately leather portfolio models to neon-colored rubber shells meant to jazz up your iPad while helping you keep a firm grip on the thing.
When considering a case, think about how you plan to carry and use the iPad. If it’s going to ride along in a backpack, a sturdy padded pouch may be more protective that a thin leather binder-type cover. Protect Your iPad has some tips on the type of cases available and where to buy them.
Note
Apple describes the iPad’s screen as having a “fingerprint-resistant oleophobic coating,” which makes it sound like the device has some sort of psychiatric condition or a fear of butter substitutes (known as oleomargarine back in the day). Not to worry! Oleo, from the Latin oleum, just means “oil” — like the natural oils from your fingertips when you slide them around the iPad’s glossy screen. The oleophobic coating is just a plastic polymer applied to the iPad’s glass that’s supposed to cut down on smeary pawprints.
Get iPad: The Missing Manual now with the O’Reilly learning platform.
O’Reilly members experience books, live events, courses curated by job role, and more from O’Reilly and nearly 200 top publishers.

