Chapter 4. Voicemail, Texting, & Other Phone Tricks
Once you’ve savored the exhilaration of making phone calls on the iPhone, you’re ready to graduate to some of its fancier tricks: voicemail, text messages, AT&T features like Caller ID and Call Forwarding, and a Bluetooth headset or car kit.
Visual Voicemail
On the iPhone, you don’t dial in to check for answering-machine messages people have left for you. You don’t enter a password. You don’t sit through some Ambien-addled recorded lady saying, “You have…17…messages. To hear your messages, press 1. When you have finished, you may hang up….”
Instead, whenever somebody leaves you a message, the phone wakes up, and a notice on the screen lets you know who the message is from. You also hear a sound, unless you’ve turned that option off in Settings or turned on the silencer switch (Three Presses: VoiceOver or White-on-Black).
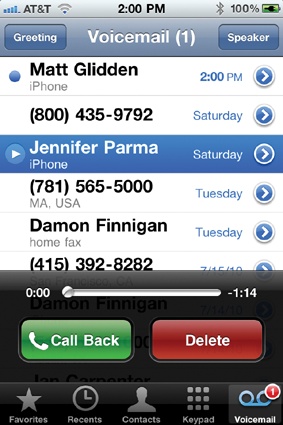
That’s your cue to tap Home→Phone→Voicemail. There you see all your messages in a tidy chronological list. (The list shows the callers’ names if they’re in your Contacts list; otherwise it shows their numbers.) You can listen to them in any order—you’re not forced to listen to three long-winded friends before discovering that there’s an urgent message from your boss. It’s a game-changer.
Setup
To access your voicemail, tap Phone on the Home screen, and then tap Voicemail on the Phone screen.
The very first time you visit this screen, the iPhone prompts you to make up a numeric password for your voicemail account—don’t worry, you’ll never have to enter it again—and to record a “Leave me a message” greeting.
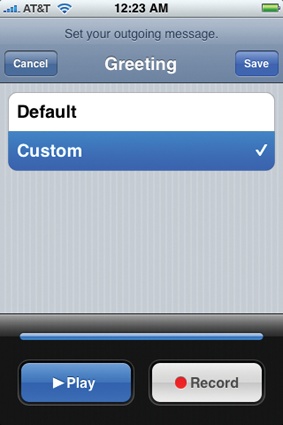
You have two options for the outgoing greeting.
Default. If you’re microphone-shy, or if you’re famous and you don’t want stalkers and fans calling just to hear your famous voice, then use this option. It’s a prerecorded, somewhat uptight female voice that says, “Your call has been forwarded to an automatic voice message system. 212-661-7837 is not available.” Beep!
Custom. This option lets you record your own voice saying, for example, “You’ve reached my iPhone. You may begin drooling at the tone.” Tap Record, hold the iPhone to your head, say your line, and then tap Stop.
Check how it sounds by tapping Play.
Using Visual Voicemail
In the voicemail list, a blue dot ![]() indicates a message you haven’t yet played.
indicates a message you haven’t yet played.
Tip
You can work through your messages even when you’re out of AT&T cellular range—on a plane, for example—because the recordings are stored on the iPhone itself.
There are only two tricky things to learn about Visual Voicemail:
Tap a message’s name twice to play it. That’s a deviation from the usual iPhone Way, where just one tap does the trick. In Visual Voicemail, tapping a message just selects it and activates the Call Back and Delete buttons at the bottom of the screen. You have to tap twice to start playback.
Turn on Speaker Phone first. As the name Visual Voicemail suggests, you’re looking at your voicemail list—which means you’re not holding the phone up to your head. The first time people try using Visual Voicemail, therefore, they generally hear nothing!
That’s a good argument for hitting the Speaker button before tapping messages that you want to play back. That way, you can hear the playback and continue looking over the list. (Of course, if privacy is an issue, you can also double-tap a message and then quickly whip the phone up to your ear.)
Note
If you’re listening through the earbuds or a Bluetooth earpiece or car kit, of course, you hear the message playing back through that. If you really want to listen through the iPhone’s speaker instead, tap Audio, and then Speaker Phone. (You switch back the same way.)
Everything else about Visual Voicemail is straightforward. The buttons do exactly what they say:
Delete. The Voicemail list scrolls with a flick of your finger, but you still might want to keep the list manageable by deleting old messages. To do that, tap a message and then tap Delete. The message disappears instantly. (You’re not asked to confirm.)
Tip
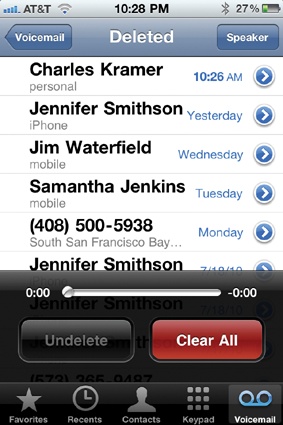
The iPhone hangs on to old messages for 30 days—even ones you’ve deleted. To listen to deleted messages that are still on the phone, scroll to the bottom of the list and tap Deleted Messages.
On the Deleted screen, you can Undelete a message that you actually don’t want to lose yet (that is, move it back to the Voicemail screen) or tap Clear All to erase these messages for good.
Call Back. Tap a message and then tap Call Back to return the call. Very cool—you never even encounter the person’s phone number.
Rewind, Fast Forward. Drag the little white ball in the scroll bar (beneath the list) to skip backward or forward in the message. It’s a great way to replay something you didn’t catch the first time.
Greeting. Tap this button (upper-left corner) to record your voicemail greeting.
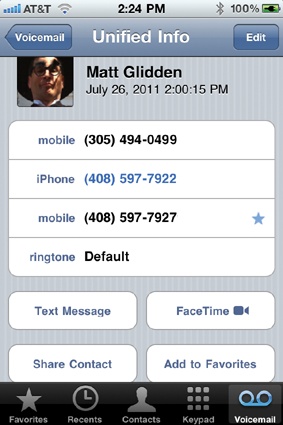
Call Details. Tap the
 button to open the Info screen for the message that was left
for you. Here you’ll find out the date and time of the message.
button to open the Info screen for the message that was left
for you. Here you’ll find out the date and time of the message.If it was left by somebody who’s in your Contacts list, you can see which of that person’s phone numbers the call came from (indicated in blue type), plus a blue
 if that number is in your Favorites list. Oh, and you can add
this person to your Favorites list at this point by tapping Add to Favorites.
if that number is in your Favorites list. Oh, and you can add
this person to your Favorites list at this point by tapping Add to Favorites.If the caller’s number isn’t in Contacts, then you’re shown the city and state where that person’s phone is registered. And you’ll be offered a Create New Contact button and an Add to Existing Contact button, so you can store it for future reference.
In both cases, you also have the option to return the call (right from the Info screen) or fire off a text message.
Dialing in for Messages
Gross and pre-iPhonish though it may sound, you can also dial in for your messages from another phone. (Hey, it could happen.)
To do that, dial your iPhone’s number. Wait for the voicemail system to answer.
As your own voicemail greeting plays, dial *, your voicemail password, and then #. You hear the Uptight AT&T Lady announce the first “skipped” message (actually the first unplayed message), and then she’ll start playing them for you.
After you hear each message, she’ll offer you the following options (but you don’t have to wait for her to announce them):
To delete the message, press 7.
To save it, press 9.
To replay it, press 4.
To hear the date, time, and number the message came from, press 5. (You don’t hear the lady give you these last two options until you press “zero for more options”—but they work anytime you press them.)
Tip
If this whole Visual Voicemail thing freaks you out, you can also dial in for messages the old-fashioned way, right from the iPhone. Open the keypad and hold down the 1 key, just as though it’s a speed-dial key on any normal phone.
After a moment, the phone connects to AT&T; you’re asked for your password, and then the messages begin to play back, just as described above.
Text Messages (SMS)
“Texting,” as the young whippersnappers call it, was huge in Asia and Europe before it began catching on in the United States. These days, however, it’s increasingly popular, especially among teenagers and twentysomethings.
SMS stands for Short Messaging Service. An SMS text message is a very short note (under 160 characters—a sentence or two) that you shoot from one cellphone to another. What’s so great about it?
Like a phone call, it’s immediate. You get the message off your chest right now.
As with email, the recipient doesn’t have to answer immediately. The message waits for him even when his phone is turned off.
Unlike a phone call, it’s nondisruptive. You can send someone a text message without worrying that he’s in a movie, a meeting, or anywhere else where talking and holding a phone up to the head would be frowned upon. (And the other person can answer nondisruptively, too, by sending a text message back.)
You have a written record of the exchange. There’s no mistaking what the person meant. (Well, at least not because of sound quality. Whether or not you can understand the texting shorthand culture that’s evolved from people using no-keyboard cellphones to type English words—“C U 2mrO,” and so on—is another matter entirely.)
The basic iPhone plans don’t come with any text messages. You can pay $5 a month for 200 messages, or pay more for more. Remember that you use up one of those 200 each time you send or receive a message.
And by the way, picture and video messages (known as MMS, or multimedia messaging service) count as regular text messages.
Receiving a Text Message
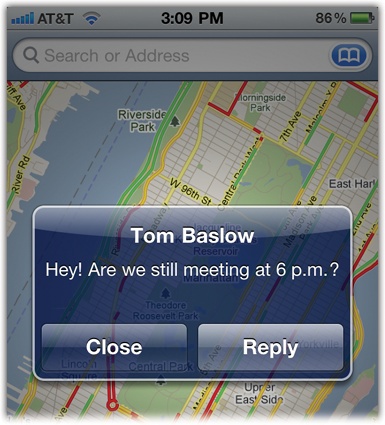
When you get an SMS, the iPhone plays a quick marimba riff and displays the name or number of the sender and the message, in a translucent message rectangle. If you’re using the iPhone at the time, you can tap Close (to keep doing what you were doing) or Reply (to open the message).
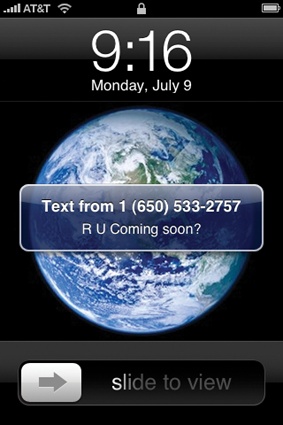
Otherwise, if the iPhone was asleep, it wakes up and displays the message right on its Unlock screen (below, left). You have to unlock the phone and then open the Messages program manually. Tap the very first icon in the upper-left corner of the Home screen.
Tip
The Messages icon on the Home screen bears a little circled number “badge,” letting you know how many new text messages are waiting for you.

Either way, the look of Messages might surprise you. It resembles iChat, Apple’s chat program for Mac, in which incoming text messages and your replies are displayed as though they’re cartoon speech balloons (above, right).
Tip
The last 50 exchanges appear here. If you want to see even older ones, scroll to the very top and tap Load Earlier Messages.
To respond to the message, tap in the text box at the bottom of the screen. The iPhone keyboard appears. Type away, and then tap Send. Assuming your phone has cellular coverage, the message gets sent off immediately.
Tip
Links that people send you in text messages actually work. For example, if someone sends you a Web address, tap it with your finger to open it in Safari. If someone sends a street address, tap it to open it in Google Maps. And if someone sends a phone number, tap it to dial.
And if your buddy replies, then the balloon-chat continues, scrolling up the screen. Don’t forget to turn the iPhone 90 degrees for a bigger, wider keyboard!
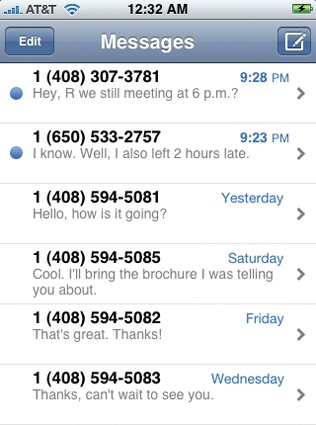
The Text List
What’s cool is that the iPhone retains all these exchanges. You can review them or resume them at any time by tapping Messages on the Home screen. A list of text message conversations appears; a blue dot indicates conversations that contain new messages.
Tip
If you’ve sent a message to a certain group of people, you can pre-address a new note to the same group by tapping the old message’s row here.
The truth is, these listings represent people, not conversations. For example, if you had a text message exchange with Chris last week, a quick way to send a new text message (on a totally different subject) to Chris is to open that “conversation” and simply send a “reply.” The iPhone saves you the administrative work of creating a new message, choosing a recipient, and so on.
Tip
Hey, you can search text messages now! At the very top of the list, there’s a Search box. You can actually find text inside your message collection.
If having these old exchanges hanging around presents a security (or marital) risk, you can delete one in either of two ways:
From the Text Messages list:Swipe away the conversation. Just swipe your finger horizontally across the conversation’s name (either direction). That makes the Delete confirmation button appear immediately.
From within a conversation’s speech-balloons screen: Tap Edit to open the message-deletion screen. Here you can delete all the exchanges simultaneously (tap Clear All) or vaporize only particularly incriminating messages. To do that, tap the round
 buttons for the individual balloons you want to nuke; then tap
Delete (2) (or whatever number the button says). Tap Done.
buttons for the individual balloons you want to nuke; then tap
Delete (2) (or whatever number the button says). Tap Done.

Sending a New Message
If you want to text somebody you’ve texted before, the quickest way, as noted above, is simply to resume one of the “conversations” already listed in the Text Messages list.
But options to fire off text messages lurk all over the iPhone. A few examples:
In the Messages program. From the Home screen, tap Messages. The iPhone opens the list of messages you’ve received. Tap the
 button at the top-right corner to open a new text message
window.
button at the top-right corner to open a new text message
window.Address it by typing a few letters of the recipient’s name and then choosing from the list of matches. Or tap the
 button, which opens your Contacts list. Tap the person you want
to text.
button, which opens your Contacts list. Tap the person you want
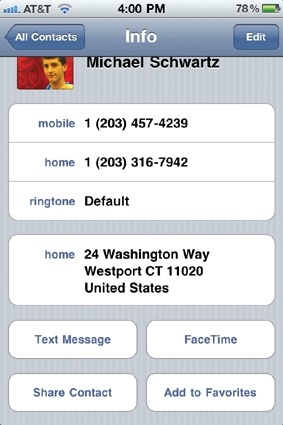
to text.In the Contacts, Recents, or Favorites lists. Tap a person’s name in Contacts, or
next to a listing in Recents or Favorites, to open the Info
screen; tap Text Message. In other words, sending a text message to anyone whose cellphone number lives in your
iPhone is only two taps away.From Photos or Voice Memos. Whenever you see a
 (Share) button—when you’re looking at a photo or a video in
Photos, for example, or when you tap the
(Share) button—when you’re looking at a photo or a video in
Photos, for example, or when you tap the  button in Voice Memos—the usual list of sending options
appears. It usually includes Email, MobileMe—and MMS. Tapping MMS sends you back to Messages, where the photo, video, or audio file is ready to send. (More
on multimedia messages shortly.)
button in Voice Memos—the usual list of sending options
appears. It usually includes Email, MobileMe—and MMS. Tapping MMS sends you back to Messages, where the photo, video, or audio file is ready to send. (More
on multimedia messages shortly.)
You can now tap that ![]() button again to add another recipient for this
same message (or tap the
button again to add another recipient for this
same message (or tap the ![]() button to type in a phone number). Lather, rinse, repeat as
necessary; they’ll all get the same message.
button to type in a phone number). Lather, rinse, repeat as
necessary; they’ll all get the same message.
In any case, the skinny little text message composition screen is waiting for you now. You’re ready to type and send!
New Options in iOS 4
You might not think that an act as simple as sending a text message would come with a bunch of options, but you’d be wrong. If you tap Settings→Messages, you’ll stumble upon two new text-messaging options in iOS 4:
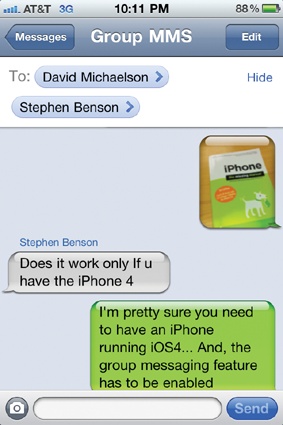
Group Messaging. Suppose you’re sending a message to three friends named A, B, and C (they had very unimaginative parents). When they reply to your message, the responses will appear in a Messages thread that’s dedicated to this particular group (facing page, left). It works only if all of you have turned on Group Messaging. (Note to the paranoid: It also means that everyone sees everyone else’s phone numbers.)
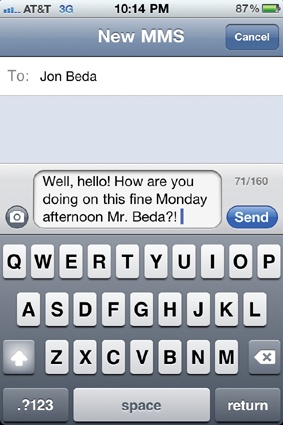
Character Count. If a message is longer than 160 characters, the iPhone breaks it up into multiple messages. That’s convenient, sure. But if your cellphone plan permits only a fixed number of messages a month, you could wind up sending (and spending) more than you intended.
The new Character Count feature can save you. When it’s on, after your typing wraps to a second line, a little counter appears just above the Send button (“71/160,” for example, as shown here at right). It tracks how many characters remain within your 160-character limit for one message.
Show Subject Field. If email messages can have Subject lines, why not text messages? Now, on certain newfangled phones (like yours), they can; the message arrives with a little dividing line between the subject and the body, offering your recipient a hint as to what it’s about.
Picture, Audio, or Video Messages
Man, we waited long enough for this. It was absolutely bizarre that, for all its other superpowers, the iPhone could not send photos to other cellphones, let alone audio clips or video clips. This feature—called MMS (multimedia messaging service) was on every cellphone on earth, even the $20 starter phones. But not on the iPhone.
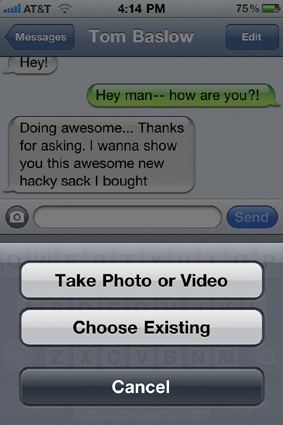
Fortunately, MMS is here now. To send a photo or (on the iPhone 3GS or iPhone 4) a
video, tap the ![]() icon next to the box where you type your text messages (shown on
the next page at right). Two buttons appear: Take Photo or Video or Choose
Existing.
icon next to the box where you type your text messages (shown on
the next page at right). Two buttons appear: Take Photo or Video or Choose
Existing.
(On the iPhone 3G, the first button says Take Photo instead.)
If you want to transmit a photo or video that’s already on your phone, then tap Choose Existing; your Photos app opens automatically, showing all your photos and videos. Tap the one you want and then tap Choose. If you choose Take Photo or Video instead, then your Camera app opens so you can take a new picture or snag a video clip.
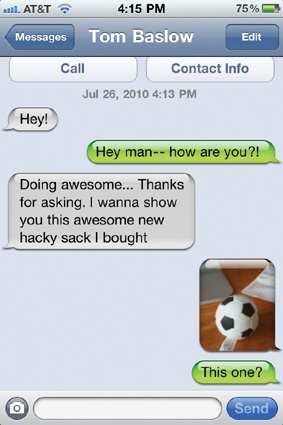
In any case, you now return to your SMS conversation in progress—but now that photo or video appears inside the Send box. Type a caption or comment, if you like. Then tap Send to fire it off to your buddy.
Capturing Text-Message Goodies
In general, text messages are fleeting; most people have no idea how they might capture them and save them forever. Copy and Paste helps with that. (So does the amazing Google Voice service, but that’s another conversation.)
Some of the stuff in those text messages is easy to capture,
though. For example, if you’re on the receiving end of an MMS photo or video, tap the small preview in the speech bubble. It opens at
full-screen size so you can have a better look at it—and if it’s a video, there’s even a
![]() button so you can play it. Either way, if the picture or video is
good enough to preserve, tap the
button so you can play it. Either way, if the picture or video is
good enough to preserve, tap the ![]() button. You’re offered a Save Image or Save Video button; tap to
add the photo or video to your iPhone’s collection.
button. You’re offered a Save Image or Save Video button; tap to
add the photo or video to your iPhone’s collection.
If someone sends you contact information (name and address, for example), you can add it to your Address Book. Just tap inside that bubble, and then tap either Create New Contact or Add to Existing Contact.
Free Text Messaging
Text messaging is awesome. Paying for text messaging, not so much.
Fortunately, there are all kinds of sneaky ways to do text messaging for free. Yes, you read that right: free. Here are a couple of examples:
Solution #1: TextFree Unlimited. It’s an app from the App Store that gives your iPhone its own phone number just for free text or picture messages, so you can send and receive all you want without paying a cent.
Solution #2: Sign up for a free Google Voice account. It has a million great features. But one of the best is that it lets you send and receive free text messages. You can do that from your computer (an amazingly useful feature, actually) at voice.google.com, or using the pseudo-app for your iPhone (in Safari, visit m.google.com/voice to see it).
Chat Programs
The iPhone doesn’t come with any chat programs, like AIM (AOL Instant Messenger), Yahoo Messenger, or MSN Messenger. But installing one yourself—like AIM, below—is simple, as described in Chapter 7.

If you’re a hard-core chatter, though, what you really want is an all-in-one app like IM+ or Beejive IM. You get a single app that can conduct chats with people on just about every chat network known to man: GTalk, Yahoo, MSN/Live Messenger, AIM, iChat, ICQ, MySpace, Twitter, Facebook, Jabber, and Skype.
Call Waiting
Call waiting has been around for years. With a call-waiting feature, when you’re on one phone call, you hear a beep indicating that someone else is calling in. You can tap the Flash key on your phone—if you know which one it is—to answer the second call while you put the first one on hold.
Some people don’t use call waiting because it’s rude to both callers. Others don’t use it because they have no idea what the Flash key is.
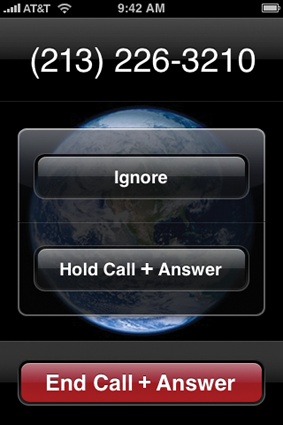
On the iPhone, when a second call comes in, the phone rings (and/or vibrates) as usual, and the screen displays the name or number of the caller, just as it always does. Buttons on the screen offer you three choices:
Ignore. The incoming call goes straight to voicemail. Your first caller has no idea that anything’s happened.
Hold Call + Answer. This button gives you the traditional call-waiting effect. You say, “Can you hold on a sec? I’ve got another call,” to the first caller. The iPhone puts her on hold, and you connect to the second caller.
At this point, you can jump back and forth between the two calls, or you can merge them into a conference call, just as described on Add Call (Conference Calling).
End Call + Answer. Tapping this button hangs up on the first call and takes the second one.
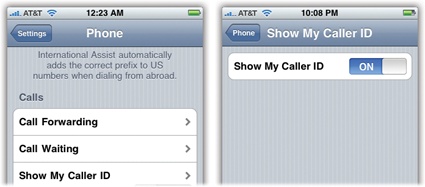
If call waiting seems a bit disruptive all the way around, you can turn it off (the switch is in Settings→Phone→Call Waiting). When call waiting is turned off, incoming calls go straight to voicemail when you’re on the phone.
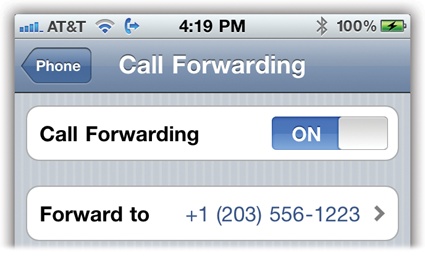
Call Forwarding
Here’s a pretty cool feature you may not have even known you had. It lets you route all calls made to your iPhone number to a different number. How is this useful? Let us count the ways:
When you’re home. You can have your cellphone’s calls ring your home number so you can use any extension in the house, and so you don’t miss any calls while the iPhone is turned off or charging.
When you send your iPhone to Apple for battery replacement, you can forward the calls you would have missed to your home or work phone number.
When you’re overseas, you can forward the number to one of the Web-based services that answers your voicemail and sends it to you as an email attachment (like GrandCentral.com or CallWave.com).
When you’re going to be in a place with little or no AT&T cell coverage (Alaska, say), you can have your calls forwarded to your hotel or a friend’s cellphone. (Forwarded calls eat up your allotment of minutes, though.)
You have to turn on call forwarding while you’re still in an area with AT&T coverage. Start at the Home screen. Tap Settings→Phone→Call Forwarding, turn call forwarding on, and then tap in the new phone number. That’s all there is to it—your iPhone will no longer ring.
At least not until you turn the same switch off again.
Caller ID
Caller ID is another classic cellphone feature. It’s the one that displays the phone number of the incoming call (and sometimes the name of the caller).
The only thing worth noting about the iPhone’s own implementation of caller ID is that you can prevent your number from appearing when you call other people’s phones. From the Home screen, tap Settings→Phone→Show MyCaller ID, and then tap the On/Off switch.
Bluetooth Earpieces and Car Kits
The iPhone has more antennas than an ant colony: seven for the cellular networks, one for WiFi hot spots, one for GPS, and one for Bluetooth.
Bluetooth is a short-range wireless cable elimination technology. It’s designed to untether you from equipment that would ordinarily require a cord. Bluetooth crops up in computers (print from a laptop to a Bluetooth printer), in game consoles (like Sony’s wireless PlayStation controller), and above all, in cellphones.
There are all kinds of things Bluetooth can do in cellphones, like transmitting cameraphone photos to computers, wirelessly syncing your address book from a computer, or letting the phone in your pocket serve as a wireless Internet antenna for your laptop. But most people use the iPhone’s Bluetooth primarily for hands-free calling.
To be precise, it works with those tiny wireless Bluetooth earpieces, of the sort you see clipped to people’s ears, as well as with cars with Bluetooth phone systems. If your car has one of these “car kits” (Acura, Prius, and many other models include them), you hear the other person’s voice through your stereo speakers, and there’s a microphone built into your steering wheel or rearview mirror. You keep your hands on the wheel the whole time.
Note
This discussion covers monaural Bluetooth earpieces intended for phone calls. But the iPhone can also handle Bluetooth stereo headphones, intended for music. Details are on Bluetooth Stereo Headphones.
Pairing with a Bluetooth Earpiece
So far, Bluetooth hands-free systems have been embraced primarily just by the world’s geeks for one simple reason: It’s way too complicated to pair the earpiece (or car) with the phone.
So what’s pairing? That’s the system of “marrying” a phone to a Bluetooth earpiece, so that each works only with the other. If you didn’t do this pairing, then some other guy passing on the sidewalk might hear your conversation through his earpiece. And you probably wouldn’t like that.

The pairing process is different for every cellphone and every Bluetooth earpiece. Usually it involves a sequence like this:
On the earpiece, turn on Bluetooth. Make the earpiece discoverable. Discoverable just means that your phone can “see” it. You’ll have to consult the earpiece’s instructions to learn how to do so.
On the iPhone, tap Home→Settings→General→Bluetooth. Turn Bluetooth to On. The iPhone immediately begins searching for nearby Bluetooth equipment. If all goes well, you’ll see the name of your earpiece show up on the screen.
Tap the earpiece’s name. Type in the passcode, if necessary. The passcode is a number, usually four or six digits, that must be typed into the phone within about a minute. You have to enter this only once, during the initial pairing process. The idea is to prevent some evildoer sitting nearby in the airport waiting lounge, for example, to secretly pair his earpiece with your iPhone.
The user’s manual for your earpiece should tell you what the passcode is (if one is even required).
When you’re using a Bluetooth earpiece, you dial using the iPhone itself (unless you’re using voice dialing, of course). You generally use the iPhone’s own volume controls, too. You generally press a button on the earpiece itself to answer an incoming call, to swap call waiting calls, and to end a call.
If you’re having any problems making a particular earpiece work, Google it. Type “iPhone Motorola H800 earpiece,” for example. Chances are good that you’ll find a writeup by somebody who’s worked through the setup and made it work.
Car Kits
The iPhone works beautifully with Bluetooth car kits, too. The pairing procedure generally goes exactly as described above: You make the car discoverable, enter the passcode on the iPhone, and then make the connection.
Once you’re paired up, you can answer an incoming call by pressing a button on your steering wheel, for example. You make calls either from the iPhone or, in some cars, by dialing the number on the car’s own touchscreen.
Note
When Bluetooth is turned on but the earpiece isn’t, or when the earpiece isn’t
nearby, the ![]() icon appears in gray. And when it’s connected and working right,
the earpiece’s battery gauge appears on the iPhone’s status bar.
icon appears in gray. And when it’s connected and working right,
the earpiece’s battery gauge appears on the iPhone’s status bar.
Of course, studies show that it’s the act of driving while conversing that causes accidents—not actually holding a phone. So the hands-free system is less for safety than for convenience and compliance with state laws.
Custom Ringtones
The iPhone comes with 25 creative and intriguing ringing sounds, from an old car horn to a peppy marimba lick. Sounds shows you how to choose the one you want to hear when your phone rings. You can also buy ready-made pop-music ringtones from the wireless iTunes Store (The Wireless iTunes Store).
But where’s the fun in that? Surely you don’t want to walk around listening to the same ringtones as the millions of other iPhone owners.
Fortunately, you can also make up custom ring sounds, either to use as your main iPhone ring or to assign to individual callers in your Contacts list. This section covers the two official ways of going about it—carving 30-second ringtone snippets out of pop songs and recording your own in GarageBand on a Mac—and points you to the two sneakier ways.
iTunes Ringtones
Apple began selling custom ringtones from its iTunes Store in 2007. Using simple audio tools in the latest version of the iTunes program, you can buy a song for $1, choose a 30-second chunk, pay $1 more for the ringtone, and sync the result to your iPhone.
(Now, if paying a second dollar to use 30 seconds of a song you already own strikes you as a bit of a rip-off, you’re not alone. But look at the bright side: That’s a lot cheaper than most ringtones. Pop-song ringtones from T-Mobile and Sprint cost $2.50 apiece; from Verizon, they’re $3. You don’t get to customize them, choose the start and end points, adjust the looping, and so on.)
Unfortunately, not all iTunes songs can become ringtones—only the ones whose rights-cleared-by-the-lawyers status is designated by a bell icon. To see that icon, add the Ringtones column to the iTunes list by right-clicking or Control-clicking any column name and then choosing Ringtones from the pop-up menu. You can see the Ringtones column (and some bell icons) here.
When you see a purchased song in your iTunes list that bears the lucky bell, click the bell itself. The Ringtone Editor, which looks like a horizontal strip of sound waves, appears at the bottom of the window.
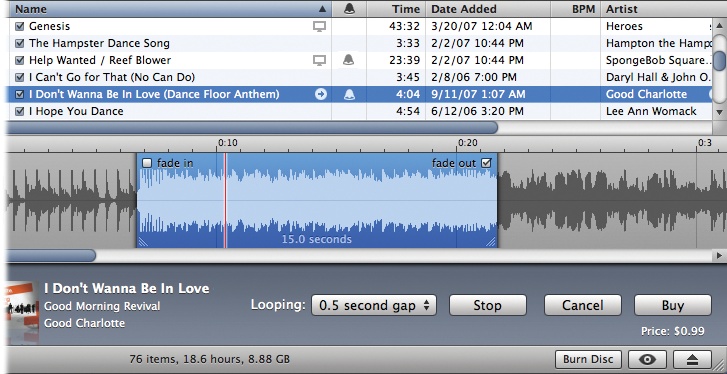
Your ringtone can be up to 30 seconds long. Start, therefore, by dragging the blue, highlighted rectangle around until it’s sitting on the portion of the song you want to serve as your ringtone. At any time, you can…
Click Preview to hear what the ring will sound like.
Adjust the length of the ring snippet by dragging its lower corners.
Control how much of a silent gap you want between repetitions of the ring, using the Looping pop-up menu.
Turn off the fade-in or fade-out by turning off the corresponding checkboxes.
Freeze the ringtone in its current condition and sync it to your iPhone by clicking Buy. Your cost: $1.
After your next sync with your iPhone, you’ll find a new section, called Custom, in the list of available ringtones (Settings→Sounds). It’s the list of the new ringtones you’ve bought—or built, as described next.
GarageBand Ringtones
If you have a Macintosh, then you can also create your own ringtones without paying anything to anyone—by using GarageBand, the music-editing program that comes on every new Mac (version ’08 or later).
Start by building the ringtone itself. You can use GarageBand’s Loops (prerecorded instrumental snippets designed to sound good together), for example, or sound you’ve recorded with a microphone. (There’s nothing like the prerecorded sound of your spouse’s voice barking out from the phone: “HONEY! PICK UP! IT’S ME!” every time your beloved calls.)
If you’re not especially paranoid about record-company lawyers, you can also import any song at all into GarageBand—an MP3, AIFF, MIDI, or non-copy-protected AAC file, for example—and adapt a piece of it into a ringtone. That’s one way for conscientious objectors to escape the $1-per-ringtone surcharge.
In any case, once you have your audio laid out in GarageBand tracks, press the letter C key. That turns on the Cycle strip—the yellow bar in the ruler shown on the facing page. Drag the endpoints of this Cycle strip to determine the length of your ringtone (up to 40 seconds long).
Tip
One feature that’s blatantly missing on the iPhone is a “vibrate, then ring” option. That’s where, when a call comes in, the phone first vibrates silently to get your attention and begins to ring out loud only if you still haven’t responded after, say, 10 seconds.
GarageBand offers the solution: Create a ringtone that’s silent for the first 10 seconds (drag the Cycle strip to the left of the music) and only then plays a sound. Then set your iPhone to vibrate and ring. When a call comes in, the phone plays the ringtone immediately as it vibrates—but you won’t hear anything until after the silent portion of the ringtone has been “played.”
Press the space bar to start and stop playback as you fiddle with your masterpiece.
When everything sounds good, choose Share→Send Ringtone to iTunes. Next time you set up your iPhone sync, click the Ringtones tab in iTunes and schedule your newly minted ringtone for transfer to the phone.
Tip
There are two other, less official ways to create ringtones. One method lets you snag a piece of any not-copy-protected song in your iTunes library. The process takes several steps, but it’s free and doesn’t require special software. Details are in the free PDF appendix on this book’s “Missing CD” at www.missingmanuals.com.
The other is to use a program like Ringtone Recorder Pro, a $1 download from the App Store. It emails you a ringtone (for subsequent syncing from iTunes) from anything you can record with your iPhone’s microphone—voices, music, any audio—which is a very cool idea.
Nike + iPhone
Here’s what you might consider an unlikely partnership: Apple + Nike. For $20, you can buy a tiny Nike/Apple transmitter that you slip into a special socket in specially marked Nike running shoes.
Tip
Pssst—you don’t actually need the shoes. Online, you can buy a cheap little Velcro pouch that fastens the transmitter to any old shoe. Or just stick the transmitter in your sock.
Then, as you run, you could listen to your workout playlists; in the background, the software displays your time, distance, pace, and calories burned. It even talks to you—for example, letting you know when you were halfway and near the end of the run. After each run or walk, you can upload the data to nikeplus.com to track your progress, slice and dice your statistics, compare workouts with other people, or even challenge them to a virtual race.
(Don’t buy the $30 Sport Kit by mistake. It includes another part—a snap-on iPod receiver—which the iPhone doesn’t need.)
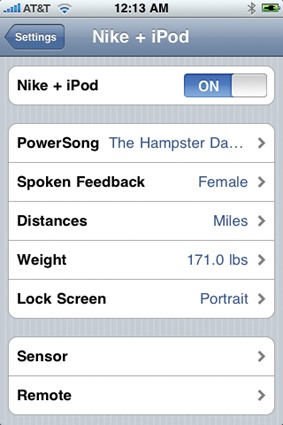
To get started, you have to unlock the dormant Nike feature. From the Home screen, tap Settings. Scroll wayyyy down the list until you see the cluster of settings for your individual apps; one of them is Nike + iPod. Tap to turn this feature On. Now the whole screen of Nike + iPod settings appears:
PowerSong. A PowerSong is one particularly motivating tune that you can summon (by tapping PowerSong) as your willpower to keep running begins to fade. (“I Will Survive,” perhaps?) Tap here to open your master iPod song list, where you can choose the song you want.
Spoken Feedback. As you run, a voice periodically reports your progress. Here’s where you specify the gender of that voice (the male one is Lance Armstrong) or turn it off altogether.
Distances. Specify your favorite units: miles or kilometers.
Weight. Input your body weight. (The software needs this detail to calculate how many calories you’re burning.)
Lock Screen. As you run and jiggle, you don’t want the screen display to keep flipping between horizontal and vertical orientations. Don’t worry; it won’t, because on this screen, you specify how you want the Nike display frozen. You can choose Portrait, Landscape Left, or Landscape Right.
Sensor, Remote. Use these two options to “pair” your iPhone with your shoe sensor and your optional Nike remote control, respectively.

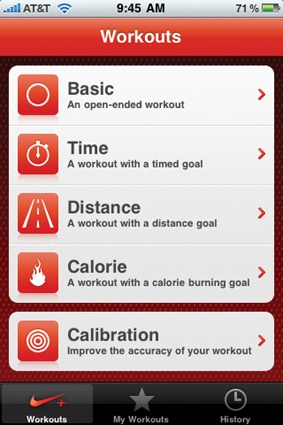
Now find and tap the Nike + iPod icon on your Home screen. On the Workouts screen, tap the sort of run you want: Basic (just run), Time (a fixed time), Distance, or Calorie (run till you’ve burned off a certain number of calories).
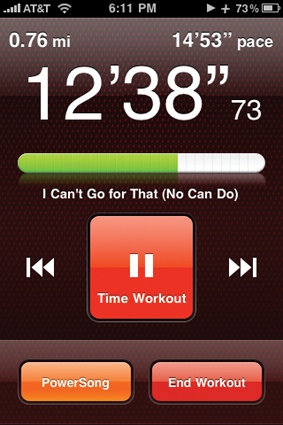
Once you begin running, the screen tracks your progress stats: distance, elapsed time, pace (minutes per mile), and calories burned. A green progress bar shows you how much of the run you’ve completed. At any time, you can tap PowerSong (to play your motivational fave) or End Workout (you wuss!), whereupon you see a Summary screen.
Tip
If necessary, you can duck into another program on your iPhone while you’re running. (Email-aholics, you know who you are.) When you press the Home button, the Nike app recedes into the background; a red “Touch to return to workout” strip appears at the top of your Home screen and whatever app you open.
When the workout is over, you can tap History to see a summary of your runs, or My Workouts to save canned run-type/music combinations.
Next time you sync your iPhone with iTunes, you’ll see a new Nike + iPod tab at the top, where your workout summary appears. A checkbox lets you know that your workout data will get transmitted to Nikeplus.com automatically. Go there to study your stats and track your progress!
Tip
Truth is, you really don’t need to invest in all of this Nike + iPod stuff just to track your workouts. The App Store (Chapter 7) is full of programs that do pretty much the same thing. RunKeeper, for example, uses the iPhone’s own up-and-down motion as you run (rather than a transmitter in your shoe) to track your footsteps. Like Nike, it has a companion Web site—not as polished or complete as Apple/Nike’s, of course—that tracks your stats and progress. It even taps into the iPhone’s GPS to know where you ran—and shows you a map of your path on the Web.
Best of all, these apps work with any iPhone, not just the 3GS and 4.
Talking Buttons—and Accessibility
If you were told the iPhone was one of the easiest phones in the world for a blind person to use, you might spew your coffee. The thing has no physical keys at all! How would a blind person use it?
You won’t believe the lengths to which Apple has gone to make the iPhone usable for the blind (iPhone 3GS and 4); you can literally turn the screen off and operate everything—do your email, surf the Web, adjust settings, run apps—by tapping and letting the phone speak what you’re touching, in whatever language your iPhone uses. It’s pretty amazing.
You can also magnify the screen, reverse black for white (for better-contrast reading), or convert stereo music to mono (great if you’re deaf in one ear).
Here’s a rundown. To turn on any of the features described here, go to the Home screen and tap Settings→General→Accessibility.
Tip
You can turn the iPhone’s accessibility features on and off with a triple-click on the Home button. See Three Presses: VoiceOver or White-on-Black for details.
VoiceOver
VoiceOver is the option that makes the iPhone speak everything you touch—even the little status gauges at the top of the screen.
On the VoiceOver settings pane, tap the On/Off switch to turn VoiceOver on. You can also adjust the Speaking Rate of the synthesized voice.
Now you’re ready to start using the iPhone in VoiceOver mode. There’s a lot to learn, and practice makes perfect, but here’s the overview:
Tap something to hear it. Tap icons, words, even status icons at the top; as you go, the voice tells you what you’re tapping. “Messages.” “Calendar.” “Mail—14 new items.” “45 percent battery power.” You can tap the dots on the Home screen, and you’ll hear, “Page 3 of 9.”
Once you’ve tapped a screen element, you can also flick your finger left or right—anywhere on the screen—to “walk” through everything on the screen, left to right, top to bottom.
Double-tap the screen to “tap” it. Ordinarily, you tap something on the screen to open it. But since single-tapping now means “speak this,” you need a new way to open everything. So: To open something you’ve just heard identified, double-tap anywhere on the screen. (You don’t have to wait for the voice to finish talking.)
Tip
Or do a split tap. Tap something to hear what it is—and with that finger still down, tap somewhere else with a different finger to open it.
There are all kinds of other special gestures in VoiceOver. Make the voice stop speaking with a two-finger tap; read everything, in sequence, from the top of the screen with a two-finger upward flick; scroll one page at a time with a three-finger flick up or down; go to the next or previous screen (Home, Stocks, and so on) with a three-finger flick left or right; and more.
Or try a three-finger triple tap; it blacks out the screen, giving you total privacy as well as a heck of a battery boost. (Repeat to turn the screen back on.)
If you rely on VoiceOver for using your iPhone, then you should download the free PDF appendix to this chapter from this book’s “Missing CD” page at www.missingmanuals.com.
Tip
VoiceOver is especially great at reading your iBooks e-books out loud. Details on Notes, Bookmarks, Highlighting, Dictionary.

White on Black
By reversing the screen’s colors black for white, like a film negative, you create a higher-contrast effect that some people find is easier on the eyes. To try it out, go to Settings→General→Accessibility and turn on White on Black. (The colors reverse, too—blue for yellow, and so on—an interesting effect, to say the least.)
Zooming
The iPhone may be a neat little computer, but it’s a neat little computer; it has the smallest screen of any laptop on the market. Every now and then, you might need a little help reading small text or inspecting those tiny graphics.
If you turn on Zoom (in Settings→General→Accessibility), then you can magnify the screen whenever it’s convenient, up to 500 percent. Of course, the screen image is now too big to fit the physical glass of the iPhone, so you’ll need a way to scroll around on your jumbo virtual screen. Here’s the scheme:
Turn zooming on or off by tapping the screen with three fingers.
(That’s why you can’t use Zoom while VoiceOver is also turned on; the three-finger tap has a different function in each.) The screen is now 200 percent of original size.
Pan around the virtual giant screen by dragging or flicking with three fingers.
Zoom in more or less by double-tap/dragging with three fingers. It’s like double-tapping, except that you leave your fingers down on the second tap—and drag them upward to zoom in more (up to 500 percent), or down to zoom out again.
Mono Audio
If you’re deaf in one ear, then listening to any music that’s a stereo mix can be frustrating; you might be missing half the orchestration or the vocals. When you turn on the Mono Audio option in Settings→General→Accessibility, the iPhone mixes everything down so that the left and right channels contain the same monaural playback. Now you can hear the entire mix in one ear.
Speak Auto-text
You know how the iPhone suggests a word as you type (Auto-Suggestions)? This option in Settings→General→Accessibility makes the iPhone speak each suggestion. That effect has two benefits: First, you don’t have to take your eyes off the keyboard, which is great for speed and concentration. Second, if you’re zoomed in, you may not be able to see the suggested word appear under your typed text—but now you still know what the suggestion is.
Get iPhone: The Missing Manual, 4th Edition now with the O’Reilly learning platform.
O’Reilly members experience books, live events, courses curated by job role, and more from O’Reilly and nearly 200 top publishers.

