Chapter 1. The Guided Tour
You won’t believe how much is hidden inside this sleek, thin slab. Microphone, speaker, cameras, battery. Processor, memory, power processing. Sensors for brightness, tilt, and proximity. Twenty wireless radio antennas. A gyroscope, accelerometer, and barometer. And on the Face ID phones—that is, the recent phones that don’t have a home button—the face-recognition system includes an infrared lamp, an infrared camera, and a tiny projector.
For the rest of this book, and for the rest of your life with the iPhone, you’ll be expected to know what’s meant by, for example, “the side button” and “the Lock screen.” A guided tour, therefore, is in order.
Sleep and Wake
For most of its existence, your iPhone will be neither on nor off. It will be asleep. It sleeps whenever you don’t touch the screen for a while (you choose the interval), or when you press the side button.
In sleep mode, the screen is dark, yet the phone stays on alert to take an incoming call or message. If you’re on a call, it continues. If music is playing, it keeps going. If you’re recording audio, the recording proceeds.
But with your phone asleep, you preserve battery power. And you don’t have to worry about accidental button presses. (You wouldn’t want to discover that your iPhone has been sending texts or taking photos from the depths of your bag. Nor would you want it to dial a random number from your back pocket, a phenomenon that’s earned the unfortunate name butt-dialing.)
Waking the Phone
You could argue, though, that knowing how to wake the phone might be a useful skill. The technique depends on whether you have a Face ID phone (iPhone 11, 11 Pro, 11 Pro Max, X, XR, XS, XS Max) or one with a home button:
-
Face ID phones: Press the side button, or just lift the phone to a vertical position.
TIP
On the Face ID phones, you can also tap anywhere on the screen, as long as Tap to Wake is turned on in Settings → Accessibility → Touch → Tap to Wake.

Figure 1-1.
-
Home-button phones: Press the home button or the side button, or just lift the phone upright. On the iPhone 6s and later, the side button is on the right edge; on the original iPhone SE, it’s on the top. (That’s right—on the iPhone SE, the side button is on the top. Keep up.)

Figure 1-2.
NOTE
You can turn off “Wake when I lift you” for any iPhone model. It’s in Settings → Display & Brightness; turn off Raise to Wake.
No matter which model you have, the screen lights up, and you’re looking at the Lock screen.
The Lock Screen
When you wake the phone, you don’t bring it fully to life. You land instead at a halfway point called the Lock screen (next page, left).
That’s a state of being somewhere between asleep and on. You can get a lot done here even before you reach the Home screen: check the time, read your new messages, consult your calendar, take a photo, and more.
Chapter 2 goes into exhausting detail about how to manage and customize your notifications, the little Lock screen banners that inform you about missed calls, texts, emails, Facebook posts, or whatever you specify.
Unlock the Phone
Often, you’ll wake your phone only to check the time or your notifications; then you’ll just put it back to sleep again (hit the side button, or just toss it in your pocket and wait for it to auto-sleep).
But other times you’ll want to finish turning it on, proceeding to the Home screen. Here’s how that works:
-
Face ID phones: Swipe up from the bottom of the screen. It can be a very short, light, quick swipe. If the phone’s front camera system recognizes your face (“Fingerprints for Apps, Websites, and Apple Pay”), or if you enter the passcode correctly, you arrive at the Home screen.
-
Home-button phones: Click the home button. If the phone recognizes your fingerprint (“Fingerprint Security (Touch ID)”), or if you enter the passcode correctly, you arrive at the Home screen.
Now, remember: You can do a lot on an iPhone even before you’ve fully awakened it. Bad guys don’t need a password to view the notifications on your Lock screen; to talk to Siri (Chapter 5); to control your Apple-compatible door locks and lights; to take a picture; and so on. For privacy, you can turn those features off individually. See “The Notification Center”.
TIP
iOS offers a buried but powerful option for home-button phones: Rest Finger to Open. (It’s in Settings → Accessibility → Home Button.) When you turn this on, the second click—the one to get past the Lock screen—is no longer necessary.
If your phone is asleep, then just lifting it (with your finger resting on the home button) wakes and unlocks it; you barely even see the Lock screen. Or you can click the home button and just leave your finger on it. In each case, you save at least one home-button press.
So what if you do want to visit the Lock screen? Just raise the phone, or click the side button, without touching the home button.
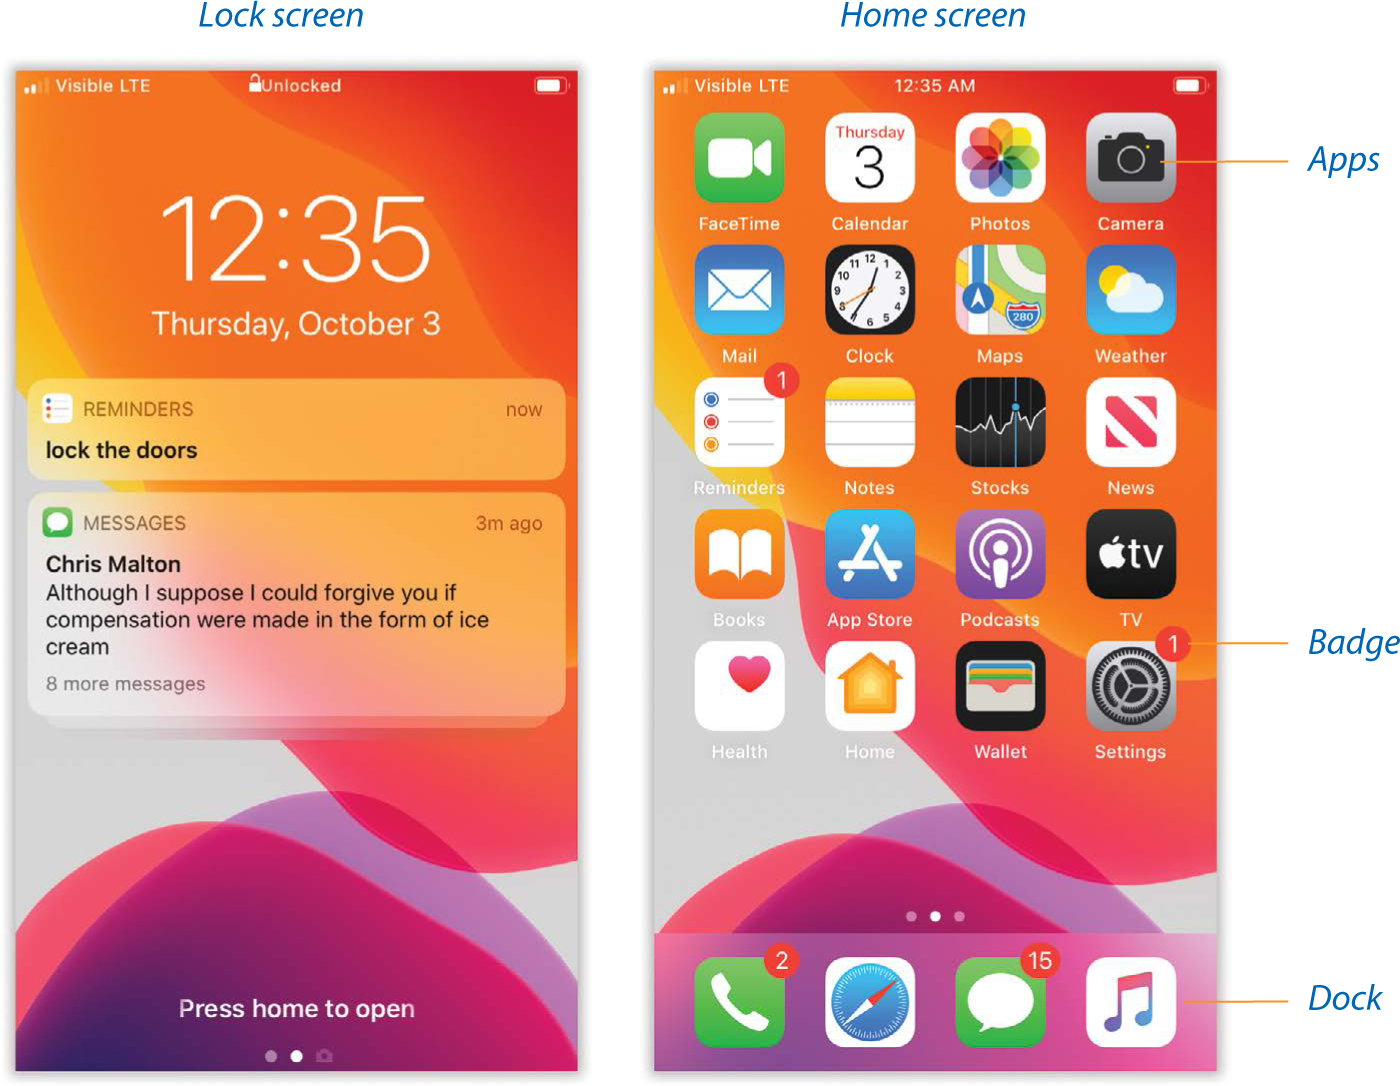
Figure 1-3.
The Home Screen
The Home screen is the launching pad for every iPhone activity. It’s what appears when you press the home button or swipe up on the screen (Face ID phones). It’s the immortal grid of colorful icons.
It’s such a software landmark, in fact, that a quick tour might be helpful:
-
Icons. Each icon represents one of your iPhone apps (programs)—Mail, Maps, Camera, and so on—or a folder you’ve made to contain some apps. Tap one to open that app or folder.
Your iPhone comes with a couple of dozen apps preinstalled by Apple; you can’t remove them. The real fun, of course, comes when you download more apps from the App Store (Chapter 10).
-
Badges. Every now and then, you’ll see a tiny, red number “badge” (like
 ) on one of your app icons. It’s telling you something new awaits: new email, new text messages, new updates for the apps on your iPhone. It’s saying, “Hey, you! Tap me!”
 -
Home screen dots. The standard Home screen can’t hold more than 20 or 24 icons. As you install more and more apps on your iPhone, you’ll need more and more room for their icons. Fortunately, the iPhone makes room for them by creating additional Home screens automatically. You can spread your new programs’ icons across 11 such launch screens.
The little white dots are your map. Each represents one Home screen. If the third one is “lit up,” you’re on the third Home screen.
To move among the screens, swipe horizontally—or tap to the right or left of the little dots.
And if you ever scroll too far from the first Home screen, here’s a handy shortcut: Press the home button, if you have one, or do the “go home” swipe up from the bottom (yes, even though you’re technically already home). That takes you back to the first Home screen.
-
The Dock. At the bottom of the Home screens, four exalted icons sit in a row on a light-colored panel. This is the Dock—a place to park the most important icons on your iPhone. These, presumably, are the ones you use most often. Apple starts you off with the Phone, Mail, Safari, and Music icons there.
What’s so special about this row? As you flip among Home screens, the Dock never changes. You can never lose one of your four most cherished icons by straying from the first page; they’re always handy.
-
The wallpaper. You can replace the background image (behind your app icons) with a photo. A complicated, busy picture won’t do you any favors—it will just make the icon names harder to read—so Apple provides a selection of handsome, relatively subdued wallpaper photos. But you can also choose one of your own photos.
For instructions on changing the wallpaper, see “Siri & Search”.
It’s easy (and fun!) to rearrange the icons on your Home screens. Put the most frequently used icons on the first page, put similar apps into folders, and reorganize your Dock. Full details are in “A Welcome Note About App Backups”.
Turning the Phone On and Off
Most of the time, you’ll just put the phone to sleep when you’re not using it. You’ll very rarely turn the phone fully off. But just in case:
-
Turning the phone on. The phone does come from the factory turned fully off, so it’s good to know: To turn on a fully off phone, hold in the side button for a few seconds—until the
 logo appears. Then wait for about a minute.
 -
Turn the phone fully off. You might turn the iPhone off whenever you’re not going to use it for a few days. In this condition, the phone uses no power at all, and all calls go straight to voicemail.
If you have a Face ID phone, hold in the side button and either of the volume buttons across from it for a few seconds.
If you have a home-button phone, just hold in the side button (which may be on the top, remember).
NOTE
There’s also a long way. Go to Settings → General → Shut Down.
The screen changes to say, among other things, slide to power off. Confirm your decision by placing a fingertip on the ![]() and sliding to the right. The device shuts off completely.
and sliding to the right. The device shuts off completely.
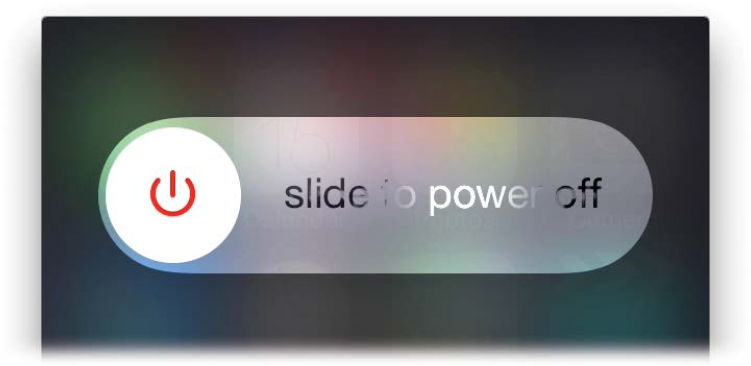
Figure 1-4.
If you change your mind about turning the iPhone off, tap the Cancel button.
-
Answer call/Dump to voicemail. The side button has another function, too: When a call comes in, you can tap it once to silence the ringing or vibrating. After four rings, the call goes to voicemail.
You can also tap it twice to dump the call to voicemail immediately. (Of course, because they didn’t hear four rings, some people will realize you’ve blown them off. Bruised egos may result.)
In combination with other buttons, the side button is also involved in capturing a screenshot (“Capturing the Screen”), speaking to Siri (“How to Use Siri”), and restarting a locked-up phone (“iPhone Doesn’t Turn On”).
Silencer Switch, Volume Keys
Praise be—this phone has a silencer switch! This tiny flipper, on the left edge near the top (shown in “The Lock Screen”), means no ringer or alert sound will humiliate you in a meeting, at a movie, or in church. To turn off the ringer, push the flipper toward the back of the phone.
NOTE
Even when silenced, the iPhone still makes noise in certain circumstances: when an alarm goes off; when you’re playing music, video, or a podcast; when you’re using Find My (“Favorites Folders”); when you’re using VoiceOver; or, sometimes, when a game is playing. Also, the phone still vibrates when the silencer switch is engaged, although you can turn that off in Settings → Sounds & Haptics.
On the left edge are the volume controls. They work in five ways:
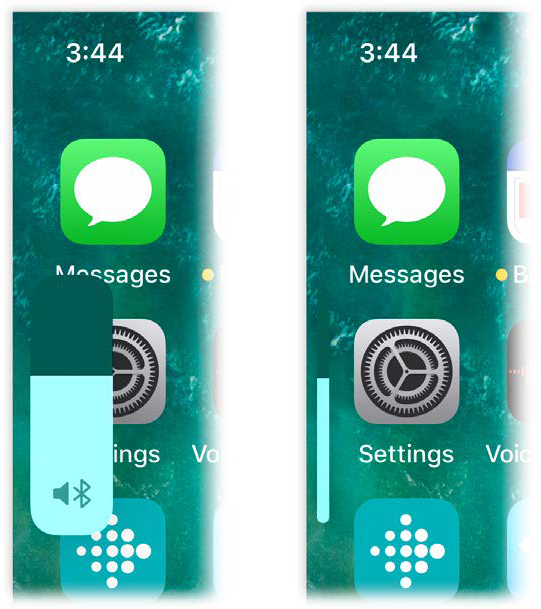
Figure 1-5.
-
On a call, these buttons adjust the speaker or earbud volume.
-
When you’re listening to music, they adjust the playback volume—even when the phone is locked and dark.
-
When you’re taking a photo or video, either one serves as a shutter button or a camcorder start/stop button.
-
When a call comes in, they silence the ringing or vibrating.
-
At all other times, they adjust the volume of sound effects like the ringer, alarms, and Siri.
In each case, a volume graphic appears to show you where you are on the volume scale (above, right). In iOS 13, it’s no longer a huge block that covers up whatever you’re doing (above, left); it’s a subtle, quickly collapsing slider at the left side of the screen, right next to the volume keys.
Screen
The touchscreen is your mouse, keyboard, dialing pad, and notepad. You might expect it to get fingerprinty and streaky.
But the iPhone has an oleophobic screen. That may sound like an irrational fear of yodeling, but it’s actually a coating that repels grease. A single, light wipe on your clothes restores the screen to its right-out-of-the-box crystal sheen.
The iPhone’s screen has crazy-high resolution (the number of tiny pixels per inch). It’s really, really sharp, as you’ll discover when you try to read text or make out the details of a map or a photo. The actual number of pixels depends on your phone: It’s 1136 × 640 in the original iPhone SE, 1334 × 750 in the iPhone 6/6s/7/8, and 2436 × 1125 in the XS and 11 Pro. The massive XS Max and 11 Pro Max models supposedly pack an awe-inspiring 2688 × 1242 tiny dots, but nobody’s ever counted.
TIP
If your puny thumb is too small to reach the top of your mammoth iPhone screen, consider turning on Reachability (“Reachability”).
The front of the iPhone is a special formulation made by Corning, to Apple’s specifications—even better than the Gorilla Glass used on previous models, Apple says. It’s unbelievably resistant to scratching. You can still crack it if you drop it just the wrong way, though.
If you’re nervous about protecting your iPhone, you can always get a case for it, or a “bumper”—a silicone band that wraps around the edges.
Face ID Phones: The Notch
If anyone grumbles about the Face ID iPhones at all, it’s about the notch. That’s the dark area at the top center that contains the front-facing camera, the earpiece, and the phone’s Face ID sensors (“Fingerprints for Apps, Websites, and Apple Pay”). Apple decided that, to keep the phone as small as possible, this notch would interrupt the standard status bar, splitting it into two “ears.”

Figure 1-6.
You can’t see the notch when the status bar is black—on a black Home screen, for example. You don’t see it when you’re looking at photos or videos, either, unless you zoom into them. You do see the notch when the status bar is white or another color, and it’s also noticeable when you’re using an app that hasn’t been updated for Face ID phones. Sometimes those apps try to display information right where the notch sits!
In any case, on the ears, there’s very little room for status icons. The left ear shows the time and, sometimes, the location services logo (![]() ); and the right ear shows icons for your cellular bars, Wi-Fi strength, and battery level. (The left ear turns red, green, or blue to provide privacy warnings from background apps, as described in a moment.)
); and the right ear shows icons for your cellular bars, Wi-Fi strength, and battery level. (The left ear turns red, green, or blue to provide privacy warnings from background apps, as described in a moment.)
To see the full range of status icons, swipe down from the right ear to open the Control Center (“Control Center”). Everything, including the cell network name, appears on this screen—although, if you’re having a bad day, you’ll see the words “No Service” instead.
Home-Button Phones: The Status Bar
The icons you may see in the status bar at the top of a home-button iPhone screen can convey a huge range of information—if you know how to interpret them. Here they are, from left to right.
-
Cell signal (
 ). The number of bars indicates the strength of your cell signal, and thus the likelihood of losing the connection. If there are no bars, then the dreaded words “No Service” appear here.
 -
Network name and type. These days, different parts of the country—and even your street—are blanketed by cellular internet signals of different speeds, types, and ages. Your status bar shows you the kind of network signal it has.
From slowest to fastest:
 or
or  means your iPhone is connected to your carrier’s slowest, oldest internet system. You might be able to check email, but you’ll lose your mind waiting for a web page to load.
If you see
 , you’re in a 3G network—still slow compared with
  , which offers speed in between 3G and LTE.
And if you see
 up there—well, get psyched. You’re in a city with a 4G LTE cellular network. And that means very fast internet.
NOTE
If you’re an AT&T customer, you might also see a
 logo. Don’t be fooled—that’s not 5G, the superfast network coming to iPhones in 2020. That’s just sneaky AT&T’s version of LTE.
You may also see a notation like “T-Mobile Wi-Fi” or “VZW Wi-Fi.” The iPhone can make free phone calls over a Wi-Fi network—if your cellphone carrier has permitted it, and if you’ve turned the feature on (“Mac as Speakerphone”). It’s a great way to make calls indoors where the cell signal is terrible.
-
Airplane mode (
 ). If you see this instead of cell-signal and Wi-Fi bars, then the iPhone is in airplane mode (“Airplane Mode and Wi-Fi Off Mode”).
 -
Do Not Disturb (
 ). Nothing can make the phone ring, buzz, or light up except calls from the most important people. See “Do Not Disturb”.
 -
Wi-Fi signal (
 ). You’re connected to a wireless hotspot. The more “sound waves” you see, the stronger the signal.
 -
10:19 PM. When the iPhone is unlocked, a digital clock appears on the status bar.
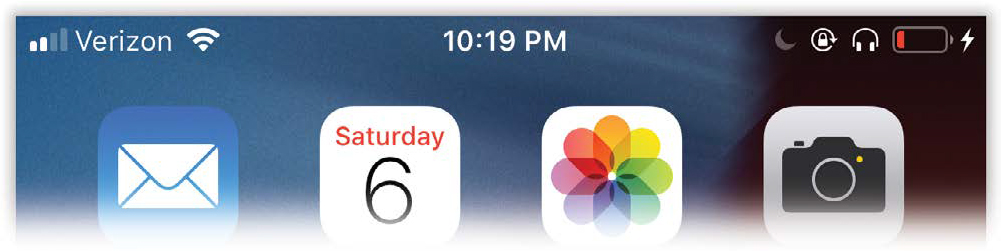
Figure 1-7.
-
Alarm (
 ). A valuable reminder that you have an alarm set.
 -
Wireless earbuds (
 ). The iPhone is connected wirelessly to a Bluetooth earpiece, earbuds, or headphones. (You may even see the device’s battery gauge:
  .)
.) -
TTY (
 ). You’ve turned on Teletype mode, meaning the iPhone can communicate with a Teletype machine. (That’s a machine that lets deaf people make phone calls by typing and reading text. It hooks up to the iPhone with a special cable Apple sells from its website.)
 -
Call forwarding (
 ). You’ve told your iPhone to auto-forward any incoming calls to a different number. This icon explains at a glance why your iPhone never seems to get calls anymore.
 -
VPN (
 ). You corporate stud! You’ve managed to connect to your corporate network over a secure internet connection, probably with the assistance of a system administrator—or by consulting “Control Center”.
 -
Syncing (
 ). The iPhone is currently syncing with some internet service—iCloud, for example (Chapter 16).
 -
Battery meter (
 ). When the iPhone is charging, the lightning bolt appears. Otherwise, the battery logo “empties out” from right to left to indicate how much charge remains. (You can even add a “% full” indicator to this gauge; see “Emergency SOS”.)
 -
Navigation active (
 ). You’re running a GPS navigation app, or some other app that’s tracking your location, in the background (yay, multitasking!). Why is a special icon necessary? Because those GPS apps slurp down battery power like a thirsty golden retriever. Apple wants to make sure you don’t forget you’re running it.
 -
Rotation lock (
 ). This icon reminds you that you’ve deliberately turned off the screen-rotation feature, where the screen image turns 90 degrees when you rotate the phone. See “Customizing the Control Center”.
From time to time, you’ll see the left ear or the entire status bar change color. That’s its way of saying, “Hey, watch what you’re saying or doing, because an app in the background is observing you!” Here’s your key:
-
Red for when you’re recording in the background—either using the Voice Memos app to record audio or the screen-recording feature described in “Recording Screen Video”.
-
Green for when you’re on a phone call or FaceTime call in the background. They can still hear you!
-
Blue for when an app is actively tracking your location. If you’re using GPS or something, well, that’s fine. But if it’s some evil app that’s tracking you, now you’ll know.
TIP
In each case, you can tap that colored status bar (or, on Face ID phones, that colored ear) to jump into the app responsible.
Cameras and Flash
On a Face ID phone, the front-facing camera is hiding inside the notch (“Face ID Phones: The Notch”). On a home-button phone, above the screen, there’s a horizontal slot. That’s the earpiece. Just above it or beside it, the tiny pinhole is the front-facing camera.
This camera’s primary purpose is to let you take selfies and conduct video chats using the FaceTime feature, but it’s also handy for checking for spinach in your teeth.
Until the iPhone 11 family came along, the front camera was never as good as the back cameras, though; it’s always been worse in low light and taken much lower-resolution shots.
A tiny LED lamp appears next to the back lens—actually, it’s two lamps on the 6 and 6s iPhones, and four on the 7, 8, and Face ID phones. That’s the flash for the camera, the video light when you’re shooting movies, and a darned good flashlight for reading restaurant menus and theater programs in low light. Open the Control Center (“Control Center”) and tap the ![]() icon to turn the light on and off.
icon to turn the light on and off.

Figure 1-8.
The pinhole nestled near the lenses is a microphone. It’s used for recording clearer sound with video, for better noise cancellation on phone calls, and for better directional sound pickup.
The iPhone Plus models and Face ID models actually have two or even three lenses on the back, for different degrees of zoom. Details on this feature and everything else on the iPhone’s cameras are in Chapter 9.
Sensors
Behind the glass above the screen are two sensors. (On the black iPhones, you can’t see them except with a flashlight.) First, there’s an ambient-light sensor that brightens the display when you’re in sunlight and dims it in darker places.
Second, there’s a proximity sensor. When something (like your head) is close to the sensor, it shuts off the screen and touch sensitivity. It works only in the Phone app. With the screen off, you save power and avoid dialing with your cheekbone when you’re on a call.
SIM Card Slot
On the right edge of the iPhone, there’s a pinhole on what looks like a very thin slot cover. If you push an unfolded paper clip straight into the hole, the SIM card tray pops out.
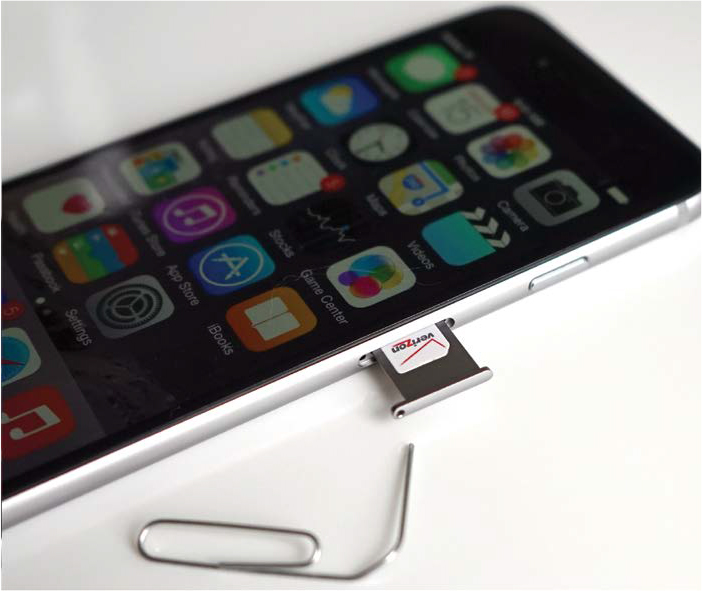
Figure 1-9.
A SIM card is a tiny memory card that stores your account info—things like your phone number and calling-plan details. (SIM stands for “subscriber identity module.”)
By removing the card from one phone and putting it into another phone, you can transplant a phone’s brain. The other phone now knows your number and account details, which can be handy when your iPhone goes in for repair. For example, you can turn a Verizon iPhone 11 into a T-Mobile iPhone 11 just by swapping in a T-Mobile SIM card.
Knowing about SIM cards is also smart when you travel overseas, because you can rent a cheap local SIM card to use while you’re there. You’ll avoid racking up hundreds of dollars in international roaming fees on your own plan, but of course you’ll have a different phone number temporarily.
TIP
If you’d rather keep your own plan and number overseas, contact your carrier before you go. Tell them where you plan to travel, and ask for a temporary international plan. If you fail to make this call, you may (a) not be able to use the phone at all, or (b) pay through the nose, ears, and eyeballs for the roaming surcharges. (One exception: On T-Mobile, international texting and internet are free.)
There are some situations when swapping SIM cards from one iPhone to another isn’t straightforward. Here are some of the gotchas:
-
If your objective is to switch carriers (for example, Verizon to T-Mobile), you’ll need an unlocked iPhone. A locked phone is married, by software, to your original carrier; that’s how they make sure you’re not going to ditch them while you still owe them money.
If you bought your iPhone from your original carrier, it’s probably locked. Contact customer service; they’ll unlock it for you by remote control (assuming you don’t owe them money). If you bought it new from any other source, and paid for it up-front, it’s already unlocked.
-
If you have a GSM iPhone from T-Mobile or AT&T, it won’t work on the Sprint or Verizon networks, alas.
-
The iPhone XS, XS Max, 11, and 11 Pro models can, incredibly, have two phone numbers. You might have one for work and the other for personal use.
There’s a physical SIM card, plus an electronic SIM (eSIM). There’s some fine print here: The feature works only if your carrier offers it, and it requires an unlocked iPhone. But it’s been done right; for example, you can specify which line gets dialed for each person in your Contacts. (And if you don’t specify, the iPhone just uses the number you used last time.)
If you were curious enough to open the SIM card tray, you can close it simply by pushing it back into the phone until it clicks.
Headphone Jack
Until the iPhone 7 came along, iPhones contained a standard jack for plugging in earbuds or headphones.
No Headphone Jack
Why did Apple remove the headphone jack from the iPhone 7 and later models? Well, that jack may not seem very big—but on the inside of the phone, the corresponding receptacle occupied an unnerving amount of nonnegotiable space. Apple wanted that space back: for a bigger battery, for a better camera, for new features.
So how are you supposed to listen to music without a headphone jack? Apple offers three ways:
-
Use the adapter. Apple makes a 2-inch adapter cord that connects any headphones to the phone’s Lightning (charging) jack. It came in the box with iPhone 7, 8, and X models; it’s a separate purchase for later models (how rude!).
-
Use the earbuds. The phone also comes with white earbuds that connect to the Lightning jack.
TIP
Of course, if your headphones are plugged into the Lightning jack, you can’t charge your phone while listening over them. Fortunately, Amazon is full of cheap adapters that let you charge and plug in headphones simultaneously.
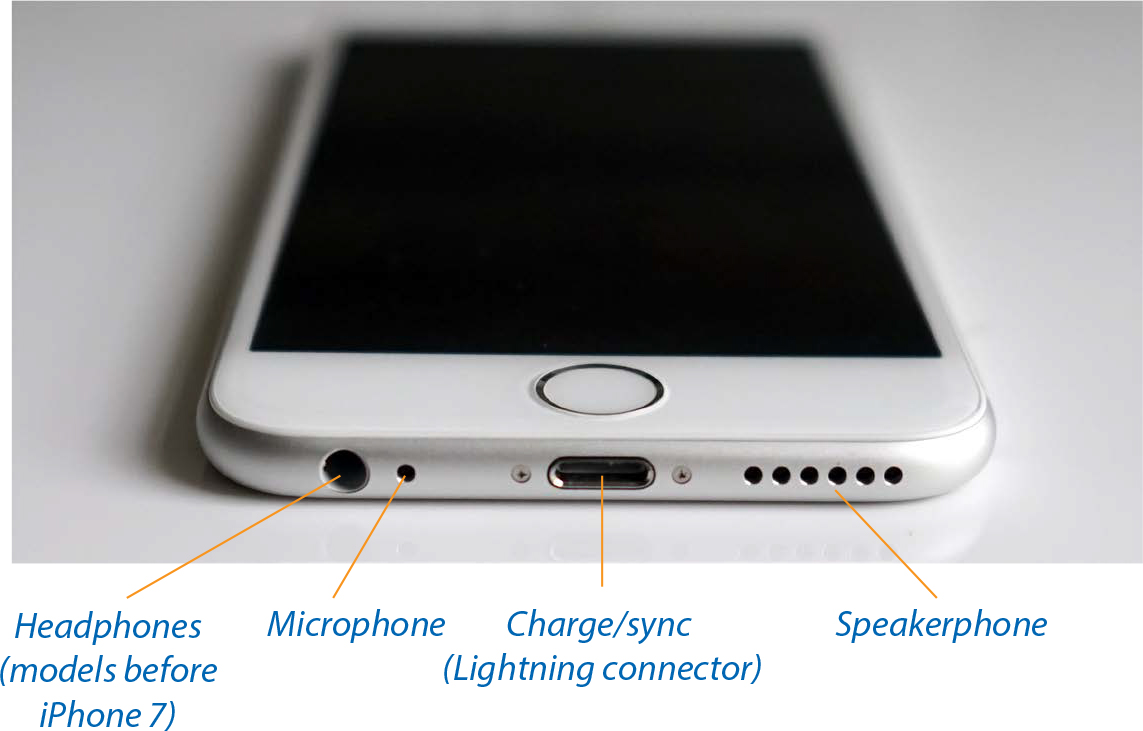
Figure 1-10.
-
Use wireless headphones. You can also use any Bluetooth wireless earbuds—from $17 plastic disposable ones to Apple’s own, impressive AirPods. “Bluetooth Accessories” has more on Bluetooth headsets.
In theory, those three approaches should pretty much cover you whenever you want to listen.
In practice, though, you’ll still get zapped by the occasional inconvenience. You’ll be on a flight, for example, listening to your laptop with headphones—and when you want to switch to the phone, you’ll realize your adapter cord is buried in the overhead bin (based on a true story).
But this kind of hassle is the new reality. Samsung, Motorola, Google, HTC, and other companies have already ditched the headphone jack on their phones, and other phone makers will follow suit.
Microphone, Speakerphone
On the bottom of the iPhone, Apple has parked some important audio components: the speaker and a microphone or two.
On the iPhone 7 and later models, actually, there are two speakers, on the top and bottom of the phone. Stereo sound has come to the iPhone. (Face ID phones even record video in stereo.)
NOTE
On the bottom edge, inside a perforated grille, a tiny second microphone lurks. It’s the key to the iPhone’s noise-cancellation feature. It listens to the sound of the world around you and pumps in the opposite sound waves to cancel out all that ambient noise. It doesn’t do anything for you—the noise cancellation affects what the other person on the phone hears.
That’s why there’s yet another microphone at the top back (between the camera and flash); it’s designed to supply noise cancellation for you, so the other person sounds better when you’re in a noisy place.
Lightning Connector
On the bottom edge of the phone, right in the center, you’ll find the connector that charges and syncs the iPhone with your computer.
For nearly 10 years, the charge/sync connector was the famous 30-pin connector. But starting on the iPhone 5, Apple replaced that inch-wide connector with a far-smaller one it calls Lightning. The Lightning connector is a great design: It clicks nicely into place (you can even dangle the iPhone from it), yet you can yank it right out. You can insert the Lightning into the phone either way—there’s no “right-side up.” It’s much sturdier than the old connector. And it’s tiny, which was Apple’s primary goal—only 0.3 inches wide.
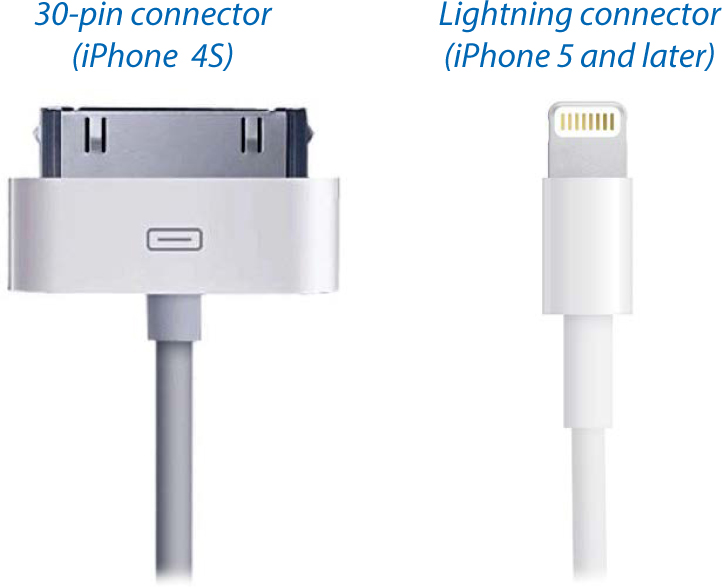
Figure 1-11.
You may still occasionally encounter a car adapter or hotel-room alarm clock with the old kind of connector. (For $30, you can buy an adapter.)
Over the years, a new ecosystem of accessories based on the Lightning connector has arisen. We’ll enjoy a new era of standardization—until Apple changes jacks again.
Antenna Band
Radio signals can’t pass through metal. That’s why there are strips or panels of plastic or glass on every iPhone.
And there are a lot of radio signals going into this phone. All told, there are 20 different radio transceivers inside the modern iPhone. They tune in to the LTE, 3G, and 4G signals used in various countries around the world, plus the three CDMA signals used in the U.S.; and one each for Wi-Fi, Bluetooth, American GPS, and Russian GPS.
In the Box
Inside the minimalist box, you get the iPhone and these items:
-
A Lightning cable. When you connect your iPhone to your computer using this cable, it simultaneously syncs and charges. See Chapter 15.
-
The AC adapter. When you’re traveling without a computer, you can plug the Lightning cable into the included two-prong outlet adapter, so you can charge the iPhone directly from a wall socket.
TIP
Apple’s 18-watt adapter offers fast charging for the iPhone 8 and later, meaning 30 minutes to a 50 percent charge. It’s $30—or included right in the box with the iPhone 11 Pro.
-
The earbuds. Every iPhone comes with a pair of the iconic white earbuds that announce to the world, “I have an iPhone!” These days, they’re what Apple calls EarPods. They sound great, although their bulbous shape may get uncomfortable in smaller ears. A volume control/clicker is right there on the cord, so you can answer phone calls and pause the music without even taking the phone out of your pocket. (The EarPods that come with the iPhone 7 and later plug into the Lightning jack, since there’s no headphone jack. The 7, 8, and original X phones also come with that 2-inch adapter cable for existing earbuds.)
-
Decals and info card. iPhone essentials.
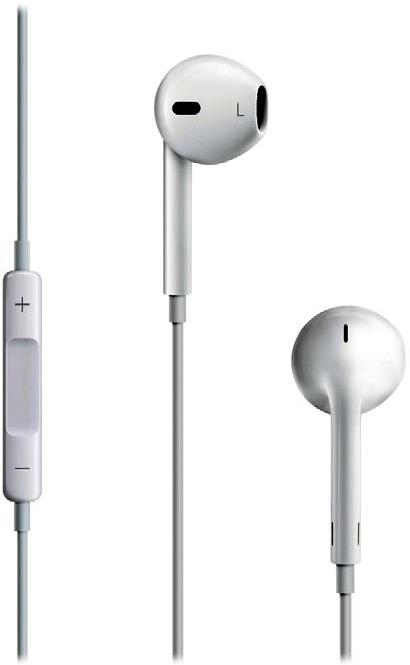
Figure 1-12.
Finger Techniques
On the iPhone, you operate all your software using the touchscreen instead of physical buttons.
Tap
The iPhone’s onscreen buttons are big, giving your fingertip a fat target.
You can’t use a fingernail or a pen tip; only skin contact works. (You can also buy an iPhone stylus. But a fingertip is cheaper and harder to misplace.)
Double-Tap
Double-tapping is generally reserved for two functions:
-
In the Safari, Photos, and Maps apps, double-tapping zooms in on whatever you tap, magnifying it. (At that point, double-tapping means “Restore to original size.”) Double-tapping also zooms in to formatted email messages, PDF files, Microsoft Office files, and other things.
-
When you’re watching a video, double-tapping switches the aspect ratio (video screen shape).
Swipe
In some situations, you’re asked to confirm an action by swiping your finger across the screen. That’s how you confirm that you want to shut off the phone, for example. Swiping is also a great shortcut for deleting an email or a text message.
Pinch and Spread
In apps like Photos, Mail, Safari, and Maps, you can zoom in on a photo, message, web page, or map by spreading.
That’s when you place two fingers (usually thumb and forefinger) on the glass and spread them. The image magically grows, as though it were printed on a sheet of rubber.
NOTE
English has failed Apple here. Moving your thumb and forefinger closer together has an appropriate verb: pinching. But there’s no good word to describe moving them the opposite direction. Apple uses the expression pinch out to describe that move (along with the redundant-sounding pinch in). But in this book, the opposite of “pinching” is “spreading.”
Once you’ve zoomed in like this, you can zoom out again by putting two fingers on the glass and pinching them together.

Figure 1-13.
Flick
A flick is a faster, less-controlled drag. You flick vertically to scroll lists on the iPhone. The faster you flick, the faster the list spins downward or upward. Lists have a real-world sort of momentum; they slow down after a second or two, so you can see where you wound up.
At any point during the scrolling of a list, you can flick again (if you didn’t go far enough) or tap to stop the scrolling (if you see the item you want).
Edge Swipes
Swiping your finger inward from outside the screen has a few variations:
-
From the top edge. Opens the Notification Center, which lists all your missed calls and texts, shows your appointments, and so on.
-
From the bottom edge. On home-button iPhones, opens the Control Center, a unified miniature control panel for brightness, volume, Wi-Fi, and so on. (On Face ID phones, swipe down from the right ear instead.)
-
From the left edge. In many apps, this means “Go back to the previous screen.” That works in Mail, Settings, Notes, Messages, Safari, Facebook, and some others. At the Home screen, it opens the Today screen (“Making DNDWD Mandatory”).
It sometimes makes a difference whether you begin your swipe within the screen or outside it. At the Home screen, for example, starting your downward swipe within the screen area doesn’t open the Notification Center—it opens the iPhone’s search function.
Quick Actions (Long-Press)
If you long-press an app’s icon (touch until you feel a little vibration on most phones), you get a shortcut menu of useful commands. Apple calls them quick actions, and each is designed to save you a couple of steps. Sometimes, above the commands, you get a bubble of information, too. (That bubble may offer an Add Widget button; see “Making DNDWD Mandatory”.)
Some examples:
-
The Camera app icon offers Take Selfie, Record Video, Take Photo, and Take Portrait Selfie commands.
-
Photos offers a bubble of icons for the four most recent Memories it’s come up with (“The “For You” Tab”), as well as Most Recent, Favorites, One Year Ago, and Search commands.
-
Notes gives you New Note, New Checklist, New Photo, and Scan Document commands. In the bubble, you see the last note you edited.
-
Maps offers Mark My Location, Send My Location, and Search Nearby (for restaurants, bars, shops, and so on). When you’re at home, you may see your travel time to work and the current traffic situation.
-
The Phone app sprouts icons for people you’ve called recently, as well as Create New Contact, Search for Contact, View Most Recent Call, and View Most Recent Voicemail (handy!).
-
Calendar opens a bubble that displays your next appointment, plus an Add Event command.
-
Reminders displays whatever deadline is coming up next. It also lists some of your reminder categories, so you can create a new to-do directly inside one of them (for example, New in Family).
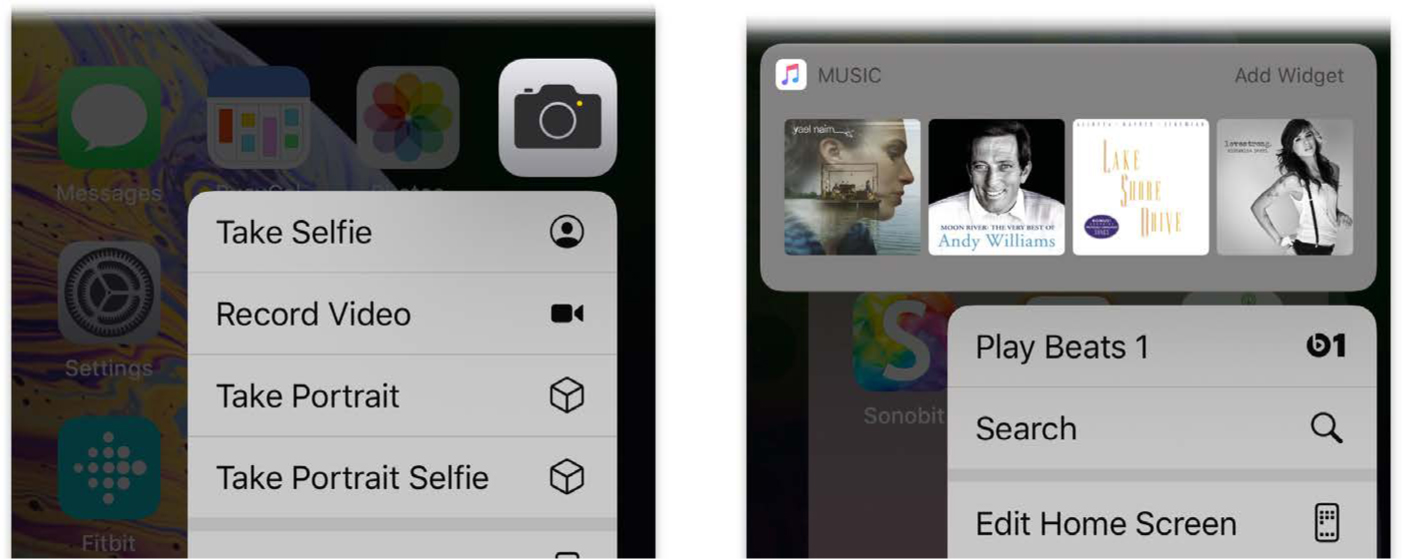
Figure 1-14.
-
Mail and Messages offer New Message commands. Mail also offers Search, New Message, and an inbox or two. Both apps display an icon (or several) representing recent correspondents.
-
Music displays a bubble of four recent album-art icons, along with commands for Play Beats 1 and Search.
-
Home-screen folders sprout a Rename command at your fingertip. Sometimes you’re offered the names of a couple of apps inside, too.
Similar quick actions also sprout from these Apple apps’ icons: Clock, Measure, Wallet, iTunes Store, App Store, TV, Health, Weather, Calculator, Books, News, Safari, FaceTime, Podcasts, Contacts, and Find My.
Non-Apple apps often offer shortcut menus, too. For example, the Fitbit app offers one-tap ways to log your weight, water or food intake, or exercises. The Delta app offers quick links for Check In, Flight Status, and My Trips. The Uber app offers one-tap buttons for booking a ride to your Home or place of Work.
TIP
The Edit Home Screen command appears in the shortcut menu for every app. Tap it to commence dragging your icons around as described in “A Welcome Note About App Backups”. (Alternatively, just keep pressing past the point of the shortcut menu’s appearance.)
And, of course, you can use long-presses to respond to notifications: Reply to a text message, accept a Calendar invitation, or see where your Uber is on a map.
You can long-press a message in a list in Mail; you get both a preview bubble and a shortcut menu of handy commands like Reply, Reply All, Forward, and so on. Drag upward on the preview to see the hidden shortcut commands.
You can also long-press in Maps (preview information about a pushpin), Calendar (see details of an event), Photos (preview a photo in a screenful of thumbnails), Safari (preview the page hiding behind a link), Weather (add a new city or see weather details for a name in the list of cities), Music (shows you albums you can play with a tap on the cover art), TV (read details about a movie in a list), Notes (see the contents of a note’s name in a list), the Messages list (see quick replies like “Yes” and Thanks”), and News (preview the body of an article in a list).
NOTE
3D Touch is on its way out.
The screens on iPhone models from the 6s to the XS can detect how hard your finger is pressing, thanks to a technology Apple called 3D Touch. For example, you can hard-press a message in your email inbox to see a preview of its contents. (You can no longer press even harder to open the message full-screen, though, the feature called Peek and Pop.)
Unfortunately, people found 3D Touch plus long-pressing to be one interface technique too many; they were confused and frustrated. So in iOS 13, hard-pressing still works in most contexts on 3D Touch phones. But long-pressing works in all those same places—and on all iOS 13 phone models.
Charging the iPhone
The iPhone has a built-in, rechargeable battery that fills up most of its interior. How long a charge lasts depends on what you’re doing—music playback saps the battery the least; games and GPS navigation sap it the most. But one thing is for sure: You’ll have to recharge the iPhone regularly. For most people, it’s every night.
NOTE
The iPhone’s battery isn’t replaceable. It’s rechargeable, but after 400 or 500 charges, it starts to hold less juice. Eventually, you’ll have to pay Apple to install a new battery. (Apple says the added bulk of a protective plastic battery compartment, a removable door and latch, and battery-retaining springs would have meant a much smaller battery—or a much thicker iPhone.)
Charging with the Cable
You recharge the iPhone by connecting the white Lightning cable that came with it. In general, people plug the far end into either of two places:
-
A computer’s USB jack. In general, the iPhone charges even if your computer is asleep. (If it’s a laptop that itself is not plugged in, though, the phone charges only if the laptop is awake. Otherwise, you could come home to a depleted laptop.)
-
The AC adapter. The little white two-prong cube that came with the iPhone connects to the end of the cradle’s USB cable.
Unless the charge is really low, you can use the iPhone while it charges. The battery icon in the upper-right corner displays a lightning bolt to let you know it’s charging.
TIP
If you have an iPhone 6 or later, it’ll charge much faster if you charge it with the 2.1-amp wall adapter that comes with an iPad, instead of the 1-amp adapter that comes with the phone. How does a 90 percent charge in two hours sound?
Better yet: If you have an iPhone 8 or later, you can get really fast charging—along the lines of 50 percent charge in 30 minutes—but only if you connect it to a USB-C power brick plugged into the wall. Apple sells one, the 18W USB-C Power Adapter, for $29—but the cable you need (USB-C to Lightning) isn’t included. Fast charging is cool, but it ain’t cheap. (The 18-watt charger is included only with the iPhone 11 Pro.)
Charging on a Pad (iPhone 8 and later)
iPhone fans can stop looking at Samsung owners with envy: Now you, too, can charge your phone by setting it down on a Qi charging pad.
NOTE
Qi, pronounced “chee,” is the Chinese word for the life force in everyone and everything. It’s also a great word for Scrabble.
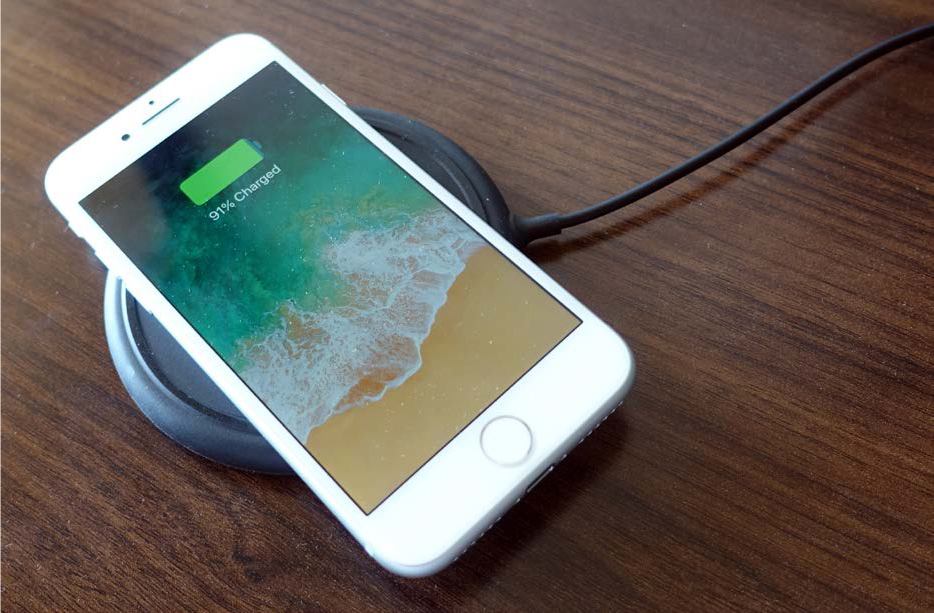
Figure 1-15.
You can buy one of these tabletop charging pads from any company; they cost about $12 on Amazon. You have to plug the pad into a power outlet, of course—wireless charging isn’t really wireless at all. But at least you’re spared the hassle of plugging and unplugging a cable every night. You just place the iPhone face-up onto the pad, and boom: The little lightning-bolt icon appears, and the “now charging” chime sounds.
Some fun facts about speed:
-
Charging a dead iPhone for two hours brings it to about 40 percent charge on a standard 5-watt Qi pad, or to about 50 percent if you use a “fast-charging” 7.5-watt pad. (For comparison, two hours brings it to 80 percent charge using the standard Lightning cable.)
-
If you plug in the Lightning cable and put the phone on the charging pad, you don’t cut the time in half. In that situation, the cable wins. The pad does nothing.
Battery Life Tips
For most people, the battery life of the iPhone is about a day. But if you can’t even make it to bedtime, knowing how to scale back your iPhone’s power appetite should come in extremely handy.
These are the biggest wolfers of electricity: the screen and background activity (especially internet activity). Therefore, when you’re nervous about your battery on an important day, here are your options:
-
Low Power Mode can squeeze another three hours of life out of a charge.
In Low Power Mode, your iPhone quits doing a lot of stuff in the background, like fetching new mail and updating apps. It also stops playing most of iOS’s cute animations and stops listening for you to say “Hey Siri” (“What to Say to Siri”). The processor slows down, too; it takes longer to switch between apps, for example. And the battery indicator turns yellow, to remind you why things have suddenly slowed down.
Unless you’ve fiddled with the settings, you get an invitation to turn on Low Power Mode when your battery sinks to 20 percent remaining, and then again at 10 percent. You can also turn on this mode manually, using the Control Center (“Control Center”) or the switch in Settings → Battery (below, top right).
If your phone is plugged in, it exits Low Power Mode automatically once it has enough juice (lower right).
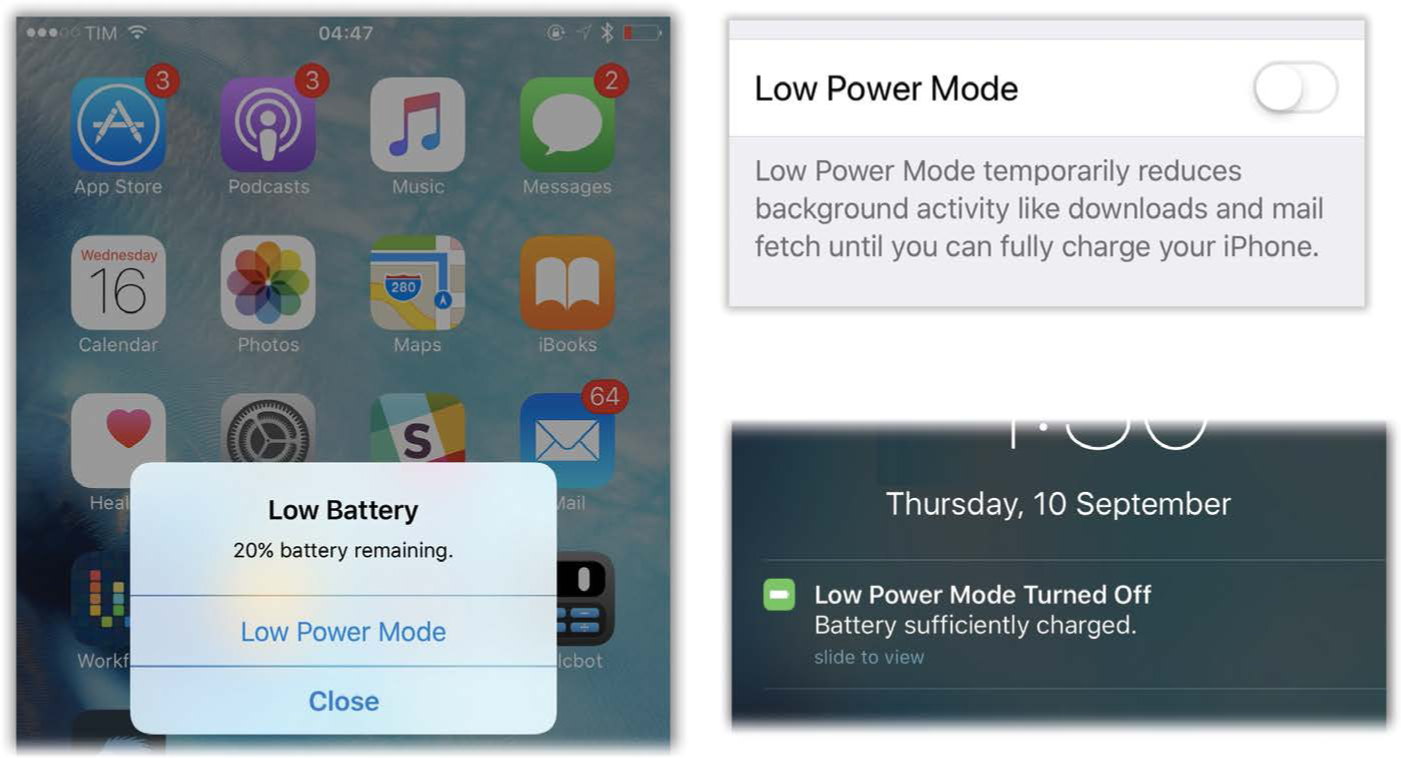
Figure 1-16.
At any time, you can also shut down juice-guzzling features manually. Here they are, roughly in order of power appetite:
-
Dim the screen. Turning down your screen saves a lot of battery power. The quickest way is to open the Control Center (“Control Center”), and then drag the brightness slider.
On a new iPhone, Auto-Brightness is turned on, too. In bright light, the screen brightens automatically; in dim light, it darkens. That’s because when you unlock the phone after waking it, it samples the ambient light and adjusts the brightness.
NOTE
This works because of the ambient-light sensor near the earpiece. Apple says it experimented with having the light sensor active all the time, but it was weird to have the screen constantly dimming and brightening as you used it.
(You can turn this auto-brightness feature off in Settings → Accessibility → Display & Text Size.)
TIP
You can set things up so a triple-click on the home button or side button instantly dims your screen. It doesn’t save any power, but it’s great for use in the bedroom, movie theater, or planetarium—without having to fuss with settings or sliders. See “The Instant Screen-Dimming Trick” for this awesome trick.
-
Turn off “push” data. If your email, calendar, and address book are kept constantly synced with the internet, then you’ve probably gotten yourself involved with Yahoo Mail, iCloud (Chapter 16), or Microsoft Exchange. Unfortunately, all that continual sniffing of the airwaves, looking for updates, costs you battery life. If you can do without the immediacy, visit Settings → Passwords & Accounts → Fetch New Data. If you turn off the Push feature for each email account and set it to Manually instead, your iPhone checks for email and new appointments only when you actually open the Mail or Calendar apps. Your battery goes a lot further.
-
Beware GPS. GPS navigation, in Maps or Google Maps, drains your battery power like a hole in a water bucket. So as you drive, once your guidance app has led you to a place you recognize, by all means shut it off.
But there’s more. In Settings → Privacy → Location Services, there’s a list of all the apps on your phone that are using its location feature to know where you are. It’s a combination of GPS, cell-tower triangulation, and Wi-Fi hotspot triangulation. And it uses battery power.
Some apps, like Maps, Find My, and Yelp, don’t do you much good unless they know your location. But plenty of others don’t really need to know where you are. Facebook and Twitter, for example, want that information only so they can location-stamp your posts. In any case, the point is to turn off Location Services for each app that doesn’t really need to know where you are.
TIP
In the list of apps under Location Services, tiny
 icons show you which apps are using GPS right now and which have used it in the past 24 hours. These icons can guide you in shutting off the GPS use of various apps.
 -
Beware processor gluttons. 3D games and other graphically intensive apps are serious power hogs, too.
-
Turn off background updating. Non-Apple apps check frequently for updates, too: Facebook, Twitter, stock-reporting apps, and so on. Not all of them need to be busily toiling in the background. Your best bet for battery life, then, involves visiting Settings → General → Background App Refresh and turning the switch off for each app whose background activity isn’t strictly necessary.
-
Turn off Wi-Fi. If you’re not in a wireless hotspot, you may as well stop the phone from using its radio. Open the Control Center and tap the
 icon to turn it off. Or at the very least tell the iPhone to stop searching for Wi-Fi networks it can connect to. “The List of Hotspots” has the details.
 -
Turn off Bluetooth. If you’re not using a Bluetooth gadget (headset, fitness band, or whatever), then for heaven’s sake shut down the Bluetooth radio. Open the Control Center and tap the
 to turn it off.
 -
Turn off cellular data. This option (in Settings → Cellular, but there’s also a Control Center button for it:
 ) turns off the cellular internet features of your phone. You can still make calls, and you can still get online in a Wi-Fi hotspot.
This feature is designed for people who have a capped data plan—a limited amount of internet use per month. If you discover you’ve used up almost all your data allotment for the month, and you don’t want to go over your limit (and trigger an overage charge), you can use this option to shut off all data. Now your phone is just a phone—and it uses less power.
-
Consider airplane mode. In airplane mode, you shut off all the iPhone’s power-hungry radios. Even a nearly dead iPhone can hobble on for a few hours in airplane mode—something to remember when you’re desperate. To enter airplane mode, tap the
 icon in the Control Center (“Control Center”).
TIP
For sure turn on airplane mode if you’ll be someplace where you know an internet signal won’t be present—like on a plane, a ship at sea, or Wyoming. Your iPhone never burns through a battery charge faster than when it’s hunting for a signal it can’t find; your battery will be dead within a couple of hours.
-
Turn off the screen. With a press of the side button, you can turn off the screen, rendering it black and saving power. That won’t interrupt audio playback—like music or podcasts—or Maps navigation.
If your battery still seems to be draining too fast, check out the table on the facing page at right, which shows you exactly which apps are using the most power.
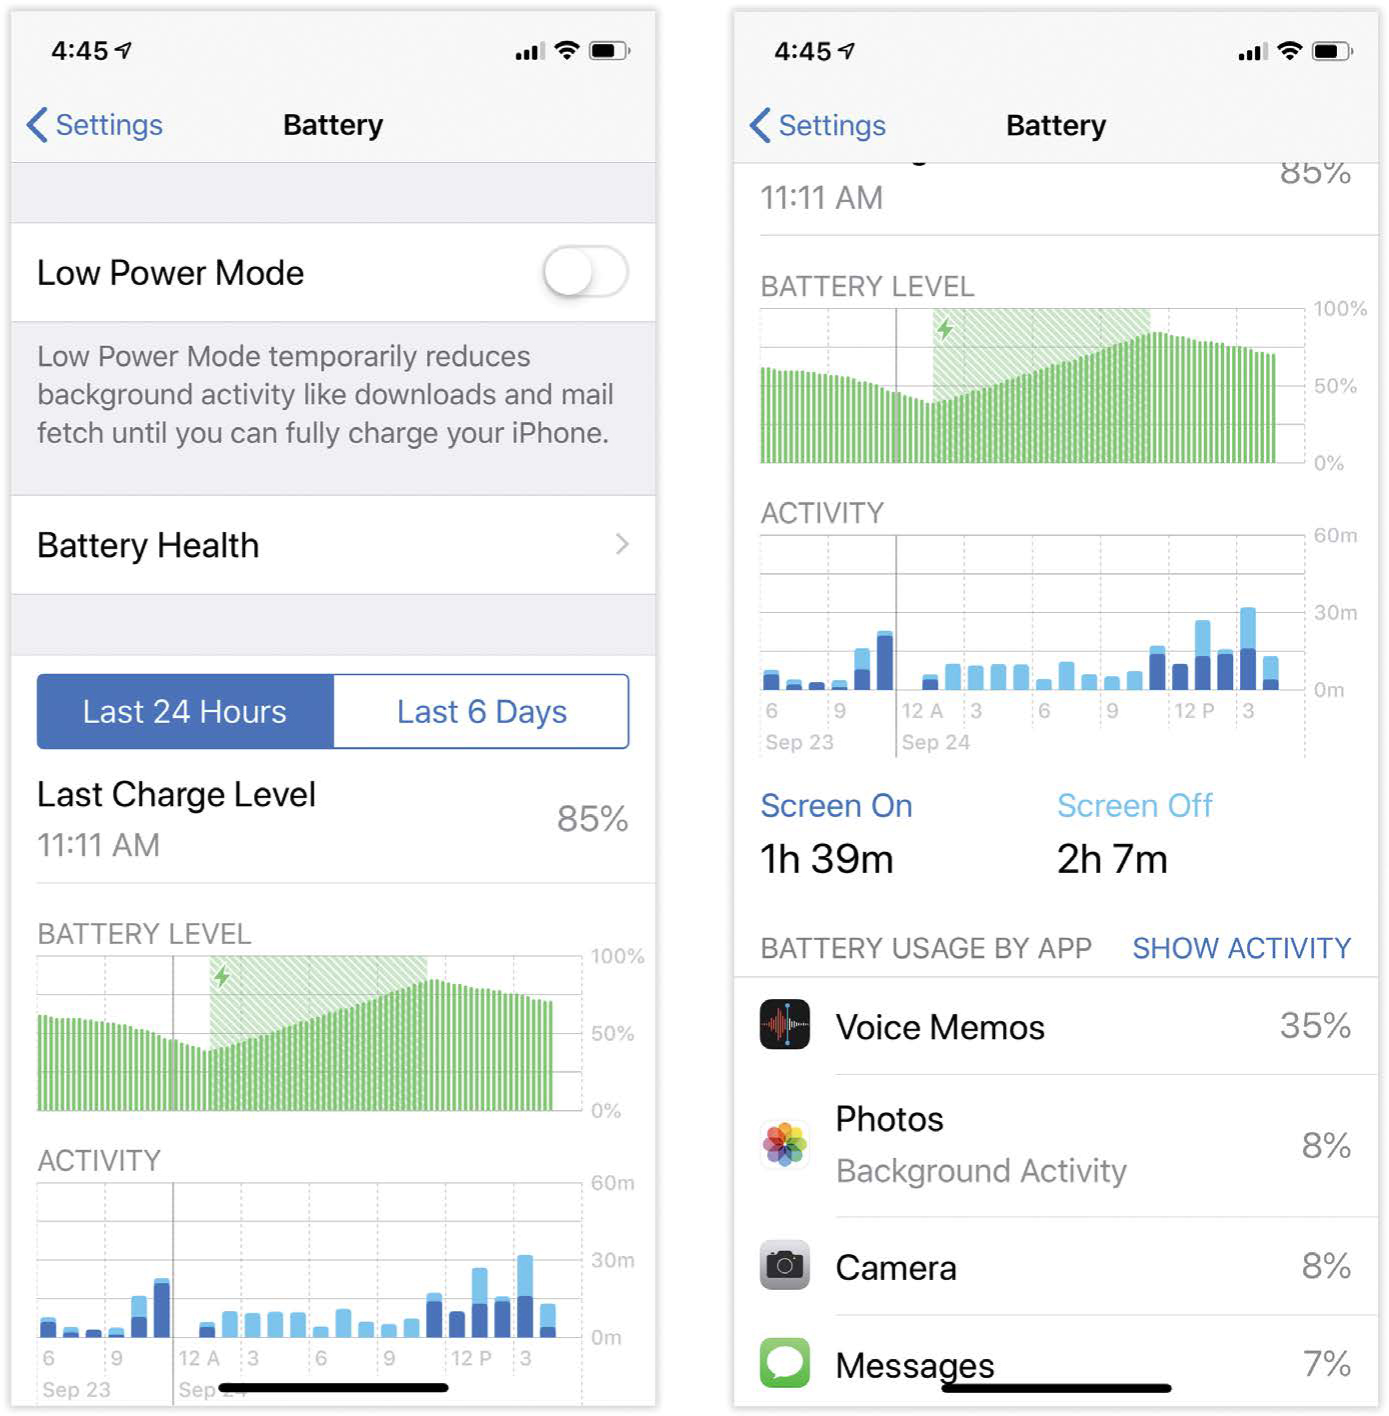
Figure 1-17.
To see it, open Settings → Battery. You can switch between battery readouts for the past 24 hours, or for the past six to ten days.
Keep special watch for apps bearing these labels:
-
Low Signal. A phone uses the most power of all when it’s hunting for a cellular signal, because it has to amplify its radios in hopes of finding one. If your battery seems to be running down faster than usual, the “Low Signal” notation is a great clue—and a suggestion that maybe you should use airplane mode when you’re on the fringes of cellular coverage.
-
Background activity. Background internet connections are especially insidious. These are apps that do online work invisibly, without your awareness—and drain the battery in the process. Here you can clearly see which apps are doing it.
Once you know the culprit app, it’s easy to shut its background work down. Open Settings → General → Background App Refresh and switch off each app whose background activity isn’t strictly necessary.
TIP
If you tap Settings → Battery → Show Activity (previous page, right), the screen shows you how much time each app has spent running—both in the foreground and in the background. It’s an incredibly informative display if you’ve been wondering where all your battery power has been going.
There is, by the way, another kind of battery life: the battery’s lifespan. In iOS 13, for the first time, Apple has given you a feature to prolong it: Optimized Battery Charging. If you turn this feature on in Settings → Battery → Battery Health, the phone can limit its charging to 80 percent full most times—a classic trick for making lithium-ion batteries last longer. It studies your charging habits, though, so it’s supposed to give you a full charge when you need it.
Control Center
For such a tiny device, there are an awful lot of settings you can change—hundreds of them. Trouble is, some of them (volume, brightness) need changing a lot more often than others (language preference, voicemail greeting).
That’s why Apple invented the Control Center: a panel that offers quick access to the controls you need the most.
To open the Control Center, no matter what app you’re using, do like this:
-
Face ID phones: Swipe down from the upper-right ear.
TIP
On the Lock screen, a faint underline appears beneath the right ear to remind you the Control Center is there.
-
Home-button phones: Swipe upward from beneath the screen.
You can even open the Control Center, using these techniques, from the Lock screen (unless you’ve turned off that feature in Settings → Face ID & Passcode → Allow Access When Locked: Control Center).
Now, it’s worth pointing out that many of the Control Center’s settings are even faster to change using Siri, as described in Chapter 5. When it’s not socially awkward to speak to your phone (like at the symphony or during a golf game), you can use spoken commands to adjust settings without even touching the screen.
The Starter Set
You can customize what appears on the Control Center, but the following controls are nonnegotiable. They’re your starter set, and you can’t remove most of them.
TIP
In many cases, you can long-press one of these buttons to open a subpanel that offers even more controls, as shown below at right. The following write-up dives into those long-press options in detail.
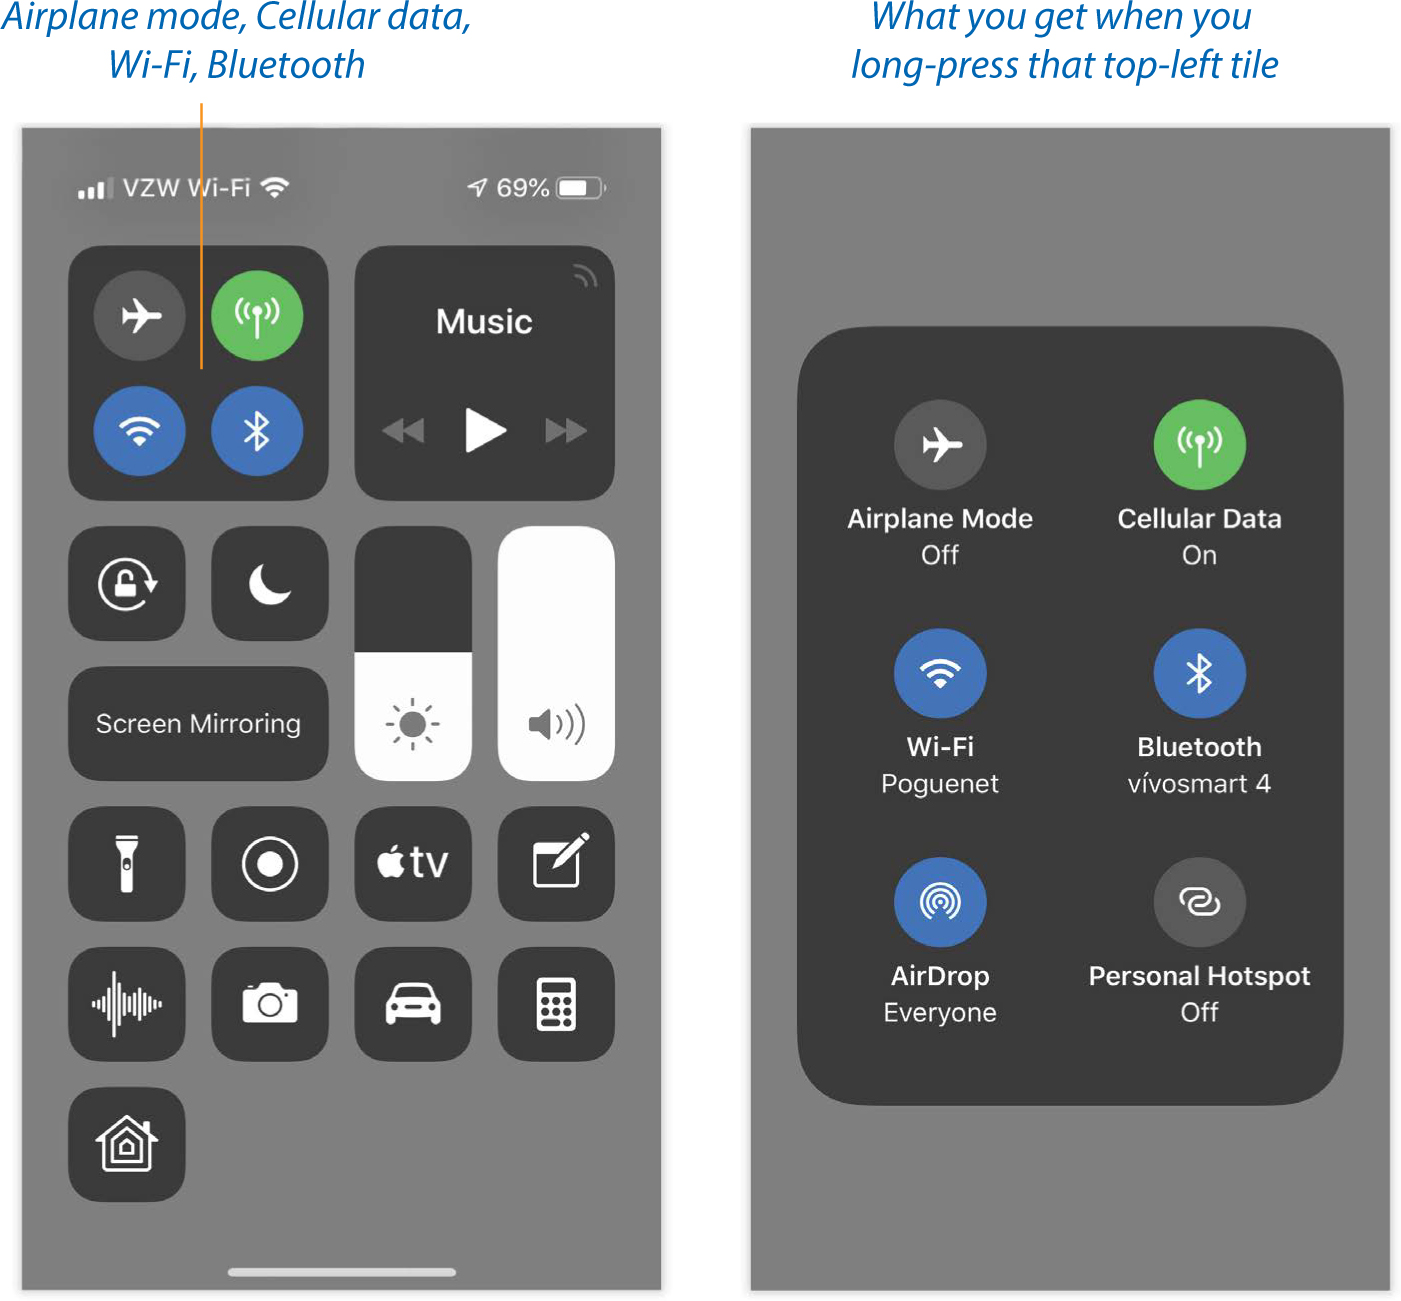
Figure 1-18.
-
Airplane mode (
 ). Tap to turn the icon orange. Now you’re in airplane mode; the phone’s wireless features are all turned off. You’re saving the battery and obeying FAA regulations. Tap again to turn off airplane mode.
Sample Siri command: “Turn airplane mode on.” (Siri warns you that if you turn airplane mode on, Siri herself will stop working. Say, “OK.”)
-
Cellular data (
 ). This icon is the on/off switch for your iPhone’s connection to the internet over the cellular airwaves (rather than Wi-Fi). Cellular data, after all, costs you money—especially when you’re roaming (“Bluetooth”)—and you may have a monthly limit. So it’s good to be able to control when you’re using it up.
Sample Siri command: “Turn off cellular data.”
-
Wi-Fi (
 ). Tap to turn your phone’s Wi-Fi off (white) or on (blue).
Sample Siri commands: “Turn off Wi-Fi.” “Turn Wi-Fi on.”
NOTE
The Wi-Fi and Bluetooth buttons here in the Control Center turn off those wireless features only partly and only temporarily.
The first time you use these buttons, a message appears, letting you know that Wi-Fi or Bluetooth will be off only until tomorrow (namely, until 5 a.m.). Apparently, a lot of people forgot to turn these features on again—when, for example, getting into their Bluetooth-equipped cars the next day.
Meanwhile, some aspects of these technologies remain on—enough Wi-Fi to let AirDrop (“AirDrop”), Personal Hotspot (“Personal Hotspot (Tethering)”), and Location Services (“Privacy”) work, and enough Bluetooth to let the Apple Watch, Personal Hotspot, and Handoff connect.
Bottom line: Turning off Wi-Fi or Bluetooth in the Control Center doesn’t save you as much battery, or block as many radio signals, as really turning them off. If that’s your goal, go into Settings → Wi-Fi or Settings → Bluetooth and do it the hard way.
-
Bluetooth (
 ). Tap to turn your Bluetooth transmitter off (white) or on (blue).
Sample Siri commands: “Turn Bluetooth on.” “Turn off Bluetooth.”
Long-press options: If you long-press anywhere in this cluster of four wireless buttons, you pop open a new panel. It offers the same buttons—Airplane Mode, Cellular Data, Wi-Fi, Bluetooth—with labels, this time, along with two more.
First, there’s AirDrop (
 ). This feature gives you a quick, effortless way to shoot photos, maps, web pages, and other stuff to nearby iPhones, iPads, iPod Touches, and even Macs. (See “AirDrop” for details.) Tap this button to see the AirDrop controls.
Second, there’s Personal Hotspot (
 ), which lets your phone act as a Wi-Fi hotspot for your laptop or other gadgets (“Personal Hotspot (Tethering)”).
TIP
Once you’ve opened this mini-panel, long-press again on the
 button to specify which hotspot you want to join—or long-press
  to specify which Bluetooth gadget to connect to. These are nifty iOS 13 shortcuts. See “Edge Swipes”.
 -
Music. On this little tile, you see information about the current song, plus playback controls (
 ).
).These controls govern playback in whatever app is playing music or podcasts in the background: the Music app, Pandora, Spotify, whatever it is. You can skip a horrible song quickly and efficiently without having to interrupt what you’re doing, or pause your podcast to chat with a colleague.
Sample Siri commands: “Pause the music.” “Skip to the next song.” “Play some Billy Joel.”
Long-press options: The subpanel offers a scrubber bar that shows where you are in the song, the album art, and a button (
 ) that lets you choose what speaker you want to use. It always lists iPhone (the built-in speakers), but it may also list things like a Bluetooth speaker, earbuds, or AirPlay, which sends music or video to a wireless speaker system or TV (see “TV Output”).
There’s also a volume slider. It lets you make big volume jumps faster than you can by pressing the volume buttons on the side of the phone.
-
Rotation lock (
 ). When rotation lock is turned on (red), the screen no longer rotates when you turn the phone 90 degrees. The idea is that sometimes, like when you’re reading an ebook on your side in bed, you don’t want the screen picture to turn; you want it to stay upright relative to your eyes. (A little
  icon appears at the top of the screen to remind you why the usual rotating isn’t happening. On iPhones with Face ID, you’ll have to open the Control Center to see that icon.)
The whole thing isn’t quite as earth-shattering as it sounds—first, because it locks the image in only one way: upright, in portrait orientation. You can’t make it lock into widescreen mode. Furthermore, many apps don’t rotate with the phone to begin with. But when that day comes when you want to read in bed on your side, your iPhone will be ready. (Tap the button again to turn rotating back on.)
There are no Siri or long-press options for this control.
-
Do Not Disturb (
 ). Do Not Disturb mode, described in “Do Not Disturb”, means the phone won’t ring or buzz when people call—except a few handpicked people whose communiqués are allowed to ring through. Perfect for sleeping hours; in fact, you can set up an automated schedule for Do Not Disturb (midnight to 7 a.m., say).
But what if you wake up early or want to stay up late? You can tap to turn Do Not Disturb on (blue moon) or off (white).
Long-press options: Here’s a brilliant feature: Do Not Disturb can turn itself off automatically. Long-pressing the Control Center icon offers you choices like For 1 hour (great for meetings), Until tomorrow morning (great for dates), and Until I leave this location (great for movies and plays). If the iPhone knows you’re in a meeting, based on your calendar, you get a fourth option, which names the current appointment so that DND will turn off as soon as whatever-it-is ends.
An option to jump to your daily automatic Schedule for Do Not Disturb is here, too; it takes you to the screen described in “Do Not Disturb”.
Sample Siri commands: “Turn on Do Not Disturb.” “Turn Do Not Disturb off.”
-
Brightness (
 ). Here’s a screen-brightness slider—in the form of a big, fat vertical bar that’s easy to operate. Drag anywhere within it, up or down, to change the brightness.
Sample Siri commands: “Make the screen brighter.” “Dim the screen.”
Long-press options: The subpanel presents an on/off button for three features: Night Shift, which makes the screen yellower before bedtime to prevent sleep disturbance (“Accessibility”); True Tone, a feature of the iPhone 8 and later phones that tweaks the screen colors to make them look consistent in whatever ambient light you’re in (“Accessibility”); and Dark Mode, a new iOS 13 look described in “What’s New in iOS 13”.
-
Volume (
 ). Here it is, next to brightness: an equally big, fat volume slider. Slide your finger up or down to adjust the audio volume.
Long-press options: Long-pressing doesn’t gain you any new controls. It does, however, open up a much bigger version of the volume slider. It’s now easier to make finer adjustments.
The bottom row of the starter icons, described next, are removable. If they’re not floating your boat, see the next section for instructions on how to get rid of them.
-
Flashlight (
 ). Tap to turn on the iPhone’s “flashlight”—actually the LED lamp on the back that usually serves as the camera flash. Knowing that a source of good, clean light is a few touches away makes a huge difference if you’re trying to read in the dark, find your way along a path at night, or fiddle with wires behind your desk.
NOTE
On the Face ID phones, there’s also a flashlight button right on the Lock screen. Long-press it to turn it on.
Long-press options: You get a four-segment “slider” that controls the flashlight’s brightness. The top segment means full brightness; the bottom one means Off. That’s supercool, especially on the iPhone 7 and later, where the LED flashlight is enough to light up a high-school football game at night.
Sample Siri commands: “Turn on the flashlight.” “Turn it off”
-
Timer (
 ). Tap to open the Clock app—specifically, the Timer mode, which counts down to zero. Apple figures you might appreciate having direct access to it when you’re cooking, for example, or waiting for your hair color to set.
Long-press options: Long-pressing gets you a cool “Set timer for” slider, so you can start a timer for anywhere from one minute to two hours with a single finger swipe. Hit Start to start, or tap outside the slider to cancel the whole procedure.
Sample Siri commands: “Open the Timer.” Or, better yet, bypass the Clock and Timer apps altogether: “Start the timer for three minutes.” “Count down from six minutes.” (Siri counts down right there on the Siri screen.)
-
Calculator (
 ). Tap to open the Calculator app—a handy shortcut if it’s your turn to figure out how to divide up the restaurant bill.
Long-press options: A Copy Last Result button appears, so you can snag whatever.
Sample Siri commands: “Open the calculator.” Or, better yet, without opening any app: “What’s 106 divided by 5?”
-
Camera (
 ). Tap to jump directly into the Camera app. Because photo ops don’t wait around.
Long-press options: Handy! Here are the Take Selfie, Record Video, and (on Plus and Face ID models) Take Portrait commands. Each saves you a little fiddling in the Camera app.
Sample Siri commands: “Take a picture.” “Open the camera.” “Scan QR Code.” “Record video.”
-
Home (
 ). Here’s instant access to your HomeKit smart-home gadgets, if any. Door locks, lights, thermostats, what have you. Tap to open a page of icons for the ones you’ve identified as your favorites (“Home”); from here, tap to turn them on and off, or long-press to open their settings pages. (There aren’t any long-press options on the Control Center icon itself.)
Sample Siri commands: “Turn on the kitchen lights.” “Set the downstairs to 70 degrees.” You know.
Customizing the Control Center
Make Control Center your own! You can add all kinds of buttons to it.
The Center for Control Center Customization, as it turns out, is Settings → Control Center → Customize Controls (below, left). Here’s a giant list (right) of the buttons you’re allowed to add or remove. It’s very simple: Tap ![]() and then Remove to remove a button that’s already installed. Tap
and then Remove to remove a button that’s already installed. Tap ![]() to install a button that’s not yet on the Control Center.
to install a button that’s not yet on the Control Center.
And drag the little ![]() handles up or down to choose an order for your icons on the Control Center.
handles up or down to choose an order for your icons on the Control Center.

Figure 1-19.
Here are your options (except as noted, none of them offer further options when you long-press):
-
Flashlight, Timer, Calculator, Camera, Home. As described previously.
-
Accessibility Shortcuts. Opens the same list of accessibility shortcuts (Zoom, VoiceOver, AssistiveTouch, and so on) you’ve chosen to list for quick access when you triple-click the home button. These options, and the triple-clicking business, are described in “Accessibility Shortcut”.
-
Alarm. Tap to open the Clock app, this time set to Alarm mode (“Alarm”), where you can set (or turn off) an upcoming alarm.
-
Apple TV Remote. This pops open an onscreen version of your Apple TV remote control, complete with Menu, Play, and Siri buttons—plus a large trackpad area for scrolling around. This item is fantastic when you can’t seem to dig your actual Apple TV remote from under the couch cushions.
-
Dark Mode. Turns on iOS 13’s new Dark mode (“What’s New in iOS 13”).
-
Do Not Disturb While Driving. Apple is very proud of this feature, which prevents notifications, calls, or texts from lighting up your phone or making it ring whenever you’re behind the wheel and in motion.
You can read all about this feature in “One More Safety Measure”. There you’ll learn that you can (and probably should) set it to turn on automatically when you’re driving. In other words, this button is primarily useful for turning DNDWD off—when you’re in the passenger seat.
-
Guided Access. Opens the on/off switch for Guided Access, otherwise known as “kiosk mode.” It locks the phone into one particular app, so that (for example) your toddler can play with it without wreaking any havoc. See “Guided Access (Kiosk Mode)”.
-
Hearing. Turns on Live Listen, the feature that turns your iPhone into a remote microphone for your AirPods wireless earbuds (“Live Listen”).
-
Low Power Mode. Here’s a one-touch way to manually switch on the battery-saving feature known as Low Power Mode (“Battery Life Tips”).
-
Magnifier. Turns the entire phone into a powerful, illuminated magnifying glass, as described in “Magnifier”.
-
Notes. This is a big, big deal. The idea is to give you immediate access to Notes, so you can jump in, no matter what you were doing, to write down something quickly: a phone number someone’s giving you, dosage instructions your doctor’s rattling off, or a brainstorm you’ve just had for a million-dollar product.
TIP
One tap opens directly into the Notes app. But if you long-press instead, you get a list of commands like New Note, New Checklist, New Photo, and Scan Document.
Now then. If you make Notes part of the Control Center, it will be available even when the phone is locked. Clearly, that could be a privacy disaster if your phone falls into the hands of some passing evildoer.
Apple has given that scenario a lot of thought, though. First of all, if you open Notes from the Lock screen, there’s no way to see any existing notes. You’re stuck on a single page.
But that’s not the end of the privacy control—oh, heavens, no. Open Settings → Notes → Access Notes from Lock Screen.
At the top, you have three choices. Off means forget it—you can’t open Notes from the Lock screen at all. (So why bother putting the Notes button on the Control Center? Because you can still use it when the phone isn’t locked.)
Always Create New Note means every time you open Notes from the Lock screen, you wind up at another fresh, empty Notes page.
And Resume Last Note…well, if you choose this option, Settings has a whole bunch more questions for you.
For example, if you open Notes from the Lock screen, do you want it to reopen the last note you viewed in the app? Or just the last note you opened from the Lock screen? That second option is another security precaution, keeping your Lock screen doodlings separate from your other stuff.
You also get a bunch of time settings, like After 5 Minutes, After 15 Minutes, and so on. What Apple is saying here: “Even though you’ve selected Resume Last Note, you’re still going to get a new, empty note if it’s been at least five minutes since the last time you looked at it. Just in case you wander off during a meeting and some idiot picks up your phone six minutes later to see what you were writing.”
Never ignores all these options. It means that every time you open Notes from the Lock screen, you’ll return to whatever Note page you’ve been working on.
If all these options make perfect sense to you, there are many fine career opportunities awaiting you at the Internal Revenue Service.
-
QR Code Reader. Opens the Camera app in QR Code mode (“Camera”).
-
Screen Recording. Here’s a freak of iOS nature: a Control Center button for a feature you can’t trigger in any other way. The idea, of course, is to let you record videos of what’s happening on the iPhone screen—with narration, if you like. See “Recording Screen Video” for details.
-
Stopwatch. Tap to open the Clock app, already tuned to the Stopwatch mode (“Stopwatch”). You’re all ready to time that 50-yard dash or teenage room-cleaning.
-
Text Size. There are all kinds of ways to make text bigger and more readable on the iPhone’s screen (see “Motion”). But this Control Center option gives you a more immediate way of making adjustments—say, when you find yourself on some web page in 3-point type. Tap to see a vertical slider, whose segments indicate increasingly larger type sizes. Slide your finger accordingly.
-
Voice Memos. The Voice Memos app has always been handy for recording speeches, interviews, song ideas, and so on. What hasn’t been handy is the long slog to get into the app and start recording.
No more! Tap this button to open the Voice Memos app, where another tap begins the recording. Better yet, a long-press on this Control Center button produces a menu that lists your three most recent recordings (for instant playback)—and a New Recording button. In other words, you can get the audio capture going with only one tap-and-slide in the Control Center.
-
Wallet. Here’s another way to jump into your Apple Wallet—usually because you want to use Apple Pay (“Apple Pay”). Tap this button to open the Apple Pay screen with your preferred card selected; at this point, you’ll use your fingerprint—or on Face ID phones, your face—to complete the transaction.
Closing the Control Center
The Control Center closes when any of these things happen:
-
You tap one of the buttons that opens an app (Timer, Calculator, Camera, Notes, and so on).
-
You tap anywhere except on a button.
-
You swipe upward (Face ID phones) or downward (home-button phones) anywhere on the Control Center.
-
You press the home button, if you have one.
NOTE
In some apps, on home-button phones, swiping up doesn’t open the Control Center on the first try, much to your probable bafflement. Instead, swiping just makes a tiny ![]() appear at the edge of the screen. (You’ll see this behavior whenever the status bar—where the time and battery gauge appear—is hidden, as in the full-screen modes of Books, Maps, TV, and so on. It also happens in the Camera app.)
appear at the edge of the screen. (You’ll see this behavior whenever the status bar—where the time and battery gauge appear—is hidden, as in the full-screen modes of Books, Maps, TV, and so on. It also happens in the Camera app.)
In those situations, Apple is trying to protect you from opening the Control Center accidentally—for example, when what you really wanted to do was scroll up. No big deal; once the ![]() appears, swipe up again to open the Control Center.
appears, swipe up again to open the Control Center.
If you find yourself opening the Control Center accidentally too often—when playing games, for example—you can turn it off. Open Settings → Control Center. Turn off Access Within Apps. Now swiping opens the Control Center only at the Home screen.
Passcode Protection
Like any smartphone, the iPhone offers a first line of defense if it ever winds up in the wrong hands. It’s designed to keep your stuff private from other people in the house or the office, or to protect your information in case you lose the iPhone.
Some iPhone owners don’t bother setting up a passcode. Maybe they never set the thing down, so they don’t worry about privacy. Or maybe there’s just not that much personal information on the phone—and meanwhile, having to enter a passcode every time you wake the phone can get to be a hassle.
TIP
If you ever do lose your phone, you can put a passcode on it by remote control; see “Enable Offline Finding”.
Everyone else figures that the inconvenience of entering a passcode many times a day is a small price to pay for the knowledge that nobody can get into your stuff if you lose your phone.
Of course, you can also protect your home-button phone with a fingerprint or your Face ID phone with face recognition. But both of those require that you first create a passcode, which will always be the fallback.
Even if you usually unlock the phone with your finger or face, you’ll still be required to use that passcode, for added security, after any of these things occur:
-
You’ve restarted or shut down the phone.
-
You’ve made several failed attempts to log in with a finger or face.
-
It’s been two days since you unlocked the phone.
-
It’s been six days since you last entered your passcode, and you haven’t used your finger or face in eight hours.
-
You started to turn off the phone as described in “Turning the Phone On and Off” but tapped Cancel instead.
None of that will be on the test. The point is that sometimes, even with finger or face recognition, you’ll need your passcode.
Setting Up a Passcode
Now, you probably created a phone passcode the first time you turned your iPhone on; the iPhone practically insists on it.
But if you skipped that step, here’s how to do it now.
Open Settings → Touch ID & Passcode. On iPhone Face ID models, it’s called Face ID & Passcode.
Tap Turn Passcode On. iOS proposes that you make up a six-digit passcode. But if you tap Passcode Options, you can choose instead a Custom Alphanumeric Code (any password, any length), Custom Numeric Code (an all-number code, any length), or 4-Digit Numeric Code (you know—ATM style).
You’re asked to type the passcode you want twice, to make sure you didn’t make a typo.
NOTE
Don’t kid around with this passcode. If you forget the code, you’ll have to restore your iPhone (“iPhone Doesn’t Turn On”), which wipes out everything on it. You’ve probably still got most of the data on your computer or backed up on iCloud, of course (music, video, contacts, calendar), but you may lose text messages, mail, and so on.
Once you confirm your passcode, you return to the Passcode Lock screen. Here you have a few more options.
The Require Passcode option lets you specify how quickly the passcode is requested before locking somebody out: anywhere from immediately after the iPhone wakes to as long as four hours later. (These options are a convenience to you, so you can quickly check your calendar or missed messages without having to enter the passcode—while still protecting your data from, for example, criminals who pick up your iPhone while you’re out getting coffee.)
NOTE
If you use Touch ID or Face ID, Immediately is your only option. Just keep your fingers or face handy.
Certain features are accessible on the Lock screen even before you’ve entered your passcode: the Today and Notifications tabs of the Notification Center, the Control Center, Siri, Home Control, Reply with Message (the ability to reply to text messages right from their notification bubble on the Lock screen), and Return Missed Calls (the option to return a missed call from its bubble, without unlocking the phone).
NOTE
The USB Accessories option is meant to add security. Off means that, starting an hour after the phone has gone to sleep, anything you’ve plugged into the Lightning jack is electronically disconnected (aside from charging).
What Apple is worried about is that your family will wait till you’ve gone to bed, grab your iPhone, and then connect it to a computer, open iTunes, and sneakily get access to your data. Now they can’t. (They can’t sneakily connect your phone to earbuds or speakers, either.) If that seems a little far-fetched to you, then turn this on so you won’t wonder why your plug-in gadgets don’t seem to be working.
These are huge conveniences, but also, technically, a security risk. Somebody who finds your phone on your desk could, for example, blindly voice-dial your colleagues or use Siri to send a text. If you turn these switches off, nobody can use these features until after unlocking the phone with your passcode, fingerprint, or face.
Finally, here is Erase Data—an option that’s both scary and reassuring. When this option is on, if someone makes 10 incorrect guesses at your passcode, the iPhone erases itself. It’s assuming that some lowlife burglar is trying to crack into it to have a look at all your personal data.
This option, a pertinent one for professional people, provides potent protection from patient password prospectors.
And that is all. From now on, each time you wake your iPhone (if it’s not within the window of repeat visits you established), you’re asked for your passcode.
Fingerprint Security (Touch ID)
All home-button iPhones offer the option of using a more secure and convenient kind of “passcode”: your fingertip.
The lens built right into the home button (clever!) reads your finger at any angle. It can’t be faked out by a plastic finger or even a chopped-off finger. You can teach it to recognize up to five fingerprints; they can all be yours, or some can belong to other people you trust.
Before you can use your fingertip as a passcode, though, you have to teach the phone to recognize it. iOS asks you to set up a fingerprint the first time you wake your new phone (or newly upgraded one). But if, at that juncture, you hit Skip, here’s how you can add one now:
-
Create a passcode. You can’t use a fingerprint instead of a passcode, only in addition. You’ll still need a passcode from time to time to keep the phone’s security tight. For example, you need to enter your passcode if you can’t make your fingerprint work—maybe it got encased in acrylic in a hideous crafting accident), if you restart the phone, and so on.
So open Settings → Touch ID & Passcode and create a password, as described earlier.
-
Teach a fingerprint. At the top of the Touch ID & Passcode screen, you see the on/off switches for the four things your fingerprint can do: unlock the phone (iPhone Unlock); pay for things (Apple Pay); serve as your password when you buy books, music, apps, and videos from Apple’s online stores (iTunes & App Store); and automatically enter your password into websites and apps (Password Autofill; see “Passwords and Credit Cards”).

Figure 1-20.
But what you really want to tap here, of course, is Add a Fingerprint.
Now comes the cool part. Place the finger you want to train onto the home button—your thumb or index finger are the most logical candidates. You’re asked to touch it to the home button over and over, maybe six times. Each time, the gray lines of the onscreen fingerprint darken a little more, as shown on the previous page.
Once you’ve filled in the fingerprint, you see the Adjust Your Grip screen. Tap Continue. Now the iPhone wants you to touch the home button another few times, this time tipping the finger a little each time so the sensor gets a better view of your finger’s edges.
Once that’s done, the screen says “Success!”
You’re ready to start using the fingerprint. Try it: Put the phone to sleep. Then wake it by pressing the home button, and leave your finger on the button for about a second. The phone reads your fingerprint and instantly unlocks itself.
And now, a few notes about using your fingerprint as a password:
-
Yes, you can touch your finger to the home button at the Lock screen. But you can also touch it at any Enter Passcode screen.
Suppose, for example, that your Lock screen shows that you missed a text message. And you want to reply. Well, you can swipe across that notification to open it in its native habitat—the Messages app—but first you’re shown the Enter Passcode screen. Ignore that. Just touch the home button with the finger whose print you recorded.
-
Apple says the image of your fingerprint is encrypted and stored in the iPhone’s processor chip. It’s never transmitted anywhere, it never goes online, and it’s never collected by Apple.
-
If you return to the Touch ID & Passcode screens, you can tap Add a Fingerprint again to teach your phone to recognize a second finger. And a third, fourth, and fifth.
-
On the other hand, it makes a lot of sense to register the same finger several times. You’ll be amazed at how much faster and more reliably your thumb (for example) is recognized if you’ve trained it as several different “fingerprints.”
-
To rename a fingerprint, tap its current name (“Finger 1” or whatever). To delete one, tap its name and then tap Delete Fingerprint. (You can figure out which finger label is which by touching the home button; the corresponding label blinks. Sweet!)
-
You can register your toes instead of fingers, if that’s helpful. Or even patches of your wrist or arm, if you’re patient (and weird).
-
The Touch ID scanner may have trouble recognizing your touch if your finger is wet, greasy, or scarred.
-
The iPhone’s finger reader isn’t just a camera; it doesn’t just look for the image of your fingerprint. It’s actually measuring the tiny differences in electrical conductivity between the raised parts of your fingerprint (which aren’t conductive) and the skin just beneath the surface (which is). That’s why a plastic finger won’t work—and even your own finger won’t work if it’s been chopped off (or if you’ve died).
Fingerprints for Apps, Websites, and Apple Pay
So if your fingerprint is such a great solution to password overload, how come it works only to unlock the phone and to buy stuff from Apple’s online stores? Wouldn’t it be great if your fingerprint could also log you into secure websites? Or serve as your ID when you buy stuff online?
That dream is finally becoming a reality. Software companies can now use your Touch ID fingerprint to log into their apps. Mint (for checking your personal finances), Evernote (for storing notes, pictures, and to-do lists), Amazon (for buying stuff), and other apps now permit you to substitute a fingerprint touch for typing a password.
What’s really wild is that password-storing apps like 1Password and LastPass have been updated, too. Those apps are designed to memorize your passwords for all sites on the web, of every type—and now you can use your fingerprint to unlock them.
Moreover, your fingerprint is now the key to the magical door of Apple Pay, the wireless pay-with-your-iPhone technology described in “Apple Pay”.
This is all great news. Most of us would be happy if we never, ever had to type in another password.
Face ID
When Apple decided to cover the entire face of the iPhone X and its successors with screen, there was an obvious problem: the home button. Were they really going to interrupt that gorgeous ocean of screen with a cutout for the home button?
Nope. The home button went away. In place of its functions, Apple came up with the various swipes and side-button presses described in this book. And in place of the fingerprint reader, the Face ID models have a facial recognition system. You unlock the phone by looking at it.
You can’t fool Face ID with a photo, a mask, or even a 3D model of your head. It works in the dark. It works if you change hairstyles, glasses, makeup, or facial hair. It works through most sunglasses. It works if you’re wearing a hat and scarf (it just has to see your eyes, nose, and mouth).
If you grow fat, or skinny, or old, it will still work, because it gradually updates its model of your face as you use it. (And if you have radical plastic surgery, well, you’ll have to retrain it. Takes about a minute.)
It can’t be forced on you when you’re sleeping, because you have to be looking at the phone. It can’t be forced on you by a police officer, because you can disable it with a quick, secret button press (“The “Forcible Unlock” Situation”).
Whereas one in 50,000 people might be able to get into your phone with a fingerprint, Face ID’s miss rate is one in a million. (The exception: Your identical twin might be able to fool it. You’ve been warned.)
You’ll use Face ID wherever you used to use your fingerprint: triggering Apple Pay, for example, or logging into apps like Mint, 1Password, and E-Trade.
TrueDepth
So how does the phone recognize your face? Using a mass of sensors Apple calls TrueDepth. They hide in the notch at the top of the iPhone.
When you wake the phone, an infrared lamp (called the flood illuminator—but you knew that) blasts invisible light forward to see if a face is in range. If so, a tiny dot projector blasts 30,000 pinpoints of infrared light onto your face, and an infrared camera reads the distortion of their spacing and shape to find its contours. (That’s why Face ID works in the dark—it relies on infrared light.)
If the infrared camera confirms that you’re you—if the mathematical model of your facial contours matches what it captured when you trained it—then the phone unlocks. Only the tiny opening of a padlock on the Lock screen signifies that facial recognition has done its thing.
Training Face ID
In most ways, Face ID works exactly like Touch ID, described earlier. For example, you must create a passcode as a backup before you can turn on Face ID.
You’ll need that passcode from time to time, for added security—after you’ve restarted the phone, after five failed attempts to log in with facial recognition, and so on (see “Passcode Protection”).
After creating your passcode in Settings → Face ID & Passcode, tap Set Up Face ID. Center your face in the circle, and then trace a circle in the air with your nose, so the frame of the circle fills in. You’re asked to do this a second time; it has now created its model of your face.
(Apple stresses that the scan of your face is never transmitted, not even to Apple, and is not part of any backup. It’s stored in a protected piece of memory called the Secure Enclave.)

Figure 1-21.
You can even train the cameras to recognize a second face (tap Set Up an Alternative Appearance). That might be a second person (your spouse, your kid), or it might be you with a dramatically different look. Either way, it means more flexibility.
Using Face ID
From now on, you can unlock your iPhone like this:
-
Wake the phone by tapping the screen, pressing the side button, or tipping the phone upright.
-
Look at the phone. A white padlock at the top of the screen opens to show you that Face ID has recognized you and unlocked the phone.
If all you wanted to do was check your notifications or something, that’s all there is to it. In fact, what’s especially cool is that when you wake the phone, message and mail notifications don’t reveal their contents—but once the phone recognizes you, they expand in place!
If you actually want to proceed—to go to the Home screen, for example—then there’s one more step:
-
Swipe up from beneath the screen. It can be a short, quick swipe. The Home screen (or whatever app you were using) appears. You’re in.
Every now and then, Face ID doesn’t unlock when you look at it, and asks that you enter your passcode.
If you do, that’s a good thing; Face ID learns from its mistake and is more likely to recognize you the next time.
But if you’re in a hurry, you can just tell Face ID to try scanning you again: A quick swipe up from the bottom of the screen makes the phone perform a new scan. (Of course, putting the phone to sleep and waking it again will do the same thing.)
TIP
There are some useful options to change in Face ID: See “Face ID (Touch ID) & Passcode”.
Get iPhone: The Missing Manual, 13th Edition now with the O’Reilly learning platform.
O’Reilly members experience books, live events, courses curated by job role, and more from O’Reilly and nearly 200 top publishers.

