The iPod’s menus are as straightforward as its controls. You use the scroll wheel to go down the list of options you see on the screen. Then you press the Select button to pick what you want. Small arrows on the end of each menu item (like this: Settings >) indicate that another menu lurks behind it, so keep pressing Select until you get to where you want to go. (If you realize that’s not where you want to go, press the Menu button to retrace your steps.)
Note
The menus and screens described here refer to the ones used in iPod system software 1.0 for the video-enabled iPods first released in 2005, and the mighty-mite iPod Nano.
The main screen (Figure 1-5) says iPod at the top and offers a choice of six areas to go to next: Music, Photos, Videos, Extras, Settings, and Shuffle Songs. The iPod Nano has the same set of menus except for the Videos item because it can’t play video. Here’s more about what’s under each menu item.

Figure 1-5. If you don’t see this main menu (shown on the left) at the moment, press the Menu button repeatedly until you do. From here, you can drill down into any iPod function. Use the scroll wheel to slide the highlight bar down the menu, and press the round Select button to jump into the chosen menu, in this case, the Music menu.
The Music menu is a big one-stop shopping center for all of the iPod’s audio-related options, including tunes, audiobooks, and podcasts.
A playlist is a customized list of songs that you create from the tracks in your music library. It’s your own personal music mix that you can save, store, and play over and over again on your iPod or computer.
Except for On-The-Go playlists (described next), you make playlists on your Mac or PC using the iTunes software. For example, you can make a playlist called “Go For Baroque” and add all of your favorite Bach and Handel songs from your music library, in the order you want to hear them. You can also get the computer to create playlists for you with the iTunes Smart Playlists feature.
Once you save a playlist and synchronize your computer with the iPod, the file is transferred to the iPod.
All of the playlists you’ve created in iTunes appear in the Playlists menu (Figure 1-6). When you want to hear a particular set of songs, choose the playlist’s name and press Play. When you finish listening to one playlist, pick another from the Playlists menu to keep jamming.
Playlists are not set in stone. For example, if you made a playlist called “All of Radiohead,” and Radiohead puts out a new album, you can just rip the new CD on your Mac or PC, drag the files onto your existing Radiohead playlist, and update the iPod.
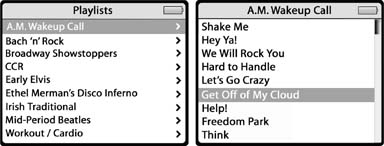
Figure 1-6. Left: Scroll to the playlist you want to hear, select it, and press Play.Right: If you highlight a playlist name and then press Select, you see a list of the songs in that playlist.
To modify or delete a playlist, use iTunes; you can’t do that kind of thing on the iPod. Chapter 5 has loads more info on creating and editing playlists.
Before the 2003 iPods beamed in from Apple headquarters, the only way to make a playlist for the iPod was to sit down at your computer and fire up iTunes (Chapter 5). Then you had to download the fresh, hot playlist to the iPod when it was connected.
This method didn’t exactly provide instant gratification. If, while you were bopping around town, you found yourself suddenly wishing you could hear an eclectic mix of tunes from several different albums and artists, you were out of luck.
The Playlists On-The-Go feature fixes that. You scroll through your iPod’s music library, choose the song you want to add, and hold down the Select button for a few seconds. The song’s title blinks three times to acknowledge its addition to a special, modifiable playlist called On-The-Go. You’re then free to scroll onward to the next song you want to add. You can press and select entire albums, artists, or even other playlists to add to your On-The-Go compilation.
To see your On-The-Go playlist, just scroll to the very bottom of the Playlists menu. Press Select to see the list of songs in it—or press Play to hear them.
For people who really love spontaneous music-mixing, it’s also possible to save ‘n’ sync multiple On-The-Go playlists. Once you have a set list you really want to keep in the On-The-Go area of the playlists menu, scroll down to the bottom of the list and choose Save Playlist. This slides you over to another screen where your options are Cancel or Save Playlist. Press Save Playlist to have the songs immortalized as New Playlist 1 on the iPod, until you can hook up with iTunes and rename it something more memorable.
Once you save an On-The-Go playlist on the iPod, all those songs move over to New Playlist 1, and you can whip up a fresh grouping of tunes. If you opt for Save Playlist again, that new batch becomes New Playlist 2. If you have your iPod configured to automatically sync with iTunes (Section 12.10), all the New Playlists appear in the iTunes Source list, where you can rename them. If you choose to manually update your iPod, though, you don’t get to see the New Playlists in iTunes, and you have to recreate them yourself within iTunes because the program won’t save them for you.
Note
The first version of the On-The-Go playlist feature held the song set in its memory only until the next time you connected it to the computer. Later versions of the iPod system software fixed that temporal annoyance and let you sync your spontaneous mix back into iTunes—as long as your iPod is set to automatically synchronize with iTunes on your computer.
If you tire of those tunes before you sync up again and don’t want to save them, you can wipe out the temporary list by selecting the Clear Playlist option at the bottom of the On-The-Go submenu.
The Music menu holds much more than playlists, though. It has a number of categories useful for finding and playing exactly what you want to hear. Other items on the Music menu include:
Artists. This menu groups every tune by the performer’s name.
Albums. This view groups your music by album.
Songs. This is a list of every song on the iPod, listed alphabetically.
Podcasts. All of your favorite prerecorded radio-style programs hang out on this menu.
Genres. This menu sorts your music by type: rock, rap, country, and so on.
Composers. The iPod displays all of your music, grouped by songwriter.
Audiobooks. This menu lists your iPod’s spoken-word content.
Figure 1-7 shows the Artists menu. To see a list of all the songs on your iPod sorted by the artist who performs them, select Artists from the Music menu, and the next screen presents you with an alphabetical list of bands and singers. Chapters 4, 5, and 6 let you know how all that song information gets attached to your digital audio files in the first place.
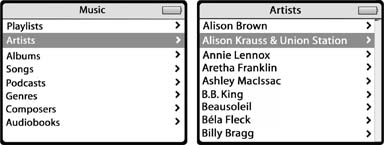
Figure 1-7. Click Artists to see a list of all the bands and singers in your iPod’s music library. Once you select an artist, the next screen takes you to a list of all of that performer’s albums. Similarly, the Albums menu shows all your iPod’s songs grouped by album name.
Note
If you’re a classical music buff, all bets are off when it comes to filing tidy bits of information into the Song, Composer, and Artist slots. As an article in the New York Times put it: “Take Saint-Saëns’s First Cello Concerto, ‘Violoncello in A major,’ Opus 33, No. 1, with Mstislav Rostropovich as soloist and Carlo Maria Giulini conducting the London Philharmonic. Whose name should go into the ‘artist’ slot? And what’s the ’song title'?”
Sometimes, you just have to suffer for your art.
The main difference between older iPods and the ones that appeared at the end of 2004 is the ability to display digital pictures on that bright color screen. Full-size iPods can also mimic a Kodak carousel and play slideshows on a connected television set (Section 6.2.5.1).
The Photos menu is where you go on your iPod or iPod Nano to adjust your picture-viewing preferences. (The two TV-related settings are not available on the Nano.)
Time Per Slide. You can linger up to 20 seconds on each photo or manually forge ahead.
Music. Here you can select a playlist as your slideshow soundtrack or opt for respectful silence.
Repeat. As with playlists, you can have the slideshow repeat when it gets to the end.
Shuffle Photos. Toggle the setting to On to randomly display each photo in the slideshow.
Transitions. You can turn on the option here for a classic Hollywood wipe as you move from photo to photo.
TV Out. To display your slideshow on a connected TV, select the On or Ask option. For portable slideshows on the iPod screen, choose Off or Ask. (Off does what it says, and Ask nags you to pick between your TV and your iPod’s screen before it’ll play the show.)
TV Signal. Different countries have different television broadcast standards. When connected to a TV in North America, South America, or East Asia, select NTSC; most of Europe, China, Africa, and Australia use the PAL standard.
The photo library or albums you loaded on your iPod (see Chapter 6) is listed here. Select Photo Library to scroll through a pint-size visual directory of all the pictures stored in the selected album, as shown on the left in Figure 1-8. Use the scroll wheel to highlight a particular photo and press the Select button to see just that image on the screen (Figure 1-8, right). Use the Previous and Next buttons to move backward or forward through the pictures in the library.

That fifth-generation iPod is also a personal movie player, and with that capability, it brings a menu full of video settings and sorting options:
Video Playlists. Just like music, you can make playlists of videos in iTunes.
Movies. Home movies and other homemade creations can be found here.
Music Videos. This submenu lists your collected music-video clips.
TV Shows. A menu for iTunes store-purchased episodes and personally recorded shows.
Video Podcasts. Some podcasts have pictures now; come here when they do.
Video Settings. You can configure your TV playback options and also set the iPod to play video in the widescreen format or adjust it for full-screen viewing.
Playing a video works just like playing a song: browse, scroll, and select. Chapters 5, 6, and 7 tell you how to buy, sort, and organize your iPod’s video collection from the iTunes side of the fence.
This menu contains all the goodies that make the iPod more than just a music player. Here’s what you’ll find there.
Note
The iPod models released before 2003 lack the Notes feature, Solitaire, Music Quiz, and the Parachute game.
When you choose Clock, you have the opportunity to set up live clocks in multiple cities of your choosing. This little timekeeper comes in handy if you forget your watch in any time zone! To create a clock, choose Clock → New Clock and pick your geographical location on the Region menu and then press onward to the City menu to set up the correct time. (There’s more on the Clock in Chapter 8.)
Each clock you make has its own set of submenus when you press the Select button:
The iPod’s alarm clock can give you a gentle nudge when you need it. To set the iPod alarm, do the following:
Choose Extras → Clock → Alarm Clock → Alarm. Press the Select button.
The Alarm changes to On. You’ve just switched the alarm on (Figure 1-9, left).
Scroll to Time, press Select, and spin the scroll wheel.
As you turn the wheel, you change the time that the iPod displays in the highlighted box (Figure 1-9, right). Press the Select button as you pick the hour, minutes, and choice of meridian for your wake-up call.
Press Select again to set the time.
It’s time to decide whether you want “Beep” (a warbling R2-D2–like noise that comes out of the iPod’s built-in speaker) or music. If you choose to be alerted by music, it will play through your headphones, assuming they haven’t fallen out of your ear sockets during sleep.
Scroll to Sound and press Select. Choose Beep (at the top of the list), or highlight the playlist you want to hear at the appointed time. Press Select.
The Alarm Clock is set. You see a tiny bell icon on the main clock screen.
When the alarm goes off, the iPod beeps for a few seconds—or plays the playlist you selected—until you press the iPod’s Pause button.
If you wake up early and want to prevent the alarm from sounding, go to Extras → Clock → Alarm Clock → Alarm and press the Select button to toggle it off.
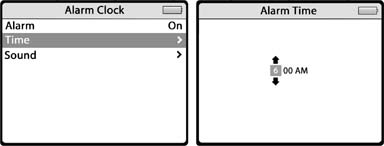
Figure 1-9. Left: Any old alarm clock lets you specify what time you want it to go off. But how many let you specify what song you want to play?Right: Turn the dial to set the time.
Tip
You don’t have to burrow all the way to the Clock option just to use your 2003-or-later iPod as a pocket watch. You can ask iPod to display the current time in its title bar whenever music is playing. To do so, choose iPod → Settings → Date & Time → Time in Title. Press the Select button to toggle the “Time in Title” display on or off.
Selecting this menu item takes you back to the Region menu so you can relocate this clock to a new town with a whirl of the wheel.
Here, make your current clock “Fall back” or “Spring forward” an hour by pressing the Select button to turn Daylight Savings Time off or on.
When time is not on your side anymore, you can get rid of the clock at hand with this menu command.
The sleep timer is like the opposite of the alarm clock: It’s designed to help you fall asleep instead of waking you. The idea is that you can schedule the iPod to shut itself off after a specified period of music playing so that you can drift off to sleep as music plays, without worrying that you’ll run down your battery.
To set the iPod’s Sleep Timer, choose Extras → Clock → Sleep Timer. Scroll down to the amount of time the iPod should play before shutting down: 15, 20, 60, 90, or 120 minutes. (You can also choose to turn off the Sleep Timer here.)
Now, start the iPod playing (press Play) and snuggle down into your easy chair or pillow. The screen displays a little clock and begins a digital countdown to sleepy-land.
Your iPod will stop playing automatically after the appointed interval—but if all goes well, you won’t be awake to notice.
The remaining items on the Extras menu go far beyond music—once you know how to use them. More details about getting the most out of your iPod are revealed in Part 3 of this book, but here’s what you have to look forward to:
Games. You can play the historic Brick game on the iPod. On 2003-and-later models, you also get Parachute, Solitaire, and a Music Quiz (Chapter 8).
Contacts. Phone numbers and addresses reside here (see the online appendix, “iPod As Organizer,” available on the “Missing CD” page at http://www.missingmanuals.com).
Calendar. This menu holds your personal daily schedule (see the online appendix, “iPod As Organizer,” available on the “Missing CD” page at http://www.missingmanuals.com).
Notes. The 2003 iPods were the first to come with a built-in text reader program that you can use to read short documents and notes (Chapter 8).
Stopwatch. The iPod can serve as your timer for keeping track of your overall workout or multiple laps around the track (Chapter 8).
Screen Lock. With all your stuff that’s nobody’s business—address book, schedule, personal photos, etc.—you may want to lock up your iPod from nosy people who’d love to scroll into your life (Chapter 8.)
The Settings menu has more than a dozen options for tailoring how your iPod sounds and looks.
Note
The following list refers to the state of the iPod menu software as of January 2006. Depending on your iPod model and the version of the iPod software you’re using, you may see slight variations on the options offered.
The About screen displays the name of your iPod; the number of songs, videos, and photos on it; the hard drive capacity of your model; and how much disk space is free. As shown in Figure 1-10, you can also find the version of the iPod system software that your unit is currently running, as well as your iPod’s serial number. (The serial number is also engraved on the iPod’s back panel.)
The iPod has a handy personalization feature: the ability to arrange your iPod’s Main Menu screen so that only the items you like show up when you spin the wheel. For example, you could insert the Calendar option onto the iPod’s opening screen so that you don’t have to drill down through the Extras menu to get at it.
To customize your iPod’s Main Menu, start by choosing Settings → Main Menu from the main iPod menu (Figure 1-10, right). You see a list of items that you can choose to add to or eliminate from your iPod’s main screen: Playlists, Artists, Clock, Contacts, Screen Lock, and so on.
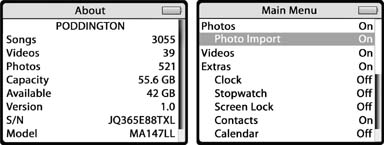
Figure 1-10. Left: Among other trivia bits, the About screen shows how much space on the iPod is available for you to fill with songs and files.Right: The Main Menu settings, just under About, can customize your iPod’s main screen.
As you scroll down the list, press the Select button to turn each one on or off. You might, for example, consider adding these commands:
To see the fruits of your labor, press Menu twice to return to the main screen. Sure enough, in addition to the usual commands described in this chapter, you’ll see the formerly buried commands right out front, ready to go.
There are also some hidden menu items for iPod accessories here. For example, you can bring the Photo Import option—used with third-party media readers or the iPod Camera Connector (Section C.4) to dump pictures from a digital camera onto the iPod’s hard drive—up to the main menu. Likewise, here you can also activate the Voice Memos item used with attachable microphones.
When the Shuffle option is off, the iPod plays straight down each playlist as you originally designed it (Chapter 5). If you turn on Shuffle Songs, the iPod ambles through all the songs on your chosen playlist or album in random order. Press Select again to get Shuffle Albums, which makes the iPod mix up the order of the albums it plays (but not the songs within each album).
To set your Shuffle preferences, choose Settings → Shuffle from the Main menu. Then press the Select button to cycle through your three options—Off, Songs, or Albums—until you hit the one you want.
The Repeat function works like the similarly named button on a CD player: It makes the music you’re listening to loop over and over again.
To set your Repeat preferences, choose Settings → Repeat from the Main menu. Now, by pressing the Select button repeatedly, you can cycle through these three options:
Repeat One. You’ll hear the current song repeated over and over again, like a hippie teenager with a new Beatles 45.
Repeat All. This function repeats the current list over and over again, whether that’s an album, a playlist, or your entire song library.
Off. The iPod will play the selected playlist or album once and then stop.
The iPod screen’s backlight is pretty, but it can be a real drain on the iPod’s battery. Fortunately, you can specify how long the backlight stays on each time you press a button or turn the dial, from 1 Second to Always On. If you never want the iPod to light up—for example, when it’s in its case and you use the remote control to operate it—you can also turn off the backlight completely.
To set your Backlight Timer preferences, choose Settings → Backlight Timer. Scroll to the amount of time you want the Backlight to stay on when you touch any iPod button—2 Seconds, 5 Seconds, or whatever—and then press Select.
For example, if you use the iPod in low-light conditions, or you have a hard time reading the screen, a ray of backlight for 5 or 10 seconds should be enough time to scroll up to a new playlist or album when you touch the controls.
Choose Always On to keep the light shining until you manually turn it off by holding down the Menu button.
Serious audio book aficionados will appreciate this new setting that arrived with the latest iPods. The Audiobooks setting now lets you speed up or slow down the narrator’s voice as he or she reads to you. If you later decide that the Faster setting makes your spoken novel sound like it’s being read by an auctioneer, switch the setting back to Normal.
When it comes to the range of sounds, not all music is created equal. A howling heavy metal rock band produces a wider array of noises than a solo female singer armed with only an acoustic guitar.
Equalization is the art of adjusting the frequency response of an audio signal. An equalizer emphasizes or boosts some of its frequencies while lowering others. In the range of audible sound, bass frequencies are the low rumbly noises; treble is at the opposite end with the high, even shrill sound; and midrange is, of course, in the middle, and it’s the most audible to human ears.
To save you the trouble of getting an audio engineering degree, the iPod includes a set of equalizer presets, named after the type of music (and the typical musical instruments) they’re designed to enhance. Dance music, for example, usually has higher bass frequencies to emphasize the booming rhythm.
By contrast, if you’re listening to your playlist of Haydn string quartets, try setting the iPod’s equalizer to the Classical preset. This setting softens some of the more screechy higher frequencies while providing firm, sturdy midrange and bass frequencies that make for a mellow cello.
There are more than 20 equalizer presets on the iPod—for acoustic, classical, dance, hip hop, jazz, pop, rock, and other types of music—plus, settings that can add or reduce bass and treble sounds. They might drain the battery a little faster, and you might not be able to hear much difference, but many people prefer equalized music for the overall sound quality.
To set your iPod’s Equalizer to a preset designed for a specific type of music or situation, choose iPod → Settings → EQ. Scroll down the list of presets until you find one that matches your music style, and then press the Select button. The name of the preset is now listed next to EQ on the Settings menu.
Tip
See Chapter 5 for more on equalization and how you can apply it from your computer.
Many songs are not just by one band or singer, but are part of compilations, like greatest-hits-of-the-decade collections, movie soundtracks, and all-star tribute albums. Turning this setting to On lets you add a Compilations submenu to the main Music menu so those hard-to-sort group efforts show up as one album.
This ingenious setting cuts down on those jarring moments between, say, George Winston’s New Age noodling and the latest angry Metallica thrash, by adjusting the overall volume settings.
The key to making this feature work is to remember that you have to turn it on in two places: once in iTunes on your Mac or PC, and once on the iPod.
Start in iTunes. Choose Preferences → Playback (⌘-comma on the Mac; Ctrl+comma in Windows), and turn on the Sound Check box. Then, on the iPod, choose Settings → Sound Check, and press the Select button to change the setting from Off to On.
The next time you sync up your iPod with the computer, the Sound Check adjustments you made in iTunes get passed along to the player.
If you don’t like the Sound Check effect, turn it off in both places.
Usually, each time you click an iPod button or turn its dial, you hear a little clicking sound from the iPod’s built-in speaker. If you prefer to scroll in silence, simply turn the Clicker sound off here. Current iPods let you opt to have the Clicker noise play only through the headphones, only through the iPod’s speaker, or both.
Some people might think the Clicker noise sounds like ants tap dancing, but others like the audio cue—especially on click wheel iPods that don’t otherwise give much in the way of feedback while you’re scrolling.
If you’ve just flown in from the coast and need to adjust your iPod’s clock, you can change the player’s date, time, and time zone settings here. These settings are especially important if the iPod needs to be punctual, like when you intend to use the Alarm Clock.
Note
If you’re syncing your iPod to a Mac running Mac OS X 10.2 or later, don’t bother setting your date and time on the iPod. The computer does it for you.
To manually set the clock from the Date & Time settings area:
From the main menu, choose Settings → Date & Time.
You’re going to set the time zone first. Setting the time zone is sort of a moot point if you never go far enough to change time zones. But if you travel a lot and want to change the iPod’s clock with a minimum of fuss, this setting saves you from resetting the time when you land in New York after flying in from Los Angeles.
Scroll to and select Set Time Zone. Pick your time zone (or a city in your time zone) from the list. Press the Select button when you’re done.
You may notice that the iPod’s list doesn’t match the list of time zones found in a world atlas. Although the standard U.S. time zones are represented (with a Daylight Savings Time option for each), foreign time zones are represented by a list of major cities in each. The list isn’t in alphabetical order, but starts at the International Date Line and moves eastward from Eniwetok to Auckland.
Back on the Date & Time settings screen, scroll to and select Set Date & Time.
Use the scroll wheel to adjust the highlighted hour, minute, day, month, and year. You can also choose to have the iPod display the time in the standard 12-hour clock with a.m. and p.m. designations, or the 24-hour clock used by the military and on M*A*S*H reruns. Use the Next and Previous buttons on the iPod to skip over fields you don’t need to change.
Press the Select button for each part of today’s date as you scroll to it, until everything is set.
Press the Menu button a couple of times to return to the main menu.
This setting lets you change the sorting order of the first and last names of people in your iPod’s built-in address book (see the online appendix, “iPod As Organizer,” available on the “Missing CD” page at http://www.missingmanuals.com).
The iPod is the United Nations of digital audio players, in that it can display its menus in most major European and Asian languages.
To set the language for the iPod’s menus, choose Settings → Languages from the main iPod menu. Scroll down the list of languages and press the Select button when you find your native tongue (or the one you want to use if you’re practicing vocabulary for Swedish class).
The iPod’s menus now appear in the new language. To change back, return to the Language settings and scroll to a new language.
Tip
See Section 12.3.8 if you accidentally change your display language to Korean and can’t figure out how to change it back again.
The Legal menu contains a long scroll of copyright notices for Apple and its software partners. It’s not very interesting reading unless perhaps you’re studying intellectual-property law.
This command takes all your iPod’s customized sound and display settings back to their original factory settings. This feature doesn’t erase your music or contacts—just customized tweakings of things like the Shuffle function and Backlight Timer.
To return your iPod to its untweaked state, choose Settings → Reset All Settings. Then scroll to Reset and press the Select button. (There’s a Cancel option if you decide to bail out.)
Note
Reset All Settings affects the software only. It’s not the same thing as resetting the iPod itself (the hardware). Resetting the iPod involves pushing buttons to reboot the player when the iPod freezes or won’t wake up from sleep mode. See Section 12.2 to learn the procedure.
The mystical, magical qualities of the iPod’s Shuffle Songs setting (”How does my little PeaPod always know when to play my Weird Al Yankovic and Monty Python songs to cheer me up?”) have become one of the player’s most popular features, so Apple moved Shuffle out to the main menu. Just scroll and select if you want to shuffle.
Highlight this command and press Select to call up the main Now Playing screen, shown in Figure 1-11. Obviously, you only see this item on the iPod’s menu when you have something playing.
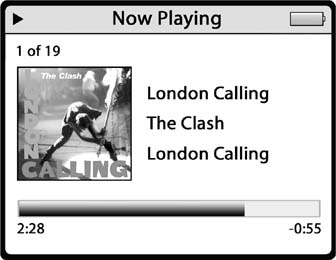
Figure 1-11. Now Playing displays the current song, album, and performer. Each time you press the Select button, the display changes from the progress bar, to a movable diamond to skip through parts of the song, to a bigger album art picture, to a text display of lyrics (Section 5.3.4.4), to a screen where you can adjust a song’s rating by turning the scroll dial.
Get iPod & iTunes: The Missing Manual, Fourth Edition now with the O’Reilly learning platform.
O’Reilly members experience books, live events, courses curated by job role, and more from O’Reilly and nearly 200 top publishers.

