Chapter 4. Get Organized With the iPod Touch
You’ll learn to:
Ask Siri to get info, launch apps, and open web pages
Get turn-by-turn directions
Post to Twitter and Facebook from apps
Organize your life and appointments with apps
Use Passbook
Make FaceTime video calls
THE IPOD FIRST MADE its mark as an entertainment device back in 2001, but as it’s evolved from a humble music player to a pocket computer, it’s picked up a few more capabilities. The iPod Touch of 2012 is an electronic address book, notepad, voice-memo recorder, to-do list, datebook, atlas, and dictionary. This chapter explains how to use your iPod to do all that—and to use the keyboard as efficiently as possible in the process.
Thanks to the built-in apps that come with this most versatile of iPods, you can keep your life in sync with the people in it. You can make and take video calls with FaceTime, post and read updates from pals using Twitter and Facebook, send instant messages to other iOS users, and check your Notifications Center for anything you might have missed.
The iPod Touch has other apps to keep you organized as well. You can store movie tickets, airline boarding passes, and customer-loyalty cards in Passbook, check the weather and stock market with a tap, and set the Touch’s clock for multiple time zones. And if you don’t have a free finger to do the tapping, you can ask Siri, the cheerful virtual assistant that comes with iOS 6 (and the latest Touch), to do the checking for you. So if you’re ready to let the iPod make life just a little easier, turn the page.
Use the Touch Keyboard
THE TOUCH HAS FOUR buttons but no keys—and no physical keyboard. You type in web addresses, email messages, Game Center sign-ups, and more from the Touch’s virtual keyboard. The ’board magically appears whenever you tap an area that requires typed text.
Trained typists (or those with large fingers) may find the keyboard annoying at first, but most people feel it gets easier the more they use it. To enter a letter, tap the key you want. As your finger hits the screen, a bigger version of the letter balloons briefly into view so you can visually confirm your keystroke.
The keyboard works in portrait (vertical) mode, but it’s wider and easier to use in landscape (horizontal) view. It’s a regular old QWERTY keyboard, with a few special keys.
Shift (
 ). Need a capital letter? Tap this key first (it takes on an eerie white glow to show you it’s in action) and then type your letter, which should appear in uppercase. After all that excitement, the key returns to normal and your letters go back to lowercase.
Backspace/Delete (
 ). One of the most popular keys ever. Press this one to back up and erase previously typed letters. Tap once to erase the first letter to the left. Hold the key down to have it gobble letters a bit faster, like a reverse Pac-Man. Hold it down even longer, and it whacks entire words at a time for speedier deletion.
 . The Touch keyboard has a finite amount of space and not enough room for all the keys the average person uses. Tap this button when you need to type in numbers or punctuation, and the keyboard switches to a whole new set of keys. Tap the same key—which is now an
  key—to return to the letters keyboard. (Want to get to a special character more quickly? Press and hold the key until the keyboard changes, and then drag your finger over to the punctuation or number you need.)
Need even more characters? The Touch has a third keyboard tucked away. When you’re on the
keyboard, a  key appears. Tap it to get more obscure characters, like math symbols, brackets, and currency signs.

When you type letters into a note, an email message, a web form, or any place that’s not a URL, the Touch adds a return key to the keyboard so you can jump from one line to the next. This key transforms itself to say “Join” when you type in a WiFi password, “Go” when you enter a web address, and “Search” when you enter keywords into Safari’s search box.
To make up for its limited real estate, the Touch keyboard includes shortcuts that help you work faster:
Web addresses. When you type in Safari’s web address box, the keyboard adds a few characters to aid your URL entry, including an underscore, a slash, and a hyphen. It also provides a .com button so you can finish off that address fast. For URLs that end with other suffixes, like .edu, .org, .us, or .net, press and hold the .com button to see them all, and then slide your finger over to the one you need. Tap the Go button to take off.
Accented or special characters. Need an accented letter, say an á instead of a regular a? Press and hold the a character to reveal a whole bunch of accented choices and slide your finger onto the one you need. This trick works on most letters that take accent marks. You can also use it to get international currency symbols by holding down the $ key, or to get a § when you hold down &.
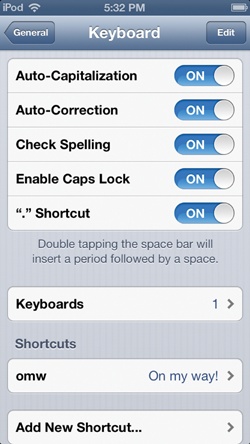
Keyboard settings shortcuts. Tap Settings→General→Keyboard to turn on (or off) all the iPod’s keyboard helper settings, like auto-capitalization (the next letter after a period gets capped), auto-correction (for catching typos), and the spell-checker that underlines suspect words in red. There’s also the Enable Caps Lock setting that kicks you into all-caps mode with a double-tap of the Shift (
) key and the “.” shortcut that inserts a period and a space at the end of a sentence when you double-tap the space bar.If you want to communicate in another language altogether, tap International Keyboards and select the language you want—the Touch offers around 50 keyboards, including those for Arabic, Cherokee, and Korean. Tap a language in the list to add its keyboard. When you’re ready to type with international flair, tap
 on the keyboard (it’s to the left of the space bar, as shown on the opposite page) and you can switch between languages and keyboard layouts.
You can also add text shortcuts for commonly used phrases. Just flick down to Shortcuts and tap Add New Shortcut.
Cut, Copy, Paste, and Replace by Touch
THE TOUCH HAS COME a long way as a device that can handle the conventions of modern word-processing. Yet it has no Ctrl or ⌘ key on its keyboard, so Apple incorporated tap-friendly commands for those convenient cut-copy-paste functions right into the Touch.
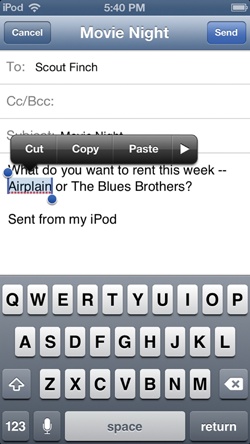
To cut or copy from text you can edit (like an outgoing email message or a note you created), double-tap a word to highlight it. A Cut | Copy | Paste box pops up. To select more words, drag the blue dots on either end of the selected word. Then tap Cut or Copy.
For pages you can’t edit (like incoming emails), hold your finger down until a magnifying glass and an insertion-point cursor appear. Drag it to the text you want to copy. When you lift your finger, a Select or Select All box appears. Select gives you the blue dots you can drag to highlight more text. Select All highlights all the text. Lift your finger, and you get a Copy button.
A web page works differently: When you lift your finger there, you get only a Copy button, as shown in the top-right image.
Tap the place where you want to paste the text—or jump to a different program and tap within it to get the Paste button.
Tap the Paste button to add the text to the new location.


Make a mistake and wish you could undo what you just did? Give the Touch a shake and then tap the Undo Edit button that appears on-screen.
Tip
If all this tiny typing is denting your productivity when you have to do some serious text input, consider getting a wireless Bluetooth keyboard for your Touch. True, you have to haul around a big chunk of gear—unless you’re at home in front of the TV. To use an external keyboard, turn on the iPod’s Bluetooth chip by choosing Settings→General→Bluetooth→On, and then follow the instructions that came with the keyboard for electronically linking it to the Touch.
In addition to the Cut, Copy, and Paste options in apps where you can edit text (like Notes or Mail), you can replace a misspelled word with one that’s spelled correctly—or look up its definition in the onboard dictionary by selecting it and tapping Define.
If you have the Touch’s spell-check function turned on (What’s in the Settings Menu), the Touch highlights typos (and unknown words) with a red underscore so they stand out as you proofread. (You do proof important messages, right?) These are the words you want to replace.
You can also replace one word with a closely related one (for those times when you typed close to, but not quite, the right word).
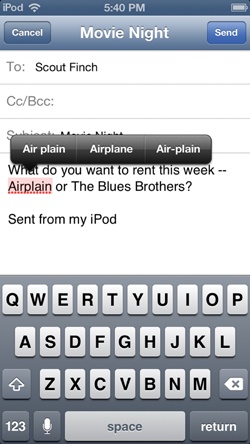
To get the Suggest option, double-tap (or Select) a word on-screen. When the Cut | Copy | Paste box appears (top right), tap ![]() and then tap Suggest on the next part of the menu bar. The Touch offers up a few alternate words. If you see the one you meant to type, tap it to replace the text. If it can’t find a similar word, you see a “No Replacements” message.
and then tap Suggest on the next part of the menu bar. The Touch offers up a few alternate words. If you see the one you meant to type, tap it to replace the text. If it can’t find a similar word, you see a “No Replacements” message.
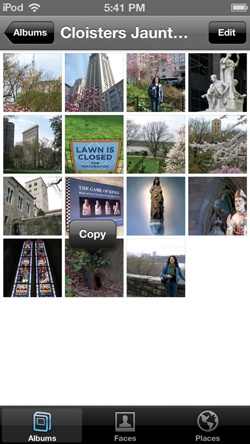
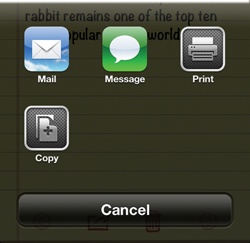
But enough about text—want to copy a photo or video into a message-in-progress or some other program? Hold your finger down on the screen until the Copy button pops up, as shown in the bottom right photo. Tap Copy, and then tap within the message to get a Paste button. Tap it to insert your image or video.
If you want to copy multiple items, like pictures out of a photo album, tap the Edit button in the top-right corner. Next, tap the photos you want to copy; red checkmarks in the corners confirm your selection. Tap the Share button in the bottom left of the toolbar, and then tap the Copy icon. Switch to the program where you want to deposit your pics (like a mail message under construction), and then press the glass until the Paste button appears.
Add Contacts to the Touch
PUTTING A COPY OF your contacts file—also known as your computer’s address book—on your iPod is easy with the help of iTunes. (Touch owners using iCloud to sync contacts and calendars can skip to Set Up an iCloud Account.)
Windows users need to store their contacts in Outlook Express, Outlook 2003 or later, Windows Contacts, or the Windows Address Book (used by Outlook Express and some other email programs).
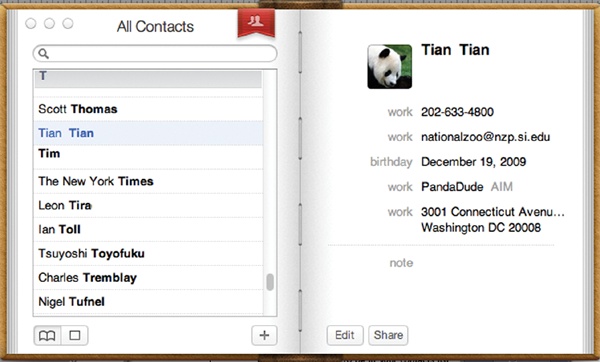
Mac folks need to have at least Mac OS X 10.5 (Leopard) and the Mac OS X Address Book (shown below), which Apple’s Mail program uses to stash names and numbers. You can also use Entourage 2004 or later and Outlook 2011, but you have to link before you sync: In the mail program, choose Preferences, and then click Sync Services. Turn on the checkboxes for sharing contacts and calendars with Address Book and iCal (Apple’s calendar program) so iTunes syncs up the info with the Touch’s Address Book and iCal apps.
You need one other thing for an on-the-go contacts list: the right type of iPod. That means a Touch or Classic, or an older click-wheel Nano. Sadly, the touchscreen Nano can’t display contacts, calendars, or notes.
To turn your iPod into a little black book, follow these steps:
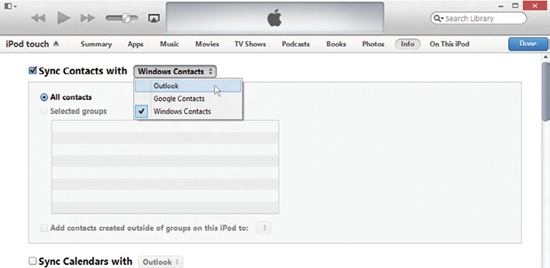
Connect your iPod to your computer and click its icon in the iTunes window. (If you use Outlook or Outlook Express, launch that now, too.)
In the main part of the iTunes window, click the Info tab.
Windows owners: Turn on the checkbox next to “Sync contacts from” and use the drop-down menu to choose the program that holds your contacts. Mac owners: Turn on the “Sync Address Book contacts” checkbox. If you want to sync contact groups, select them from the “Selected groups” box. You can also choose to import the photos in your contacts files.
Click the Apply button in the lower-right corner of the iTunes window.
iTunes updates your iPod with the contact information stored in your address book. If you add new contacts while you have your iPod plugged in, choose File→Update iPod or click the Sync button in iTunes to move the new data over to your pocket player. When you decide someone doesn’t deserve to be in your contacts list anymore, delete her from your computer’s address book, and she’ll disappear from your iPod the next time you sync up.
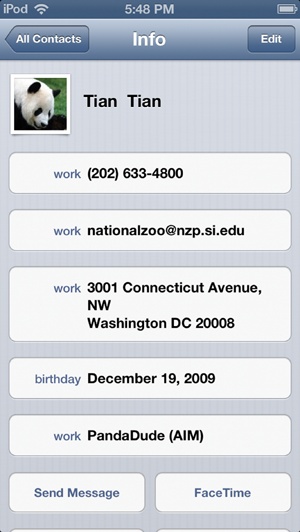
To look up a pal on an iPod Touch, tap the Contacts icon on the Home screen and flick your way to the person’s name. Tap the name to see the person’s contact info. Tap Send Message or FaceTime to directly contact your contact; tap the Share Contact button to email the info. And if you want to know more about sending Messages or starting FaceTime chats, keep reading—both of those Touch apps are covered later in this chapter.
Tip
On the iPod Touch, you can sync contacts from your Google Gmail and Yahoo Mail address books. First, tap the Settings icon on the Touch’s Home screen. On the Settings screen, tap Mail, Contacts, Calendars. On the next screen, tap the name of the account—Google’s Gmail or Yahoo Mail. On the following screen, you can turn on wireless syncing for Contacts, Calendars, Notes, and more. If you prefer to sync over USB, import the Google or Yahoo contacts into your computer’s address book and then sync the address book through iTunes. For example, in OS X 10.8 on the Mac, choose Contacts→Preferences to pull in contacts from those other accounts.
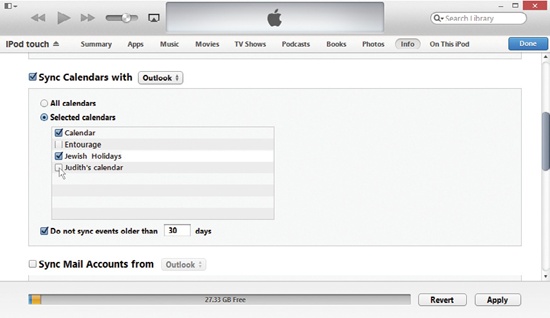
Sync Up Your Calendars
JUST AS ITUNES CAN pluck contacts out of your computer’s address book, it can also snag and sync a copy of your desktop’s daily or monthly schedule to your iPod Touch—if you use Outlook on your PC or iCal on your Mac. (You can also use Entourage 2004 or later by choosing, in Entourage, Preferences→Sync Services and turning on the option to have Entourage share events with iCal; Outlook 2011 for the Mac works similarly.) Or you could just use iCloud (Set Up an iCloud Account).
To get your calendar connected, fire up iTunes and follow these steps:
Connect your iPod to your computer and click the iPod’s icon when it shows up at the top of the iTunes 11 window.
On the page full of iPod syncing options, click the Info tab. Scroll down past Contacts to Calendars.
Turn on the checkbox next to “Sync calendars from Microsoft Outlook” (Windows) or “Sync iCal calendars” (Mac). If you have multiple calendars, select the ones you want to copy.
In the lower-right corner of the iTunes window, click the Apply button.
If iTunes doesn’t automatically start updating your iPod with your datebook, choose File→Sync iPod. If you haven’t changed any sync settings and you’re just updating contact info, iTunes’ Apply button turns into a Sync button, and you can click that instead of going up to Menuville.
After the sync, it’s time to check your dates. On the iPod Touch, tap the Calendar icon on the Home screen. When the current month appears on-screen, tap List, Day, or Month to see your schedule for the short or long term, or tap Today to see the current day’s events.
If you synced over multiple calendars, the Touch displays events from all your datebooks on the main screen. To see one calendar at a time, tap the Calendars button in the top-left corner and select the one you want.
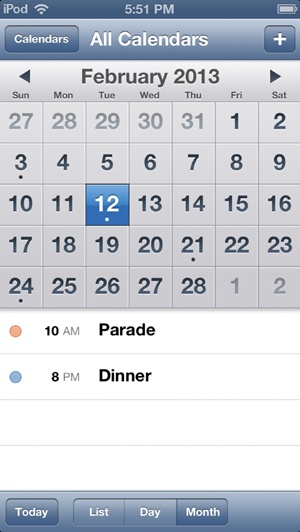
On any calendar, the List view shows all your upcoming appointments one after the other. In Month view, your Touch represents events with black dots and lists them by day below the calendar. Tap the black triangles on either side of the month name to go forward or backward through the months. Tap the ![]() button to add an event.
button to add an event.
A few other calendar-keeping tips:
Turn the Touch sideways to see your calendar for the current week.
Tap the
 icon to see the meeting and event invites you’ve received and add them to your calendar with a tap.
You can have your iPod remind you of upcoming events. The Touch emits a beeping on-screen alert keyed to the event reminders in your synced calendar. You can set your own alert by selecting an event and tapping the Edit button. Tap the Alert screen and pick a suitable amount of advance warning.
Map Your Way with WiFi
THE TOUCH’S RELIANCE ON a WiFi signal doesn’t make it a very good navigational device when you’re away from your home network or a coffee shop (unless you have a personal portable hot spot, like the Verizon MiFi). There are plenty of times, however, when getting directions and finding places on a map from the comfort of a WiFi connection comes in handy.
To plot your course, tap the Maps icon on the Home screen. With the Maps app and a network connection, you can:
Find yourself. Tap the compass icon in the bottom-left corner (
 ) to have the Touch pinpoint your current location within a few hundred yards. (While the Touch doesn’t have a GPS chip inside it, it does have software that calculates your position based on a big database of WiFi hot spots.) To find yourself, you need to make sure you have Location Services turned on. To do that, tap Settings→Privacy→Location Services→On.
Find an address. In the Address box at the top of the screen, type in an address—or tap the
 icon to call up your Contacts list, where you can select the friend or business you want to map. Then tap the Search button to see a red pushpin drop onto that location.
If your location has a green car icon next to it (
 ), tap the icon to get turn-by-turn directions to there from your current location. (To get turn-by-turn directions from any two roadworthy points, see Get Turn-by-Turn Directions.)
Options for map addresses. Tap the Directions button (
 ) at the bottom of the screen. When you see your address marked on the map next to the pushpin, tap the
  icon to advance to a screen where you can get directions to or from that address. Your other options include adding the address to a contact file (great for filing away restaurants you want to visit again), or sharing the location details by email, iMessage, Twitter, or Facebook. You can also bookmark it for future reference. (Tap the button to call up a screen with tabs for Bookmarks, Recents [for recent locations], and Contacts.) If you know where you’re going and suspect the map is wrong (and people have criticized the Maps app in iOS 6 for inaccuracy), tap the Report a Problem button and march through the resulting screens to notify Apple.
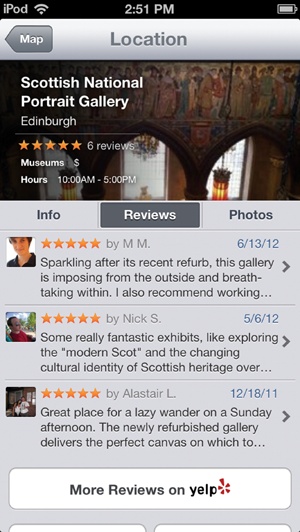
Find reviews of area points-of-interest. In iOS 6, Apple has teamed up with Yelp to provide information, photos, and reviews about restaurants, bars, stores, and other attractions on the map. When you see an icon for a local establishment—like a knife-and-fork for a restaurant or a mug for a coffee shop—tap it. If the place has been checked out by anybody on the Yelp user reviews site, you’ll see a series of stars rating the place. Tap
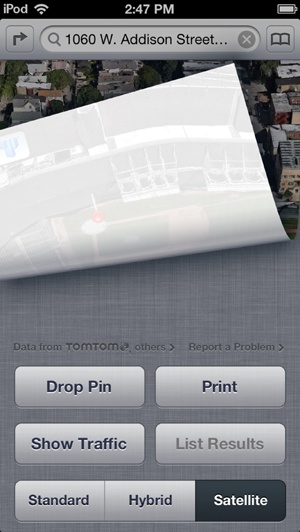
on the place name to get to the Info tab listing its phone number, website (if it has one), and exact address. In the same box, tap Reviews (bottom left) to see more detailed thoughts from Yelp reviewers. Tap the Photos tab to see pictures taken at the location.Find your view. The Maps app offers three views of the terrain: Standard (regular old cartography with labeled streets and points-of-interest), Satellite (pictures of the area from space) and Hybrid, which puts Standard labels on Satellite photos. In iOS 6, the app now includes 3D maps in the Standard mode and the urban-friendly Flyover view in Satellite or Hybrid mode that let you zoom in and out and spin the landscape on-screen around with your fingers. To add the third dimension, tap the 3D or Flyover button (which looks like a trio of buildings) in the bottom-left corner of a map. To switch map-viewing modes, tap the curled-up corner on the bottom left to see the hidden menu (shown here at the bottom right). You can also drop a pushpin or print out your map to an AirPrint-friendly printer (Print from Your Touch).

Get Turn-by-Turn Directions
The Touch may not have its own cellular connection and the ability to play GPS in the car, but you can still get turn-by-turn directions for printing out (Print from Your Touch) or general reference. And if you get truly lost while you’re on the road, the app can serve as a guiding beacon—just stop at a WiFi-enabled rest stop or café to have the Touch triangulate your position using hotspots.
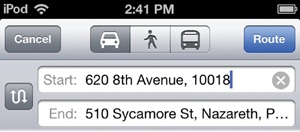
To get the Touch telling you where to go, make sure you turn on the iPod’s Location Services (Privacy and Location Services), and then tap the Directions button. Then:
In the Start box, tap to select Current Location.
In the End box, type in the destination address.
Select the driving icon (
 ). If you tap the person icon (
 ), you get walking directions. Tap the bus (
 ) and you go to the App Store to shop for mass-transit apps.
Tap the Route button.
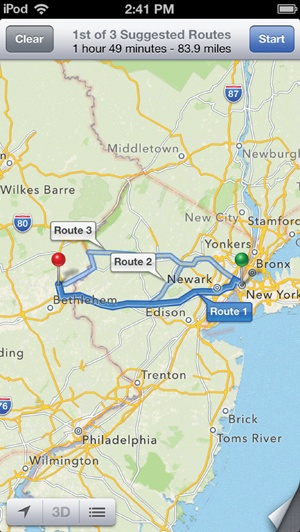
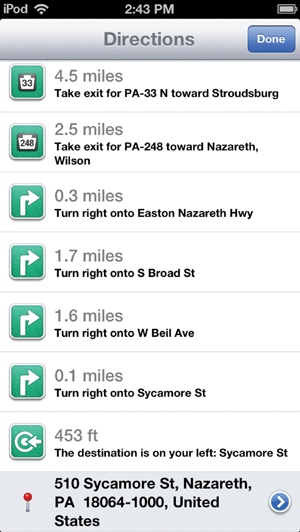
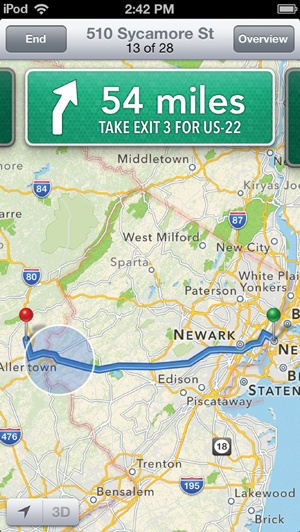
If Maps shows you multiple paths to a destination on the Suggested Routes screen, choose one and tap Start. (You can jump right into turn-by-turn directions from any point on the map by tapping
in the place name.)
If you want to see what you’re in for on any given route, select it on the Suggested Routes screen (bottom left) and tap the Directions icon (![]() ) in the lower-left corner to see each turn presented in a step-by-step list (bottom middle). Once you pick a route and hit the Start button, the Touch displays each turn on the journey in a big green box on the map (bottom right). Again, this may not be so helpful unless you have WiFi access, but you can peek ahead.
) in the lower-left corner to see each turn presented in a step-by-step list (bottom middle). Once you pick a route and hit the Start button, the Touch displays each turn on the journey in a big green box on the map (bottom right). Again, this may not be so helpful unless you have WiFi access, but you can peek ahead.
Make FaceTime Video Calls
SINCE THE EARLY DAYS of science-fiction movies and TV shows, the videophone has been a staple of fantasy communication. Cheap webcams and teleconferencing systems made the fantasy real, but they’re so last year (and so stationary). For modern convenience, the Touch makes and takes video calls thanks to FaceTime, its built-in mobile video-chat app.
To use FaceTime, you need an Apple ID (Chapter 13) and a WiFi connection. You also need folks to talk to, namely other new Touch owners and people running around with at least iPad 2s and iPhone 4/4S models who have time to chat.
Once you have all that, getting started with FaceTime is easy:
Tap the FaceTime icon on the Home screen and sign in with your Apple ID. Fill in your vitals, like your geographic region and email address, so other FaceTimers can find and call you.
Once you have your account set up, tap the Contacts icon on the Home screen, tap the name of the person you want to call, and then tap the FaceTime button at the bottom of the Contacts screen. Since iPhone 4/4S/5 owners can use their phone numbers for FaceTime calls, a screen pops up asking what connection (phone digits or email address) you want to use for the call. Tap your choice. If you don’t have anybody in your Contacts file, flip back to Add Contacts to the Touch, which explains how to import your computer’s address book or add entries on the Touch itself.
When your buddy picks up the call, hold your Touch up so they can see you and start chatting. You see them, too. If the little picture-in-picture window of your face is in the way, use your finger to drag it to a new part of the screen.
After you wave goodbye, tap End to hang up the call.

If you need to temporarily turn off the sound during a call (like when the baby starts screaming), tap the Mute icon (![]() ).
).
Want to show your friend what you’re seeing without physically flipping the Touch around? Tap the ![]() icon in the bottom-right corner to switch to the Touch’s rear camera. Tap the icon again to return the view to you.
icon in the bottom-right corner to switch to the Touch’s rear camera. Tap the icon again to return the view to you.
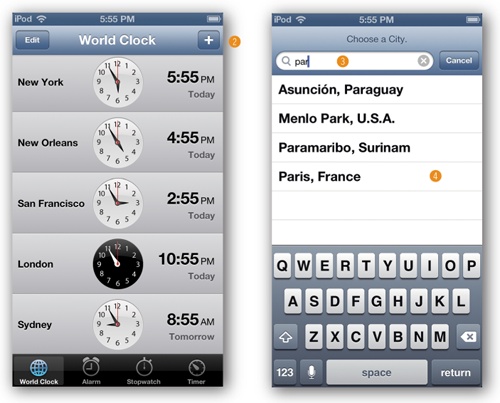
Keep Time with the Touch Clock
THE IPOD TOUCH HAS a Clock app, but it’s more than just a digital pocket watch. It’s actually four clocks in one: World Clock, Alarm, Stopwatch, and a Timer. Here’s how to work them all.
World Clock
The Touch should already have a couple of clocks: one you created when you first set up your player and selected your time zone, and one for (of all places) Cupertino, California, home of Apple HQ. To add new cities around the world:
If you want to rearrange your list of clocks, tap the Edit button and use the three-stripe gripstrip (![]() ) to drag them into the order you want.
) to drag them into the order you want.
To delete a clock, tap the Edit button, tap the ![]() icon next to the clock’s name, and then tap Delete.
icon next to the clock’s name, and then tap Delete.
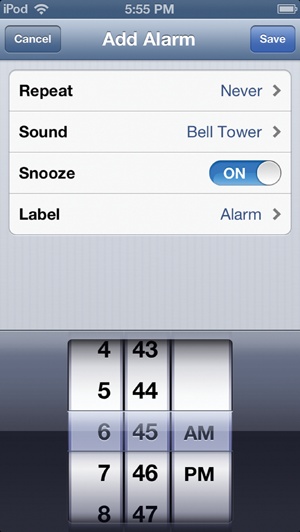
Alarm
Need a personalized wake-up call from that power nap or an alert for some other timed event? The Touch comes with its own built-in alarm clock. To set it, tap Home→Clock→Alarm. On the main Alarm screen, tap the + button and then spin the wheels (shown top right) to set the time for the alarm to sound. Tap the Sound button to pick a song or a tone to play when the alarm goes off. You can also have the alarm repeat regularly, give it a name, and even add a snooze button if you need another 10 minutes of sleep. Press Done when you finish.
Stopwatch
To get to the Touch’s stylish full-screen stopwatch, tap Home→Clock→Stopwatch.
To start timing yourself, tap the green Start button. The timer starts counting, and the Start button turns into a red Stop button. (Tap that when you’re done timing.) If you’re running a series of laps, tap the gray Lap button each time you finish a turn on the track. The iPod records your time for that lap (shown middle right) and then starts timing your next one.

The iPod displays the time for the lap-in-progress above the overall session timer. It lists the time for completed laps below the timer, so you can track your workout. The timer keeps ticking even if you tap your way to another program. When you return to the stopwatch, it’s still going.
If you need to pause the timer, tap the Stop button; to pick up where you left off counting, tap Start again. When you’re finally done, tap the Stop button to halt the clock. To clear the times from the screen, hit the gray Reset button.
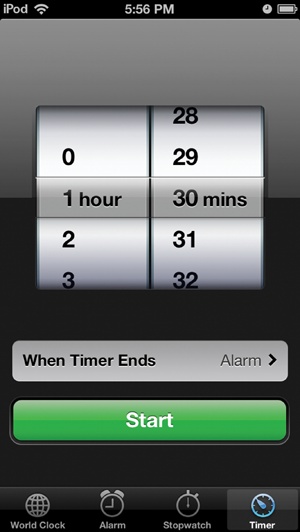
Timer
Want to make sure the roast doesn’t burn? Tap Home→Clock→Timer and dial up a period of time (shown at bottom right) to count. Tap “When Timer Ends” and pick an alert sound, and then tap Start.
Notes, Weather, Stocks, and Calculator
THE MULTIMEDIA APPS ON the Touch may get a lot of attention, but a humble quartet of utilities adds to this iPod’s usefulness and helps you stay organized with the ability to jot down quick thoughts, check the forecast, keep tabs on the stock market, and do a few calculations.
Notes
When you need to write up something in a hurry—like a grocery list or an idea for the Great American Novel—tap the Notes icon on the Home screen. The Touch keyboard slides up, ready for action (right). Tap ![]() to add a new note, and tap
to add a new note, and tap ![]() to delete one. To call up a previously typed note, tap its name in the main Notes list. To email or print a note, tap
to delete one. To call up a previously typed note, tap its name in the main Notes list. To email or print a note, tap ![]() .
.

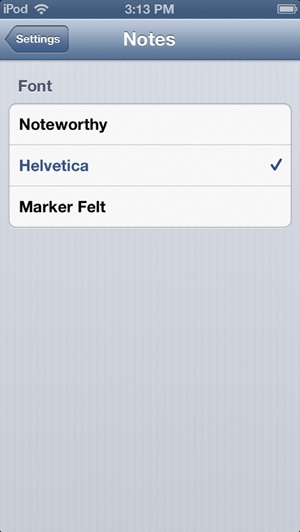
If you have Google, Yahoo, or AOL mail accounts set to sync wirelessly, you can sync their Notes, too. Tap Settings→Mail, Contacts, Calendars; tap the name of your account; and tap the Notes button to On. And you can sync notes through iCloud (Set Up an iCloud Account). Hate the Notes font? Tap Settings→Notes to change it (above).
Weather
On the Home screen, tap the Weather icon to get temperatures and hourly forecasts for your favorite locations. To add cities to your list:

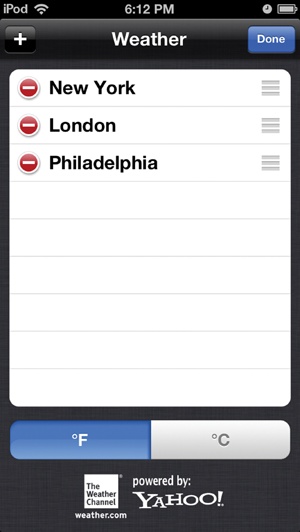
Tap the encircled
 in the bottom-right corner of the screen to flip it around; you can delete existing cities here by tapping
  and reorder them by dragging them up or down by the grip strip (
 ).
).Tap the
 button in the upper-right corner to add towns by name or ZIP code. Tap Done when you finish.
To cycle through your cities when you open the weather app, swipe a finger across screen to whip through them.
If you were checking the forecast ahead of a trip to the area, tap ![]() in the bottom-left corner of the Weather app to get Yahoo’s event info for that locale.
in the bottom-left corner of the Weather app to get Yahoo’s event info for that locale.
Stocks
When you tap open the Stock app from the Home screen, you get an eyeful of financial information—including, if you like, updates on your own market holdings.

To add your stocks to your palm-sized Big Board:

When you tap open the Stocks app now, you get a snapshot of current trading prices for your selected stocks, (delayed 20 minutes or so). On the main Stocks screen, flick the bottom panel to browse through three screens of information about a selected stock, including a quick-look chart of its 52-week performance, sales graphs, and recent headlines about the company. Tap ![]() to get company info from Yahoo Finance.
to get company info from Yahoo Finance.
Turn the Touch sideways and tap to see the stock’s trading price rise and fall over a day, a week, a month, 3 months, 6 months, 1 year, or 2 years, plus a quick look at the big indexes like the Dow Jones Industrials, NASDAQ, and the S&P 500.
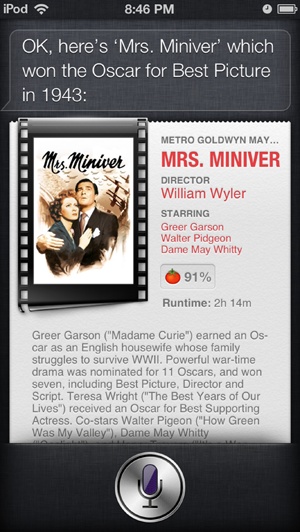
Command Siri
IT’S A BUSY WORLD and everybody needs a little help sometime. Imagine how great it would be if you could ask your Touch to take on a task, like automatically add your next dentist appointment to your calendar or fire up a text message to remind your spouse to bring home cat treats after work—just like those people with iPhones running Apple’s Siri virtual assistant software.
Now, the good news for many Touch owners: Siri has arrived. To use this sassy little helper program with the big personality, you need:
Once you have all that, you’re ready to make Siri work for you. The feature is turned on and ready to go by default if you’re running iOS 6, but if you want to make sure, visit Home→Settings→General→Siri and confirm Siri is set to On.
Using Siri
On the surface, summoning Siri is simple: hold down the Touch’s Home button until you hear two beeps and the program appears on-screen with a cheery “What can I help you with?” note above a microphone. This indicates that Siri is listening and ready to serve.
Now it’s your turn to tell her what you want. Since Siri works with a huge number of apps within iOS 6 (including the Clock, Reminders, and more), you have plenty of options. You can have Siri:
Show you directions to a place on a map
Post a comment to Facebook or Twitter, or send an instant message
Look up movie times or baseball stats
Search the Web
Check your calendar
Play a song by a specific artist
Settle movie trivia arguments
In fact, Siri can do so much, you may not know where to start. If you’d just like to see what Siri can do, tap the ![]() on the right side of Siri’s question box. That brings up a list of the things Siri does, with brief examples of how to ask for them in Siri-speak.
on the right side of Siri’s question box. That brings up a list of the things Siri does, with brief examples of how to ask for them in Siri-speak.

Once you ask for something, Siri does her best to perform the task or bring back the information requested. If she can’t, she apologizes politely in her sincere little lady robot voice. (And don’t ask her to “open the pod bay doors,” either—she’s a little sensitive about HAL 9000 jokes.)
Customizing Siri
Siri works best when she understands who you are, where you live, who you’re related to, and other little details about your life. When the program has this information, you can say, “Call my wife” or “What good pizza places are near work?” and Siri already knows who to call and where to look for pies.
To add your personal information, tap to Home→Settings→General→Siri→My Info. The Touch displays your own Contacts file card where you can make sure you filled in your home and work addresses. If you use Siri as a guide to nearby businesses, you need to have the iPod’s Location Services feature (Privacy and Location Services) activated; just go to Settings→Location Services→On so Siri knows where you are.
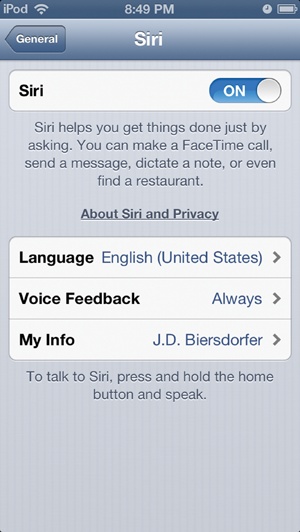
Siri is powerful—but it can also use up a lot of power. To turn her off when your iPod’s battery is feeling low, go to Home→Settings→General→Siri→Off.
Record Voice Memos
THE TOUCH DOESN’T JUST play sound, it records it, too, thanks to its Voice Memos feature. Voice Memos can be helpful when you have a sudden brainstorm, need to leave instructions for subordinates, or other situations where it’s easier to talk instead of type. When you get done recording, you can share your immortalized musings by emailing them or messaging them directly from your iPod. You can also sync them back to iTunes to keep a copy on your computer.
To take a vocal memo, tap Home→Utilities→Voice Memos and then:
To start recording, tap the red dot. You can pause your recording by tapping the Touch’s on-screen Pause icon; tap it again to continue recording.
Tap the black square on the right side of the screen to stop recording. To play back a recording, tap the
 icon and select the recording from the Voice Memos menu.
To delete a recording, select it on the Voice Memos menu, and then press the Delete button, as shown above-right.

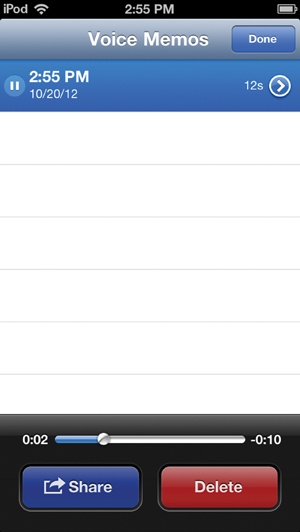
The Touch has a Share button on the same screen that lets you send the recording as an email attachment or message (above, right). If you tap the recording’s ![]() icon, you get a Trim Memo button that lets you edit the clip. On this same screen, tap the recording’s name to assign it a predefined label, like “Interview.”
icon, you get a Trim Memo button that lets you edit the clip. On this same screen, tap the recording’s name to assign it a predefined label, like “Interview.”
If your iPod is set to sync, iTunes offer to copy your recordings to its Voice Memos playlist the next time you make the iPod-iTunes connection.
Use Messages
THANKS TO THE MESSAGES app in iOS 5 and later, Touch owners now have a way to send free, unlimited text messages, photos, and videos to people running Messages on their iPads, iPhones, and Touches. It works over a WiFi connection on the iPod Touch. Setting up Messages takes just a few steps:
On the Home screen, tap open the Messages app. The first time you start it up, it asks you to enter your Apple ID. (If you’ve blown off Apple’s previous 18 attempts to get you to sign up for an account, tap Create New Account and follow along on-screen.) The email address you use with your Apple ID is the one people need in order to send you iMessages.
To add more email addresses to your Message accounts, tap open the Settings icon on the Touch’s Home screen and, in the left column of icons, tap Messages. Tap the “Receive At” line, and then type in the addresses. (The Settings screen also has a button to turn off iMessage if you don’t want to be pestered.)
Once you sign up, you can send messages to others who have registered with Apple. Tap open Messages on the Home screen, tap the
 icon, and then enter the address of your recipient. Type your message in the text field at the bottom of the screen, and then tap Send.
Tap
 if you want to include a picture or video from your Camera Roll—or shoot a new pic for the occasion.

To see your previous conversations, tap the Messages button in the upper-left corner of the screen. A list of earlier chats appear on-screen. From here, you can tap open a conversation to review or restart it. To whack old chatter, tap the Edit button, select the conversations, tap the ![]() icon next to each one, and then tap the Delete button.
icon next to each one, and then tap the Delete button.
Unlike a cellphone text plan, which ties your message Inbox to your mobile number, Messages works by email address. This means you can get your messages on several iOS 5 or iOS 6 devices to keep your conversations going. And, unlike a cellphone text plan, Messages is free—making it an affordable way to keep up with your pals, as long as they’re all using recent iOS gadgets, too.
Set Up Reminders
THE IPOD TOUCH’S TO-DO List app is called Reminders, and its Home-screen icon awaits your tap. With Reminders, you can jot down tasks you need to complete in the near or far future and have the iPod alert you when you forget a chore. If you have an iCloud account (Set Up an iCloud Account), you can view your reminders on the Web as well, and Mac users running OS X 10.8 (Mountain Lion) can sync them up in the system’s Reminders app.
Here’s how to get started:
Tap open the Reminders app and tap the
icon to add a new task.Hit the Return key on the Touch keyboard to add the reminder to the list.
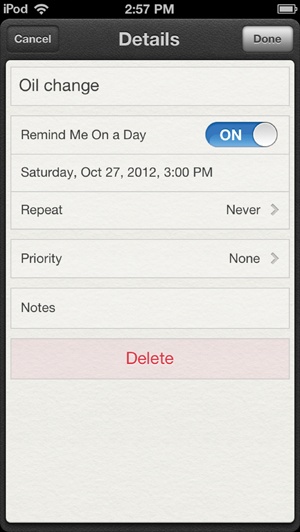
On the main Reminders list screen, tap the > at the end of a line to add more information about the task and set a priority for it, as well as the date and time you want to be reminded. Tap Done when you finish.

Once you complete a task, tap ![]() to put a check in the box and move the chore to your Completed list. To get to this searchable list of your past, present, and future reminders, tap the
to put a check in the box and move the chore to your Completed list. To get to this searchable list of your past, present, and future reminders, tap the ![]() button in the upper-left corner.
button in the upper-left corner.
Use the Passbook E-Wallet App
MOVIE TICKETS AND AIRLINE boarding passes were some of the first things to move from paper to pixels, and now Apple hopes to help you keep track of ’em. In iOS 6, the iPod Touch now sports an app called Passbook out on its Home screen, designed to be a holding pen for those digitized tickets, boarding passes, customer-loyalty cards, coupons, and other chunks of wallet-filler.
To use Passbook, you need a two things:
A Passbook-enabled app. The first time you open Passbook, it offers to take you to the App Store to find some. Several companies, including American Airlines, Starbucks, Walgreen’s, Fandango, were early in with Passbook-ready apps. The Web is another place to get passes (like digital loyalty cards or electronic concert tickets) from retailers.
An iCloud account (Set Up an iCloud Account). You need to be signed in to iCloud to add passes to Passbook. You also need make sure Passbook and Documents & Data are enabled. To do so, go to Home→Settings→iCloud→Passbook→On and Home→Settings→iCloud→Documents & Data→On.
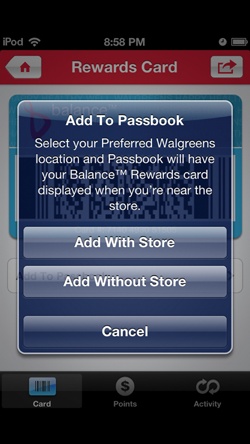
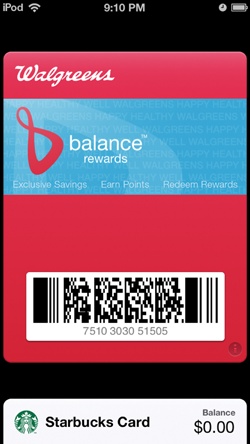
After you accept an app’s offer to add a pass (shown below on the left), the pass joins your Passbook app. To open the pass, say, when you’re buying toothpaste at Walgreen’s and want to earn purchase points, tap open the Passbook app (shown below on the right) and tap the name of the pass. The cashier scans it right on your Touch. If you have a WiFi signal and Location Services turned on, your pass for that store may appear on the Touch’s screen automatically.
To delete a pass from Passbook, tap ![]() in the corner, and then tap
in the corner, and then tap ![]() .
.
Add Twitter and Facebook Accounts
SOCIAL NETWORKING, PRIMARILY IN the form of Twitter and Facebook, has become so ubiquitous that Apple built support for these two services right into iOS 6. If you have an account with either site, here’s how to set it up on your Touch. Once you do, you can quickly share links, photos, and more to your followers and friends online by tapping ![]() within the Safari, Photos, or other compatible app and choosing Twitter or Facebook from the menu.
within the Safari, Photos, or other compatible app and choosing Twitter or Facebook from the menu.
Twitter, for those who haven’t been paying attention the past few years, is a microblogging service; it lets you update friends about your activities or musings. Millions of people use it to report what they see or feel, check for public announcements, and share links to photos and web pages. You have 140 characters per message to express your thoughts. And it’s free.
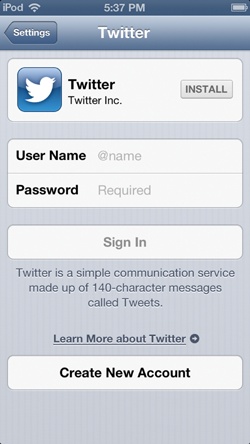
Technically, Twitter is not a built-in app, but so many iPod programs offer a tweet option that it’s best covered in this part of the book. To get full use of the Twitter experience with your iPod apps and see reactions to the things you share, you can install the Twitter app right from the Settings screen:
Tap Home→Settings→Twitter.
Tap the Install button to snag the program from the App Store. (You need to have an App Store account and password to get the app, so check out Buy iPod Touch Apps if you don’t.)
If you already have a Twitter account, you don’t need to install the app if you just want to tweet out links and photos from your Touch. Type in your Twitter user name and password on the settings screen and tap Sign In.
If you’re new to this Twitter thing but want to take the plunge right on your iPod, tap the Create New Account button and follow along.
So now that you have Twitter installed and your personal Twitter account set up, what do you do with it on your Touch? If you’re an experienced Twitter user, you’ve probably already put this book down and gone off to post a few tweets to your pals.
If you’re brand-new to Twitter, you should take a spin over to the Support area of Twitter’s site. The company offers an online guide to the service and its search feature so you can find out what everyone is tweeting about. The guide is at http://support.twitter.com/groups/31-twitter-basics.
Like, Twitter, Facebook is also more tightly integrated into the iPod’s apps in iOS 6. For example, if you’re in the Photos app and want to post a picture to Facebook, just tap the Action Menu (![]() ) and select Facebook—instead of having to open the Facebook app, tap the Add Photo button, navigate to the picture in your Photos app, and then upload it. Quickly posting links to Facebook from Safari works the same way.
) and select Facebook—instead of having to open the Facebook app, tap the Add Photo button, navigate to the picture in your Photos app, and then upload it. Quickly posting links to Facebook from Safari works the same way.
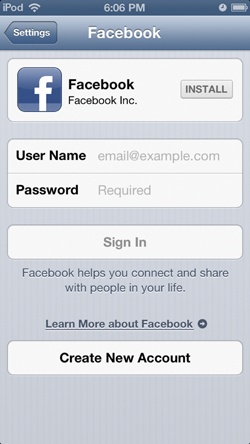
To take advantage of all this convenience, you need to install the Facebook app on your Touch and configure your Facebook account. Fortunately, you can do it all in the same place:
Tap Home→Settings→Facebook.
If you don’t have the Facebook app installed already, tap the Install button, This takes you to the App Store, where you can download the free app. (You do need an Apple ID for this, see Set Up an Apple Account if you haven’t signed up yet.)
If you’re one of the few people in the civilized world without a Facebook account to begin with, tap Create New Account and follow along.
Once you install the Facebook app, go back to Home→Settings→Facebook and enter your Facebook user name and password. A privacy notice appears, identifying the personal information on your iPod that Facebook can access, like the info in Photos and Contacts. If you have privacy issues, turn off access to certain apps, like Contacts and Calendars, here. If you don’t have issues, you can even sync your Contacts with Facebook.
Tip
If you let Facebook sync up with your iPod’s calendar app, it adds in the birthdays of your Facebook friends and Facebook events to your calendar to keep you in the loop even if you’re not using Facebook at the moment. Likewise, if you let Facebook mind-meld with the Contacts app on your Touch, it syncs up information like email address and phone numbers your Facebook pals have posted on their profiles.
Use Notifications
THE IPOD’S NATIVE APPS can keep track of your life, from bugging you about meetings to reminding you to buy milk on the way home. And once you visit Settings→Notifications and turn on alerts for the apps you want to hear from, you’ll get little on-screen notifications no matter what you’re doing on the iPod.
But wouldn’t it be great to have just one place where you can review pressing matters, like calendar appointments, email messages, or pending to-do list items?
Thankfully, there is such a Dashboard of Your Life. It’s called the Notifications screen. To see it from anywhere or any app on your Touch, just place your finger at the very top edge of the screen and drag downward, like you’re pulling down a miniature window shade. The Notifications screen appears.
You can get a quick hit of data and jump to any listed app or message by tapping it. Notifications also appear on the iPod’s Lock Screen so you don’t miss anything when you’re not using your Touch. To go right to a notice, put your finger on the app’s icon or message and slide it to the right. This simultaneously unlocks the Touch and opens the app that’s badgering you for attention.
Customizing Notifications
By default, the Notifications screen shows you basic info-nuggets, like pending reminders, calendar appointments, stock prices, and any new email messages that have arrived. But like most things on the Touch, you can customize your Notifications screen by adding apps to it, removing them, or resorting them.
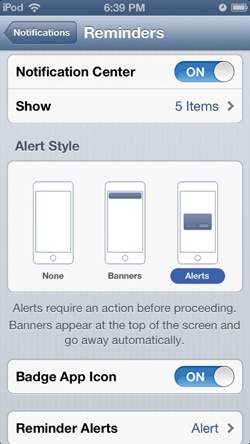
To do all this, tap Settings→Notifications. As shown at the top of the opposite page, you can sort the displayed apps manually or by time (meaning the newest notices appear highest up). To manually sort the apps, tap the Edit button in the top-right corner and use the grip strip (![]() ) to drag them into a new order. Tap an app’s name to turn its notifications on or off—or to further customize its display with one of two on-screen styles (a small, top-of-the-screen “banner” or a larger, middle-of-the-screen “alert”).
) to drag them into a new order. Tap an app’s name to turn its notifications on or off—or to further customize its display with one of two on-screen styles (a small, top-of-the-screen “banner” or a larger, middle-of-the-screen “alert”).

No matter when a notification pops onto your screen, you can always review it by dragging down the Notifications screen. To dismiss the screen, place your finger at the bottom of it and flick upwards. Consider yourself notified.
The “Do Not Disturb” Setting
The Touch can alert you to all sorts of events, but if you want to lock in a little peace and quiet, hang out the iPod’s “Do Not Disturb” sign.
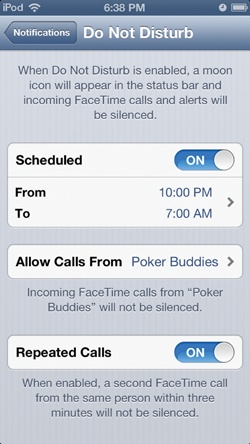
On the Do Not Disturb screen (shown here), tap to enter a time range when you regularly do not want to be interrupted by alerts and calls. You can allow a specific group of contacts to still call you anyway, as well as someone who may be calling repeatedly.
If you just want a temporary respite from alerts without formally scheduling hours, tap Settings→Do Not Disturb→On. Reverse the process to restore alerts.
Use the iPod Dictionary
AS YOU MAY HAVE noticed from tapping text to cut, copy, paste, or replace misspelled words, a Define option can also appear in the pop-up menu. This launches the iPod’s global dictionary, a built-in reference that works with most apps. It defines words in real time, so you need an Internet connection for it to work.
Using the dictionary is easy—when you see a word you don’t recognize in a text-oriented app like Safari or Mail, tap it twice (or press and hold it for a second) to select it. Then tap the Define option from the pop-up menu (below left). The dictionary looks up the word and presents the definition on a new screen (below right). When you’re done with the dictionary, tap the Done button in the top-right corner to dismiss it and return to your previous screen.
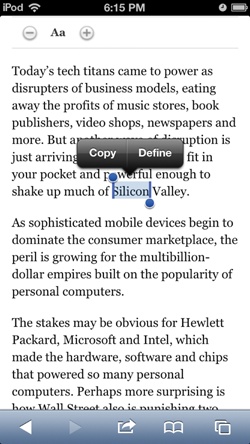

Some words may have long and varied definitions, so flick down the box to see all the noun, verb, adjective, and adverb forms. And some words, like “superior,” may double as place names, as in Superior, Wisconsin.
Search the iPod Touch
ONCE YOU GET YOUR Touch fully loaded, you may actually want to find something on it—a certain song in your music library, a calendar appointment you need to reference, or someone’s address, for example. If you have your 64-gigabyte Touch filled to the max, you may not want to wade around looking for that needle-in-a-data haystack. You can, however, shine the Spotlight on it.
Spotlight is the iPod’s built-in tool for introspection and self-searching. It scans your Touch for words, apps, phrases, names, titles, and more. You can call up songs, appointments, email messages with directions to a house party, and all sorts of other things. You get to Spotlight a few ways:
If you’re on your first Home screen, press the Home button to call up Spotlight.
If you’re a few Home screens deep, flick backwards from left to right until you pass your first Home screen and arrive at the Spotlight screen, where you can flick no further.

Once you’re on the Spotlight screen, type the name or words you’re looking for (“Doctor Rosado” or “Harrigan” or “Pensacola”). Spotlight searches as you type, narrowing its results as you continue. On the results screen, tap any item to open it. You can even launch one of your apps from the list—which is a great way to fire up programs after you fill up your 11 Home screens with icons and don’t have any place to display new app icons.
Flick to the bottom of the list and you get the option to search for your topic on the Web and Wikipedia via Safari. And with iOS 6 on a 5th-generation Touch, you can get Siri to do the searching for you (Command Siri).
Tip
Tired of songs by The Smiths popping up when you search for messages from your cousins—also named Smith? You can fine-tune your Spotlight search results to weed out certain types of files. Just tap Home→Settings→General→Spotlight Search and turn off the checkmarks next to items like Music or Videos.
Print from Your Touch
YOU PRETTY MUCH HAVE two ways to print messages, photos, and other documents from your iPod Touch: apps or AirPrint.
The App Store (Chapter 6) offers dozens of utility programs that let you print files from your iPod on your home printer. Some may be more elegant than others, but odds are you can find something in the Store that’ll have you printing for less than $10.
If you’ve never searched the Store for an app, Buy Apps on the Touch shows you how; just type print into the App Store’s search box and go to town. When you find an app that appeals to you from its description and reviews, buy it, install it, and follow the app’s directions for printing.
The other way to print uses Apple’s AirPrint technology. This approach can be more expensive—you need a compatible printer—but ultimately easier to use because the technology is built into your iPod, so you’re not at the mercy of a third-party app.
AirPrint works with more than 75 printer models—many of them made by HP, with assorted entries from Brother, Canon, Epson, and Lexmark playing along. So if you don’t have an AirPrint printer in the house, you have to buy one, which can cost at least $90. You can see a list of AirPrint printers at http://support.apple.com/kb/ht4356.
AirPrint has become much more widespread than it used to be. Here’s how it works:
Find an AirPrint-ready printer. If you just bought one to use with your iOS devices, follow the printer’s setup instructions for adding it to your wireless network. (You may have to upgrade certain models, like the HP Photosmart D110a, with a firmware update from the manufacturer; check the printer’s manual for specific steps.)
Pick a file on your iPod Touch that you want to print. AirPrint works with Mail, Safari, Maps, iBooks, and pictures from both the Photos and Photo Booth apps. Other apps from the App Store, like iWork and the note-organizing Evernote, also offer the Print option. With a file open, tap
 and choose Print. (In Mail, tap
  ; in Maps, tap the bottom-right corner to get to the Print command .)
Tap Select Printer. The iPod searches your network for all the AirPrint machines it can locate and presents you with a list of the ones it finds. Tap the name of your printer to select it.
With your printer now selected, tap the Printer Options arrow to go back to the main Print box. Tap the + and - buttons to increase or decrease the number of copies you print.
Tap the Print button and listen for the sound of your printer whirring.
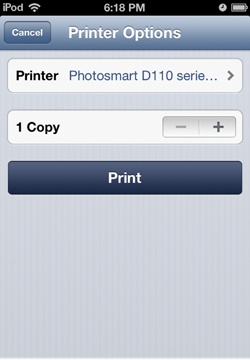
Once you configure AirPrint the first time, the Touch remembers your printer and offers it as the default choice the next time you need to make paper. If you add additional AirPrint printers to your network and want to switch to one of those, tap its name next to Printer in the Printer Options box.

Managing Print Jobs
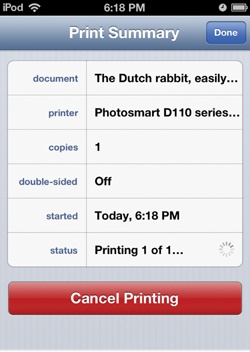
Like other computers, the iPod Touch shows you how many print jobs you have lined up. It also gives you the chance to cancel a job if you change your mind—or you realize you just told the Touch to print 22 copies instead of two.
To see the jobs in your print queue, double-click the Home button and swipe through the apps panel until you see the Print Center icon (circled). Tap it to see a summary of your print jobs (below right). Tap Cancel Printing to stop a job and save that ink and paper for another time.
Tip
If you don’t have or want an AirPrint printer, hit the Web. For example, Netputing’s AirPrint Activator for Mac OS X (netputing.com/airprintactivator) lets iOS devices see and use a network printer; you can find a Windows version with a quick Web search. These solutions might require trust and technical fiddling, but they often get the job done fine.
Set Privacy Settings on the Touch
SOME PEOPLE MAY NOT care what information app developers and social-networking sites collect about them or what personal data these groups can grab off your Touch. If you’re one of them, feel free to skip this section. However, if you want to know if that fun photo app you got from the App Store is grabbing a copy of your Contacts list for itself or what apps can see the physical location of your iPod Touch (and therefore, you) read on.
New to iOS 6, the Privacy settings page is a centralized place where you can see all the apps that request access to certain parts of your iPod. These include both built-in and third-party apps that want access to the contents of your Photos app, your contacts and calendars, your location settings—even your Facebook and Twitter accounts.
Most of the time, these requests are perfectly fine and necessary for an app to function. After all, how is the Maps app supposed to give you directions unless it can tap into the iPod’s Location Services and pull in your coordinates from its great big database of WiFi hotspots and other data it used to figure our where you are? Still, some apps may be a little sneakier about the data they peek at (often for advertising reasons).
So, to see who’s looking at what on your iPod (and turn off access to stuff you don’t want to share), tap Home→Settings→Privacy.

Privacy and Location Services
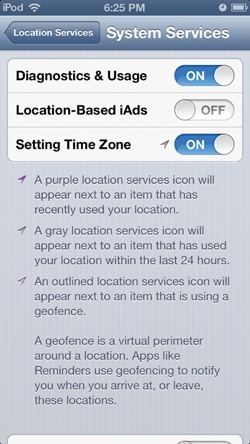
The iPod’s quasi-GPS function, known as Location Services, pins your presence on a map by way of its WiFi signal. While useful for getting Siri to figure out where you are and for Maps (and Yelp check-ins at restaurants in places that have WiFi access), you may not always want to be located. To turn off the tracker, tap Home→Settings→Privacy→Location Services→Off.
The Location Services screen also shows you a list of apps requesting your whereabouts. As shown below on the left, you can tap the On or Off button next to each app’s name to approve or deny the request.
You can also see what iOS 6 functions use your location data. On the Locations Services screen, tap System Services (shown below on the right) to see a list with an On/Off switch next to each service. Denying your location information to a system service may impede the iPod from things like finding your correct time zone based on your current location, but you do have the power to say No if you want to.
If you’d prefer not to have on-screen advertisements in apps stalking you as you travel around, you can flip off the setting for Location-Based iAds here as well. And if you’re curious about what triggers an app to use your location, a list on the System Services screen explains (below right).

Get iPod: The Missing Manual, 11th Edition now with the O’Reilly learning platform.
O’Reilly members experience books, live events, courses curated by job role, and more from O’Reilly and nearly 200 top publishers.

