Chapter 4. Getting Started
Introduction
JAX-WS, or Java API for XML Web Services, offers a set of three basic choices for connecting to web services: Dynamic Invocation, Proxy, and SAAJ. The first two hide the complexity of dealing with the XML plumbing under the hood. The third gives you full access to the SOAP envelope in an XML view, as well as a few different ways to control the invocation of your SOAP requests.
Given this flexibility, it is easy to use JAX-WS clients to invoke web services. But there is an initial hump to get over in sorting out the differences in the three APIs and determining when to use each. There are a number of standard variations on the basic request and response that can get pretty tricky. Once you need to decorate a request (see Intercepting the Request to Perform Protocol-Specific Work), or want to add MIME attachments or custom headers to your SOAP message, or invoke your client asynchronously, there’s some work to be done.
One initially confusing thing about web services is the way things
are named. For example, you might think that the Service class is used to create a web service
implementation. But it isn’t; instead, it represents a Service Endpoint
Interface on the client side, acting as a proxy for the service endpoint
you actually want to invoke. Another potentially confusing area is the
great number of classes and annotations that you typically won’t be using
directly, depending on your approach. If you’re just browsing the JavaDocs in the Java EE 5 API, you might not
know if you’re supposed to write a @WebService annotation on the same class
as a Provider annotation (you’re not), or whether Provider implementations
go on the client if Services do (they don’t). But that’s what this chapter
is all about.
This chapter is a “convenience chapter” of sorts. It is about getting set up with some tools and getting a sense of the publicly available web service landscape. In the first chapter, we looked at general SOA concepts and terms; this chapter zeroes in on web service-specific concepts, such as SOAP and WSDL. We get together some tools we need to deploy and consume services and make your first Hello World web service, and we close with a brief look at monitoring tools to aid in debugging.
If you are interested in reading the specifications that support modern Java web services development, they include:
- JSR 181
Web Services Metadata for the Java Platform. Provides many of the annotations used to sew together and deploy web services.
- JSR 224
The Java API for XML-Based Web Services (JAX-WS 2.1). Replaces JAX-RPC as the modern way to create web services, and operates at a higher-level object view than SAAJ does.
- JSR 109
Web Services for Java EE. Defines the programming model for web services.
- JSR 67
The SOAP with Attachments API for Java (SAAJ 1.3). Describes how to create and consume web services at a lower-level, XML view, as opposed to the object view provided by JAX-WS.
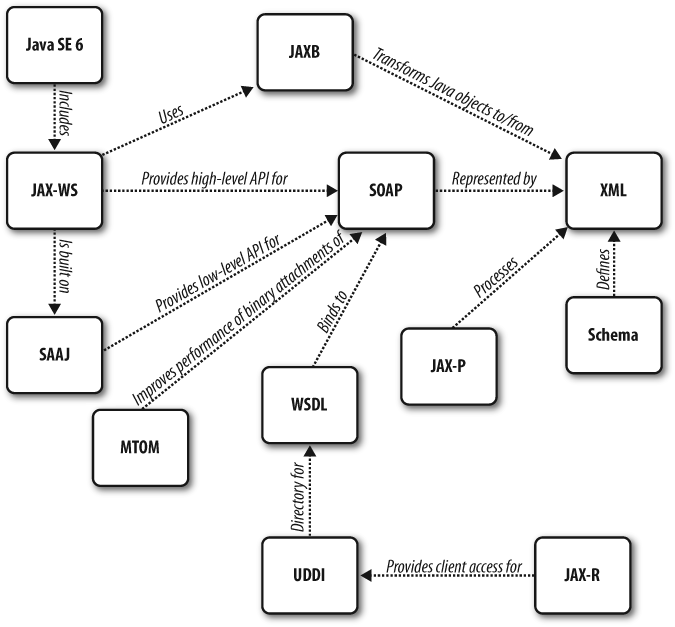
This book addresses a variety of other specifications, such as those for SOAP, OASIS XML Catalogs, JAXB, and JBI. But those are the code web services specifications from Sun. This chapter assumes you have a basic familiarity with the idea of SOAP. The illustration in Figure 4-1 shows how the basic APIs fit together.
The world of Java web services is a big, complicated, and fascinating place. Let’s jump in!
Using Publicly Available Web Services to Test Against
Problem
You want to eliminate a few variables in the complex world of web services development by using an existing, established WSDL for a real web service to test against. This will allow you to just on the client part for now.
Solution
Use some of the publicly available free web services from places like StrikeIron.com or XMethods.com.
Here are a few places you can look to find WSDLs to run your test clients against:
- Web Service X
This is a pretty good place to start. Their web services are free, have some documentation, require no signup, and are very simple and straightforward to invoke. Moreover, they are written in .NET, so you will be experiencing the real benefit of web services (and encountering some of the rough edges) right off the bat. Try them out at http://www.webservicex.net.
- StrikeIron.com
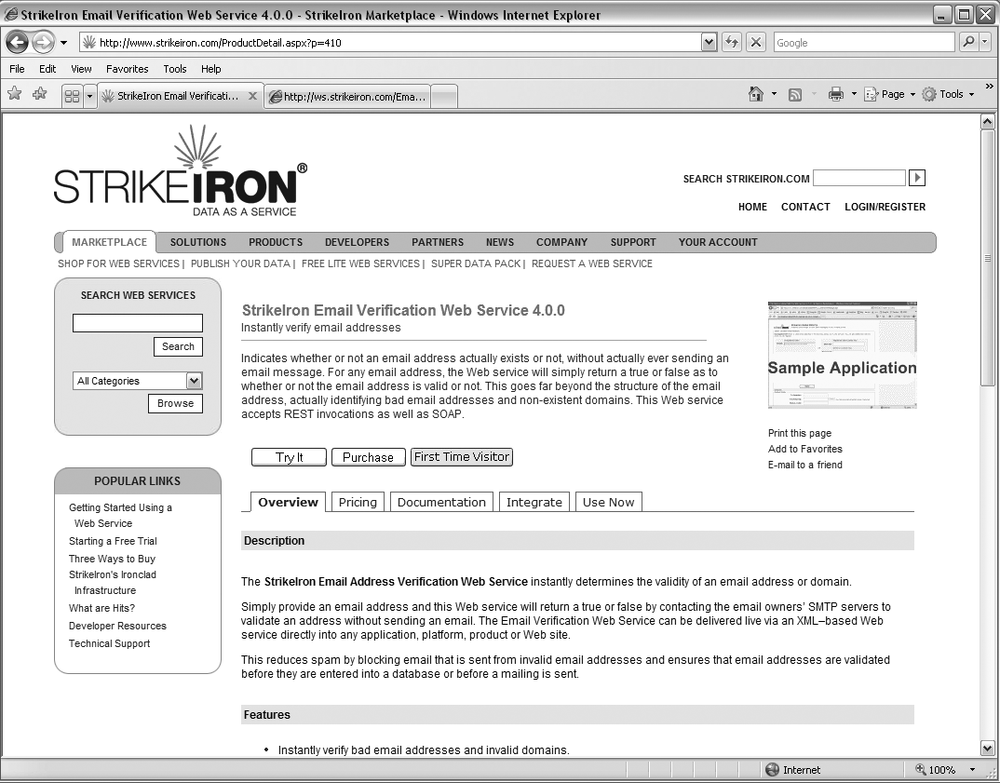
If you supply your email address, you can invoke a service five times. If you do a full registration, you get 25 times; after that, they’ll want you to purchase the service. Note that StrikeIron is not a test bed, and that they make money by having developers and organizations purchase their services for production use. They have real implementations behind them and do real work, such as figuring out the geocode (latitude and longitude) of a certain address. But the services here are real-world with non-trivial interfaces that require passing license info in headers, and the schemas define many composite objects. All of this can make StrikeIron rather tough to start out with. A sample StrikeIron.com service documentation page is shown in Figure 4-2.
- XMethods.com
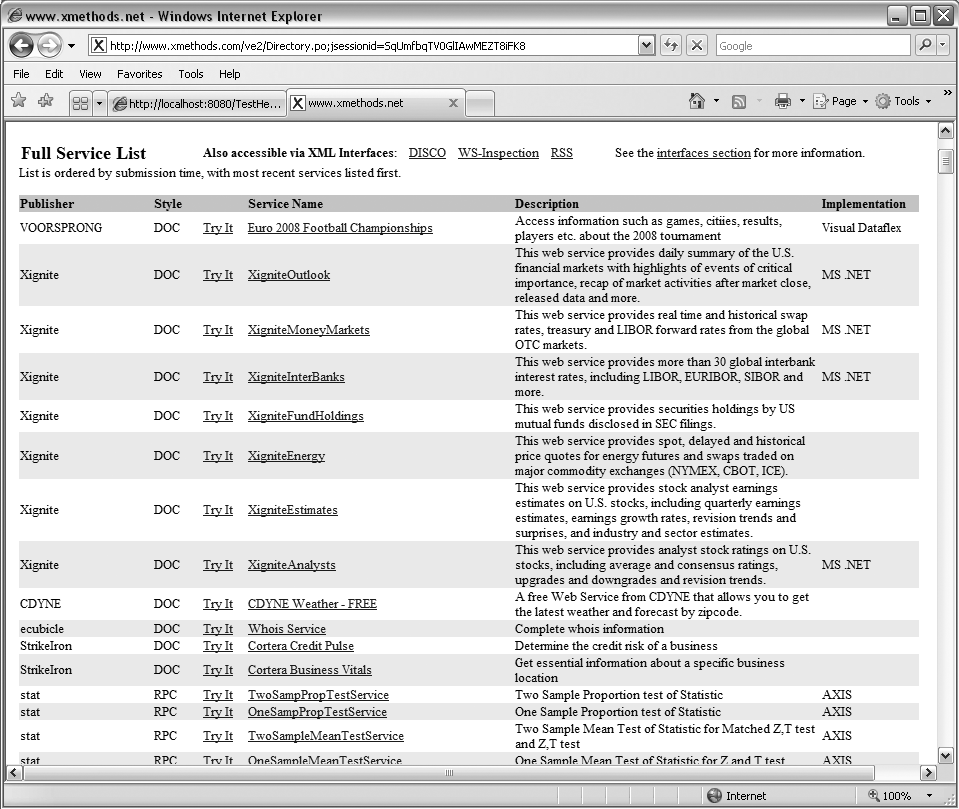
There’s no signup and no fuss to using many of the services here. The services are not written by XMethods themselves, however; they just host them. So each service will have its own terms of use, and they vary widely in how well they are implemented and documented. Services here are provided by individual developers as well as for-profit companies such as CDyne and StrikeIron. The way that XMethods lists their available services is shown in Figure 4-3.
- CDyne.com
Another web service provider similar to StrikeIron. They also provide a free set of services for developers to use. If you supply a 0 as the credentials key, you can get started with limited usage as with StrikeIron. Their free developer section is available at http://www.cdyne.com/free/default.aspx.
- FedEx.com
Offers a Ship Manager web service that you can try out with registration.
- Amazon.com
Amazon provides web services at http://aws.amazon.com. At this page you can sign up as a developer, browse their solutions catalog, read whitepapers, and more. Their services include storage (S3), virtual servers (EC2), and database usage (SimpleDB).
Makes a variety of APIs available at http://code.google.com/. They are no longer giving out keys to their SOAP-based web service, and the services they offer are primarily focused around JSON and similar technologies.
Discussion
Web services are very complex. Despite the fact that they are wonderful tools for integration across platforms, and that companies like Sun and Microsoft have made great strides in working toward true interoperability with them, services remain just plain hard. They include fussy details that require painstaking attention. The reality of web services today is that there are many slight variations across platforms, versions of the platforms, and different implementations of engines and IDEs. How does one get started in such an environment?
One way to make the enormous web-services pill a little easier to swallow is to eliminate one half of the equation. Instead of writing the service and consuming it too, you can use some web services that are publicly available for free, and just concentrate on getting your client going. That gives you an opportunity to understand the intricacies from one side and see how your client works with an already tested service, so that you can be confident in at least one piece initially.
As discussed earlier, publicly available web services that are free to use can be really good for developers who are just getting started with web services. Also, keep in mind that in some cases you actually can purchase the services for real business use, such as with the services from StrikeIron, Amazon, Google, and eBay. Not only that but, these companies are pioneers in the web services space. These two factors can add up to some fairly complex and lengthy WSDLs. If you’re still at the Hello World stage, using these services with their wide variety of options and authentication schemes can be overwhelming. Starting with something from XMethods may be a little easier, but many of those services have been developed by well-intentioned people who may be using older versions of their services platform, and you may run into services that don’t truly meet your spec or that are just not interoperable. So, if you find yourself banging your head against the wall for a really long time, it may not be you.
Installing Metro
Problem
You want to use the latest Java APIs available to make it easier to develop interoperable web services.
Solution
Install Metro. Metro is hosted at https://metro.dev.java.net as a free and open source project.
Discussion
Metro 1.0.1 is included with Glassfish 9.1 update 1. The JAX-WS Reference Implementation, available within Java SE 6 and Glassfish, provides a rich set of APIs for producing and consuming web services, including WS-Addressing and MTOM capabilities. Metro extends the capabilities of this basic platform but without vendor lock-in.
Note
WSIT, or Web Services Interoperability Technology, is what ensures that JAX-WS applications interoperate with web services and clients from other platforms that conform to the Basic Profile 1.1. WSIT is bundled with JAX-WS 2.1, as included in Glassfish. The WSIT technology is not based on any JSR, and as such is not available as a plug-in for other application servers. Other vendors, such as Oracle WebLogic 10.3, offer roughly equivalent technology, however. In fact, Oracle’s WebLogic implementation uses considerable code from the Glassfish and Metro open source projects.
Think of Metro as two basic layers. The core layer gives you the JAX-WS RI, and implementations of key web services specifications to promote interoperability: WS-I Basic Profile, WS-I Attachments Profile, and WS-Addressing. WS-IT, or Web Services Interoperability Technology, provides interoperability with the .NET 3.0 and 3.5 web services platform on Windows. If you download only Glassfish and not the separate Metro 1.1, you get these features.
The second layer of Metro offers advanced features in four categories: Transports, Reliability, Security, and Transactions, as highlighted in Table 4-1.
JAX-WS relies on JAXB (Java API for XML Binding) to provide a translation or mapping layer between XML and Java.
Note
WS-Addressing abstracts the physical location of a web service resource for looser coupling. MTOM (Message Transmission Optimization Mechanism) optimizes the transmission of binary data within SOAP messages.
While Metro is available as a separate download that can work in conjunction with other containers such as WebLogic 10.3, it is generally considered as the Sun web services stack, as shown in Figure 4-5.
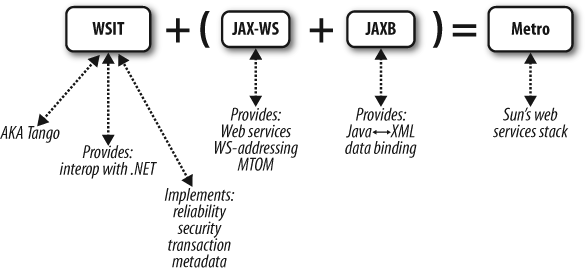
In addition to implementing these important specifications, Metro also provides certain conveniences. For example, it offers a single annotation that allows you to perform schema validation against incoming and outgoing message payloads. Metro gives you support for REST via the Jersey project, as well as Spring and JSON (JavaScript Object Notation) integration.
Here’s how to get Metro:
Download the most recent stable build from https://metro.dev.java.net.
In a console, navigate to the directory you downloaded it to.
Execute
> java -jar metro-installer.jar. Agree to the license. The installer will expand a directory containing a variety of samples and documentation, as well as a few JARs in the lib directory.Navigate to the directory the installer created and run the appropriate Ant script for your platform. First, get the location of your Glassfish home and set that variable on the command. Run wsit-on-glassfish.xml as follows:
> ant -Denv.AS_HOME=C:\\programs/glassfishv2ur1 -f wsit-on-glassfish.xml
You should see that some files were copied and the installation was successful. After restart, the latest version of Metro should now be available for your Glassfish domains.
Note
Metro comes with some tools that are newer versions of the ones
that come with the JDK, and some of these are also in Glassfish. For
example, the wsimport tool that comes with Java SE
1.6.0_05 is version 2.1.1. However, invoking > wsimport
-version from within the
<glassfish-home>/bin directory shows
“JAX-WS RI 2.1.3-hudson-390-” after installing Metro. It’s important
to keep your paths straight while using these tools!
This solution assumes that you already have a recent version of Glassfish running locally. It is available at https://glassfish.dev.java.net. Glassfish 9.1 update 1, Metro 1.3, and JDK 1.6.0_05 were used to test the examples I’ve written for this book. If you do not want to use Glassfish, Metro also works with Tomcat, JBoss, and WebLogic.
Using Metro 1.3 in Maven
Here are the dependencies to add to your pom.xml if you are using Maven 2 to build your web service and you want to use extra features in Metro:
<dependency>
    <groupId>com.sun.xml.ws</groupId>
    <artifactId>webservices-rt</artifactId>
    <version>1.3</version>
    <scope>compile</scope>
</dependency>
<dependency>
  <groupId>javax.xml</groupId>
  <artifactId>webservices-api</artifactId>
  <version>1.3</version>
  <scope>compile</scope>
</dependency>
Installing Oracle WebLogic
Problem
You want to use the latest JAX-WS tools and WS-* implementations, and you also want the support and extensions of a vendor product.
Solution
Get Oracle WebLogic 10gR3 (also known as 10.3). The installation includes WebLogic Server as well as Workshop for WebLogic, which is an Eclipse-based IDE that integrates well with WebLogic server.
Follow these steps on Linux:
Download the WebLogic 10.3 file for your platform from http://www.oracle.com/technology/software/products/ias/bea_main.html. You can choose the Net installer (smaller download, but requires an Internet connection) or the Package installer (large download of nearly 800MB, but no Internet required). On Linux, the file is inet_server103_linux32.bin.
Change permissions on the file to allow it to be executed. If you have a GUI in your Linux distribution, just double-click the filename to start the installer. If not, just navigate to the directory you downloaded the binary file to and type ./net_server103_linux32.bin.
Follow the instructions in the wizard. The first step is to create a BEA home (BEA used to make WebLogic until Oracle purchased them in mid-2008). Mine will be /opt/oracle. Next, you’ll specify a temp directory for installer files.
Next, specify a custom installation so that you can select everything it will install (there’s a lot). If you want detailed information on each item to be installed, click it once, or view the documentation at http://edocs.bea.com/wls/docs103/getstart/overview.html#wp1062352.
Finally, choose the JDKs to install. By default, these will be Java 1.6.0_05 for the Sun and JRockit JVMs. JRockit is the Oracle implementation of the Java virtual machine, and integrates well with its WebLogic product. This step will get all the remaining files you need to complete the installation.
Now set the install directories for WebLogic 10gR3 Server and Workshop. I’ll put the server in /opt/oracle/wlserver_10.3. The installation size is roughly 1.13GB.
Now that the installation is complete, you can run the QuickStart application, which allows you to start the Server and Workshop components.
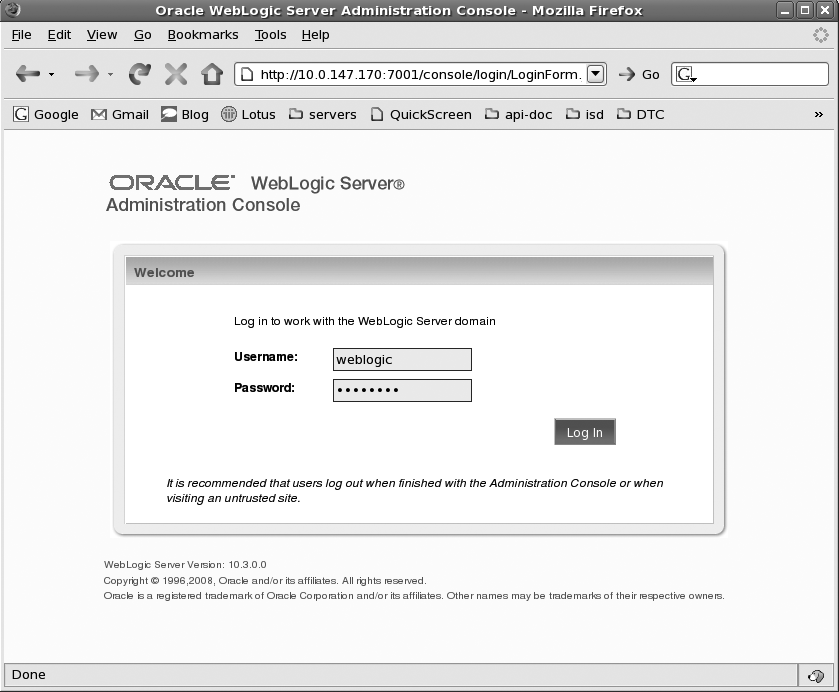
Starting the server console
Once you have started WebLogic Server, you can start the console by accessing http://localhost:7001/console. The console login screen is shown in Figure 4-6.
Note
Enter “weblogic” for the username and password.
Now that you are logged in, you are ready to create a web service, package, and deploy it to the console.
Creating and Deploying the Simplest Web Service
Problem
You are new to web services and want to create and deploy the simplest possible functioning web service.
Solution
Write a POJO (Plain Old Java Object) annotated with
@WebService and use
javax.xml.ws.Endpoint to wrap and publish it
within the JVM using the HTTP server built into Java SE 6.
Example 4-1 shows the simplest web service you can write.
package com.soacookbook.ch03;

import javax.jws.WebService;
import javax.jws.soap.SOAPBinding;

@WebService
@SOAPBinding(style=SOAPBinding.Style.RPC)
public interface Hello {

    String sayHello(String name);
}
Here, you created a public interface that clients can use to
invoke the service. You used the @WebService
annotation to indicate that this interface should be made available as a
service by the publisher. You then indicated a SOAP binding style of
RPC (Remote Procedure Call). Now you need a class to
implement the complex business logic (see Example 4-2).
package com.soacookbook.ch03;

import javax.jws.WebService;

@WebService(endpointInterface="com.soacookbook.ch03.Hello")
public class HelloWS implements Hello {

    public String sayHello(String name) {
        return "Hello, " + name + "!";
    }
}
This service will accept a single parameter and return a string
containing the parameter value. Notice that both the interface and the
implementation must have the @WebService annotation for publishing
and invoking using an Endpoint.
The implementation points to its client-facing interface using
the endpointInterface attribute of the
@WebService annotation. This is a fully qualified
string.
Note
If you specify a value for the endpointInterface
attribute in the @WebService annotation, the interface
will act as the service of record, and its further annotations will be
honored while any subsequent annotations in the implementing class
will be ignored. This is why you specify the SOAP binding in the
interface.
That is all you need to do to create a web service in its most
basic form. But it’s not quite a real web service until you publish it
so that clients can invoke it. You do not need to use a web container
for this example. You will use the
javax.xml.ws.Endpoint class to publish it to the
HTTP server internal to the Java SE 6 VM, as shown in Example 4-3.
package com.soacookbook.ch03;

import javax.xml.ws.Endpoint;

public class HelloPublisher {
    public static final String URI = "http://localhost:9999/hello";

    public static void main(String[] args) {

        //Create instance of service implementation
        HelloWS impl = new HelloWS();

        //Make available
        Endpoint endpoint = Endpoint.publish(URI, impl);

        //Test that it is available
        boolean status = endpoint.isPublished();
        System.out.println("Web service status = " + status);
    }
}
The Endpoint class has a static
publish method that binds the annotated service
implementation class to a location and makes the service available
there. You can then check the status of your service using the
isPublished method. At this point, your service has been
deployed and is available at the specified location.
The endpoint interface allows you to access the complete web
service. For instance, you can get the meta data associated with the
endpoint by invoking the getMetadata method on the endpoint
instance. This returns a List<Source> of XML
documents. You can also get access to the executor that is used to
dispatch requests to the service by invoking the
getExecutor method on the endpoint instance.
See Also
Understanding WSDL to learn more about what was just generated and how it works.
Creating and Deploying a Service to WebLogic
Solution
Follow the steps below.
First, it’s probably a good idea to create a new domain for yourself, though you can use the default domain for testing. For this example, I’ve created one and set it to listen on port 7777.
Note
To set up a domain through WebLogic Workshop, right-click in the Servers tab and choose New Server. At the screen to specify a domain directory, click the Click Here to Launch Configuration Wizard to Create a New Domain and follow the steps. Once your domain is created and your server added, right-click on it and choose Start to start the server. Now you’re ready to create and deploy a web service project.
Create a web service project
Follow these steps to create a web service project for WebLogic that uses portable JAX-WS annotations:
In WebLogic Workshop, choose File→New→Project.
Under the Web Services project type, choose Web Service Project. Click Next.
Give your project a name. Choose your new server as the Project Runtime.
In the Configurations area, choose Annotated Web Service Facets JAX-WS 10.3. Click Next.
Uncheck the box next to WebLogic Web Service Extensions in order to keep your code more readily portable and rely only on the JAX-WS standard.
Accept the defaults for the remainder of the wizard and click Finish to create the project.
Now that the project exists, let’s add the web service.
Create the web service
Under Java Resources, choose the src directory, right click, and create a New Package. I’ve named mine
com.soacookbook.Right-click on your package, and choose New WebLogic Web Service.
In the Filename field, enter HelloWS and finish the wizard.
Now you have a new web service class. Modify the contents of the class to look like this:
@WebMethod
public String sayHello(String name) {
  return "Hello, " + name;
}
Now you need to create the WSDL for the web service.
Deploy the web service
Now that you have a complete web service, you’re ready to deploy it to your WebLogic server. Here are the simple steps to do that:
Right-click on the web service implementation class itself (here,
HelloWS.java) and choose Run As→Run On Server.Choose the local WebLogic server that you installed earlier and click Finish.
Test the service using the built-in test client
Like Glassfish, WebLogic Workshop comes with an easy way to test a web service. When you deploy and run the service through Workshop, it will automatically create a simple graphical client that allows you to test your service.
So after the deploy step, Workshop should launch a screen similar to that shown in Figure 4-7. It shows your web service operation and allows you to enter a value and get a response. In both cases, the SOAP message is shown.
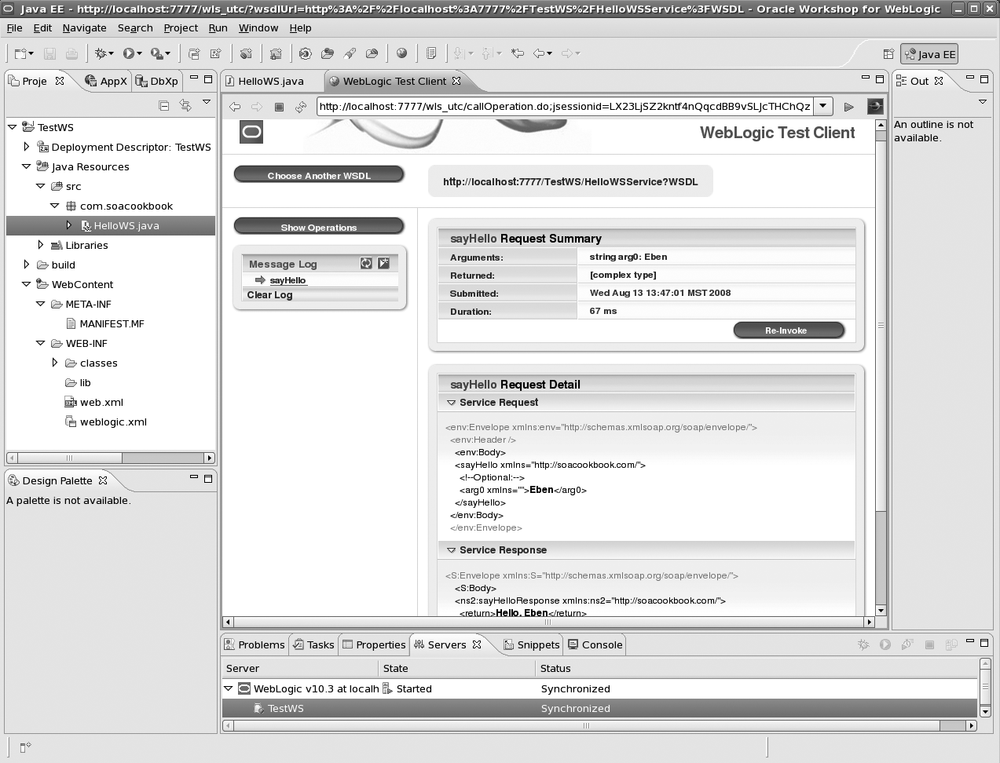
The test client is useful as you are getting started, to see
what your messages look like on the wire (without HTTP headers). Also,
if you want to view the WSDL for this service, you can click the link
at the top of the test client. In this case, it’s
http://localhost:7777/TestWS/HelloWSService?WSDL.
Setting Up a Maven 2 Service and Client Project
Problem
You want to create a project to house a web service and its client in Maven 2. You already understand Maven, but you aren’t sure what plug-ins you need, what goals to associate them with, or how to structure it.
Solution
Create three projects: one for the service, one for the client, and a parent. Run unit tests in the service and client projects. Also, there are some general dependencies you’ll want to set up to work with Java EE 5, and you’ll need to update the default Java SDK to 1.6.
Discussion
For the examples in this book that use Java SE 6, you’ll need to update your POM to include the compiler plug-in that uses SE 6, as shown below:
<build>
  <plugins>
     <plugin>
        <groupId>org.apache.maven.plugins</groupId>
        <artifactId>maven-compiler-plugin</artifactId>
        <version>2.0.2</version>
        <configuration>
          <source>1.6</source>
          <target>1.6</target>
        </configuration>
     </plugin>
...
This ensures that the JAX-WS and XML libraries you’ll need will be available.
In general, the easiest way to create web services is to use Maven
2, set up a web project (specify
<packaging>war</packaging>), and then create a
POJO that has the @WebService
annotation on the class. If you stop there, however, your WAR will
deploy properly but won’t contain any web services. That’s because by
default Maven 2 uses an older DTD for Servlet 2.3 in the
web.xml file. To solve this, add the following
dependency to your pom.xml:
<dependency>
  <groupId>javaee</groupId>
  <artifactId>javaee-api</artifactId>
  <version>5</version>
  <scope>provided</scope>
</dependency>
Then you have to replace the web-app declaration.
Look in your project’s src/main/webapp/WEB-INF
folder for the web.xml file, and replace the
following code:
<!DOCTYPE web-app PUBLIC
 "-//Sun Microsystems, Inc.//DTD Web Application 2.3//EN"
 "http://java.sun.com/dtd/web-app_2_3.dtd" >
<web-app>
  <display-name>My Service</display-name>
</web-app>
with the Servlet 2.5 version specified here:
<?xml version="1.0" encoding="UTF-8"?>
<web-app version="2.5"
  xmlns="http://java.sun.com/xml/ns/javaee"
  xmlns:xsi="http://www.w3.org/2001/XMLSchema-instance"
  xsi:schemaLocation="http://java.sun.com/xml/ns/javaee
  http://java.sun.com/xml/ns/javaee/web-app_2_5.xsd">

   <display-name>My Service</display-name>
</web-app>
You also need to set up dependencies for Metro only if you are doing any Metro-specific code (like WS-Addressing on the client, or a stateful web service that relies on Metro’s export mechanism):
<dependency>
  <groupId>com.sun.xml.ws</groupId>
  <artifactId>webservices-rt</artifactId>
  <version>1.3</version>
  <scope>provided</scope>
</dependency>
<dependency>
  <groupId>javax.xml</groupId>
  <artifactId>webservices-api</artifactId>
  <version>1.3</version>
  <scope>provided</scope>
</dependency>
Now when you deploy your projects, they’ll know to interpret the annotations and create a service for you.
Overall, the idea is this: you create a parent so that you have a place to build that creates the entire world for you with a single click. It builds the service first, then deploys it, and then builds the client, using the freshly deployed WSDL.
With your JUnit tests, make sure that you test in both the service and client projects. Hopefully, this will seem obvious. But the confusion here can stem from our tendency to think that the web service project must be tested as a web service because that is what’s being built. But that would require testing after deployment, which goes against the grain of how Maven works. It’s easy enough to get the results you want by following Maven conventions.
Basically, because the deploy phase happens after the test phase,
your service project build should test the code directly, as regular
Java code, not the code deployed as a web service with a WSDL. To do so,
you can make use of mock objects. The Jakarta Commons project is helpful here. It allows you to
mock JNDI calls and make connections to a database defined as a
DataSource in your container. That will make sure
that the Java code is thoroughly tested (you can use Cobertura from
http://cobertura.sourceforge.net/ to see just how
much). The client project will then execute its tests against the live,
freshly deployed service.
Creating the service project
The service project is just a regular EAR or WAR project, depending on whether you’re using an EJB or a servlet for your service implementation. The only thing to note is that you want to make the service artifact deploy automatically at build time, so that when the client builds too, it can read the new WSDL and get the new implementation of the service. You do that as you would with any regular WAR or EAR. If you’re using Glassfish, here’s a good plug-in to use:
<plugin>
  <groupId>org.n0pe.mojo</groupId>
  <artifactId>asadmin-maven-plugin</artifactId>
  <version>0.1</version>
  <configuration>
    <glassfishHome>${my.glassfish.home}</glassfishHome>
  </configuration>
  <executions>
    <execution>
      <phase>install</phase>
      <goals>
        <goal>redeploy</goal>
      </goals>
    </execution>
   </executions>
</plugin>
This plug-in executes during the install phase to deploy your WAR or EAR automatically during your build. This is a nice convenience. The only item of note here is that it’s important to use a property for things like paths that might be specific to a given developer’s box. Here, I’m referencing a property whose value is specified in my own settings.xml file.
Creating the client project
If you are creating a service for public consumption, you may just stop at creating the service itself, and let clients figure out on their own how to use it. But you might want to also create a client JAR that you can make available to users on a Java platform, as a convenience. This is something that Amazon, eBay, Google, and others did in the early days of web services, to make their services easier to work with. They’d distribute a client ZIP file that contained both Java and C# code, allowing developers to get up and running with their services more quickly.
Even if you are developing web services for internal use only, it still may be a good idea to create a client JAR that already contains the generated artifacts off the WSDL so that integrating usage of your service into business applications is not only easier, but also more controlled. For example, if you’re creating the client JAR, you can add features such as WS-Addressing, schema validation, and so on without requiring every developer in your shop to understand all those things, or even to be aware that they’re happening under the hood. This allows you more flexibility. Of course, if you have business applications written in COBOL or C# that need to invoke your service, they can’t use your Java client. You can then either create one for them, or let them do it themselves.
Note
If you’re creating both the service implementation and a convenience client, be certain that you are designing your service in a fully encapsulated manner, and not allowing the client to do any real work. That might sound obvious enough, but it’s an easy trap to fall into when you are getting started and doing services internally—especially because in order to make the learning curve shorter, the designers of the Java web service APIs made everything build on familiar web technologies.
Here’s an easy rule of thumb to make this distinction. If you’re making both a client and the service simultaneously, that’s fine. It’s a common thing to do. But be sure not to have any code in your client JAR that is necessary for the functioning of your solution. It’s only a convenience, nothing more. If there’s code in your client that would make the overall solution fail were it removed, the service is designed wrong, and you need to find a way to move that functionality back into the service.
Your client and service projects need to be versionable independently of one another. For example, you might add multithreading to your client, but that doesn’t mean that anything in your service has changed. You need to be able to redistribute the client to a Maven repository separately, with its own version.
For the client project, use the wsimport plug-in like this:
<plugin>
 <groupId>org.codehaus.mojo</groupId>
 <artifactId>jaxws-maven-plugin</artifactId>
 <version>1.9</version>
 <executions>
   <execution>
     <goals>
       <goal>wsimport</goal>
     </goals>
   </execution>
 </executions>
 <configuration>
   <packageName>com.myProject</packageName>
     <wsdlUrls>
       <wsdlUrl>${com.myProject.wsdl.url}</wsdlUrl>
     </wsdlUrls>
     <verbose>true</verbose>
  </configuration>
</plugin>
The JAX-WS plug-in is available at https://jax-ws-commons.dev.java.net/jaxws-maven-plugin/.
It allows you to add wsimport and wsgen functionality to your Maven 2 build. The
<packageName> is the name of your generated source
package.
Creating the parent project
You don’t truly need the parent project, but it does allow you to specify shared dependencies, such as Java SE 6, Log4J, JUnit, or other items that both the client and the service require. The parent can declare these dependencies, and also declare its children as the service and client projects, like this:
<modules>
   <module>ws</module>
   <module>client</module>
</modules>
The purpose of the parent is so that you can build and deploy the service, then immediately build the client against it to make sure that any changes in your WSDL are compatible with your client, and vice versa.
Another reason is so that you have a single umbrella project that makes a convenient target for integration builds. For example, if you’re using something like Cruise Control (http://cruisecontrol.sourceforge.net/) or Hudson (https://hudson.dev.java.net/) to perform continuous integration, it’s easier to set up that tool to point to a single POM it needs to build.
However, if you’re using a tool like Hudson on its own build server, you will probably need to set up a profile for the build server to use when it specifies WSDL locations, a path to the application server it should deploy to, and so on. Here’s a quick example:
<profiles>
<!-- For shared Continuous Integration Hudson Build.
     Developers should have their own profile set in profiles.xml,
     which should be ignored by source repository. -->
  <profile>
     <id>myProject-integration-profile</id>
     <activation>
     <!-- This property is passed to Maven from within
          the Hudson build configuration on the build server. -->
     <property>
        <name>integrationBuild</name>
        <value>true</value>
     </property>
     </activation>
     <properties>
       <glassfish.home>/domains/devtools/glassfish/...</glassfish.home>
       <my.wsdl.url>http://example.com:7575/my/MyService?wsdl</my.wsdl.url>
     </properties>
   </profile>
</profiles>
Then in the project for this service that you’ve made in your
continuous integration (CI) tool, you can specify a system property
that controls what machine this project is being built from. Here I’ve
used the integrationBuild property that the Hudson
project has configured to pass as an argument to the build, so that
the properties for it to use (such as the location of the app server
to deploy to and the WSDL URL that the client should read) are
triggered.
Thanks to Brian Mericle for his work with me on this solution.
Understanding WSDL
Problem
You have just deployed a simple web service and want to view its WSDL to understand the relation of your code to the deployed web service.
Solution
Inspect the WSDL by appending ?WSDL to the end of the
service name. This is only a convention and is not required by any
specification, but all of the major vendors (IBM, Microsoft, BEA/Oracle,
Sun, JBoss) adhere to it.
Check out the following discussion on the key sections of a WSDL in order to better understand this important part of your web service contract.
Discussion
It’s hard to have a general discussion of WSDL sections because they change depending on choices you made in a specific service. So in this discussion, we examine the WSDL that is generated for the web service you created in Creating and Deploying the Simplest Web Service, Example 4-3.
Inspect the WSDL published to the Java 6 internal HTTP server by
opening your web browser to http://localhost:9999/hello?wsdl.
You should see something like Example 4-4.
<?xml version="1.0" encoding="UTF-8"?>
<definitions xmlns="http://schemas.xmlsoap.org/wsdl/"
    xmlns:tns="http://ch03.soacookbook.com/"
    xmlns:xsd="http://www.w3.org/2001/XMLSchema"
    xmlns:soap="http://schemas.xmlsoap.org/wsdl/soap/"
    targetNamespace="http://ch03.soacookbook.com/"
    name="HelloWSService">
  <types></types>
  <message name="sayHello">
    <part name="arg0" type="xsd:string"></part>
  </message>
  <message name="sayHelloResponse">
    <part name="return" type="xsd:string"></part>
  </message>
  <portType name="Hello">
    <operation name="sayHello" parameterOrder="arg0">
      <input message="tns:sayHello"></input>
      <output message="tns:sayHelloResponse"></output>
    </operation>
  </portType>
  <binding name="HelloWSPortBinding" type="tns:Hello">
    <soap:binding style="rpc" transport="http://schemas.xmlsoap.org/soap/http">
    </soap:binding>
    <operation name="sayHello">
      <soap:operation soapAction=""></soap:operation>
      <input>
        <soap:body use="literal" namespace="http://ch03.soacookbook.com/"></soap:body>
      </input>
      <output>
        <soap:body use="literal" namespace="http://ch03.soacookbook.com/"></soap:body>
      </output>
    </operation>
  </binding>
  <service name="HelloWSService">
    <port name="HelloWSPort" binding="tns:HelloWSPortBinding">
      <soap:address location="http://localhost:9999/hello"></soap:address>
    </port>
  </service>
</definitions>
There are a few things to notice about the WSDL published by the endpoint. Let’s look at them to gain a better understanding of how this all works.
Types
This Types section of the WSDL is empty. Types is where a WSDL either imports or locally defines the XML schema types that the messages your web service exchanges will use. The reason this section is empty is that the messages defined by this web service use only strings, which are defined as a simple type in XML Schema—all web services will be able to use them out of the box. So it’s not necessary to put anything there.
Frequently, WSDLs will define a Types section that points to an external schema. In your WebLogic service created in Creating and Deploying a Service to WebLogic, the WSDL indicates the location of a schema, generated by the server at deploy time, that defines the types the messages will use:
<types>
<xsd:schema>
  <xsd:import namespace="http://soacookbook.com/"
    schemaLocation="http://localhost:7777/TestWS/HelloWSService?xsd=1"/>
</xsd:schema>
</types>
That URI references a complete XML Schema document that indicates the values of the complex types used in the request and response messages.
If you are writing your own WSDL, you can define your types this way in an external schema, or define them entirely inline, like this:
<types>
<xsd:schema>
  <xsd:simpleType name="ID">
    <xsd:restriction base="xsd:string">
      <xsd:pattern value="[0-9]{5}"/>
    </xsd:restriction>
  </xsd:simpleType>
</xsd:schema>
</types>
In general, it’s considered a best practice not to define your types inline in order to keep the interface separate from the implementation as much as possible. Instead, refer to an external schema.
Messages
The Messages section of the WSDL contains definitions for
the request and responses to be used in communicating with the
service. You’ll notice that there is one message each for the request
and response. The request message has the same name as the method
invocation because you are doing RPC style here. The response is given
the name of the operation appended with “Response”, which is the
default according to the JAX-WS specification. Each of these messages
has a part child. A message part is similar to a
parameter to a method in that it has a name and a type. The name for
the first part is “arg0”, which is the default. Subsequent arguments
would be named “arg1”, and so forth. These names can be customized to
make them easier to read and follow, which becomes increasingly
important for more complicated WSDLs.
For the response, there is an element <part
name="return" type="xsd:string">. Because the default
parameter style value is “wrapped,” the value that gets returned by
the web service will be wrapped within a single element with a name of
“return” from which you can extract the rest of the payload. This is
discussed in more detail in Choosing Encoding, Use, and Parameter Styles.
Binding
The Bindings section of the WSDL indicates the transport
used to send messages to and from a web service. The default is SOAP,
and other advanced options include HTTP, JMS, SMTP, and TCP. Because
you specified that you wanted to bind your service to SOAP using the
@SOAPBinding(style=SOAPBinding.Style.RPC) annotation on
your Hello service interface implementation class, you get SOAP
bindings as the message transport.
The <soap:binding> element features a transport attribute with
a value of http://schemas.xmlsoap.org/soap/http.
That means that the service will use SOAP 1.1 for the send and receive
protocol for your messages. You can also specify SOAP 1.2, but 1.1 is
the default, and using SOAP 1.2 is not widely recommended just yet, as
the overwhelming majority of implementations currently are for
1.1.
You can also see that the <soap:binding>
element features a style attribute with a value of “rpc”,
which was written in this WSDL because of the
@SOAPBinding(style=SOAPBinding.Style.RPC) annotation on
the Hello service interface. The other option you could have provided
there is “document.” This is discussed in detail in Choosing Encoding, Use, and Parameter Styles.
The service is given a namespace of
http://ch03.soacookbook.com, which matches an exact
reversal of the package name of the Java class defining the endpoint.
Likewise, the operation name matches the method name in that class
because you have not customized it.
Service
The Service section of the WSDL indicates that the name of
the service will be HelloWSService. This is the
name of the class that defined your service, with “Service” appended
to it, which is how services with no customizations are named
according to the JAX-WS specification. It also indicates that the
“HelloWSPort” port will be bound using SOAP. The elements in that
section are prefixed with soap, indicating that they are from the
http://schemas.xmlsoap.org/wsdl/soap/
namespace.
The important location attribute here indicates
where you can invoke the service, and this is what clients will use to
invoke it. The next recipe shows you how to invoke this service.
Using References in NetBeans to Generate Web Service Clients
Problem
You have grown tired of manually generating client-side code based on a WSDL from the command line, and want that to become part of your regular development workflow. You just want a quick and easy way to generate the portable JAX-WS objects based on a WSDL so that you can start using the service as you would any other dependency.
Solution
Use NetBeans 6 Web Service References from within a regular Java project.
Discussion
Many modern IDEs come with the ability to create web service
references for client projects. This saves you from some of the
error-prone drudgery of performing many manual steps on the command
line. First, set up your client project as a regular Java project and
add a service reference by pointing to the WSDL location. Then, once you
run the clean and build Ant targets through the IDE, it generally will
insert a wsimport step and compile the
generated service client code along with yours, making it available on
the classpath. This makes it very easy to create clients of existing web
services and incorporate that code into your project.
Here is how to use a web service reference in NetBeans 6, which is representative of how various IDEs typically do it:
Create a new client project. This could be a web page, but for this example, you’ll just create a regular Java console-based project, and create a class with a main method to run.
Right-click on the project name and choose New→Web Service Client.
When the wizard comes up, as shown in Figure 4-8, enter the local or remote WSDL address, and a name for the package that you want generated code to be put into.
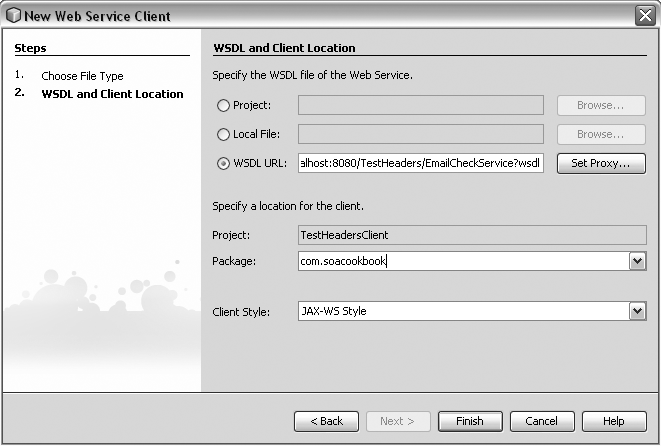
Once you click Next, NetBeans will create a local catalog for the WSDL and generate portable JAX-WS objects based on it. It puts them in a folder under your build directory called generated/wsimport/client.You will see a new folder available under your project called Web Service References. This stores a list of the web services that your project is using (that NetBeans knows about).
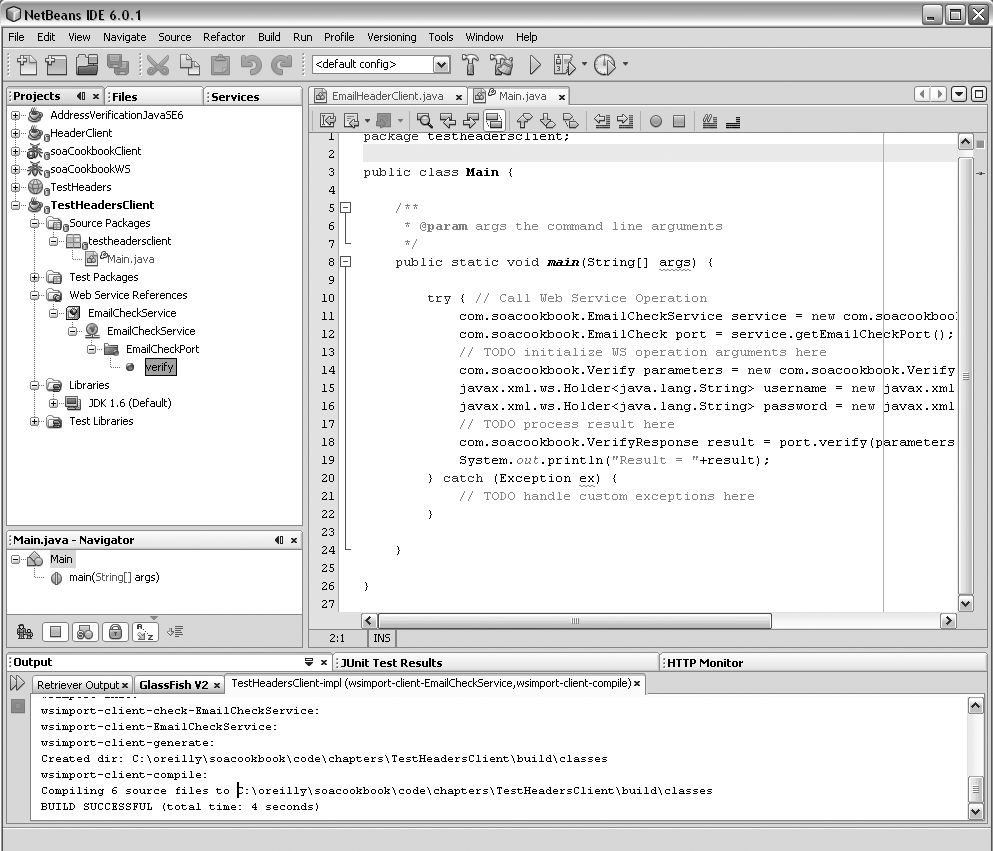
Now that your service is available, you can drag and drop from the name of the service operation you want to invoke directly onto your main method. This will generate inline the necessary code skeleton, as shown in Figure 4-9.
At this point you can add the necessary values to the skeleton code and right-click to clean, build, and run the client project.
Note
If your WSDL is not stable, you’ll need to refresh the web service reference to make sure that your client still compiles. The WSDL gets downloaded locally and referenced with an XML catalog by the IDE. If the parameters on your web service operation change, you’ll need to refresh it. In such a case, you’ll often have to delete the web service reference altogether and regenerate it. If you have client code that used to work against a given WSDL and now it won’t compile, try deleting the reference and adding it back. This will freshly import the WSDL and run the generator against it again.
Monitoring SOAP Traffic with Metro
Problem
You’re using Glassfish/Metro and you want to dump the transport-level traffic that your web service client sends and receives to the console.
Solution
Pass the flag
-Dcom.sun.xml.ws.transport.http.client.HttpTransportPipe.dump=true
to your JVM.
This dump technique shows you the bytes representing the message as it is sent and received on the wire. That means that you also get transport-specific information, such as all HTTP headers, which can be useful.
You can also do this in Ant with jvmarg:
<target name="run">
    <java classname="com.soacookbook.ch03.MyClient" fork="true">
        <arg value="someArg"/>
        <classpath>
          <path refid="jaxws.classpath"/>
          <pathelement location="..."/>
        </classpath>
        <jvmarg value="-Dcom.sun.xml.ws.transport.http.client.HttpTransportPipe.dump=
         true"/>
    </java>
</target>
Note that the JUnit Ant task will accept the jvmarg element too, so you can easily add it
to invocations that you test on your client as well. See Example 4-5.
<target name="run-test" depends="compile-test">
<echo message="-----Running Tests-----" />
<junit fork="true" printsummary="true"
       errorProperty="test.failed"
       failureProperty="test.failed">
    <classpath refid="cp.test" />

    <jvmarg
    value="-Dcom.sun.xml.ws.transport.http.client.HttpTransportPipe.dump=true"/>

    <formatter type="brief" usefile="false"/>
    <formatter type="xml"/>
    <batchtest todir="${test.report.dir}">
        <fileset dir="${test.classes.dir}"
          includes="**/*Test.class" />
    </batchtest>
</junit>

<echo message="-----Creating JUnit Report-----" />
<junitreport todir="${test.report.dir}">
    <fileset dir="${test.report.dir}" includes="TEST-*.xml"/>
    <report format="frames" todir="${test.report.dir}"/>
</junitreport>

<fail if="test.failed"
   message="Tests failed. Check log and/or reports."/>
</target>
This is an easy way to get lots of information about what’s going on behind the scenes in your SOAP message invocation. If you have improperly constructed a message, for example, this can be a terrific aid in finding the issue.
Example 4-6 shows the output that the
HttpTransportPipe dump operation gives you during
a JUnit test invocation of a web service client talking to a credit
authorizer web service (I added line breaks only for
readability).
4/27/08-14:40 DEBUG  com.soacookbook.ch03.test.SchemaValidateTest.testCreditAuth -
Invoking Credit Authorizer Service.
---[HTTP request]---
SOAPAction: ""
Accept: text/xml, multipart/related, text/html, image/gif, image/jpeg, *; q=.2, */*; q=.2
Content-Type: text/xml;charset="utf-8"
<?xml version="1.0" ?>
<S:Envelope xmlns:S="http://schemas.xmlsoap.org/soap/envelope/">
<S:Body><creditCard xmlns="http://ns.soacookbook.com/credit">
<cardNumber>4011111111111111</cardNumber>
<name>
<firstName>Phineas</firstName>
<middleInitial>J</middleInitial>
<lastName>Fogg</lastName>
</name>
<expirationDate>2015-04-27-07:00</expirationDate>
</creditCard>
</S:Body></S:Envelope>--------------------

---[HTTP response 200]---
Transfer-encoding: chunked
null: HTTP/1.1 200 OK
Content-type: text/xml;charset="utf-8"
Server: Sun Java System Application Server 9.1_01
X-powered-by: Servlet/2.5
Date: Sun, 27 Apr 2008 21:40:44 GMT
<?xml version="1.0" ?>
<S:Envelope xmlns:S="http://schemas.xmlsoap.org/soap/envelope/">
<S:Body>
<authorization xmlns="http://ns.soacookbook.com/credit">
<amount>2500.0</amount>
</authorization>
</S:Body></S:Envelope>--------------------
There is a corresponding class available on the server side that lets you dump messages for incoming traffic to the console.
Note
If you are invoking your web services through a web page, it is also convenient to use the Firefox plug-in called Live HTTP Headers, which shows the HTTP headers for every request and response in a window. You can get it at https://addons.mozilla.org/en-US/firefox/addon/3829.
Discussion
The disadvantage to using monitoring GUI tools, other than the
fact that you need a GUI environment to run them, is that they use a
man-in-the-middle strategy that requires rerouting the destination of
your messages. Here’s how they work: the monitor receives your request,
dumps the payload, and then forwards your request to its intended
destination. So, you are forced to change your service client to point
to the port on which the monitor listens. Setting
HttpTransportPipe.dump=true allows you to see the content
of your messages with less error-prone twiddling. It can be easier,
quicker, and cleaner to set up a console dumper like this as you are
getting started.
Note
Using the console dumper is not appropriate for production situations, but it can save you lots of time during development.
Dumping during a Maven unit test run
It is useful to see the SOAP messages being passed during an execution of unit tests. This is easy to do if you are running your build directly from the command line or from within an IDE, both of which offer a clear way to send arguments to the VM during execution.
But if you’re building from Maven 2, it may not be immediately apparent how to get this to work. All you have to do is add a system property to the Surefire plug-in, like this:
<plugin>
  <groupId>org.apache.maven.plugins</groupId>
  <artifactId>maven-surefire-plugin</artifactId>
  <version>2.4.3</version>
  <configuration>
    <systemProperties>
      <property>
        <name>wsdlLocation</name>
        <value>${my.wsdl.url}</value>
      </property>
      <property>
        <name>com.sun.xml.ws.transport.http.client.HttpTransportPipe.dump</name>
        <value>true</value>
      </property>
    </systemProperties>
  </configuration>
</plugin>
This will create the same effect as passing the argument
directly to the VM as you would with -D.
Transport-independent logging
The preceding examples work if you are using HTTP as the transport layer. If you are using a different protocol, you need a transport-agnostic class. Using basically the same mechanism just described, you can substitute this invocation instead:
com.sun.xml.ws.util.pipe.StandaloneTubeAssembler.dump=true
See Also
Other tools are available as well. Check out the WS Monitor tool at https://wsmonitor.dev.java.net, and for Axis, TCPMon at http://ws.apache.org/axis/java/user-guide.html.
Monitoring SOAP Traffic with TCPMon
Solution
Use TCPMon, an open source monitor for TCP traffic, available from https://tcpmon.dev.java.net. You’ll need to change the values in your local WSDL to use it.
Discussion
You can run the tool a few ways—directly from the Web using Java Web Start, or by downloading the JAR. It will listen on an available port, and you must route requests through it for it to be able to dump the traffic data. TCPMon will then forward the requests on to the actual destination.
Running TCPMon
The easiest way to get started with TCPMon is to visit the website and find the link that says “Click here to run directly from the web.” If you don’t want to do that, you can download it and execute it on Windows by double-clicking it or on Linux by typing this command:
$ java -jar tcpmon.jar
This will start up the Java Web Start program. Here are the steps to get it up and running. You’ll use a NetBeans sample project because it gets in the way the least. If you have another web service and client you want to use, the general instructions are still relevant:
Start the application. In the GUI, change the default values to the following:
Local Port: 8090
Server Port: 8080
Click “Add Monitor,” which will run the listener.
You want to send a SOAP request to port 8080 because that’s the port your service is listening on. So you need to change your WSDL to point to 8090 so that TCPMon can dump the message. Then the value you supplied in the Server Port field is the target to which TCPMon will forward each request. Because all you care about here is illustrating the traffic dump, and not the service itself, you’ll just create a new web service sample project in NetBeans. To do so, click File→New Project→Samples→Web Service→Calculator. Of course, you can use any project you like. Doing so will also create a Calculator Client project, containing a web service reference.
When the client project was created, it imported a copy of the WSDL from the service. This is the copy you need to change to point to TCPMon. To access the WSDL, navigate to Configuration Files→xml-resources→web-service-references, and find the WSDL under it. If you’re using a different web service client project, just locate the local copy of the WSDL that is being invoked. Find this section at the end of the WSDL file:
<soap:address location="http://localhost:8080/CalculatorApp/CalculatorWSService">
Change the location to
http://localhost:8090/CalculatorApp/CalculatorWSService.Now you need to change your application to use the modified WSDL. If you’re using the NetBeans sample, find the ClientServlet Java source file in the
org.me.calculator.clientpackage. Find this line:@WebServiceRef(wsdlLocation = "http://localhost:8080/CalculatorApp/CalculatorWSService?wsdl")
Modify it to use the TCPMon port number of 8090. Because you’re in a servlet, the container will inject the service instance at runtime, and use the modified WSDL location.
If you weren’t using a servlet, but had generated portable artifacts from
wsimport, you could use code similar to this:URL wsdlLocation = new URL("file:///C:/projects/etc/CalculatorWSService.wsdl"); QName serviceName = new QName("http://calculator.me.org/", "CalculatorWSService"); CalculatorWSService service = new CalculatorWSService(wsdlLocation, serviceName); CalculatorWS port = service.getCalculatorWSPort(); int result = port.add(2, 3);
The thing that you’re doing here is overriding the WSDL that the client will use when invoking the service; you’re pointing to the file that you’ve modified manually.
Now you’ll make a request, routed through the monitor. If necessary, clean and build the web service Calculator project, and make sure it is deployed using the Undeploy and Deploy target.
Now right-click on the web service Calculator Client project and choose Run.
Then go to the monitor application and click Submit to Server. The monitor will display a timestamp of your request and show the request and response contents, including HTTP headers, in the windows.
TCPMon is shown in action in Figure 4-10.
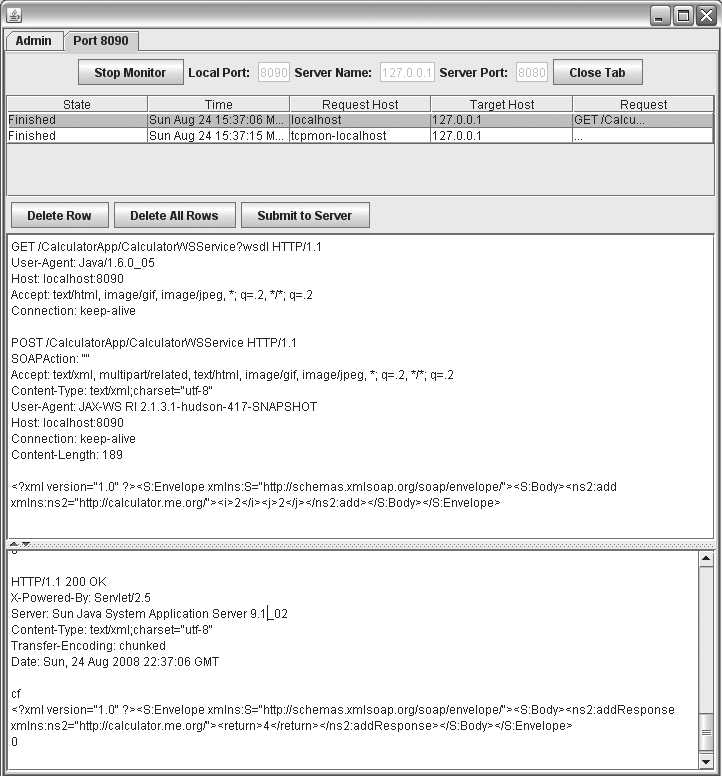
Using TCPMon is pretty easy to use given all it’s doing for you, and it’s a terrific aid when you’re debugging. Just remember to change your WSDLs back.
Get Java SOA Cookbook now with the O’Reilly learning platform.
O’Reilly members experience books, live events, courses curated by job role, and more from O’Reilly and nearly 200 top publishers.

