Chapter 1. Out of the Box: Setting Up, Taking a Tour

DID YOU KNOW THAT serious gadget geeks treat device openings as YouTube-worthy rituals? They actually videotape, narrate (my hand is shaking from the fatigue of waiting in line all night…), and then post the entire experience online—from waiting in line to opening the package to a tour of the interface. Assuming your day job leaves you little time for YouTube, consider this chapter your own Kindle Fire meet ’n’ greet.
When you first unpack the Fire, you’ll notice that Amazon has kept physical buttons and ports to a bare minimum. It’s inside, once you’ve flipped Fire on, that might take a little getting used to. Here, you’ll encounter a navigational system for programs and files that looks absolutely nothing like what you’ve seen on a regular computer. Instead, think super-sized smartphone or souped-up ATM.
In the following pages, you’ll learn much more than simply how to turn the Fire on and enter your account info. You’ll see how to control the device using neither mouse nor menu. You’ll get touchscreen basics, including some taps and tricks that will make your time in TouchLand more enjoyable. Finally, you’ll take a trip into the Cloud for a brief but necessary introduction to how Amazon expects anyone with a sizable digital media collection to enjoy it all given the Fire’s small storage saddles. Fasten your seat belt—videotaping what lies ahead is strictly optional.
Parts and Ports
Amazon has made a serious commitment to minimalist hardware design—no small feat for a firm whose first device, the original Kindle, had more buttons than a tailor’s shop. There’s the 7-inch screen, of course; a black border and rubberized backside for gripping the gadget; and a mere five buttons, openings, and exits:
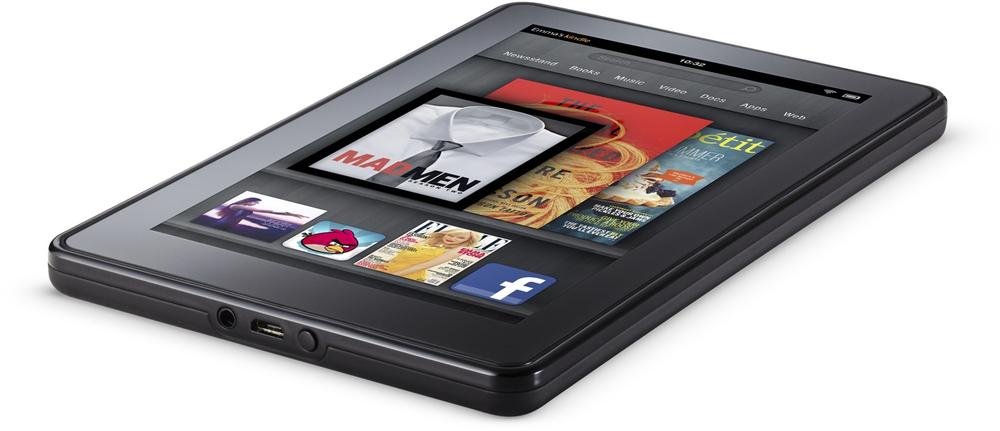
Combo charging and USB port. On the bottom of the device is where you insert the one and only accessory that comes in the box—the power cord. Should you wish to transfer digital files directly from a Mac or PC to the Fire (a strictly optional maneuver covered in detail starting on Transferring Files from Your Computer), you can stick a USB cable here. If you’re like most people, most of the time, you’ll use this port for battery refills.
On/off switch. This nubbin, right next to the power port, is about as big as a candy dot. In addition to letting you turn the Fire on and off, it’s also how you put it to sleep (a power-saving mode that’s quicker to rejuvenate than a cold start).
Tip
A common criticism of this first Fire is the placement of its power button. Down there on the bottom of the device, it’s way too easy to hit accidentally, say the complainers. If you agree, here’s a simple fix: rotate the Fire 180 degrees. What’s onscreen shifts to match how your Fire is oriented, and the offending button is on top, safely away from unintentional turnoffs.
Audio port. Stick pretty much any gadget-friendly headphone in this 3.5-millimeter opening; the sounds that ensue will be for your ears only.
Speakers. When headphone-free, the Fire plays its beats and beeps through this extremely modest pair of top-mounted stereo speakers.
Turning the Fire On, Making It Yours
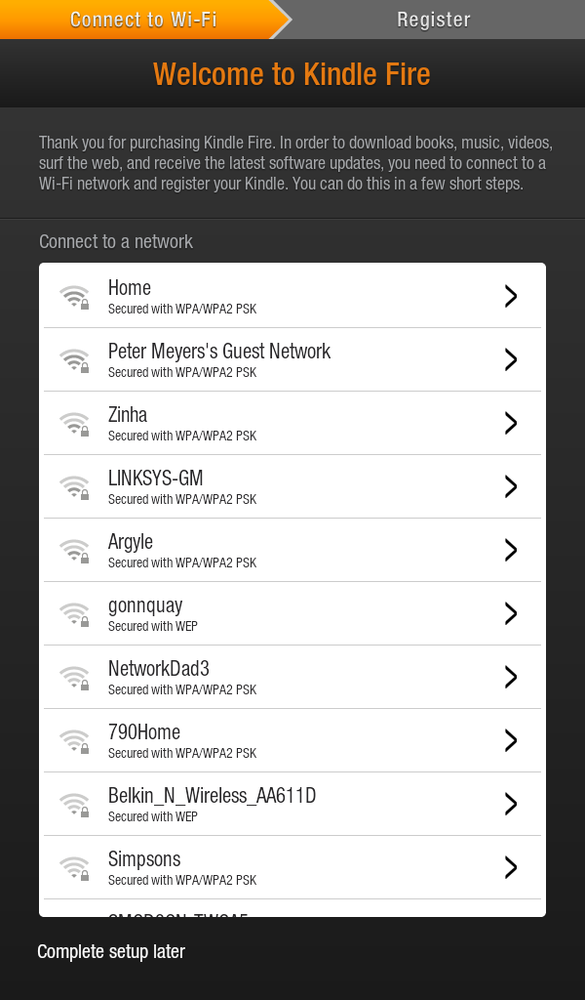
If by some miracle of self-restraint you haven’t turned the Fire on, do so now by pressing the power button. Holding the button for a second is plenty long enough to do the trick. The device logo greets you, followed by a screen sporting some time zone’s version of now. Any finger will do as your entry key: Swipe the big orange arrow from right to left. You’ve arrived at the “Welcome to Kindle Fire” screen.
As you probably know, the Fire connects to the world at large via WiFi. (See the box on WiFi 101 for a WiFi primer.) Ahead, you’ll learn about plenty you can do when not in range of one of these wireless Internet zones. But the setup process and all your initial Fire fiddling are much simpler when you’re in a hotspot. Once you’re appropriately situated, your first steps are pretty straightforward:
Note
If WiFi is truly nowhere to be found (perhaps you’re unboxing on a plane), tap the link that says “Complete setup later” and then dismiss the message warning you about all the fun you’re missing out on—ebook and music buying, app downloading, and so on. When you do get within WiFi range, you need to take care of two chores: Connect to a WiFi network and register your Fire with Amazon. The Quick Settings menu (The Home Screen) is where you make both happen.
Connect to a WiFi network. A list of available hotspots appears, with tiny lock icons next to any that require a password. Tap the name of the one you wish to log into. Apartment dwellers may need to scroll down to see the full list. (Scrolling instructions await on Tapping, Touching, Typing for touchscreen rookies. The short version: Place and hold you finger on the screen and then drag up or down in the direction you want the list to move.) If you’re seeing one of those locks, and you’ve been given the password, enter it on the screen that appears after you tap the network’s name.
Note
Some security-conscious citizens hide their WiFi network’s name from publicly viewable lists, like the one you see on Turning the Fire On, Making It Yours. If that describes you (or, more likely, your teenage WiFi administrator), scroll to the bottom of the list, tap “Enter other Wi-Fi network,” type your network’s name (in the box that says Network SSID), pick the security method from the drop-down menu of that name, and then enter a password.
Pick a time zone. Tap to choose from the list of U.S. options, or pick from a list of worldwide alternatives by opening the “Select another time zone” menu. Then hit Continue.
Register your Kindle. If you bought it yourself—that is, using your own Amazon account—the Fire has your account info already filled in, as you’ll see on the next screen, which greets you by name. If someone else purchased it for you, as a gift, say, tap Not Donald Trump and then log in using your own Amazon account. (Don’t have one? The box on Creating an Amazon Account shows you how to knock out that must-do chore.) Finally, tap the Get Started Now button.
If a software update is available—a likely occurrence in these early days of bug-squashing and feature-adding—the Fire will immediately start downloading it. Though the Fire offers you an option to pause this operation and resume later, it’s best to incorporate these changes as Amazon issues them. After digesting the new software the device shuts down; restart it by pressing the power button to pick up again from this point.
Take a whirl through the quick start tips Amazon has scrawled on your screen. Sure, you’ve got this book, but you have no choice but to tap through each of the mini-tutorial’s Next buttons (in the lower-right corner) before you can start using the Fire. Tap Close on the last screen when you’re done. Now you’re on the home screen.
Rotation and Orientation
Sometimes you want to hold the Fire upright, like a paperback. Sometimes you want to turn it on its side for race-car driving or movie watching. The first is often referred to as portrait mode (think Mona Lisa); the sideways pivot is called landscape (think, well, a nice wide landscape). Like any modern touchscreen device, the Fire is smart enough to sense when you switch. It reorients whatever is onscreen to match the mode you’re in. Try it now to experience one of a new tablet owner’s small but delightful pleasures.
Note
Most apps (for ebook reading, browsing the web, and so on) will shift their contents according to how you’re holding the Fire. Sometimes, however, a no-shift order has been programmed in by an app developer. In the Fire’s own video-watching app, for example, you can hold the device in portrait mode but the show remains in landscape. Makes sense, if you think about it, considering how truncated things would look if a movie got crammed into the narrow width of portrait mode.
Turning the Fire Off
The party’s barely started, but perhaps you need a break from all this gadget-induced excitement. You have two alternatives: powering the Fire down and putting it to sleep. What’s the difference? The first saves more battery life, but requires more time to power back on (about 30 seconds, versus pretty much instantaneously to wake from sleeping). The choice, of course, is yours, but plenty of people rarely turn their Fires off completely.
To power down completely, press and hold the power button for about a second. A message appears onscreen asking you to confirm that you really want to shut down. To give your Fire a nap (and avoid having to power up again), press the power button ever so briefly; the screen goes dark. When you want to wake the Fire, press the button again and swipe the yellow unlock arrow.
Charging the Fire is simple. Plug the power cord into a standard electric wall socket and connect the USB dongle to the opening on the Fire that matches it. A full charge takes about four hours this way; you can also refill by plugging into a computer, but this method works more slowly. To check how much juice remains, in the Status bar (The Home Screen), tap Quick Settings→More and then scroll down to and tap Device, where you see a quick report listing the figure in percentage terms. Two other ways to tell: The power button glows red when charging (and green when finished), and the Status bar’s battery icon turns fully green when charging is done. During a charge, it pulses to indicate the fill-up’s in progress.
Tip
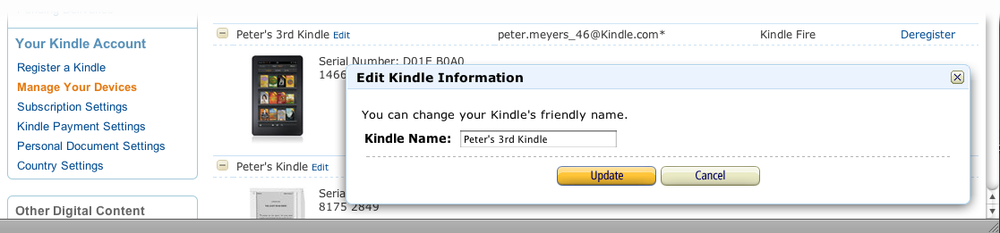
Don’t like your Fire’s assigned name (Gertrude’s 7th Kindle)? It’s what appears on the upper-left corner of the screen, as well as on Amazon’s various ebook, music, and media stores when you’re asked which device you want to send your purchase to. Name-changing is easy. On Amazon.com, use the home page’s left-hand Shop All Departments menu to navigate to Kindle→Manage Your Kindle. On the left side of the page that appears, click Manage Your Devices and then click the Edit link next to your Fire’s currently assigned name. Enter the new name you want in the pop-up window and then click Update. Patience is the final requirement: It may take a few hours for your new handle to appear on the Fire.
The Home Screen
The home screen is the entry point to all the fun stuff on your Fire. If the Fire were a regular computer, here’s where you’d find its desktop, control panel, application launcher, and search tool…all crammed onto one screen. There’s a certain elegance to the layout here: As crowded as your Fire may some day become with ebooks, apps, tunes, and TV shows, you can always count on this screen’s navigational simplicity. Head to toe, here’s what your newest gadget looks like:
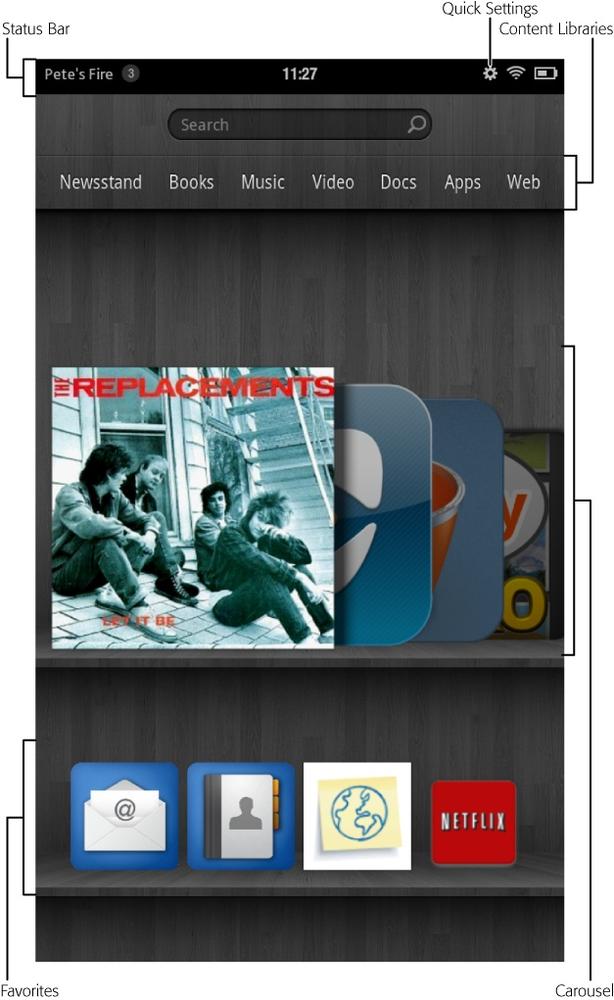
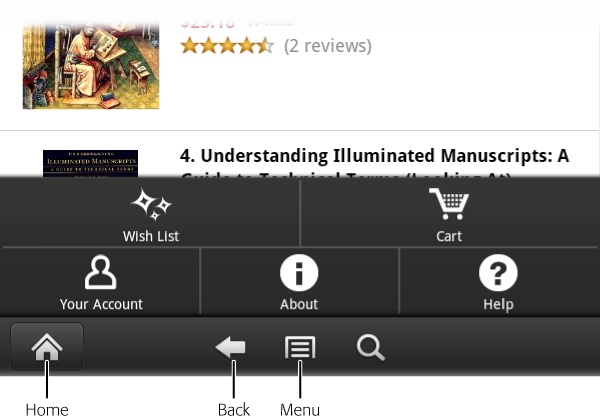
The Status bar. Most of what’s here is strictly read-only: your Fire’s name, the time, the strength of your WiFi connection (represented by the industry standard stack-of-curved-lines icon), and a battery charge indicator (filled with white when you’re fully charged; green when you’re charging and plugged in). You may sometimes also see, on the left side, a number inside a circle: This Notifications circle is how apps, and the Fire itself, signal they’ve got a message for you—a new tweet or email awaits, for example. It’s tappable, as is the gear-shaped Quick Settings icon on the right side.
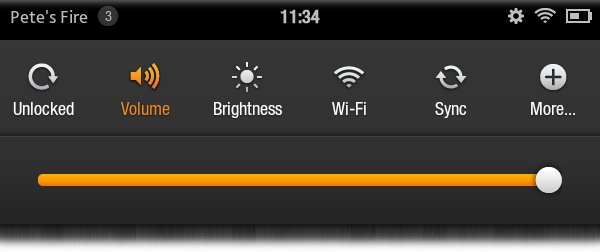
That gear is the secret door to all sorts of custom controls. Tap it, and down drops a panel of frequently needed virtual settings: Locked/Unlocked (to prevent, or allow, the screen’s contents from rotating as you turn the device horizontally or vertically); Volume (plus music controls, if you’ve got a tune playing); Brightness (of the screen’s display); Wi-Fi (quick access to nearby networks); Sync (coordinates where you are in the ebook you’re reading, or show you’re watching, so you can pick up in the same spot on another device); and the overstuffed More option. This last one is covered choice-by-choice in Appendix A; you’ll also meet its options on an as-needed basis throughout the main chapters of this book. Basically, it’s the Fire’s equivalent of Windows’ Control Panel or the Mac’s System Preferences.
Note
See an X next to the WiFi icon? It often appears after you wake the device from its sleep mode. The quickest remedy, if you know you’re in a recently visited hotspot, is simply waiting. A couple seconds and that X usually goes away. If you’re out and about and seeing it, then tap the main Web link on the top of Fire’s home screen and some entity—an airport, hotel, or restaurant WiFi system—will ask either for your credit card (to pay for hourly access) or a guest code.
The search oval. On Day One this lookup tool may not get much of a workout—what have you got to hunt for? But as you fill up Fire, it’s a handy way to quickly find what you need. Depending on which tab you touch after tapping the oval—Library or Web—you’re poking through your own collection (of songs, books, TV shows, and so on) or the Internet at large.
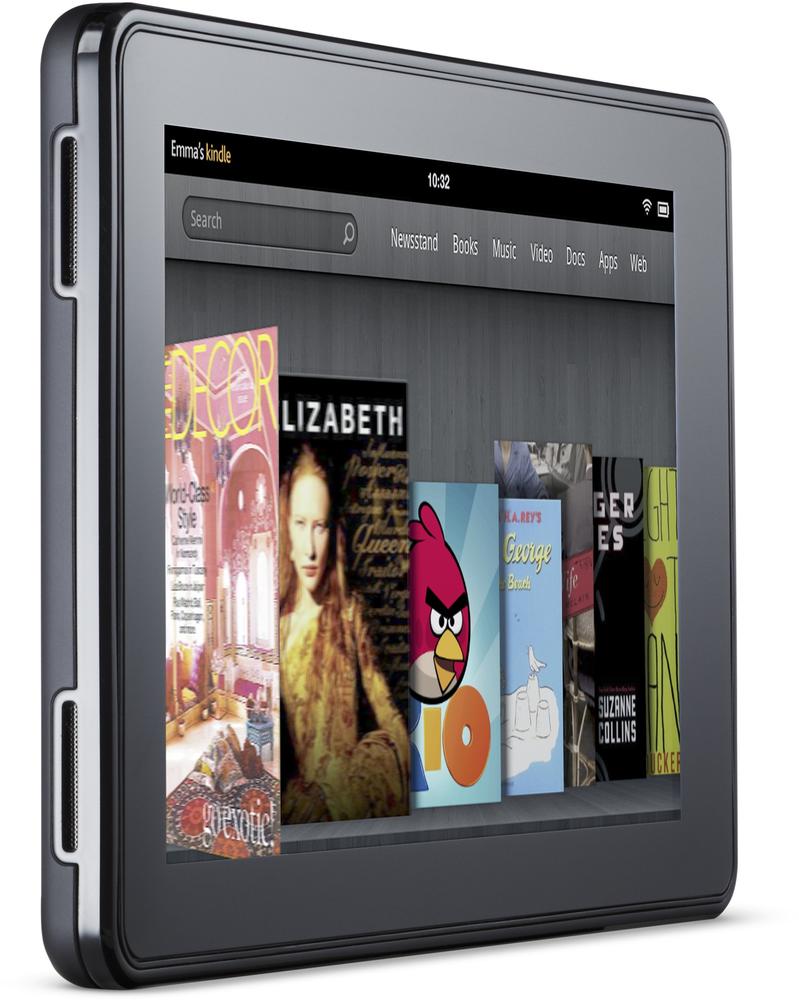
Content Libraries. Each of the seven links in this row puts you one tap away from the Fire’s starring lineup: Newsstand, Books, Music, Video, Docs, Apps, and Web. Each of these precincts gets its own chapter in the pages ahead. Enter any of them to either play with your collection or shop in the dedicated stores.
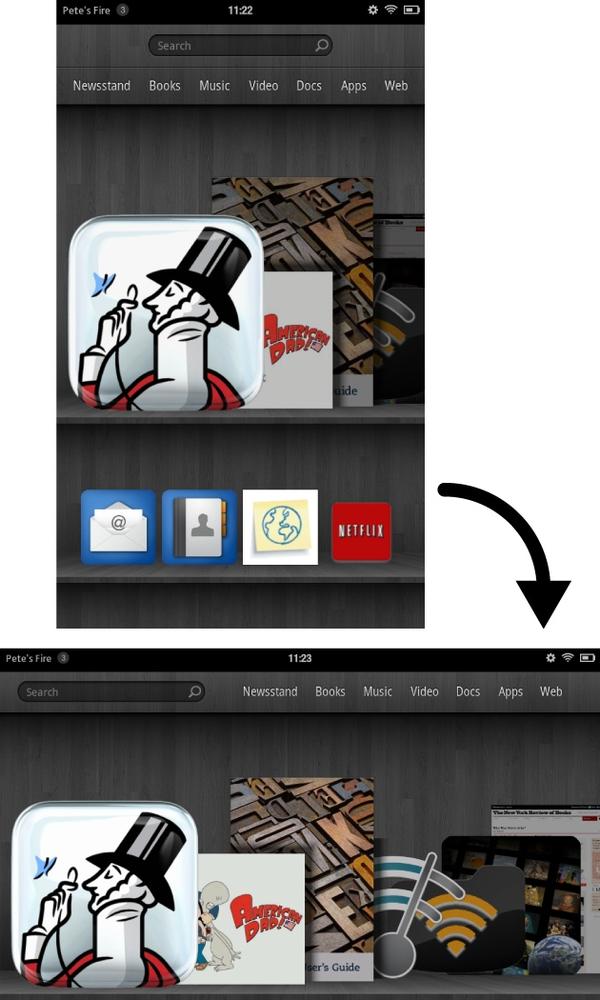
The Carousel. A horizontally swipeable list of shortcut icons to items you’ve recently looked at: a book, an app, a TV show, or anything else on the Fire. A single tap launches whatever the icon represents. What’s here is whatever’s in the Fire’s recent memory. In other words, the system decides what’s on this shelf, not you. First time Fire starters will see an Amazon-penned user’s guide (helpful, but containing none of the gems you get in a, um, real guidebook), a welcome note from Amazon CEO Jeff Bezos, and a list of any ebooks you’ve bought from his ebook shop, the Kindle Store.
Move through this carousel by holding down and tracing your finger right to left. A light touch is all it takes; you can also flick, just as you’d do when spinning a Lazy Susan: The touchscreen plays along and delivers more or less momentum, depending on how fast you flick. Notice the little white downward-pointing arrow on the lower-right corner of any ebook cover. That means the item is sitting up on Amazon’s servers; to download it, simply tap anywhere on the cover. After it downloads, tap it again, and the book appears onscreen. To get rid of anything on the Carousel, hold your finger on its icon and, from the pop-up menu, pick Remove from Carousel.
Tip
You can get back to the home screen from pretty much anywhere by tapping the middle of any app, ebook, movie, and so on; the Options bar pops up at the bottom of the Fire, and on its far left side is the Home icon. Tap it and you’re back on the main page. The universal back button—a leftward-pointing arrow—is also a handy navigational tool to know about. Tap it to return to whichever screen you just came from. Finally, pretty much every app has a Menu button; tap it to expose a row or two of further options, tailored to each app.
Favorites. Here’s your turn to play home page designer. Put one-tap icons to all your favorite apps, ebooks, web pages—even playlists (Playlists: Be Your Own DJ). If you can view it on the Kindle, you can stick it on this shelf. Create as many of these one-tap-and-you’re-there bookmarks as you like. (More shelves get added as you need ’em.) The quickest way: Start looking or listening to anything and, when its icon appears in the Carousel, tap and hold its icon till the Add to Favorites option appears. Feel like redecorating? Tap, hold, and drag any icon to reposition it. Or clean out your shelves by tapping, holding, and choosing “Remove from Favorites.”
Now’s a good time to mention two ways to protect your Fire from prying eyes and over-enthusiastic fingers. To require a password before letting anyone onto the home screen, head to Quick Settings→More→Security and set Lock Screen Password to On. Enter, confirm again the password you want, and then tap Finish. Now anyone who turns on or wakes up your Fire will need to enter the secret code. Four choices up from Security sits Restrictions. This gate-keeping feature is handy for parents who want to let their kids use the Fire to read books or play with apps, but prevent them from getting online or buying apps. It works by slapping a passcode lock on the WiFi network. To do that, turn the sole entry in Restrictions—Enable Restrictions—On and then create a password using the process just described for Security. Next time you hand over your Fire to Junior, turn off WiFi (Quick Settings→WiFi→Off) and he’ll stay offline.
Tapping, Touching, Typing
You know how to tap. But don’t be embarrassed if all the other, not-so-obvious touchscreen gestures seem foreign. That includes the flick, the swipe, the pinch, the twist, and—they don’t call it multi-touch for nothing—those two-fingered maneuvers. Here, then, is a brief primer:
Tapping. The touchscreen equivalent of mouse clicking. For icons and hyperlinks, a single tap is all you need. On web pages, photos, and some apps, double-tapping enlarges the spot where your finger hit. Double-tap again to return to the regular, full-page view. (Keep in mind that double-tapping doesn’t always make things bigger; when using the Kindle app to read ebooks, for example, that gesture has no effect; Playing Page Designer shows how to use the Options bar to bump up the font size.)
Swiping. Here’s where you hold and trace your finger in either direction, left or right. Great for reviewing long rows of book covers, albums, and movies. If you swipe-and-release quickly, the items whiz along, till the software-simulated friction slows them down. Same as Vanna White spinning the big Wheel of Fortune.
Flicking. Basically, vertical swiping. Any time you see a long, scrolling list (contacts, song titles) you can skim by moving the top of your finger quickly up- or downward. As in all touch gestures, use the fleshy tip of your finger here, not the nail (which will work, but is much harder to position).
The two-finger spread. There isn’t any real-world equivalent to this gesture, but somehow the way it works makes sense: Take two fingers (typically the thumb and pointer), put them down on the screen next to each other, and spread them apart. This move almost always enlarges what’s onscreen. Very popular among photo and drawing apps.
The pinch. Sometimes called the reverse spread, since it’s the previous gesture rewound. On any bit of content that’s been enlarged, place two fingers a chicken wing or so apart from each other and then pull them together. Now you get to see more stuff onscreen, albeit in a shrunken state.
The Keyboard
Voice recognition may be the future of gadget control, but the microphone-free Fire will ignore you no matter how loud you shout. Typing, then, is how you conduct searches, compose emails, and craft status updates. The downside of touchscreen typing on a relatively small device is the cramped keyboard; even a puny netbook gives you bigger tiles to press. The good news: Smart software powers the Fire’s virtual keyboard. With time-saving assists like auto-completion suggestions, keyboard labels that adjust on-the-fly to match options you’re most likely to need, and some simple auto-correct fixes, you’ll probably find this input method easy to master.
Note
What follows is an all-purpose guide to keyboarding. Many apps add custom frills, like a dedicated .com button in the web browser’s keyboard.
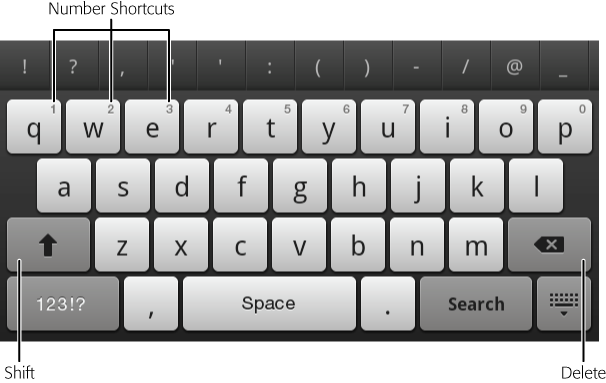
The home screen’s search bar is a good place to take the keyboard for a spin. Tap anywhere inside its oval, and up pops a five-row keyboard on the bottom of the screen. It works just as you might expect. Tap any key to type. As you do so, the keyboard sprouts a reminder, above and to the left of wherever you’ve just tapped, of the key you pressed. It’s meant to spare you the trouble of having to look up and double check the top of the screen after each tap. Make a mistake? The Delete key on the far right edge erases one character each time you hit it. Tap the Shift key once to summon an upper-case layout that sticks around for the next letter only. Tap the Shift key twice and the capital lineup sticks around till you dismiss it by tapping the Shift key again.
To get those tiny numbers perched in the upper-right corner of the top letter row, just tap and hold any host letter. Tap and hold q, for example, and you see an orange 1 sprout up; remove your finger to insert the number. (Change your mind? Drag your finger away till the orange key turns gray; now it won’t enter anything in the text box.)
Above the letters, a row of common punctuation marks—exclamation point, question mark, and so on—are arranged for quick access. Other useful punctuation marks are hidden under the period (.) key. Touch and hold it to see a dozen or so items: semicolon, plus sign, ampersand, and so on.
Tip
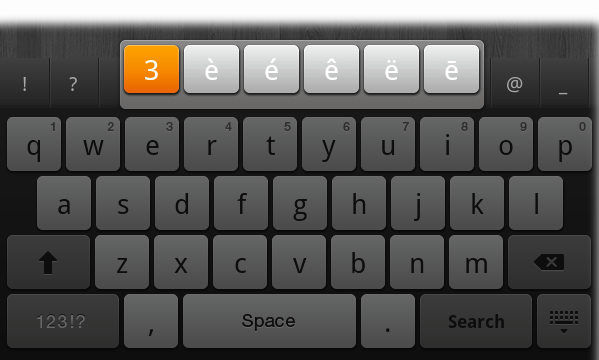
Turns out a bunch of letters sport secret, tucked away variations. Touch and hold the a for the most common accented varieties: à á â ã ä å ā æ. Other multipurpose keys include: e, y, u, i, o, s, c, and n.
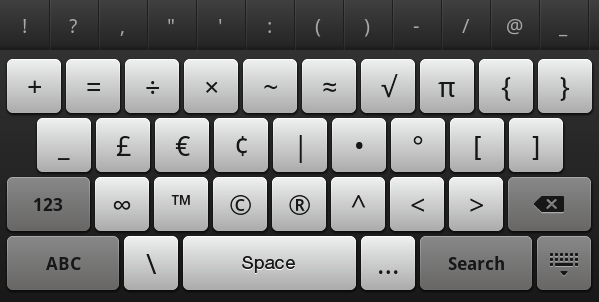
You can find other, less popular variations (asterisk, pound sign) by tapping the lower-left corner’s 123!? key. Burrow even further down to more options (the British pound, the Euro, squiggly brackets) by tapping the 123!? key and then, on the screen that appears, tap the •+= key. Return from any of these odd-key expeditions by tapping the lower-left corner’s ABC key.
To edit a word you’ve already typed—for example, fixing the typo ckngress—tap (but don’t hold) the spot you want to fix. You don’t have to hit the exact letter, because you get an orange pointer that you can reposition by dragging, if it’s not exactly where you want it. When it’s positioned correctly—in front of the k—tap the keyboard’s Delete key and then insert an o to fix the mistake.
Note
Want to customize a handful of keyboard settings, like the sounds it makes when tapped and whether or not new sentences automatically start with a capital letter? Kindle Keyboard has the scoop.
Installing Apps
Apps are a big reason people buy tablets and smartphones. Short for applications, these downloadable programs turn your Fire into a 21st-century Swiss Army knife. Play games, edit photos, brush up on your Shakespeare—the list of what these single-purpose programs can do is almost endless. Amazon’s store (officially called the Amazon Appstore for Android) is where you shop for, or download for free, these goodies.
Note
As with regular computers, apps run only on the systems they’re programmed for. So an app designed for the iPad won’t work on the Fire unless the developer releases a separate version. Complicating matters a bit, Amazon doesn’t make it easy to shop at any ol’ Android app store, including the Walmart of app outlets, Google’s Android Market. (The Tip on Tip has some tips about how to get around the roadblocks.) Instead, Amazon’s opted to link your device with its own app store. The benefit? Simple installation and a catalog that includes only apps that Amazon has verified as Fire-friendly.
The simplest way to get an app is by heading to the Apps Library and tapping the Store link. Use the search oval to look for a specific title, or browse either of the Top Paid and Free lists. There’s also a horizontally swipeable list of sub-categories: New, Games, Entertainment, and so on.
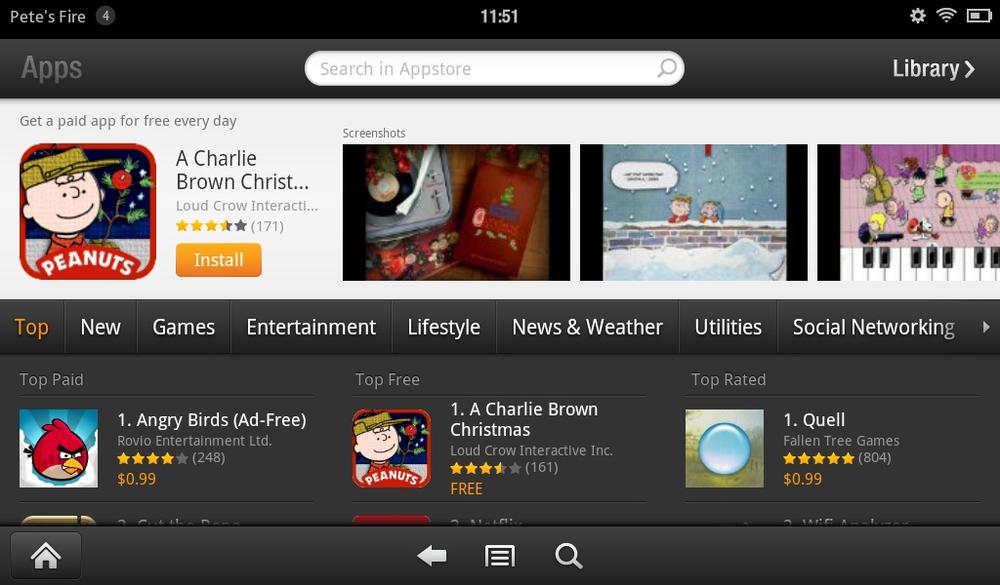
Once you’ve spotted an app you want, click its orange download button (either the one that says Free or lists a price). The button turns green (saying either Get or Buy App); tap it again to start the download. After the download is complete, the button morphs one last time and now says Open. Tap it to launch the app. Throughout this book you’ll meet apps that beef up what your Fire can do. And the final three chapters focus exclusively on helping you pick the best apps in popular, crowded categories like games and task trackers.
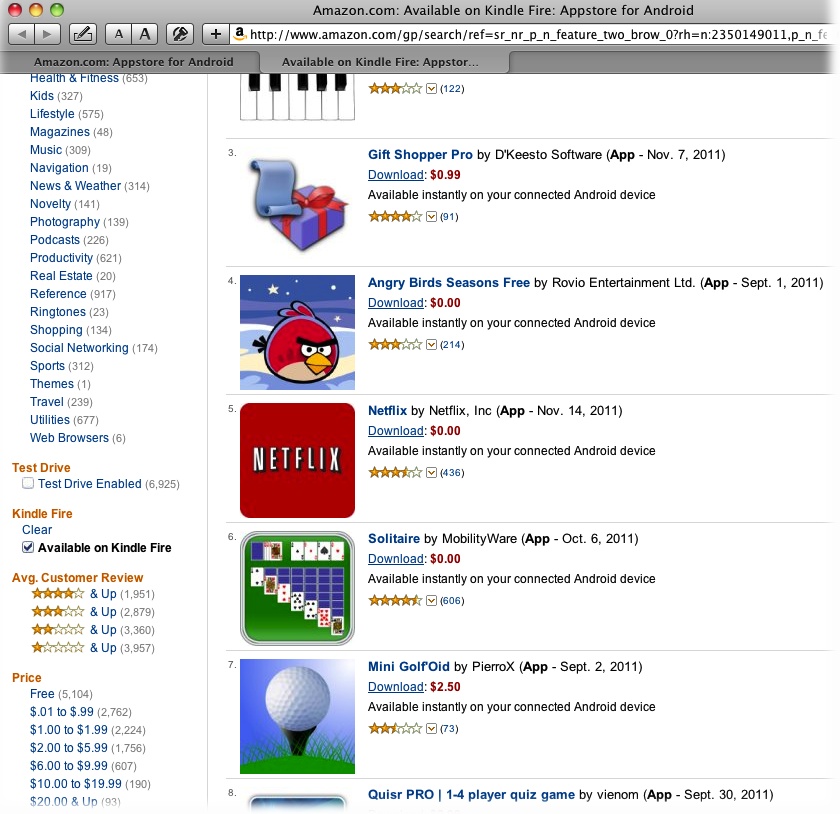
You can also go app picking from a computer’s web browser. One advantage to this route is that you get some fine-tuned browsing options that aren’t available on the Fire’s built-in app store. For example, in the “Available on Kindle Fire” section of the web-based store (http://amzn.to/kfmm131) you can turn on a checkbox (left-hand column) showing just the free apps. When you’ve found an app you want, click its “Buy now” or “Get now” button (the second is for freebies). In a minute or so, a new message appears in your Fire’s Notifications circle (The Home Screen), letting you know your new app’s ready for download. Tap the link that says “New Apps Available” and, from the list that appears, hit the Install button next to whatever you just downloaded.
If you’re getting impatient and haven’t got word of the app’s arrival, you can nudge the Fire to check for available downloads. Tap the Apps Library link, followed by the upper-right Store button. Then go to Options bar→Menu→My Apps and tap the upper-right Refresh button.
Tip
Got your eyes on an Android app that’s not listed in Amazon’s Appstore? If you see an app listed in the Android Market or other app retailer, you can grab and install some titles (but not all; Google’s own official apps are a notable exception). Be ready, though, for a little software spelunking. The how-to blog Tested has a nice guide: http://bit.ly/kfmm106.
Cloud vs. Device
Many early Fire reviews agreed: 8 gigabytes of storage was somewhere between skimpy and scandalous. With a device that’s supposed to be a portable media center, how on earth can you cram everything into that meager space?
You can’t. But you don’t have to.
Enter the Cloud, this decade’s frontrunner for most overused bit of jargon. As you’ve probably figured out, the term refers to stuff stored up on the Internet. Geeks appreciate how the Cloud matches the Internet illustrations in their diagrams. Marketing types get excited because terms like online and web-based were getting boring.
To be fair, though, Cloud-based offerings do contain some special qualities. For starters, any digital file that’s stored in the Cloud is automatically available on any of the devices you own or happen to be using (a PC at the library, for example). That means any Kindle book you’ve ever bought is ready for downloading and reading on any Kindle gadget or app. Same goes, more or less, for Amazon’s TV shows and movies. (The “less” being that you can’t watch a movie on your first-generation Kindle.) In a world where most people shuttle between multiple computers, tablets, and smartphones, having widespread, easy access to all this media is a huge convenience.
Amazon takes the concept a bit further with its Whispersync service. With Whispersync, not only is that John Grisham thriller you’re reading available on any Kindle reader, but your bookmarks, notes, and even your reading location are coordinated everywhere. Start reading on the commute home using a BlackBerry, and then pick up where you left off on your Fire when you crawl into bed. Backup worries also get washed away. No longer do you have to go through the tedium of all that copying. As long as you believe that Amazon’s here to stay—probably a safe bet—their pledge is that you can always re-download anything you bought from them.
For Fire owners, the Cloud plays an even bigger role. It gives you access to loads more media than can actually fit on your machine. With a mere 6 gigabytes of available storage space, it won’t come close to holding the 20 GB-plus music collections that many folks have accumulated. And forget about those digital movie libraries. At around 2 GB for each title, you wouldn’t get halfway through the Star Wars saga.
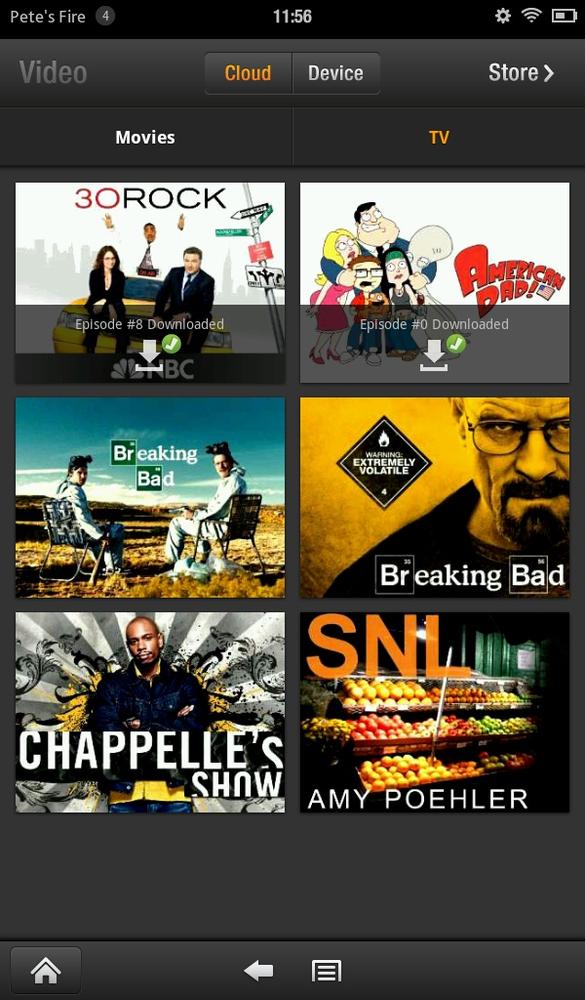
Amazon’s solution? Setting you up with a healthy sized Cloud-based shelf. You can enjoy anything stored there, as long as you have a WiFi connection. Tap any of the main Libraries (music, books, and so on), and you’ll notice two tabs at the top of each library’s screen: Device and Cloud. Here lie the routes to whatever you want to play or view. Files behind door number one reside directly on the Fire itself. Door number two—the Cloud—is what lives on Amazon’s virtual drives. Whenever you and your Fire are inside a reasonably speedy WiFi zone, everything you see there is showtime ready.
Now, of course, there are some catches:
Moving your files online. For ebooks, apps, TV shows, and movies, this one’s a non-issue. Buy any of those items from Amazon, and the digital files await online forevermore and automatically. Music’s another story. If you’ve built your collections from iTunes purchases or burning lots of CDs, you’ll need to spend time hauling those bits from local hard drive to the one in the Cloud. Guidance on how to make that happen begins on The Amazon MP3 Uploader. (If you’ve bought your tunes from Amazon, you’re covered. All its MP3 files get stored there once you flip on a single checkbox; details on Buying More Storage.)
No or poor WiFi connection. Remotely stored media is only convenient if you can get to it. If you’re a subway-riding city slicker, ranch hand far out on the range, or an airplane-trapped traveler, you may not have a WiFi signal in reach.
Everything Amazon. It’s getting increasingly difficult these days to live a life that doesn’t depend on one of the following firms: Amazon, Apple, Facebook, or Google. By storing all or most of your digital stuff on Amazon’s servers, you’re making it tough to pack up and take your media business somewhere else. And it’s not simply a logistical challenge you’d face. In plenty of cases—ebooks, TV shows, and movies—you can’t take those files with you. They’ve got software locks attached (DRM, short for digital rights management) that make the files playable only on Amazon-controlled software and gadgets.
Cost. Amazon’s starter cloud package is free and reasonably sized (5 gigabytes, no charge for those tunes purchased on their music store). But if you stick with Amazon, you’ll probably find yourself ponying up for additional space. All your options are described starting on Buying More Storage, but given the annual fees for this extra space, it’s a price worth understanding.
Fact is, though, however many downsides you can think of, with only 8 gigs on the Fire, sooner or later you’ll have to pick what deserves on-device storage and what’s okay to keep in Cloudville. Of course there’s no right or wrong approach. A few items are no-brainers for bringing onto the Fire: the ebook you’re currently reading, plus the handful of Best Books Ever; reference works (cookbooks, for example) that would be great to have while at that cabin in the woods; any movies you want to watch on a long flight; the couple hundred greatest hits in your music and photo library; and your essential document collection. It helps that the Fire makes it pretty easy to flush out what you don’t need and download what you do.
So there you have it: a short version of Cloud 101. Ready to go have some fun with your Fire? Reading books is a great place to start, which is what the next chapter covers in detail.
Get Kindle Fire: The Missing Manual now with the O’Reilly learning platform.
O’Reilly members experience books, live events, courses curated by job role, and more from O’Reilly and nearly 200 top publishers.

