Chapter 4. THE DISPLAY LIST
One of the most dramatic changes introduced by ActionScript 3.0, particularly for designers accustomed to prior versions of ActionScript, is the way in which visual elements are added to an application at runtime. In prior versions of ActionScript, a separate approach was used to add most kinds of visual assets at runtime, requiring varied syntax. Management of those assets—particularly depth management—and creating and destroying objects, were also fairly restrictive and could be relatively involved depending on what you were trying to accomplish.
ActionScript 3.0 brings with it an entirely new way of handling visual assets. It’s called the display list. It’s a hierarchical list of all visual elements in your file. It includes common objects such as movie clips, but also objects such as shapes and sprites that either didn’t previously exist or could not be created programmatically.
In this chapter, we’ll look at the following topics:
The Sum of Its Parts. Understanding the display list means understanding its parts. In addition to knowing the kinds of objects that can be part of the display list, it’s also important to grasp the simple difference between display objects and display object containers.
Adding and Removing Children. The best part of the display list is how easy and consistent it is to add objects to, and remove objects from, the list.
Managing Object Names, Positions, and Data Types. In addition to adding and removing display objects, you will need to manipulate existing members of the display list. You will likely need to find an object, either by name or position in the list, or even identify an object’s data type as a particular display object class.
Changing the Hierarchy. It’s also much easier than ever before to manage asset depths (z-order, or the visual stacking order controlled by ActionScript, rather than timeline layers), and to change the familial relationship of assets. Moving a child from one parent to another is a breeze.
A Dynamic Navigation Bar. As a quick demonstration of using the display list, we’ll show you how to dynamically generate a very simple navigation bar.
The Sum of Its Parts
If you start thinking about the display list by thinking about what you see in any given application, you’re half-way home. In addition to contributing to the structure of the new event model, discussed in Chapter 3, the display list is responsible for maintaining the visual and spatial assets in your file. You will use the display list to create and destroy visual assets, to manage their coexistence, and manage how they interrelate.
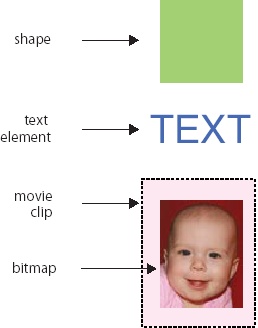
Let’s take a look at the contents of the display list of a simple file structure. Figure 4-1 shows that this file has a shape, a text element, and a movie clip, and inside the movie clip is a bitmap. Figure 4-2 shows the display list of the same structure.
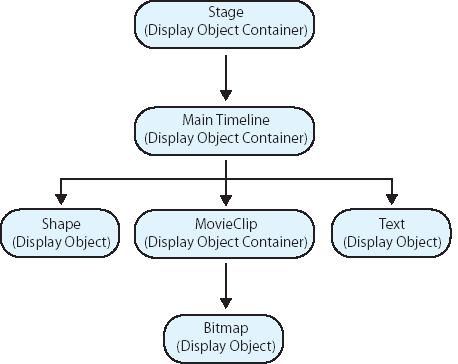
At the top of the list is the stage. Although you can access the stage from many objects in the display list, it’s easiest to think of the stage as the foundation on which everything is built. It also helps to think of the stage as the ultimate container within which all your visual assets reside at runtime. The container analogy will soon become central to this discussion. The stage contains everything.
Next is the main timeline, which is also referenced using the
root display object instance
variable. (See the sidebar, "_root versus root" for more information.) Like
the stage, a Flash file requires one timeline within which all other
assets are contained. Because of event propagation, it is common to
use the main timeline as a location to add event listeners when
writing scripts in the timeline. In that context, the main timeline is
typically referenced using the this identifier, as in “this object being
currently referenced within the context of the script.” (For more
information about event listeners and event propagation, see Chapter 3. For more
information about this, see
Chapter 2.)
Below the main timeline in the display list hierarchy are all the visual assets in the file. Included in the sample display list are the aforementioned shape, text, and movie clip assets, and inside the movie clip is the bitmap.
You may notice in Figure 4-2 that everything is subtitled as a display object or display object container. This is key to understanding and working with the display list effectively. It probably follows that everything in the display list is a display object. However, some display objects can contain other elements and therefore are also display object containers.
For example, a shape is a display object, as are bitmaps and videos. However, none of these items can have children, so the display list lineage ends there. A movie clip can have children, such as other movie clips, therein. Therefore, although a movie clip is a display object, it is also a display object container. This concept of display objects also possibly being containers is useful when traversing the display list, determining whether a display object has children, moving a child from one parent to another, and so on.
Display List Classes
In just a moment, we’ll walk through a typical ActionScript display list that demonstrates the distinction between display objects and display object containers. First, however, take a look at the individual classes that contribute to the display list, as shown in Figure 4-3.
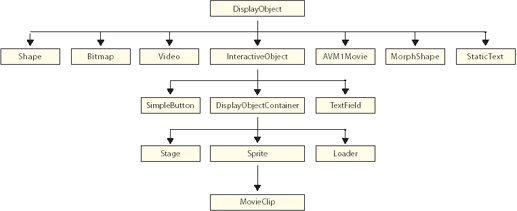
We discussed classes in Chapter 1, and we’ll be using them extensively as we delve deeper into the book. For now, however, and in this context, just think of these classes as objects that can be part of the display list. As you look through Figure 4-3, for instance, you’ll recognize Shape, Bitmap, Video, and so on.
It is important to note, however, that, unlike Figure 4-2, this is not a hierarchical depiction of an actual display list. For example, it is possible for shapes, bitmaps, videos, and static text, among other items, to exist inside movie clips. Yet in the diagram in Figure 4-3, MovieClip appears to be lowest in the display list hierarchy, making this seem impossible in the traditional flowchart sense.
The key to this apparent dichotomy is that the display list
classes originate with the DisplayObject class, and the flowchart
shows the descendents of that class. Figure 4-3 is hierarchical, but it shows
the possible objects that can be a part of any
display object. Because a display object is anything that is, or can
be, part of the display list, this flowchart is valid not only when
examining the contents of the stage, but also when examining the
contents of a movie clip, for example.
Here is a quick description of the classes in Figure 4-3, rearranged slightly for clarity of discussion.
DisplayObjectAnything that can exist in the display list is a display object, and more specialized classes are derived from
DisplayObject.ShapeThis is a rectangle, ellipse, line, and so on, created with drawing tools. New to ActionScript 3.0, you can now create these at runtime.
BitmapThis is an ActionScript bitmap created at runtime using the
BitmapDataclass. Note that a standard JPG import does not create this kind of bitmap, but rather creates a shape. After creating a bitmap with this class, however, you can place an imported JPG into it for display.VideoThis is a video display object, the minimum required to play a video, rather than using a video component.
InteractiveObjectThis class includes any display object the user can interact with using the mouse or keyboard. It is not used directly to manipulate the display list. Instead, you work with its descendents.
Skipping a bit, temporarily, and moving down a level:
SimpleButtonThis class is used to create a button that’s functionally equivalent to the buttons you probably have experience with in the authoring interface. However, in ActionScript 3.0, you can now create buttons on the fly by using other display objects for their up, over, down, and hit states.
TextFieldThis class includes dynamic and input text elements, controllable with ActionScript.
DisplayObjectContainerThis class is similar to
DisplayObjectin that it refers to multiple display object types. The difference here, however, is that this object can contain children. All display object containers are display objects, but only display objects that can have children are display object containers. For example, a video is a display object, but it cannot have children. A movie clip is a display object, and it can have children, so it’s also a display object container. Usually, you will work directly with this class when traversing the display list, looking for children or ancestors. Usually, you will manipulate one or more of its descendent classes.
There are four kinds of display object containers:
StageRemember, the stage itself is part of the display list. This class demonstrates that any interactive object can reference the stage which, itself, is a display object container.
SpriteNew to ActionScript 3.0, a sprite is simply a movie clip without a timeline. Many ActionScript manipulations typically performed using movie clips only require one frame of the created movie clip’s timeline. So, the size and administrative overhead of the timeline is unnecessary. As you become more accustomed to ActionScript 3.0, and begin to consider optimization more frequently, you may find yourself using sprites more than movie clips.
LoaderThis class is used to load external assets destined for the display list, including bitmaps and other SWFs.
MovieClipThis is the movie clip you probably know and love, as a result of creating them in the authoring interface, via ActionScript, or both.
We left three items from the second tier for last, as you will probably use these classes the least often:
AVM1MovieThis class is for working with loaded SWFs created using ActionScript 1.0 or 2.0. AVM1, (which stands for ActionScript Virtual Machine 1) is reserved for SWFs that use ActionScript 1.0 and/or ActionScript 2.0, while AVM2 is used for SWFs that use ActionScript 3.0. Because Flash Player uses two discrete code bases, these virtual machines are not compatible. The
AVM1Movieclass provides a way of manipulating display properties of legacy SWFs, but does not facilitate communication between ActionScript 3.0 and older SWFs. This must be accomplished by other means, such as LocalConnections. We will discuss these other methods in Chapter 13.MorphShapeandStaticTextThese two classes represent a shape tween and static text element, respectively, neither of which are controllable directly via ActionScript. However, they are part of the display classes because they inherit properties, methods, and events from their
DisplayObjectparent class. This makes it possible to rotate a static text element, for example.
Once you begin using the display list frequently—especially if you are familiar with the ActionScript 2.0 method of doing things—you will quickly become enamored with its power, flexibility, and simplicity. We will show you how to perform several common display list tasks in this chapter but, if you take one thing away from this initial discussion, it should be a basic understanding of display object versus display object container. To demonstrate this effectively, let’s look at a short segment of code that traces requested content of the display list to the output window.
Displaying the Display List
It’s sometimes useful, especially when you’re creating many display objects with potentially complicated nested objects, to walk through the display list and analyze its contents. This little function, found in the companion source file trace_display_list.fla will trace the contents of any display object.
1 function showChildren(dispObj:*):void {
2    for (var i:int = 0; i < dispObj.numChildren; i++) {
3         var obj:DisplayObject = dispObj.getChildAt(i);
4         if (obj is DisplayObjectContainer) {
5             trace(obj.name, obj);
6             showChildren(obj);
7         } else {
8             trace(obj);
9         }
10     }
11 }
12
13 showChildren(stage);
Lines 1 and 11 define the function showChildren(), which requires as its
argument the display object you wish to analyze. (See the adjacent
note for more information on the use of the asterisk datatype.) Line
13 calls the function and, in this case, passes in the stage for
analysis. In this example, the function will trace the contents of
all children of the stage.
Lines 2 and 10 define a for loop, which will loop until there
are no more children in the display object passed into the function.
The number of loops is determined by the numChildren property, which returns the
number of nested display objects in the object being analyzed. Each
time through the loop, line 3 populates the obj variable with the next child in the
display list using the getChildAt() method. This determines the
child object at the level indicated by the loop counter (i). The first time through the loop,
when i is 0, the first child
will be returned. The second time when i is 1, the second child will be
returned, and so on.
Line 4 is what makes this function handy. It first checks to
see whether the display object currently being analyzed is also a
display object container. It does so by using the new is operator, which checks the data type
of the object in question, comparing it against the DisplayObjectContainer type. This is
important because if the display object is not a container, the walk
through is over for that portion of the display list. The if statement will evaluate to false, jumping down to lines 7 and 8,
and the object will be traced. The conditional then ends at line 9,
and the code increments and goes through the loop again.
If the display object is also a container, it may have
children, so the walk must continue down through that branch of the
list. The if statement will
evaluate to true, and the
object (along with its name, in this case) is traced at line
5.
Finally, at line 6, the function calls itself again. passing in the object currently being inspected. This concept is called recursion. A function calling itself may seem redundant, but it can be very useful. In this case, each time the function is called, it receives a new display object to analyze, so the function reports the contents of that specific display object. The result is a complete walkthrough of all display objects, no matter how many children each may have.
The showChildren() function in action
Take a look at the function in action. Figure 4-4 shows a sample file that will be analyzed. The rectangle and circle movie clips, with their instance names, are indicated in the figure. Within the rectangles, a shape gives the fill and stroke appearance. Inside the circles, a shape provides the fill and stroke and a static text element is added.
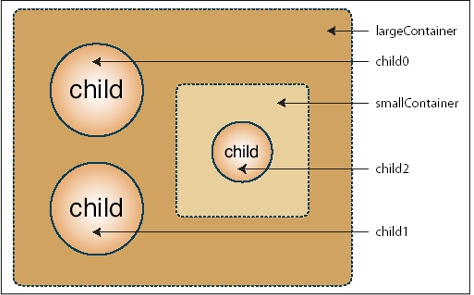
When the function runs, the following is traced to the output window, showing all children of the stage. It lists display containers by name and object reference, and display objects by object reference alone.
root1 [object MainTimeline]
largeContainer [object largeContainer_1]
[object Shape]
smallContainer [object smallContainer_2]
[object Shape]
child2 [object MovieClip]
[object Shape]
[object StaticText]
child0 [object MovieClip]
[object Shape]
[object StaticText]
child1 [object MovieClip]
[object Shape]
[object StaticText]
You can improve the readability of the trace by adding indents to show the parent-child relationship of the traced objects. The following is seen in trace_display_list2.fla (bold lines are new or changed).
1   function showChildren(dispObj:*, indentLevel:Number):
                             void {
2     for (var i:int = 0; i < dispObj.numChildren; i++) {
3         var obj:DisplayObject = dispObj.getChildAt(i);
4         if (obj is DisplayObjectContainer) {
5             trace(padIndent(indentLevel), obj.name, obj);
6             showChildren(obj, indentLevel + 1);
7         } else {
8             trace(padIndent(indentLevel) + obj);
9         }
10     }
11 }
12
13 showChildren(stage, 0);
14
15 function padIndent(indents:int):String {
16     var indent:String = "";
17     for (var i:Number = 0; i < indents; i++) {
18         indent += "    ";
19     }
20     return indent;
21 }
The function in lines 15 through 21 takes a desired indent level and returns four spaces for each indent specified. For example, the first child will have no indent, or an indent level of 0. Therefore, it will return four spaces zero times, for no indent effect. The first nested child will have an indent level of 1, so the function will return four spaces of indent. A child at a second tier of nesting will have an indent level of 2, so the function will return eight spaces of indent, and so on.
We can indicate the number of indents by passing a value
into a second parameter in the main function, in the form of
indentLevel, as seen in
line 1. Now that this second parameter exists, we’ve changed the
calls to the function, at lines 6 and 13, to add the indent value.
The process begins at line 13 with an indent level of zero. Each
recursive call, however, must be indented one more level, so line
6 adds 1 to the indentLevel
argument each time the function is called.
Finally, lines 5 and 8 add the new spaces, for each level of
indent, that are returned by the padIndent() function. The result,
shown here, is a more human-readable output with the indents
representing nested children.
root1 [object MainTimeline]
     largeContainer [object largeContainer_1]
        [object Shape]
         smallContainer [object smallContainer_2]
            [object Shape]
             child2 [object MovieClip]
                [object Shape]
                [object StaticText]
         child0 [object MovieClip]
            [object Shape]
            [object StaticText]
        child1 [object MovieClip]
            [object Shape]
           [object StaticText]
If you wish, you may also change the string returned from
the padIndent() function to
another number of spaces, or even another character such as a
period.
Adding and Removing Children
The previous section described the parts of the display list,
and how to analyze an existing list. But you’ll also need to know how
to add to, and remove from, the display list at runtime. In previous
versions of ActionScript, you needed to rely on varying methods to add
items to the stage. For example, you needed to use separate methods
for creating a movie clip, placing a library movie clip on stage, or
duplicating a movie clip. Using the ActionScript 3.0 display list, you
only need one approach to create a movie clip. You will use new MovieClip(). Even adding a precreated
movie clip from the library is consistent with this syntax, as you’ll
soon see.
Using addChild()
Adding a display object to the display list requires just two simple steps. The first is to create the object—in this case, an empty movie clip (that is, a movie clip created dynamically, but that currently has no content):
var mc:MovieClip = new MovieClip();
This literally creates the movie clip but does not display it.
In order for the movie clip to display, you must add it to the
display list using the addChild() method:
addChild(mc);
You can also specify a particular target for the movie clip,
as long as that target is a display object container. (Remember, you
can’t add children to display objects like shapes, videos, text
elements, and so on, because they are not display object
containers.) So, if you instead wanted to add the mc movie clip nested inside another
movie clip called navBar, you
would change the second step to:
navBar.addChild(mc);
We’ve been using movie clips in our examples, but it’s also as straightforward to add other display objects. Two simple examples include creating a sprite and a shape:
var sp:Sprite = new Sprite();
addChild(sp);

var sh:Shape = new Shape();
addChild(sh);
You don’t even have to specify a depth (visible stacking
order), because the display list automatically handles that for you.
In fact, you can even use the same addChild() method for changing the
depths of existing display objects, but we’ll discuss depths in
greater detail later in this chapter.
Adding Symbol Instances to the Display List
In the previous, simple examples, we’ve created display objects without content. In Chapter 8, we’ll show you how to draw with code, so you can create content for these movie clips, relying solely on code for small file size and more dynamic control.
However, you will frequently find the need to use custom art in your files, and in those situations code-only solutions will not do. So, in this chapter, we’re going to focus on dynamically adding movie clips that already exist in your library. In the accompanying source file, addChild.fla, you will find a unicycle in the library. To add this movie clip to the display list using ActionScript, you must set up the library symbol first.
In prior versions of ActionScript, there were two ways of doing this. The first approach was to assign the symbol a linkage identifier name. This was similar to an instance name for library symbols, in that you could reference the symbol by name using ActionScript. The second way was to assign a class to the movie clip so that it could be created when you created an instance of the class, and also have its own code to execute.
In ActionScript 3.0, these two approaches are unified. Rather than using the linkage identifier, you simply use a class name to reference a symbol in all cases. When you’ve written a class for the symbol, which we’ll do in later chapters, the symbol will behave accordingly. However, when you just want to reference the symbol, Flash will automatically create an internal placeholder class for you, and use the class name to dynamically create the symbol when requested. This approach also allows you to easily add classes later while changing little or nothing in your file.
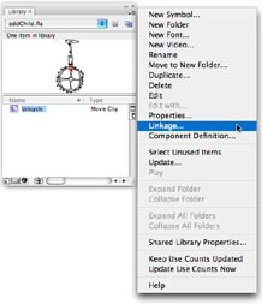
Continuing our movie clip example, to add a class name to a symbol, select the movie clip in your library, and then click the Symbol Properties button (it looks like an “i” at the bottom of the library) for access to all the symbol properties. Alternatively, you can focus only on the linkage information by choosing Linkage from the library menu, as seen in Figure 4-5.
In the resulting dialog, seen in Figure 4-6, click to enable
the Export for ActionScript option, and add a name to the Class field. When you start working with
classes, you will follow a few simple rules and conventions, one of
which is to capitalize the first letter of your class name. This is
a bit different from naming a variable, where you might choose to
use a lowercase first letter, so it’s a good idea to get into this
practice now. In the addChild.fla source file, we’ve used the
class name Unicycle.
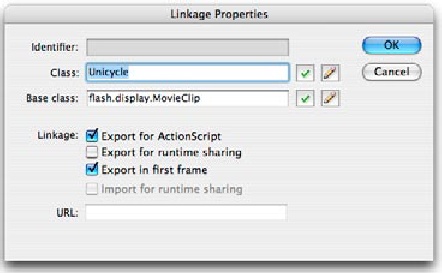
You will also likely notice that Flash adds the MovieClip class (in this case) to the
Base class field for you.
This makes it possible to automatically access the properties,
methods, and events available to the MovieClip class. For example, you can
automatically manipulate the x and y coordinates of your new custom
movie clip.
Now that you’ve given your movie clip a class name, you can
create an instance of that custom movie clip class the same way you
created an instance of the generic movie clip class. Instead of
using MovieClip(), however,
you will use Unicycle() to
create the movie clip. The same call of the addChild() method is used to add the
newly created movie clip to the display list, as seen in the
following code. The code and required movie clip exist in the
accompanying source file addChild.fla.
var cycle:MovieClip = new Unicycle();
addChild(cycle);
Using addChildAt()
The addChild() method
adds the display object to the end of the display list, which places
the object at the top-most z index. This makes it very easy to place
items on top of all other items. However, it’s also useful to be
able to add a child at a specific position in the display list. For
example, you may wish to insert an item into the middle of a
vertical stack of display objects.
This example, found in the addChildAt.fla source file, adds a movie
clip with the class name Ball
to the start of the display
list with every mouse click. The ultimate effect is that a new ball
is added below the previous
balls, and positioned up and to the right 10 pixels, every time the
mouse is clicked.
1 var inc:int = 0;
2
3 stage.addEventListener(MouseEvent.CLICK, onClick, false, 0, true);
4
5 function onClick(evt:MouseEvent):void {
6            var ball:MovieClip = new Ball();
7     ball.x = ball.y = 100 + inc * 10;
8           addChildAt(ball, 0);
9           inc++;
10}
Line 1 initializes a variable that will be incremented with each ball added. Line 3 adds an event listener to the stage, listening for a mouse click, so that any mouse click will trigger the listener’s function. The function in lines 5 through 10 performs four basic tasks. In line 6, a new Ball movie clip is created.
Line 7 manipulates the x and y coordinates in a single
instruction, setting x equal
to y, which is equal to the
value of an expression. This is handy when both x and y values are the same. In this case, the
expression sets the new ball to x and y of 100 and adds a 10-pixel offset for
each ball added. For example, when the first ball is added,
inc is 0 so the additional
pixel offset is 0*10 or 0. Then inc is incremented at the end of the
function, in line 9. The next mouse click that calls the function
will update the offset to 1*10 or 10 pixels for the second ball,
2*10 or 20 pixels offset for the third ball, and so on. Most
importantly, line 8 adds the ball to the display list, but always at
position 0, making sure the newest ball is always on the
bottom.
Note
It is possible to manipulate display objects—such as setting properties or invoking methods—both before and after the object has been added to the display list. By doing this, you can create a display object, initialize its properties to your liking, but reserve adding it to the display list until it is needed. See the sidebar "Display Objects and References to Stage and Root" for a notable exception to this rule.
Removing Objects from the Display List and from Memory
It’s equally important to know how to remove objects from the
display list. The process for removing objects is nearly identical
to the process for adding objects to the display list. To remove a
specific display object from the display list, you can use the
removeChild()
method:
removeChild(ball);
Remove a display object at a specific level using removeChildAt():
removeChildAt(0);
The following example is the reverse of the addChildAt() script discussed in the
prior section. It starts by using a for loop to add 20 balls to the stage,
positioning them with the same technique used in the prior script.
(For more information on for
loops, please review Chapter 2.)
It then uses the event listener to remove the
children with each click.
1 for (var inc:int = 0; inc < 20; inc++) {
2     var ball:MovieClip = new Ball();
3     ball.x = ball.y = 100 + inc * 10;
4     addChild(ball);
5 }
6
7 stage.addEventListener(MouseEvent.CLICK, onClick, false, 0, true);
8
9 function onClick(evt:MouseEvent):void {
10     removeChildAt(0);
11 }
Preventing out of bounds errors
The previous script works if something’s in the display list. If after removing the last ball, you click the stage again, you’re warned “the supplied index is out of bounds.” That’s because you’re trying to remove a child from position 0 of the display list, when there’s nothing in the display list at all.
To avoid this problem, you can first check to see whether
there are any children in the display object container that you
are trying to empty. Making sure that the number of children
exceeds zero will prevent the aforementioned error from occurring.
The following is an updated onClick() function, replacing lines
9–11 in the previous code, with the new conditional in bold. (For
more information on conditionals, please review Chapter 2.)
9   function onClick(evt:MouseEvent):void {
10    if (numChildren > 0) {
11       removeChildAt(0);
12    }
13 }
Note
If you ever want to use a for loop to remove many objects at
once (everything in the display list, for example), it is easier
to remove the objects from the bottom, as discussed here. This
is because, as long as there is something in the display list,
there will always be something in position 0, and you will avoid
the index out of bounds error. For more information, consult
Chapter 20 of Colin Moock’s Essential ActionScript 3.0.
Removing objects from memory
As we discussed when introducing event listeners in Chapter 3, it is important to remember that inadequate asset management can result in memory leaks. It is always a good idea to try to keep track of your objects and, when you are sure you will no longer need them, remove them from memory.
Keeping track of objects is particularly relevant when discussing the display list because it is easy to remove an object from the display list but forget to remove it from RAM. Doing so will cease displaying the object, but the object will still linger in memory. The following script, a simplification of the previous example, will both remove a movie clip from the display list and from RAM.
1 var ball:MovieClip = new Ball();
2 ball.x = ball.y = 100;
3 addChild(ball);
4
5 stage.addEventListener(MouseEvent.CLICK, onClick, false, 0, true);
6
7 function onClick(evt:MouseEvent):void {
8     this.removeChild(ball);
9     //ball removed from display list but still exists
10             trace(ball);
11             ball = null;
12             //ball now entirely removed
13     trace(ball);
14
15     stage.removeEventListener(MouseEvent.CLICK, onClick);
16 }
Lines 1 through 5 are derived from the previous example,
creating and positioning the ball, adding it to the display list,
and adding a mouse click listener to the stage. The first line of
function content, line 8, removes the ball from the display list
using the removeChild()
method. Although it is no longer displayed, it is still around, as
shown by line 10, which traces the object to the output panel.
Line 11, however, sets the object to null, marking it for removal from
memory—again, shown by tracing the object to the output panel in
Line 13.
Note
As an added review of best practices, line 15 emphasizes
the concept of removing event listeners covered in Chapter 3. This is a
good example of this practice, since using a weak reference in
the last parameter of the addEventListener() method in line 5
is not reliable. Remember, weak references are a best practice
backup plan, not a substitute for explicitly removing your
unwanted listeners. For additional information, please review
Chapter 3.
Managing Object Names, Positions, and Data Types
As any display list grows, it inevitably becomes necessary to traverse its contents and work with individual display objects. This may require simple tasks such as identifying a display object by name or z index, or even by referencing existing display objects as a specific display list class.
Finding Children by Position and by Name
Many of the example scripts in this chapter demonstrate working with children that have previously been stored in a variable and that are already known to you. However, you will likely have the need to find children in the display list with little more to go on than their position or name.
Finding a child by position is consistent with adding or
removing children at a specific location in the display list. Using
the getChildAt() method, you
can work with the first child of a container using this familiar
syntax:
var dispObj:DisplayObject = getChildAt(0);
If you don’t know the location of a child that you wish to
manipulate, you can try to find it by name using its instance name.
Assuming a child had an instance name of circle, you could store a reference to
that child using this syntax:
var dispObj:DisplayObject = getChildByName("circle");Finally, if you need to know the location of a display object
in the display list, but have only its name, you can use the
getChildIndex() method to
accomplish your goal.
var dispObj:DisplayObject = getChildByName("circle");
var doIndex:int = getChildIndex(dispObj);
Casting a Display Object
Note that, in the preceding discussion, we used DisplayObject as the data type when
retrieving a reference to a display object—rather than MovieClip, for example. This is because
you may not know if the child is a movie clip, sprite, shape, and so
on.
In fact, Flash may not even know the data type, such as when referencing a parent movie clip created using the Flash interface (rather than ActionScript), or even the main timeline. Without the data type information supplied in the ActionScript creation process, Flash sees only the parent timeline as a display object container.
To tell Flash the container in question is a movie clip, you
can cast it as such—that is, you can change the data type of that
object to MovieClip. For
example, consider a movie clip created in the Flash interface that
needs to tell its parent, the main timeline, to go to frame 20. A
simple line of ActionScript is all that would ordinarily be
required:
parent.gotoAndStop(20);
However, because Flash doesn’t know that gotoAndStop() is a legal method of the
display object container (the stage, for example, can’t go to frame
20, and neither can a sprite), you will get the following
error:
Call to a possibly undefined method gotoAndStop through a reference
    with static type flash.display:DisplayObjectContainer.
To tell Flash the method is legal for the main timeline, you need only state that the parent is of a data type that supports the method. In this case, the main timeline is a movie clip, so you can say:
MovieClip(parent).gotoAndStop(20);
This will prevent the error from occurring, and the movie clip will be able to successfully send the main timeline to frame 20.
Changing the Display List Hierarchy
In addition to the improved consistency over previous versions of ActionScript, when adding and removing visual assets at runtime, the display list also makes managing assets much easier. Particularly simplified are: changing the visual stacking order (depth management) and dynamically changing the familial relationship between visual assets (reparenting, or moving a display object from one parent to another).
Depth Management
Adding items to the display list does not require that you specify which level the new child should occupy, because all that is handled for you automatically. This also makes managing the depths of display objects much easier than ever before.
To begin with, you can simply use the addChild() or addChildAt() methods to alter the order
of display list items. As we discussed, adding a child to a level
below other elements using the addChildAt() method will automatically
push the other element depths up a level. But you can also use the
addChild() method on an
object that already exists in the display list.
This step will remove the object from its original position and move
it to the top of stack, pushing the other elements down.
For example, consider the following code. Lines 1 through 6
use the standard approach of creating and adding movie clips to the
display list, with the added step of giving each clip an instance
name. Lines 7 and 8 display the results at this point and, as
expected, mc1, or “clip1,” is
at level 0, and mc2, or
“clip2,” is at level 1.
1 var mc1:MovieClip = new MovieClip();
2 mc1.name = "clip1";
3 addChild(mc1);
4 var mc2:MovieClip = new MovieClip();
5 mc2.name = "clip2";
6 addChild(mc2);
7 trace(getChildAt(0).name);
8 trace(getChildAt(1).name);
However, if you add mc1
to the display list again, it is moved from position 0 to the end of
the list, and mc2 gets pushed
to position 0. This can be shown by adding these new lines to the
script:
9 addChild (mc1);
10 trace (getChildAt (0).name );
11 trace (getChildAt (1).name );
There are three additional ways to set the z-order of objects
that are already in the display list. The swapChildren() method will swap the
locations of two known display objects. For example, adding the
following line to the ongoing script will swap positions between mc1
and mc2, no matter where they are:
12 swapChildren(mc1, mc2);If you don’t already have references to the children, you can
get them using the aforementioned getChildByName() method, or switch the
children based on their current levels using the swapChildrenAt() method. Adding the
following line to this simplified example will achieve this result,
but this method will swap any two levels, even if they’re not
consecutive.
13 swapChildrenAt(0, 1);Finally, you can specify a new index for any existing display object. The following new example, seen in the setChildIndex.fla source file, takes advantage of the event propagation discussed in Chapter 3 to automatically bring any display object that is rolled over with the mouse to the top of the visual stacking order.
1 addEventListener(MouseEvent.MOUSE_OVER, onBringToTop, false, 0,
  true);
2
3 function onBringToTop(evt:MouseEvent):void {
4     setChildIndex(MovieClip(evt.target), numChildren-1);
5 }
This script accomplishes its task by setting the child’s display list index to the highest level possible. The script first determines the number of children in the display object container (in this case, the main timeline) and then, because ActionScript arrays are zero-based (meaning the first item is item 0), it subtracts 1 to get the highest existing index in the display list. For example, if there are three items in the display list, their indices would be 0, 1, and 2. The number of children would be 3, and 3 minus 1 equals 2—the highest index in the list. Figure 4-7 illustrates.
Warning
Using prior versions of ActionScript, some developers specified depths known to be higher than any existing depth as a means of ensuring that an object would always be on top of all other objects. This is not possible in ActionScript 3.0. Specifying a level that is higher than the number of children in the display list will result in the “supplied index is out of bounds” error discussed in the prior section, "Preventing out of bounds errors.”
By setting every item rolled over to the highest possible index, all other items are pushed back, popping the rolled-over item to the highest z index.
Reparenting Children
Another task that is vastly simplified by the display list is moving a child from one parent to another. In the reparenting.fla source file, a moon can be moved to either of two night skies, just by clicking that sky (Figure 4-8). Both skies are also draggable, demonstrating that the moon will move with the night sky.
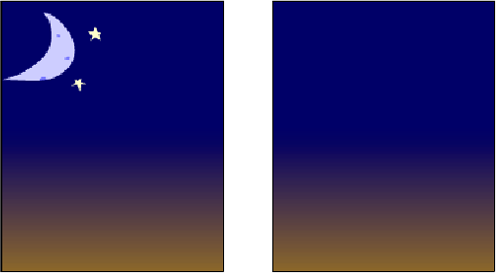
The script begins by adding the moon to the first sky (on the
left) as its starting position. It then adds an event listener to
the main timeline to allow any child that receives a mouse down event to call onDrag() and then, on mouse up, call onDrop().
1     sky1.addChild(moon);
2
3     this.addEventListener(MouseEvent.MOUSE_DOWN, onDrag, false, 0,
      true);
4     this.addEventListener(MouseEvent.MOUSE_UP, onDrop, false, 0, true);
The onDrag() function
starts by stopping its progress (by using the return keyword to leave the function) if
the clicked item (the target of the mouse
down event) is the moon itself. This prevents the
circular error of trying to add a display object to itself.
This function then adds the moon to the sky that was clicked. This action removes the moon from its previous parent and adds it to the clicked item, therefore reparenting the moon. The function then enables dragging of the clicked item.
5 function onDrag(evt:MouseEvent):void {
6     if (evt.target == moon) { return; }
7     evt.target.addChild(moon);
8     evt.target.startDrag();
9 }
10
Finally, when the mouse
up event is received, the onDrop() function disables dragging on
the clicked item.
11 function onDrop(evt:MouseEvent):void {
12     evt.target.stopDrag();
13 }
As you can see, by using the addChild() method, you can move a
display object from one parent container to another, resulting in
the child inheriting all the relevant attributes of its new
parent.
A Dynamic Navigation Bar
Now it’s time to tie much of this together and create a dynamic navigation bar. This project will create a five-button navigation bar that will be centered on stage as shown in Figure 4-9. To simulate functionality, each button will trace its name to the Output panel when clicked.
Here is the start of the script for the navigation bar:
1 var btnNum:int = 5;
2 var spacing:Number = 10;
3
4 var navBar:Sprite = new Sprite();
5 addChild(navBar);
The script begins at lines 1 and 2 by initializing the number of buttons used and the space in pixels between each button. It then creates a container for the buttons in line 4. This navigation bar doesn’t need a timeline so, for added efficiency, a sprite will be used as the container rather than a movie clip. Next, line 5 adds the sprite to the display list.
6 var btn:SimpleButton;
7 for (var i:uint = 0; i < btnNum; i++) {
8     btn = new Btn();
9     btn.name = "button" + i;
10    btn.x = spacing + i * (btn.width + spacing);
11    btn.y += 5;
12    btn.addEventListener(MouseEvent.CLICK, onTraceName, false, 0,
      true);
13    navBar.addChild(btn);
14 }
A for loop then creates
the total number of buttons. Each time through the loop, a new button
is created from a button symbol in the library with the linkage class
of Btn (line 8). An instance name is assigned to
the button, combining the string “button” and the loop counter value
(line 9). Thus, the first button is called
button0, the second is called
button1, and so on.
The current button is positioned horizontally (line 10), offset
by the spacing set in line 2, plus the width of the button and another
spacing gap for each button in the loop. Therefore, the first button
is positioned only 10 pixels to the right of the container’s
registration point (spacing,
plus zero times the sum of the width of the button and spacing). The last button is positioned 10
pixels to the right of the container’s registration point plus 4 times
the width of the button and spacing. The vertical position is also
set, moving the button down 5 pixels.
As the last instructions in the loop, a mouse click listener is
added to the button, specifying the onTraceName() function to be called when
the event is received (line 12), and the button is added to the
navBar parent (line 13).
15 var bg:MovieClip = new NavBarBack();
16 bg.width = btnNum * (btn.width + spacing);
17 bg.width += spacing;
18 navBar.addChildAt(bg, 0);
Starting with line 15, a background is added to the
navBar. Its width is set to the total number of
buttons times the sum of the button width and spacing, plus a spacing gap to the right of the button.
The background is then added to the navBar at
position 0, ensuring that it’s placed behind all the buttons.
19 navBar.x = (navBar.stage.stageWidth - navBar.width) / 2;
20 navBar.y = 20;
The finished navBar is
then centered horizontally at an x coordinate determined by the width
of the stage minus the width of the navBar, divided by 2 for a left and right
margin. It is also positioned vertically at a y coordinate of 20
pixels.
21 function onTraceName(evt:MouseEvent):void {
22    trace(evt.target.name);
23 }
Finally, the onTraceName() function, identified in the
event listener as the function to execute when the mouse click was
received, traces the name of the clicked button.
This exercise demonstrates how to create a simulated navigation bar using the display list, when no assets previously existed on the stage. Later in the book, you will learn how to create the buttons and draw the background shape entirely with ActionScript, removing the need to precreate these assets as library symbols.
What’s Next?
The display list is among the most important new introductions to ActionScript 3.0. It is worth the effort to explore the properties, methods, and events of the various display list classes—starting with the contents of this chapter, and then delving into the Flash help system, and additional resources, as you gain experience. Experimenting with the display list will show you that it is easy to use and, if you have experience with prior versions of ActionScript, you will soon find that it is much simpler and more consistent than equivalent methods in ActionScript 1.0 or ActionScript 2.0.
Next, we’ll discuss timeline control. Regardless of whether you are creating lengthy linear animations or single-frame applications, you are likely to require some level of control over the main timeline or movie clips. ActionScript 3.0 offers a few new features for you to try out.
In the next chapter, we’ll discuss:
Controlling playback of your animations and applications by moving the playhead with ActionScript
Using new ActionScript to parse frame label names from timelines and scenes
Changing the frame rate of movie playback for the first time
Get Learning ActionScript 3.0 now with the O’Reilly learning platform.
O’Reilly members experience books, live events, courses curated by job role, and more from O’Reilly and nearly 200 top publishers.

