Like many creative technologies, the Flash platform (not just the software, but also the community) has exploded over the last several years, fueled by faster, less expensive computers, the arrival of economical broadband access, and the growing role the Internet plays in our personal and professional lives. If you’re reading this book—whether you’re a developer or designer (or perhaps a member of the recently dubbed devigner camp: a programming creative that defies easy description)—it’s because Flash does, or will, play a part in your productivity. No matter what your experience level, you’ll find that Flash is a big application with a lot to offer.
The latest version, Flash CS4 Professional, has added even more tools to your potential toolbox. Flash’s internal scripting language, ActionScript 3.0, has been enhanced in key areas, and many new controls have been added to the application interface. Such features as simple 3D asset manipulation, inverse kinematics for animation, and a brand-new motion editor are among major changes available to all Flash users, with or without programming skills.
With all of this power, however, comes complexity. There’s no denying that Flash has a significant amount of breadth and depth, and learning your way around can be a challenge if you try too much, too fast. As discussed in the preface, this book will introduce you to the highlights of Flash’s essential features and apply examples of their use to an ongoing portfolio project. You’ll focus primarily on the Flash interface, with a measure of ActionScript thrown in to get the job done.
Note
When you are ready to take your projects to the next level and learn more ActionScript, this book’s companion volume, Learning ActionScript 3.0: A Beginner’s Guide (O’Reilly), will help. For more information, see the Preface.
The first step in learning Flash is exploring the application interface—sometimes referred to as an integrated development environment (IDE). Since Adobe’s acquisition of Flash, the interface has undergone changes to improve consistency and interoperability with other Adobe Creative Suite applications. Flash CS4 Professional has come closer to this goal of common user interface elements than any previous version of Flash. Before you can investigate further, however, you’ll need to create a new document.
If you’re new to Flash, you may be surprised when you are immediately prompted with a Welcome screen upon launch. Shown in Figure 1-1, this screen is divided into five main areas.

- Open a Recent Item
A short list of previously opened documents at your fingertips. Upon first launch, this list will be empty, but it will maintain a list of your eight most recently used files, as well as an option to open any existing file. To open a listed recent item, click its name. To open an existing document that is not listed, click the Open button, and a standard file browser will appear, allowing you to find and open the document.
- Create New
You will likely select from this list most often and, when working with this book, you will usually choose the Flash File (ActionScript 3.0) option. Clicking this button will create a native Flash file (often abbreviated as FLA and pronounced “flah” because of its .fla filename extension) that is preconfigured to use ActionScript 3.0 as its scripting language. This choice tells Flash to use the appropriate syntax when checking and compiling your scripts.
Note
Although the limited ActionScript covered in this book will focus exclusively on version 3.0, it is still possible to create ActionScript 1.0- or 2.0-based files by choosing Flash File (ActionScript 2.0) during the file creation process.
Selecting which version of ActionScript is used in each file is very important. Flash Player 9 and later, for example, can play Flash files created in any of three versions of ActionScript: 1.0, 2.0, and 3.0. Versions 1.0 and 2.0 can coexist and are represented collectively by the ActionScript 2.0 option. However, it is not possible for a single FLA to include both ActionScript 3.0 and either previous version.
The good news is, you’re not locked in to this decision when creating a new file. It’s possible to change which version of ActionScript a file uses after you have created the file. This won’t change any of the code you’ve written, but it will tell Flash how to correctly check and compile your scripts.
- Create from Template
Clicking this button opens a dialog displaying ready-made templates optimized for various advertising dimensions. Clicking any template will open a file that is preconfigured with the template assets. You will create and use a template later in this chapter.
- Extend
The link in this section connects to the online Adobe Exchange, which allows you to download extensions that add functionality to Flash.
- Links area
The ribbon across the bottom of the Welcome screen provides links to additional online material covering introductory material, new features, further resources, tips, podcasts, and more.
If you prefer not to use the Welcome screen, you can disable it by checking the “Don’t show again” feature in the lower-left corner of the screen. All of the features on the Welcome screen are available in the File and Help menus, and you can restore the Welcome screen later in the application preferences, if you wish.
Depending on how extensively you use Flash and how much you accomplish within the application itself (as opposed to creating assets in other applications, for example), the interface can quickly become cluttered with windows and panels. Flash CS4 Professional helps address this issue by originating most of its features within one main application window. You can then adjust this configuration in a number of ways, making it easier to organize your work environment while still customizing it to your liking.
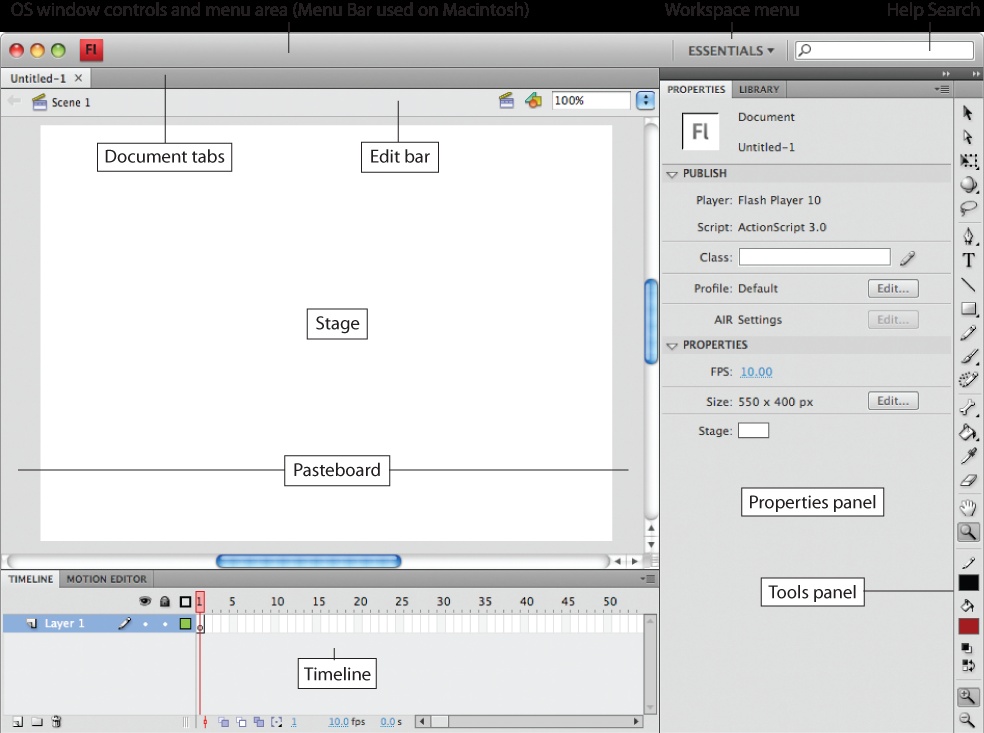
If you’ve used Flash before, you may be surprised at the setup of the work area the first time you launch the application. While some areas of the interface remain familiar, others have changed location, shape, and even functionality. Take a moment to look at the default layout of the interface in Figure 1-2.
Note
Figure 1-2 depicts the Essential workspace. You can change the workspace to a number of preset layouts, as well as customize it to your own liking. See Selecting and Editing a Workspace, later in this chapter.
The focus of the default layout is the coupled Stage and Pasteboard. The Stage is the area of your final file that will be visible during playback. The Pasteboard is the gray area surrounding the Stage that will not be displayed at runtime. This is handy for moving assets in and out of view. For example, an asset that sits on the Pasteboard will not initially be visible, and can be animated onto the Stage. Similarly, an asset can be moved to the Pasteboard to be hidden from view.
As you read this book, it will help you to liken the Flash world to the real-life world of theater or film. Think of the Stage as the stage or set on which a play or film is performed. Think of the Pasteboard as the wings of the theater or the soundstage, used by performers and crew for props, costume changes, and entrances and exits.
By default, each time a Flash document is opened, it is displayed as a tab just above the Stage inside the main application window. All Flash documents are collected as tabs in a layout just above the Stage inside the main application window. You can drag these tabs to reorder them, drag them out of the tabbed layout to create new document windows, or drag them back into the tabbed layout to consolidate windows.
For example, if you open two documents, they will appear as tabs in the order in which they were opened—MyDocument1.fla and MyDocument2.fla, for example. If you drag MyDocument1.fla to the right of the tab for MyDocument2.fla, the tabs will reorder. If you drag a document tab down away from its original location, the document will transfer to its own window. Later, you could drag the window bar back to the series of tabs, and the document would reappear as a tab, discarding the unused window.
Each document window contains a Stage and Pasteboard, as well as a small group of navigation and zoom tools collectively known as the Edit Bar. The Edit Bar helps you navigate through nested assets the same way your operating system lets you navigate through nested folders—maintaining a breadcrumb path of your progress as you descend through the levels of nested content. It also allows you to select scenes, which are analogous to the scenes of your play or film, and symbols, which are analogous to actors in a play. You’ll learn more about these in later chapters. Finally, you can use the Zoom menu in the right corner of the Edit Bar to view your document at various sizes. The menu offers sizes between 25 and 800%, and you can enter values manually ranging from 8% to 2000% zoom.
Note
Scenes are used to break up very long timelines into manageable chunks. You can use the Scenes panel (Window→Other Panels→Scenes) to add, rename, navigate to, and delete scenes.
Above the Stage is the main window bar, containing operating system controls—window controls for both platforms, and the full application menu on the Windows platform (the standard operating system Menu Bar is used on the Macintosh platform.) Also included in this window bar is an interface configuration menu and a Help search field.
Beneath the Stage is the Timeline. As its name implies, the Timeline uses a time-based metaphor for playing through your file and is analogous to a reel of film. By default, the Flash playhead, or current frame marker, scrolls through the Timeline during playback, displaying each linear frame of your project the way light projects each frame of film sequentially onto a screen.
Each time you place an asset on the stage during authoring, it will appear in the timeline much the way an event is represented in a historical timeline. A short event, for instance, might be represented as a dot, while a line spanning several years might reference a longer event. The Flash Timeline works in a similar way.
You can control when assets are displayed in your file by placing them in specific frames of the Timeline. For example, if you want a background image to appear throughout your presentation, that asset should span every frame used. A menu, on the other hand, might only appear in one frame. Further, if you want something to be visible for a short time, you can remove it from the timeline after a short span of frames.
Unlike film, however, the time is not fixed in Timeline playback. Not only can you change the frame rate of your file—a bit like slow motion or fast-forward—but you can also use ActionScript to jump the Flash playhead, moving it from any frame to any other frame, and even stopping it on a given frame for any length of time. In these ways, playing a Flash file can be thought of more like watching a movie on DVD.
Warning
Another way that the Flash Timeline model differs from film is that Flash animations on older computers can play back slower than the requested frame rate. So, it’s important to test your work on a variety of computers whenever possible.
Docked to the right of the Stage and Timeline (as seen previously in Figure 1-2) are the Properties, Library, and Tools panels. Panels display groups of related parameters and controls for easy access. You’ll use panels frequently and you can rearrange them to suit your workflow. You can show or hide them based on need, arrange them in logical groups, and rearrange them at will.
The Tools panel contains a variety of tools for creating and manipulating assets. The Library panel is used to organize Flash symbols and similar assets and is, therefore, somewhat akin to a theater dressing room holding actors for a performance. Finally, the Properties panel is where you will most often adjust the many document and asset properties, such as size and position. These three panels, as well as a few more, are discussed in greater detail in the following section.
Panels are the real workhorses of the Flash interface, and bear the brunt of the poking and prodding you’ll do while working on a file. Throughout the book, you’ll work with these panels extensively, so this discussion is meant to give you a brief functional overview of some of the most commonly used panels.
Divided into six main sections, Flash’s Tools panel is the go-to panel that contains the tools you’ll use throughout your work (Figure 1-3). The Tools panel also contains menus of related tools ( Figure 1-4), only one of which can be used at a given time. The following list describes the Tools panel’s six sections.
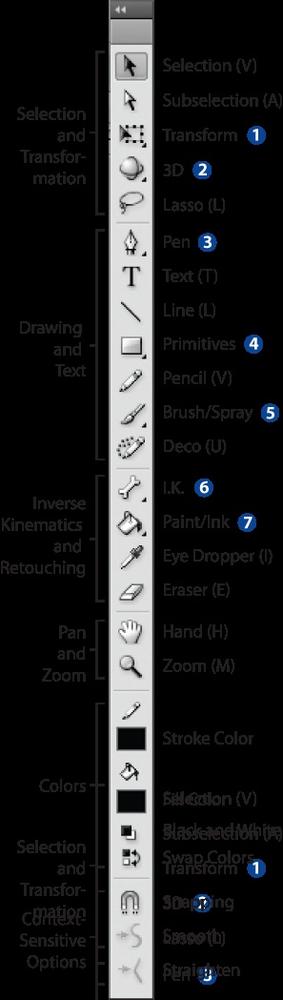
Figure 1-4. Default tool menus accessed from the Tools panel; keyboard shortcuts are listed in parentheses
- Selection and transformation
The first section of the Tools panel is dedicated to selection and transformation tools. Here you will find three ways to select elements for manipulation. The Selection and Lasso tools function the same way they do in most applications, allowing you to select objects by clicking or dragging over them, respectively. The Subselection tool allows you to select individual points and control handles of vectors rather than the entire object.
Also in this section are two transformation tool menus. The Transform menu contains the 2D tools Free Transform (used for scaling, rotating, and skewing objects) and Gradient Transform (used for performing similar manipulations on gradient fills). The 3D menu, new to Flash CS4, contains the 3D Rotation tool (used to rotate objects around the x-, y-, and z-axes in 3D space) and the 3D Translation tool (used to move the positions of objects along the same three axes in 3D space).
- Drawing and text
This section of the Tools panel contains creation tools, such as Text and Line. The Text tool creates text elements, and the Line tool creates lines (also commonly called strokes in Flash). Here you’ll also find a menu of primitive shapes, including rectangles, ellipses, polygons, and stars. The equally common Pencil, Brush, and Pen tools function much the same way they do in other applications, except that in Flash, all drawing tools create vectors rather than pixels.
Pencil and Brush are primarily freehand tools, while Pen is used to draw Bézier curves—computer-interpolated curves that are shaped by dragging control points and handles. The Pen menu contains additional tools for granular control over corners and smoothing of these curves.
The Brush menu contains a tool that is new to CS4 called the Spray Brush. Inherited from Adobe Illustrator, the Spray Brush allows you to spray shapes and symbols on the Stage, placing them automatically with possible adjustments to scale and rotation.
In a similar vein, the Deco tool distributes shapes or symbols along a grid, symmetric pattern, or even a growing vine algorithm. The latter provides options for leaf and flower art, as well as advanced options such as branch rotation and segment length. You’ll use the Deco tool in the next chapter to create your first interactive exercise.
- Inverse kinematics and retouching
New to CS4, you can now use the Bones tool, and its accompanying Bind tool, to create armatures for animating linked objects. For example, you can use the Bones tool to link and animate a robotic arm. Moving the claw at the end of the arm automatically moves each arm segment, with optional constraints such as joint rotation limits. This is known as inverse kinematics.
In Flash, the Eye Dropper, Eraser, and Paint Bucket tools work in nontraditional ways. As with the Brush and Pencil tools, they manipulate vectors exclusively, not pixels. The Paint Bucket has a cousin tool called the Ink Well, which applies color and other characteristics to lines the way a Paint Bucket affects fills.
- Pan and zoom
The last batch of dedicated tools is tried and true, consisting of the Hand tool for moving the stage around within the window, and the Zoom tool (magnifying glass) for changing the degrees of magnification.
- Colors
The colors segment of the Tools panel works together with many other tools, providing quick access to predefined colors for strokes and fills. As with other applications, you can also select a default black-and-white color set and swap the two colors with the click of a button.
- Context-sensitive options
The final segment of the Tools panel is a context-sensitive area that varies depending on which selection is active. Figure 1-3 shows the options for the Selection tool, which include turning snapping on and off and smoothing or straightening selected lines.
The Properties panel (also called the Property Inspector) is the newly expanded primary location for adjusting values for such object properties as size, location, orientation, and color effects. Users of previous Flash versions will notice a big change here: the new panel is vertical and now offers convenient access to a much larger number of properties. It is still context-sensitive, hiding and revealing properties according to which object is selected. To accommodate a large number of properties, the panel provides scroll bars when needed, and is grouped into categories that can be collapsed or expanded.
When you select a tool in the Tools panel, its properties become active in the Properties panel. If a tool has no configurable attributes, the Properties panel shows document properties, such as stage size and color. You’ll configure these properties when you create your first FLA, but it’s helpful to become accustomed to the context-sensitive nature of the Properties panel.
As you saw from the tabs at the top of the panel area in Figure 1-2, the Library is grouped with the Properties panel in the default workspace layout. To select another panel in a group, simply click its tab in the topmost portion of the panel group. The selected panel will come to the front.
The Library (shown in Figure 1-5) is an essential repository of reusable assets such as bitmaps, sounds, and native Flash asset types such as buttons and movie clips. A movie clip, for example, is an animation asset that has its own dedicated Timeline. You can create an animation in a movie clip and then conveniently treat the entire animation as a single asset.
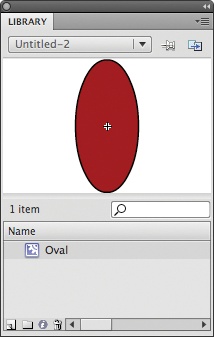
Symbols will be discussed in greater detail in Chapter 3, but the key thing to remember now is that symbols contribute mightily to the efficiency of your file. Symbols can be used many times in a file without contributing noticeably to file size beyond their first use. In addition, you can manipulate a single instance of a symbol on the Stage without affecting other instances of that symbol.
The lower-left corner of the Library features buttons for (from left to right) quickly creating new symbols, creating folders to organize your internal assets, editing symbol properties, and deleting symbols. Libraries from all open files will appear in the menu at the top of the Library, allowing you to switch between libraries easily and drag assets from any open Library to any open file.
The two buttons in the upper-right corner of the Library can help in this regard. Using the New Library button (shown in blue), you can create another window for the Library to allow dragging assets from one Library to another (without having to add content to the Stage). You can also pin a library to a Flash file (using the button that looks like a pushpin). This ensures that, when switching between files, the selected Library will always become active. This is helpful when frequently moving between many open documents.
You can now search the Library using the input search field between the asset list and thumbnail. New to Flash CS4 Professional, this feature filters the assets displayed in the Library by name. Using the column headers at the top of the asset list, you can also sort the Library by name, linkage name/class (used with ActionScript and discussed in Chapter 6), use count, date modified, and asset type.
Here are several additional, commonly used panels, all of which you can access from the Window menu:
- Align
Align is an impressive tool that will align, distribute, and space assets according to desired constraints, as well as match asset sizes.
- Info/Transform
These two are a duo of related transformation panels that allow you to alter specific properties of selected assets. The Info panel displays the position (x- and y-coordinates) and color (red, green, blue, and alpha values) under the mouse, and lets you edit the width, height, x-, and y-coordinates of a selected object. The Transform panel lets you alter the scale, rotation, skew, 3D rotation point, and 3D transform point of an asset.
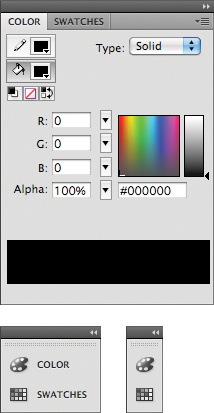
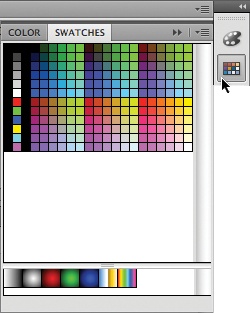
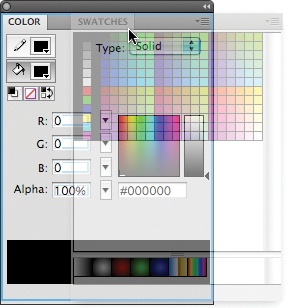
- Color/Swatches/Kuler
In this trio of related color panels, Color is the most powerful and is the panel in which you will most often define not only custom colors, but also gradients. The Swatches panel contains a collection of swatches that you can edit, save, and load, and this is where you will store custom colors and gradients for quick recall. Kuler, a Flash panel extension that ships with Flash, is an online system for sharing color families. The panel is found in the Windows→Extensions submenu, and an Internet connection is required for use.
- Motion Editor/Motion Presets
The Motion Editor is a powerful companion to the Timeline and is the editing panel for the new CS4 animation model. The Motion Presets panel contains a list and preview animation of many predesigned motion sets, such as bounce, fly, and zoom in and/or out of frame. These panels will be discussed at length in Chapter 5.
- Components/Component Inspector
Components and the Component Inspector provide ways to add complex functionality and user interface (UI) elements to your projects using little to no ActionScript. You will learn more about components in Chapter 9.
- Actions/Output/Compiler Errors/Debug Console/Variables
These panels are used when authoring ActionScript. The Actions panel is Flash’s internal script editor, the Output and Compiler Errors panels are used to monitor script integrity and output, and the Debug Console and Variables panels are used during debugging to trace through script execution and monitor variable values. The latter two panels are found in the Windows→Debug Panels submenu.
- History
The History panel maintains a list of nearly everything you do in Flash and allows you to backtrack through previously completed tasks. If you are familiar with the History panels in Adobe Photoshop or Adobe Illustrator, you will feel right at home with this panel.
Although this list doesn’t cover every panel available in Flash CS4 Professional, working with several of these utilities should give you the experience required to explore additional panels when needed.
As discussed previously, the Timeline is a time-based representation of your project file and can be likened to a roll of film. As the author of a Flash document, you are the director of a film. You will use the Timeline to navigate through your file, composing scenes, positioning actors, and controlling their entrances and exits.
Take a look at Figure 1-6, a detailed view of the Timeline. The red rectangle highlighting the number 1 and the corresponding thin red line that spans the height of the Timeline comprise the playhead. This marker indicates the current frame displayed to your audience. Viewers of your file will experience content—see visual assets, hear sounds, and so on—placed in this frame.
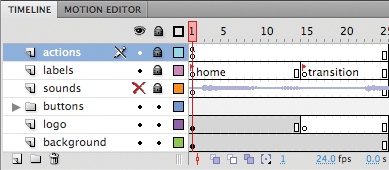
To work with other frames of a multi-frame Timeline, you can move the playhead by clicking or dragging along the strip of numbers at the top of the Timeline. Time increases when moving to the right, and you’ll notice the frame numbers climb, to 5, 10, and so on, until the figure ends at frame 25. Positioning the playhead in any frame allows you to preview or edit the frame’s content, including manipulating assets on the Stage, as well as editing the Timeline itself. For example, you will learn how to draw art on the Stage in Chapter 2, how to add sound to the timeline in Chapter 13, and how to add ActionScript to a frame in Chapter 6.
The three numbers in the lower-right corner of Figure 1-6 display information regarding the current time and rate of playback of your file. The first number shows that the playhead is currently in frame 1. The next number indicates that the frame rate, or speed at which this Timeline will play, is 24 frames per second. The last number shows the elapsed time, or the time-based equivalent of the current frame. In this case, the current frame is frame 1, which resides at 0.0 seconds. If the playhead were at frame 24, the elapsed time would read 1.0 second because the frame rate is 24 frames per second.
To the left of the time indicators, just below the playhead marker, is an icon that looks like a tiny version of the playhead. Clicking this button will autoscroll your Timeline to center the current frame. The icons to the right of this button allow you to display and edit multiple frames at once. This will be discussed in the context of animation in Chapter 5.
So far, discussion of the Timeline has been focused on the horizontal, as the playhead moves through frames with time. There is also a vertical component of the Timeline panel. If you look again at Figure 1-6, you’ll see that the Timeline is divided into rows (called layers). Serving a similar purpose as the layers in Adobe Photoshop or Illustrator, Timeline layers provide one way of defining a visual stacking order in your projects. The bottommost layer is at the bottom of the stack, and the topmost layer appears on top of all others. For example, in frame 1 of Figure 1-6, the contents of the background layer appear below the contents of the logo layer.
Although most layers contain some type of visual content, they serve other purposes, too, some of which are depicted in Figure 1-6. For instance, you can add sounds to the Timeline for audio playback without having to do any programming. You can name your frames in order to locate a portion of your movie easily or to perform scripting navigation using ActionScript. The scripts you write are often added to the Timeline, and can be consolidated in a dedicated layer for this purpose. It’s also possible to organize layers into folders to keep things tidy.
When organizing your content, you can add or delete layers or folders using the icons in the lower-left corner of the panel, and you can rename a layer by double-clicking its text. Finally, you can hide, lock, or display the contents of layers as outlines by clicking the appropriate column in the layer (eye, lock, and box icons, respectively).
It’s important for you as a director to control many aspects of your movie. Not only must you position your actors in the foreground and your sets in the background (using layers), you must also cue the appearances of your characters. This is accomplished with keyframes—special frames that you add to a layer to break it into segments and control its content.
For example, keyframes appear in frames 1 and 15 of the logo layer, indicated by the circle icons found in these frames. A filled circle indicates there is content in the frame, while an empty circle shows that the frame is empty. After you define keyframes, you can let Flash do all the work of calculating the appearance of the interim frames. This will be discussed at length in Chapter 5 when you read more about animation. The small vertical rectangles in frames 14 and 25 of the logo layer simply mark the end of a frame span.
Now that you’ve seen the high points of the Flash CS4 Professional interface, it’s time to make it your own. If you’ve used Flash before, you may be feeling a little disoriented due to the size and location changes of various panels. The good news is, the interface is highly customizable and it’s very easy to adjust to your liking.
When customizing the interface, a good place to start is viewing the available workspace presets. In the upper-right corner of the main application window, next to the Help search field, you will find a menu of presets (shown in Figure 1-7) that are optimized for a variety of user profiles.
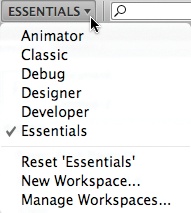
Start by looking at how each preset is configured and determine which is closest to your liking before editing. Users accustomed to prior versions of Flash, for example, may wish to start with the Classic workspace. This configuration places the Tools panel on the right, the Timeline at the top, and a default set of panels to the right of the stage, reproducing application layouts of prior Flash versions.
If you wish to return to the original profile at any time during the customizing process, simply choose the Reset option from the menu of presets. After you customize your interface, you can use this menu to save your layout as a new preset. You can also use the Manage Workspaces option if you need to rename or delete presets.
You can view all panels at full size or in one of two minimized states: icon-and-name view or icon-only view. The default minimized state is icon-and-name view. Figure 1-8 shows all three view options.
Clicking the double-arrow icon in the upper right corner of each panel toggles between the panel’s full-size view and your choice of minimized states. When minimized, you can drag a panel from one or both vertical edges (depending on where the panel is docked) to reduce its appearance to an icon-only view.
In either minimized state, clicking on the icon or name (when present) flies out the full-size panel for use, as shown in Figure 1-9. Based on your choice of preference setting, the panel can automatically minimize when you’re working with any other interface element, or remain open until you choose to close it. See the upcoming section The Preferences Dialog for more information.
Some panels will already be docked to the interface in each workspace preset, and others will open in a free-floating state. Regardless of its original position, any panel can be grouped, ungrouped, and docked (snapped to a set location such as the top, bottom, or sides of a window, rather than free-floating) by simply dragging the panel by its tab to the desired destination.
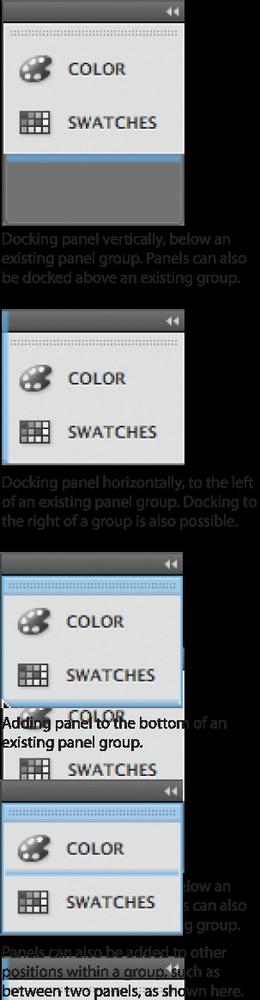
To group panels, drag one panel to another. In Figure 1-10, the standalone Swatches panel is grouped into a panel set with the Color panel. The destination panel group is highlighted with a blue outline that helps show where the panel is being dragged. You can remove a panel from a group by dragging it away from the set by its tab.
To dock a panel, drag it to one of the edges of the destination panel or panel group. Figure 1-11 shows the blue outline feedback that Flash provides when you dock or group panels. The blue line indicates where the panel will end up. As the figure shows, you can dock above, below, to the left, or to the right of a panel or set. You also add a panel to a group, even when the group is minimized.
Choosing to dock a panel on its own or to group it with other panels is purely a matter of preference. Without a very large monitor, the interface would be too cluttered to use if every panel were free-floating. Docking panels helps you wrest control over your work area because you can easily minimize panels without losing track of them.
Grouping panels together can also help you create a single place to find related panels that you will need on a regular basis. For example, it is common to find the Color and Swatches panels grouped, as well as to find the Align, Transform, and Info panels collected into one group.
Note
Remember that most Flash interface elements are panels, so they can be free-floating or docked in just about any configuration of rows and columns. Panels can also be resized by dragging their edges. For example, Flash CS4 Professional is the first version of the application that can organize its Tools panel in a nonvertical layout. The Tools panel is approximately square in the Designer workspace preset, but is a single horizontal row in the Developer workspace preset.
Because of its complexity, Flash has a large number of preference settings—too many to discuss in depth here. Instead, I’ll show you some of the settings relevant to the discussions in this chapter. We’ll examine additional preference settings in later chapters when applicable. To access the Preferences dialog (Figure 1-12), select the Preferences option from the Flash Professional application menu (Mac) or the Edit menu (Windows).
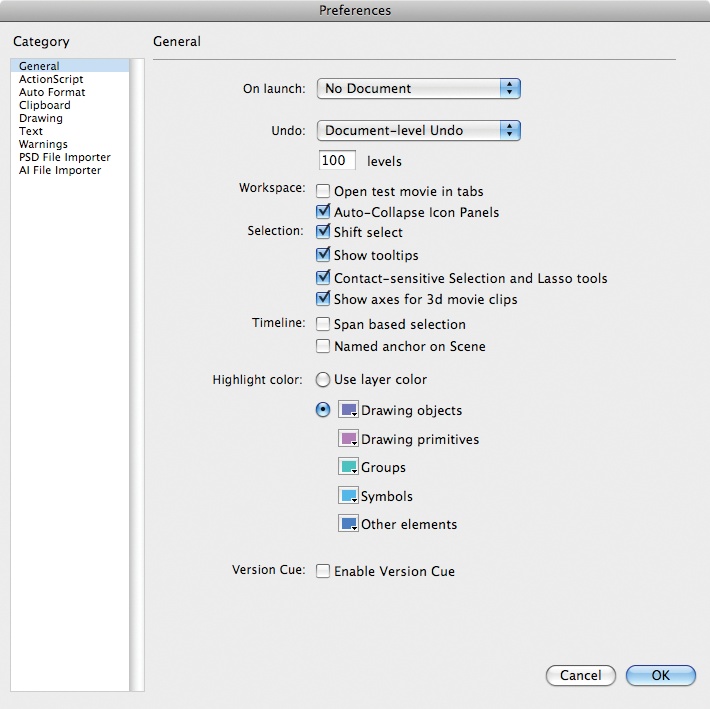
Within the Preferences dialog, preference settings are organized into several pages. In this chapter, we’ll look at the General options:
- On launch
The On launch setting allows you to dictate what occurs when the application is first opened. You may elect to show no document, create a new document, open the most recently edited document, or display the Welcome screen. If you previously elected to dismiss the Welcome screen and wish to restore it, this is the setting for you.
- Undo
Flash offers two systems of storing undo operations. You can specify a Document-level Undo history, in which one history list is maintained for each document, or an Object-level Undo history, in which a list of prior activity is recorded for each major object in the application. Although the latter provides a more granular degree of undo, it will also increase the size of your authoring files substantially (it has no effect on the size of runtime files). You are probably better off staying with the default Document-level Undo option to start, and then determining later if you need to switch to storing object-level histories. In both cases, you can set the number of undo levels maintained in each history list.
- Open test movie in tabs
Once you start working with FLA files, you will need to check your work by compiling test SWF files. For expediency, you will likely want to preview the test files within the Flash interface, and only occasionally test them in a browser. When viewing a SWF in Flash, the Open test movie in tabs option allows you to specify whether the resulting test file opens in a new tab, grouped with all other open document tabs, or in a new window.
The best choice here is a matter of taste, and relies heavily on the behavior of other elements of the Flash interface—specifically, which panels remain visible while a test file has focus and how that behavior differs when the SWF is in a tab or its own window. As such, I recommend that you try the setting both ways and determine which approach you prefer.
- Auto-Collapse Icon Panels
The Auto-Collapse Icon Panels setting determines how active panels behave when activated from a minimized dock. When this option is enabled, the panel minimizes again the moment you interact with any other interface element. When the option is disabled, the panel remains open until you manually close it.
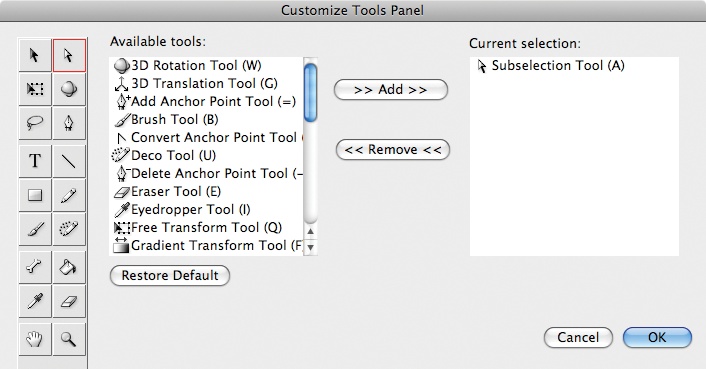
After you have spent some time with the Flash interface, you may find that you are itching to rearrange the tools in the Tools panel. For instance, you may want to make the Subselection tool a child of the Selection tool, or you may want to group tools of like functionality together. You may find that you want to move the Lasso tool immediately below the selection tools, or move the Text tool to the bottom of the drawing and text group. This is easily accomplished using the Customize Tools menu item in the Flash Professional menu (Mac) or Edit menu (Windows).
As shown in Figure 1-13, the current Tools panel layout appears at the left of the dialog. To change this configuration, first select a slot in the Tools panel, and then choose which of the available tools will appear in that slot. The topmost tool will appear in the panel, and all additional tools will appear in a submenu. You can also remove tools from the selected slot. Finally, if you make a terrible mess of things, you can always restore the default configuration using the Restore Default button.
Note
Regardless of the orientation of your Tools panel, the tools still appear in sequence, corresponding to sequential rows in this dialog. For example, compare the order of the tools in the dialog shown in Figure 1-13 with the order of the vertical tool strip shown in Figure 1-2.
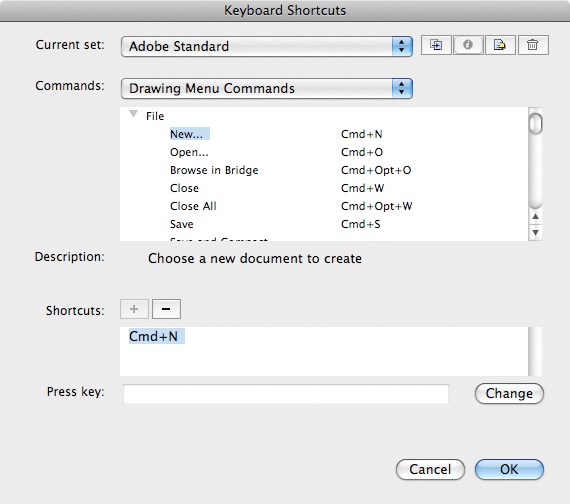
The Keyboard Shortcuts feature (Figure 1-14) in the Flash Professional menu (Mac) or Edit menu (Windows) allows you to configure which keyboard shortcuts trigger which menu items.
The Current Set field includes preset keyboard shortcut configurations modeled after other applications. If you are a frequent user of any of the featured applications, you may wish to mimic one of those keyboard configurations. You can duplicate, rename, export, and delete any of these presets. To prevent permanent loss to shortcut configurations, you must duplicate a present, or create a new preset, before you can modify its settings.
If you wish to change the keyboard shortcut attributed to any menu, you must first select the appropriate menu category. Like many applications, the Flash interface is context-sensitive. Next, expand the menu name and select the desired menu item. Finally, select an existing shortcut to change or remove its value, assign a new shortcut, or even add a shortcut if more than one is helpful. When changing or adding selected values, type the new shortcut in the Press key field and click the Change button.

Throughout this book, you will often use your creativity, experiment with specific features, and try to accomplish isolated tasks. However, Flash is a very big program, and it’s easy to wind up with a lot of basic skills and no way to use them. With this in mind, a book-wide project will wind its way through the chapters. This approach to learning not only allows you to review what you’ve read in a specific chapter, but also ties it all together to create a Flash website or application.
The project chosen for this book is a designer’s portfolio. It will remain simple, helping to focus your attention on the content at hand, but the project goal is to cover as much of the material discussed as possible. In this chapter, you’ll create a template that will simplify the creation of other project assets in later chapters.
Before you can save a template, you must create a new file and configure its document properties. Files that you create from this template will assume these properties, so the settings should match those you want to use in future files.
Create a new ActionScript 3.0 file on the Welcome screen, or by selecting File→New.
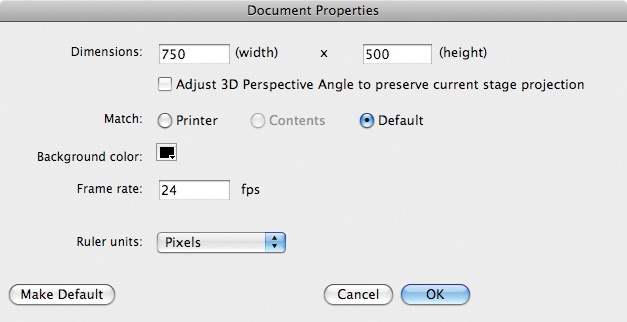
Select Modify→Document to access the Document Properties dialog (Figure 1-15). You can also access this dialog by clicking Edit in the Properties section of the Properties panel, after clicking on the Stage.
Set the width and height of the document to
750and500, respectively.Note
The project dimensions 750×500 were chosen so your project will display easily for the largest number of users. This size will fit in a browser window, without scrolling, on a monitor with a resolution as low as 800×600.
Disable the Adjust 3D Perspective Angle option. You will learn more about this in Chapter 8, but, briefly, disabling this feature ensures that a 3D setting that affects perspective is based on the new document size, not the previous document size.
Change the Background color to black. This setting will set the Stage color of every file created from this template.
Set the Frame rate to
24and set the Ruler units to Pixels.
You will learn more about creating new content in Chapter 2, and importing content in Chapter 3, but a quick venture into these areas now will improve the functionality and demonstrate a feature of your template.
If you haven’t already done so, download the source files for this chapter from the companion website, www.LearningFlashCS4.com.
Select the first frame of the Timeline layer and import the provided content_ui_guide.jpg graphic by selecting File→Import→Import to Stage. Select the bitmap on Stage and, using the Properties panel, set its x and y properties to
0.Double-click the layer name and rename it
guide. Lock the layer by clicking the dot across from the layer name in the column under the padlock.
Next you will create a placeholder asset that you can use to quickly add content to future files. You will learn more about drawing in Flash and creating native Flash asset types in the next few chapters. Just follow along carefully for now and be sure to test your progress through this exercise. When you’re done, compare your results with the provided sample files.
Create a new layer in the timeline and name it
content. You should have two layers: the locked guide and empty content layers. Click the frame in the content layer so you will be ready to create your next asset.Select the Rectangle tool from the Tools panel and draw a rectangle anywhere on the stage. You will adjust this shape in just a moment.
Switch to the Selection tool and drag over the rectangle to select the shape. Use the Fill color chip to select a bright color.
Create a movie clip asset type by selecting Modify→Convert to Symbol. When the Convert to Symbol dialog appears, name the asset
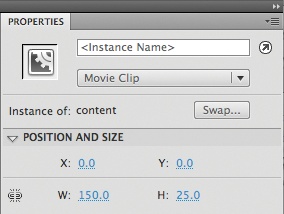
contentand choose Movie Clip from the Type menu. Finally, click the tiny box in the upper-left corner of the nine-box grid next to the Registration option (you will learn much more about these options in the chapters to come). Click OK to finish the process. The rectangle you created in step 2 has been converted to a Flash movie clip symbol.Using the Selection tool, click on the movie clip you just created and look at the Properties panel. If the panel is not open, access it by selecting Window→Properties. The top of the panel will show that you have selected your movie clip. Look in the Position and Size section of the Properties panel and click on the blue links next to the x and y properties. Set both of these to
0, as shown in Figure 1-16. Your movie clip has now been moved to the upper-left corner of the Stage.
If you can easily see your placeholder asset against the guide graphic you imported, consider this part of the exercise finished. If not, you can double-click the placeholder to edit it. After double-clicking, use the Selection tool to drag over the entire rectangle to select all of it, and then drag it with the mouse to a more visible location. You can also experiment with other drawing tools to make the placeholder more visible. The sample file, for example, added text to the movie clip. You’ll learn a simple way to work with text in the next chapter.
Note
Text entry fields that look like web links, such as those pictured in Figure 1-16, are called hot text fields. They work like normal text fields when clicked, but you can also drag your mouse left and right to adjust their values interactively.
This loose approach to the placeholder asset is fine because you will delete this asset later when replacing it with project content.
Now it’s time to test your file. You will do this many, many times throughout the book, so it’s a good idea to start now. Select Control→Test Movie, and Flash will compile your authoring-only FLA file into a final file with the extension .swf, suitable for distribution. Because of the extension, these documents are usually called swiff files.
You should see everything you added to your file, including the guide graphic that you imported and the movie clip that you created. Close the window or tab with your SWF in it, and return to your FLA. If you’re happy with your results, continue with the project. If not, open the template_01.fla file from the companion source files and continue on with that file. This template document is provided for your convenience.
Note
Although not required every time you test, it helps to save your file at least once before testing. By default, SWF files are compiled to the same directory, and given the same name, as your FLA. Knowing where the FLA is saved will help you find the SWF later, if needed. Saving your work also increases the likelihood of recovering from a potential crash.
When creating a template, you will want to design it so that a minimum amount of fuss is required to create usable new files. The placeholder movie clip is useful because it has already been positioned and you can easily edit it to add new content. The guide graphic, however, should not appear in newly published files.
To solve this problem you need to convert the normal layer in which the guide graphic resides into a special layer type called (appropriately enough) a guide layer. Double-click the icon to the left of the guide layer name and, in the Layer Properties dialog, choose the Guide type. Click OK to close the dialog and test your movie again.
You should now see only the placeholder movie clip. The guide layer is visible in authoring mode to help you position assets and guide your design and development, but it is not included in the final published SWF file. Check your work against template_02.fla. Continue with the project if you’re satisfied, or use the provided source file from this point forward.
The last things to add to your file are three empty layers that you’ll make use of later in newly created files.
Select the content layer to make sure the new layers appear at the top of the layer stack.
Click the New layer button in the lower-left corner of the Timeline panel, and create three new layers.
Name the layers, from the top down,
actions,labels, andsounds.Lock the layers to prevent unwanted editing and compare your work against the source file, template_03.fla.
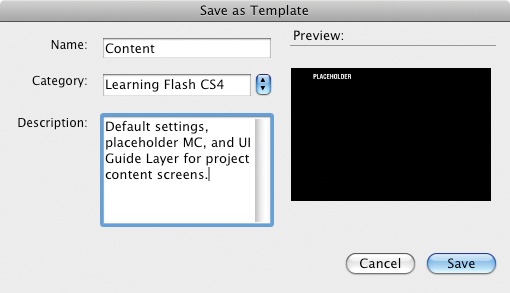
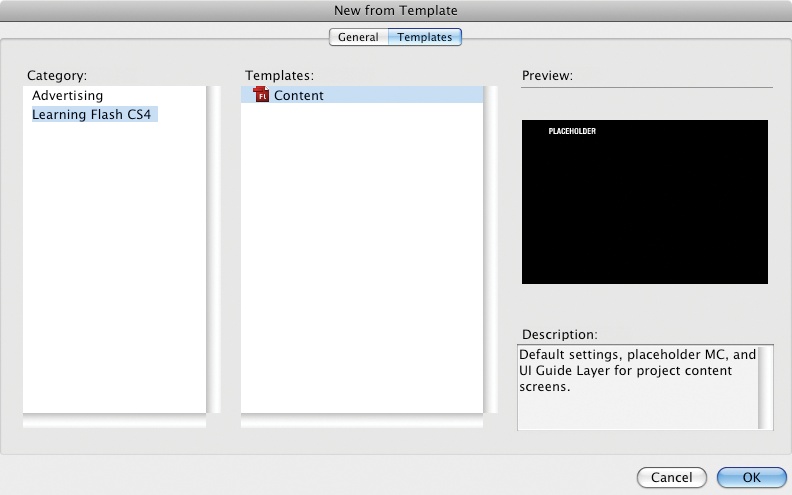
All that remains now is saving your file as a template. Instead of using the standard Save option, use File→Save as Template. The Save as Template dialog will appear, and you can name the file, assign it to a category, and write a simple description. Follow the settings in Figure 1-17, naming the template Content and creating a category called Learning Flash CS4.
From this point forward, you can create a new file from this template, instead of an empty new file, as shown in Figure 1-18. Try this now, and you’ll find that the new file is correctly sized and contains the correct layers, the placeholder movie clip, and the guide layer in place.
If you weren’t entirely successful, don’t worry about it. It’s still early in the development of the project, and the upcoming chapters will explain the steps you took here in much greater detail. If you prefer, open the provided source file template_03.fla and save that as a new template for your ongoing efforts.
Get Learning Flash CS4 Professional now with the O’Reilly learning platform.
O’Reilly members experience books, live events, courses curated by job role, and more from O’Reilly and nearly 200 top publishers.

