In designing Mac OS X, one of Apple’s key goals was to address the window-proliferation problem. As you create more files, stash them in more folders, and launch more programs, it’s easy to wind up paralyzed before a screen awash with cluttered, overlapping rectangles. Mac OS X offers some clever new tools for retaining control.
The title bar has several functions. First, when several windows are open, the darkened window name and light pinstripes tell you which window is active (in front); windows in the background appear dimmed, with translucent, slightly darker-striped title bars. Second, the pinstripes act as a handle that let you move the entire window around on the screen. That’s a critical tool in Mac OS X, because you can no longer drag the other three edges of a window to move it.
Note
Here’s a nifty keyboard shortcut that debuted in Mac OS X 10.2: For the first time in Mac history, you can cycle through the different open windows in one program without using the mouse. Just press
-~ (that is, the tilde key, to the left of the number 1 key). With each press, you bring a different window forward within the current program. It works both in the Finder and in your everyday programs.
(On the other hand, the
-~ keystroke no longer summons the Go To Folder dialog box. The new keystroke for that is Shift-
-G.)
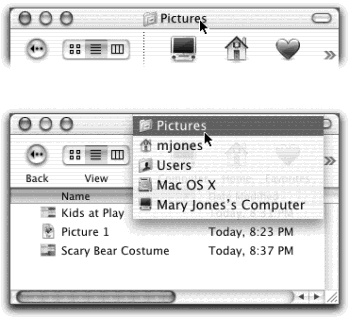
After you’ve opened one folder that’s inside another, the title bar’s secret folder hierarchy menu is an efficient way to backtrack—to return to the enclosing window. Figure 1-3 reveals everything about the process after this key move: press the
key as you click the name of the window. (You can release the
key immediately after clicking.)
By choosing the name of a folder from this menu, you open the corresponding window. When browsing the contents of the Users folder, for example, you can return to the main hard drive window by
-clicking the folder name Users and choosing Macintosh HD from the menu.
Note
Keyboard lovers, take note. Instead of using this title bar menu, you can also jump to the enclosing window by pressing
-up arrow. Add the Option key if you want to switch into “Old Finder Mode” in the process (see Section 1.2.7).
Pressing
-down arrow takes you back into the folder you started in, assuming that it’s still highlighted. (This makes more sense when you try it than when you read it.)
Once you’ve mastered simple dragging, you’re ready for these three terrific title bar tips:
Pressing the
key lets you drag the title bar area of an inactive window—one that’s partly covered by a window in front—without bringing it to the front.
As a matter of fact, depending on the program you’re clicking into, you can operate any control in a background window without bringing it to the front—its resize box, buttons, pop-up menus, and even scroll bars. In fact, you can even drag through text without bringing a window forward. In every case, just keeping
pressed as you click or drag is the secret.
Note
Only Cocoa programs, as described in Section 4.6, offer the full range of
-clickable controls. In general, programs that have simply been Carbonized respond only to
-clicking title-bar elements.
By the way, you can always close (or minimize or zoom) a background window without the help of the
key. Just click its title bar buttons normally. Mac OS X does its thing without taking you out of your current window or program.
One more title bar trick: By double-clicking the stripes, you minimize the window, making it collapse into the Dock exactly as though you had clicked the minimize button (Section 1.2.3).
The Option key means “apply this action to all windows.” For example, Option-double-clicking any title bar minimizes all desktop windows, sending them flying to the Dock.
As the tip of your cursor crosses the three buttons at the upper-left corner of a window, tiny symbols appear inside them: x, -, and +. Ignore the gossip that these symbols were added to help colorblind people who can’t distinguish the colors red, yellow, and green; colorblind people are perfectly capable of distinguishing the buttons by their positions, just as they do with traffic lights.
Instead, these cues appear to distinguish the buttons when all three are identical gray, as they are when you use Graphite mode (Section 8.11). They also signal you when it’s time to click. For example, as described in the previous section, you can use these three buttons even when the window is not frontmost. You know the buttons are ripe for the clicking when you see the little symbols appear under your cursor.
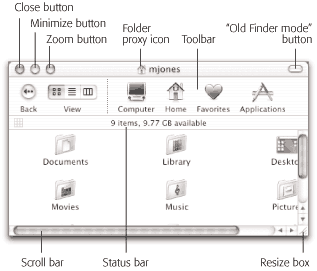
Figure 1-4. When Steve Jobs unveiled Mac OS X at a Macworld Expo in 1999, he said that his goal was to oversee the creation of an interface so attractive, “you just want to lick it.” Desktop windows, with their juicy, fruit-flavored controls, are a good starting point.
The most important window gadget is the close button, the red, droplet-like button in the upper-left corner (see Figure 1-4). Clicking it closes the window, which collapses back into the icon from which it came.
Note
If, while working on a document, you see a tiny dot in the center of the close button, Mac OS X is trying to tell you that you haven’t yet saved your work. The dot goes away when you save the document.
The universal keyboard equivalent of the close button is
-W (for window)—a keystroke well worth memorizing. If you get into the habit of dismissing windows with that deft flex of your left hand, you’ll find it far easier to close several windows in a row, because you don’t have to aim for successive close buttons.
In many programs, something special happens if you’re pressing the Option key when using the close button or its
-W equivalent: You close all open windows. This trick is especially useful in the Finder, where a quest for a particular document may have left your screen plastered with open windows for which you have no further use. Option-clicking the close button of any one window (or pressing
-Option-W) closes all of them.
On the other hand, the Option-key trick doesn’t close all windows in every program—only those in the current program. Option-
losing an AppleWorks document closes all AppleWorks windows, but your Finder windows remain open. Moreover, Option-
losing works only in enlightened applications, such as AppleWorks, Quicken, and the Finder. (In this department, Microsoft is not yet enlightened.)
Click this yellow drop of gel to minimize any Mac window, sending it shrinking, with a genie-like animated effect, into the right end of the Dock, where it then appears as an icon. The window isn’t gone; it hasn’t actually closed. It’s just out of your way for the moment, as though you’ve set it down on a shelf. To bring it back, click the newly created Dock icon (see Figure 1-5, and see Chapter 3 for more about the Dock).
Minimizing a window in this way is a great window management tool. In the Finder, minimizing a window lets you see whatever icons were hiding behind it. In a word processor, this technique lets you type up a memo that requires frequent consultation of a spreadsheet behind it.
Note
If you enjoy the ability to roll up your windows in this way, remember that you actually have a bigger target than the tiny minimize button. The entire striped title bar becomes a giant minimize button when you double-click anywhere on it.
Better yet, you can also minimize a window from the keyboard by pressing
-M. That’s a keystroke worth memorizing on Day One.
Adjusting the Genie Speed
Apple has a name for the animation you see when you minimize, open, or close a window: the genie effect, because it so closely resembles the way Barbara Eden, Robin Williams, and other TV and movie genies entered and exited their magic lamps and bottles.
But you don’t have to watch the “genie” animation precisely the same way, day in and day out. You can slow it down or speed it up like this:
Slow it down. Whenever Steve Jobs does a Mac OS X demo, one of his favorite bits is slowing down the animation so that we can see it in all its graceful, slow motion. How does he do that?
If you Shift-click a window’s minimize button, it collapses into the Dock at about one-fifth its usual speed—an effect sure to produce gasps from the onlookers. (Alas, the Control and Control-Shift variations of Mac OS X 10.1 and earlier are no longer in 10.2.) The Shift key also slows down the un-minimizing animation, the one you see when you click a window icon in the dock to restore it to full size.
If you add Shift to the keystroke that opens a disk or folder (
-O), meanwhile, you get a related effect: a very cool, very useless slo-mo window-opening effect. It follows, of course, that if you Shift-click a window’s Close button, the window closes painfully slowly. Cool!
Speed it up. There’s no keystroke for making the animation go faster. You can, however, substitute a faster style of minimizing animation.
To do so, choose
→Dock→Dock Preferences. From the “Minimize using” pop-up menu, choose Scale Effect, and then close the window. Now, instead of collapsing through an invisible funnel, minimized windows simply shrink as they fly down to the dock, remaining rectangular, requiring less computing by Mac OS X and therefore taking less than a second to disappear.
The minimize button harbors only one hidden feature, but it’s very entertaining. If you Option-click it, all windows in the current program shrink away simultaneously—great when you’ve got several Web browser windows open, for example, or an abundance of word processor documents. (Unfortunately, there’s no one-click method for un-minimizing all of the windows in that program. You have to click them one at a time on the Dock.)
Figure 1-5. Clicking the minimize button sends a window scurrying down to the Dock, collapsing in on itself as though being forced through a tiny, invisible funnel. If you collapse a document window in this way (as opposed to a desktop window), a tiny icon appears on the corner of its minimized image to identify the program it’s running in.
Note
Mac OS X’s high-horsepower graphics engine can even change menu commands as you press modifier keys. For example, open a couple of Finder windows and then click the Window menu. Focus your eyes on the Minimize Window command. Now press Option and watch both the wording and the listed keyboard equivalent change instantly to Minimize All Windows (Option-
-M).
A click on this green geltab (see Figure 1-4) makes a desktop window just large enough to show you all of the icons inside it. If your monitor isn’t big enough to show all the icons in a window, the zoom box resizes the window to show as many as possible. In either case, a second click on the zoom button restores the window to its original size. (The Window→Zoom Window command does the same thing.)
Each Finder-window title bar features a small icon next to the window’s name (Figure 1-6), representing the open window’s actual folder or disk icon. By dragging this tiny icon, you can move or copy the folder to a different folder or disk, to the Trash, or into the Dock without having to first close the window. (If this feature strikes you as unimpressive, you probably never witnessed a hapless Mac novice making repeated attempts to drag an open window into the Trash in, say, System 7.5.)
Note
When clicking the folder proxy icon, hold down the mouse button for a half second, or until the icon darkens. Only then are you allowed to drag it.
When dragging this proxy icon to a different place on the same disk, the usual folder-dragging rules apply: Hold down the Option key if you want to copy the original disk or folder. Without the Option key, you move the original folder. (You’ll find details on moving and copying icons in the next chapter.)
Chapter 3 describes this fascinating desktop-window element in great detail.
In the old days, double-clicking any folder opened it into a new window. Double-click three folders, you get three windows. But Mac OS X doesn’t work that way. As shown in Figure 1-7, double-clicking a folder makes the original window disappear.
Note
If you Option-double-click a folder, you don’t simply replace the contents of a fixed window that remains on the screen; you actually switch windows, as evidenced by their changing sizes and shapes.
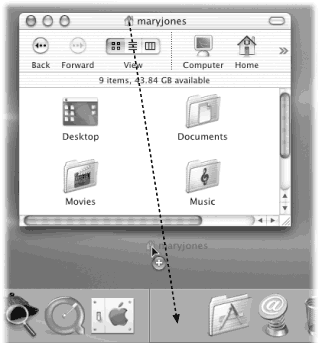
Figure 1-6. When you find yourself confronting a Finder window that contains useful stuff, consider dragging its proxy icon to the Dock. You wind up installing its folder or disk icon there for future use. That’s not the same as minimizing the window, which puts the window icon into the Dock, and only temporarily. Most Mac OS X document windows also offer a proxy-icon feature, but produce only an alias when you drag it to a different folder or disk.
So what if you’ve now opened inner folder B, and you want to backtrack to outer folder A? In that case, just click the tiny left-arrow button labeled Back, shown in Figure 1-7, or use one of these alternatives:
None of that will help you, however, if you want to copy a file from one folder into another, or to compare the contents of two windows. In that case, you’ll probably want to see both windows open at the same time.
In such situations, you can open a second window using any of these techniques:
Choose File→New Finder Window (
-N).
Note
The window that appears when you do this is the Computer window, which usually isn’t where you find the folders you want to work with. Changing this setting should be one of your first bits of business in Mac OS X.
To do so, choose Finder→Preferences and click the Home button instead. Now every new Finder window shows you your Home folder (Section 2.1), which contains all of your files—a much more useful arrangement.
-double-click a disk or folder icon.
Double-click a folder or disk icon on your desktop.
Choose Finder→Preferences and turn on “Always open folders in a new window.” Now when double-clicked, all folders open into new windows. (This is the option for veteran Mac fans who don’t care for the new behavior.)
Switch to Old Finder Mode, described next.
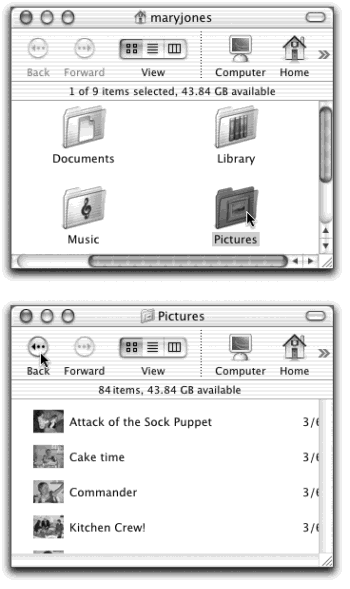
Figure 1-7. In an effort to help you avoid window clutter, Apple has designed Mac OS X windows so that double-clicking a folder in a window (top) doesn’t actually open another window (bottom). Every time you double-click a folder in an open window, its contents replace whatever was previously in the window. If you double-click three folders in succession, you still wind up with just one open window.
“Old Finder Mode,” of course, isn’t the technical Apple term, but it should be. Here’s how it works.
The upper-right corner of every Finder window contains a little button that looks like a half-inch squirt of Crest toothpaste. When you click it, you enter Old Finder Mode. (You can also enter Old Finder Mode by pressing
-B, the equivalent for the View→Hide Toolbar command.)
In this mode, the two biggest behavioral differences between Mac OS X and its predecessor disappear, to the relief of many Mac old-timers. First, the Finder-window toolbar, shown in Figure 1-4, slides out of sight.
The second big change in Old Finder Mode is that double-clicking a folder now works like it used to. Every time you double-click a folder, you open a new corresponding window.
When you’ve had enough of Old Finder Mode, you can return to regular Mac OS X mode by clicking the Toolbar Disclosure button again, by pressing
-B again, or by choosing View→Show Toolbar.
Scroll bars appear automatically in any window that isn’t big enough to show all of its contents. Without scroll bars in word processors, for example, you’d never be able to write a letter that’s taller than your screen. You can manipulate a scroll bar in three ways, as shown in Figure 1-8.
Multiple Views, Same Folder
If you’ve read this section carefully, you may have discovered a peculiar quirk of the Mac OS X Finder: By choosing File→New Finder Window (or
-double-clicking a disk or folder icon), you open a second, completely independent Finder window. If you stop to think about it, therefore, there’s nothing to stop you from opening a second, third, or fourth copy of the same folder window. Once they’re open, you can even switch them into different views.
Try this, for example: Choose Go→Applications. Choose File→New Finder Window (
-N), and then choose Go→Applications again. Using the View menu or the controls in the toolbar, put one of these windows into list view, and the other into icon view.
This phenomenon has its advantages. For example, you might decide to open the same window twice while doing some hard-drive housekeeping. By keeping a list view open, you can check the Size column as you move your files into different folders (so you can make sure the folders fit onto a blank CD, for example)—but by keeping a column view open, you gain quicker navigational access to the stuff on your drive.
Mac OS X introduces a new scroll bar option called “Scroll to here.” Ordinarily, when you click into scroll bar track above or below the gelatinous handle, the window scrolls by one screenful. But your other option is to turn on “Scroll to here” mode in the General panel of your System Preferences (see Section 8.11). Now when you click into scroll bar track, the Mac considers the entire scroll bar a proportional map of the document, and scrolls precisely to the spot you clicked. That is, if you click at the very bottom of the scroll bar track, you see the very last page.
Note
No matter which scrolling option you choose in the General panel, you can always override your decision on a case-by-case basis by Option-clicking in the scroll bar track. In other words, if you’ve selected the “Scroll to here” option, you can produce a “jump to next page” scroll by Option-clicking in the scroll bar track.
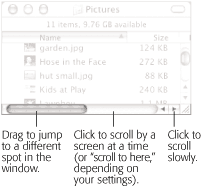
Figure 1-8. Three ways to control a scroll. The scroll bar arrows (right side) appear nestled together when you first install Mac OS X, as shown here. If you, an old-time Windows or Mac OS 9 fan, prefer these arrows to appear on opposite ends of the scroll bar, visit the General panel of System Preferences, described in Section 8.11.
It’s worth noting, however, that the true speed expert eschews scroll bars altogether. Your Page Up and Page Down keys let you scroll up and down, one screen at a time, without having to take your hands off the keyboard to grab the mouse. The Home and End keys, meanwhile, are generally useful for jumping directly to the top or bottom of your document (or Finder window). And if you bought a non-Apple mouse that has a scroll wheel on the top, you can use it to scroll windows, too, without pressing any keys at all.
Figure 1-9. Position your mouse inside a Finder window (list views
not included) or even an Internet Explorer window. While pressing ![]() and Option,
you can drag—and scroll—in any direction. As you drag, the cursor
changes shape, becoming a white-gloved butler’s hand. Where can you
get that kind of service these days?
and Option,
you can drag—and scroll—in any direction. As you drag, the cursor
changes shape, becoming a white-gloved butler’s hand. Where can you
get that kind of service these days?
At first glance, you might assume that scroll bars are an extremely inefficient mechanism when you want to scroll a window diagonally—and you’d be right. Fortunately, Mac OS X includes an alternate scrolling system for such situations. Position your mouse inside a Finder window; while pressing
and Option, you can drag—and scroll—in any direction, as shown in Figure 1-9.
The lower-right corner of every standard Mac OS X window is ribbed, a design that’s meant to imply that you can grip it by dragging. Doing so lets you resize and reshape the window (see Figure 1-4).
In the days of Mac OS 9, an information strip appeared in every Finder window, just beneath the title bar. It told you how many icons were in the window (“14 items,” for example) and the amount of free space remaining on the disk.
When you first run Mac OS X, this information strip is missing. If you long for it, choose View→Show Status Bar. This strip now appears in every Finder window (see Figure 1-4)—at least until you hide it again by choosing View→Hide Status Bar.
Get Mac OS X: The Missing Manual, Second Edition now with the O’Reilly learning platform.
O’Reilly members experience books, live events, courses curated by job role, and more from O’Reilly and nearly 200 top publishers.

