Mac OS X’s built-in speech recognition software lets you execute various system and application commands by speaking them (assuming you have a microphone attached to or built into your Macintosh). The system includes many commands. Application developers can also define spoken commands that work within their own programs, and users can expand the machine’s speakable repertoire by writing and installing scripts.
The speech recognition system is primarily useful for defining voice-activated macros and shortcuts. It doesn’t let you use your microphone as a complete alternative to the keyboard and mouse. The system can’t, for example, take dictation into a word processor. For that level of functionality, you need a third-party application, such as IBM’s ViaVoice (http://www.ibm.com/software/speech/mac/osx/).
You can configure and activate the speech recognition through the three tabbed panes of the Speech preferences panel, shown in Figure 4-60.
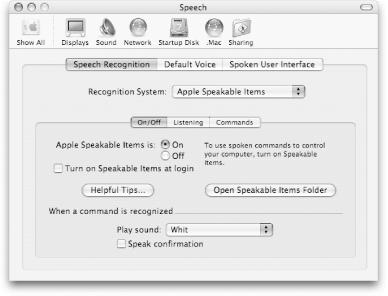
To turn speech recognition on, set the “Apple Speakable Items is” radio button to On. This causes the speech systems’ round “listener” window (Figure 4-61) to appear. Note that the listener floats over all your active windows, but you can drag it anywhere you like. It remains visible until you switch the Apple Speakable Items button back to Off.

The system doesn’t try listening for commands until
you put it into listening mode via the Speech
panels’ Speech Recognition→Listening tab. By default,
the listening key is set to Esc (the Escape key). Until you press the
Esc key, the microphone is grayed out; however, when the Esc key is
pressed, the listener looks similar to Figure 4-61,
complete with a sound input indicator (the blue-, green-, and
red-colored bars) and indicator arrows showing that sound is being
received by the microphone. If you don’t want to
have the Esc key as the default key for listening, click on the
Change Key button and enter a new key or key combination (e.g.,
![]() -Esc).
-Esc).
Warning
If you use the Terminal and Speech Recognition together, you should change your listening key to something other than Esc because that key has a special meaning and functionality when running programs from the command line.
There are two Listening Methods:
- Listen only while key is pressed
This setting is an on-demand mode, which listens only when the Esc key is pressed.
- Key toggles listening on and off
Under this setting, pressing and releasing the listening key (Esc) toggles listening mode on or off. Because this means the computer’s microphone will actively receive and analyze sounds over longer stretches of time, you must set two more controls to help it discriminate spoken commands from background noise (or other things you might say while sitting at your computer).
If you have selected the “Key toggles listening on and off” radio button, there are some additional settings you should look at, including:
- Name
By default, this is set to the Star Trek-esque Computer, which means you must first say “Computer, ...” before issuing a spoken command. You can change the Name; however, you should choose a name that’s easy to say and unlikely to appear in any conversation your Mac might overhear.
- Name is
This pop-up menu defines how the computer differentiates spoken commands from other sounds. Here are the options in this menu:
- Optional before commands
When this setting is selected, the machine doesn’t listen for its Name and tries to interpret everything it hears as a potential command. For example, in order to check your mail and then switch to iTunes, you only need to say, “Get my mail. Switch to iTunes.”
Warning
This setting is actually rather dangerous because if you are in listening mode, anything you say that the computer hears can be interpreted as a command.
- Required before each command (the default)
This setting has the speech system listen for the name defined in the Name field before interpreting every command. For example, to hear a knock-knock joke, you could say “Computer, tell me a joke.” (If you try this, remember that you need to say “Computer, ...” before each step of the joke. For example, “Computer, who’s there?” and “Computer, Thea who?”)
- Required 15 seconds after last command, Required 30 seconds after last command
These settings also require that you speak the Name that you chose in the Name text field. Once you have said it, however, the machine will continue to interpret sounds as possible commands until either 15 or 30 seconds have elapsed without recognizing a command. Thus, you can launch multiple commands like this: “Computer, get my mail. Switch to iTunes.”
The last two items at the bottom of the Listening pane allow you to specify which microphone to use (Line In or Internal microphone) and to set the volume for the microphone’s input. Pressing the Volume button pops open a window that lets you test and adjust the volume level by having you say some sample commands.
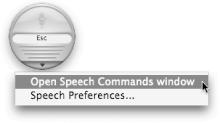
To see which commands are available to you at any time, click on the triangle at the bottom of the listener window, as shown in Figure 4-62.
The Speech Commands window, shown in Figure 4-63, has two parts:
The top section shows a log of the speech commands issued.
A Commands section (at the bottom of the window), which shows a list of available commands, collapsed into categories with disclosure triangles to reveal the speakable commands.
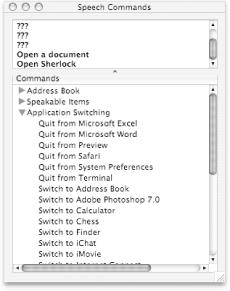
By default, there are two categories in the Commands section:
- Speakable Items
This is a catch-all category for commands you can invoke throughout the system.
- Application Switching
This lists the special commands for switching (and launching) between applications, based on the application icons in the Dock.
Applications such as the Finder, Mail, and Safari define their own speakable items when they are the active (i.e., front-most) application. When that application is active, its list of speakable items shows up in the Commands section.
If you click on the Open Speakable Items Folder button located on the
Speech→Speech Recognition→On/Off pane, a Finder window pops open,
listing the speakable items on your system. The speakable items
available exist as files in ~/Library/Speech/Speakable
Items. Files residing within that folder directly
represent systemwide items. Those inside the Application Speakable
Items folder are specific to various applications on your system.
Each speakable item can either be a property
list (.plist) file, an AppleScript, or some
other type of Finder object. Property lists simply execute the
commands predefined by the system or speech-friendly application.
AppleScripts are executed by the system.
In other words, users can make their own voice-activated commands by
writing (or finding on the Internet) an AppleScript that performs a
particular task or series of tasks, giving that script a
pronounceable name. The AppleScript can then be placed into the
~/Library/Speech/Speakable Items directory.
Finally, any other Finder object—arbitrary files, folders, disks, or aliases to one of these—acts as if it was double-clicked in the Finder when its name is spoken.
Get Mac OS X Panther in a Nutshell, 2nd Edition now with the O’Reilly learning platform.
O’Reilly members experience books, live events, courses curated by job role, and more from O’Reilly and nearly 200 top publishers.

