You can alter the appearance and location
of the text within the Button. The simplest way is to use the
-font option to change the font. Chapter 3 covers fonts in detail so we’ll just
look at a few simple ways to change the font:
-font => "{Times New Roman} 12 {normal}"There can be only a single font for each Button, so the text string
cannot change font in the middle of a word. However, each Button (or
widget) in an application can have a different font. Here is an
example of two Buttons in a window, one with the default font and the
other with "lucidasans-14" (a Unix font) as its
font:
$mw->Button(-text => "Exit",
            -command => sub { exit })->pack(-side => 'left',
                                      -fill => 'both', -expand => 1);
$mw->Button(-text => "Exit",
            -font => "lucidasans-14",
            -command => sub { exit })->pack(-side => 'left',
                                      -fill => 'both', -expand => 1);
Figure 4-16 shows the resulting window.
You can also
move the text around within the Button. As in a word-processing
document, you can change where the text will justify. The option that
controls this is -justify:
-justify => 'left' | 'right' | 'center'
The default
for -justify is 'center'.
Normally the text displayed in a Button is a quick one- or two-word
statement; for example, Exit, Done, Yes, No, or Cancel. The
justification of the text isn’t too obvious unless multiple
lines of text are used. By default, the Button will display multiple
lines only if a \n is included in the string. If
you want the program to wrap the text automatically, use the
-wraplength option:
-wraplength => amountThe amount indicates the maximum length of
the line as a valid screen distance. If the length of the text string
in the Button exceeds this amount, the text will wrap around to the
next line. The default for -wraplength is 0.
Here is an example that uses both the -justify and
-wraplength options:
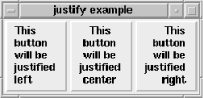
foreach (qw(left center right)) {
  $b =  $mw->Button(-text =>"This button will be justified $_",
                    -command => sub { exit },
                    -wraplength => 53,
                    -justify => $_)->pack(-side => 'left',
                                          -fill => 'both',
                                          -expand => 1);
  }
Figure 4-17 shows the results of the three Buttons. Although this example doesn’t show it, it is possible for text to be wrapped in the middle of a word.
The final
possible adjustment to the text (or bitmap) is its position within
the Button. This is controlled by the -anchor
option, which is similar to the -anchor option
used with the geometry managers:
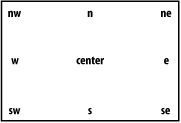
-anchor => 'n' | 'ne' | 'e' | 'se' | 's' | 'sw' | 'w' | 'nw' | 'center'Like the window, the Button has compass points that define locations within the Button. Figure 4-18 shows where these points are.
The default position for the text is 'center'.
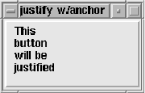
When the position is changed, it is not obvious that this option is
in effect unless the Button is resized larger. In Figure 4-19, the Button is the same one created in the
-justify example (Figure 4-17),
except -anchor =>
'nw' has been added to the option list.
As mentioned earlier, this option is similar to the
pack command’s -anchor
option, except this option changes the position of the text in the
Button, whereas the pack
-anchor option changes the position of the widget
in the window.
Get Mastering Perl/Tk now with the O’Reilly learning platform.
O’Reilly members experience books, live events, courses curated by job role, and more from O’Reilly and nearly 200 top publishers.

