11.2. Inserting Web Parts and Web Part Zones
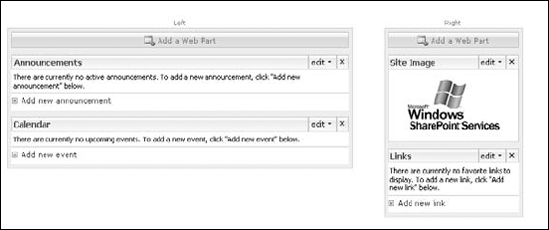
You insert Web parts on Web pages by using the Add Web Part Web dialog box, which is available in the Edit mode of a SharePoint Web page. To open a Web page in Edit mode, choose Site Actions ![]() Edit Page in the SharePoint Web page. By default, SharePoint Web pages contain Web part zones that allow management of Web parts by using the SharePoint user interface. Each Web part zone has the Add Web Part bar at the top, which allows users to access the Add Web Part dialog box for adding Web parts to the zone. Figure 11.6 shows two Web part zones — Left and Right — that have two Web parts each. The Left zone has the Announcements and Calendar Web parts, and the Right zone has the Image and Links Web parts.
Edit Page in the SharePoint Web page. By default, SharePoint Web pages contain Web part zones that allow management of Web parts by using the SharePoint user interface. Each Web part zone has the Add Web Part bar at the top, which allows users to access the Add Web Part dialog box for adding Web parts to the zone. Figure 11.6 shows two Web part zones — Left and Right — that have two Web parts each. The Left zone has the Announcements and Calendar Web parts, and the Right zone has the Image and Links Web parts.
Figure 11.6. Examples of Web part zones on a SharePoint Web page
To add a Web part to a zone, simply click the Add Web Part bar to open the Add Web Part dialog box, which shows the list of available Web parts. Simply select the Web parts that you want to insert in a zone and then click Add. The selected Web parts are added to the applicable zone.
Notice the Advanced Web Part gallery and options link at the bottom on the Add Web Part dialog box. As shown in Figure 11.7, clicking on this link opens the Add Web Parts pane on the right side of ...
Get Microsoft® Office SharePoint® Designer 2007 Bible now with the O’Reilly learning platform.
O’Reilly members experience books, live events, courses curated by job role, and more from O’Reilly and nearly 200 top publishers.

