When you organize a simple activity like seeing a movie with friends, you probably don’t bother writing out the steps. You just call your friends, pick a movie, get tickets, and buy popcorn without a formal plan. But for more complex projects—like doing your taxes or launching a new product line—identifying the work involved is key to planning how and when to get it done. For example, missing the April 15 tax deadline can cost you hundreds of dollars in penalties. And that new product may make a profit only if you keep costs below $100,000 and get it on store shelves before Thanksgiving. In cases like these, cost, delivery dates, and other objectives are important.
That’s where a WBS (work breakdown structure) comes in. Carving up the project’s work into a hierarchy of progressively smaller chunks until you get to bite-sized pieces is the first step toward figuring out how and when everything will get done. If you’re new to managing projects, don’t panic—you’ve built a WBS before. The movie example in the previous paragraph is actually a simple WBS.
The structure of a WBS is much like the system of blood vessels in your body, with the aorta representing the entire project and the smaller blood vessels as progressively smaller chunks of the overall work at each level (summary tasks). The hordes of tiny capillaries that deliver blood to every part of your body correspond to the individual tasks (called work packages) at the bottom of the WBS, which are the smallest chunks of work that you assign to people to complete the project.
In this chapter, you’ll learn how to create a WBS that successfully communicates the work within a project. Equally important, you’ll learn how to tell when the WBS is broken down enough. The rest of the chapter helps you get your WBS into Microsoft Project so you can move on to constructing a project schedule as described in Chapter 6.
The fastest way to create a WBS is to construct it directly in Project, and this chapter shows you several ways to do just that. If you’re working alone, you can empty your brain into Project, or you can just as easily transcribe the results of collaborative WBS sessions. If you love working in Microsoft Word, or if teams submit individual Word documents for their portions of the project, you can also build a WBS in Word and transfer the results into Project. (When you copy an indented list of tasks from Word or Outlook, Project 2010 automatically transforms them into a hierarchy of summary tasks and subtasks.) Finally, you’ll learn how to create documents that describe and support your project’s work packages.
Knowing the high-level tasks that make up your project is important, but big chunks like Build Bridge, Hire New Staff, and Plan Grand Opening Party don’t help when you’re trying to estimate costs, line up resources, schedule work, or track progress. You need to get much more specific about the work all this is going to take. The point of a WBS is to break down the work into small enough pieces that you can:
Improve estimates. Smaller tasks are not only less intimidating, they make it much easier to figure out how many people you need to perform each portion of work, how long it’ll take, and how much it’ll cost.
Keep the team focused. Because the WBS spells out exactly what’s needed to achieve the project’s objectives, it acts as a checklist for the work on the project team’s plate. It also gently guides team members away from doing things outside the project’s scope.
Assign work to resources. When work is broken down into discrete tasks, it’s easier to identify the skills needed to complete the assignment. The project manager can clearly determine who’s responsible for what. Also, team members are more likely to understand their individual assignments, which makes them happy and helps keep the project on track.
On the other hand, don’t go overboard by dissecting work into miniscule assignments. Productivity drops when team members keep switching to new assignments, and your temptation to micromanage increases. (You’ll learn how to determine the appropriate size for a work package in the next section.)
Keep the project on track. Shorter tasks give you frequent checkpoints for tracking costs, effort, and completion dates. Moreover, if tasks have strayed off course, you can take corrective action before things get out of hand.
Note
In the PMI project management methodology, introduced briefly in Chapter 1, a WBS is the result of the scope definition process. The starting point is a scope statement (Defining Project Boundaries) in which you define what’s within the scope of the project and, just as important, what isn’t. For example, knowing whether the cleaning service you hire takes on teenagers’ rooms could be essential to success. For many projects, especially those performed for government agencies, the WBS is a contractually binding document, making the correct inclusion and exclusion of work essential.
Like Goldilocks, you have to find the right size for the work packages—not too big, not too small, but just right. Large work packages can be so vague that team members aren’t sure what they’re supposed to do. Moreover, your team could reassure you for weeks that a large chunk of work is running smoothly, only to beg for a schedule-busting extension just when you thought they’d be done. Too-small work packages, on the other hand, carry all the disadvantages of micromanagement: excessive communication, unending status reporting, lost productivity, and so on. So how do you build a WBS with work packages that are just right?
Each project is unique, so don’t expect the same approach to work for every project you manage. Identifying work can run the gamut from invigoratingly informal to scrupulously methodical, depending on whether you’re planning a small project for a close-knit group or wrestling with a multi-year, multi-vendor project. (Whatever the project, a sure-fire shortcut is to borrow from existing sources, as described in the box on Borrowing a WBS.)
A WBS has only two types of elements: summary tasks and work packages. As you learned in Chapter 3, the lowest level tasks in a WBS are work package tasks—hunks of actual work that you assign to team members. Anything else in a WBS is simply some level of summary of that work, which can nest to as many levels as you need, as shown in Figure 4-1. As it turns out, you can build a WBS from whichever direction you prefer—top down, bottom up, or side to side—as described in the following sections.
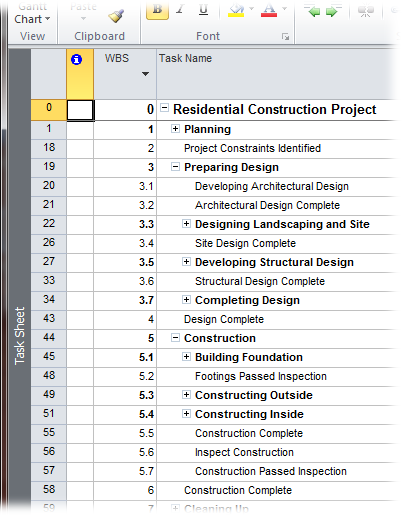
Figure 4-1. The organization of a WBS can vary, but the work packages remain the same. For example, you might track a project by phases (planning, design, and construction) or by completed components (from condo unit to floor to building). As you build a WBS, you can change summary tasks and move work packages around.
As the name "work breakdown structure” implies, the most common way to build a WBS is to start with the entire project and break it down until you reach assignable work packages at the bottom. (The box on Displaying a WBS in a Hierarchy describes how to show a top-down view of a WBS.) The most common way to decompose (that is, break down) a project is by the deliverables that you want the project to produce and the milestones you want it to attain. (See Identifying Project Results for detailed definitions of deliverables and milestones.)
A project scope statement (Defining Project Boundaries) usually lists a set of deliverables that the project’s customer and other stakeholders expect to receive. One of the best ways to identify project work is to create high-level tasks for every deliverable. For example, if you’re planning the party of the century, you’d create summary tasks for food, drinks, music, and the video you need to blackmail your friends after the fact.
Once you have these top-level tasks, you take another pass at decomposition by identifying intermediate deliverables and critical milestones, like completing the celebratory rum cake or finalizing the reservations for all the party vendors. For each intermediate deliverable and milestone, ask yourself what work it entails. For instance, the music requires an audio system as well as a song list, so you add one task for renting the audio equipment and another for building a playlist of songs on your computer. Then, you simply repeat this process for each deliverable until you have work packages that you can assign to your spouse, your kids, the caterer, and other folks you hire. (See the box on Good Task Names for advice on naming tasks effectively.)
Once you complete your WBS, take some time to verify it. Make sure all the items in the scope statement have corresponding work in the WBS, and look out for work packages that don’t support the scope. Add missing summary tasks and work packages. If you think of a deliverable that isn’t in the scope statement, add the work to the WBS and revise the scope statement. Keep in mind, though, that if you’re doing projects for customers, you probably need their approval to change the scope statement.
Another way to slice and dice a project is to identify what you have to do from the beginning of the project until the end. This approach isn’t all that different from the top-down decomposition described in the previous section, except that you decompose each branch of the tree until you reach its work packages. Then, you go back to the top and work your way to the bottom of the next branch.
This variation on the top-down method is ideal when different teams or groups work on a project. Once you identify top-level tasks, you can assign their decomposition to the groups that do the work. See Documenting a WBS in Another Program for instructions on assembling WBSs from several groups.
Tip
Don’t forget to include project initiation and management tasks in your WBS. Sure, some of your work goes on behind the scenes without obvious deliverables, but project management is essential to keeping projects within budget and on schedule. Besides, project management does have deliverables, since most customers and stakeholders sign off on project plans and want to see status reports, documents, and expenditures.
Identifying work packages and then organizing them into summary tasks usually works only for small projects, but small projects occur often enough to make this a popular approach. Whether you write tasks on sticky notes or type them into Project, you and your team can identify every iota of work you can think of. Then, you can head to a quiet spot to organize it into higher-level tasks.
Most people can keep track of up to five things at once, although stress and age increase forgetfulness. If you’re a juggler extraordinaire, you might be able to absorb eight items, but, beyond that, all bets are off. Between three and seven levels of summary tasks is ideal for a WBS that audiences can digest. For example, you can divide the entire project at the top level into phases like defining requirements, designing systems, and developing components. Then, within each phase, you can create lower levels to identify work in more detail.
For monster projects, though, you can exceed the level limit without losing focus by breaking the behemoth into subprojects. If the overall project is building a new jet, you can have a few levels of decomposition to reach a set of subprojects, each of which contributes major deliverables (engines, fuselage, electronics, and so on). Then, separate WBSs for each subproject can include their own three to seven levels. When vendors or subcontractors perform subprojects, ask them to develop the WBSs for their subprojects.
Tip
If you have a bunch of folks helping you create the WBS, see the box on Too Many Cooks Can Spoil the WBS for advice on working together effectively.
As with almost any endeavor, the last 20 percent is the most difficult. The first several levels of the WBS might appear almost effortlessly, but then the decomposition can slow to a crawl as you try to decide whether something represents a work package or not. Here are some ideas for how to decide what constitutes a work package:
To estimate work. When you break tasks down into work packages based on the work you know how to estimate, figuring out the overall project is as easy as adding up estimates for all the chunks. For example, you may not have a clue how long it will take to deploy Windows 7 throughout your organization, but you know that it takes 3 hours to install and reconfigure one computer.
To track progress. One rule of thumb for defining work packages is to keep task duration between 8 and 80 hours (in other words, anywhere from one workday up to two work weeks). These durations also give you early warning when tasks overrun their estimates. In addition, if you break work down into durations no longer than the time between status reports, you’re likely to have concrete progress to report. The downside is that you need a clear idea of how long various tasks take, but this approach works well for projects similar to those you’ve performed in the past.
To maintain focus. Guidelines aside, simply decompose work to the level of detail that you can handle. If you’re a keep-things-simple type, you can keep your WBS at a high level and let team leaders manage details. On the other hand, if you can remember details the way a Starbucks barista remembers coffee orders, you can break down the work to your heart’s content. Just remember that dividing work into portions that take less than a day can reduce productivity and morale (with certain exceptions, as discussed in the box on When Short Is Sweet).
Your WBS may not have started out in Project. Maybe you scribbled it on a whiteboard, scrawled it on sticky notes pasted to flip charts, or it’s just rattling around noisily in your head. Regardless of where your ideas are, you can make short work of getting them into Project. Once you get familiar with the techniques for outlining tasks described on the next few pages, you’ll develop a rhythm to your data entry. If you already have an outline, you can quickly type or copy it into Project from the top down. Or if work packages are bubbling up in your brain, you can enter them without worrying about the order of the tasks or the overall structure. You can rearrange and add summary tasks and work packages later.
One of the more efficient data entry methods is to start at the top of a WBS and complete each level of tasks before dropping to the next level. Because Project creates a new task at the same outline level as the previous task, this approach keeps indenting and outdenting to a minimum.
For maximum efficiency, when you flesh out a lowest-level summary task, insert as many rows as there are work packages for that summary task, and then type the names of the work packages in the Task Name cells. The following steps show you exactly how to work your way down a WBS one level at a time:
Click the File tab, and then choose New.
Project selects “Blank project” in the Available Templates pane.
On the right side of the window, click Create to create a new blank project file.
The Gantt Chart view appears with the Entry table on the left and the Gantt Chart timescale on the right. If you don’t see the Gantt Chart view, click the Task tab, and then choose Gantt Chart in the View section.
If the WBS column doesn’t appear in the Entry table, right-click the Task Name heading and, from the shortcut menu, choose Insert Column.
Project inserts a new column to the left of the Task Name column with “[Type Column Name]” in the heading cell.
Type WBS, and then press Enter.
You could also scroll in the drop-down list, as shown in Figure 4-2 and then click WBS, but, in this case, typing is quicker.
Note
The WBS code format that Project uses out of the box is a number at each level, with levels separated by periods. If your organization has a custom WBS format, you can set up your own WBS code (see Setting Up Custom WBS Codes).
Figure 4-2. Project keeps track of WBS numbers for tasks whether the WBS column is visible or not. You can label the column with a different name, align the text in the column, and specify the column width. After you add the column, right-click the heading cell and then choose Field Settings on the shortcut menu. Type the column heading you want in the Title box. Choose the alignment you want, the width, and then click OK.
In the Entry table, click the first Task Name cell, and then type the name of the first top-level summary task.
Press Enter to save this task, and then move down to the Task Name cell in the next row, as shown in Figure 4-3.
Note
You don’t have to create a top-level task for the overall project. Project has a project summary task, which sits in an exalted position of Row 0 and rolls up the values for all the other tasks in the schedule. If you want to see the Project Summary task, choose Format Show/Hide Project Summary Task. To always show the project summary tasks, click the File tab and choose Options. In the Project Options dialog box, click Advanced. Finally, scroll to the “Display options for this project” section, and then turn on the “Show project summary task” checkbox.
Repeat step 5 for each top-level task in the WBS.
Creating the tasks at the top-level is as easy as it gets: You type a task’s name, press Enter, and repeat until all your top-level tasks are there. Now you’re ready to add tasks at the next level of the WBS.
To add subtasks to a summary task, click the Task Name cell immediately below the summary task you’re fleshing out, and then press Insert as many times as there are subtasks, as demonstrated in Figure 4-4.
This step is the secret to speedy outlining because it works in the same way at every level of the WBS: second-level, third-level, or lowest-level summary task. When you insert rows for the lowest-level summary task, insert as many rows as there are work packages for that summary task. Then you can type away and fill them all in quickly.
With the blinking insertion point in the blank Task Name cell beckoning you, type the name of the subtask, and then press Enter to create the task.
Pressing Enter moves the active cell to the next Task Name cell. However, the first subtask isn’t at the right level—it’s still at the same level as the summary task.
To indent the task, press the up arrow key, and then press Alt+Shift+right arrow. Or, on the Task tab, click Indent Task (the green, right-pointing arrow in the Schedule section).
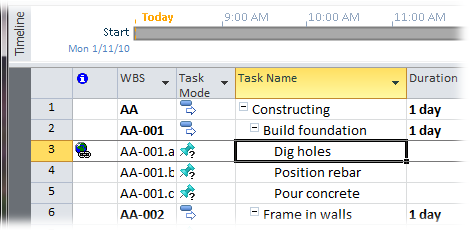
Project indents the subtask and indicates its subordinate position in two ways: with the WBS number and the outline box—both shown in Figure 4-5.
Press the down arrow key to move to the next Task Name cell, type the name, and then press Enter.
Because the first subtask is at the correct level, the remaining subtasks come to life at the right level for their summary task.
Repeat steps 7 through 10 for every summary task in the WBS, ultimately filling in each level of the WBS.
Your initial draft of the WBS is complete.
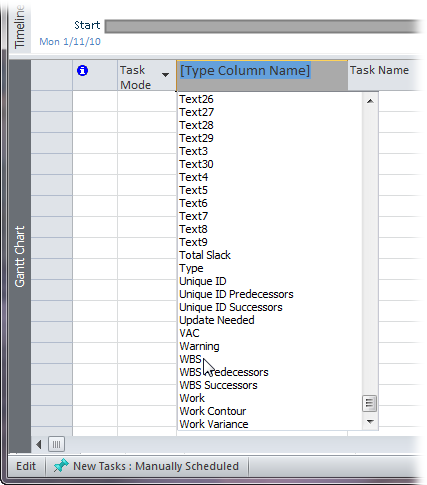
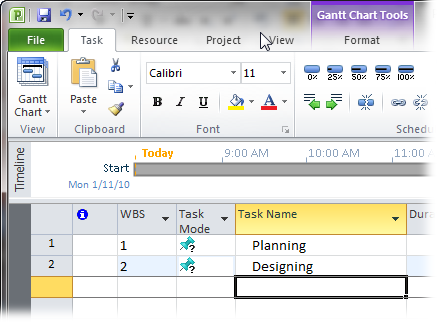
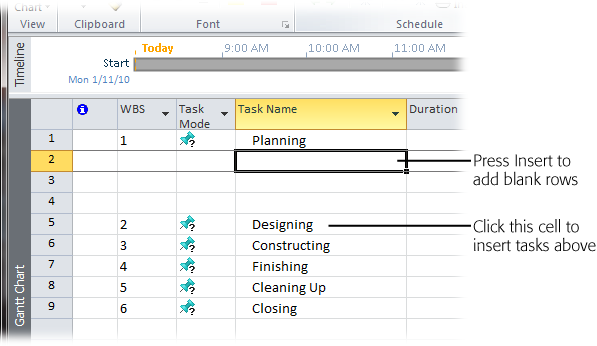
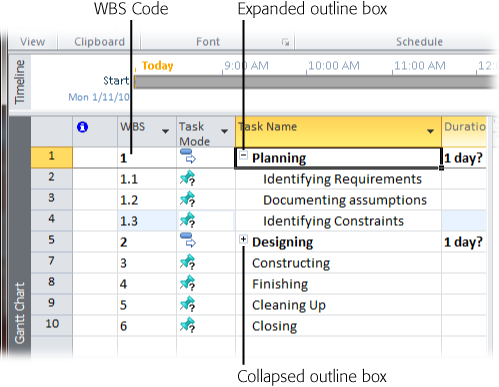
Figure 4-5. The WBS code for the subtask includes an additional level of numbers. If the summary task WBS number is 2.4, its first outline box subtask has the number 2.4.1. Summary task names are preceded by an outline box—a square with a minus sign inside that indicates that the summary task is expanded. If you click the box, the summary task collapses and hides its subtasks, and the outline box changes to a square with a + sign.
If you’re in high gear churning out project tasks, you can gleefully insert, delete, and rearrange the WBS outline as you go. The resulting WBS looks exactly the same as one methodically typed from the top down. Also, the methods for adding, moving, and changing outline levels for tasks are the same whether you’re creating or modifying a WBS. You can use the following techniques to develop a WBS in any order:
Insert a new summary task without subtasks. In the row below the new summary task, click the Task Name cell, and then press Insert. Type the task name and press Enter. Select the new summary task, and then either press Alt+Shift+left arrow or, on the Task tab, click Outdent Task (the green, left-pointing arrow in the Schedule section) until the summary task is at the level you want.
Insert a new summary task for selected subtasks. If you want to summarize several existing tasks, you can use the Insert Summary Task command (new in Project 2010). First, select the subtasks. Then, on the Task tab, click Insert Summary Task in the Insert section. (The icon looks like a summary task bar with a yellow asterisk.) Project selects the Task Name cell, which contains the text “<New Summary Task>”, so you can simply start typing to name the new summary task.
Insert a new subtask. In the row below an existing subtask, click the Task Name cell, and then press Insert. The task appears at the same outline level as the task you clicked.
Make a summary task into a subtask. Select the first subtask for the summary task, and then either press Alt+Shift+left arrow or, on the Task tab, click Outdent Task (the green, left-pointing arrow). When you outdent the subtask, the summary task’s outline box disappears.
Move a subtask to the next lower level. Select the task, and then press Alt+Shift+right arrow or, on the Task tab, click Indent Task (the green, right-pointing arrow). The task drops to the next lower level while the task above it turns into a summary task.
Elevate a subtask to the next higher level. Click the task. Then, on the Task tab, click Outdent Task (the green, left-pointing arrow) or press Alt+Shift+left arrow.
Move a subtask to another summary task. Click the ID cell (the first column of the view table) for the task you want to move. After the pointer turns into a four-headed arrow, drag the task to its new home in the outline. Then change its outline level, if necessary.
Delete a subtask. Select the subtask, and then press Delete.
Delete a summary task. To delete a summary task and all of its subtasks, select the summary task, and then press Delete, or right-click the summary task and choose Delete Task from the shortcut menu. (And if you want to delete a summary task and keep all its subtasks, see the box on Sparing the Subtasks.)
Note
To use the Delete key to get rid of a task, you have to select the entire task row by clicking the row’s ID number. If you select only the Task Name cell and then press Delete, Project deletes the text in the cell. Alternatively, if you click the Smart Tag with an X, which appears to the left of the Task Name cell, you can choose “Only clear the contents of the Task Name Cell” or “Delete the entire task”.
You can also whip up a list of indented tasks in Microsoft Word or Outlook, and then copy and paste them into Project 2010. More of your team members are likely to be familiar with Word or Outlook than with Project, so you’re likely to get project info from them in Word documents or emails. In Word and Outlook, it’s easy to indent, outdent, insert, move, and delete tasks. Then, all you have to do is copy the text in either of those programs and paste it into Project.
Note
In Project 2007 and earlier versions, you could build an outline in Word and import it into a Project file. Project 2010 reduces that unwieldy process to a few simple steps.
Here are techniques you can use to build a task list in Word or Outlook:
Promote a task. Position the cursor to the left of the task text and then press Backspace.
Demote a task. Position the cursor to the left of the task text and then press Tab.
Move tasks. Select the task(s) you want to move, and then drag them to a new position. Or, use Ctrl+X and Ctrl+V to cut and paste the tasks from one position to another. If need be, demote or promote the tasks to the correct level.
Delete tasks. Select the task(s) you want to delete, and then press Delete or Ctrl+X.
If you paste a list of tasks from Word or Outlook into Project 2010, the program is smart enough to transform the indents in Word documents or Outlook emails into WBS levels in Project. Suppose different teams use Word documents to define the tasks they plan to perform. They can send them to you and all you have to do is open the Word documents, copy the text, and paste it into Project. Here’s how:
Open the document in Word or, if the tasks are in an email in Outlook, open the email.
Select the tasks you want to paste into Project, as shown in Figure 4-6 (top), and then press Ctrl+C.
Switch over to Project and click the first blank Task Name cell where you want to paste the tasks; then press Ctrl+V.
Project inserts the task names into the Task Name cells and indents the tasks to the same level that they were at in the Word document or Outlook email, as shown in Figure 4-6 (bottom).
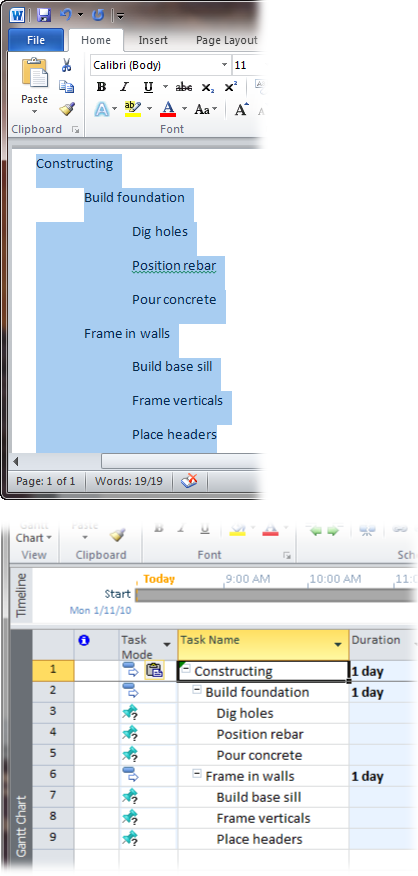
Figure 4-6. Top: Type each task name on a separate line in a Microsoft Word document. To make a line a subtask, select it and then press Tab. To promote an item to a higher level, position the cursor to the left of the text, and press Backspace. Bottom: When you paste tasks into Project, it figures out the correct outline level.
The WBS codes built into Project are simple outline codes with a number for each level in the outline hierarchy. For instance, a WBS code of 2.1.3 might represent the second phase of the project, the first summary task in that phase, and the third work package for that summary task. If your organization uses custom codes, you can build a tailored numbering system—called a code mask—to specify each level of your WBS code. If you use abbreviations for phases, numbers for summary tasks, and letters for work packages, say, a customized WBS for the design phase of a project might look like this: Dsn 1.a.
To define a custom WBS code, follow these steps:
On the Project tab, click WBS, and then choose Define Code.
The WBS Code Definition dialog box appears. Although any existing WBS codes show numbers for each level with a period as a separator, the boxes in the WBS Code Definition dialog box are empty until you specify a custom scheme for your WBS codes.
Note
If you assemble several projects into a single master project (What to Do with Project Information), you can make WBS codes unique for each project, even if they use the same code mask. If you work with multiple projects, set up the code mask for a new project before you get too deep into defining the project’s tasks. That way you don’t have to renumber all your tasks later. In the Project Code Prefix box, type a prefix for the current project, like “PRJ01.” Project then inserts this prefix at the beginning of the WBS codes for the tasks in the project; for instance, PRJ01.1.4.1.
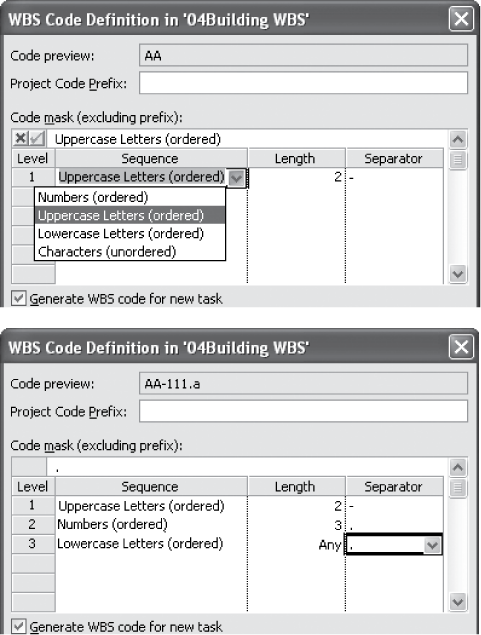
In the “Code mask” section’s first Sequence cell, choose the type of characters you want to use for the top level of the hierarchy, as shown in Figure 4-7 top.
You can choose from Numbers (ordered), Uppercase Letters (ordered), Lowercase Letters (ordered), and, for the most flexible coding, Characters (unordered). With ordered numbers and letters, Project automatically increments the numbers or letters as you add tasks to the WBS, proceeding, for example, from 1.1 to 1.2. to 1.3.
In the first Length cell, choose a number (from 1 to 10) for the length of the top level’s mask.
Project initially selects Any, which means the entry for the level can be of any length. If the level uses a number, Project increments the number beginning at 1 and continuing to 10, 100, or 1000, if necessary. If the level uses letters, then you can type a code of any number of characters at that level.
Choosing a number limits the entry to between one character and the length you specify. If you limit a numeric entry to one character, Project cycles through the numbers 1 through 9, moves to 0, and then repeats.
In the Separator cell, choose the character that separates the top level from the next level.
Your only choices for separators are periods (.), minus signs (-), plus signs (+), or slashes (/).
Repeat steps 2–4 for each additional level of the code mask.
You can specify dozens of levels in a code mask (in fact, a WBS code can be as long as 255 characters), but being miserly with levels makes the schedule easier to comprehend.
After you’ve defined all the levels in the code mask, be sure that the “Generate WBS code for new task” checkbox is turned on if you want Project to automatically assign a WBS code to new tasks you create.
The only time you might want to turn this checkbox off is when you plan to renumber all the WBS codes after you’ve organized your tasks and don’t want to be distracted by the interim codes that Project assigns.
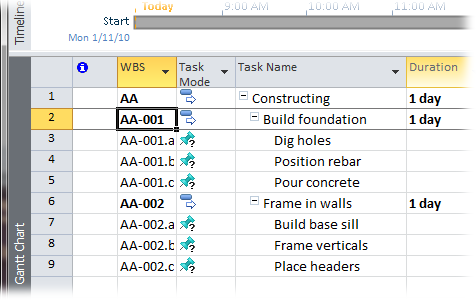
To ensure that your WBS codes are unique, keep the “Verify uniqueness of new WBS codes” checkbox turned on. Click OK, and then review the refreshed WBS codes in the task list, as shown in Figure 4-8. Although Project adds WBS codes to tasks when the “Generate WBS code for new task” checkbox is turned on, sometimes you want to type WBS codes manually, and that can lead to duplicate WBS codes. The only time you might turn off the “Verify uniqueness of new WBS codes” checkbox is if you’re planning to renumber tasks later and you get tired of the warnings Project displays. As the box on Renumbering Task WBS Codes explains, you can renumber the WBS codes for tasks to correct or reorder your project.
Figure 4-7. Top: The choices for characters, length, and separators are limited. If you use unordered characters, you have to type the characters you want for each code, such as Dsn-.1, Const.3, or Rvw.7. Bottom: As you specify the code mask for each level, the “Code preview” box at the top of the dialog box displays a sample WBS code.
If the WBS column isn’t visible in the current view, add it so you can verify that the code is set up the way you want.
Right-click the Task Name heading and, from the shortcut menu, choose Insert Column. In the new column, type WBS and then press Enter.
If you’ve ever asked a teenager to do a chore, you know the importance of clearly specifying the work to perform and the results you expect. Otherwise, the dishes in the dishwasher might be placed in the cupboards—before they’ve been washed. Providing project team members with clear guidance is equally important, but the task names in Project are too short to get into detail. For that reason, separate documents that describe work packages are a great way to tell team members how to do their assignments completely and correctly. And you don’t even have to worry about keeping track of lots of loose documents: You can link them to the Project schedule, as described on Linking and Embedding Entire Files into Project.
Ideally, a work package document describes the work to perform, how to know when it’s done, and how to tell whether it’s done right. A work package for baking a loaf of bread might include the steps for mixing, kneading, forming, and baking the bread. The document could specify that the bread is done when tapping it delivers a hollow thump. Similarly, the work package might state that a successful loaf is an attractive brown color, twice as tall as the unbaked dough, and full of evenly sized holes.
Even small projects require dozens of work package documents. You can speed up your work by creating a Word template for work packages that’s as basic or as fancy as your knowledge of Word. That way, you can open the template and have a document all labeled and ready for you to fill in. For example, you might set up a basic work package template with the following information:
WBS number. The WBS number that Project assigned to the task in your project schedule.
Work package name. The task name from the project schedule.
Description of work. You can use paragraphs or bullet points and provide as much detail as you need to ensure success. If you know an experienced resource is going to do the work, the document can be brief. For trainees, on the other hand, you can provide detailed checklists of steps or the name of the person who can mentor the assigned resource.
Result. Describe the final state when the work is done as well as how to verify that the work was done correctly. In a work package for setting up a computer, for example, you might include the list of programs that should launch when the installation is complete.
Reference materials. Projects use many types of documents to specify deliverables: requirements, specifications, blueprints, and so on. If other detailed documentation exists, list where to find those documents, like the folder on the network drive or the project notebook.
Creating a Word template is no harder than creating a Word document. However, finding and using a template takes some setup. Here’s how to create a Word template and save it for reuse:
Create a Word document with the labels you want to include.
If you want to get fancy, you can insert a logo, add instructions to help others fill in work packages, and so on.
In Word 2010, on the File tab, click Save. In Word 2007, choose Office button→ Save.
The Save As dialog box appears.
Navigate to the folder you use for your custom templates.
For example, create a folder called Templates in the My Documents folder.
In Word 2010, in the “File name” box, type the name of the template. In the “Save as type” box, choose Word Template, and then click Save.
In Word 2007, in the navigation bar on the left side of the dialog box, click Trusted Templates before you click Save.
To set up faster access to your template, on the File tab, click Options.
Telling Word where to find your custom templates makes it easier to locate and open this template later. That way, you can see these templates right in the New Document dialog box every time you start a new project, as described in the next section.
In the Word Options dialog box, click Advanced. Then scroll to the General section at the bottom of the dialog box and select File Locations.
You want to tell Word where to find your templates.
Select “User templates” or “Workgroup templates”, and then click Modify. In the Modify Location dialog box, navigate to your template folder, and then click OK.
Choose the folder you created in step 3.
Click OK again to close the Options dialog box.
Tip
The box on Setting File Locations in Word 2003 explains how to find the File Locations feature in Word 2003.
In Word 2010, on the File tab, click New. (In Word 2007, choose Office button→New.) Under the Available Templates heading, click “My templates”. The New dialog box appears showing the templates in your user templates folder. Select the template you want, and then click OK.
To use a template in Word 2003, choose File→New. In the New Document task pane, under the Templates heading, click “On my computer”. The Templates dialog box appears open to the General tab, which displays the templates in your User templates or Workgroup template folders (whichever you chose in the previous steps). Select the template, and then click OK.
After you create work package documents (as described in the previous section) that spell out the details of tasks, you’re likely to refer to those documents as you work on your Project schedule. There’s no need to open them by hand or try to remember where they are. Instead, you can insert a hyperlink from a task in the Project schedule to the corresponding work package document. With a hyperlink in place, opening the work package document is a quick click in Project.
To create a hyperlink in a Project task, do the following:
In Project, right-click the task you want to link to a work package document, and then choose Hyperlink from the shortcut menu.
The Insert Hyperlink dialog box appears.
In the “Link to” bar, click Existing File Or Web Page.
Navigate to the folder that contains the work package document, and then double-click the name of the work package file. The “Look in” box shows the folder while the Address box displays the filename.
Click OK.
In the Indicators column, a hyperlink icon appears, as shown in Figure 4-9.
Figure 4-9. The Hyperlink icon looks like a globe with a link of chain, a not-so-subtle commentary that hyperlinks connect the world. If the Indicators column isn’t visible, then right-click the Entry table and choose Insert Column on the shortcut menu. In the Field Name drop-down list, choose Indicators.
To access a hyperlinked file, simply right-click the hyperlink icon in the Indicator cell and then choose Hyperlink→Open Hyperlink.
The program associated with the file launches, and the file opens.
Get Microsoft Project 2010: The Missing Manual now with the O’Reilly learning platform.
O’Reilly members experience books, live events, courses curated by job role, and more from O’Reilly and nearly 200 top publishers.

