As Easy as It Gets: Auto and Auto Flash Off
The following steps walk you through taking a picture in Auto and Auto Flash Off modes. A couple of notes before you start:
- The steps show you how to take the picture using autofocusing. To focus manually, ignore the autofocusing instructions.
- Autofocusing information presented here assumes that you're using the viewfinder. Things work differently when you use Live View mode, so see Chapter 4 to go that route.
- Set the Mode dial to Auto or Auto Flash Off (refer to Figure 3-1).
- Set the focusing method, Release mode, and other basic settings as outlined in the preceding section.
- Looking through the viewfinder, compose the shot so that your subject is within the autofocus brackets, labeled in Figure 3-4.
The camera's autofocusing points are scattered throughout the area indicated by the brackets. This figure (and others in this chapter) shows the viewfinder as it appears when you use a standard (non-DX) lens. If you're using a DX lens, you also see a crop box indicating the image area, assuming that the Auto DX Crop option is enabled for the Image Area setting on the Shooting menu, as it is by default. Be sure that your subject is within that box.
- Press and hold the shutter button halfway down.
The following occurs:
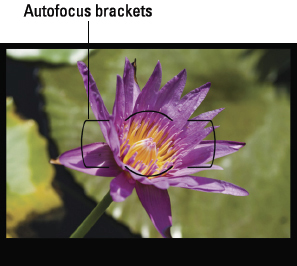
Figure 3-4: Position your subject within the area surrounded by the autofocus brackets.
- Exposure metering begins. The autoexposure ...
Get Nikon D600 For Dummies now with the O’Reilly learning platform.
O’Reilly members experience books, live events, courses curated by job role, and more from O’Reilly and nearly 200 top publishers.

