Let’s assume you have a significant PHP codebase that you have decided to convert to Node.js. You will provide both the PHP and Node.js codebases to your users for the foreseeable future, meaning that you will update and improve both codebases simultaneously. But you only know a little about Node.js; in fact, you have not really done any serious development with Node.js yet. Where do you start?
The first thing to do is to download Node.js for your platform, probably Linux or Windows (yes, they have a Windows version now!). Since installation methods and installers vary from version to version and change over time, this book will not spend time on how to install the current version. Instead, if you need assistance with installation, you should use the online documentation and, if that fails you, use Google or another search engine to find web pages and forum postings where others have come across the same installation issues you are having and have found solutions that you can use.
Once installed, you will see that a Node.js installation is
fairly simple and has two main parts: the main node
executable and the npm
The node
node hello.js
The node
Notice that hello.js uses the
.js extension. The .js extension
stands for JavaScript. Unfortunately, files with the
.js extension can contain either client-side
JavaScript or server-side Node.js code. Even though they both use the
JavaScript language, they have nothing else in common. Client-side
JavaScript code needs to be served out to browsers, while server-side
Node.js code needs to have the nodenode
In some Node.js projects, the client-side JavaScript files are put in one folder, such as a client folder, while the Node.js files are put in another folder named something like server. Separating client-side JavaScript files from Node.js files via a folder scheme helps, but is still problematic because many source code editors show only the filename but not the full path name in a title bar or tab.
Instead, I have adopted the .njs extension for Node.js files and reserved the .js extension for client-side JavaScript files in my own projects. Let me be clear, though: the .njs extension is not a standard! At least, not yet (and maybe not ever). I have diligently searched using Google, and it is common to use the .js extension for Node.js code. To avoid constant confusion between client-side and server-side JavaScript, I use the .njs extension for Node.js code, and in your own PHP to Node.js conversion, I suggest that you do the same.
So, instead of using the hello.js file given earlier, I would use hello.njs:
node
    hello.njs
The remainder of this book will use the .njs extension for Node.js files.
A simple hello.njs looks like:
console.log('Hello world!');
If you run node
hello.njs
To actually get a web server running, use the following hellosvr.njs source file:
varhttp=require('http');http.createServer(function(req,res){res.writeHead(200,{'Content-Type':'text/plain'});res.end('Hello World!\n');}).listen(1337,'127.0.0.1');console.log('Server running at http://127.0.0.1:1337/');
If you run node
hellosvr.njs
If you start a browser such as Firefox or Chrome and type http://127.0.0.1:1337/ into the address bar, you will see a simple web page that says, “Hello world!” In fact, if you go to http://127.0.0.1:1337/index.html or http://127.0.0.1:1337/abc or even http://127.0.0.1:1337/abc/def/ghi, you will always see the same simple web page that says “Hello world!” because the server responds to all web page requests in the same way.
For now, the important line in this source file is the first
line that uses the Node.js require()
global function. The require() function
makes a Node.js module available for use. Node.js modules are what you
might expect: a collection of data and functions that are bundled
together, usually providing functionality in some particular area. In this
case, the http Node.js module provides
simple HTTP server functionality.
The nodehttp, https,
fs, path, crypto,
url, net, dgram,
dns, tls, and child_process. Expect these built-in modules and
their functionality to vary from version to version.
By design, a module resides in a namespace. A namespace is an
extra specification that is added to the front of a data or function
reference; for example, http is the
namespace that the createServer()
function resides in. In Node.js, a namespace is just implemented as an
object. When the http module is loaded,
the require() function returns an
object and that object is assigned to the http variable. The variable does not have to be
called “http”; it could be called “xyzzybub” and, in that case, the server
would be created by calling the xyzzybub.createServer() function.
Why have a namespace? Why not just put all the data and functions as global variables?
Node.js anticipated that new modules with new functionality, such
as a MySQL access, would be developed by other people and need to be
integrated into the nodehttp or xyzzybub.
These new modules with new functionality are packages. A package
is a module that can be added to the nodenode
The npmnode
To install a package, first use Google or another search engine
to find the npm package that you want to install. Often, the package will
be found on GitHub.
An alternative to using a search engine is to use the
npmsearch
Instead of the web server that always returns a “Hello world!” page, suppose we want to create a web server that actually serves up static web pages from files on the hard disk. To find a Node.js static file server module, a good search phrase to type into a search engine is “nodejs static file web server”. Alternatively, “npm search static”, “npm search file”, or “npm search server” will list the npm packages that have the words “static”, “file”, or “server” in their names or descriptions. Using either of these two methods or both in combination (and with a little extra reading and browsing), you will find that Alexis Sellier, a.k.a. cloudhead, created a popular static file server module and hosted it here.
This package can be installed by running the following command
line (additional options, such as the -g--global
npm install node-static
The npm
npm http GET https://registry.npmjs.org/node-static
npm http 200 https://registry.npmjs.org/node-static
npm http GET https://registry.npmjs.org/node-static/-/node-static-0.5.9.tgz
npm http 200 https://registry.npmjs.org/node-static/-/node-static-0.5.9.tgz
node-static@0.5.9 ./node_modules/node-static
The GET indicates that an HTTP
GET was used to attempt to retrieve the package. The
200 indicates that the HTTP GET request returned “HTTP
status 200 OK”, meaning that the file was retrieved
successfully.
There are hundreds of npm packages, but a few very popular ones
are express, node-static, connect, sockets.io, underscore, async, and optimist.
To implement a web server that serves up static web pages, use the following httpsvr.njs source file:
varhttp=require('http');varstatic=require('node-static');varfile=newstatic.Server();http.createServer(function(req,res){file.serve(req,res);}).listen(1337,'127.0.0.1');console.log('Server running at http://127.0.0.1:1337/');
At a basic level, this is how Node.js development happens. An
editor is used to create and modify one or more .njs
source files that contain Node.js code. When new functionality is needed
that is not built into the nodenpmnode
At this point, three Node.js servers have been presented: hello.njs, hellosvr.njs, and httpsvr.njs. These source files have been so simple that it did not matter how they were created. You could have used any text editor to create them and they would work fine. If you made a mistake, it was easily remedied by editing the source file.
It is safe to assume, though, that you already have a complicated PHP web application with dozens of files and tens of thousands of lines of PHP that you want to convert to Node.js. The conversion strategy will follow a straightforward but tedious step-by-step routine.
The first step will be to create a boilerplate Node.js source file, as described in detail in Chapter 2, that will support the new Node.js code. This boilerplate Node.js code will be enhanced to respond to the specific URLs that are available to be invoked by the client. A web application is, at its heart, a series of URL requests. The objective of conversion is to make a Node.js server that responds to the client in the exact same way as the PHP server. To make this happen, the boilerplate Node.js code is modified to handle each HTTP call and route it to specific Node.js code that will later implement the functionality of the specific PHP page in Node.js.
The second step will be to refactor the PHP code, as described in detail in Chapter 3 and Chapter 4, to make it easier to convert to Node.js code—that is, make the PHP code more Node.js friendly. It may come as a shock, but the conversion process is not just a matter of freezing the PHP code in whatever form it currently is, copying the PHP code into the Node.js source file, and then, line by line, converting the PHP code to Node.js code. Since both the PHP and Node.js code will be improved and have new features added going forward, it makes sense that both the PHP and Node.js code will need to “give” a little in their purity to smooth over the differences between how the two languages function. The PHP code will need to be refactored and make some sacrifices that will allow functional Node.js code to be created later on. At the end of the conversion process, both codebases will look very similar and will be written in a sort of hybrid metalanguage, a collection of idioms and algorithms that are easily ported from PHP to Node.js. The metalanguage will make both codebases look a little odd, but will be fully functional and, with time, will become very familiar and understandable to the developers who maintain and improve both codebases. Even if you plan to throw away the PHP code in the end and want to have pristine Node.js code, it is best to refactor the PHP code anyway, convert both the PHP and Node.js code into the odd hybrid metalanguage, throw away the PHP code, and then refactor the hybridized Node.js code into pure Node.js code. Refactoring PHP code is an essential step for any PHP to Node.js conversion, no matter what your eventual goal is.
The third step is to copy and paste one of the PHP pages from the
PHP source file into the Node.js source file. Almost certainly, the
Node.js server will then be broken; when the node
The fourth step is to convert and fix the newly added code in the
Node.js file, as described in detail in the remaining chapters, such that
it becomes working Node.js code. Initially, the Node.js server will not
run and will immediately exit with a stack trace. The stack trace will
indicate the location of the error, which will be caused by some PHP code
that was not completely converted or was not converted correctly to
Node.js code. After the problem is analyzed, a conversion technique from
one of the remaining chapters will be applied to the entire Node.js file;
for example, Chapter 7 shows the technique to convert PHP array initialization
using the array() function to Node.js
object initialization using curly brackets ( { and } ). When the Node.js
server is run again, it will get a little further along, but will most
likely continue to exit with a stack trace. Eventually, the Node.js code
will be good enough such that it will not immediately exit with a stack
trace.
It is surprising how much unconverted PHP code can exist in a
Node.js source file and not cause the Node.js server to immediately exit
with a stack trace. As you become familiar with the conversion process,
you will learn just how similar PHP and Node.js are, even such that
unconverted PHP code will be parseable by the nodenode
Once the Node.js code is good enough that it does not immediately exit with a stack trace, you can begin to test the client against it. The client will usually be a browser, like Firefox or Google Chrome. Usually, when you start trying to use the client, the Node.js code will exit with a stack trace at some point, and then you will need to analyze the stack trace and apply a conversion technique to fix the problem. Over time, you will develop an ad hoc series of test cases that you can execute with the client to reveal unaddressed conversion issues or hopefully to confirm that the Node.js server is running correctly.
At times, it will also help to use a visual diff tool to compare the PHP code and Node.js code; by viewing it side by side with the original PHP code, you can more easily locate issues in the new Node.js code. This will help remind you of conversion techniques that you have not used yet but need to use. It will also help you keep the conversion process on track and under control.
The rest of the PHP to Node.js conversion process is simply a matter of applying a combination of previous steps many, many times until all the PHP code has been converted to Node.js code and the Node.js code works reliably and interchangeably with the PHP version. Depending on the size of the PHP codebase, the conversion process may take months, but—if you are determined—the conversion will be accomplished.
During the conversion process, you will see a lot of stack traces.
A lot. Here’s an example stack trace that is generated because the
node-static npm package was not
installed using the npm
module.js:337
  throw new Error("Cannot find module '" + request + "'");
            ^
Error: Cannot find module 'node-static'
  at Function._resolveFilename (module.js:337:11)
  at Function._load (module.js:279:25)
  at Module.require (module.js:359:17)
  at require (module.js:375:17)
  at Object.<anonymous> (httpsvr.njs:2:14)
  at Module._compile (module.js:446:26)
  at Object..js (module.js:464:10)
  at Module.load (module.js:353:31)
  at Function._load (module.js:311:12)
  at Array.0 (module.js:484:10)
The top of the stack trace shows the code that threw the error. This is not the code that caused the error; this is the code that created and threw the error object.
Below that, the error message inside the Error object is shown. This error message
indicates that the node-static module
could not be found.
The remainder is the “call stack,” a series of function calls
indicated by the word “at” that show the chain of function calls that
arrived at the code that threw the error. The call stack is listed from
innermost call to outermost call. In this case, the Function._resolveFilename() function is the call
at the top of the call stack, which indicates that it is the innermost
call and thus the one that actually contains the code that threw the
error. The Function._resolveFilename()
function was called by the Function._load() function, which was called by
the Module.require() function, which
was called by the require() function,
which was called by the Object.<anonymous>() function, and so on.
After each function call in the call stack, you will see the filename of the source file that contains that function, the last line that was executed (which is either the line that called the function above it or the line that actually threw the error object), and the position in the line that was last executed. In the example, you can see that two source files are involved: module.js and httpsvr.njs.
The module.js file resides inside the
node
The part of the call stack to focus our attention on is:
Object.<anonymous> (httpsvr.njs:2:14)
This function call is on line 2 at position 14 in the httpsvr.njs file. Here’s the httpsvr.njs file:
varhttp=require('http');varstatic=require('node-static');varfile=newstatic.Server();http.createServer(function(req,res){file.serve(req,res);}).listen(1337,'127.0.0.1');console.log('Server running at http://127.0.0.1:1337/');
By cross-referencing the call stack with the source code, the
require() function that attempts to
load the node-static module is the
function call in which the error occurred. This is consistent with the
error message: “Cannot find module ‘node-static’".
If we look up the call stack, we see
the Function._load() function and the
Function._resolveFilename() function at the top. Looking
at the name of these two functions, we guess that the Node.js
environment is having difficulty loading the module because it cannot find
the file that is associated with the module. We can guess that the module
file (probably the npm package) is missing because it has not been
installed yet. Again, this is consistent with the error message: “Cannot
find module ‘node-static’".
The Object.<anonymous>
so-called function probably indicates that the require() function call was made in the global
space, instead of within a user-defined function in
httpsvr.njs. But that is not always the case. An
anonymous object may be generated inside a user-defined function. But
farther down the call stack, below the Object.<anonymous> function call, we see
that the caller was the Module._compile
function in the module.js file. The require() function call was made in the global
space.
Using all this information, one solution is to try to install the
node-static npm package:
npm install node-static
Admittedly, you won’t need to do all this analysis every time you see a Node.js call stack. But since you will be seeing many, many call stacks, you should understand how to thoroughly analyze one—especially because catching and fixing errors is what takes 95% of the time in a PHP to Node.js conversion.
In summary, here’s the process to analyze a call stack: read the error, look at the error message (if any), take a guess and focus on a particular function call in your own code, look at the code and find the line and perhaps even the position of the error, look up the stack to see if it indicates more detail about what the error might be, and look down the stack to see how the execution of the server got to that particular function call.
Learning how to fully analyze a stack trace is one helpful skill for doing a successful PHP to Node.js conversion. A stack trace is a diagnostic tool for figuring out what is wrong with the code, like an x-ray is used by a doctor to figure out what is wrong with his patient. From a certain point of view, converting PHP to Node.js can be seen as similar to a complex surgery on a patient. You will be performing surgery on PHP and Node.js code. Like performing surgery, it takes a lot of skill and tenacity, but having a good environment can really help, too. Just like the x-ray is a tool used in the operating room, the stack trace will be a tool in the development environment for the conversion. Next, we will discuss integrated development environments, which will provide a sort of “operating room theater” for the conversion process.
Since you will probably be dealing with dozens of PHP files and tens of thousands of lines of PHP and, very soon, dozens of Node.js files and tens of thousands of lines of Node.js, a simple plain text editor will probably not be good enough to keep track of everything and keep the conversion process efficient. A plain text editor will be fine when you are typing in some simple examples to learn how to program using Node.js, but when you are dealing with a large amount of PHP and Node.js code, you will need something more effective.
If you were developing PHP or Node.js code by itself, you could choose a single language integrated development environment (IDE) and use it nearly straight out of the box. Eclipse PDT (PHP Development Tools) is a popular PHP IDE written in Java that is produced by the Eclipse Foundation. Some others are Zend Studio, PHPEdit, and Dreamweaver. On the Node.js side, there are fewer choices, and they are of more dubious popularity and effectiveness. At the time of this writing, I found Komodo Edit, nide, and Cloud9.
However, your objective is to convert PHP code to Node.js code while simultaneously improving and adding features to both codebases. To do this effectively, I recommend using the Eclipse PDT, but with some modifications to help it support Node.js code. Additional knowledge on how to easily compare PHP and Node.js code will be needed to support the conversion process.
Now, before I describe how to set up Eclipse PDT for PHP to Node.js conversion, I should briefly address developers who reject such tools and insist on using simple plain text editors. They say, “I only use vi!” If you are somebody who feels this way, you are free to skip the rest of this chapter and set up your conversion environment in any way that works for you. I am describing the installation and modification of Eclipse PDT here only because it was an essential tool for me to do my own PHP to Node.js conversion project and it will be an essential tool for a lot of other developers as well.
To install Elipse PDT, first download Java. All the Eclipse IDEs are developed in Java and need Java to run, including the Eclipse PDT. I prefer to install the Java JDK instead of the JRE. At the time of this writing, I am using jdk-6u29-windows-i586.exe.
Next, browse to here. Consider using the Zend Server Community Edition (CE) installation, which includes Eclipse PDT, the Zend Server HTTP server with built-in PHP debugging support, and even the MySQL database. I assume that your PHP web application uses the MySQL database or at least has the MySQL database as an option.
As of this writing, there is a PDT and Zend Server Community Edition link on the Eclipse PDT downloads page. If the link does not exist or you have a different web server already running, download the latest stable Eclipse PDT version that is appropriate for your operating system. Then, skip the next few paragraphs until the text describes installing and configuring the Eclipse PDT. Otherwise, follow the link and download the Eclipse PDT for Zend Server CE. For now, I am using zend-eclipse-php-helios-win32-x86.zip. Unzip but do not run the Eclipse PDT yet.
From the same web page, download Zend Server CE itself. At this time, I am using ZendServer-CE-php-5.3.8-5.5.0-Windows_x86.exe.
Install Zend Server CE. In brief, choose sensible, mostly default, selections until the Setup Type page. Select the Custom radio button on the Setup Type page, instead of the Typical radio button, and press the Next button. Check the “MySQL Server (separate download)” checkbox from the Custom Setup page. Then finish the installer.
Currently, Zend Server CE shows a browser to configure the way that it operates. In our case, no special configuration is needed for the server itself.
The MySQL database server is installed and configured as part of the Zend Server CE installer. By default, the root password for the MySQL database server is the empty string (a.k.a. “”).
Run the Eclipse PDT. Zend Server CE is built on Apache 2 and has an htdocs folder. When the Eclipse PDT runs, find and select the htdocs folder as the Eclipse PDT Workspace folder. If you are using a different web server than Zend Server CE or Apache, select the document root as the Eclipse PDT Workspace folder so the PHP files that are deployed to the web server can be edited in place.
It is beyond the scope of this book, but if you wish, try to experiment with using the PHP debugger on your existing PHP codebase.
The Eclipse PDT and your web server will be the foundation of your “conversion development environment.” Now, let’s make some modifications and learn how to use the Eclipse PDT to effectively manage and implement the conversion process.
The Eclipse PDT, by itself, already supports JavaScript files, and since Node.js is JavaScript, it supports Node.js. But because the .njs file extension is nonstandard, Eclipse PDT does not recognize a .njs file as a Node.js file. So if a .njs file (e.g., httpsvr.njs) is opened in Eclipse PDT, it is shown as plain text with no syntax coloring or popup code completion like in a regular JavaScript (.js) file.
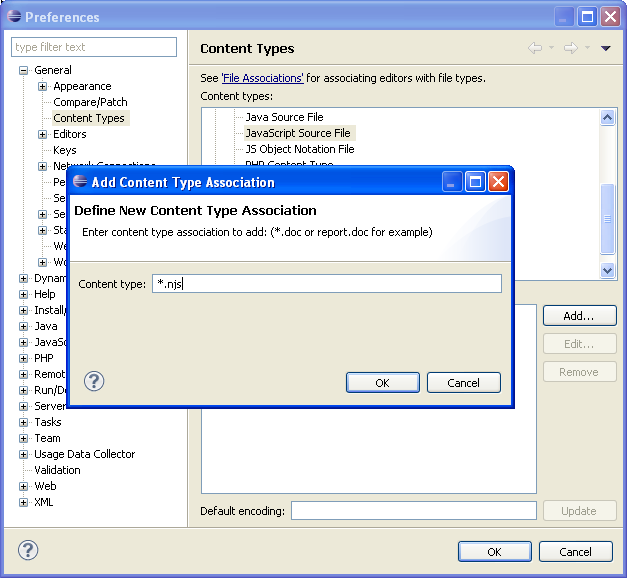
To modify Eclipse PDT to recognize .njs files as Node.js files, open the Window menu from the Eclipse PDT main menu and select the Preferences menu item. When you do this, you will see the Preferences dialog box with two inset panes (Figure 1-1). In the left pane, you will see a tree control with a hierarchically organized group of categories and subcategories of preferences. In the right pane, you will see a dialog that allows you to view and edit the preference items for the currently selected category in the left pane.
In the left pane, open the General tree folder item, then select
the Content Types tree item. In the right pane, you will see a list of
content types. Open the Text tree folder item in the “Content types” tree
control in the right pane. Beneath the Text tree folder item, select the
JavaScript Source File tree item. When you select the JavaScript Source
File tree item, you should see a list box with a single item, “*.js
(locked)”, in the “File associations” list box along with an Add… button
on the middle-right of the pane. Press the Add… button. Once the Add…
button is pressed, the Add Content Type Association dialog box should pop
up (Figure 1-2). You will type *.njs
into the “Content type” edit box in that new dialog box.
Then, press the OK button on all the open dialog boxes to store the modifications.
When that modification is saved, JavaScript syntax coloring and code completion will work for Node.js source files that are stored as .njs files.

With syntax coloring working for .njs files, you can spot simple Node.js syntax errors by noticing that some words have the wrong color. Visual inspection is an important part of any programming project, particularly in a PHP to Node.js conversion project. Another useful visual inspection technique is comparing the PHP and Node.js codebases using an advanced and very visual diff viewer to find out all kinds of things about the quality and progress of the conversion.
A diff program shows the difference between two files. Simple text-based diff programs usually print out the differences as monochrome lines of text, each line from a single file. That kind of diff program is useless for analyzing a PHP to Node.js conversion. A sophisticated visual diff program is needed. Instead of showing files as alternating lines of text, the files will be shown side by side. Instead of monochrome, color will be used. Instead of showing only which lines are different, the differences within the lines—down to the character level—will be reconciled and shown.
Eclipse PDT has an advanced visual diff viewer built in. We can use this viewer to compare a .php file to its corresponding .njs file. To use the viewer of a .php file and a .njs file, select both files. Then, right-click one of them and select the Compare With submenu and then the Each Other menu item within that submenu. Figure 1-3 shows a screenshot of the Eclipse PDT viewer comparing a simple .php file with its corresponding .njs file.
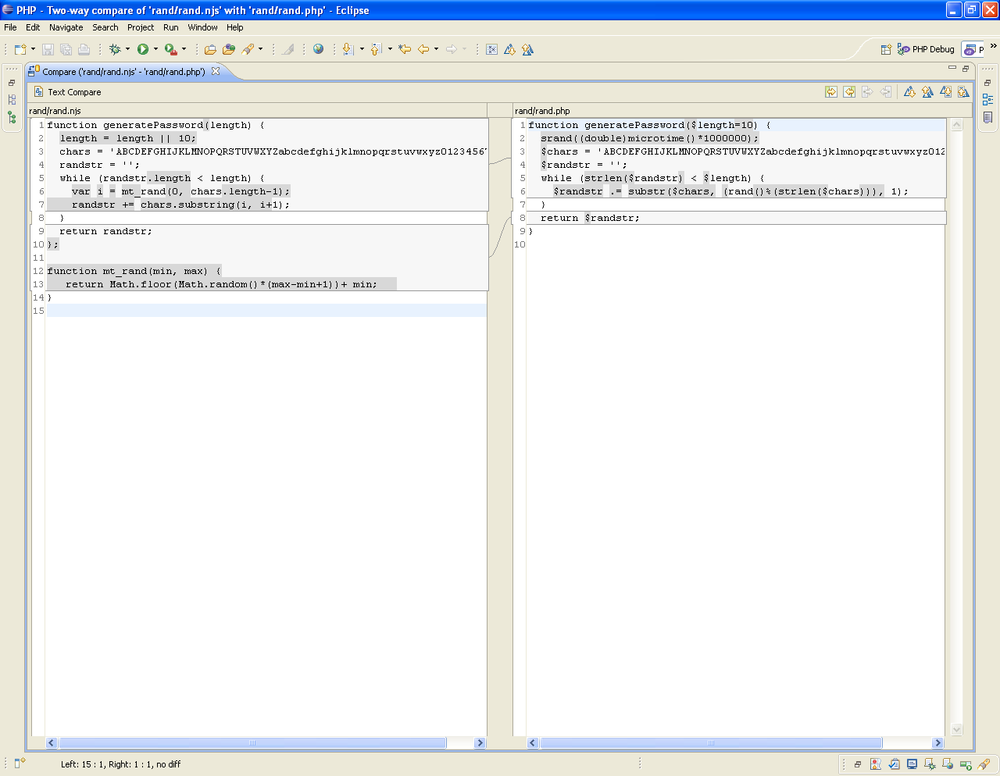
You do not need to look at the figure in detail to either understand how it works or see just how similar PHP and Node.js are.
On the left is the rand.njs file. On the right is the rand.php file. The differences are in gray; the identical sequences of characters that have been matched are in white.
Notice how many of the lines are almost completely in white, except
for a stray dollar sign ($) in gray. Both PHP and Node.js use the keyword
function in the same place and put the
name of the function in the same place. Over the years, it has become
common for new languages to eschew variation in syntax structure and adopt
a similar syntax for things like defining functions. Also, notice that the
while statement is very
similar.
It benefits the developer to make it easy for the visual diff to compare the .php file to its corresponding .njs file. The visual diff feature in Eclipse PDT is very good but it is not infallible. Sometimes, moving around code in either file may allow the comparison algorithm of the visual diff feature to find more matches; that is, the visual diff feature will show more white in both files. Copying a function so that it is earlier or later in a file might be irrelevant to the performance and functionality of the code, but might make the visual diff feature match up the code much more accurately. It is worth spending some time periodically throughout the conversion process to experiment with moving code around in each file and seeing the effect on the comparison.
In Eclipse PDT, the code can be edited in a separate window, in the comparison window itself, or in both. If it is edited in a separate window and saved, any comparison windows that show the same file will be reloaded and recompared. Making some tweaks in a separate window and saving the file so that the effect on the comparison can be determined is a common technique.
Naturally, it really helps to keep the code in the same format in both files to use the same names for everything (such as functions and variables), and even to refactor the code in one or both files such that the visual diff feature will find as many matches as possible.
To keep the PHP and Node.js code synchronized and simultaneously improve and add features to both codebases, you will often rely on the visual diff to make sure that the PHP and Node.js code are correct. In time, a developer will develop a finely tuned sense of what is not enough white and what is too much white.
When there isn’t enough white, the visual diff feature usually is getting off track and trying to match PHP code in the .php file to Node.js code in the .njs file, which is not meant to be matched. There will be a lot of gray in the comparison, indicating differences, and not each matches. Experimentation will often correct this issue.
When there is too much white, it often means that there is some PHP code in the .njs file that has not been converted completely to Node.js code. Even though the .njs file can be parsed and run, too much white indicates that more conversion is needed. Often, eyeballing the Node.js code will indicate specific conversions that have not been done yet. One simple conversion that may be missed is that dollar signs ($) need to be added to PHP variables; dollar signs are not used on Node.js variables. Adding dollar signs to the PHP code will reduce the amount of white, bringing the comparison closer to having the right amount of white.
Visual inspection, especially using the visual diff feature, is much faster than interactively testing the PHP and the Node.js code. Visual inspection can act as a “smoke test” to determine if the conversion is approximately correct. Automated test cases, which are beyond the scope of this book, may also be used to quickly test the effectiveness of the conversion so far.
Throughout the book, there will be opportunities to convert a
particular code element of a large amount of PHP code into the
corresponding code element for Node.js code. For example, a PHP associative array is created by calling the
PHP array() function, whereas in
Node.js, it is often created by using the object literal notation, which
uses curly brackets ( { and } ). When the contents of an entire
.php file are copied wholesale into a
.njs file at the start of the conversion of the code,
the .njs file will then obviously contain many PHP
array() function calls that will need
to be replaced by Node.js object literals. A simple way to address this particular conversion issue
might be to simply use Eclipse PDT’s Find/Replace feature to do a global
search for array( and universally replace it with a
left curly bracket ( { ); see Figure 1-4.
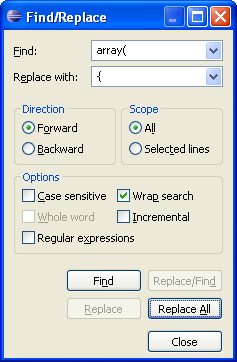
The operation of this dialog box is straightforward.
Rather than including a screenshot of the Find/Replace dialog box every time that it is needed, this book uses a text shorthand. For the Find/Replace dialog box options in the figure, the text will have the following blurb inserted:
Operation: "Find/Replace" in Eclipse PDT
Find: array(
Replace: {
Options: Case sensitive
Action: Replace All
The Find/Replace dialog box can be used in two different ways.
One way is to do what I call a “blind” global find-and-replace action, like the example find-and-replace blurb in Figure 1-4. I call it “blind” because it finds and replaces every occurrence in the file all at once, with no warning and no manual inspection. If all the Find/Replace dialog box values are tested and determined to be foolproof, a “blind” global find-and-replace action is fast and accurate. Unfortunately, if the result causes an error, there are only two options: undo the action or perform a new action that corrects the previous action.
The second option for find-and-replace action repair work is worth pointing out. Sometimes, it is better to do a simple-to-understand find-and-replace action that will correctly convert 298 code elements and incorrectly convert two code elements than it is to do a complicated find-and-replace action that correctly converts the same 300 code elements. Manually finding and fixing a few edge cases is a worthwhile technique; not everything needs to be fully automatic. Even though PHP to Node.js conversion is a lengthy task, it is not a task that you will be running over and over. This book is not describing “continuous conversion”; it is describing conversion as a one-time event. So manually finding and fixing a few edge cases is a perfectly acceptable technique to get the job done.
A second way to use the Find/Replace dialog box is to do a step-by-step global find-and-replace action. First, the Find/Replace dialog box is used to find the first instance. The developer then examines the instance and decides whether to modify the code manually (which he can do by clicking on the code and without dismissing the dialog box), or to execute the replace (by pressing the Replace/Find button), or to skip to the next instance without changing the current instance (by pressing the Find button again). Here’s the blurb for a step-by-step global find-and-replace action:
Operation: "Find/Replace" in Eclipse PDT
Find: array(
Replace: {
Options: Case sensitive
Action: Find, then Replace/Find
The Find/Replace dialog box in the Eclipse PDT can also use regular
expressions. Regular expressions are a pattern matching technique: instead
of finding an exact phrase, a regular expression describes a pattern to
search for. Each time that the pattern is found, the exact phrase that
matches the pattern can be applied to the Replace field. For example, if
the array\((.*)\) regular expression matches
array(id=>'name'), the (.*) in
the regular expression will save the id=>'name'
text. This saved text is called a capture field, or less commonly, a
capture group. In the Eclipse PDT Find/Replace dialog box, a capture field
is captured by surrounding it with undelimited parentheses. To apply a
capture field to the Replace field, the capture fields are enumerated
according to the order that they were captured in the Find field. A dollar
sign ($) indicates that a capture field is being specified, followed by
the capture field number. For example, $1 in the
Replace field indicates the first capture field, which, in the example
earlier in this paragraph, would contain the
id=>'name' text. Very often, there is only one
capture field, so it is very common to only see $1 and
rarely to see $2, $3, or
beyond.
Here’s a blurb for a blind global find-and-replace action using regular expressions:
Operation: "Find/Replace" in Eclipse PDT
Find: array\((.*)\)
Replace: {$1}
Options: Case sensitive, Regular expressions
Action: Replace All
In converting PHP to Node.js, regular expressions are only tangential to the process, so this book will not be giving a primer on how to understand and write your own regular expressions. The regular expressions will be provided as part of blurbs for find-and-replace actions that can be copied to the appropriate fields of the Find/Replace dialog box in the Eclipse PDT, usually verbatim, without requiring you to understand or modify them. If you need additional help with regular expressions or need to understand the rules and how they work, you are encouraged to consult the Eclipse PDT and to use Google or a similar search engine to find websites, blogs, and forums that will answer your questions.
Find-and-replace actions with regular expressions are often more comprehensive and effective than literal find-and-replace actions (i.e., actions where only one specific string is matched). A regular expression allows more variation in what it can match, and with capture fields, it can transport that variation to the Replace field. Often, a literal find-and-replace will be able to match only the beginning of a code element or the end of a code element at one time because the code element can vary in the middle. With a regular expression, the middle can be matched to a pattern that allows the entire code element to be matched in a single find-and-replace action. When the conversion of a code element can be done in a single find-and-replace action, instead of multiple ones, the chances for errors are reduced.
Until now, this chapter has described a range of activities and knowledge about how to set up a development environment for doing a PHP to Node.js conversion. The first thing to do was to download and install Node.js itself and become familiar with the two executables that it comes with. After that, we dug into Node.js stack traces to learn how to read them and how to use them to find what the real, underlying problem is such that the coding issue can be addressed and repaired. Then, we set up the Eclipse PDT as a foundation for a development environment, including a modification for it to understand .njs files, geared toward PHP to Node.js conversion. And finally, we learned how to use the visual diff feature and find-and-replace actions that will be very important when doing the conversion.
A capable development environment is essential to efficiency and is the way that big efforts get done. Too often, amateur developers will leap into coding with an inefficient or even an annoying development environment. At first, the development will go quickly in any environment because a small amount of code is simple to improve upon. But as the codebase grows larger, the complexity of the code will also grow and the pace of development will slow down. An inefficient or annoying development environment will do nothing to help the developer with the complexity, but a capable development environment will simplify the knowledge needed and help the developer such that the pace can be sustained and, ultimately, the project finished.
With a PHP to Node.js conversion, it is assumed that a large PHP codebase already exists. At the end of the conversion, it is expected that the codebase will more than double in size: the PHP code will be refactored for conversion, not brevity, so it will increase, and of course, an entire Node.js codebase will be added. The initial PHP codebase might have been created by many developers, but in conversions, there is often so much coupling between the activities that only a single developer will do the majority of the conversion. Even though a primitive development environment might have been acceptable for the creation of the original PHP codebase, a more sophisticated development environment will be needed to convert it to Node.js.
If a project already has an existing development environment, it may not be necessary to adopt the Eclipse PDT. The Eclipse PDT is presented as a workable, prototypical environment suitable only for conversion activities. Alternative development environments can work if they can support and be coupled with additional tools that support the features in this chapter. In summary, they need to be made to support the following syntax coloring for both .php and .njs files, visual side-by-side comparison between two files down to a word-by-word comparison and not just line-by-line comparison, and find-and-replace actions that support regular expressions.
Now that all the infrastructure for the conversion is ready, we can move on to creating the initial .njs file that will host the new Node.js code. In the next chapter, a template for an initial .njs file will be presented such that, in subsequent chapters, PHP code can be refactored for conversion and actual PHP code can be copied into Node.js files and transformed into working Node.js code.
Get Node.js for PHP Developers now with the O’Reilly learning platform.
O’Reilly members experience books, live events, courses curated by job role, and more from O’Reilly and nearly 200 top publishers.

