Before we get into the how of creating XML editing solutions in Word, let’s look at an example of what it is we’re trying to achieve. This example will reappear throughout the chapter.
Suppose a small Public Relations department wants to create press releases that look good as Word documents but that also can integrate into other systems or that can be published in other formats. Consider also that the people who write such press releases have experience with Word but have no understanding of XML.
By leveraging Word 2003’s custom XML schema functionality (in the Office Professional or standalone versions), the IT department can create an XML template[2] for Word that enables end users in the PR department to not only create new press releases in XML but to edit existing ones too. Imagine that they have already defined an XML schema that includes the basic information that a press release needs to represent. Example 4-1 shows just such a schema.
Example 4-1. The press release schema, pressRelease.xsd
<xsd:schema xmlns:xsd="http://www.w3.org/2001/XMLSchema"
  xmlns="http://xmlportfolio.com/pressRelease"
  targetNamespace="http://xmlportfolio.com/pressRelease"
  elementFormDefault="qualified">

  <xsd:element name="pressRelease" type="prType"/>

  <xsd:complexType name="prType">
    <xsd:sequence>
      <xsd:element name="company" type="companyType"/>
      <xsd:element name="contact" type="contactType"/>
      <xsd:element name="date" type="xsd:date"/>
      <xsd:element name="title" type="xsd:string"/>
      <xsd:element name="body" type="bodyType"/>
    </xsd:sequence>
  </xsd:complexType>

  <xsd:complexType name="companyType">
    <xsd:sequence>
      <xsd:element name="name" type="xsd:string"/>
      <xsd:element name="address" type="addressType"/>
    </xsd:sequence>
  </xsd:complexType>

  <xsd:complexType name="addressType">
    <xsd:sequence>
      <xsd:element name="street" type="xsd:string"/>
      <xsd:element name="city" type="xsd:string"/>
      <xsd:element name="state" type="xsd:string"/>
      <xsd:element name="zip" type="xsd:integer"/>
      <xsd:element name="phone" type="phoneType"/>
      <xsd:element name="fax" type="phoneType"/>
    </xsd:sequence>
  </xsd:complexType>

  <xsd:complexType name="contactType">
    <xsd:sequence>
      <xsd:element name="firstName" type="xsd:string"/>
      <xsd:element name="lastName" type="xsd:string"/>
      <xsd:element name="phone" type="phoneType"/>
    </xsd:sequence>
  </xsd:complexType>

  <xsd:complexType name="bodyType">
    <xsd:sequence>
      <xsd:element name="para" type="paraType" maxOccurs="unbounded"/>
    </xsd:sequence>
  </xsd:complexType>

  <xsd:complexType name="paraType" mixed="true">
    <xsd:choice minOccurs="0">
      <xsd:element name="leadIn" type="xsd:string"/>
    </xsd:choice>
  </xsd:complexType>

  <xsd:simpleType name="phoneType">
    <xsd:restriction base="xsd:string">
      <xsd:pattern value="[0-9]{3}-[0-9]{3}-[0-9]{4}"/>
    </xsd:restriction>
  </xsd:simpleType>

</xsd:schema>
The XML schema in Example 4-1 declares a title and a
body that contains one or more paragraphs. It also contains
information about the company making the announcement and the contact
person for this press release. Certain fields require their text to
conform to a particular format. Specifically, the zip code must be an
integer value, the date must conform to the ISO 8601 date format
(xsd:date), and each phone number (three in all)
must follow a specific format, namely
xxx-xxx-xxxx.
Now let’s jump to the completed solution. The IT
department delivers a single read-only file named New Press
Release.xml to the PR department. To create a new XML
press release, PR department employees simply double-click the file
and begin filling out the template. To save their new press release,
they select File →
Save, as usual. Editing an existing press release is just as easy:
double-click the existing press release file, make changes, and save
changes. All the while, users need not know that the actual format of
the files they are creating and editing is XML, let alone that it
conforms to a special schema defined by the IT department.
This sounds simple enough, but what is the editing experience like for the user? How easily can they screw things up? Well, the developers in our imaginary IT department are smart and have figured out a way to use a combination of Word’s new XML and document protection features in such a way that users won’t be able to screw things up, at least not without some deliberate effort. In fact, they created the solution with several assumptions in mind:
Users should not have to know anything about XML.
Users should not be able to inadvertently mess up the template in which they are editing.
Users should not be required to turn special options on or off.
The last assumption has a catch: while users may not be required to
change any settings, they are required to leave
the default XML and save settings unchanged. As long as they simply
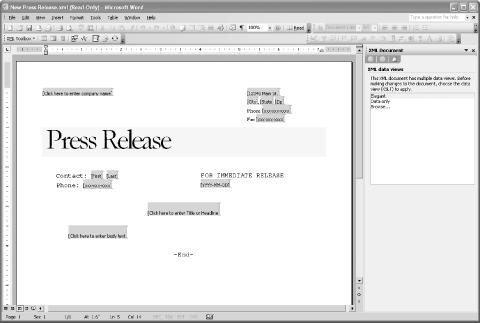
edit documents and save them, all should go well. Figure 4-1 shows what the user sees when first opening
the New Press Release.xml file.
The gray areas in the “press release” template in Figure 4-1 contain placeholder text, such as “Click here to enter company name.” These are familiar constructs in Word templates and are thus familiar to experienced Word users. What is not immediately evident is that these fields correspond to underlying XML elements, a fact which is successfully hidden from the user’s view.
The XML Document task pane shown in Figure 4-1 lists one or more “XML data views” that the user can choose from. In this case, the options are “Elegant,” “Data only,” and “Browse . . . .” Here we only care about the default “Elegant” view, so the user can simply ignore the task pane and begin editing. As soon as they begin editing, the “XML Document” task pane permanently disappears, because it is not possible to choose a different view after changes have been made to the document.
There are several additional things to note about the user’s editing experience:
Invalid values in the document (such as a phone number in the wrong format) are flagged with a pink squiggly underline. The user can see what the problem is by right-clicking it.
Word will not let the user save the document until all validation errors are resolved.
Word will not let the user edit any part of the document other than the fields they are supposed to edit. They cannot, for example, inadvertently edit the “Press Release” heading or delete an entire field.
Word will not let the user apply any direct formatting to the text they enter, e.g., bold or italic.
Word will not let the user apply any styles to the text they enter, except for those that have been specifically allowed.
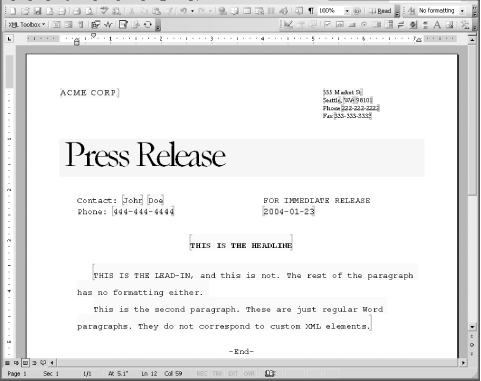
Figure 4-2 shows the template after being filled out by a user.
The editable regions shown in Figure 4-2 are bracketed and highlighted yellow; this is the default behavior for when editing restrictions are in force. Also, the squiggly lines are gone, since each value now conforms to its required format.
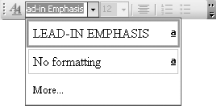
You can also see in Figure 4-2 that all of the fields in the template are simple text fields—all, that is, except the body of the press release. Here the user can enter multiple paragraphs and can apply some limited formatting. Specifically, there is a character style called “Lead-in Emphasis,” which is turned on by default when the user begins typing the body text. This style is used to delineate the lead-in text for the press release. In Figure 4-2, the lead-in text happens to be “This is the lead-in.” The only formatting effect that the style has is to make the text all-caps. After the user has finished typing the lead-in text, they can turn the all-caps formatting off by selecting the other special character style they have at their disposal: “No formatting.” Figure 4-3 shows the entire style drop-down box that the user sees. Since formatting restrictions are in force, the user only sees the styles they are allowed to apply.
After the user is finished filling out the template and is satisfied with the result, they select File → Save and get the prompt shown in Figure 4-4.
Since the New Press Release.xml file is
read-only, the user is prompted to select a new file name. Here is
where the user must not interfere with the
document’s default settings. In this case,
“Apply
transform” must remain checked, and
“Save data only” must remain
unchecked. After entering a filename
(MyPressRelease.xml in this case) and clicking
“Save,” the user is given one final
warning before the XML document is saved, shown in Figure 4-5.
The purpose of this warning is to alert the user that Word-specific formatting and document features are going to be stripped out of the saved document. Users will have to get used to selecting “Continue,” because this is precisely what we want.
Finally, the MyPressRelease.xml file is saved
with the filename and location that the user chose. The content of
this file is shown in Example 4-2 (with indentation
added).
Example 4-2. The contents of the press release XML file saved by Word, MyPressRelease.xml
<?xml version="1.0" encoding="UTF-8" standalone="no"?>
<?mso-application progid="Word.Document"?>
<pressRelease xmlns="http://xmlportfolio.com/pressRelease">
  <company>
    <name>ACME Corp.</name>
    <address>
      <street>555 Market St.</street>
      <city>Seattle</city>
      <state>WA</state>
      <zip>98101</zip>
      <phone>222-222-2222</phone>
      <fax>333-333-3333</fax>
    </address>
  </company>
  <contact>
    <firstName>John</firstName>
    <lastName>Doe</lastName>
    <phone>444-444-4444</phone>
  </contact>
  <date>2004-01-23</date>
  <title>This is the Headline</title>
  <body>
    <para xml:space="preserve"><leadIn>This is the lead-in,</leadIn> and this is
 not. The rest of the paragraph has no formatting either.</para>
    <para xml:space="preserve">This is the second paragraph. These are just regular
 Word paragraphs. They do not correspond to custom XML elements.</para>
  </body>
</pressRelease>
Note that all of the information that the user entered has been
preserved in the final press release XML document. The text in the
text-only fields has been preserved verbatim, and the styled
paragraphs of the press release body have been converted to our press
release schema’s custom para and
leadIn elements.
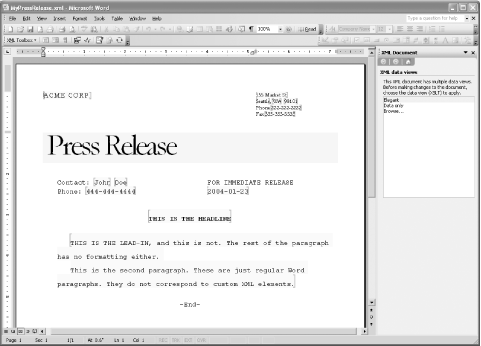
To make subsequent changes to this press release, the user would simply double-click the XML file. Word opens the file and displays the view shown in Figure 4-6. This is very similar to the original template view, the only difference being that all of the fields are already filled out.
When the user is done editing, they simply select File → Save, and the XML file will be updated according to the changes they made.
The rest of this chapter systematically covers the custom XML schema support in Word 2003 (standalone and Office 2003 Professional versions), while continually making reference back to this example. First, we’ll detail the components of Word’s custom XML schema functionality and how they work. Then, with that knowledge in hand, we’ll go step-by-step through the creation of the press release template, in “Steps to Creating the onload Stylesheet.” Then, in “Deploying the Template,” we’ll look at how the application can be deployed in a corporate environment. Finally, we’ll conclude by addressing some important limitations of Word’s custom XML support.
[2] The word
“template” is heavily (and in many
ways unavoidably) overloaded in this chapter. It can mean anything
from a .dot file to an XSLT instruction, from an
XML view in Word to an empty XML
“skeleton” document. Most often, we
use it to mean the general XML editing application, as in
“the press release template.” Of
course, context will be your best guide. Just don’t
get hung up on thinking it’s a technical term;
it’s not.
Get Office 2003 XML now with the O’Reilly learning platform.
O’Reilly members experience books, live events, courses curated by job role, and more from O’Reilly and nearly 200 top publishers.


