We’re about to start building an Orchard website. We’ll create some content. We’ll manage some content. We’ll change the way our site looks and behaves. We’ll write some code to extend the functionality that’s available out of the box. Though we could perform all of these tasks without ever looking at the Orchard source, we’re .NET developers. We’re most comfortable in Visual Studio, so why wouldn’t we start there?
Though it’s not entirely necessary, it’s my preference to build modules, create themes, and manage my Orchard sites all within the context of the full Visual Studio 2010 Orchard solution. Aside from being able to debug the site with Visual Studio, having the source handy also provides a great reference when creating your own Orchard extensions. We’ll learn how to develop extensions in the chapters ahead.
Orchard extensions are known as modules. Creating a module requires writing code, typically C#, but any .NET language will work. You could write that code in Notepad or any text editor of your choice, but that wouldn’t be the most efficient way to work. In this chapter and those that follow, I assume that you’ll be working with Visual Studio 2010 Professional or higher.
The Orchard documentation contains tutorials on how to perform tasks, such as creating modules, without Visual Studio. While it certainly is possible to do so, it’s impractical to consider this approach for all but the most basic of Orchard workflows. You could use the Express editions of Visual C# and Visual Web Developer. However, you won’t be able to open the master solution. Express editions don’t support mixed project type (web and class library) solutions.
Note
A $500 IDE might seem to be an expensive barrier to entry for an open source project such as Orchard. To lower the bar, the Orchard team has provided documentation and tooling that supports non-Visual Studio workflows. The open source IDE MonoDevelop is probably the best alternative, as you can work within the master Orchard solution.
There are two ways to get the Orchard solution onto your local development environment. The simplest way is to go to the Orchard downloads at CodePlex.com, which is Microsoft’s open source project hosting site. Though I sometimes use the source control option described below for my Orchard development, I’m instead going to use a packaged release for this book. That will guarantee we’re all using the same source. The solution I’m using for this book can be found at http://orchard.codeplex.com/releases/view/74491.
With each release (major or minor), Orchard zip files are made available on this page. One is a precompiled version of Orchard, which is optimized for users who want to deploy Orchard and won’t be coding extensions for the site. This package is labeled Orchard.Web.1.4.0.zip. At the time of this writing, 1.4.0 is the current version. This ZIP file appears under the heading “Recommended Download.”
Note
The URL http://orchard.codeplex.com/releases/view/74491 will always point to the 1.4.0 release. Click the “Downloads” tab on the page to find downloads for the latest version as it may have changed by the time this book is published.
A second ZIP file download is a snapshot of the Orchard source code as it existed for the release. This package is labeled Orchard.Source.1.4.0.zip. Download this zip file and extract it to work with the most recent and stable release of Orchard. This ZIP file appears under the heading “Other Available Downloads.” Each release will have different zip files available, but the web and source downloads should be consistently available.
As an alternative, you could get the Orchard source by cloning the source control repository. This is the method I prefer for module development, as it guarantees that I will be developing against the most recent committed changes. Of course, there is a risk that a feature in the current codebase will not make the final cut. For this reason, to follow along with the examples in this book you should download the source as described previously in this chapter. However, I’ll describe how to clone the source later in case you wish to try that option instead.
The Orchard team uses the distributed version control system (DVCS) Mercurial. You don’t need to understand much about Mercurial (Hg) in order to use it to get the Orchard source. I won’t cover anything beyond where to download Mercurial and the two commands you’ll use with Mercurial and Orchard. If you would like more information on Mercurial, I suggest reading Mercurial: The Definitive Guide by Bryan O’Sullivan (O’Reilly).
Mercurial is an open source project and is freely available at http://mercurial.selenic.com/. There is a Windows shell extension called TortoiseHg, which allows you to access common commands by right-clicking on folders in Windows Explorer. When you download and install TortoiseHg, the command line client is also installed. After running the installer, open up a command prompt and enter the following command:
hg clone https://hg01.codeplex.com/orchard OrchardThe clone command in Mercurial is loosely analogous to a checkout command in Subversion or Team Foundation Server. One significant difference is that cloning copies the entire repository locally. With a DVCS such as Mercurial, there is no centralized repository.
The first argument passed to the clone command is the URL where
the repository may be found. The second is the name of the local
directory to where your repository will be copied. This path is relative
to the directory from which you ran the hg command. In other words, if the command
prompt opened into C:\users\John,
you’d have a new folder: C:\users\John\Orchard.
Note
If the hg command was not recognized by Windows, it is likely that the path to hg.exe was not added to your system’s path environment variable. By default this path is C:\Program Files (x86)\Mercurial.
If you choose to obtain the source by way of cloning the repository, it’s a good practice to get the latest changesets, or commits, to the repository. Open a command prompt to the directory into which you cloned Orchard and run the following command:
hg pullThe pull command will get
the latest version of the Orchard sources. However, Mercurial doesn’t by
default add updates into your working copy. To update your local
repository with any changes found during a pull, run the following
command:
hg updateIf you navigate to the directory where you either unzipped the source package or cloned the Mercurial repository, you should see two directories src and lib. Open up the src directory and locate the file Orchard.sln, which is the Orchard solution. Open this solution file and build it.
After you’ve successfully compiled the Orchard source, you’ll need to create a virtual directory in Internet Information Services (IIS). Name this virtual directory “Orchard.” The physical path of the virtual directory should be set to the location of the Orchard web project. If you copied the Orchard source to a directory c:\dev\Orchard, then the physical path would be c:\dev\Orchard\src\Orchard.Web.
Alternatively, you could simply use the ASP.NET Development Server
that ships with Visual Studio. In fact, the default settings of the
Orchard solution are to run the Orchard.Web project using this server. While,
generally speaking, the development server should be adequate for the
purpose of Orchard site development, I prefer to work with IIS when
possible. IIS will be what you use in production, so you’re more likely
to catch certain issues in development with a local IIS setup.
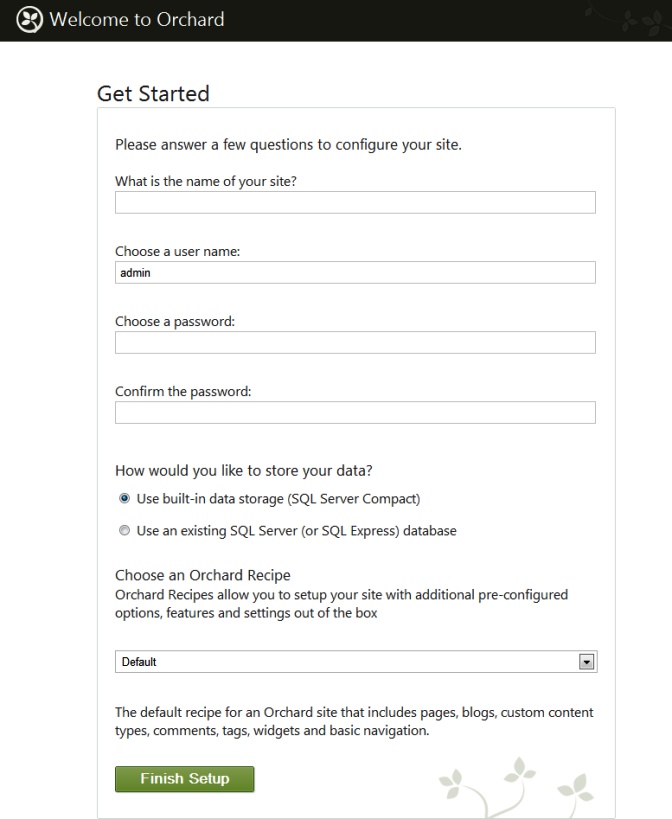
After you’ve created the virtual directory, open up a web browser and navigate to http://localhost/orchard. If you are using the ASP.NET Development Server, simply run the Orchard.Web project using Ctrl+F5 to start the site without debugging (or just F5 to start with debugging). You should see the screen in Figure 1-1.
Note
The very first run of an Orchard site will probably seem slow as some of the dynamic components are compiled and cached.
The Get Started page (Figure 1-1) requires you to provide a few quick details to get your Orchard site up and running. The first three questions ask you to name your site and provide an administrative username and password. These values should be straightforward. You then have the option to select a SQL Server Compact or full SQL Server (or SQL Express) database. Typically you’ll choose SQL Server Compact for development only, but a low traffic site might make do with a SQL Server Compact database.
Create your new site with the name “Daisy’s Gone.” Revisit the Preface to remind yourself of the purpose of our site. You should also change the default admin name to something identifiable, like “jzablocki.” Make this change so that when content, such as blog posts or event listings, is added to the site, the name of the author isn’t “admin.” We’ll also opt to use SQL Server Compact for storage since we’re setting up this site for development purposes.
Note
An advantage of using SQL Server Compact is that you’re easily able to reset an Orchard site back to its starting state (the Get Started page) by deleting the App_Data folder containing the site’s local database. On my system, this path is C:\dev\Orchard\src\Orchard.Web\App_Data\Sites. Resetting the site is useful when you want to ensure a clean slate for new site development.
The final question on the Get Started page involves selecting an Orchard recipe. Recipes are preset site configurations and are simply XML files stored in a well-known path. It’s also possible to create your own. The default Orchard setup includes three:
- Default
Includes frequently used Orchard features. This recipe is suitable as a starting point for most sites.
- Blog
Creates an Orchard site to be used as a personal blog.
- Core
Configures Orchard to have only the minimum required features. This recipe is much better for Orchard development than for site creation.
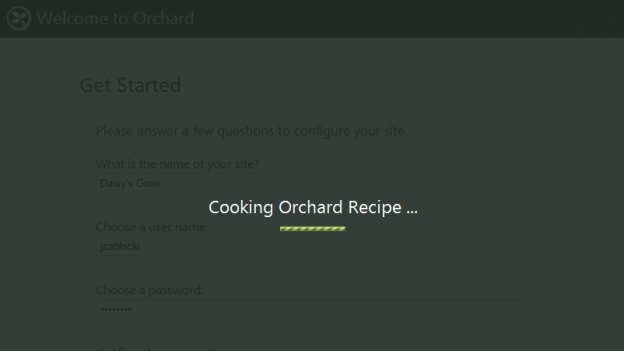
Though the “Core” recipe is suitable for module development, we’re going to use “Default” since we’re going to be building a fully functional site. After you’ve answered these five questions, click the “Finish Setup” button. You should see a modal progress bar appear with the message “Cooking Orchard Recipe” (see Figure 1-2).
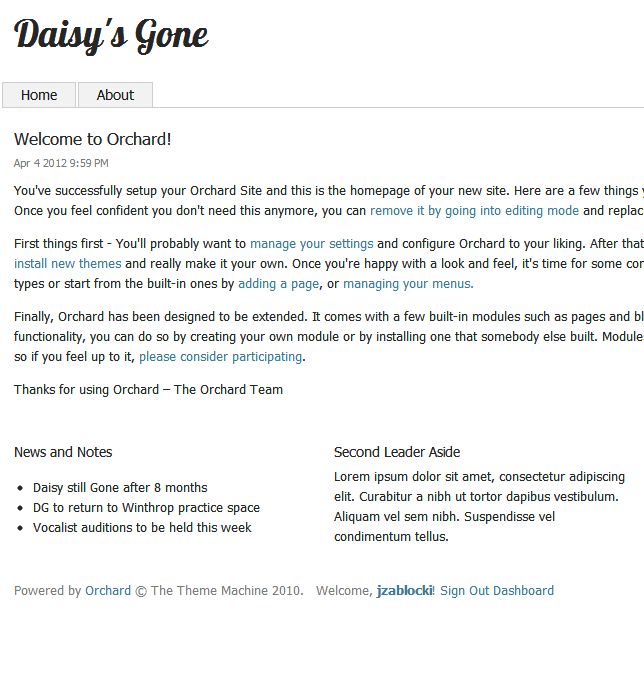
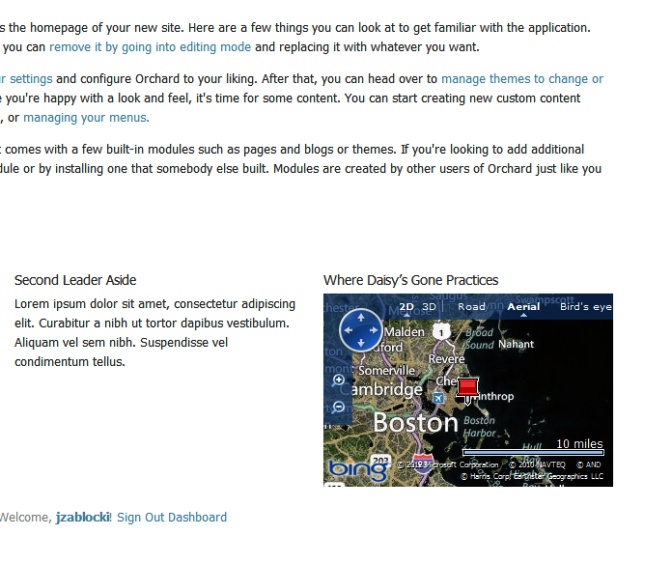
After the recipe has finished cooking, you’ll be redirected to your site’s home page (Figure 1-3). You’ll see the site name that we entered on the “Get Started” page in the upper-left corner and a series of text sections, each with a title and some content.
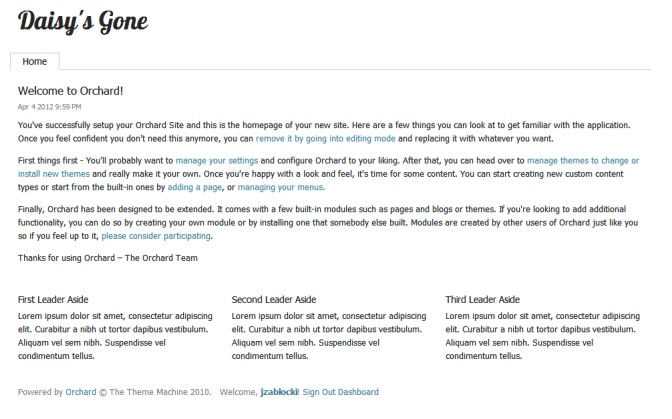
At the very bottom of the home page, you’ll see the default template’s footer with a few links. The last link is labeled “Dashboard.” Click that link to get to the admin pages for your site. When you click through, you’ll land on the admin home page. This page simply has links to finding more information on Orchard. The functionality for managing content is accessible via the menu on the left side of the screen. We’re going to explore the admin pages in more detail in the chapters ahead. For now, we’ll just take a quick tour of the basics.
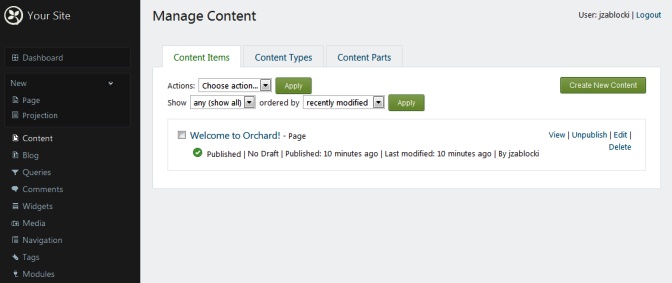
Start by clicking the “Content” link on the menu. This is the admin page where you’ll manage content, such as your site’s home page (Figure 1-4). There are three tabs on this page, which are described here. (Don’t worry about the new terms in this chapter; we’re going to revisit them over the next few chapters.)
- Content Items
Single piece of content, such as a blog post or an event listing.
- Content Types
Blueprints for content items. Defines the attributes and behavior of the content items that you’ll create using the admin tool.
- Content Parts
Reusable pieces of functionality that may be used to compose content types.
To get a sense of how content is created using these tools, click the Create New Content button in the upper-right corner of the page. You’ll be taken to a page where you are shown two links: Page and Projection. Select Page. You’ll then arrive at the page shown in Figure 1-5.
Right now, our site has only the home page. We’re going to use the New Page form to add an About page. For the title, enter “About Daisy’s Gone.” Then add some content describing the band. We’ll also check the option to “Show on main menu,” which will add a tab to the site’s main navigation. Checking this option enables an additional textbox for setting the menu text. Enter “About.”
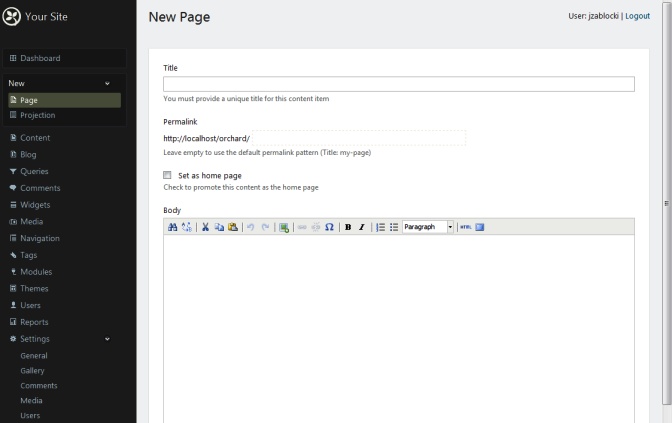
You’ll then have the option to set a “Created On” timestamp. We’ll let this default to the current date and time. We’ll also choose to “Publish Now” rather than select a future date via the “Publish Later” option. The Save button will allow you to save your work without having it appear on the site.
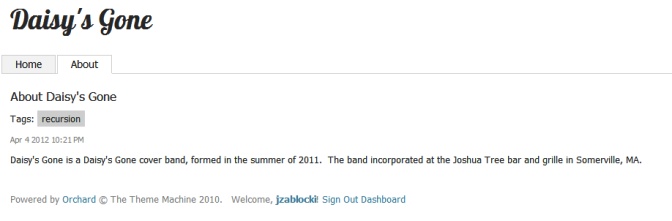
After you publish your page, click the Your Site link in the upper-left corner of the admin pages. You’ll be taken to the home page. Notice the new “About” link that has been added to the menu. Your new page is accessible via that tab (Figure 1-6).
Note
When working with a CMS such as Orchard, it’s useful to keep one browser tab open to the Dashboard and a second open to your site. This practice will allow you to Ctrl+Tab between tabs to see your changes on the live site without navigating away from your current admin location.
Widgets are UI components that may be added to some or all pages of an Orchard site. Click on the “Widgets” menu item to manage these components. On this page, you’ll see a listing of layers and zones.
- Layer
Set of rules that define when widgets will appear.
- Zone
A placeholder into which widgets may be inserted.
In Chapter 4, we’ll learn about zones, layers, and layouts in detail. For now, know that a theme defines a site’s layout and a layout defines which zones are available. The listing of zones you see on the “Widgets” admin page were defined in the default theme, which is called “The Theme Machine.” Layers define rules for which zones will be active.
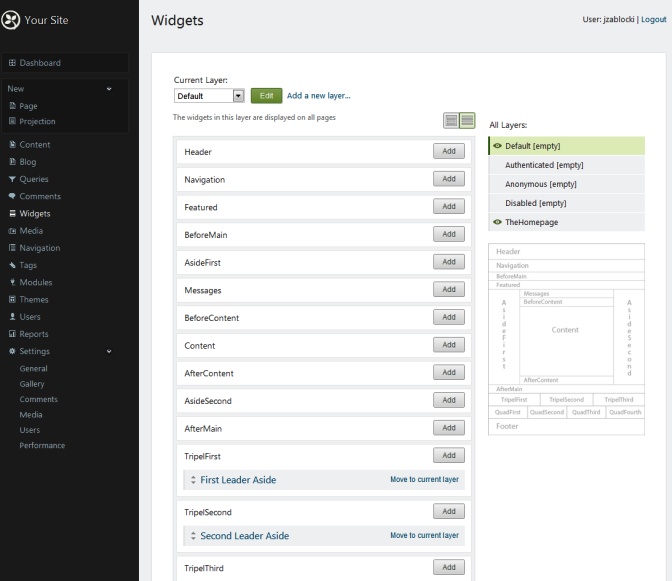
Notice that the zones TripelFirst, TripelSecond, and TripelThird have links with the text “First
Leader Aside,” “Second Leader Aside,” and “Third Leader Aside,”
respectively. If you click over to your site’s home page, you’ll see
that these are headings on the three zones at the bottom of the page
(Figure 1-3). Click through “First
Leader Aside” and you’ll find yourself on a page where you can edit the
HTML page of this widget. Appropriately, this is called an HTML Widget. If you click the “Add” button
next to any zone, you’ll see “HTML Widget” listed as an option for
each.
As we learn to create and manage content, we’ll go over these
options in more detail. For now we’ll take a quick look at changing
widgets. Click on the HTML widget
under “TripelFirst.” Enter the title “News and Notes.” Click on the
bulleted list in the HTML editor and enter some news or some notes. Save
the changes and visit your site’s home page again. You should see your
new content reflected on the home page (Figure 1-8).
Note
You might be wondering why the third set of zones are named “Tripel” and not “Triple.” It’s not a misspelling. The zones are a sort of inside joke and a tribute to Tripels, which are a particular style of high alcohol, strong pale ales.
A great deal of functionality is available for an Orchard site by downloading and installing Orchard modules. Clicking on the “Modules” admin menu option at first reveals the set of installed modules under the “Features” tab. The “Default” recipe we chose to setup our site has influenced this listing, as recipes can instruct the Orchard software to include different modules. We’ll explore the “Features” tab in more detail when we write our first custom module.
We want visitors to know where to find the band on rehearsal nights, so we’re going to include an embedded Bing map that will display a push pin at this location. We’ll place this map on the home page only. Bing Maps aren’t out of the box Orchard functionality, so we’re either going to have to code a solution or find one that’s already coded for us. Fortunately, the work has already been done.
Click on the “Gallery” tab; you’ll see a listing of modules available for download and installation. Search for “Bing Maps.” There will be a few results. The one we want is a module named “Bing.Maps” that was authored by Orchard project lead Bertrand Le Roy. Click “Install” to download and install the module. After it is installed, you’ll be prompted to enable it. After you enable it, you will be able to add it to a zone.
Note
At the time of this writing, there is a bug that might lead to a “Package installation failed” error when installing a theme or module from the Gallery. If you get that message along with a note about permissions errors, click Settings→Gallery and set the gallery feed URL to http://packages.orchardproject.net/FeedService.svc/.
Return to the “Widgets” admin page. Change the “Current Layer” drop-down box from “Default” to “TheHomepage.” Locate the zone “TripelThird.” Click “Remove” to delete the existing HTML Widget from that zone. Click “Add” and select the “Bing Map Widget” from the list of possible widgets. Enter the title “Where Daisy’s Gone Practices”; a latitude and longitude of 42.375,-70.983; and width and height of 300×200. Set the “Zoom” level to 10 and click “Save.” If you navigate to the site home page, you should now see a Bing Maps widget where before there was placeholder text (Figure 1-9).
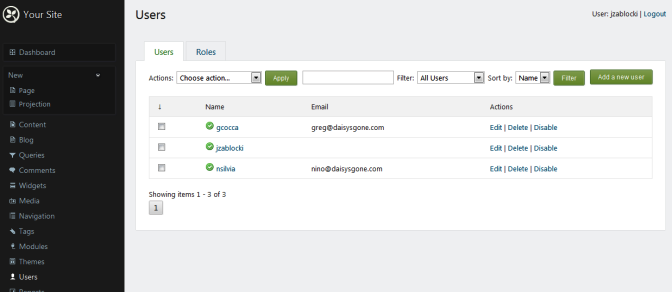
We’ve seen how to manage content. Now we’ll look briefly at who can manage content. The “Users” admin feature contains forms for managing users and roles. Creating a user is a relatively straightforward process. Click “Add New User” and enter a username, email, and password. You are also able to add users to roles. There are a number of predefined roles that are part of a standard Orchard installation.
- Administrator
Has full control over a site and its content
- Editor
Can edit and publish, but not create content
- Moderator
Can validate user-generated content, such as comments
- Author
Can create and publish content
- Contributor
Can write, but might not be able to publish content
There are also roles defined for Anonymous and Authenticated users, but membership is based on whether a user is logged into the site. These roles are not assignable. New roles with custom permissions may also be created. The “Add a role” button is accessible via the “Roles” tab. When creating a new role, you select the permissions you want to be available for users in this role.
We’re going to create two users in addition to our administrator, who in my case is named “jzablocki.” Click “Add new user” and enter the username “gcocca.” Check the “Editor” and “Author” roles and save the new user. Create another new user with the username “nsilvia” and check the role “Moderator.” Save this user. Greg—gcocca—will now be able to create, edit and publish content. Nino—nsylvia—will be able to moderate user generated comments.
One additional user setting to be aware of is under the “Settings” section of the admin menu. Click Settings→Users and you’ll find additional user management settings. You can allow users to self-register, reset their own passwords, verify email addresses, and go through an approval process before having authenticated access to the site. We’ll stick with unauthenticated comments for our content and leave all options unchecked.
We’ve now seen how to get an Orchard site up and running from the Orchard source. We’ve created and edited content. We’ve downloaded a module from the Orchard Gallery and added it to our home page. A simple site could be built and maintained using what little we’ve learned so far. Our site won’t be too complicated, but it will require some basic customization. In the chapters ahead, we’re going to learn how to unleash the power and extensibility of Orchard.
Get Orchard CMS: Up and Running now with the O’Reilly learning platform.
O’Reilly members experience books, live events, courses curated by job role, and more from O’Reilly and nearly 200 top publishers.

