Step 8: Install the Motherboard
Slide the motherboard into position, verifying that each motherboard mounting hole aligns with its brass stand-off, that each nylon stand-off slides properly into the corresponding slot on the motherboard tray, and that the I/O connectors on the rear of the motherboard align properly with the I/O template (or the access holes in the chassis).
While maintaining continuous gentle pressure toward the rear of the chassis to keep the motherboard aligned with the mounting holes, insert one of the mounting screws, but don’t tighten it fully. Continue inserting mounting screws loosely until all mounting holes are occupied. Finally, tighten each mounting screw gently, as shown in Figure 28-30. Finger-tight is adequate. We’ve seen people crack motherboards by applying too much torque to the mounting screws.
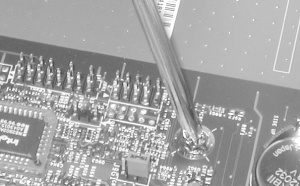
Figure 28-30. Tightening the motherboard mounting screws sufficiently to ensure good contact, but not so much as to risk cracking the motherboard
Make sure to install a motherboard mounting screw at every position. In addition to securing the motherboard physically, these screws also ground the motherboard to the chassis. Their positions are carefully calculated by motherboard designers with grounding in mind. Leaving one or more screw positions vacant can cause improper grounding, which may cause instability or high RFI emissions.
If you have not already done ...
Get PC Hardware in a Nutshell, 3rd Edition now with the O’Reilly learning platform.
O’Reilly members experience books, live events, courses curated by job role, and more from O’Reilly and nearly 200 top publishers.

