Chapter 1. The PowerShell Interactive Shell
1.0 Introduction
Above all else, the design of PowerShell places priority on its use as an efficient and powerful interactive shell. Even its scripting language plays a critical role in this effort, as it too heavily favors interactive use.
What surprises most people when they first launch PowerShell is its similarity to the command prompt that has long existed as part of Windows. Familiar tools continue to run. Familiar commands continue to run. Even familiar hotkeys are the same. Supporting this familiar UI, though, is a powerful engine that lets you accomplish once cumbersome administrative and scripting tasks with ease.
This chapter introduces PowerShell from the perspective of its interactive shell.
1.1 Install PowerShell Core
Solution
Visit the Microsoft website to find the installation instructions for the operating system and platform you want to install on. For the most common:
Windows
Install PowerShell from Microsoft through the Microsoft Store application in the Start Menu. Then, install Windows Terminal from Microsoft through the Microsoft Store application in the Start Menu.
Mac
Install PowerShell from Homebrew:
brew install --cask powershell
Linux
Installation instructions vary per Linux distribution, but the most common distribution among PowerShell Core users is Ubuntu:
# Update the list of packages
sudo apt-get update

# Install pre-requisite packages.
sudo apt-get install -y wget apt-transport-https software-properties-common

# Download the Microsoft repository GPG keys
wget -q https://packages.microsoft.com/config/ubuntu/20.04/packages-microsoft-prod.deb

# Register the Microsoft repository GPG keys
sudo dpkg -i packages-microsoft-prod.deb

# Update the list of packages after we added packages.microsoft.com
sudo apt-get update

# Install PowerShell
sudo apt-get install -y powershell
Discussion
PowerShell has already led a long and exciting life. For the first 15 years of its existence, it was known as âWindows PowerShellâ: a fantastic object-based management shell and platform that made it easy and fun for administrators, developers, and power users to get their jobs done.
In its earliest stages, this support came as part of the âWindows Management Frameworkâ: a standalone download that provided this much needed functionality on Windows. Windows PowerShell eventually became part of Windows itself, and has been a core part of the operating system since Windows 7.
In 2016, PowerShell made a tremendous shift by announcing that it would ship PowerShell on multiple operating system platformsâand by the wayâmade the entire project open source at the same time! Windows PowerShell got a new name with its new future: simply PowerShell. This major change opened the doors for vastly quicker innovation, community participation, and availability through avenues that previously would never have been possible. While the classic Windows PowerShell is still included in the operating system by default, it no longer receives updates and should be avoided.
Installing and running PowerShell on Windows
As mentioned in the Solution, the best way to get PowerShell is to install it through the Microsoft Store. This makes it easy to install and easy to update. Once youâve installed it, you can find PowerShell in the Start Menu like you would any other application.
Note
If you want to install a system-wide version of PowerShell for automation and other adminstration tasks, you will likely prefer the MSI-based installation mechanism. For more information, see the Microsoft website.
While youâre installing PowerShell from the Microsoft Store, now is a good time to install the Windows Terminal application from the Microsoft Store. The traditional console interface (the window that PowerShell runs inside of) included in Windows has so many tools and applications depending on its exact quirks that itâs nearly impossible to meaningfully change. It has fallen woefully behind on what you would expect of a terminal console interface, so the Windows Terminal application from the Microsoft Store, as shown in Figure 1-1, is the solution. Like PowerShell, it is open source, a focus of rapid innovation, and a vast improvement to what ships in Windows by default.
Figure 1-1. Windows Terminal running PowerShell, Bash, and even Azure Cloud Shell!
You can run many shells within tabs in Windows Terminal: PowerShell, Windows PowerShell, cmd.exe, Bash (if youâve enabled the Windows Subsystem for Linux), and even a connection to Azure Cloud Shell. Windows Terminal defaults to PowerShell if you have it installed.
Customizing PowerShell on Windows Terminal
There are two changes to a default Windows Terminal + PowerShell installation that really improve the experience: taskbar pinning, and themes.
Taskbar pinning
When you launch Windows Terminal, right-click on its taskbar icon. Select âPin to Taskbarâ, and then drag the icon to the far left of the taskbar. From now on, whenever you press the Windows Key + 1 at the same time, youâll either launch Windows Terminal and PowerShell (if itâs not already open), or activate it. This is an incredible way to keep your favorite shell close at hand.
Themes
Windows PowerShell has a gorgeous Noble Blue theme. Itâs easy on the eyes, quick to identify, and sets it apart from the dozens of other shells out there. PowerShell Core did not take this color scheme with it by default, but itâs still possible to customize your installation. From Windows Terminal, press Ctrl+Comma or click the downward arrow on the right-hand side of the tab strip to open the Settings dialog of Windows Terminal. The file that contains these settings will open in your default text editor. Under Profiles, find the item with Windows.Terminal.âPowerâ shellCore as its source, and add Campbell Powershell as a colorScheme. The result should look like this:
{
    "guid": ...
    "hidden": false,
    "name": "PowerShell",
    "colorScheme": "Campbell Powershell",
    "source": "Windows.Terminal.PowershellCore"
},
Pay attention to capitalization, quotes, colons, and commas, and you should have your PowerShell sessions looking noble again in no time!
Installing and running PowerShell on Mac and Linux
For the most part, installing PowerShell on Mac and Linux follows the patterns that youâre likely already familiar with.
On Mac, the recommended installation method is through the popular Homebrew package manager. Homebrew is not installed by default on macOS, but installation is quite easy. If you havenât installed Homebrew yet, you can find instructions at Homebrewâs official site.
On Linux, the installation methods vary depending on the distribution youâre interested in. For the most part, installation is as simple as registering the Microsoft repository for your distributionâs package manager, and then installing PowerShell. The Solution provides an example specific to Ubuntu 20.04, but you can get specific instructions for your distribution and specific version on the Microsoft website.
1.2 Run Programs, Scripts, and Existing Tools
Problem
You rely on a lot of effort invested in your current tools. You have traditional executables, Perl scripts, VBScript, and of course, a legacy build system that has organically grown into a tangled mess of batch files. You want to use PowerShell, but you donât want to give up everything you already have.
Solution
To run a program, script, batch file, or other executable command in the systemâs path, enter its filename. For these executable types, the extension is optional:
Program.exeargumentsScriptName.ps1argumentsBatchFile.cmdarguments
To run a command that contains a space in its name, enclose its filename in single quotes (') and precede the command with an ampersand (&), known in PowerShell as the invoke operator:
&'C:\Program Files\Program\Program.exe'arguments
To run a command in the current directory, place .\ in front of its filename:
.\Program.exearguments
To run a command with spaces in its name from the current directory, precede it with both an ampersand and .\:
&'.\Program With Spaces.exe'arguments
Discussion
In this case, the solution is mainly to use your current tools as you always have. The only difference is that you run them in the PowerShell interactive shell rather than cmd.exe.
Specifying the command name
The final three tips in the Solution merit special attention. They are the features of PowerShell that many new users stumble on when it comes to running programs. The first is running commands that contain spaces. In cmd.exe, the way to run a command that contains spaces is to surround it with quotes:
"C:\Program Files\Program\Program.exe"In PowerShell, though, placing text inside quotes is part of a feature that lets you evaluate complex expressions at the prompt, as shown in Example 1-1.
Example 1-1. Evaluating expressions at the PowerShell prompt
PS > 1 + 1
2
PS > 26 * 1.15
29.9
PS > "Hello" + " World"
Hello World
PS > "Hello World"
Hello World
PS > "C:\Program Files\Program\Program.exe"
C:\Program Files\Program\Program.exe
PS >
So, a program name in quotes is no different from any other string in quotes. Itâs just an expression. As shown previously, the way to run a command in a string is to precede that string with the invoke operator (&). If the command you want to run is a batch file that modifies its environment, see Recipe 3.5.
Note
By default, PowerShellâs security policies prevent scripts from running. Once you begin writing or using scripts, though, you should configure this policy to something less restrictive. For information on how to configure your execution policy, see Recipe 18.1.
The second command that new users (and seasoned veterans before coffee!) sometimes stumble on is running commands from the current directory. In cmd.exe, the current directory is considered part of the path: the list of directories that Windows searches to find the program name you typed. If you are in the C:\Programs directory, cmd.exe looks in C:\Programs (among other places) for applications to run.
PowerShell, like most Unix shells, requires that you explicitly state your desire to run a program from the current directory. To do that, you use the .\Program.exe syntax, as shown previously. This prevents malicious users on your system from littering your hard drive with evil programs that have names similar to (or the same as) commands you might run while visiting that directory.
To save themselves from having to type the location of commonly used scripts and programs, many users put commonly used utilities along with their PowerShell scripts in a âtoolsâ directory, which they add to their systemâs path. If PowerShell can find a script or utility in your systemâs path, you do not need to explicitly specify its location.
If you want PowerShell to automatically look in your current working directory for scripts, you can add a period (.) to your PATH environment variable.
For more information about updating your system path, see Recipe 16.2.
If you want to capture the output of a command, you can either save the results into a variable, or save the results into a file. To save the results into a variable, see Recipe 3.3. To save the results into a file, see Recipe 9.2.
Specifying command arguments
To specify arguments to a command, you can type them just as you would in other shells. For example, to make a specified file read-only (two arguments to attrib.exe), simply type:
attrib+Rc:\path\to\file.txt
Where many scripters get misled when it comes to command arguments is how to change them within your scripts. For example, how do you get the filename from a PowerShell variable? The answer is to define a variable to hold the argument value, and just use that in the place you used to write the command argument:
$filename="c:\path\to\other\file.txt"attrib+R$filename
You can use the same technique when you call a PowerShell cmdlet, script, or function:
$filename="c:\path\to\other\file.txt"Get-Acl-Path$filename
If you see a solution that uses the Invoke-Expression cmdlet to compose command arguments, it is almost certainly incorrect. The Invoke-Expression cmdlet takes the string that you give it and treats it like a full PowerShell script. As just one example of the problems this can cause, consider the following: filenames are allowed to contain the semicolon (;) character, but when Invoke-Expression sees a semicolon, it assumes that it is a new line of PowerShell script. For example, try running this:
$filename="c:\file.txt; Write-Warning 'This could be bad'"Invoke-Expression"Get-Acl -Path $filename"
Given that these dynamic arguments often come from user input, using Invoke-Expression to compose commands can (at best) cause unpredictable script results. Worse, it could result in damage to your system or a security vulnerability.
In addition to letting you supply arguments through variables one at a time, PowerShell also lets you supply several of them at once through a technique known as splatting. For more information about splatting, see Recipe 11.14.
See Also
Recipe 3.3, âStore Information in Variablesâ
Recipe 3.5, âProgram: Retain Changes to Environment Variables Set by a Batch Fileâ
Recipe 11.14, âDynamically Compose Command Parametersâ
Recipe 16.2, âModify the User or System Pathâ
Recipe 18.1, âEnable Scripting Through an Execution Policyâ
1.3 Run a PowerShell Command
Solution
To run a PowerShell command, type its name at the command prompt. For example:
PS > Get-Process

 NPM(K)    PM(M)      WS(M)     CPU(s)      Id  SI ProcessName
 ------    -----      -----     ------      --  -- -----------
     14     3.47      10.55       0.00    6476   0 AGMService
     14     3.16      10.57       0.00    3704   0 AGSService
     37    40.12      40.51       2.06   17676   1 ApplicationFrameHost
Discussion
The Get-Process command is an example of a native PowerShell command, called a cmdlet. As compared to traditional commands, cmdlets provide significant benefits to both administrators and developers:
-
They share a common and regular command-line syntax.
-
They support rich pipeline scenarios (using the output of one command as the input of another).
-
They produce easily manageable object-based output, rather than error-prone plain-text output.
Because the Get-Process cmdlet generates rich object-based output, you can use its output for many process-related tasks.
Every PowerShell command lets you provide input to the command through its parameters. For more information on providing input to commands, see âRunning Commandsâ.
The Get-Process cmdlet is just one of the many that PowerShell supports. See Recipe 1.12 to learn techniques for finding additional commands that PowerShell supports.
For more information about working with classes from the .NET Framework, see Recipe 3.8.
1.4 Resolve Errors Calling Native Executables
Solution
Enclose any affected command arguments in single quotes to prevent them from being interpreted by PowerShell, and replace any single quotes in the command with two single quotes:
PS > cmd /c echo '!"#$%&''()*+,-./09:;<=>?@AZ[\]^_`az{|}~'
!"#$%&'()*+,-./09:;<=>?@AZ[\]^_`az{|}~
For complicated commands where this does not work, use the verbatim argument
(--%) syntax:
PS > cmd /c echo 'quotes' "and" $variables @{ etc = $true }
quotes and System.Collections.Hashtable

PS > cmd --% /c echo 'quotes' "and" $variables @{ etc = $true }
'quotes' "and" $variables @{ etc = $true }
Discussion
One of PowerShellâs primary goals has always been command consistency. Because of this, cmdlets are very regular in the way that they accept parameters. Native executables write their own parameter parsing, so you never know what to expect when working with them. In addition, PowerShell offers many features that make you more efficient at the command line: command substitution, variable expansion, and more. Since many native executables were written before PowerShell was developed, they may use special characters that conflict with these features.
As an example, the command given in the Solution uses all the special characters available on a typical keyboard. Without the quotes, PowerShell treats some of them as language features, as shown in Table 1-1.
| Special character | Meaning |
|---|---|
|
The beginning (or end) of quoted text |
|
The beginning of a comment |
|
The beginning of a variable |
|
The background pipeline operator |
|
Parentheses used for subexpressions |
|
Statement separator |
|
Script block |
|
Pipeline separator |
|
Escape character |
When surrounded by single quotes, PowerShell accepts these characters as written, without the special meaning.
Despite these precautions, you may still sometimes run into a command that doesnât seem to work when called from PowerShell. For the most part, you can resolve these with the verbatim argument marker (--%) that prevents PowerShell from interpreting any of the remaining characters on the line. You can place this marker anywhere in the commandâs arguments, letting you benefit from PowerShell constructs where appropriate. The following example uses a PowerShell variable for some of the command arguments, but then uses verbatim arguments for the rest:
PS > $username = "Lee"
PS > cmd /c echo Hello $username with 'quotes' "and" $variables @{ etc = $true }
Hello Lee with quotes and System.Collections.Hashtable
PS > cmd /c echo Hello $username `
     --% with 'quotes' "and" $variables @{ etc = $true }
Hello Lee with 'quotes' "and" $variables @{ etc = $true }
While in this mode, PowerShell also accepts cmd.exe-style environment variablesâas these are frequently used in commands that âjust used to workâ:
PS > $env:host = "localhost"
PS > ping %host%
Ping request could not find host %host%. Please check the name and try again.
PS > ping --% %host%

Pinging localhost [127.0.1.1] with 32 bytes of data:
(...)
1.5 Supply Default Values for Parameters
Solution
Add an entry to the PSDefaultParameterValues hashtable:
PS > Get-Process

Handles  NPM(K)    PM(K)      WS(K) VM(M)   CPU(s)     Id ProcessName
-------  ------    -----      ----- -----   ------     -- -----------
    150      13     9692       9612    39    21.43    996 audiodg
   1013      84    45572      42716   315     1.67   4596 WWAHost
(...)

PS > $PSDefaultParameterValues["Get-Process:ID"] = $pid
PS > Get-Process

Handles  NPM(K)    PM(K)      WS(K) VM(M)   CPU(s)     Id ProcessName
-------  ------    -----      ----- -----   ------     -- -----------
    584      62   132776     157940   985    13.15   9104 powershell

PS > Get-Process -Id 0

Handles  NPM(K)    PM(K)      WS(K) VM(M)   CPU(s)     Id ProcessName
-------  ------    -----      ----- -----   ------     -- -----------
      0       0        0         20     0               0 Idle
Discussion
In PowerShell, many commands (cmdlets and advanced functions) have parameters that let you configure their behavior. For a full description of how to provide input to commands, see âRunning Commandsâ. Sometimes, though, supplying values for those parameters at each invocation becomes awkward or repetitive.
In early versions of PowerShell, it was the responsibility of each cmdlet author to recognize awkward or repetitive configuration properties and build support for âpreference variablesâ into the cmdlet itself. For example, the Send-MailMessage cmdlet looks for the $PSEmailServer variable if you do not supply a value for its
-SmtpServer parameter.
To make this support more consistent and configurable, PowerShell supports the PSDefaultParameterValues preference variable. This preference variable is a hashtable. Like all other PowerShell hashtables, entries come in two parts: the key and the value.
Keys in the PSDefaultParameterValues hashtable must match the pattern cmdlet:parameterâthat is, a cmdlet name and parameter name, separated by a colon. Either (or both) may use wildcards, and spaces between the command name, colon, and parameter are ignored.
Values for the cmdlet/parameter pairs can be either a simple parameter value (a string, boolean value, integer, etc.) or a script block. Simple parameter values are what you will use most often.
If you need the default value to dynamically change based on what parameter values are provided so far, you can use a script block as the default. When you do so, PowerShell evaluates the script block and uses its result as the default value. If your script block doesnât return a result, PowerShell doesnât apply a default value.
When PowerShell invokes your script block, $args[0] contains information about any parameters bound so far: BoundDefaultParameters, BoundParameters, and BoundPositionalParameters. As one example of this, consider providing default values to the -Credential parameter based on the computer being connected to. Hereâs a function that simply outputs the credential being used:
functionRemoteConnector{param([Parameter()]$ComputerName,[Parameter(Mandatory=$true)]$Credential)"Connecting as "+$Credential.UserName}
Now, you can define a credential map:
PS > $credmap = @{}
PS > $credmap["RemoteComputer1"] = Get-Credential
PS > $credmap["RemoteComputer2"] = Get-Credential
Then, create a parameter default for all Credential parameters that looks at the
ComputerName bound parameter:
$PSDefaultParameterValues["*:Credential"]={if($args[0].BoundParameters-contains"ComputerName"){$cred=$credmap[$PSBoundParameters["ComputerName"]]if($cred){$cred}}}
Here is an example of this in use:
PS > RemoteConnector -ComputerName RemoteComputer1
Connecting as UserForRemoteComputer1
PS > RemoteConnector -ComputerName RemoteComputer2
Connecting as UserForRemoteComputer2
PS > RemoteConnector -ComputerName RemoteComputer3

cmdlet RemoteConnector at command pipeline position 1
Supply values for the following parameters:
Credential: (...)
For more information about working with hashtables in PowerShell, see âHashtables (Associative Arrays)â.
1.6 Invoke a Long-Running or Background Command
Solution
Invoke the command as a Job to have PowerShell run it in the background:
PS > Start-Job { while($true) { Get-Random; Start-Sleep 5 } } -Name Sleeper

Id              Name            State      HasMoreData     Location
--              ----            -----      -----------     --------
1               Sleeper         Running    True            localhost

PS > Receive-Job Sleeper
671032665
1862308704
PS > Stop-Job Sleeper
Or, if your command is a single pipeline, place a & character at the end of the line to run that pipeline in the background:
PS > dir c:\windows\system32 -recurse &

Id     Name            PSJobTypeName   State         HasMore
                                                     Data
--     ----            -------------   -----         -------
1      Job1            BackgroundJob   Running       True

PS > 1+1
2

PS > Receive-Job -id 1 | Select -First 5

    Directory: C:\Windows\System32

Mode                 LastWriteTime         Length Name
----                 -------------         ------ ----
d----           12/7/2019  1:50 AM                0409
d----           11/5/2020  7:09 AM                1028
d----           11/5/2020  7:09 AM                1029
d----           11/5/2020  7:09 AM                1031
d----           11/5/2020  7:09 AM                1033
Discussion
PowerShellâs job cmdlets provide a consistent way to create and interact with background tasks. In the Solution, we use the Start-Job cmdlet to launch a background job on the local computer. We give it the name of Sleeper, but otherwise we donât customize much of its execution environment.
In addition to allowing you to customize the job name, the Start-Job cmdlet also lets you launch the job under alternate user credentials or as a 32-bit process (if run originally from a 64-bit process).
As an alternative to the Start-Job cmdlet, you can also use the Start-ThreadJob cmdlet. The Start-ThreadJob cmdlet is a bit quicker at starting background jobs and also lets you supply and interact with live objects in the jobs that you create. However, it consumes resources of your current PowerShell process and does not let you run your job under alternate user credentials.
Once you have launched a job, you can use the other Job cmdlets to interact with it:
Get-Job-
Gets all jobs associated with the current session. In addition, the
-Before,-After,-Newest, and-Stateparameters let you filter jobs based on their state or completion time. Wait-JobReceive-Job-
Retrieves any output the job has generated since the last call to
Receive-Job. Stop-JobRemove-Job
Note
In addition to the Start-Job cmdlet, you can also use the -AsJob parameter in many cmdlets to have them perform their tasks in the background. Two of the most useful examples are the Invoke-Command cmdlet (when operating against remote computers) and the ForEach-Object cmdlet.
If your job generates an error, the Receive-Job cmdlet will display it to you when you receive the results, as shown in Example 1-2. If you want to investigate these errors further, the object returned by Get-Job exposes them through the Error property.
Example 1-2. Retrieving errors from a Job
PS > Start-Job -Name ErrorJob { Write-Error Error! }

Id              Name            State      HasMoreData     Location
--              ----            -----      -----------     --------
1               ErrorJob        Running    True            localhost


PS > Receive-Job ErrorJob
Write-Error: Error!

PS > $job = Get-Job ErrorJob
PS > $job | Format-List *

State         : Completed
HasMoreData   : False
StatusMessage :
Location      : localhost
Command       :  Write-Error Error!
JobStateInfo  : Completed
Finished      : System.Threading.ManualResetEvent
InstanceId    : 801e932c-5580-4c8b-af06-ddd1024840b7
Id            : 1
Name          : ErrorJob
ChildJobs     : {Job2}
Output        : {}
Error         : {}
Progress      : {}
Verbose       : {}
Debug         : {}
Warning       : {}

PS > $job.ChildJobs[0] | Format-List *
State         : Completed
StatusMessage :
HasMoreData   : False
Location      : localhost
Runspace      : System.Management.Automation.RemoteRunspace
Command       :  Write-Error Error!
JobStateInfo  : Completed
Finished      : System.Threading.ManualResetEvent
InstanceId    : 60fa85da-448b-49ff-8116-6eae6c3f5006
Id            : 2
Name          : Job2
ChildJobs     : {}
Output        : {}
Error         : {Microsoft.PowerShell.Commands.WriteErrorException,Microso
                ft.PowerShell.Commands.WriteErrorCommand}
Progress      : {}
Verbose       : {}
Debug         : {}
Warning       : {}


PS > $job.ChildJobs[0].Error
Write-Error: Error!

PS >
As this example shows, jobs are sometimes containers for other jobs, called child jobs. Jobs created through the Start-Job cmdlet will always be child jobs attached to a generic container. To access the errors returned by these jobs, you instead access the errors in its first child job (called child job number zero).
In addition to long-running jobs that execute under control of the current PowerShell session, you might want to register and control jobs that run on a schedule, or independently of the current PowerShell session. PowerShell has a handful of commands to let you work with scheduled jobs like this; for more information, see Recipe 27.14.
1.7 Program: Monitor a Command for Changes
As thrilling as our lives are, some days are reduced to running a command over and over and over. Did the files finish copying yet? Is the build finished? Is the site still up?
Usually, the answer to these questions comes from running a command, looking at its output, and then deciding whether it meets your criteria. And usually this means just waiting for the output to change, waiting for some text to appear, or waiting for some text to disappear.
Fortunately, Example 1-3 automates this tedious process for you.
Example 1-3. Watch-Command.ps1
################################################################################## Watch-Command#### From PowerShell Cookbook (O'Reilly)## by Lee Holmes (http://www.leeholmes.com/guide)################################################################################<#.SYNOPSISWatches the result of a command invocation, alerting you when the outputeither matches a specified string, lacks a specified string, or has simplychanged..EXAMPLEPS > Watch-Command { Get-Process -Name Notepad | Measure } -UntilChangedMonitors Notepad processes until you start or stop one..EXAMPLEPS > Watch-Command { Get-Process -Name Notepad | Measure } -Until "Count : 1"Monitors Notepad processes until there is exactly one open..EXAMPLEPS > Watch-Command {Get-Process -Name Notepad | Measure } -While 'Count : \d\s*\n'Monitors Notepad processes while there are between 0 and 9 open(once number after the colon).#>[CmdletBinding(DefaultParameterSetName="Forever")]param(## The script block to invoke while monitoring[Parameter(Mandatory=$true,Position=0)][ScriptBlock]$ScriptBlock,## The delay, in seconds, between monitoring attempts[Parameter()][Double]$DelaySeconds=1,## Specifies that the alert sound should not be played[Parameter()][Switch]$Quiet,## Monitoring continues only while the output of the## command remains the same.[Parameter(ParameterSetName="UntilChanged",Mandatory=$false)][Switch]$UntilChanged,## The regular expression to search for. Monitoring continues## until this expression is found.[Parameter(ParameterSetName="Until",Mandatory=$false)][String]$Until,## The regular expression to search for. Monitoring continues## until this expression is not found.[Parameter(ParameterSetName="While",Mandatory=$false)][String]$While)Set-StrictMode-Version3$initialOutput=""$lastCursorTop=0Clear-Host## Start a continuous loopwhile($true){## Run the provided script block$r=&$ScriptBlock## Clear the screen and display the results$buffer=$ScriptBlock.ToString().Trim()+"`r`n"$buffer+="`r`n"$textOutput=$r|Out-String$buffer+=$textOutput[Console]::SetCursorPosition(0,0)[Console]::Write($buffer)$currentCursorTop=[Console]::CursorTop$linesToClear=$lastCursorTop-$currentCursorTopif($linesToClear-gt0){[Console]::Write((" "*[Console]::WindowWidth*$linesToClear))}$lastCursorTop=[Console]::CursorTop[Console]::SetCursorPosition(0,0)## Remember the initial output, if we haven't## stored it yetif(-not$initialOutput){$initialOutput=$textOutput}## If we are just looking for any change,## see if the text has changed.if($UntilChanged){if($initialOutput-ne$textOutput){break}}## If we need to ensure some text is found,## break if we didn't find it.if($While){if($textOutput-notmatch$While){break}}## If we need to wait for some text to be found,## break if we find it.if($Until){if($textOutput-match$Until){break}}## DelayStart-Sleep-Seconds$DelaySeconds}## Notify the userif(-not$Quiet){[Console]::Beep(1000,1000)}
For more information about running scripts, see Recipe 1.2.
1.8 Notify Yourself of Job Completion
Solution
Use the Register-TemporaryEvent command given in Recipe 31.3 to register for the eventâs StateChanged event:
PS > $job = Start-Job -Name TenSecondSleep { Start-Sleep 10 }
PS > Register-TemporaryEvent $job StateChanged -Action {
     [Console]::Beep(100,100)
     Write-Host "Job #$($sender.Id) ($($sender.Name)) complete."
}

PS > Job #6 (TenSecondSleep) complete.
PS >
Discussion
When a job completes, it raises a StateChanged event to notify subscribers that its state has changed. We can use PowerShellâs event handling cmdlets to register for notifications about this event, but theyâre not geared toward this type of one-time event handling. To solve that, we use the Register-TemporaryEvent command given in Recipe 31.3.
In our example action block in the Solution, we simply emit a beep and write a message saying that the job is complete.
As another option, you can also update your prompt function to highlight jobs that are complete but still have output you havenât processed:
$psJobs=@(Get-Job-StateCompleted|?{$_.HasMoreData})if($psJobs.Count-gt0){($psJobs|Out-String).Trim()|Write-Host-ForeYellow}
For more information about events and this type of automatic event handling, see Chapter 31.
1.9 Customize Your Shell, Profile, and Prompt
Solution
When you want to customize aspects of PowerShell, place those customizations in your personal profile script. PowerShell provides easy access to this profile script by storing its location in the $profile variable.
Note
By default, PowerShellâs security policies prevent scripts (including your profile) from running. Once you begin writing scripts, though, you should configure this policy to something less restrictive. For information on how to configure your execution policy, see Recipe 18.1.
To create a new profile (and overwrite one if it already exists):
New-Item-typefile-force$profile
To edit your profile (in Visual Studio Code, if you have it installed):
code$profile
To see your profile file:
Get-ChildItem$profile
Once you create a profile script, you can add a function called prompt that returns a string. PowerShell displays the output of this function as your command-line prompt:
functionprompt{"PS [$env:COMPUTERNAME] >"}
This example prompt displays your computer name, and looks like PS [LEE-DESK] >.
You may also find it helpful to add aliases to your profile. Aliases let you refer to common commands by a name that you choose. Personal profile scripts let you automatically define aliases, functions, variables, or any other customizations that you might set interactively from the PowerShell prompt. Aliases are among the most common customizations, as they let you refer to PowerShell commands (and your own scripts) by a name that is easier to type.
Note
If you want to define an alias for a command but also need to modify the parameters to that command, then define a function instead. For more information, see Recipe 11.14.
For example:
Set-AliasnewNew-ObjectSet-Aliasbrowse'C:\Users\lee\AppData\Local\Microsoft\*\MicrosoftEdge.exe'
Your changes will become effective once you save your profile and restart PowerShell. Alternatively, you can reload your profile immediately by running this command:
.$profile
Functions are also very common customizations, with the most popular being the prompt function.
Discussion
The Solution discusses three techniques to make useful customizations to your PowerShell environment: aliases, functions, and a hand-tailored prompt. You can (and will often) apply these techniques at any time during your PowerShell session, but your profile script is the standard place to put customizations that you want to apply to every session.
Note
To remove an alias or function, use the Remove-Item cmdlet:
Remove-Itemfunction:\MyCustomFunctionRemove-Itemalias:\new
Although the prompt function returns a simple string, you can also use the function for more complex tasks. For example, many users update their console window title (by changing the $host.UI.RawUI.WindowTitle variable) or use the Write-Host cmdlet to output the prompt in color. If your prompt function handles the screen output itself, it still needs to return a string (for example, a single space) to prevent PowerShell from using its default. If you donât want this extra space to appear in your prompt, add an extra space at the end of your Write-Host command and return the backspace ("`b") character, as shown in Example 1-4.
Example 1-4. An example PowerShell prompt
################################################################################## From PowerShell Cookbook (O'Reilly)## by Lee Holmes (http://www.leeholmes.com/guide)################################################################################Set-StrictMode-Version3functionprompt{$id=1$historyItem=Get-History-Count1if($historyItem){$id=$historyItem.Id+1}Write-Host-ForegroundColorDarkGray"`n[$(Get-Location)]"Write-Host-NoNewLine"PS:$id > "$host.UI.RawUI.WindowTitle="$(Get-Location)""`b"}
In addition to showing the current location, this prompt also shows the ID for that command in your history. This lets you locate and invoke past commands with relative ease:
[C:\]
PS:73 >5 * 5
25

[C:\]
PS:74 >1 + 1
2

[C:\]
PS:75 >Invoke-History 73
5 * 5
25

[C:\]
PS:76 >
Although the profile referenced by $profile is the one you will almost always want to use, PowerShell actually supports four separate profile scripts. For further details on these scripts (along with other shell customization options), see âCommon Customization Pointsâ.
1.10 Customize PowerShellâs User Input Behavior
Solution
Use the Set-PSReadLineOption cmdlet to configure properties such as EditMode (Windows, VI, Emacs) and history management. For example, to make the continuation line for incomplete input a bit more red than usual:
Set-PSReadLineOption-Colors@{ContinuationPrompt="#663333"}
Use the Set-PSReadLineKeyHandler command to configure how PSReadLine responds to your actual keypresses. For example, to add forward and backward directory history navigation for Alt+Comma and Alt+Period:
Set-PSReadLineKeyHandler-Chord'Alt+,'-ScriptBlock{Set-Location-[Microsoft.PowerShell.PSConsoleReadLine]::RevertLine()[Microsoft.PowerShell.PSConsoleReadLine]::AcceptLine()}Set-PSReadLineKeyHandler-Chord'Alt+.'-ScriptBlock{Set-Location+[Microsoft.PowerShell.PSConsoleReadLine]::RevertLine()[Microsoft.PowerShell.PSConsoleReadLine]::AcceptLine()}
Discussion
When PowerShell first came on the scene, Unix folks were among the first to notice. Theyâd enjoyed a powerful shell and a vigorous heritage of automation for yearsâand âwhen Iâm forced to use Windows, PowerShell rocksâ is a phrase weâve heard many times.
This natural uptake was no mistake. There are many on the team who come from a deep Unix background, and similarities to traditional Unix shells were intentional. For folks coming from other shells, though, we still hear the occasional grumble that some feature or another feels weird. Alt+P doesnât launch the built-in paging utility? Ctrl+XX doesnât move between the beginning of the line and current cursor position? Abhorrent!
In early versions of PowerShell, there was nothing you could reasonably do to address this. In those versions, PowerShell read its input from the console in what is known as Cooked Modeâwhere the Windows console subsystem handles all the keypresses, fancy F7 menus, and more. When you press Enter or Tab, PowerShell gets the text of what you have typed so far, but thatâs it. There is no way for it to know that you had pressed the (Unix-like) Ctrl+R, Ctrl+A, Ctrl+E, or any other keys.
In later versions of PowerShell, most of these questions have gone away with the introduction of the fantastic PSReadLine module that PowerShell uses for command-line input. PSReadLine adds rich syntax highlighting, tab completion, history navigation, and more.
The PSReadLine module lets you configure it to an incredible degree. The
Set-PSReadLineOption cmdlet supports options for its UI, input handling mode, history processing, and much more:
EditMode                       BellStyle
ContinuationPrompt             CompletionQueryItems
HistoryNoDuplicates            WordDelimiters
AddToHistoryHandler            HistorySearchCaseSensitive
CommandValidationHandler       HistorySaveStyle
HistorySearchCursorMovesToEnd  HistorySavePath
MaximumHistoryCount            AnsiEscapeTimeout
MaximumKillRingCount           PromptText
ShowToolTips                   ViModeIndicator
ExtraPromptLineCount           ViModeChangeHandler
DingTone                       PredictionSource
DingDuration                   Colors
In addition to letting you configure its runtime behavior, you can also configure how your keypresses cause it to react. To see all of the behaviors that you can map to key presses, run Get-PSReadLineKeyHandler. PSReadLine offers pages of optionsâmany of them not currently assigned to any keypress:
PS > Get-PSReadLineKeyHandler

Basic editing functions
=======================

Key              Function           Description
---              --------           -----------
Enter            AcceptLine         Accept the input or move to the next line if
                                    input is missing a closing token.
Shift+Enter      AddLine            Move the cursor to the next line without
                                    attempting to execute the input
Backspace        BackwardDeleteChar Delete the character before the cursor
Ctrl+h           BackwardDeleteChar Delete the character before the cursor
Ctrl+Home        BackwardDeleteLine Delete text from the cursor to the start of
                                    the line
Ctrl+Backspace   BackwardKillWord   Move the text from the start of the current
                                    or previous word to the cursor to the kill
                                    ring
Ctrl+w           BackwardKillWord   Move the text from the start of the current
                                    or previous word to the cursor to...
(...)
To configure any of these functions, use the Set-PSReadLineKeyHandler command. For example, to set Ctrl+Shift+C to capture colorized regions of the buffer into your clipboard, run:
Set-PSReadLineKeyHandler-ChordCtrl+Shift+C-FunctionCaptureScreen
If there isnât a pre-defined function to do what you want, you can use the
-ScriptBlock parameter to have PSReadLine run any code of your choosing when you press a key or key combination. The example given by the Solution demonstrates this by adding forward and backward directory history navigation.
To make any of these changes persist, simply add these commands to your PowerShell Profile.
Although really only for extremely advanced scenarios now that PSReadLine covers almost everything you would ever need, you can customize or augment this functionality even further through the PSConsoleHostReadLine function. When you define this method in the PowerShell console host, PowerShell calls that function instead of Windowsâ default Cooked Mode input functionality. The default version of this function launches PSReadLineâs ReadLine input handler. But if you wish to redefine this completely, thatâs itâthe rest is up to you. If youâd like to implement a custom input method, the freedom (and responsibility) is all yours.
When you define this function, it must process the user input and return the resulting command. Example 1-5 implements a somewhat ridiculous Notepad-based user input mechanism:
Example 1-5. A Notepad-based user input mechanism
functionPSConsoleHostReadLine{$inputFile=Join-Path$env:TEMPPSConsoleHostReadLineSet-Content$inputFile"PS > "## Notepad opens. Enter your command in it, save the file,## and then exit.notepad$inputFile|Out-Null$userInput=Get-Content$inputFile$resultingCommand=$userInput.Replace("PS >","")$resultingCommand}
For more information about handling keypresses and other forms of user input, see Chapter 13.
1.11 Customize PowerShellâs Command Resolution Behavior
Solution
Assign a script block to one or all of the PreCommandLookupAction, PostCommandâLooâ kupAction, or CommandNotFoundAction properties of $executionContext.SessionState.InvokeCommand. Example 1-6 enables easy parent directory navigation when you type multiple dots.
Discussion
When you invoke a command in PowerShell, the engine goes through three distinct phases:
-
Retrieve the text of the command.
-
Find the command for that text.
-
Invoke the command that was found.
In PowerShell the $executionContext.SessionState.InvokeCommand property lets you override any of these stages with script blocks to intercept any or all of the
PreCommandLookupAction, PostCommandLookupAction, or CommandNotFoundAction stages.
Each script block receives two parameters: the command name, and an object
(CommandLookupEventArgs) to control the command lookup behavior. If your handler assigns a script block to the CommandScriptBlock property of the CommandâLookuâ pEventArgs or assigns a CommandInfo to the Command property of the CommandLookupEventArgs, PowerShell will use that script block or command, respectively. If your script block sets the StopSearch property to true, PowerShell will do no further command resolution.
PowerShell invokes the PreCommandLookupAction script block when it knows the name of a command (i.e., Get-Process) but hasnât yet looked for the command itself. You can override this action if you want to react primarily based on the text of the command name or want to preempt PowerShellâs regular command or alias resolution. For example, Example 1-7 demonstrates a PreCommandLookupAction that looks for commands with an asterisk before their name. When it sees one, it enables the
-Verbose parameter.
Example 1-7. Customizing the PreCommandLookupAction
$executionContext.SessionState.InvokeCommand.PreCommandLookupAction = {
    param($CommandName, $CommandLookupEventArgs)

    ## If the command name starts with an asterisk, then
    ## enable its Verbose parameter
    if($CommandName -match "\*")
    {
        ## Remove the leading asterisk
        $NewCommandName = $CommandName -replace '\*',''

        ## Create a new script block that invokes the actual command,
        ## passes along all original arguments, and adds in the -Verbose
        ## parameter
        $CommandLookupEventArgs.CommandScriptBlock = {
            & $NewCommandName @args -Verbose

        ## We call GetNewClosure() so that the reference to $NewCommandName
        ## can be used in the new command.
        }.GetNewClosure()
    }
}

PS > dir > 1.txt
PS > dir > 2.txt
PS > del 1.txt
PS > *del 2.txt
VERBOSE: Performing operation "Remove file" on Target "C:\temp\tempfolder\2.txt".
After PowerShell executes the PreCommandLookupAction (if one exists and doesnât return a command), it goes through its regular command resolution. If it finds a command, it invokes the script block associated with the PostCommandLookupAction. You can override this action if you want to react primarily to a command that is just about to be invoked. Example 1-8 demonstrates a PostCommandLookupAction that tallies the commands you use most frequently.
Example 1-8. Customizing the PostCommandLookupAction
$executionContext.SessionState.InvokeCommand.PostCommandLookupAction = {
    param($CommandName, $CommandLookupEventArgs)

    ## Stores a hashtable of the commands we use most frequently
    if(-not (Test-Path variable:\CommandCount))
    {
        $global:CommandCount = @{}
    }

    ## If it was launched by us (rather than as an internal helper
    ## command), record its invocation.
    if($CommandLookupEventArgs.CommandOrigin -eq "Runspace")
    {
        $commandCount[$CommandName] = 1 + $commandCount[$CommandName]
    }
}

PS > Get-Variable commandCount
PS > Get-Process -id $pid
PS > Get-Process -id $pid
PS > $commandCount

Name                           Value
----                           -----
Out-Default                    4
Get-Variable                   1
prompt                         4
Get-Process                    2
If command resolution is unsuccessful, PowerShell invokes the CommandNotFoundâAcâ tion script block if one exists. At its simplest, you can override this action if you want to recover from or override PowerShellâs error behavior when it cannot find a
command.
As a more advanced application, the CommandNotFoundAction lets you write PowerShell extensions that alter their behavior based on the form of the name, rather than the arguments passed to it. For example, you might want to automatically launch URLs just by typing them or navigate around providers just by typing relative path locations.
The Solution gives an example of implementing this type of handler. While dynamic relative path navigation is not a built-in feature of PowerShell, itâs possible to get a very reasonable alternative by intercepting the CommandNotFoundAction. If we see a missing command that has a pattern we want to handle (a series of dots), we return a script block that does the appropriate relative path navigation.
1.12 Find a Command to Accomplish a Task
Solution
Use the Get-Command cmdlet to search for and investigate commands.
To get the summary information about a specific command, specify the command name as an argument:
Get-Command CommandName
To get the detailed information about a specific command, pipe the output of
Get-Command to the Format-List cmdlet:
Get-Command CommandName | Format-List
To search for all commands with a name that contains text, surround the text with asterisk characters:
Get-Command *text*
To search for all commands that use the Get verb, supply Get to the
-Verb parameter:
Get-Command-VerbGet
To search for all commands that act on a service, use Service as the value of the
-Noun parameter:
Get-Command -Noun Service
Discussion
One of the benefits that PowerShell provides administrators is the consistency of its command names. All PowerShell commands (called cmdlets) follow a regular Verb-Noun patternâfor example, Get-Process, Get-Service, and Set-Location. The verbs come from a relatively small set of standard verbs (as listed in Appendix J) and describe what action the cmdlet takes. The nouns are specific to the cmdlet and describe what the cmdlet acts on.
Knowing this philosophy, you can easily learn to work with groups of cmdlets. If you want to start a service on the local machine, the standard verb for that is Start. A good guess would be to first try Start-Service (which in this case would be correct), but typing Get-Command -Verb Start would also be an effective way to see what things you can start. Going the other way, you can see what actions are supported on services by typing Get-Command -Noun Service.
When you use the Get-Command cmdlet, PowerShell returns results from the list of all commands available on your system. If youâd instead like to search just commands from modules that youâve loaded either explicitly or through autoloading, use the
-ListImported parameter. For more information about PowerShellâs autoloading of commands, see Recipe 1.28.
See Recipe 1.13 for a way to list all commands along with a brief description of what they do.
The Get-Command cmdlet is one of the three commands you will use most commonly as you explore PowerShell. The other two commands are Get-Help and Get-Member.
There is one important point to keep in mind when it comes to looking for a PowerShell command to accomplish a particular task. Many times, that PowerShell command does not exist, because the task is best accomplished the same way it always
wasâfor example, ipconfig.exe to get IP configuration information, netstat.exe to list protocol statistics and current TCP/IP network connections, and many more.
For more information about the Get-Command cmdlet, type Get-Help Get-Command.
See Also
1.13 Get Help on a Command
Solution
The command that provides help and usage information about a command is called Get-Help. It supports several different views of the help information, depending on your needs.
To get the summary of help information for a specific command, provide the commandâs name as an argument to the Get-Help cmdlet. This primarily includes its synopsis, syntax, and detailed description:
Get-Help CommandName
or:
CommandName -?To get the detailed help information for a specific command, supply the -Detailed flag to the Get-Help cmdlet. In addition to the summary view, this also includes its parameter descriptions and examples:
Get-Help CommandName -Detailed
To get the full help information for a specific command, supply the -Full flag to the Get-Help cmdlet. In addition to the detailed view, this also includes its full parameter descriptions and additional notes:
Get-Help CommandName -Full
To get only the examples for a specific command, supply the -Examples flag to the Get-Help cmdlet:
Get-Help CommandName -Examples
To retrieve the most up-to-date online version of a commandâs help topic, supply the -Online flag to the Get-Help cmdlet:
Get-Help CommandName -Online
To view a searchable, graphical view of a help topic, use the -ShowWindow parameter:
Get-Help CommandName -ShowWindow
To find all help topics that contain a given keyword, provide that keyword as an argument to the Get-Help cmdlet. If the keyword isnât also the name of a specific help topic, this returns all help topics that contain the keyword, including its name, category, and synopsis:
Get-Help Keyword
Discussion
The Get-Help cmdlet is the primary way to interact with the help system in PowerShell. Like the Get-Command cmdlet, the Get-Help cmdlet supports wildcards. If you want to list all commands that have help content that matches a certain pattern (for example, process), you can simply type:
Get-Help*process*
If the pattern matches only a single command, PowerShell displays the help for that command. Although command wildcarding and keyword searching is a helpful way to search PowerShell help, see Recipe 1.15 for a script that lets you search the help content for a specified pattern.
While there are thousands of pages of custom-written help content at your disposal, PowerShell by default includes only information that it can automatically generate from the information contained in the commands themselves: names, parameters, syntax, and parameter defaults. You need to update your help content to retrieve the rest. When you run Get-Help for a command that you havenât downloaded help content for, you will see the following remarks as part of that help:
REMARKS
    Get-Help cannot find the Help files for this cmdlet on this computer.
    It is displaying only partial help.
        -- To download and install Help files for the module that includes
    this cmdlet, use Update-Help.
        -- To view the Help topic for this cmdlet online, type: "Get-Help
    Get-Process -Online" or
           go to https://go.microsoft.com/fwlink/?LinkID=2096814.
Run the Update-Help cmdlet, and PowerShell automatically downloads and installs the most recent help content for all modules on your system. For more information on updatable help, see Recipe 1.14.
If youâd like to generate a list of all cmdlets and aliases (along with their brief synopses), run the following command:
Get-Help*-CategoryCmdlet|Select-ObjectName,Synopsis|Format-Table-Auto
In addition to console-based help, PowerShell also offers online access to its help content. The Solution demonstrates how to quickly access online help content.
The Get-Help cmdlet is one of the three commands you will use most commonly as you explore PowerShell. The other two commands are Get-Command and Get-Member.
For more information about the Get-Help cmdlet, type Get-Help Get-Help.
1.14 Update System Help Content
Discussion
One of PowerShellâs greatest strengths is the incredible detail of its help content. Counting only the help content and about_* topics that describe core functionality, PowerShellâs help includes approximately half a million words and would span 1,200 pages if printed.
The challenge that every version of PowerShell has been forced to deal with is that this help content is written at the same time as PowerShell itself. Given that its goal is to help the user, the content thatâs ready by the time a version of PowerShell releases is a best-effort estimate of what users will need help with.
As users get their hands on PowerShell, they start to have questions. Some of these are addressed by the help topics, while some of them arenât. Sometimes the help is simply incorrect due to a product change during the release. To address this, PowerShell supports updatable help.
Itâs not only possible to update help, but in fact the Update-Help command is the only way to get help on your system. Out of the box, PowerShell provides an experience derived solely from what is built into the commands themselves: name, syntax, parameters, and default values.
When you run Get-Help for a command that you havenât downloaded help content for, youâll see the following remarks as part of that help:
REMARKS
    Get-Help cannot find the Help files for this cmdlet on this computer.
    It is displaying only partial help.
        -- To download and install Help files for the module that includes
    this cmdlet, use Update-Help.
        -- To view the Help topic for this cmdlet online, type: "Get-Help
    Get-Process -Online" or
           go to https://go.microsoft.com/fwlink/?LinkID=2096814.
Run the Update-Help cmdlet, and PowerShell automatically downloads and installs the most recent help content for all modules on your system.
When you run Update-Help, PowerShell looks at each module on your system, comparing the help you have for that module with the latest version online. For in-box modules, PowerShell uses download.microsoft.com to retrieve updated help content. Other modules that you download from the internet can use the HelpInfoUri module key to support their own updatable help.
PowerShell stores this content in the PowerShell\Help directory in your user documents or home directory.
By default, the Update-Help command retrieves its content from the internet. If you want to update help on a machine not connected to the internet, you can use the
-SourcePath parameter of the Update-Help cmdlet. This path represents a directory or UNC path where PowerShell should look for updated help content. To populate this content, first use the Save-Help cmdlet to download the files, and then copy them to the source location.
For more information about PowerShell help, see Recipe 1.13.
1.15 Program: Search Help for Text
Both the Get-Command and Get-Help cmdlets let you search for command names that match a given pattern. However, when you donât know exactly what portions of a command name you are looking for, you will more often have success searching through the help content for an answer. On Unix systems, this command is called Apropos.
The Get-Help cmdlet automatically searches the help database for keyword references when it canât find a help topic for the argument you supply. In addition to that, you might want to extend this even further to search for text patterns or even help topics that talk about existing help topics. PowerShellâs help facilities support a version of wildcarded content searches, but donât support full regular expressions.
That doesnât need to stop us, though, as we can write the functionality ourselves.
To run this program, supply a search string to the Search-Help script (given in Example 1-9). The search string can be either simple text or a regular expression. The script then displays the name and synopsis of all help topics that match. To see the help content for that topic, use the Get-Help cmdlet.
Example 1-9. Search-Help.ps1
################################################################################## Search-Help#### From PowerShell Cookbook (O'Reilly)## by Lee Holmes (http://www.leeholmes.com/guide)################################################################################<#.SYNOPSISSearch the PowerShell help documentation for a given keyword or regularexpression. For simple keyword searches in PowerShell version two or three,simply use "Get-Help <keyword>".EXAMPLEPS > Search-Help hashtableSearches help for the term 'hashtable'.EXAMPLEPS > Search-Help "(datetime|ticks)"Searches help for the term datetime or ticks, using the regular expressionsyntax.#>param(## The pattern to search for[Parameter(Mandatory=$true)]$Pattern)$helpNames=$(Get-Help*|Where-Object{$_.Category-ne"Alias"})## Go through all of the help topicsforeach($helpTopicin$helpNames){## Get their text content, and$content=Get-Help-Full$helpTopic.Name|Out-Stringif($content-match"(.{0,30}$pattern.{0,30})"){$helpTopic|Add-MemberNotePropertyMatch$matches[0].Trim()$helpTopic|Select-ObjectName,Match}}
For more information about running scripts, see Recipe 1.2.
1.16 Launch PowerShell at a Specific Location
Discussion
If you are browsing the filesystem with Windows Explorer, typing pwsh.exe or
powershell.exe into the address bar launches PowerShell in that location (as shown in Figure 1-2).
Figure 1-2. Launching PowerShell from Windows Explorer
Note that what you type must end with the .exe extension, otherwise Explorer will generally open your PowerShell documents folder. Additionally, you can open Windows PowerShell directly from the File menu, as shown in Figure 1-3.
For another way to launch PowerShell from Windows Explorer, Windows Terminal (if youâve installed it) adds an âOpen in Windows Terminalâ option when you right-click on a folder from Windows Explorer.
If you arenât browsing the desired folder with Windows Explorer, you can use StartâRun (or any other means of launching an application) to launch PowerShell at a specific location. For that, use PowerShellâs -NoExit parameter, along with the
-Command parameter. In the -Command parameter, call the Set-Location cmdlet to initially move to your desired location.
pwsh -NoExit -Command Set-Location 'C:\Program Files'
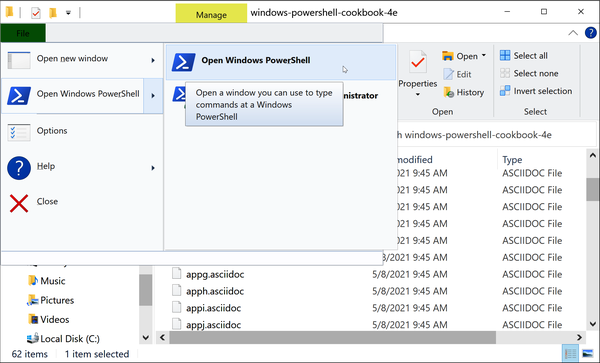
Figure 1-3. Launching PowerShell from Explorer
1.17 Invoke a PowerShell Command or Script from Outside PowerShell
Discussion
By default, any arguments to pwsh.exe get interpreted as a script to run. If you use the -Command parameter, PowerShell runs the command as though you had typed it in the interactive shell, and then exits. You can customize this behavior by supplying other parameters to pwsh.exe, such as -NoExit, -NoProfile, and more.
Note
If you are the author of a program that needs to run PowerShell scripts or commands, PowerShell lets you call these scripts and commands much more easily than calling its command-line interface. For more information about this approach, see Recipe 17.10.
Since launching a script is so common, PowerShell provides the -File parameter to eliminate the complexities that arise from having to invoke a script from the
-Command parameter. This technique lets you invoke a PowerShell script as the target of a logon script, advanced file association, scheduled task, and more.
Note
When PowerShell detects that its input or output streams have been redirected, it suppresses any prompts that it might normally display. If you want to host an interactive PowerShell prompt inside another application (such as Emacs), use - as the argument for the -File parameter. In PowerShell (as with traditional Unix shells), this implies âtaken from standard input.â
pwsh -File -
If the script is for background automation or a scheduled task, these scripts can sometimes interfere with (or become influenced by) the userâs environment. For these situations, three parameters come in handy:
-NoProfile-
Runs the command or script without loading user profile scripts. This makes the script launch faster, but it primarily prevents user preferences (e.g., aliases and preference variables) from interfering with the scriptâs working environment.
-WindowStyle-
Runs the command or script with the specified window styleâmost commonly
Hidden. When run with a window style ofHidden, PowerShell hides its main window immediately. For more ways to control the window style from within PowerShell, see Recipe 24.3. -ExecutionPolicy-
Runs the command or script with a specified execution policy applied only to this instance of PowerShell. This lets you write PowerShell scripts to manage a system without having to change the system-wide execution policy. For more information about scoped execution policies, see Recipe 18.1.
If the arguments to the -Command parameter become complex, special character handling in the application calling PowerShell (such as cmd.exe) might interfere with the command you want to send to PowerShell. For this situation, PowerShell supports an EncodedCommand parameter: a Base64-encoded representation of the Unicode string you want to run. Example 1-10 demonstrates how to convert a string containing PowerShell commands to a Base64-encoded form.
Example 1-10. Converting PowerShell commands into a Base64-encoded form
$commands='1..10 | % { "PowerShell Rocks" }'$bytes=[System.Text.Encoding]::Unicode.GetBytes($commands)$encodedString=[Convert]::ToBase64String($bytes)
Once you have the encoded string, you can use it as the value of the EncodedCommand parameter, as shown in Example 1-11.
Example 1-11. Launching PowerShell with an encoded command from cmd.exe
Microsoft Windows [Version 10.0.19041.685]
(c) 2020 Microsoft Corporation. All rights reserved.

C:\Users\Lee>PowerShell -EncodedCommand MQAuAC4AMQAwACAAfAAgACUAIAB7ACAAIgBQAG8A
   dwBlAHIAUwBoAGUAbABsACAAUgBvAGMAawBzACIAIAB9AA==
PowerShell Rocks
PowerShell Rocks
PowerShell Rocks
PowerShell Rocks
PowerShell Rocks
PowerShell Rocks
PowerShell Rocks
PowerShell Rocks
PowerShell Rocks
PowerShell Rocks
For more information about running scripts, see Recipe 1.2.
1.18 Understand and Customize PowerShellâs Tab Completion
Discussion
When you press Tab, PowerShell invokes a facility known as tab expansion: replacing what youâve typed so far with an expanded version of that (if any apply.) For example, if you type Set-Location C:\ and then press Tab, PowerShell starts cycling through directories under C:\ for you to navigate into.
The features offered by PowerShellâs built-in tab expansion are quite rich, as shown in Table 1-2.
| Description | Example |
|---|---|
Command completion. Completes command names when current text appears to represent a command invocation. |
|
Parameter completion. Completes command parameters for the current command. |
|
Argument completion. Completes command arguments for the current command parameter. This applies to any command argument that takes a fixed set of values (enumerations or parameters that define a |
|
History text completion. Replaces the current input with items from the command history that match the text after the |
|
History ID completion. Replaces the current input with the command line from item number |
|
Filename completion. Replaces the current parameter value with file names that match what youâve typed so far. When applied to the |
|
Operator completion. Replaces the current text with a matching operator. This includes flags supplied to the |
|
Variable completion. Replaces the current text with available PowerShell variables. PowerShell even incorporates variables from script content that has never been invoked. |
|
Member completion. Replaces member names for the currently referenced variable or type. When PowerShell can infer the members from previous commands in the pipeline, it even supports member completion within script blocks. |
|
Type completion. Replaces abbreviated type names with their namespace-qualified name. |
|
If you want to extend PowerShellâs tab expansion capabilities, define a function called TabExpansion2. You can add this to your PowerShell profile directly, or dot-source it from your profile. Example 1-12 demonstrates an example custom tab expansion function that extends the functionality already built into PowerShell.
Example 1-12. A sample implementation of TabExpansion2
################################################################################## TabExpansion2#### From PowerShell Cookbook (O'Reilly)## by Lee Holmes (http://www.leeholmes.com/guide)################################################################################functionTabExpansion2{[CmdletBinding(DefaultParameterSetName='ScriptInputSet')]Param([Parameter(ParameterSetName='ScriptInputSet',Mandatory=$true,Position=0)][string]$inputScript,[Parameter(ParameterSetName='ScriptInputSet',Mandatory=$true,Position=1)][int]$cursorColumn,[Parameter(ParameterSetName='AstInputSet',Mandatory=$true,Position=0)][System.Management.Automation.Language.Ast]$ast,[Parameter(ParameterSetName='AstInputSet',Mandatory=$true,Position=1)][System.Management.Automation.Language.Token[]]$tokens,[Parameter(ParameterSetName='AstInputSet',Mandatory=$true,Position=2)][System.Management.Automation.Language.IScriptPosition]$positionOfCursor,[Parameter(ParameterSetName='ScriptInputSet',Position=2)][Parameter(ParameterSetName='AstInputSet',Position=3)][Hashtable]$options=$null)End{## Create a new 'Options' hashtable if one has not been supplied.## In this hashtable, you can add keys for the following options, using## $true or $false for their values:#### IgnoreHiddenShares - Ignore hidden UNC shares (such as \\COMPUTER\ADMIN$)## RelativePaths - When expanding filenames and paths, $true forces PowerShell## to replace paths with relative paths. When $false, forces PowerShell to## replace them with absolute paths. By default, PowerShell makes this## decision based on what you had typed so far before invoking tab completion.## LiteralPaths - Prevents PowerShell from replacing special file characters## (such as square brackets and back-ticks) with their escaped equivalent.if(-not$options){$options=@{}}## Demonstrate some custom tab expansion completers for parameters.## This is a hash table of parameter names (and optionally cmdlet names)## that we add to the $options hashtable.#### When PowerShell evaluates the script block, $args gets the## following: command name, parameter, word being completed,## AST of the command being completed, and currently-bound arguments.$options["CustomArgumentCompleters"]=@{"Get-ChildItem:Filter"={"*.ps1","*.txt","*.doc"}"ComputerName"={"ComputerName1","ComputerName2","ComputerName3"}}## Also define a completer for a native executable.## When PowerShell evaluates the script block, $args gets the## word being completed, and AST of the command being completed.$options["NativeArgumentCompleters"]=@{"attrib"={"+R","+H","+S"}}## Define a "quick completions" list that we'll cycle through## when the user types '!!' followed by TAB.$quickCompletions=@('Get-Process -Name PowerShell | ? Id -ne $pid | Stop-Process','Set-Location $pshome',('$errors = $error | % { $_.InvocationInfo.Line }; Get-History | '+' ? { $_.CommandLine -notin $errors }'))## First, check the built-in tab completion results$result=$nullif($psCmdlet.ParameterSetName-eq'ScriptInputSet'){$result=[System.Management.Automation.CommandCompletion]::CompleteInput(<#inputScript#>$inputScript,<#cursorColumn#>$cursorColumn,<#options#>$options)}else{$result=[System.Management.Automation.CommandCompletion]::CompleteInput(<#ast#>$ast,<#tokens#>$tokens,<#positionOfCursor#>$positionOfCursor,<#options#>$options)}## If we didn't get a resultif($result.CompletionMatches.Count-eq0){## If this was done at the command-line or in a remote session,## create an AST out of the inputif($psCmdlet.ParameterSetName-eq'ScriptInputSet'){$ast=[System.Management.Automation.Language.Parser]::ParseInput($inputScript,[ref]$tokens,[ref]$null)}## In this simple example, look at the text being supplied.## We could do advanced analysis of the AST here if we wanted,## but in this case just use its text. We use a regular expression## to check if the text started with two exclamations, and then## use a match group to retain the rest.$text=$ast.Extent.Textif($text-match'^!!(.*)'){## Extract the rest of the text from the regular expression## match group.$currentCompletionText=$matches[1].Trim()## Go through each of our quick completions and add them to## our completion results. The arguments to the completion results## are the text to be used in tab completion, a potentially shorter## version to use for display (i.e.: intellisense in the ISE),## the type of match, and a potentially more verbose description to## be used as a tool tip.$quickCompletions|Where-Object{$_-match$currentCompletionText}|Foreach-Object{$result.CompletionMatches.Add((New-ObjectManagement.Automation.CompletionResult$_,$_,"Text",$_))}}}return$result}}
1.19 Program: Learn Aliases for Common Commands
In interactive use, full cmdlet names (such as Get-ChildItem) are cumbersome and slow to type. Although aliases are much more efficient, it takes a while to discover them. To learn aliases more easily, you can modify your prompt to remind you of the shorter version of any aliased commands that you use.
This involves two steps:
-
Add the program,
Get-AliasSuggestion.ps1, shown in Example 1-13, to your tools directory or another directory.Example 1-13. Get-AliasSuggestion.ps1
################################################################################## Get-AliasSuggestion#### From PowerShell Cookbook (O'Reilly)## by Lee Holmes (http://www.leeholmes.com/guide)################################################################################<#.SYNOPSISGet an alias suggestion from the full text of the last command. Intended tobe added to your prompt function to help learn aliases for commands..EXAMPLEPS > Get-AliasSuggestion Remove-ItemPropertySuggestion: An alias for Remove-ItemProperty is rp#>param(## The full text of the last command$LastCommand)Set-StrictMode-Version3$helpMatches=@()## Find all of the commands in their last input$tokens=[Management.Automation.PSParser]::Tokenize($lastCommand,[ref]$null)$commands=$tokens|Where-Object{$_.Type-eq"Command"}## Go through each commandforeach($commandin$commands){## Get the alias suggestionsforeach($aliasinGet-Alias-Definition$command.Content){$helpMatches+="Suggestion: An alias for "+"$($alias.Definition)is$($alias.Name)"}}$helpMatches -
Add the text from Example 1-14 to the
Promptfunction in your profile. If you donât yet have aPromptfunction, see Recipe 1.9 to learn how to add one.Example 1-14. A useful prompt to teach you aliases for common commands
functionprompt{## Get the last item from the history$historyItem=Get-History-Count1## If there were any history itemsif($historyItem){## Get the training suggestion for that item$suggestions=@(Get-AliasSuggestion$historyItem.CommandLine)## If there were any suggestionsif($suggestions){## For each suggestion, write it to the screenforeach($aliasSuggestionin$suggestions){Write-Host"$aliasSuggestion"}Write-Host""}}## Rest of prompt goes here"PS [$env:COMPUTERNAME] >"}
For more information about running scripts, see Recipe 1.2.
1.20 Program: Learn Aliases for Common Parameters
Solution
Use the Get-ParameterAlias script, as shown in Example 1-15, to return all aliases for parameters used by the previous command in your session history.
Example 1-15. Get-ParameterAlias.ps1
################################################################################## Get-ParameterAlias#### From PowerShell Cookbook (O'Reilly)## by Lee Holmes (http://www.leeholmes.com/guide)################################################################################<#.SYNOPSISLooks in the session history, and returns any aliases that apply toparameters of commands that were used..EXAMPLEPS > dir -ErrorAction SilentlyContinuePS > Get-ParameterAliasAn alias for the 'ErrorAction' parameter of 'dir' is ea#>Set-StrictMode-Version3## Get the last item from their session history$history=Get-History-Count1if(-not$history){return}## And extract the actual command line they typed$lastCommand=$history.CommandLine## Use the Tokenizer API to determine which portions represent## commands and parameters to those commands$tokens=[System.Management.Automation.PsParser]::Tokenize($lastCommand,[ref]$null)$currentCommand=$null## Now go through each resulting tokenforeach($tokenin$tokens){## If we've found a new command, store that.if($token.Type-eq"Command"){$currentCommand=$token.Content}## If we've found a command parameter, start looking for aliasesif(($token.Type-eq"CommandParameter")-and($currentCommand)){## Remove the leading "-" from the parameter$currentParameter=$token.Content.TrimStart("-")## Determine all of the parameters for the current command.(Get-Command$currentCommand).Parameters.GetEnumerator()|## For parameters that start with the current parameter name,Where-Object{$_.Key-like"$currentParameter*"}|## return all of the aliases that apply. We use "starts with"## because the user might have typed a shortened form of## the parameter name.Foreach-Object{$_.Value.Aliases|Foreach-Object{"Suggestion: An alias for the '$currentParameter' "+"parameter of '$currentCommand' is '$_'"}}}}
Discussion
To make it easy to type command parameters, PowerShell lets you type only as much of the command parameter as is required to disambiguate it from other parameters of that command. In addition to shortening implicitly supported by the shell, cmdlet authors can also define explicit aliases for their parametersâfor example, CN as a short form for ComputerName.
While helpful, these aliases are difficult to discover.
If you want to see the aliases for a specific command, you can access its Parameters collection:
PS > (Get-Command New-TimeSpan).Parameters.Values | Select Name,Aliases

Name                Aliases
----                -------
Start               {LastWriteTime}
End                 {}
Days                {}
Hours               {}
Minutes             {}
Seconds             {}
Verbose             {vb}
Debug               {db}
ErrorAction         {ea}
WarningAction       {wa}
InformationAction   {infa}
ErrorVariable       {ev}
WarningVariable     {wv}
InformationVariable {iv}
OutVariable         {ov}
OutBuffer           {ob}
PipelineVariable    {pv}
If you want to learn any aliases for parameters in your previous command, simply run Get-ParameterAlias.ps1. To make PowerShell do this automatically, add a call to Get-ParameterAlias.ps1 in your prompt.
This script builds on two main features: PowerShellâs Tokenizer API, and the rich information returned by the Get-Command cmdlet. PowerShellâs Tokenizer API examines its input and returns PowerShellâs interpretation of the input: commands, parameters, parameter values, operators, and more. Like the rich output produced by most of PowerShellâs commands, Get-Command returns information about a commandâs parameters, parameter sets, output type (if specified), and more.
For more information about the Tokenizer API, see Recipe 10.10.
1.21 Access and Manage Your Console History
Solution
The shortcuts given in Recipe 1.9 let you manage your history, but PowerShell offers several features to help you work with your console in even more detail.
To get the most recent commands from your session, use the Get-History cmdlet (or its alias of h):
Get-HistoryTo rerun a specific command from your session history, provide its ID to the Invoke-History cmdlet (or its alias of ihy):
Invoke-History ID
To increase (or limit) the number of commands stored in your session history, assign a new value to the $MaximumHistoryCount variable:
$MaximumHistoryCount = Count
To save your command history to a file, pipe the output of Get-History to the Export-CliXml cmdlet:
Get-History | Export-CliXml Filename
To add a previously saved command history to your current session history, call the Import-CliXml cmdlet and then pipe that output to the Add-History cmdlet:
Import-CliXml Filename | Add-History
To clear all commands from your session history, use the Clear-History cmdlet:
Clear-HistoryDiscussion
Unlike the console history hotkeys discussed in Recipe 1.9, the Get-History cmdlet produces rich objects that represent information about items in your history. Each object contains that itemâs ID, command line, start of execution time, and end of execution time.
Once you know the ID of a history item (as shown in the output of Get-History), you can pass it to Invoke-History to execute that command again. The example prompt function shown in Recipe 1.9 makes working with prior history items easy, as the prompt for each command includes the history ID that will represent it.
Note
You can easily see how long a series of commands took to invoke by looking at the Duration property. This is a great way to get a handle on exactly how little time it took to come up with the commands that just saved you hours of manual work:
PS:29 > Get-History 27,28 | Format-Table *

Id CommandLine             StartExecutionTime   Duration
-- -----------             ------------------   --------
27 dir                     2/15/2021 5:12:49 PM 00:00:00.0319401
28 Start-Sleep -Seconds 45 2/15/2021 5:12:53 PM 00:00:45.0073792
IDs provided by the Get-History cmdlet differ from the IDs given by the Windows console common history hotkeys (such as F7), because their history management techniques differ.
By default, PowerShell stores the last 4,096 entries of your command history. If you want to raise or lower this amount, set the $MaximumHistoryCount variable to the size you desire. To make this change permanent, set the variable in your PowerShell profile script.
By far, the most useful feature of PowerShellâs command history is for reviewing ad hoc experimentation and capturing it in a script that you can then use over and over. For an overview of that process (and a script that helps to automate it), see Recipe 1.22.
1.22 Program: Create Scripts from Your Session History
After interactively experimenting at the command line for a while to solve a multistep task, youâll often want to keep or share the exact steps you used to eventually solve the problem. The script smiles at you from your history buffer, but itâs unfortunately surrounded by many more commands that you donât want to keep.
Note
For an example of using the Out-GridView cmdlet to do this graphically, see Recipe 2.4.
To solve this problem, use the Get-History cmdlet to view the recent commands that youâve typed. Then, call Copy-History with the IDs of the commands you want to keep, as shown in Example 1-16.
Example 1-16. Copy-History.ps1
################################################################################## Copy-History#### From PowerShell Cookbook (O'Reilly)## by Lee Holmes (http://www.leeholmes.com/guide)################################################################################<#.SYNOPSISCopy selected commands from the history buffer into the clipboard as a script..EXAMPLEPS > Copy-HistoryCopies the entire contents of the history buffer into the clipboard..EXAMPLEPS > Copy-History -5Copies the last five commands into the clipboard..EXAMPLEPS > Copy-History 2,5,8,4Copies commands 2,5,8, and 4..EXAMPLEPS > Copy-History (1..10+5+6)Copies commands 1 through 10, then 5, then 6, using PowerShell's arrayslicing syntax.#>[CmdletBinding()]param(## The range of history IDs to copy[Alias("Id")][int[]]$Range)Set-StrictMode-Version3$history=@()## If they haven't specified a range, assume it's everythingif((-not$range)-or($range.Count-eq0)){$history=@(Get-History-Count([Int16]::MaxValue))}## If it's a negative number, copy only that manyelseif(($range.Count-eq1)-and($range[0]-lt0)){$count=[Math]::Abs($range[0])$history=(Get-History-Count$count)}## Otherwise, go through each history ID in the given range## and add it to our history list.else{foreach($commandIdin$range){if($commandId-eq-1){$history+=Get-History-Count1}else{$history+=Get-History-Id$commandId}}}## Finally, export the history to the clipboard.$history|Foreach-Object{$_.CommandLine}|clip.exe
For more information about running scripts, see Recipe 1.2.
1.23 Invoke a Command from Your Session History
Discussion
Once youâve had your shell open for a while, your history buffer quickly fills with useful commands. The history management hotkeys described in Recipe 1.9 show one way to navigate your history, but this type of history navigation works only for command lines youâve typed in that specific session. If you keep a persistent command history (as shown in Recipe 1.31), these shortcuts do not apply.
The Invoke-History cmdlet illustrates the simplest example of working with your command history. Given a specific history ID (perhaps shown in your prompt function), calling Invoke-History with that ID will run that command again. For more information about this technique, see Recipe 1.9.
As part of its tab-completion support, PowerShell gives you easy access to previous commands as well. If you prefix your command with the # character, tab completion takes one of two approaches:
- ID completion
-
If you type a number, tab completion finds the entry in your command history with that ID, and then replaces your command line with the text of that history entry. This is especially useful when you want to slightly modify a previous history entry, since
Invoke-Historyby itself doesnât support that. - Pattern completion
-
If you type anything else, tab completion searches for entries in your command history that contain that text. Under the hood, PowerShell uses the
-likeoperator to match your command entries, so you can use all of the wildcard characters supported by that operator. For more information on searching text for patterns, see Recipe 5.7.
PowerShellâs tab completion is largely driven by the fully customizable TabâExpansion2 function. You can easily change this function to include more advanced functionality, or even just customize specific behaviors to suit your personal preferences. For more information, see Recipe 1.18.
1.24 Program: Search Formatted Output for a Pattern
While PowerShellâs built-in filtering facilities are incredibly flexible (for example, the Where-Object cmdlet), they generally operate against specific properties of the incoming object. If you are searching for text in the objectâs formatted output, or donât know which property contains the text you are looking for, simple text-based filtering is sometimes helpful.
To solve this problem, you can pipe the output into the Out-String cmdlet before passing it to the Select-String cmdlet:
Get-Service|Out-String-Stream|Select-Stringaudio
Or, using built-in aliases:
Get-Service|oss|slsaudio
In script form, Select-TextOutput (shown in Example 1-17) does exactly this, and it lets you search for a pattern in the visual representation of command output.
Example 1-17. Select-TextOutput.ps1
################################################################################## Select-TextOutput#### From PowerShell Cookbook (O'Reilly)## by Lee Holmes (http://www.leeholmes.com/guide)################################################################################<#.SYNOPSISSearches the textual output of a command for a pattern..EXAMPLEPS > Get-Service | Select-TextOutput audioFinds all references to "Audio" in the output of Get-Service#>param(## The pattern to search for$Pattern)Set-StrictMode-Version3$input|Out-String-Stream|Select-String$pattern
For more information about running scripts, see Recipe 1.2.
1.25 Interactively View and Process Command Output
Discussion
The Out-GridView cmdlet is one of the rare PowerShell cmdlets that displays a graphical user interface. While the Where-Object and Sort-Object cmdlets are the most common way to sort and filter lists of items, the Out-GridView cmdlet is very effective at the style of repeated refinement that sometimes helps you develop complex queries. Figure 1-4 shows the Out-GridView cmdlet in action.
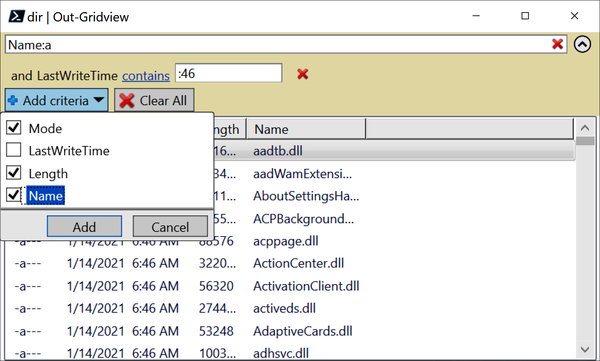
Figure 1-4. Out-GridView, ready to filter
Out-GridView lets you primarily filter your command output in two ways: a quick filter expression and a criteria filter.
Quick filters are fairly simple. As you type text in the topmost âFilterâ window, Out-GridView filters the list to contain only items that match that text. If you want to restrict this text filtering to specific columns, simply provide a column name before your search string and separate the two with a colon. You can provide multiple search strings, in which case Out-GridView returns only rows that match all of the required strings.
Note
Unlike most filtering cmdlets in PowerShell, the quick filters in the Out-GridView cmdlet do not support wildcards or regular expressions. For this type of advanced query, criteria-based filtering can help.
Criteria filters give fine-grained control over the filtering used by the Out-GridView cmdlet. To apply a criteria filter, click the âAdd criteriaâ button and select a property to filter on. Out-GridView adds a row below the quick filter field and lets you pick one of several operations to apply to this property:
-
Less than or equal to
-
Greater than or equal to
-
Between
-
Equals
-
Does not equal
-
Contains
-
Does not contain
In addition to these filtering options, Out-GridView also lets you click and rearrange the header columns to sort by them.
Processing output
Once youâve sliced and diced your command output, you can select any rows you want to keep and press Ctrl+C to copy them to the clipboard. Out-GridView copies the items to the clipboard as tab-separated data, so you can easily paste the information into a spreadsheet or other file for further processing.
In addition to supporting clipboard output, the Out-GridView cmdlet supports full-fidelity object filtering if you use its -PassThru parameter. For an example of this full-fidelity filtering, see Recipe 2.4.
1.26 Program: Interactively View and Explore Objects
When working with unfamiliar objects in PowerShell, much of your time is spent with the Get-Member and Format-List commandsânavigating through properties, reviewing members, and more.
For ad hoc investigation, a graphical interface is often useful.
To solve this problem, Example 1-18 provides an interactive tree view that you can use to explore and navigate objects. For example, to examine the structure of a script as PowerShell sees it (its abstract syntax tree):
$ps={Get-Process-ID$pid}.AstShow-Object$ps
For more information about parsing and analyzing the structure of PowerShell scripts, see Recipe 10.10.
Example 1-18. Show-Object.ps1
################################################################################# Show-Object#### From PowerShell Cookbook (O'Reilly)## by Lee Holmes (http://www.leeholmes.com/guide)################################################################################<#.SYNOPSISProvides a graphical interface to let you explore and navigate an object..EXAMPLEPS > $ps = { Get-Process -ID $pid }.AstPS > Show-Object $ps#>param(## The object to examine[Parameter(ValueFromPipeline=$true)]$InputObject)Set-StrictMode-Version3Add-Type-AssemblySystem.Windows.Forms## Figure out the variable name to use when displaying the## object navigation syntax. To do this, we look through all## of the variables for the one with the same object identifier.$rootVariableName=dirvariable:\*-ExcludeInputObject,Args|Where-Object{$_.Value-and($_.Value.GetType()-eq$InputObject.GetType())-and($_.Value.GetHashCode()-eq$InputObject.GetHashCode())}## If we got multiple, pick the first$rootVariableName=$rootVariableName|%Name|Select-First1## If we didn't find one, use a default nameif(-not$rootVariableName){$rootVariableName="InputObject"}## A function to add an object to the display treefunctionPopulateNode($node,$object){## If we've been asked to add a NULL object, just returnif(-not$object){return}## If the object is a collection, then we need to add multiple## children to the nodeif([System.Management.Automation.LanguagePrimitives]::GetEnumerator($object)){## Some very rare collections don't support indexing (i.e.: $foo[0]).## In this situation, PowerShell returns the parent object back when you## try to access the [0] property.$isOnlyEnumerable=$object.GetHashCode()-eq$object[0].GetHashCode()## Go through all the items$count=0foreach($childObjectValuein$object){## Create the new node to add, with the node text of the item and## value, along with its type$newChildNode=New-ObjectWindows.Forms.TreeNode$newChildNode.Text="$($node.Name)[$count] = $childObjectValue"$newChildNode.ToolTipText=$childObjectValue.GetType()## Use the node name to keep track of the actual property name## and syntax to access that property.## If we can't use the index operator to access children, add## a special tag that we'll handle specially when displaying## the node names.if($isOnlyEnumerable){$newChildNode.Name="@"}$newChildNode.Name+="[$count]"$null=$node.Nodes.Add($newChildNode)## If this node has children or properties, add a placeholder## node underneath so that the node shows a '+' sign to be## expanded.AddPlaceholderIfRequired$newChildNode$childObjectValue$count++}}else{## If the item was not a collection, then go through its## propertiesforeach($childin$object.PSObject.Properties){## Figure out the value of the property, along with## its type.$childObject=$child.Value$childObjectType=$nullif($childObject){$childObjectType=$childObject.GetType()}## Create the new node to add, with the node text of the item and## value, along with its type$childNode=New-ObjectWindows.Forms.TreeNode$childNode.Text=$child.Name+" = $childObject"$childNode.ToolTipText=$childObjectTypeif([Management.Automation.LanguagePrimitives]::GetEnumerator($childObject)){$childNode.ToolTipText+="[]"}$childNode.Name=$child.Name$null=$node.Nodes.Add($childNode)## If this node has children or properties, add a placeholder## node underneath so that the node shows a '+' sign to be## expanded.AddPlaceholderIfRequired$childNode$childObject}}}## A function to add a placeholder if required to a node.## If there are any properties or children for this object, make a temporary## node with the text "..." so that the node shows a '+' sign to be## expanded.functionAddPlaceholderIfRequired($node,$object){if(-not$object){return}if([System.Management.Automation.LanguagePrimitives]::GetEnumerator($object)-or@($object.PSObject.Properties)){$null=$node.Nodes.Add((New-ObjectWindows.Forms.TreeNode"..."))}}## A function invoked when a node is selected.functionOnAfterSelect{param($Sender,$TreeViewEventArgs)## Determine the selected node$nodeSelected=$Sender.SelectedNode## Walk through its parents, creating the virtual## PowerShell syntax to access this property.$nodePath=GetPathForNode$nodeSelected## Now, invoke that PowerShell syntax to retrieve## the value of the property.$resultObject=Invoke-Expression$nodePath$outputPane.Text=$nodePath## If we got some output, put the object's member## information in the text box.if($resultObject){$members=Get-Member-InputObject$resultObject|Out-String$outputPane.Text+="`n"+$members}}## A function invoked when the user is about to expand a nodefunctionOnBeforeExpand{param($Sender,$TreeViewCancelEventArgs)## Determine the selected node$selectedNode=$TreeViewCancelEventArgs.Node## If it has a child node that is the placeholder, clear## the placeholder node.if($selectedNode.FirstNode-and($selectedNode.FirstNode.Text-eq"...")){$selectedNode.Nodes.Clear()}else{return}## Walk through its parents, creating the virtual## PowerShell syntax to access this property.$nodePath=GetPathForNode$selectedNode## Now, invoke that PowerShell syntax to retrieve## the value of the property.Invoke-Expression"`$resultObject = $nodePath"## And populate the node with the result object.PopulateNode$selectedNode$resultObject}## A function to handle key presses on the tree view.## In this case, we capture ^C to copy the path of## the object property that we're currently viewing.functionOnTreeViewKeyPress{param($Sender,$KeyPressEventArgs)## [Char] 3 = Control-Cif($KeyPressEventArgs.KeyChar-eq3){$KeyPressEventArgs.Handled=$true## Get the object path, and set it on the clipboard$node=$Sender.SelectedNode$nodePath=GetPathForNode$node[System.Windows.Forms.Clipboard]::SetText($nodePath)$form.Close()}elseif([System.Windows.Forms.Control]::ModifierKeys-eq"Control"){if($KeyPressEventArgs.KeyChar-eq'+'){$SCRIPT:currentFontSize++UpdateFonts$SCRIPT:currentFontSize$KeyPressEventArgs.Handled=$true}elseif($KeyPressEventArgs.KeyChar-eq'-'){$SCRIPT:currentFontSize--if($SCRIPT:currentFontSize-lt1){$SCRIPT:currentFontSize=1}UpdateFonts$SCRIPT:currentFontSize$KeyPressEventArgs.Handled=$true}}}## A function to handle key presses on the form.## In this case, we handle Ctrl-Plus and Ctrl-Minus## to adjust font size.functionOnKeyUp{param($Sender,$KeyUpEventArgs)if([System.Windows.Forms.Control]::ModifierKeys-eq"Control"){if($KeyUpEventArgs.KeyCode-in'Add','OemPlus'){$SCRIPT:currentFontSize++UpdateFonts$SCRIPT:currentFontSize$KeyUpEventArgs.Handled=$true}elseif($KeyUpEventArgs.KeyCode-in'Subtract','OemMinus'){$SCRIPT:currentFontSize--if($SCRIPT:currentFontSize-lt1){$SCRIPT:currentFontSize=1}UpdateFonts$SCRIPT:currentFontSize$KeyUpEventArgs.Handled=$true}elseif($KeyUpEventArgs.KeyCode-eq'D0'){$SCRIPT:currentFontSize=12UpdateFonts$SCRIPT:currentFontSize$KeyUpEventArgs.Handled=$true}}}## A function to handle mouse wheel scrolling.## In this case, we translate Ctrl-Wheel to zoom.functionOnMouseWheel{param($Sender,$MouseEventArgs)if(([System.Windows.Forms.Control]::ModifierKeys-eq"Control")-and($MouseEventArgs.Delta-ne0)){$SCRIPT:currentFontSize+=($MouseEventArgs.Delta/120)if($SCRIPT:currentFontSize-lt1){$SCRIPT:currentFontSize=1}UpdateFonts$SCRIPT:currentFontSize$MouseEventArgs.Handled=$true}}## A function to walk through the parents of a node,## creating virtual PowerShell syntax to access this property.functionGetPathForNode{param($Node)$nodeElements=@()## Go through all the parents, adding them so that## $nodeElements is in order.while($Node){$nodeElements=,$Node+$nodeElements$Node=$Node.Parent}## Now go through the node elements$nodePath=""foreach($Nodein$nodeElements){$nodeName=$Node.Name## If it was a node that PowerShell is able to enumerate## (but not index), wrap it in the array cast operator.if($nodeName.StartsWith('@')){$nodeName=$nodeName.Substring(1)$nodePath="@("+$nodePath+")"}elseif($nodeName.StartsWith('[')){## If it's a child index, we don't need to## add the dot for property access}elseif($nodePath){## Otherwise, we're accessing a property. Add a dot.$nodePath+="."}## Append the node name to the path$tempNodePath=$nodePath+$nodeNameif($nodeName-notmatch'^[$\[\]a-zA-Z0-9]+$'){$nodePath+="'"+$nodeName+"'"}else{$nodePath=$tempNodePath}}## And return the result$nodePath}functionUpdateFonts{param($fontSize)$treeView.Font=New-ObjectSystem.Drawing.Font"Consolas",$fontSize$outputPane.Font=New-ObjectSystem.Drawing.Font"Consolas",$fontSize}$SCRIPT:currentFontSize=12## Create the TreeView, which will hold our object navigation## area.$treeView=New-ObjectWindows.Forms.TreeView$treeView.Dock="Top"$treeView.Height=500$treeView.PathSeparator="."$treeView.ShowNodeToolTips=$true$treeView.Add_AfterSelect({OnAfterSelect@args})$treeView.Add_BeforeExpand({OnBeforeExpand@args})$treeView.Add_KeyPress({OnTreeViewKeyPress@args})## Create the output pane, which will hold our object## member information.$outputPane=New-ObjectSystem.Windows.Forms.TextBox$outputPane.Multiline=$true$outputPane.WordWrap=$false$outputPane.ScrollBars="Both"$outputPane.Dock="Fill"## Create the root node, which represents the object## we are trying to show.$root=New-ObjectWindows.Forms.TreeNode$root.ToolTipText=$InputObject.GetType()$root.Text=$InputObject$root.Name='$'+$rootVariableName$root.Expand()$null=$treeView.Nodes.Add($root)UpdateFonts$currentFontSize## And populate the initial information into the tree## view.PopulateNode$root$InputObject## Finally, create the main form and show it.$form=New-ObjectWindows.Forms.Form$form.Text="Browsing "+$root.Text$form.Width=1000$form.Height=800$form.Controls.Add($outputPane)$form.Controls.Add($treeView)$form.Add_MouseWheel({OnMouseWheel@args})$treeView.Add_KeyUp({OnKeyUp@args})$treeView.Select()$null=$form.ShowDialog()$form.Dispose()
For more information about running scripts, see Recipe 1.2.
1.27 Record a Transcript of Your Shell Session
Solution
To record a transcript of your shell session, run the command Start-Transcript. It has an optional -Path parameter that defaults to a filename based on the current system time. By default, PowerShell places this file in the My Documents directory. To stop recording the transcript of your shell system, run the command Stop-Transcript.
Discussion
Although the Get-History cmdlet is helpful, it does not record the output produced during your PowerShell session. To accomplish that, use the Start-Transcript cmdlet. In addition to the Path parameter described previously, the Start-Transcript cmdlet also supports parameters that let you control how PowerShell interacts with the output file.
If you donât specify a -Path parameter, PowerShell generates a random filename for you. If you want to process this file after stopping the transcript, PowerShell adds this as a property name to the output of either Start-Transcript or Stop-Transcript:
PS > $myTranscript = Start-Transcript
PS > Stop-Transcript
Transcript stopped, output file is D:\Lee\PowerShell_transcript...
PS > $myTranscript | fl * -force

Path   : D:\Lee\PowerShell_transcript.LEE-DESKTOP.kg_Vsm_o.20201217195052.txt
Length : 104

PS > $myTranscript.Path
D:\Lee\PowerShell_transcript.LEE-DESKTOP.kg_Vsm_o.20201217195052.txt
PowerShell transcripts start with a standard file header that includes time, user, host name, as well as several other useful items. If you specify the
-IncludeInvocationHeader parameter either interactively or through system-wide policy, PowerShell also includes a separator between commands to assist in automatic analysis.
**********************
PowerShell transcript start
Start time: 20201217190500
Username: ubuntu-20-04\lee
Machine: ubuntu-20-04 (Unix 4.19.128.0)
Host Application: /opt/microsoft/powershell/7/pwsh.dll
Process ID: 1925
OS: Linux 4.19.128-microsoft-standard #1 SMP Tue Jun 23 12:58:10 UTC 2020
(...)
**********************
**********************
Command start time: 20201217190502
**********************
PS /mnt/c/Users/lee> Get-Process
NPM(K) PM(M) WS(M) CPU(s) Id SI ProcessName
------ ----- ----- ------ -- -- -----------
0 0.00 5.26 0.16 984 984 bash
0 0.00 0.53 0.02 1 0 init
0 0.00 0.07 0.00 982 982 init
0 0.00 0.08 0.32 983 982 init
0 0.00 96.52 0.64 1925 984 pwsh
0 0.00 3.25 0.00 1873 â¦73 rsyslogd
**********************
Command start time: 20201217190504
**********************
PS /mnt/c/Users/lee> cat /var/log/powershell.log
(...)
In addition to letting you record transcripts manually, PowerShell also lets you set a system policy to record these automatically. For more information on how to set this up, see Recipe 18.2.
1.28 Extend Your Shell with Additional Commands
Solution
If the module is part of the standard PowerShell module path, simply run the command you want:
Invoke-NewCommandIf it is not, use the Import-Module command to import third-party commands into your PowerShell session.
To import a module from a specific directory:
Import-Module c:\path\to\module
To import a module from a specific file (module, script, or assembly):
Import-Module c:\path\to\module\file.ext
Discussion
PowerShell supports two sets of commands that enable additional cmdlets and providers: *-Module and *-PsSnapin. Snapins were the packages for extensions in version 1 of PowerShell, and are rarely used. Snapins supported only compiled extensions and had onerous installation requirements.
Version 2 of PowerShell introduced modules that support everything that snapins support (and more) without the associated installation pain. That said, PowerShell version 2 also required that you remember which modules contained which commands and manually load those modules before using them. Windows now includes thousands of commands in hundreds of modulesâquickly making reliance on oneâs memory an unsustainable approach.
Any recent version of PowerShell significantly improves the situation by autoloading modules for you. Internally, PowerShell maintains a mapping of command names to the module that contains them. Simply start using a command (which the Get-Command cmdlet can help you discover), and PowerShell loads the appropriate module automatically. If you wish to customize this autoloading behavior, you can use the $PSModuleAutoLoadingPreference preference variable.
When PowerShell imports a module with a given name, it searches through every directory listed in the PSModulePath environment variable, looking for the first module that contains the subdirectories that match the name you specify. Inside those directories, it looks for the module (*.psd1, *.psm1, and *.dll) with the same name and loads it.
When you install a module on your own system, the most common place to put it is in the PowerShell\Modules directory in your My Documents directory. In Windows PowerShell, this location will be WindowsPowerShell\Modules. To have PowerShell look in another directory for modules, add it to your personal PSModulePath environment variable, just as you would add a Tools directory to your personal path.
For more information about managing system paths, see Recipe 16.2.
If you want to load a module from a directory not in PSModulePath, you can provide the entire directory name and module name to the Import-Module command. For example, for a module named Test, use Import-Module c:\path\to\Test. As with loading modules by name, PowerShell looks in c:\temp\path\to for a module (*.psd1, *.psm1, or *.dll) named Test and loads it.
If you know the specific module file you want to load, you can also specify the full path to that module.
If you want to find additional commands, see Recipe 1.29.
1.29 Find and Install Additional PowerShell Scripts and Modules
Solution
Use the Find-Module command to find interesting modules:
PS > Find-Module *Cookbook* | Format-List

Name                       : PowerShellCookbook
Version                    : 1.3.6
Type                       : Module
Description                : Sample scripts from the PowerShell Cookbook
Author                     : Lee Holmes
(...)
Then use Install-Module to add them to your system.
Install-ModulePowerShellCookbook-ScopeCurrentUser
Similarly, use the Find-Script and Install-Script commands if the item has been published as a standalone script. If you havenât already on your machine, make sure to add My Documents\PowerShell\Scripts to your system path. For more information about modifying your system path, see Recipe 16.2.
PS > Find-Script Get-WordCluster | Install-Script -Scope CurrentUser
PS > Get-WordCluster -Count 3 "Hello","World","Jello",
    "Mellow","Jealous","Wordy","Sword"

Representative Items
-------------- -----
Wordd          {World, Wordy, Sword}
Jealou         {Jello, Jealous}
Hellow         {Hello, Mellow}
Discussion
The PowerShell Gallery is the worldwide hub for publishing and sharing PowerShell scripts and modules. It contains thousands of modules: official corporate releases by Microsoft and many other companies, popular community projects like the DbaTools module for SQL management, and fun whimsical ones like OutConsolePicture to display images as ANSI graphics.
The PowerShell Galleryâs web interface lets you search, browse, and explore, but of course thatâs not the way you use it through PowerShell.
In PowerShell, the Find-Module and Install-Module commands let you interact with the PowerShell Gallery and install modules from it. You can find modules by name, tags, and even Just Enough Administration role capabilities.
When you first try to install a module from the PowerShell Gallery, PowerShell will provide a warning:
PS > Install-Module someModule -Scope CurrentUser

Untrusted repository
You are installing the modules from an untrusted repository. If you trust this
repository, change its InstallationPolicy value by running the Set-PSRepository
cmdlet. Are you sure you want to install the modules from 'PSGallery'?
[Y] Yes  [A] Yes to All  [N] No  [L] No to All  [S] Suspend  [?] Help
(default is "N"):
Common to all other code-sharing repositories out there, there are no restrictions on who can publish to the PowerShell Gallery or what they can publish. If a module is reported through the abuse reporting mechanisms and found to be malicious or against the galleryâs Terms of Service, it will of course be removed. But other than thatâyou should not consider the gallery to be vetted, approved, or otherwise implicitly trustworthy. To acknowledge this and remove the warning from future module installations, you can can declare the PowerShell Gallery to be trusted on your machine:
Set-PSRepository-NamePSGallery-InstallationPolicyTrusted
In addition to the public PowerShell Gallery, PowerShell can also talk to private galleries (including file shares!) as well. PowerShell uses the NuGet protocol. For more information about creating a private PowerShell Gallery, see the PowerShell Gallery documentation.
1.30 Use Commands from Customized Shells
Discussion
As described in Recipe 1.28, PowerShell modules and snapins are the two ways that third parties can distribute and add additional PowerShell commands. Products that provide customized versions of the PowerShell console do this by launching PowerShell with one of three parameters:
-
-PSConsoleFile, to load a console file that provides a list of snapins to load. -
-Command, to specify an initial startup command (that then loads a snapin or module) -
-File, to specify an initial startup script (that then loads a snapin or module)
Regardless of which one is used, you can examine the resulting set of loaded extensions to see which ones you can import into your other PowerShell sessions.
Detecting loaded snapins
The Get-PsSnapin command returns all snapins loaded in the current session. It always returns the set of core PowerShell snapins, but it will also return any additional snapins loaded by the customized environment. For example, if the name of a snapin you recognize is Product.Feature.Commands, you can load that into future PowerShell sessions by typing Add-PsSnapin Product.Feature.Commands. To automate this, add the command into your PowerShell profile.
If youâre uncertain of which snapin to load, you can also use the Get-Command command to discover which snapin defines a specific command:
PS > Get-Command Get-Counter | Select PsSnapin

PSSnapIn
--------
Microsoft.PowerShell.Diagnostics
Detecting loaded modules
Like the Get-PsSnapin command, the Get-Module command returns all modules loaded in the current session. It returns any modules youâve added so far into that session, but it will also return any additional modules loaded by the customized environment. For example, if the name of a module you recognize is ProductModule, you can load that into future PowerShell sessions by typing Import-Module ProductModule. To automate this, add the command into your PowerShell profile.
If you are uncertain of which module to load, you can also use the Get-Command command to discover which module defines a specific command:
PS > Get-Command Start-BitsTransfer | Select Module

Module
------
BitsTransfer
1.31 Save State Between Sessions
Discussion
PowerShell provides easy script-based access to a broad variety of system, engine, and other events. You can register for notification of these events and even automatically process any of those events. In the following example, we subscribe to the event called PowerShell.Exiting. PowerShell generates this event when you close a session.
You can use this event to save and restore state, variables, and anything else you need. While the PSReadLine module already automatically saves your command history between sessions, for demonstration purposes we can implement similar functionality through the PowerShell.Exiting event. You would place a call to Enable-HistoryPersistence in your profile (Example 1-19).
Example 1-19. Enable-HistoryPersistence.ps1
################################################################################## Enable-HistoryPersistence#### From PowerShell Cookbook (O'Reilly)## by Lee Holmes (http://www.leeholmes.com/guide)################################################################################<#.SYNOPSISReloads any previously saved command history, and registers for thePowerShell.Exiting engine event to save new history when the shellexits.#>Set-StrictMode-Version3## Load our previous history$GLOBAL:maximumHistoryCount=32767$historyFile=(Join-Path(Split-Path$profile)"commandHistory.clixml")if(Test-Path$historyFile){Import-CliXml$historyFile|Add-History}## Register for the engine shutdown event$null=Register-EngineEvent-SourceIdentifier`([System.Management.Automation.PsEngineEvent]::Exiting)-Action{## Save our history$historyFile=(Join-Path(Split-Path$profile)"commandHistory.clixml")$maximumHistoryCount=1kb## Get the previous history items$oldEntries=@()if(Test-Path$historyFile){$oldEntries=Import-CliXml$historyFile-ErrorActionSilentlyContinue}## And merge them with our changes$currentEntries=Get-History-Count$maximumHistoryCount$additions=Compare-Object$oldEntries$currentEntries`-PropertyCommandLine|Where-Object{$_.SideIndicator-eq"=>"}|Foreach-Object{$_.CommandLine}$newEntries=$currentEntries|?{$additions-contains$_.CommandLine}## Keep only unique command lines. First sort by CommandLine in## descending order (so that we keep the newest entries,) and then## re-sort by StartExecutionTime.$history=@($oldEntries+$newEntries)|Sort-Unique-DescendingCommandLine|SortStartExecutionTime## Finally, keep the last 100Remove-Item$historyFile$history|Select-Last100|Export-CliXml$historyFile}
This script could do anything, but in this example we have it save our command history and restore it when we launch PowerShell. Why would we want to do this? Well, with a rich history buffer, we can more easily find and reuse commands weâve previously run. For two examples of doing this, see Recipes 1.21 and 1.23.
Enable-HistoryPersistence takes two main actions. First, we load our stored command history (if any exists). Then, we register an automatic action to be processed whenever the engine generates its PowerShell.Exiting event. The action itself is relatively straightforward, although exporting our new history does take a little finesse. If you have several sessions open at the same time, each will update the saved history file when it exits. Since we donât want to overwrite the history saved by the other shells, we first reload the history from disk and combine it with the history from the current shell.
Once we have the combined list of command lines, we sort them and pick out the unique ones before storing them back in the file.
For more information about working with PowerShell engine events, see Recipe 31.2.
Get PowerShell Cookbook, 4th Edition now with the O’Reilly learning platform.
O’Reilly members experience books, live events, courses curated by job role, and more from O’Reilly and nearly 200 top publishers.

