Chapter 4. Organize Your Clips
As you edit more and more projects in Premiere, it won’t be long before you’re overwhelmed with video and other media clips. In fact, all it takes to get there are a couple of vacations, some family celebrations, and maybe a school project or two. Suffering from media overload, you click Premiere’s Organize tab and scroll through tons of clips but can’t find the one you want. What you need is a way to organize your media files.
You’ve come to the right place. This chapter introduces you to a tool that helps you tame your growing media collection: Adobe’s Elements Organizer, a high-powered, standalone program that comes with Premiere Elements. (Don’t confuse Elements Organizer with the simpler Organize tab in Premiere; to understand the differences, see On to the Organizer.)
In this chapter, you’ll learn how to rate your clips, apply searchable tags to them, and organize them into albums. All these techniques make it easy to find the clip you need when you’re in the midst of editing.
Of course, when you’re eager to start splicing clips together to create a movie, organizing clips may seem like a tedious waste of time. It’s actually the opposite. Spend a few minutes tagging clips and arranging your videos in albums, and your projects will go much faster. Not only that, three years from now, when you want to see that clip of your basset hound Clementine next to a Sequoia in Yosemite National Park, you’ll actually be able to find it.
The Organizer Application
From the outset, you should understand that the standalone program called Elements Organizer and the tab in Premiere Elements called Organize are two different beasts. Yes, they perform similar functions, and yes, their names are confusingly similar, but of the two, Elements Organizer is much more powerful. Why the duplication? Well, previous versions of Premiere Elements didn’t use Elements Organizer; it was a part of Photoshop Elements, Adobe’s photo-editing program. Adobe decided that, with Version 8 of both programs, they could share the same media library. So if you install either Premiere Elements or Photoshop Elements on your computer, you also install Elements Organizer.
Now, if that isn’t confusing enough, Elements Organizer also has a tab called Organize. This chapter focuses mostly on Elements Organizer as a standalone application. Just keep in mind that, in this chapter and in the rest of the book, the term Organizer (with an “r” at the end) means Elements Organizer, the standalone tool. When the book refers to the Organize tab, the text will make it clear whether it’s referring to Premiere Elements or Elements Organizer.
On to the Organizer
You launch the Organizer in one of two ways. From Premiere’s splash screen, click the Organize button (yes, incredibly enough, Adobe refers to the Organizer as Organize on this screen—go figure). If you’re working within Premiere, go to its Organize tab and then click the Organizer button near the top-right corner.
Note
It doesn’t help the Organizer/Organize confusion that the Organize button in the splash screen leads to the Elements Organizer program. When you use it, just focus on the Organizer icon and don’t think about the missing “r.”
No matter how you launch the Organizer, it provides a slightly different view of your media clips and slightly different tools than Premiere’s Organize tab does—see Figure 4-1. And when you look closely, you see that there are major differences between the two. For example, you can create and apply keyword tags using the Organizer, but not in Premiere’s Organize tab. And you can create Albums in the Organizer, but not from Premiere. Use the Organizer application to sort, group, and manage your ever-growing collection of media. Use Premiere’s Organize tab to view your media as you edit video.
Tour the Organizer
The Organizer displays miniature versions of all the media files you import—videos, photos, and songs—neatly arranged in rows and columns. The screen actually looks like a photographer’s lightbox, which makes sense given the Organizer’s roots as an image-organizing tool for Photoshop Elements (in fact, this book will refer to the Organizer’s main screen as “the lightbox”). Adobe refers to this collection of media as your catalog.

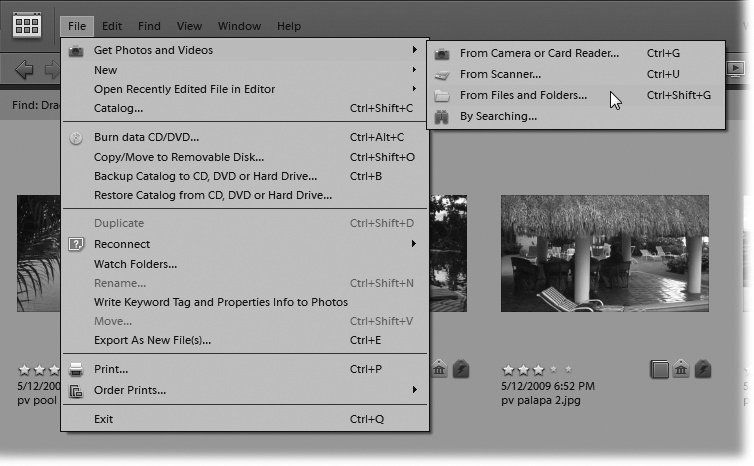
At the top of the Organizer screen, a menu bar provides commands for importing and viewing your clips. Choose File → Get Photos and Video, for example, to import media from your camcorder or computer. Under the Organizer’s Find menu, you see unique ways to view your clips (for example, by file type or by date). Need to hunt down that video of a hummingbird you snapped 7 months ago? No problem.
A search box sits below the menu bar, along with a slider that enlarges or reduces your thumbnail images.
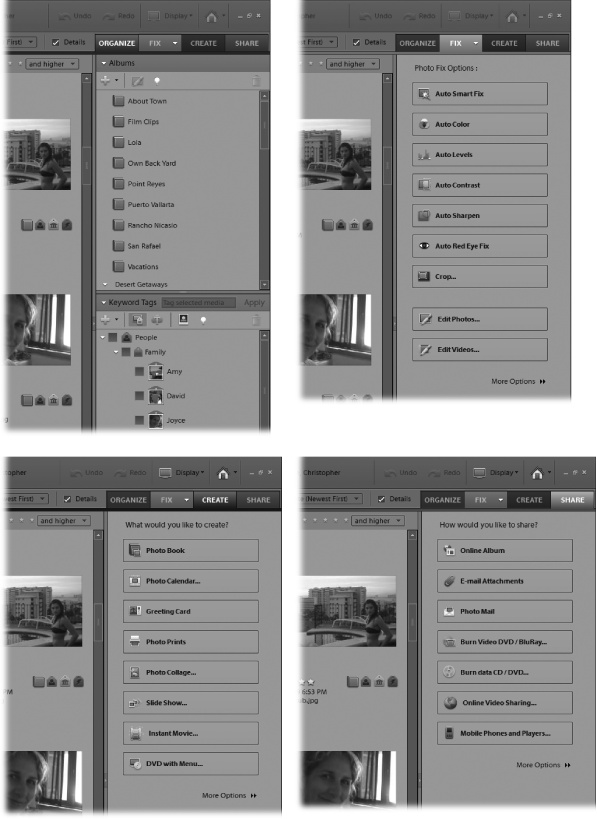
On the right side of the lightbox, you see a Tasks panel with four tabs (Figure 4-2):
Organize. Because a primary function of the Organizer is to classify your clips, you’ll spend most of your time here. You can rate your clips (from zero to five stars), attach key words to them so you can search them later, and group them into albums. All these techniques help you quickly find the media you need as you edit a project.
Fix. Use the Fix tab to touch up still images. It includes options like Auto Color to correct a picture’s color balance and contrast, Auto Contrast to improve an image’s contrast without affecting its color, and Auto Red Eye Fix.
Create. Look at the Create tab, and you can see the Organizer’s still-photo roots. Most of the options handle projects like photo books, calendars, and greeting cards. As a videographer, the buttons you’re likely to use are Slide Show, InstantMovie, and DVD with Menus. When you click on the latter two, the Organizer sends you to Premiere. For example, if you click InstantMovie, the Organizer launches Premiere and opens its InstantMovie panel.
Share. The Share tab includes options to burn DVDs and BluRay discs and upload videos online. Again, either option sends you to Premiere.
Import Media to the Organizer
Although any media you import through Premiere automatically appears in the Organizer, being able to import video, sound files, and still photos directly into the Organizer itself is handy, because it’s the same program you use to categorize that media—to rate and tag it and assign it to albums. You can import media from many sources, like camcorders and still cameras, or you can import media that’s already on your computer. (The one thing the Organizer doesn’t provide is Device Control, so, if you want to import video from a tape-based DV or HDV camcorder, you must use Premiere Elements and the steps described on Navigation buttons.)
Import Media from a Camera
Here are the steps to import media from a tapeless camcorder directly into the Organizer:
Connect your camcorder to your PC.
Some camcorders use a USB cable. Others, such as the new mini-camcorders like the Flip line of cameras, have a USB connector built right into the camera.
In the Organizer, choose File → Get Photo and Videos → From Camera or Card Reader.
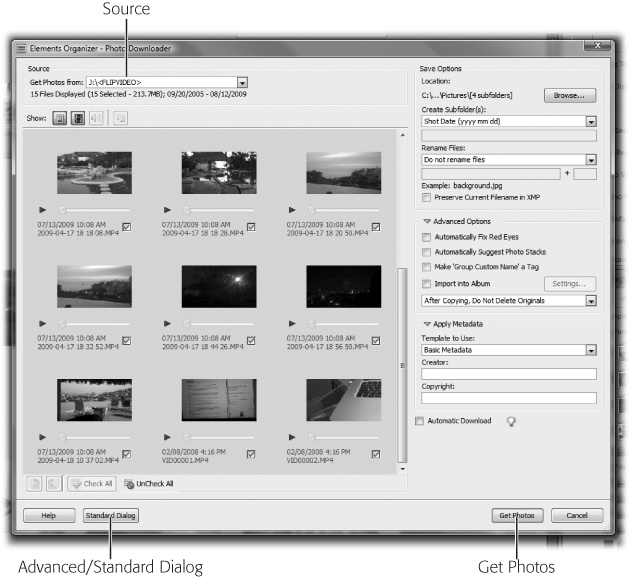
The Organizer’s Photo Downloader window opens. This window works just like Premiere’s media downloader described on Tour the Media Downloader.
Click the Select a Device menu and choose your camcorder.
Your camcorder looks like a removable storage device to Windows and the Organizer. It even has a drive letter, like E: or F:.
(Optional) Click the Advanced Dialog button to select individual clips.
To import all the media on your camcorder, skip this step. If you want to pick and choose individual files, click the Advanced Dialog button to see them listed, as shown in Figure 4-3. Check the boxes under the clips you want to import.
Click Get Media.
The Organizer copies clips from your camcorder to your computer. The imported media appears in the Organizer and in Premiere’s Organize tab, too.
Note
For more tips on using the Photo Downloader’s file renaming and metadata features, see the description of the Media Downloader on Tour the Media Downloader.
Import Media from PC Files and Folders
To grab media on your computer in a file or folder, follow these steps:
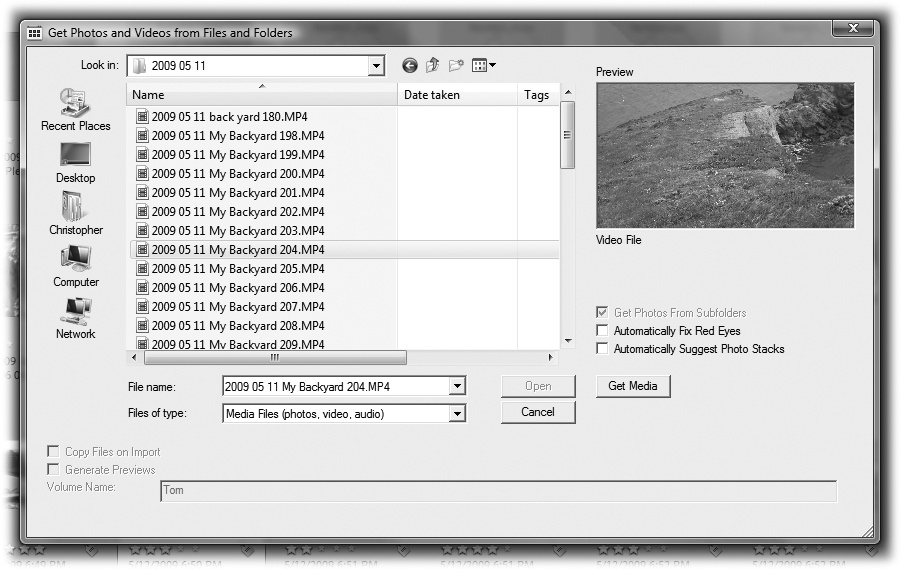
In the Organizer, choose File → Get Photo and Videos → From Files and Folders (Figure 4-4).
The Get Photos and Videos Files and Folders window opens as shown in Figure 4-5. As an alternative, Ctrl+Shift+G also opens this window.
Select the files or folders you want to import.
Select a folder to import all the media inside of it or double-click the folder to choose individual files within it. The usual selection tricks work to select multiple files:
Click to select. Shift-click to select adjacent files.
Ctrl-click to select/deselect more than one file.
Click and drag to box in and import a bunch of files at once.
The Organizer imports the clips into your catalog. The same clips appear in Premiere’s Organize tab, too.
Once you import your clips in the Organizer, you can see them in the lightbox and they’re available in Premiere’s Organize tab; it’s all part of the Organizer Philosophy described on Change Views in the Organizer.
Change Views in the Organizer
When you work on a project and have only 20 media clips to deal with, you might not need the Organizer’s help. When you’ve got 200 clips, you’re beginning to appreciate the problem. And when you’ve got 2,000 or more clips in several different projects, you’re desperate for a way to order your clips. Organizer to the rescue! Here’s how it works:
From Premiere’s splash screen, click the Organize button to launch the Organizer. Alternatively, within Premiere itself, click the Organize tab and then click the Organizer button to launch the Organizer.
The Organizer displays your catalog, all the media you’ve imported, in other words. If you added photos to the Organizer from Photoshop Elements, you’ll see those here, too.
If displayed, click the Show All button.
The Show All button appears only if you filtered the lightbox view earlier in the same work session. So if you were working in the lightbox in a filtered view (like View → Photos), switched windows to complete another task, and then came back to the lightbox, the filter remains in place. In such a case, you have to click Show All to see all your files. But every time you quit the Organizer program, the lightbox resets to Show All. The only thing is, you won’t see the Show All button because the Organizer displays all your files by default.
Use the Display menu to sort and view your clips in different ways.
Click the Display button in the upper-right corner of the Organizer. Here’s a rundown of the views available from the drop-down menu:
Thumbnail View (Ctrl+Alt+1) is the standard view. It displays miniature versions of all your media—video clips, images, and songs. Everything is in one big pool, which is great for tagging clips and creating albums.
Import Batch (Ctrl+Alt+2) Organizes your clips according to the dates you imported them to the Organizer.
Folder Location (Ctrl+Alt+3) opens a Windows Explorer-like sidebar to the left of the lightbox that displays the folders on your computer. You’re probably used to clicking a folder to see the files inside. The Organizer doesn’t work that way—in fact, it’s just the opposite. When you’re in this view, click a file in the lightbox and the sidebar on the left displays the folder it’s in.
Think of this view as a tool to tell you where your clips are on your computer. It’s part of the all-in-one-big-pool Elements Organizer philosophy. If you want to move a clip, you can drag it from the lightbox to a different folder. As mentioned earlier, you don’t want to use Windows to move media you import. If you do, the Organizer loses track of the file. Instead, use this view to move clips from one folder to another.
Date View (Ctrl+Alt+D) displays a calendar that highlights the dates on which you imported files. You can change the display to view the calendar by year, month, or day. Click on a highlighted date to preview that day’s imported media.
View, Edit, Organize in Full Screen (F11). In this view, most of the Organizer tools disappear to give you a great full-screen view of your media. You get a limited number of tools in collapsible menus on the left side of the screen for editing (Smart Fix and Auto Color, for example) and organizing (Add to Album and Add Keyword) your media. To return to the standard view, hit Esc.
Compare Photos Side by Side (F12). You see the same full-screen view described above, except that the Organizer displays two photos or video thumbnails side by side. You can preselect the images you want to compare (use Ctrl-click), or you can change the images once you’re inside the view. Click the image and use the arrow buttons that pop up along the bottom of the screen to navigate through your media collection.
You can show and hide specific types of media in the Organizer’s lightbox (just as you can in the Organize tab of Premiere).
For example, to see only video and audio files, choose View → Media Types and deselect Photos, Projects, and PDF, making sure that just Video and Audio are selected.
As you can see in Figure 4-6 each filter has a shortcut key, which is faster than using the menu:
Photos: Ctrl+1 Videos: Ctrl+2 Audio: Ctrl+3 Projects: Ctrl+4 PDF: Ctrl+5 Near the top-center of the window, click and drag the slider to resize your thumbnail images.
Drag the slider to the right to display larger but fewer thumbnails, and to the left to display smaller but more thumbnails.
Click the Date menu next to the slider to sort thumbnails by date.
The Date menu has two options: Date (Newest First) and Date (Oldest First). Newest First zeroes in on the most recent batch of clips you imported. Oldest first is helpful when you view clips that follow a logical timeline, such as a wedding or birthday party—you can review the clips in the order you captured them.
Next to the Date menu, turn on the Details checkbox.
When you select Details, additional information shows up beneath each clip (providing your thumbnails are large enough). This information includes the clip’s star rating (Rank Your Clips with Star Ratings), keyword tags (Preview and Rate in Premiere), smart tags (Smart-Tag with Auto-Analyzer), album icons (Remove Smart Tags), capture date, and file name.
You won’t see tag and album icons until you apply them to your clips, of course, which you’ll learn to do a little later in this chapter. If you can’t see the file names, make sure the thumbnail slider is set large enough to display them, and check to see that the filenames display is turned on by choosing View → Show Filenames. (While you’re in the View menu, it’s worth noting that you can show and hide file details by choosing View → Details or using the shortcut Ctrl+D.)
If you see a scroll bar on the right of the lightbox, you can use it (or the scroll wheel on your mouse) to maneuver through your clips.
Drag the scroll bar up or down to move quickly. Click the arrows at the top and bottom of the bar to move one row at a time.
You can drag the bar that separates the lightbox and the Task panel left and right to change the space available to your thumbnails. The same is true for the horizontal bar between the Albums and Keyword Tags panels. If either of those panels is closed, click the triangle button next to its name.
Use the search box that sits below the menu bar to execute a search.
For example, type in a few letters from one of your clips’ filenames. When you press Enter, the Organizer limits the media it displays to files that match the word or characters you entered.
The Organizer looks at more than file names when it searches; it searches album names, keyword tags, smart tags, and dates. As it searches, it tells you what it’s searching for, like “Find: Items matching 10/12/2009.”
In the upper-left corner, click the blue Back arrow.
The view changes to the previous view, filtered by the date. Click the back button again, and you see the view before it was filtered by the date. You can use the Back and Forward arrows to move through your view history.

Now that you have some viewing tips and tricks under your belt, it’s a great time to learn how to rate and filter clips, also known as filtering your catalog.
Rank Your Clips with Star Ratings
Suppose you spend a day shooting buffalo—with your camcorder, that is. Back home, you import your clips and you’re ready to edit. But it’s hard to tell the good buffalo clips from the bad ones when all you see is a thumbnail still of each clip.
As much as you want to jump in and start working on a project right away, take a little time to winnow the good clips from the bad by ranking them. Premiere gives you a quick and easy way to do so: star ratings. In the Organizer lightbox, five little ghosted-out stars appear under each clip (or image or song). As you play each clip, click on one of the stars to rate it.
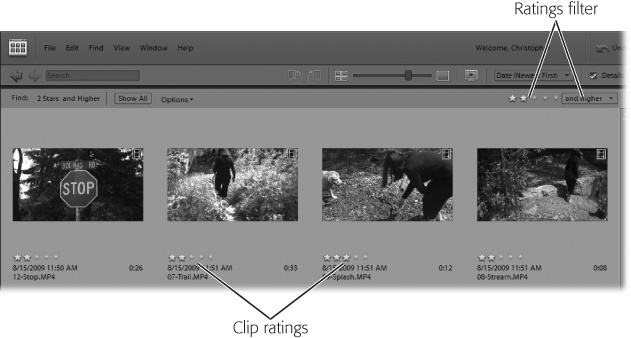
Here’s a proven strategy for figuring out how to rate a clip: On the first pass, separate usable clips from unusable ones by giving the former a single star and the latter no stars. Then filter your view of the clips to hide those you deemed unusable: in the Organizer, click one star in the Ratings filter at the top-right of the lightbox. As you continue to review and compare clips, upgrade the ratings on the usable clips to good and maybe even great by applying two, three, or more stars. (Later, if you feel you were too generous or too stingy, you can come back and change the rating.)
While this may seem like a tedious process at first, it saves tons of time in the long run because you can filter your clips by star rating as you edit your project. That way, you won’t be reviewing bad clips. For example, if you only want to see buffalo clips with a rating of three stars or better, click the appropriate star in the Ratings filter (Figure 4-7).
In practice, of course, you’ll probably work on all types of video projects—some serious, some frivolous. So let the nature of your project determine how much time you spend reviewing and rating clips. If it’s a serious project, you may want to take several passes through each clip. On the other hand, if your project is a quick-and-dirty YouTube video, forgo the multiple-pass rating and upgrade and downgrade clips as you work with them.
Apply Star Ratings
Rating your clips couldn’t be easier. Just click one of the five stars under the clip. Star-rating a clip works the same way whether you’re in the Organizer or Premiere’s Organize tab. (The steps below describe the process within the Organizer.)
Before you preview clips and apply star ratings, you may want to filter the catalog so that it displays only clips from, say, the great buffalo shoot or your most recent project. You can sort files using the Organizer’s menu bar or drop-down menus at the top of the screen. So you can, for example, sort files by selecting “Date (Newest First)” in the drop-down menu, or you can choose Find → By History → Imported on to display clips added on a specific date. (Fortunately, you don’t have to rely on your memory for the date. As shown in Figure 4-8 the Organizer presents a handy window that lists the dates you imported media, along with some other details.)

Once you’ve got the right clips in the lightbox, follow these steps to preview your videos and apply star ratings:
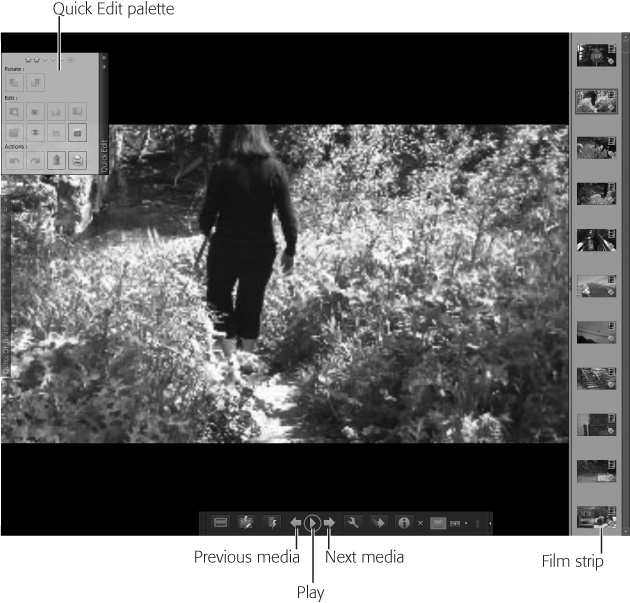
Right-click the first clip, and then choose View Photos and Video in Full Screen.
The Organizer window displays the clip in Full Screen mode, as shown in (Figure 4-9). Along the right side of the monitor, a film strip displays your media. At the bottom, a toolbox has controls for playing clips and for showing and hiding the other panels. Move your mouse to the left side of the screen, and a Quick Edit panel pops out, displaying different tools and, in the top-left corner, the star rating.
Click the Play button.
You may want to play a clip a couple of times before you decide what rating to give it—and whether you even want to use it. But keep in mind that you don’t have to use an entire clip. You may want to use just a portion of it, so don’t throw out a clip with good sections in it. As you’ll see later in this chapter, Premiere offers some help in assessing your clips with its Auto-Analyzer feature, but for now, you’re the one who knows what you want from your video. Review the clip as many times as needed to star-rate it.
If the clip is acceptable, move your mouse over the Quick Edit palette and click the one-star rating.
The rating displays as one big gold star and four ghosted-out stars. It appears in the Organizer and Premiere’s Organize tab. You can use the star rating to filter your clip catalog in both programs.
It’s hard to judge one video clip compared to another, especially if you haven’t seen all the clips yet. That’s why it makes sense to set the bar low on your first pass. Don’t give any stars to the really bad clips. Give acceptable clips a one- or two-star rating. As you pare down the clips and re-review the rated ones, you can elevate the better clips to a higher rating.
Repeat the process for all the media clips.
Depending on how much video you shot, it can be a little tedious to view each and every clip more than once. Just keep in mind that the time you spend now will save you lots of time later on. At this stage, your primary mission is to eliminate all the truly bad clips. You won’t ever have to watch that bad video again.
Get a Good View
There’s more than one way to preview video clips in the Organizer and in Premiere, and you may find that one tool works better than another for your video format. So, if the Organizer’s Full Screen view gives you fuzzy clips or the playback stutters, try one of these options for previewing and rating clips:
In the Organizer’s lightbox, right-click the clip and choose Play Video or Audio to open the media player.
Click Play to preview the clip.
Close the media player by clicking the X button in the upper-right corner.
In the lightbox, set a star rating for the clip. If you don’t see stars under the thumbnails in the lightbox, press Ctrl+D to show details.
Choose the next clip and repeat the process.
Preview and Rate in Premiere
If neither of the Organizer methods works for you, try previewing and rating your clips using Premiere. Follow these steps:
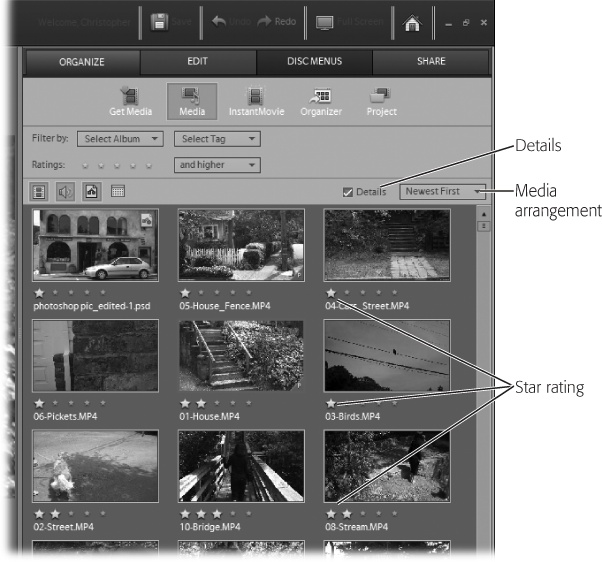
In Premiere, click the Organize tab and then click the Media button to display your clips.
Set the Media Arrangement menu to show Newest First.
Turn on the Details check box to display the star rating for clips (Figure 4-10).
Double-click a clip to open it in the Preview window.
If necessary, drag one of the edges of the Preview window to resize it.
Click play to Preview the clip.
Close the media player by clicking the X button in the upper-right corner.
Click a star under the clip to set the star rating.
Choose the next clip and repeat the process.
Apply Keyword Tags to Clips
The star rating system doesn’t specify much detail about the contents of a clip; it simply lets you broadly label a clip as relatively good or bad. Keyword tags, described in this section, and smart tags, up next, give you the opportunity to be more specific.
When you look at media files in the Organizer or in Premiere’s Organize tab, all you see is a still frame of a clip. You may wonder who’s in the clip, where was it shot, when was it shot, and probably half a dozen other questions.
Tags give you a way to describe your clips in more detail than star ratings do, and they can answer important questions like those above. Once you tag your clips, you’ve got a powerful way to zero in on just the clip you need. Get used to working with keyword tags, and you can really cut through the media clutter.
Here’s an example: Suppose you travel the country with your faithful basset hound Clementine and fussy Siamese cat Jasmine. Naturally, you shoot video every step of the way. As you import the video into the Organizer, you tag all the Clementine clips with her name and do the same for Jasmine. You also tag clips by location, like Yosemite National Park, the Grand Canyon, and Mississippi. You can apply multiple tags to clips, so some clips might end up with three tags: Clementine, Jasmine, and Grand Canyon. Then, as you edit your project, it’s easy to apply filters so you see, for example, only those clips with both Clementine and Jasmine at the Grand Canyon.
You can filter your view in either the Organizer or Premiere’s Organize tab using keyword tags. However, to create andapply tags to clips, you have to be in the Organizer. Here’s how you do that:
If you’re in Premiere Elements, click the Organize tab and then click the Organizer button. Alternatively, click the Organize button from Premiere’s splash screen.
The Organizer application opens, showing your media in the lightbox, with the tabbed Tasks panel on the right and the Organize tab selected. It displays Albums at the top and Keyword Tags below, as shown in Figure 4-11. You’ll learn about albums in more detail beginning on Remove Smart Tags, but for the time being, it’s helpful to know that they’re simply another way to group clips.
Initially, the Organizer displays all your media files. Before you apply keyword tags, you can use filters to bring the number of clips down to a more manageable quantity. The next steps describe your options.
Click the Show All button, if available.
When you do so, the Show All button disappears and the Organizer displays all the media in your catalog. As you learned above, the Show All button appears only if you filtered the lightbox view earlier in the same work session.
In the Albums panel, choose the project or album that has the files you wish to tag.
You can choose only one project or album at a time. When you click on a name, the Organizer displays only the media for that project or album.
Projects are described on Start Premiere Elements. Albums are covered in more detail on Remove Smart Tags.
(Optional) To sort your media by star rating, click a star in the upper-right corner of the lightbox and then choose an option from the menu.
After you click one of the stars, you can choose “and higher”, “and lower”, or “only” from the drop-down menu. For example, to see all the clips with a three-star or better rating, click on the third ghosted star to highlight it, and make sure “and higher” is selected in the menu.
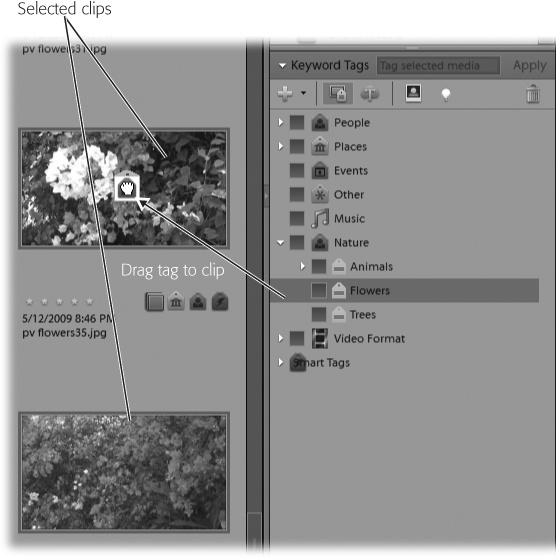
Select the clips you want to tag.
If you’re tagging a single clip, you don’t need to make a selection first—just drag the tag to the clip. If you want to tag several clips at once, you can use any of the usual multiple-selection techniques:
Ctrl-click to select multiple clips.
Shift-click to select a range of adjacent clips.
Click and drag a selection box to select a group of clips.
Select one or more tags.
Premiere provides several categories and sub-categories of tags. For example, you can select the People category and tag clips with subcategories that include Family and Friends.
If you want to apply multiple tags to the selected clips, Ctrl-click or Shift-click to highlight the tags.
Drag one of the selected tags to one of the selected clips, as shown in Figure 4-12.
The Organizer applies the selected tags to all the selected clips.
By selecting multiple clips and applying multiple tags, you can speed up your tagging chores.
Create a New Keyword Tag
You’re not limited to the Organizer’s tags, however. You can create your own. For example, within the Family sub-category, you might want to create a tag for individual family members. Then, you can not only find all the clips with Amy in them, but you can also find all the clips that have Amy, Mary, and Joyce together.
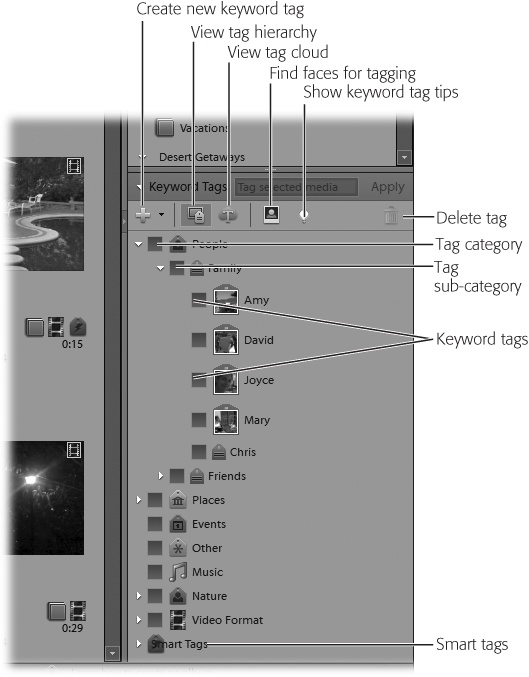
You can only create new tags from within the Organizer. Choose the Organize tab in the Task panel. If the Keyword Tags panel is closed, click the triangle button to open it. You can display tags two ways: Tag Hierarchy (click the button that looks like a TV screen with a tag beside it) or Tag Cloud (click the cloud with the big “T” on it). The Tag Hierarchy displays tags you can checkmark to narrow your view to clips that have that tag. The Cloud view displays tags as a word list; click a word to sort by that tag.
When you create a new tag, it’s easier to use Tag Hierarchy because you can see the main categories (People, Places, and so on) and their sub-categories (Family and Friends under People, for example).
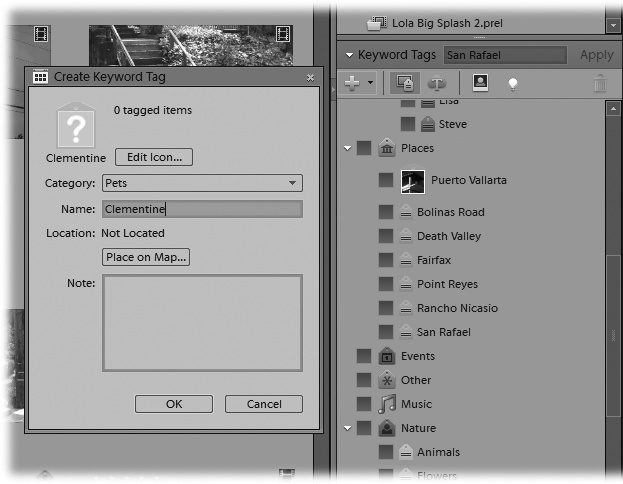
To create a new tag, click the big green + button to open a menu with several options:
New Keyword Tag. This opens the Create Keyword Tag panel (Figure 4-13) where you have a few options. Click the Edit Icon button to choose a label, color, and icon for the new tag. Premiere displays this icon on the clip’s still frame, so it provides a quick reference as you edit. For example, if you create a tag for your basset hound Clementine, you might use her picture as the icon image.
Next, you have to tell Premiere where, in the list of all the tags, to put this new tag. Use the Category drop-down menu to position it as a sub-category of an existing tag. For example, to add a tag for Clementine under “Pets”, choose the Pets category. Then, when you create the tag by clicking the OK button, “Clementine” shows up under “Pets”, replete with a little picture of your hound dog in the tag.
You may also choose to place your tag on a map and provide additional notes about the tag.
New Sub-Category. This option is really a subset of the New Keyword Tag option; it also lets you create and position a new tag. The difference is that here you can’t specify a tag color or image. Your new sub-category adopts the tag characteristics of the parent category. So if you add a sub-category to Events, it shows up as a red tag with a couple of ersatz lines of text in it.
You might wonder, if New Sub-Category does the same thing as the option above, why is it here at all? That’s because New Sub-Category lets you set up a tag without specifying a tag color or icon image. If you know you’re going to shoot footage of a vacation on Martha’s Vineyard, for example, you can set up a tag in the Event sub-category called “Martha’s Vineyard Vacation” so it’s all ready for you when you return.
If you choose this option, the Create Sub-Category panel opens as shown in Figure 4-14. At the top, type in the tag name in the Sub-Category Name box. Then, in the Category drop-down menu, choose a parent category or existing sub-category from the list.
New Category. In Elements lingo, a “category” is the top level of keyword tags. People, Places, and Events all represent categories, for example. Everything else belongs to a sub-category.
To create a new top-level tag, choose this option, name the category, and then choose a tag color and icon.

Remove Keyword Tags
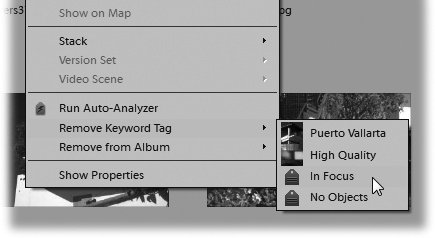
As you work on projects, you may change your mind about a keyword tag. No problem, you can remove a tag with a couple of clicks. Right-click the blue keyword tag under a clip and a menu pops up with options like “Remove Clementine Keyword Tag.” Click on the tag you want to remove, and Premiere deletes it instantly—you won’t see an alert box to double-check your intentions, so be forewarned. As an alternative, you can right-click on a thumbnail and then choose Remove Keyword Tag. This method displays a submenu with both the keyword tags and the smart tags described later.
Apply Smart Tags to Clips
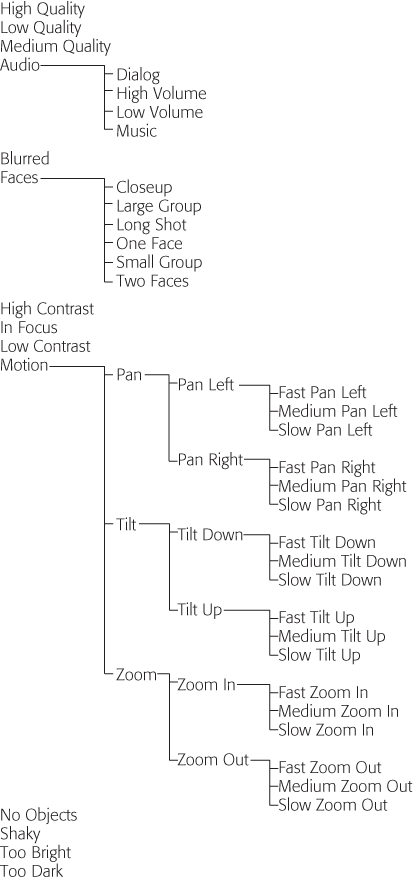
In addition to keyword tags, Premiere offers another type of tag, called a smart tag. Smart tags don’t know anything about you, your basset hound, or, unfortunately, upcoming Lotto numbers. They simply reflect Premiere’s assessment of the quality of a video clip. Ask Premiere to analyze a clip, and it identifies problems like shaky camera work, low light, and inaudible audio. It lets you know about the good things in your clips, too, with tags such as High Quality and In Focus. It then labels the clip with these assessments, and those labels become purple smart tags under your media clips. So, how do smart tags help you when you edit video? It’s like having an assistant who pre-screens your clips and flags the good and bad parts.
Premiere smart-tags your clips using a tool called Auto-Analyzer. Auto-Analyzer doesn’t simply look at each clip as a single object—it actually analyzes your footage frame by frame, looking for specific deficiencies and attributes (see Figure 4-16 for the complete list). You can’t create or add your own smart tag definitions, however.
Premiere uses smart tags in a number of ways. For example, if you attempt to use footage tagged as dark or low-contrast, Premiere asks if you want to apply Auto Contrast to improve the clip. And if you choose Premiere’s InstantMovie option, it uses the smart tags to select footage, create transitions, and apply effects.
As part of the smart-tagging process, Auto-Analyzer detects dramatic image changes in the video and, based on that, divides each clip into multiple scenes. For details on these newly created scenes, go to Smart-Tagged Video Groups.
Smart-Tag with Auto-Analyzer
You can run Auto-Analyzer from the Organizer or from inside Premiere, and you can analyze either a single or multiple clips at once (to analyze multiple clips, use the multiple-clip selection process described on Create a New Keyword Tag).
To start Auto-Analyzer in either the Organizer or Premiere, right-click the selected clip or clips and choose Run Auto-Analyzer from the shortcut menu. A small window displays a progress bar like the one in Figure 4-15, along with status messages such as “Detecting scenes” and “Analyzing media.” If it’s taking too long or you change your mind, click Cancel to stop the analysis.
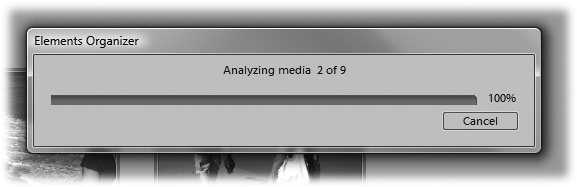
You might expect Premiere to display a report once it finishes analyzing your clip, but it doesn’t. Instead, it adds a purple smart tag to the lower-right corner of your clip. To see the results of the analysis, hold your cursor over the smart tag, and a tooltip lists the tags Auto-Analyzer applied. You can see the full list of smart tags in Figure 4-16.
Apply Smart Tags During Capture
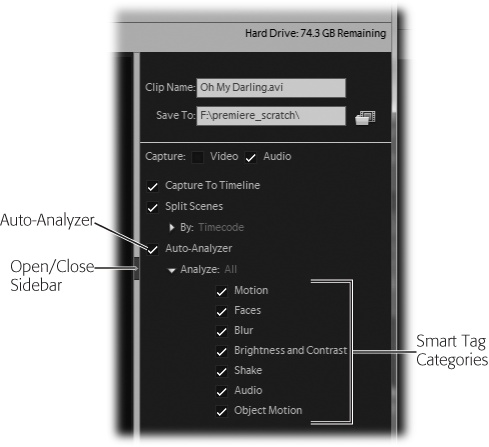
You can analyze and smart-tag your clips as you capture video, too, but only through Premiere and only with footage from a DV camcorder or an HDV camcorder (see Navigation buttons) or a webcam (you can’t auto-analyze video from an AVCHD camcorder, a mobile phone, or a PC file; to analyze those files, see the section below).
Under Premiere’s Organize tab, click Get Media and select either DV or HDV camcorder or webcam as your video source. A window of capture and smart-tagging options appears, as shown in Figure 4-17. Click the Auto-Analyzer option. If you want to pick and choose which characteristics Premiere analyzes, click the triangle beside the Analyze label and select from Motion, Faces, Blur, Brightness and Contrast, Shake, Audio, and Object Motion.
Apply Smart Tags From the Organizer
If you import video from a DVD or AVCHD camcorder, a digital still camera, or a mobile phone, or if you add clips using PC Folders and Files as a source, you can only analyze clips after you import them. Select the clips you want to tag, then right-click one of the clips and choose Run Auto-Analyzer from the shortcut menu.
Change Smart Tag Options in the Organizer
In most cases, it makes sense to let Auto-Analyzer analyze all the characteristics of a clip, and when you start out, that’s the way Auto-Analyzer’s set up. Later on, you may want to look for certain clip qualities. To do that, choose Edit → Preferences → Auto-Analyzer Options in the Organizer. The Preferences window opens, as shown in Figure 4-18. You can choose from major categories such as Audio, Face, and Object Motion, but you can’t specify the sub-categories, such as Pan and Fast Zoom In.

Apply Smart Tags Automatically
If you wait impatiently while Auto-Analyzer does its work, you may wonder if there’s a faster way to do the job. In fact, you can automatically start Auto-Analyzer in a couple of ways.
When you first install Premiere, the program sets Auto-Analyzer to run automatically whenever you have the Organizer open. Left this way, all the clips in your catalog will eventually sport that snazzy purple tag. That’s a great system so long as it doesn’t take a toll on Premiere’s performance, such as when you’re trying to play back a scene or render a clip. If Auto-Analyzer turns out to be a problem, turn it off. Go to Edit → Preferences → Auto-Analyzer Options (Figure 4-18). Click the check mark beside the option “Analyze All Media in Catalog Automatically” to remove it. If you want to stop the Auto-Analyzer for just a few moments, click the purple tag in the status bar below the catalog; it acts as a pause button.
But there’s another option that may work even better: You can run Auto-Analyzer even when you’re not using the Organizer or Premiere. You can set a preference so that the program automatically runs when you start up your computer. The idea is that when your PC isn’t busy doing other things, it spends its spare brainpower analyzing your videos.
The Organizer normally has this option turned on. To toggle it on or off, go to Edit → Preferences → Auto-Analyzer Options and check the box “Run Analyzer on Start Up”.
Smart-Tagged Video Groups
As you learned earlier, when Auto-Analyzer detects dramatic changes in a video clip, it breaks the clip into scenes. It assumes that, because the image changed so abruptly, the subject has also changed. This gives you the opportunity to treat each auto-analyzed scene as a separate entity. You may want to apply transitions between the scenes, for example. (Remember, as always, the original clip remains unchanged. Premiere still stores it as a single video file on your computer.)
You can tell when Auto-Analyzer divided a clip into multiple scenes—the thumbnail of the clip sports a thick, light-gray border, and it has an Open Group button on the right side (see Figure 4-19, top). Click the button and the clip expands into its multiple scenes (see Figure 4-19, bottom).
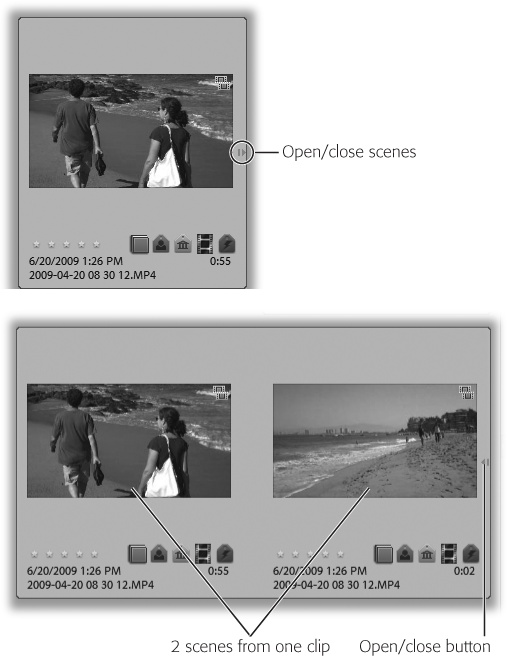
If you apply a tag to an Auto-Analyzed clip, Premiere applies the tag to all the scenes in the clip; you can’t apply a tag to an individual scene.
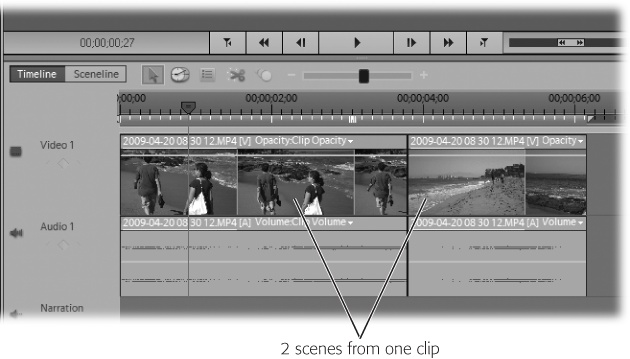
In the next chapter, you’ll learn all about adding clips to Premiere’s timeline and sceneline. For now, know that if you want to add all the scenes in a group, make sure the group is closed and then drag it to the timeline or sceneline. To add just a single scene from within a group, expand the group and drag the scene. If you happen to smart tag a clip after you add it to the timeline, it gets divided into separate scenes in the timeline (Figure 4-21). In the sceneline, the clip is separated into separate boxes, each holding a scene.
Remove Smart Tags
As you review a clip’s smart tags, you may feel that Auto-Analyzer improperly tagged a clip. Just as with keyword tags, you can remove a smart tag. Right-click the clip and, in the menu that pops up, move your cursor over the Remove Tag option. The clip’s smart tags appear at the bottom of the menu—they have the typical purple smart tag icon, as shown in (Figure 4-22). Click the tag you want to remove, and Premiere deletes it immediately—you don’t get a chance to confirm the cut.
Organize Clips into Albums
Premiere Albums are another great tool for organizing your media. They work according to the Organizer Philosophy explained on Change Views in the Organizer, and they work exceptionally well.
There’s one important thing to keep in mind when you create an album and add clips to it. You’re never copying or moving clips from one place to another—from the Organizer, say, to an album called “Beach Vacation”. You’re just creating links so that Premiere can display the clips in that album. That way, a single clip of Clementine can appear in several different albums, such as Clementine’s Favorite Moments, The Grand Canyon, and Dogs with Long Ears. No matter how many albums you add Clementine to, there’s still only one Clementine clip.
Create a New Album
You create albums inside the Organizer application. These steps create an album called “Gone Gobi.”
Click the Organize tab.
The Albums panel sits at the top of the Tasks pane. If necessary, click the triangle button to expand the panel.
Click the big green + button and choose New Album.
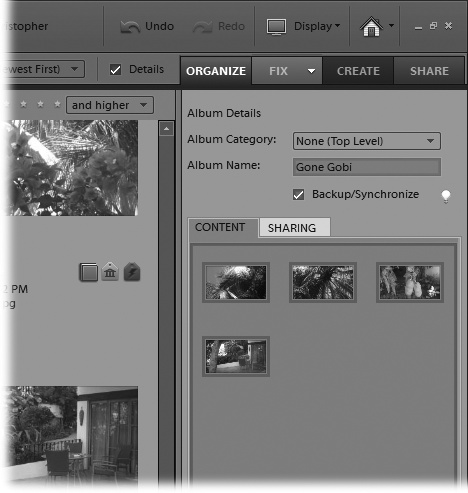
The panel changes to display Album Details (Figure 4-23).
In Album Name, type “Gone Gobi”.
The album name should be descriptive because it’s the only thing you’ll see in Premiere’s Filter by menu, shown in Figure 4-24.
Choose an Album Category from the drop-down menu.
You can collect albums in album groups, described in the next section.
Click the Content tab, and then drag clips from the lightbox into the Gone Gobi album.
You can add clips one at a time or select groups and drag them to the album. Later, you can add new clips by dragging them on to the album in the Albums panel.
Click Done.
The Album closes and it appears in the Albums panel.
If you want to make changes to your Gone Gobi album later, right-click the album in the Albums panel and choose Edit Gone Gobi Album. The Album Details panel described above opens, and you can make your changes.
Create a New Album Category
As your collection of media clips grows, you may want to create groups of albums. If you shoot a lot of family events, for example, you may create albums for birthdays, weddings, and graduations. Then, within these albums, you may have sub-albums for specific events, like Mary Frances’s Wedding and Steve’s Wedding.
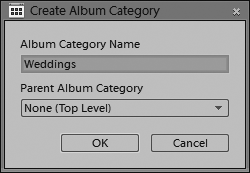
Creating album groups is similar to creating a new album. In the albums panel, click the green + button and choose Create Album Category. Then you see the Create Album Category dialog box (Figure 4-25), where you name the Album Category and, if you like, nest it inside another album category.
Projects vs. Albums
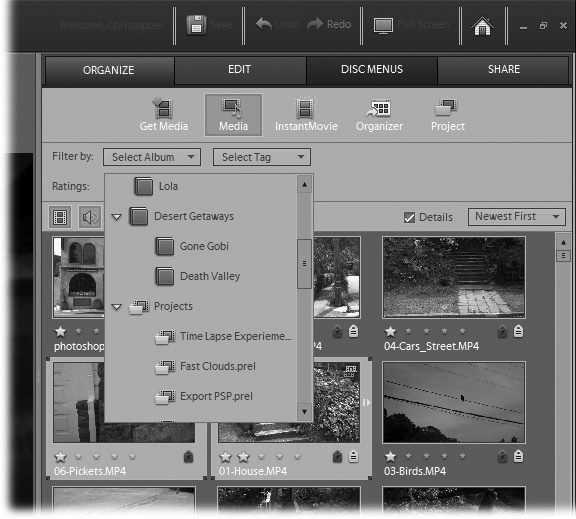
Your video projects show up at the bottom of the album panel, as shown in Figure 4-24. Technically, these projects aren’t albums, so they have their own category and different icons than albums. In Premiere, whenever you drag a clip onto the sceneline or timeline, that clip gets added to your project file. If you have a project open in Premiere and you import clips, Premiere adds those clips to that project.
In Premiere, you view the clips in a project by opening the project when you launch Premiere, clicking the Organize tab, and then clicking the Project button. In the Organizer, you view the clips in a project by selecting the project in the Album panel.
Create Smart Albums Automatically
Smart Albums are nifty containers for your clips. You never have to drag clips to smart albums; all you have to do is tell the Organizer what type of clips to include in them. You provide a set of rules, which Premiere calls “criteria,” and Smart Album uses those rules to decide which files to include in which albums. Other than that, a Smart Album is like any other album. For example, you find your Smart Albums listed in Premiere in the Select Album menu on the Organize tab.
You create a smart album from the Albums panel. Click the green + button and then choose New Smart Album. The New Smart Album panel opens as shown in Figure 4-26. Name the album and then use the drop-down menu to build your set of inclusion rules. Each rule comprises three parts. First you choose a characteristic of the clips you want to include, which can be as diverse as a keyword tag, a capture date, or an author.
Next you choose a modifier, such as “Starts With” and “Includes”. The modifier changes depending on the object; for example, if you choose to include clips based on their keyword tags, the only available modifier is “Includes”.
Finally, in the third menu, you choose the boundaries for the modifier. In the above example, you’d choose from a list of existing keyword tags. On the other hand, if you elect to include clips based on their capture date, the modifiers include: “Is”, “Is before”, “Is after”, and “Is within the last”. After you make your choice, you then choose a date (“is before 9/25/09”) or time period (“is within the last 8 days”).
Premiere applies the criteria you establish two ways. You can choose to match “Any one of the following search criteria” or “All of the following search criteria”.
Once you finish setting up the rules, the Organizer automatically searches your media and adds it to the album. And if you import or add new media that matches the criteria, the Organizer automatically adds that, too.
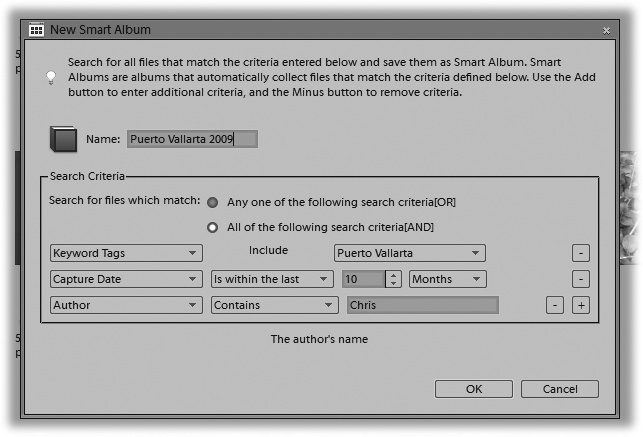
Delete a Smart Album
If the time comes when you no longer need your Puerto Vallarta 2009 Smart Album, right-click on the album name in the Albums panel and choose Delete Puerto Vallarta 2009 album from the shortcut menu. An alert box appears, asking “Are you sure you want to delete this smart album?” Click OK to go through with it or click Cancel to back out. Naturally, deleting the album doesn’t delete the clips. They’re still there in your main catalog.
Back Up and Synchronize Albums
Adobe’s optional Photoshop.com service can back up your albums (see A Brief Tour of Premiere Elements for a detailed description of the Photoshop.com service). The best thing about the service is that it’s easy, and you don’t have to worry about it too much once you set it up. The bad thing about it is that video files are big, and, after you fill up 2 GB of space, Adobe charges you for online storage based on the amount of space you use. You have to decide whether the convenience outweighs the cost (see A Brief Tour of Premiere Elements for some help). Here’s how it works:
Once you enable the Backup/Synchronize option, Premiere automatically copies the contents of the album to a synonymously named album on Photoshop.com. If you make a change, like adding or removing clips from the album, Premiere duplicates those changes to the online backup.
Tip
If backing up your video on Photoshop.com sounds too expensive, consider backing up your clips to an external hard drive, as described on Back Up Your Entire Catalog.
Filter Your View Using Star Ratings, Keyword Tags, Smart Tags, and Albums
Once you star-rate your clips, tag them with one or more keyword or smart tags, and arrange them in albums, you can use those attributes to filter clips in the Organizer and, more importantly, in Premiere.
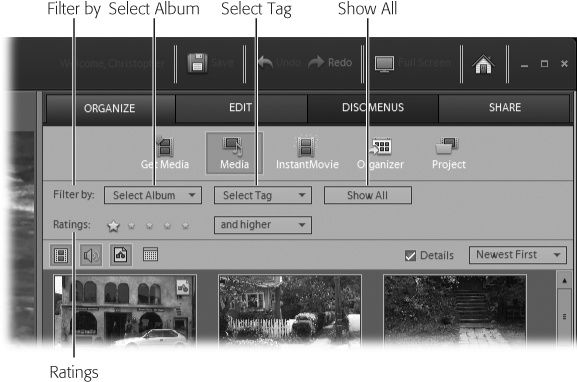
In the Organizer, you see all your clips in the lightbox. In Premiere, you see all your clips by clicking the Organize tab and then clicking the Media button. In either view, you can filter the displayed clips by their star rating. For example in Premiere, use the Rating option and the menu next to it (Figure 4-27) to specify which clips get displayed.
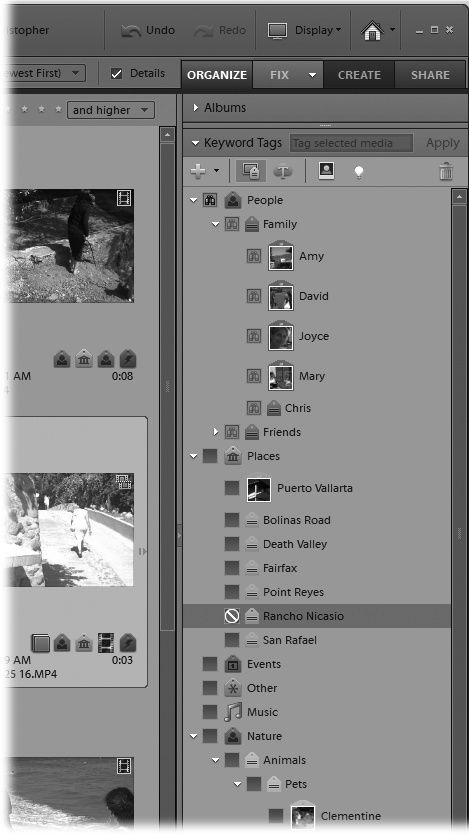
Suppose you’re looking for video clips of a place called Rancho Nicasio. Of course, you’ve dutifully applied a keyword tag for Rancho Nicasio after you imported the video. To see the Rancho Nicasio clips, in the Keyword Tags panel of the Organizer, click Places to display the tag sub-categories, which include Rancho Nicasio. When you turn on the checkbox next to Rancho Nicasio, the box displays a pair of binoculars to indicate you’ve selected that view, and the Organizer shows only the clips with the Rancho Nicasio tag (Figure 4-28).

You can also use tags to exclude images from a view. For example, suppose you want to view all the people shots in your catalog except for those tagged Rancho Nicasio and, say, Puerto Vallarta. Click the People category, and you see that all the People sub-category tags sport binoculars to show their images are included. Right-click the Rancho Nicasio tag and near the bottom of the shortcut menu choose Exclude photos with Rancho Nicasio sub-category from search results. Your keyword tags look like Figure 4-29. Hey, it’s a little wordy for a menu option, but it gets the job done. Repeat the operation for Puerto Vallarta, and you’re all set.
You can include or exclude any combination of filters, and you can use keyword tag filters along with smart tag, star rating, and album filters.
To filter your view by smart tag, follow the same procedure but select and deselect tags in the Smart Tags panel of the Organizer, where you’ll find the labels that Auto-Analyzer applied to your clips.
You have to sort clips by album or by project. In the Organizer, click on the album or project in the Albums panel. In Premiere, use the Filter by drop-down menu shown in Figure 4-27.
It’s great to be able to fine-tune what appears in the Organizer lightbox using filters, but you really need the filters as you’re editing in Premiere. Fortunately, you filter your clips in pretty much the same way there. Go to Premiere’s Organize tab and click the Select Tag menu. Choose the tags you want to include, and Premiere displays only media with tags that match (Figure 4-30). The only difference within Premiere is that you can’t use filters to exclude files.

Manage Your Catalogs
Premiere calls your collection of media—that big giant pool of video clips, sound clips, and still photos—a “catalog.” If you’re like most people, you probably want only one catalog. That way, you only have to search one collection for all your media. Select albums, apply star and tag filters, and you’ll find what you need. On the other hand, if you’d like to keep your work files in one big pool and all your family media in another pool, you can create and use two different catalogs.
When you first install Premiere (described on Get Ready for Installation) the Organizer is installed at the same time, and it creates a catalog called My Catalog. If you do nothing, that’s the catalog where Premiere stores all your media.
But if you want to create a new catalog, say one called My Business Catalog, follow these steps:
In the Organizer, choose File → Catalog (Ctrl+Shift+C).
The Catalog Manager panel opens, listing your existing catalogs in the box at the bottom. If you only have one catalog, it’s probably the original one named My Catalog.
In the upper-right corner, click New.
A text box appears where you name the new catalog. If you want the catalog to include the free music clips that come with Premiere, check the box labeled “Import free music into this catalog”.
If you have Premiere open, a message box explains that you must close Premiere before you create a new catalog.
Type “My Business Catalog” in the text box and leave the checkbox turned on. Then click OK.
The Organizer creates and opens your new catalog. You can only work in one catalog at a time, so Premiere closes My Catalog. That means you’re looking at a catalog with no content or maybe just some free music. Its keywords and albums are the barebones ones that Premiere creates when you first start out. It’s up to you to fill My Business Catalog with new clips, tags, and albums.
Remove a Catalog
When you no longer need a catalog, remove it from the Organizer. Go to File → Catalog to open the catalog manager. Select the catalog you want to remove and then click the Remove button.
Here are a couple of things to keep in mind:
Repair Your Catalog
A catalog is really just a collection of information that keeps track of where your media clips are. Catalogs track lots of complicated connections, and they have the unfortunate habit of getting fouled up. If that happens, use the catalog repair command to see if the Organizer can make things better. Go to File → Catalog to open the catalog manager. Select your catalog from the list at the bottom. Then, on the right, click the Repair button. A box with a progress bar appears and displays a message "Repairing Catalog.” When the process is complete, you may see another box that either says no errors were found or that repairs were made.
Optimize Your Catalog
If the Organizer seems to be running sluggishly, run the Optimize tool to see if it helps. The steps are similar to the Repair process described above. Go to File → Catalog to open the Catalog Manager. Select your catalog from the list at the bottom. Then, on the right, click the Optimize button. A box with a progress bar appears while the Organizer tries to do a better job of organizing. When the Organizer finishes, it returns you to the catalog manager.
Back Up Your Entire Catalog
In general, you don’t have to worry about catalogs too much, especially if you plan to have a single catalog. There is one important chore that catalogs can help with, however: backing up your files. It’s probably everyone’s least favorite chore, and video files are big. So if you’re going to back up, make it easy on yourself and buy an external hard drive. They’re inexpensive and provide tons of storage.
Plan on spending under $100 for a 500 gigabyte or 1 terabyte external drive. Get a drive that connects to your computer via a USB cable. Almost all computers have USB ports, so if disaster strikes, you can easily move all your clips to a new PC. Then follow these steps to back up everything in your catalog to the hard drive:
Connect your external hard drive to your computer through the USB cable.
The first time you connect the drive, Windows may have to install a small helper program, called a driver. Usually, you hear a tone when your computer recognizes the hard drive.
In the Organizer, choose File → Backup Catalog to CD, DVD, or Hard Drive.
As you can see from the steps above, you can back up your catalog to CDs, DVDs, or a hard drive. So why is a hard drive recommended? Three reasons:
If you back up to CDs or DVDs, you have to sit there and feed discs into your computer.
Optical drives (CD and DVD) work much more slowly than hard drives.
You’ll spend more money backing up your catalog on discs as opposed to doing so on a hard drive.
That said, go ahead and use discs in a pinch. They’re better than no backups at all.
Choose Full Backup and click Next.
If this is your first backup, choose Full Backup to back up all the clips in your catalog. Choose Incremental Backup if you want to back up only clips that have changed since the last backup.
When you click Next, you see the second panel in the backup window.
In the Select Destination Drive box, choose where you want to store the backups.
The list shows all the drives connected to your computer—CD, DVD, or external hard drive. It even lists any network drives available to you. If you want to select a specific folder within a drive, click the Browse button to locate the folder.
The Organizer displays a progress bar while it backs up the files. If there isn’t enough room on the destination drive, you see an alert box that says “Your system is low on disk space and Elements cannot perform this operation. Try removing some files to free up disk space.”
Get Premiere Elements 8: The Missing Manual now with the O’Reilly learning platform.
O’Reilly members experience books, live events, courses curated by job role, and more from O’Reilly and nearly 200 top publishers.

