In this section, you will create a simple web page two different ways: once using a generic text editor (Notepad) and then again using VS2005. The purpose of this exercise is to show you how to create a web site using any text editor and to show you how much easier it is to use VS2005.
Using either technique, the resulting web page should look something like that shown in Figure 4-1. This page will demonstrate some of the properties, events, and methods common to all ASP.NET server controls.
To create this web page without benefit of VS2005, open Notepad or your favorite editor capable of creating a flat text file (not Microsoft Word, for example, unless you want to jump through hoops). Enter the code in Example 4-1 into the file.
Example 4-1. ASPNETServerControlBasics-TextEditor.aspx
<%@ Page Language="C#" %>
<script runat="server">
   void lblTime_Init(object sender, EventArgs e)
   {
      lblTime.Font.Name = "Verdana";
      lblTime.Font.Size = 20;
      lblTime.Font.Underline = true;
      lblTime.Font.Bold = true;
      lblTime.Font.Italic = true;
      lblTime.Font.Overline = true;
      lblTime.Font.Strikeout = true;
      lblTime.Text = DateTime.Now.ToString() +
         ". Font Name: " +
         lblTime.Font.Name;
   }
</script>

<html>
   <body>
      <form id="form1" runat="server">
         <h2>Basics</h2>
         <asp:Label ID="lblTime" runat="server"
                    OnInit="lblTime_Init" />
      </form>
   </body>
</html>
Save the file as ASPNETServerControlBasics-TextEditor.aspx in any folder you want, say c:\websites.
To easily see your page processed by ASP.NET on a web server, you need to access the page in a browser via localhost . You must create a virtual directory for the folder that contains the web page file.
Tip
localhost is the address for browsers to find an IIS web server on the local machine.
If you do not have IIS installed on your development machine, you will not be able to see this page run from a browser outside of VS2005.
VS2005 does not require that IIS be installed because, in its default mode, it is able to serve its own pages. You can force VS2005 to use the IIS mode of accessing web pages when you create a new web site by selecting HTTP as the Location on the New Web Site dialog box. In this case, VS2005 will automatically create the necessary virtual directory for you.
For a complete description of the different ways that VS2005 can access web pages, see Chapter 2.
Open Computer Management by right-clicking My Computer and selecting Manage from the menu. (Alternatively, open Start → Control Panel → Administrative Tools → Computer Management.) Drill down to Services and Applications → Internet Information Services → Web Sites → Default Web Site and right-click on Default Web Site. From the drop-down, select New → Virtual Directory. Follow the wizard, using websites for the alias and browsing to the folder location where you put the .aspx file.
Now open a browser and give it the following URL:
http://localhost/websites/ASPNETServerControlBasics-TextEditor.aspx
The browser will cook a moment while the ASP.NET runtime processes the page and returns the rendered HTML.
Now you’ll create the exact equivalent web page using VS2005. Open the IDE and create a new web site called ASPNETServerControlBasics. Enter a few HTML header elements and drag and drop a Label control onto the page so that the finished default.aspx file looks something like the code shown in Example 4-2. Notice how the combination of drag and drop and Intellisense makes for so much less tedious and error-prone typing.
Example 4-2. Content of Default.aspx in ASPNETServerControlBasics
<%@ Page Language="C#" AutoEventWireup="true"
   CodeFile="Default.aspx.cs" Inherits="_Default" %>

<!DOCTYPE html PUBLIC "-//W3C//DTD XHTML 1.1//EN"
   "http://www.w3.org/TR/xhtml11/DTD/xhtml11.dtd">

<html xmlns="http://www.w3.org/1999/xhtml" >
<head runat="server">
    <title>ASP.NET Server Controls - Basics</title>
</head>
<body>
    <form id="form1" runat="server">
    <div>
      <h1>ASP.NET Server Controls</h1>
      <h2>Basics</h2>
       <asp:Label ID="lblTime" runat="server"
                  OnInit="lblTime_Init"></asp:Label>
    </div>
    </form>
</body>
</html>
Tip
For step-by-step directions on how to create this web page using VS2005 with drag and drop and Intellisense, see the sidebar "From ASPX to Drag and Drop.”
Once the controls are in place, you now want to create an event handler for the Init event of the label control lblTime. Switch to Design view if you are not there. Select the label lblTime. The lightning bolt icon will appear along the top of the Properties window.
Clicking on the lightning bolt will display all the possible events for this control. Double-click on the cell next to the Init event. The code-behind file, default.aspx.cs, will open on the work surface with a code skeleton in place for the event handler, named lblTime_Init, and the cursor inside the curly braces, ready for you to start typing your C# code. Enter the highlighted code from Example 4-3.
Example 4-3. lblTime Init event handler code for WebServerControlBasics1
using System;
using System.Data;
using System.Configuration;
using System.Web;
using System.Web.Security;
using System.Web.UI;
using System.Web.UI.WebControls;
using System.Web.UI.WebControls.WebParts;
using System.Web.UI.HtmlControls;
public partial class _Default : System.Web.UI.Page
{
protected void Page_Load(object sender, EventArgs e)
{
}
protected void lblTime_Init(object sender, EventArgs e)
{
lblTime.Font.Name = "Verdana";
lblTime.Font.Size = 20;
lblTime.Font.Underline = true;
lblTime.Font.Bold = true;
lblTime.Font.Italic = true;
lblTime.Font.Overline = true;
lblTime.Font.Strikeout = true;
lblTime.Text = DateTime.Now.ToString() +
". Font Name: " +
lblTime.Font.Name;
}
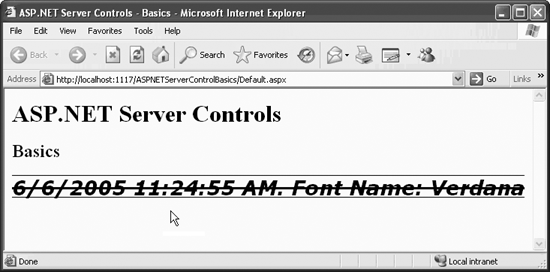
}Run the page either by pressing F5 or selecting the Debug → Start menu item. You will see something similar to that shown in Figure 4-1.
These two examples demonstrate a Label control, an event handler, and properties being set for a control.
This simple web page has static text and a web server Label control. The Label control has been assigned an id of lblTime, which allows the control to be referred to elsewhere in the code.
Of more interest is the onInit attribute, which defines an event handler for the Init event. The Init event, a member of the Control class, is called when a control is initialized. It is the first step in each control’s life cycle. All WebControls, since they are derived from Control, have an Init event.
In Examples 4-1 and 4-3, the Init event is handled by a method called lblTime_Init, defined in the code block at the top of the .aspx file or in the code-behind file, respectively. The lblTime_Init method sets several properties of the label’s font (Name, Size, and so on) and sets the value of the Text property. The Text property value is a concatenation of the current date and time, a literal string, and the name of the font used. Because DateTime.Now is of type DateTime, it must be converted to a string in the C# code.
The results, shown in Figure 4-1, are not pretty, but they are instructive. The figure shows how several text attributes—bold, italic, overline, underline, and strikeout-- can be applied to a label.
Fonts deserve special mention. Fonts contain subproperties, which are listed in Table 4-1. When used in HTML, subproperties are accessed declaratively in code in the form:
Font-Italic
Table 4-1. Subproperties of the Font object
|
SubProperty |
Type |
Values |
Description |
|---|---|---|---|
|
|
Boolean |
|
Makes the text bold; the default is |
|
|
Boolean |
|
Italicizes the text; the default is |
|
|
String |
|
Automatically updates first item in Names property. Font must be installed and available to the client browser. |
|
|
String |
|
Ordered array of font names. Stores list of available font names. Name property automatically updated with first item in array. |
|
|
Boolean |
|
Puts a line through the text; the default is |
|
|
Boolean |
|
Puts a line under the text; the default is |
|
|
Boolean |
|
Puts a line over the text; the default is |
|
|
|
|
Uses named sizes or integer point size. Named sizes only work declaratively as control attributes. |
When used in code blocks, subproperties are accessed programmatically in this form:
Font.Italic
If you use points rather than named sizes for the font size, then it is worth noting that the C# version of FontUnit provides an implicit conversion operator that takes an int and creates a FontUnit. Thus, you can write the following:
lblTime.Font.Size = 20;
You can do this without having to explicitly instantiate a FontUnit object (as is required in VS2005, for example).
For the remainder of this chapter, we’re going to discuss the various controls available to you. We’ll explain how to use each one and give you examples to work with.
Get Programming ASP.NET, 3rd Edition now with the O’Reilly learning platform.
O’Reilly members experience books, live events, courses curated by job role, and more from O’Reilly and nearly 200 top publishers.

