Figure 6-8: The Pay Bills window.
Paying Your Bills
If you’ve done everything right and recorded your bills correctly, writing checks is a snap. Just follow these steps:
1. Choose Vendors⇒Pay Bills.
Alternatively, click the Pay Bills icon located on the Home page. You see the Pay Bills window, as shown in Figure 6-8.
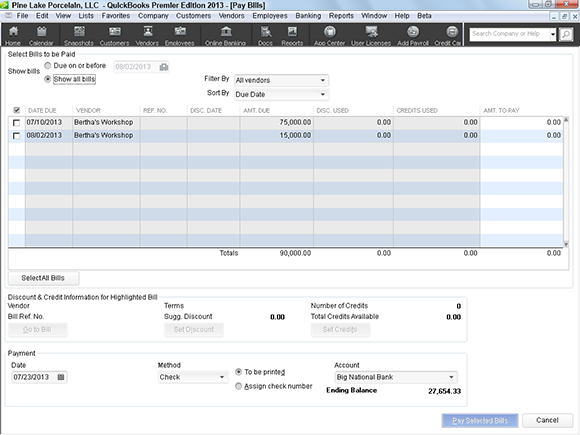
2. Change the Payment Date (at the bottom) to the date that you want to appear on the checks.
By default, this field shows today’s date. If you want another date on the payment check — for example, if you’re postdating the check — change this date. (See the online Cheat Sheet at www.dummies.com/cheatsheet/quickbooks2013
3. Set a cutoff date for showing bills.
In the Show Bills Due On or Before date field, tell QuickBooks which bills to show by entering a date. If you want to see all the bills, select the Show All Bills radio button.
4. Use the Sort By drop-down list to tell QuickBooks how to sort the bills.
You can arrange bills by due date with the oldest bills listed first, arrange them alphabetically by vendor, or arrange them from largest to smallest.
5. Identify which bills to pay.
If you want to pay all the bills in the dialog box, click the Select All Bills button. If you want to clear all the bills you marked, click the Clear Selections button. If you want to pick and choose, click to the left of the bill’s ...
Get QuickBooks 2013 For Dummies now with the O’Reilly learning platform.
O’Reilly members experience books, live events, courses curated by job role, and more from O’Reilly and nearly 200 top publishers.

